HOLIDAY DONATION DRIVE - SUPPORT MSW - DO YOUR PART TO KEEP THIS GREAT FORUM GOING! (Only 24 donations so far out of 49,000 members - C'mon guys!)
×


Peter Cane
-
Posts
240 -
Joined
-
Last visited
Content Type
Profiles
Forums
Gallery
Events
Everything posted by Peter Cane
-
Hi John and thanks. So who would you recommend that has exported modelling wood out here without problems? Pete
-
Hi guys. I would like to buy a plank of pearwood but it seems a hard to get commodity here in Australia. My questions specifically would be as follows. 1 Is English pearwood available in Oz? 2 If not, then can I legally have some sent from the UK ? Bearing in mind The Australian government are not keen on importing untreated raw wood because of infestation. 3. If I cannot get the Pear wood what would be the next best thing that is like it to work and the colour that is available here in Oz? If there is an Oz equivelant could you be kind enough to post a pic of what it looks like? Many thanks. Pete
-
Hello Nils. I am not clear on which book contains the drawings? Did you make up your plans by the use of the drawings in the book? There seems to be a 5 set Bauplan in 1:20 scale kicking around but I cannot source it anywhere. From what I have seen of it, it is very detailed. I have a hunch Matthias might have drawn them. However if I can get by by using the drawings in the book then fine. I cannot work to museum standards but my mind tries to tease me that I can....wish I could though. We dont know unless we try. It all comes down to absolute patience and how far we want to take it. Many thanks in anticipation. I am glued to your build. Pete
-
Ha ha. You are lucky... I read that one modeller ( Mathias ) made all his tree nails and of course drilled all their holes. All three thousand two hundred of them!!!. Ahhhhhh!. Pete
-
You did not tell us it was to be Viking powered as well Nils!!...but the oars are a bit short? Pete
-
I am glad you are thinking on the same lines Nils. You could actually make a nice brass gauge out of a cheese headed brass machine screw soldered to the back of a brass washer being the back plate for the gauge and having a slightly larger diameter. After polishing it up then varnish it to stop it oxidizing and going dull. Mobil oil can and sticker is also an excellent idea. If wifey wants blue chequered pillow cases then make sure you do that first!!! Captain Cook proved that crew comforts and good diet were paramount to success. ( so dont forget the stove) She will make an excellent commander! I think I am just as enthused as you and it's not even my model. Pete
-
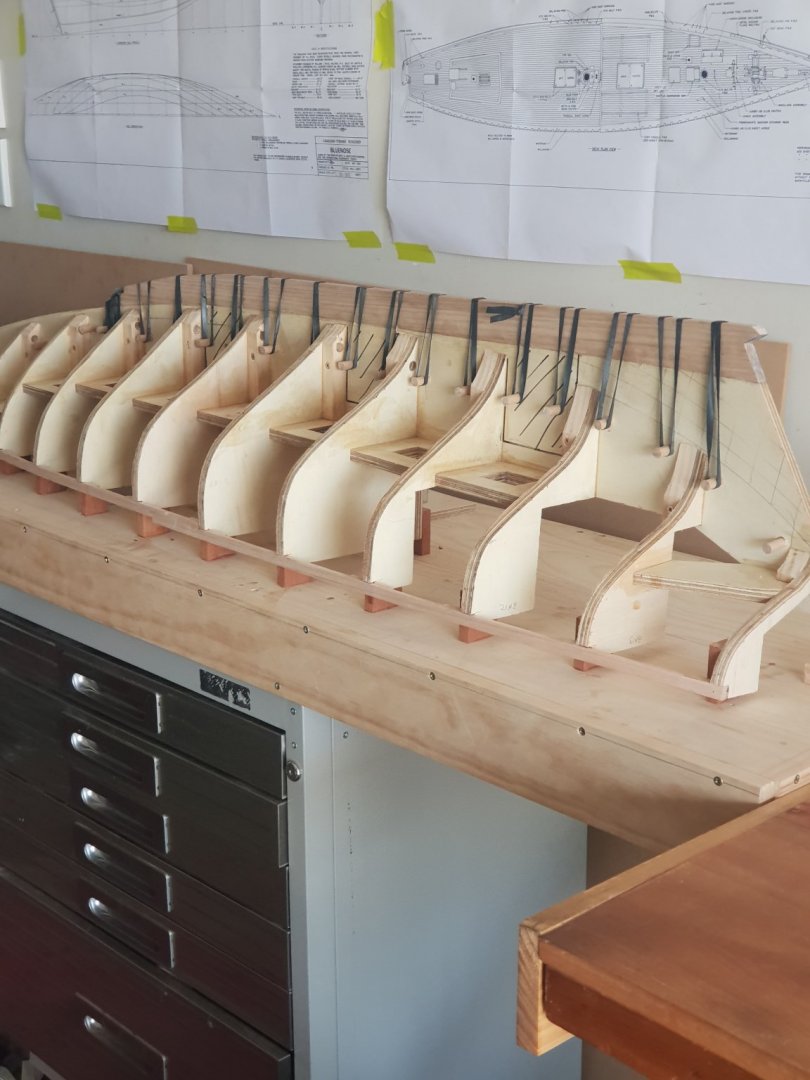
Hello Nils. Thank you for the pics of America. It was a shame that it was not to be a sailer. You made a nice job of the hull. Nice and smooth. No you did not in any way upset me. I have always had the thoughts lurking in my mind as to if my Bluenose will be top heavy due to the bulkheads. After the swimming pool test and when she is fibre glassed,...if she is too heavy I will buy a special electric tool and simply cut the bulkheads and spine out leaving the outside edges of the bulkheads still glassed to the outer hull. I dont think it will come to that though. Only time will tell. Pete
-
Hi Nils. I note what you have written about your motor. Therefore I can do the same and not be too concerned about a faithful replica. At the end of the day if it looks the part it is the part. If you could possibly get all those extra items in it will surely add to the realism especially the fuel tank. It only has to be a small cylindrical one held fast with two nice shiny brass straps? Nice brass fuel cap? Gauges will be easy. Cut it out from a photo from a magazine and stick it on to a slice of dwelling. I hear what you are saying re trying to find an existing prototype in its fishing mode. Trouble is, if it's anything like the UK , the fishermen are not allowed to earn a living anymore. I think this is a global nonsense. So few fishing boats to be see. Personally and this is only my view,.... I think it would be a shame to dirty your model up into a weathered specimen. Dont forget at one time it was a new fishing boat...its just that you have built it. You can still have all the nets, fish, etc etc. It will still be a charming model. I am following closely to see what you do next. Pete
-
Hello Nils. Yes I also love the lines of Bluenose and also wanted something big, not only to show off ...hee hee but importantly that the larger the model the more gracefully and realistic she will sail. A smaller model will Bob up and down in the water. I do have my concerns about the weight of the hull being to heavy with all its bulkheads from hard quality marine ply. The works inspector has assured me that all will be fine. ( I am now in the age bracket whereas my son advises me now!!! ) We are going definately down the line of a false keel. There is a lot to think about. I will battle on ahead until we have a floatable hull to test out in the swimming pool and then see what is what. If it is a disaster I will stop there as it will be too huge as a static model. Oh dear...I am a bit worried now! Pete
-
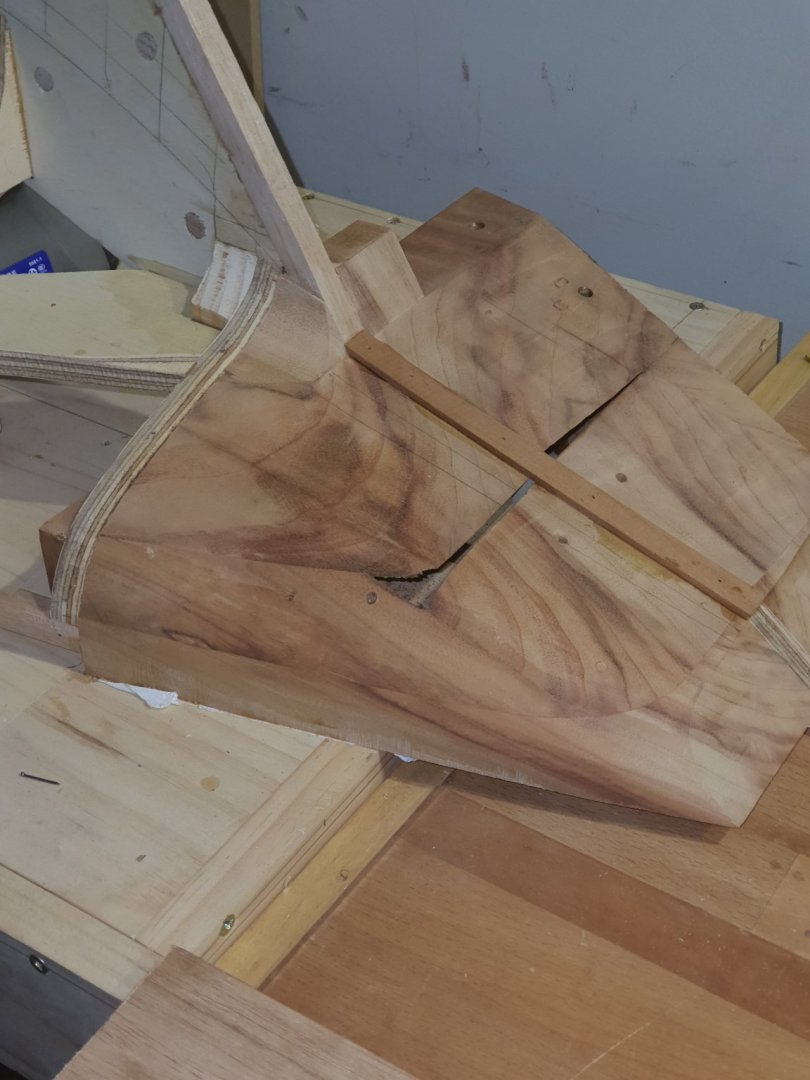
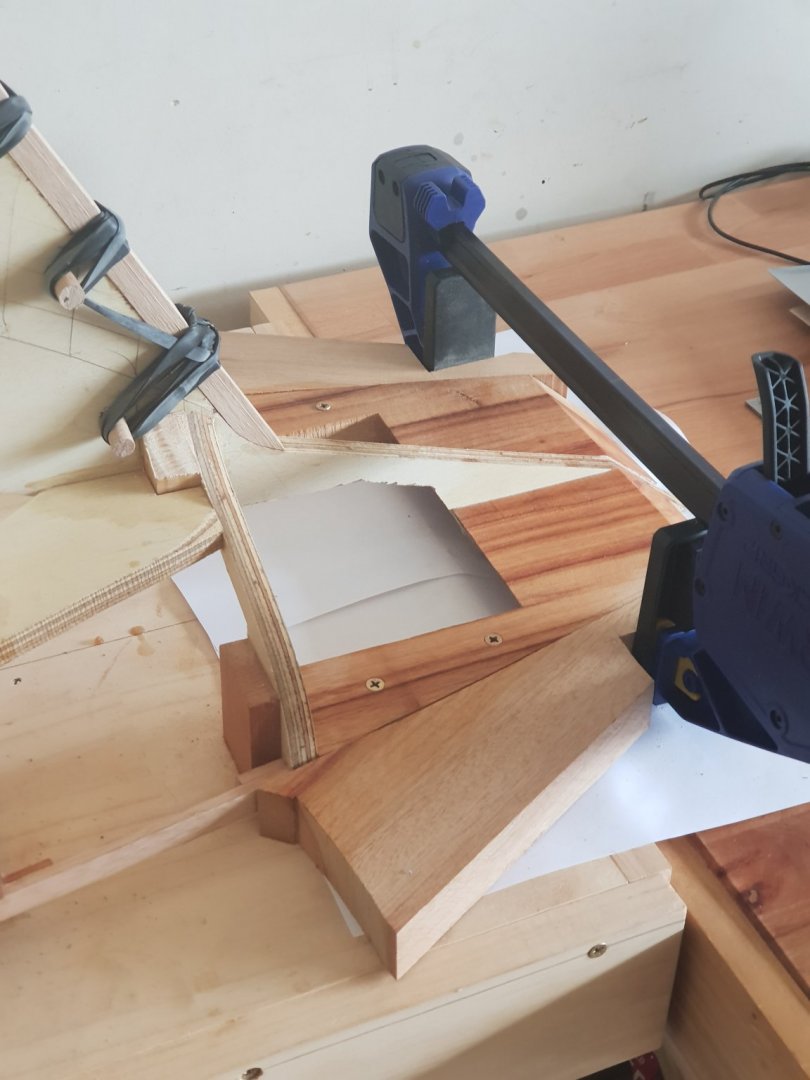
I have made a plank planing jig. Not my idea. I got it from a modeller called Mathias so his idea not mine....but it works great. Done a bit of stern carving. There you can see a blunder of errors whereas I have made the hollow box underneath too deep. Bit annoyed with myself but it does not matter as it will be planked and glassed over. The works inspector returned from work and insisted on metal plates to hold the false keel and support the existing oak keel more substantially. It certainly is strong now! Pete
-
Ha ha yes I am on fire! I am enthused but everything in slow time. In between Blue Nose I may start the odd thing like...ahem....the engine!!! But I need to do some research first with the books. Do you know if there was a " preference " to a certain make of motor used. I have seen a few you tubes of old boats fitted with a Swedish Wickhølm?. Lovely sounding tuc tuc ! And yes the kit does not do a deal for me. I think 1:24 is a good scale giving a nice size of model. I can also choose my materials whereas with a kit that's it! I do not know what Mathias was using for wood but you could not see a tool mark or glue stain anywhere. In Australia we are limited to what grows here. Gum tree is nice but too blimmen hard to work. Thank you for the tucker motor links. Pete Pete
-
Wettringer Modelbau Forum. Nils. I have just looked up the above and there is a modeller there called Mathias that is in the completion stages of a Zeesboot. He has been at it for four years. He is exceptional. Absolute master. Good heavens . Meine gute!!! This guy is meticulous. He does not miss a bolt!!! I have never seen anything like it. It is one for a museum. Anyway thank you for answering my questions. I will get both books. Luckily I understand German. I have googled Zeesboot motoren but nothing came up. Will you also have brown sails? Will you make a three legged stove for the cabin? That will be fun. Pete
-
What a lovely little ship and yes you were right six pages ago when you said it was small. You have paid attention to the tiniest details regardless of its size. I like the way you used plenty of bulkheads. My model has too few on reflection. It just goes to prove that an excellent model can be built whilst small in size. I reall love it. Thanks for sharing your build log. Pete
-
Onwards with the plot. The stem, stern post and the first stages of the stern filler blocks are now glued up. I used Campfor wood for the filler blocks. The stern is now no longer very fragile. Provision has been made for the rudder arm to swing and to be connected to the rudder servo. I may have to use a large servo that used in 1/4 scale model aircraft as it's a pretty big model. It's almost a miniature ship. Lovely wood to work with. When you plane a strip the odour is glorious. It's cheap out here as it is classed as a weed. I cannot get pear wood for future models to use as planking because to import raw wood to Australia is very difficult so I think campfor would be a good substitute. Pete


-
I keep returning to this blog because I like this little boat so much. In fact...I would like to build one myself. Fortunately, Nils will have done a complete build log to help me along. I cannot start right away because Bluenose soaks all my time but I can make preparations. Nils, how long is your model? Are there any books about them? Pictures of interior etc etc and where would I obtain the plans please? I will not be so cheeky as to do a build log on it as this is your boat. It is just that it is screaming at me now. Pete
-
To my basic mind Nils The vikings had it right!!! Build the ship ( planks ) to the natural contours of the bent clinker planks and then fit the frames. It must surely make for a gradual curve. I have always held the plank on frames or plank on bulkheads with a sceptical mind as it can and often requires tedious adjustment. The way the vikings did it, there was no mistake. It was a perfect line. That's my take on it. Onwards dear friend. Pete
-
I have decided against the above idea as it will be ugly. Far better to just bolt the false keel to the existing one as there is enough meat there to do this. So it is onwards with building and glueing the keel on. Here is the first part of the keel made of oak. I have made cleats from 9mm dowel which are an interference fit ( hit with a hammer!) To the bulkheads. They will be removed after the keel and stem are built and glued on. I am using Titebond Ultimate which is severely strong and water proof. I am waiting for my son to return from work to inspect the progress for rudeness...ha ha ha.....my mobile phone always thinks I mean something else and insists on words that are totally inappropriate. It meant...TRUENESS!!! stupid phone. He has already on several occasions pointed out certain inaccuracies that the aged father thought was okay so I am now blessed with a works foreman and inspector. He will from now on be referred to as Dick Dead Eye!!!! For his sharpness in spotting when things are not dead on!! I hope you like my ideas on clamping and glueing the keel. You may think on looking at the keel that it is dished downwards at the centre but this is an optical illusion as I have checked it with a straight edge. Oh.... M Taylor...thanks for your reply. This is the biggest model I I ever built in my 69 years of life so it is one big challenge for me. I am a glutton for punishment and need this to test me out. When I look at the accomplishments of modellers on this fabulous forum I get very humbled. I get very excited at what I see and it spurs me on to try that bit harder. I am enjoying every minute of it although it taxes my deteriorating brain. Thanks Pete

-
Roter Löwe 1597 by Ondras71
Peter Cane replied to Ondras71's topic in - Build logs for subjects built 1501 - 1750
Late to this party. Just read your whole log. Ondras you are an exceptional modeller. Beautiful planking. It has only just dawned on me why they cut a rabbett in the keel especially the bull nosed bow on galleons....to hook the plank into whilst bending it round!!! Why of course. It was your pictures that made this clear to me. Also that no plank should go to a point...because you cannot nail a point to the frames!... Duh!! I am only learning as I watch you guys teach me. Thanks a lot. Pete -
Nils. Cutting the shape of the frames must be very difficult as there are three angles to consider. You are building it like the Vikings built their ships...ie planked then framed. It all makes good sense and it is incredible that they hit on the idea all those years ago. It is looking great!!.....don't stop!!! Pete
-
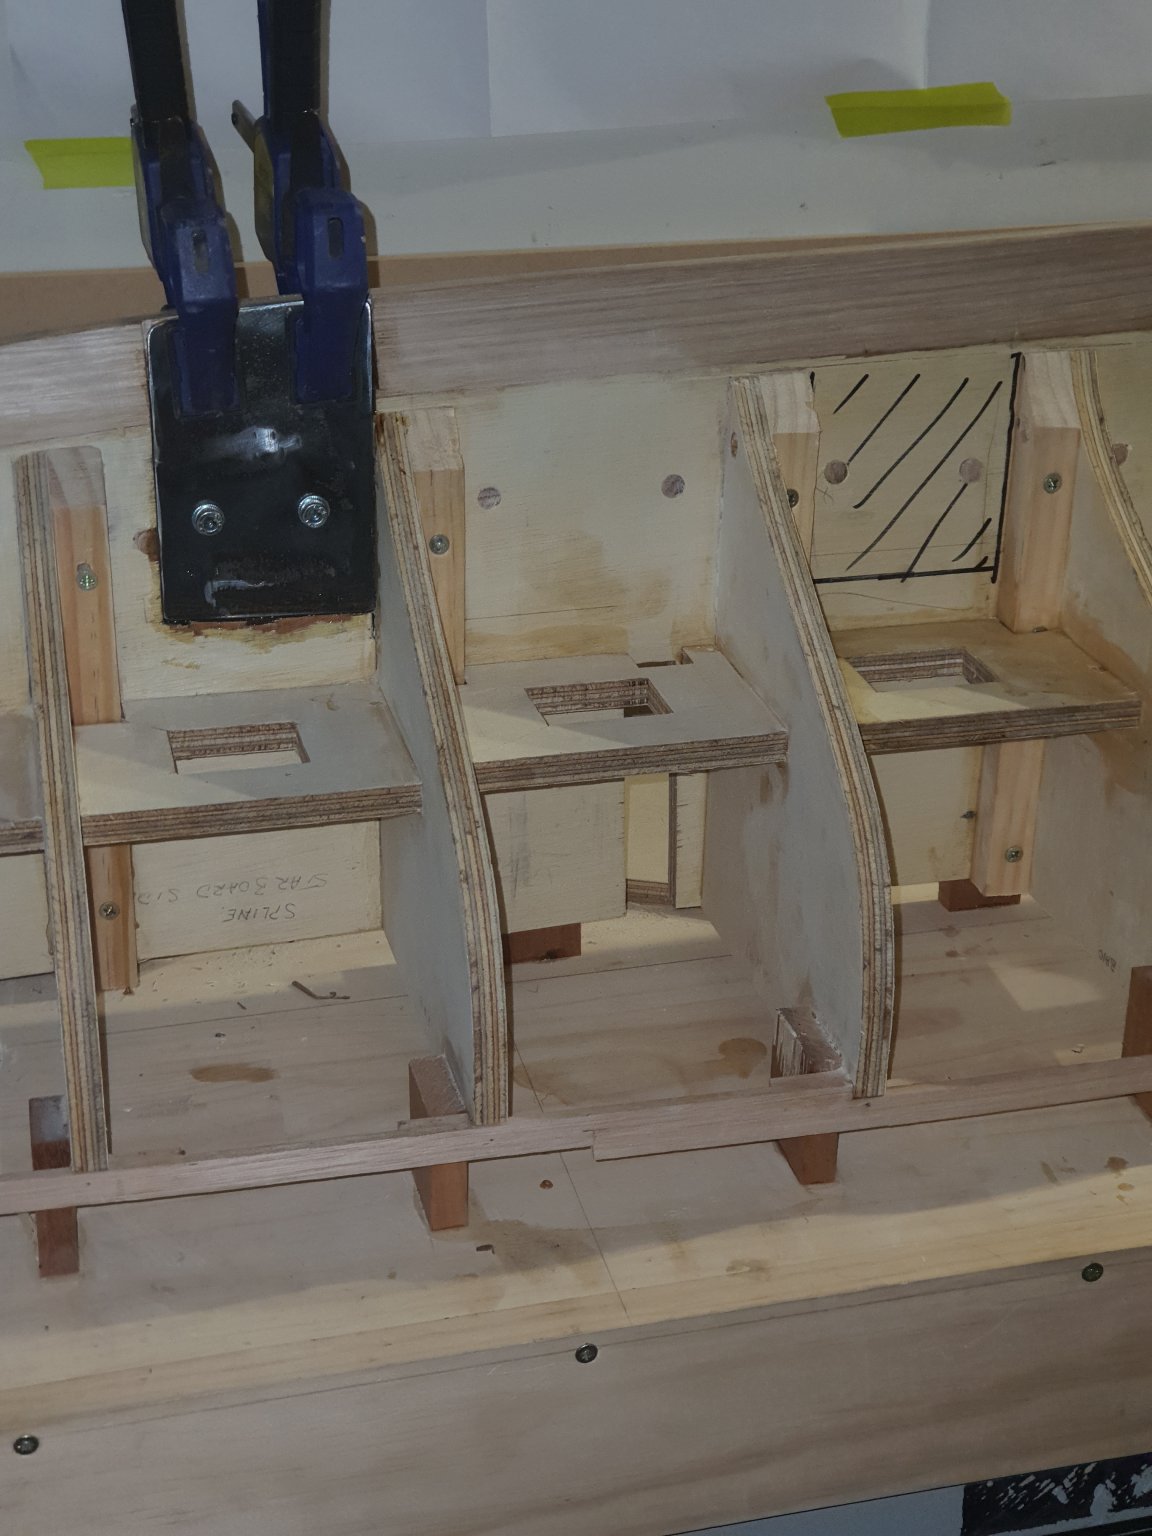
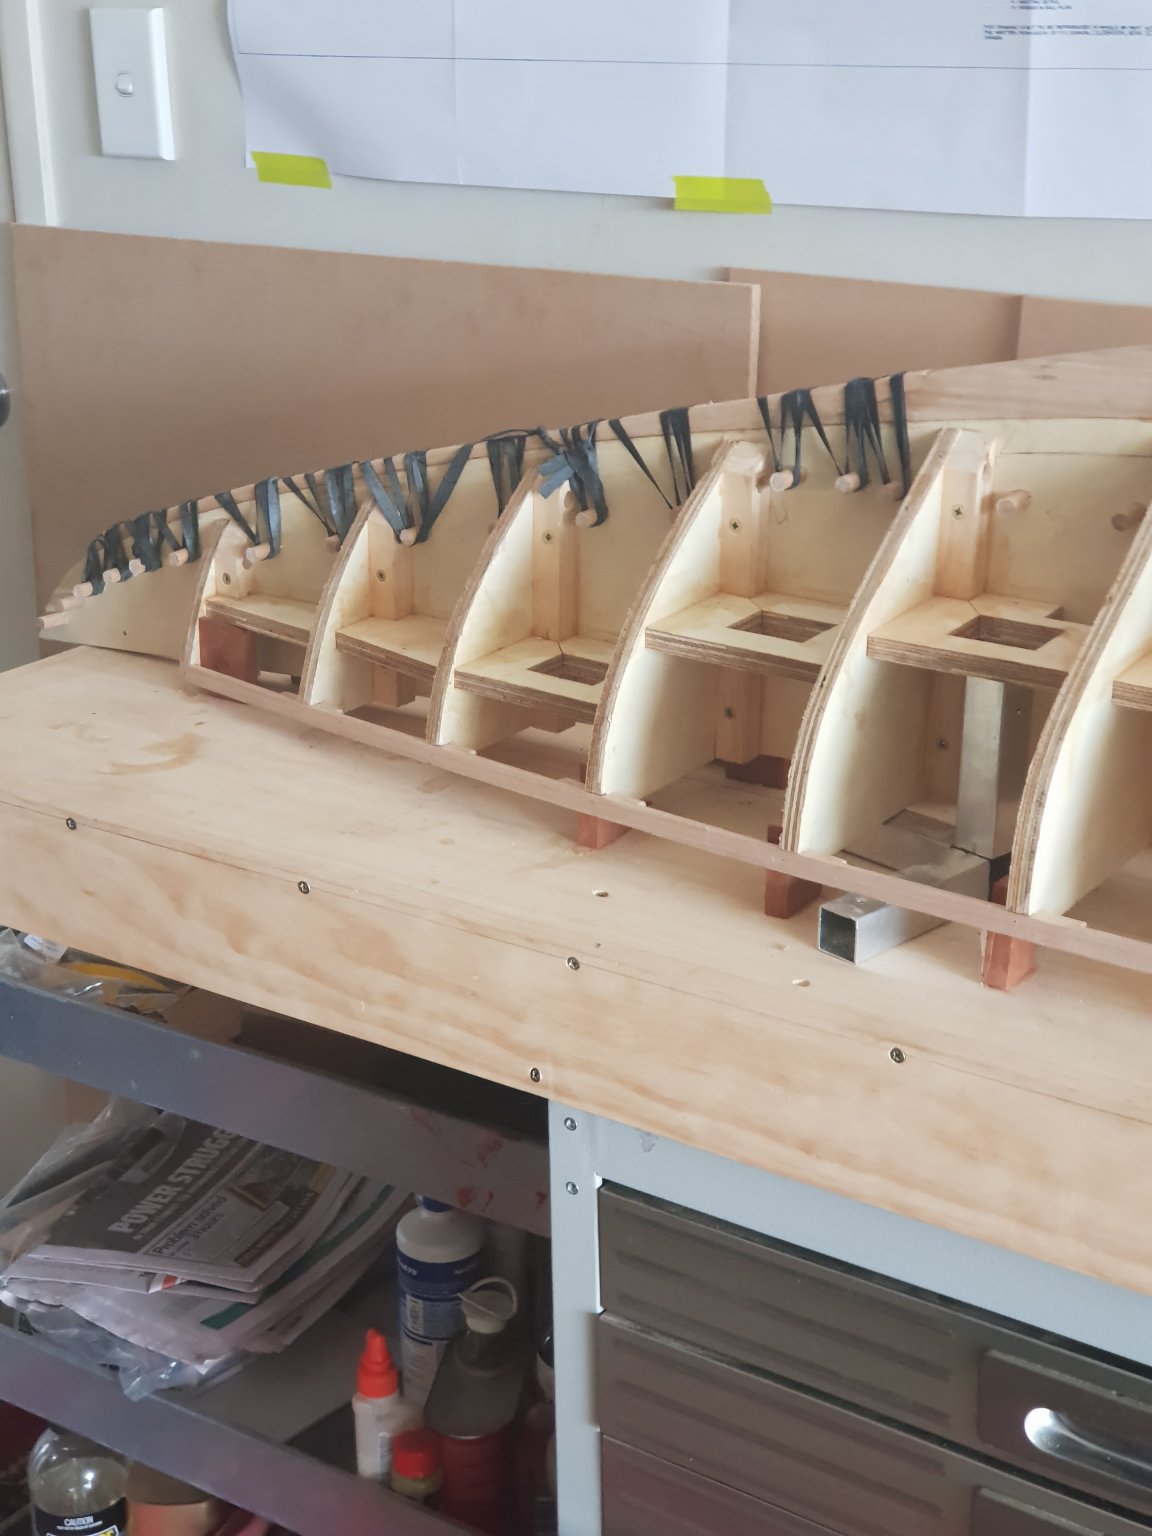
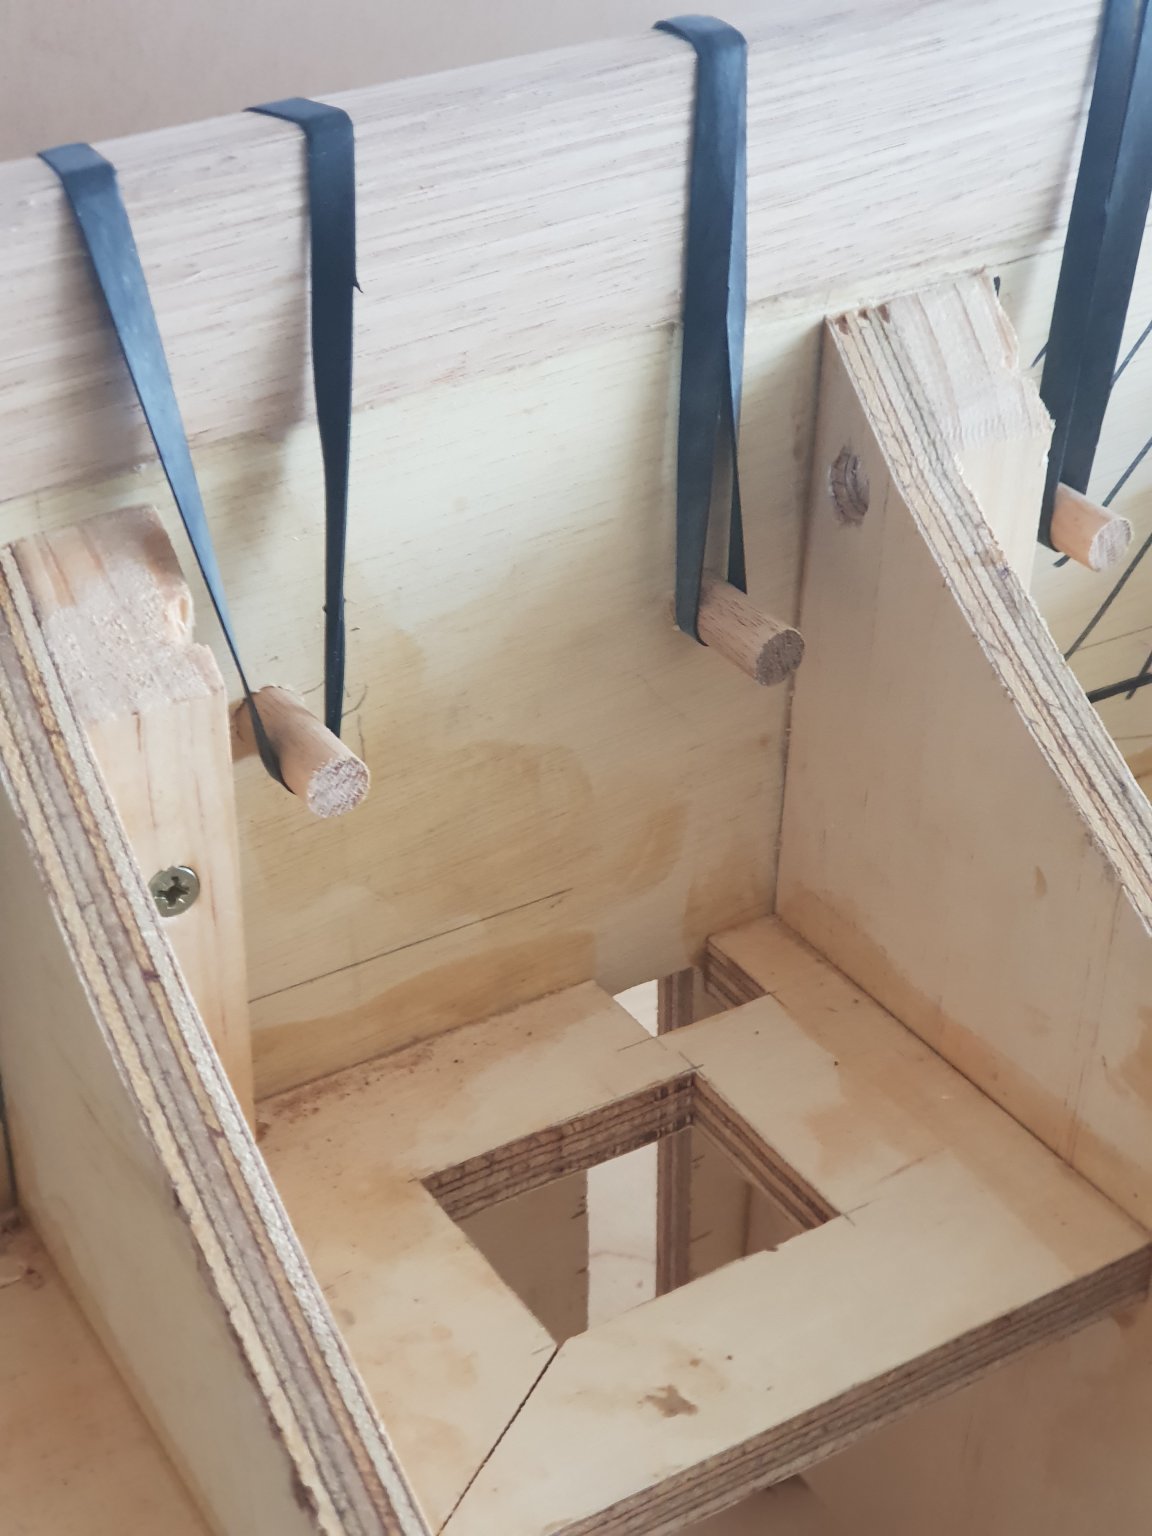
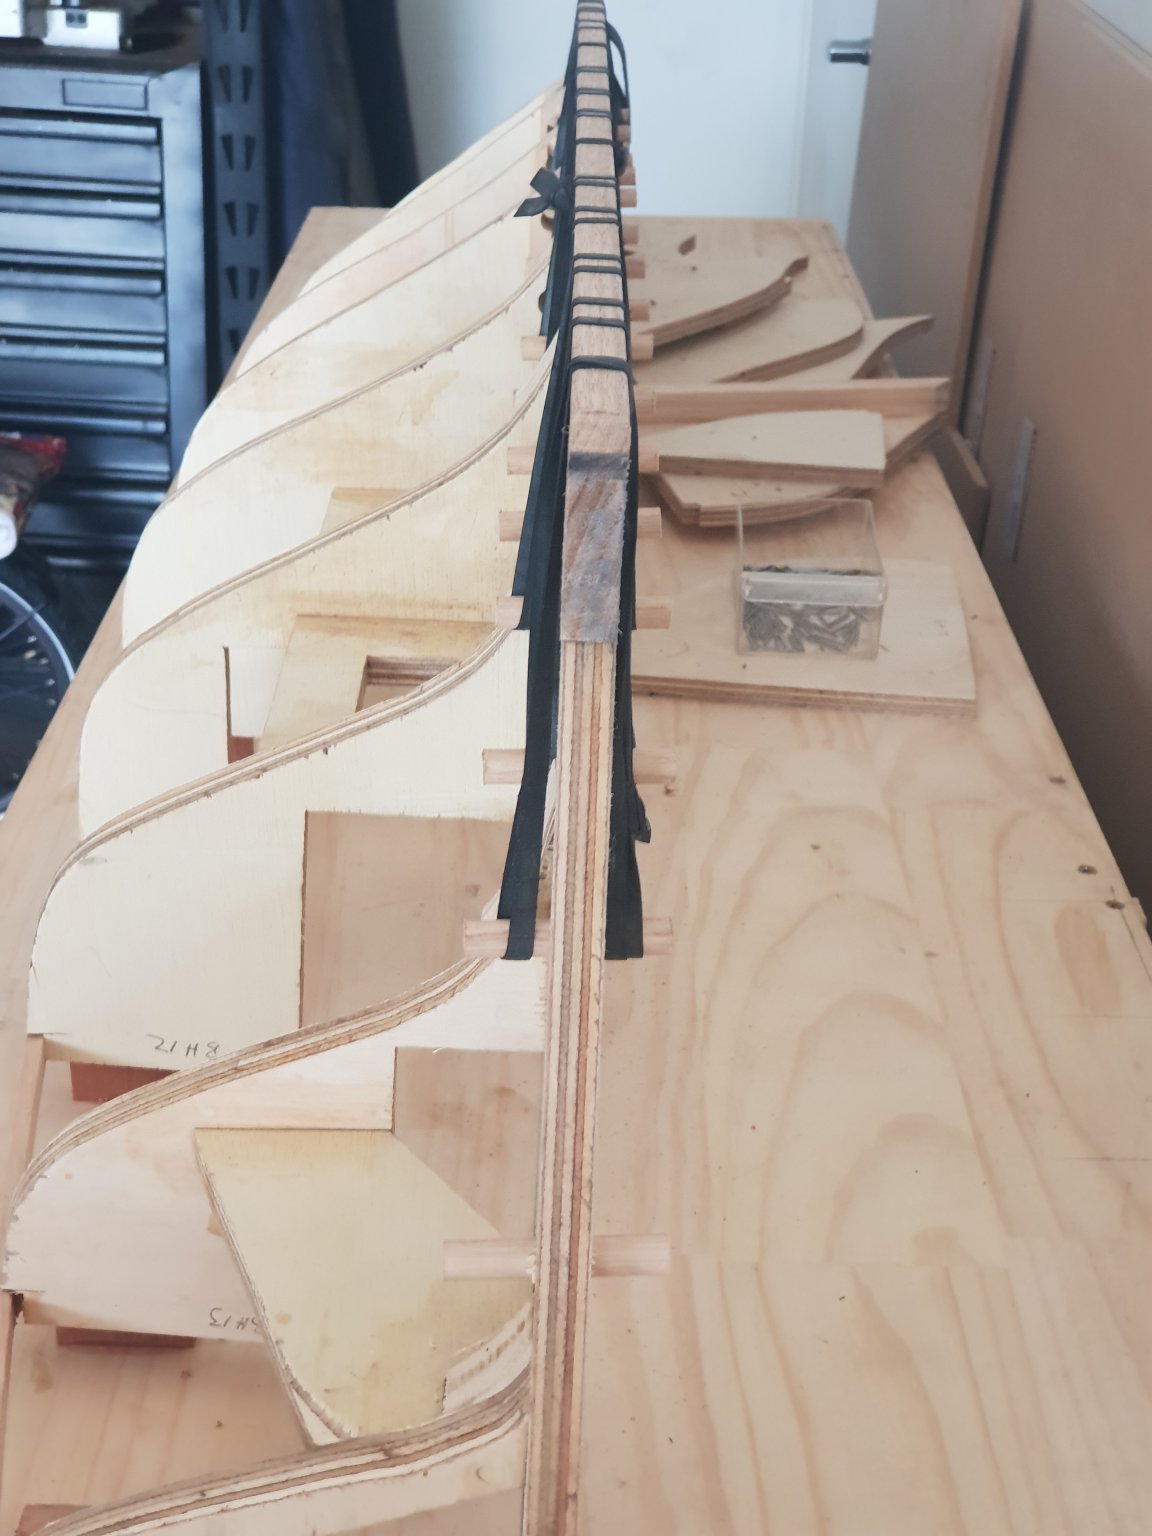
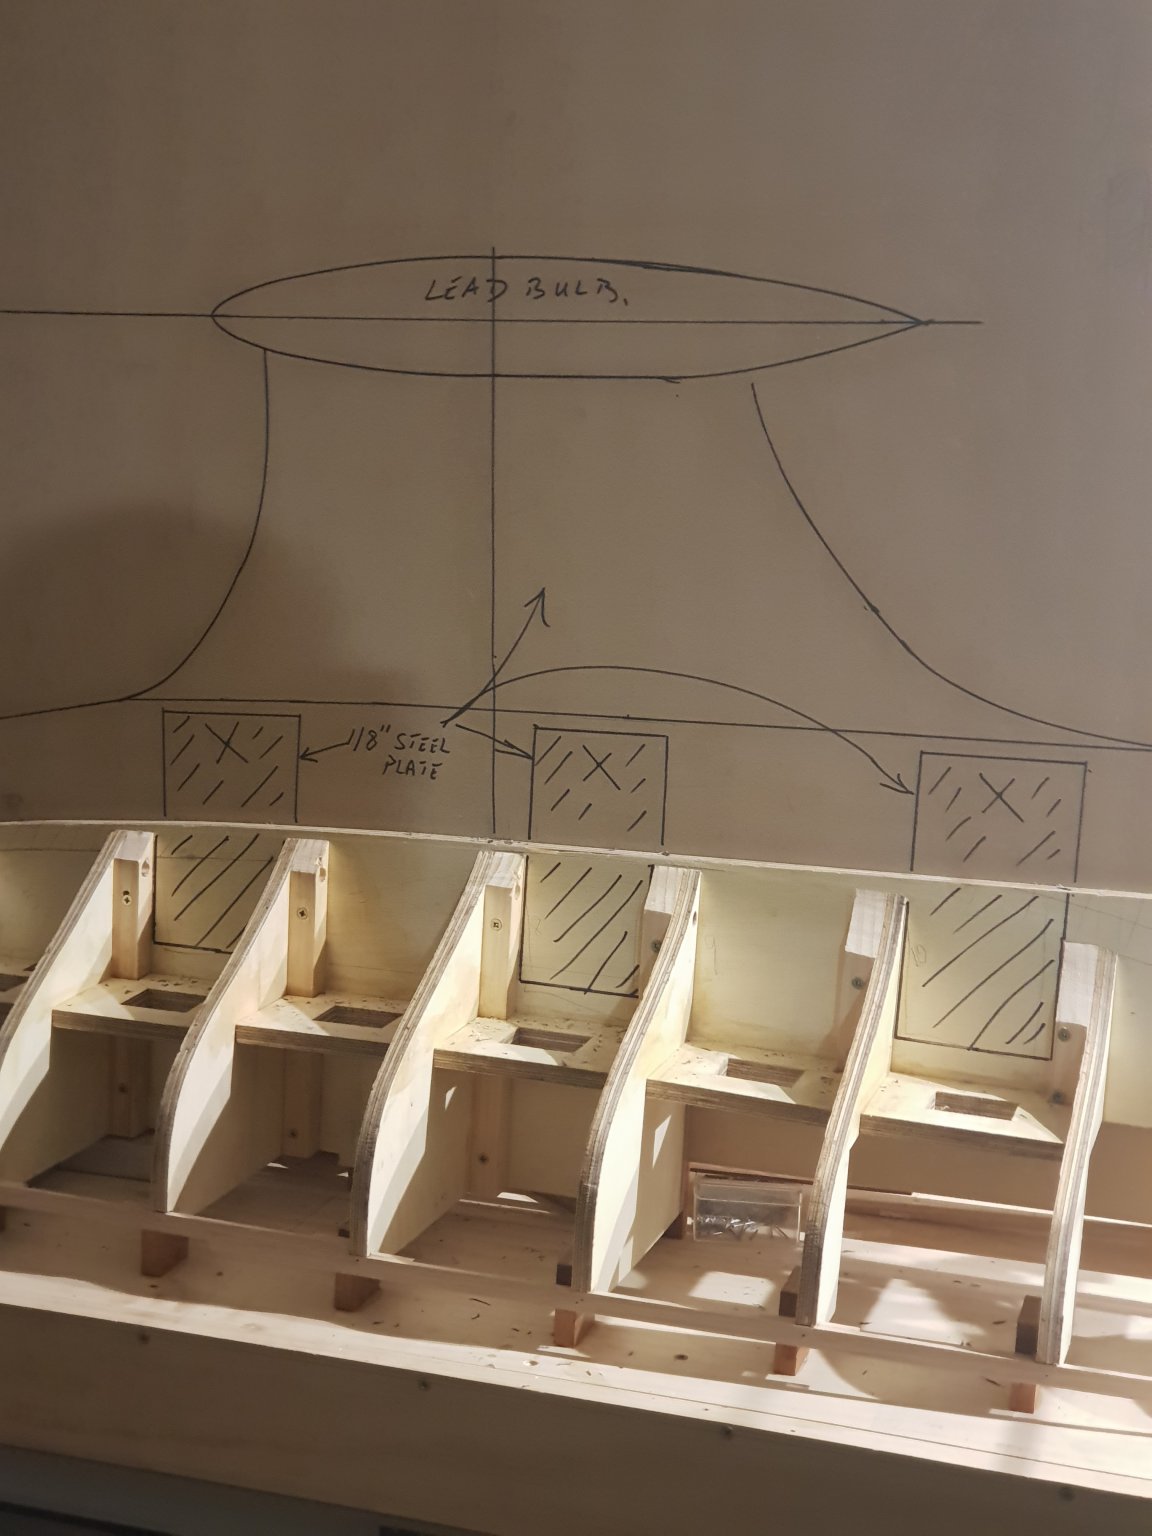
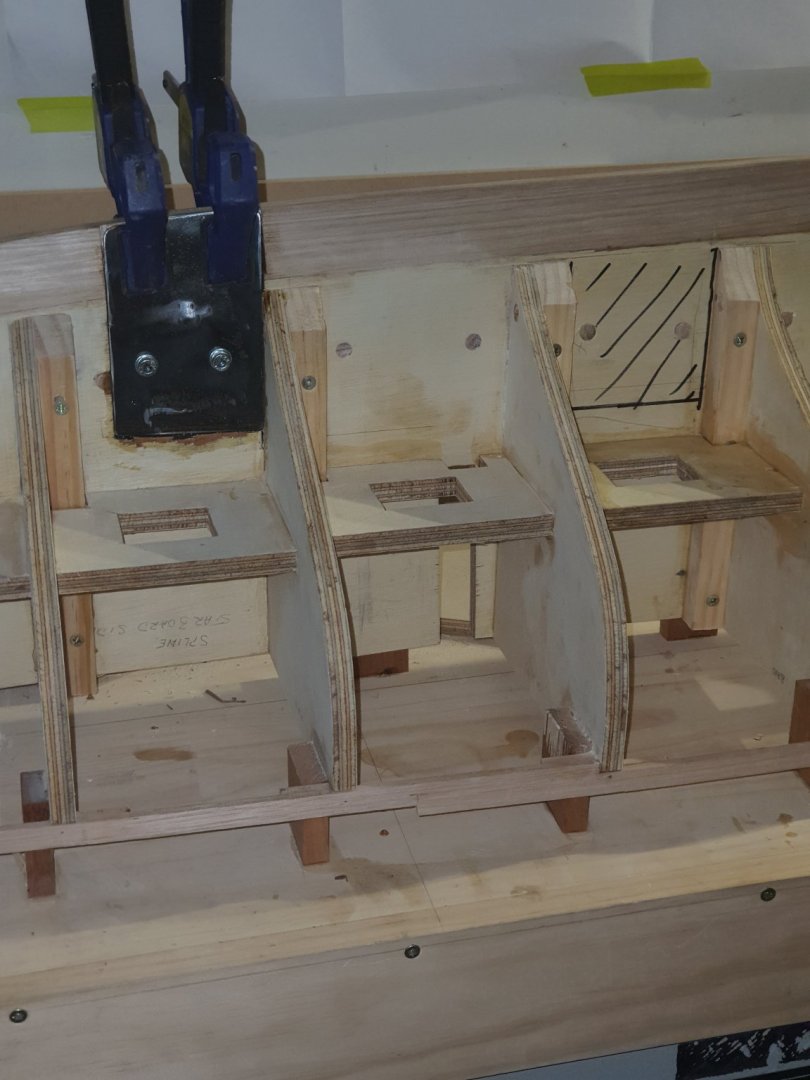
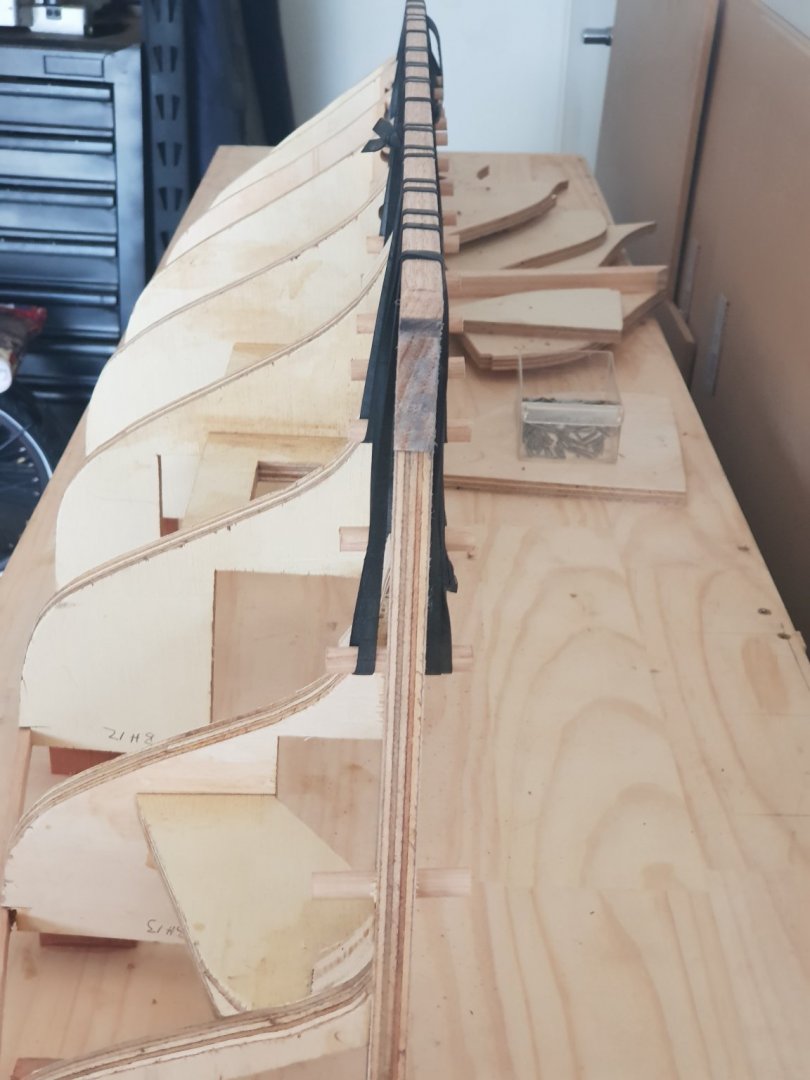
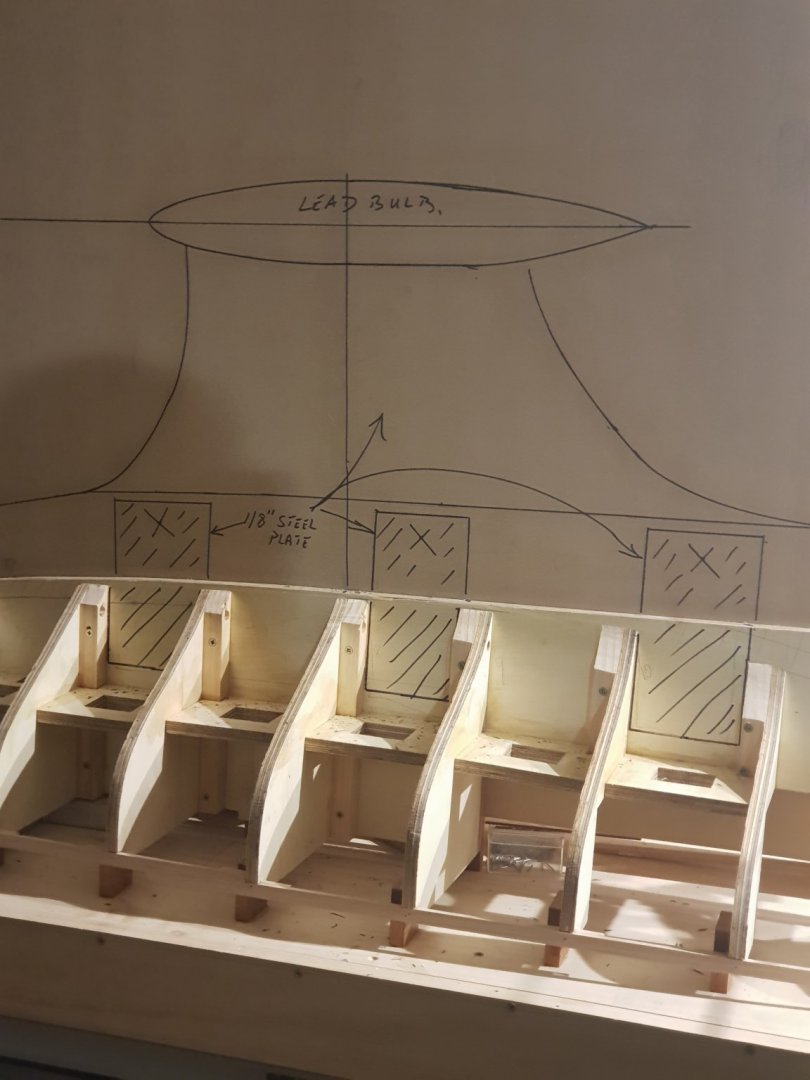
Well...we have not come to a halt exactly but need to sit and think about the next stages of construction very methodically. It is like a game of chess whereas we need to be several moves ahead to avoid defeat. We deliberately built just one half first so as to enable a board to be fixed via clamps so as to mark out exactly the keel line. Had we gone ahead and bulk headed the other side we would be in deep water. However the huge piece of MDF clamped to the board at the moment serves another purpose. To draw out what we think would be a suitable sized false keel that will be bolted on to the existing oak keel. ( when I have built it!) We discussed that if we were to just glue and clamp the keel to the spline the forces of the water versus the angled masts would be enough to snap the keel off. So we have gone Australian and over engineered it. The false keel will be bolted on to 3mm steel plates as shown hatched. The bulb will be cast from lead. The whole is impressively massive. The bottom of the bulb to the Carlin strake measures over half a meter. This is a prototype drawing subject to change but it LOOKS about right? We have also thought that the inside of the hull needs to be pretty water resistant so we will lay the Garboard strake, add a few more strakes and then glass resin the immediate bottom of the hull. Otherwise if we were to go ahead and plank it, we would not be able to reach the parts beneath the reinforcement plates with the square holes in. Having read David's pdf on cutting the rabbett for the Garboard strake, he indicates that it is not entirely necessary but this was the way real ships were built. Our Bluenose will be fiber glassed all over then sprayed so no one will know the difference. So I have that to torment me as well. Rabetts for the Garboard strake or not? Don,t forget, the model is 6 1/2 feet long so that's a lot of notching!!! There are a ton of things to think about and I go to bed sometimes with a head ache. But they are pleasant head aches. I get over them by reading what you guys are up to to give me more inspiration. If you think or see anything glaringly wrong with our thoughts please do let us know. I would rather be advised than left to spend hours on something that just will not work. Thank you for your likes and kind comments. Pete
-
Ha ha. We live in Australia so we will choose a nice sunny baking hot day ( not difficult) and enjoy getting wet. Probably with a few beers! Pete
-
Thank you dear friend for taking the time to draw sketches that speak a thousand words. Your drawings explain to me exactly how to notch the garboard strake. I thank you heartily for helping me. I will stay tuned with your build log and will also take every note of your skillful build. Thank you again. Pete