


realworkingsailor
-
Posts
3,089 -
Joined
-
Last visited
Content Type
Profiles
Forums
Gallery
Events
Posts posted by realworkingsailor
-
-
-
For those following at home, my hobby time has been a little curtailed as of late last winter. Other projects took priority and time at the bench has been limited. I'm not yet ready to get back to it, since the weather continues to slowly improve, and the outdoor projects are stacking up, but I thought I would at least start a topic as a placeholder for when I get back into model building.
This particular project has come about as a result of another project I've been working on over the winter (and will be working on for a long time yet). It began with a google query made on the spur of the moment, and has since snowballed from there. To provide a little clarity, my great uncle was an officer in the 2nd Medium Regiment, Royal Canadian Artillery, during the second world war. He served in the Italian campaign as well as the final liberation of the Netherlands. He never spoke much of his experiences when he was alive, and even my uncles and aunt don't really know what he did during the war either. Just for a laugh, I decided to see if the regimental war diary was available online. Well, I had great success there and I have discovered some amazing stories. Cross referencing the war diary with some history books, I've been able to put things in their proper context, and I'm endeavouring to create a more readable history to share with the rest of the family.
Anyway, getting more to the project at hand.
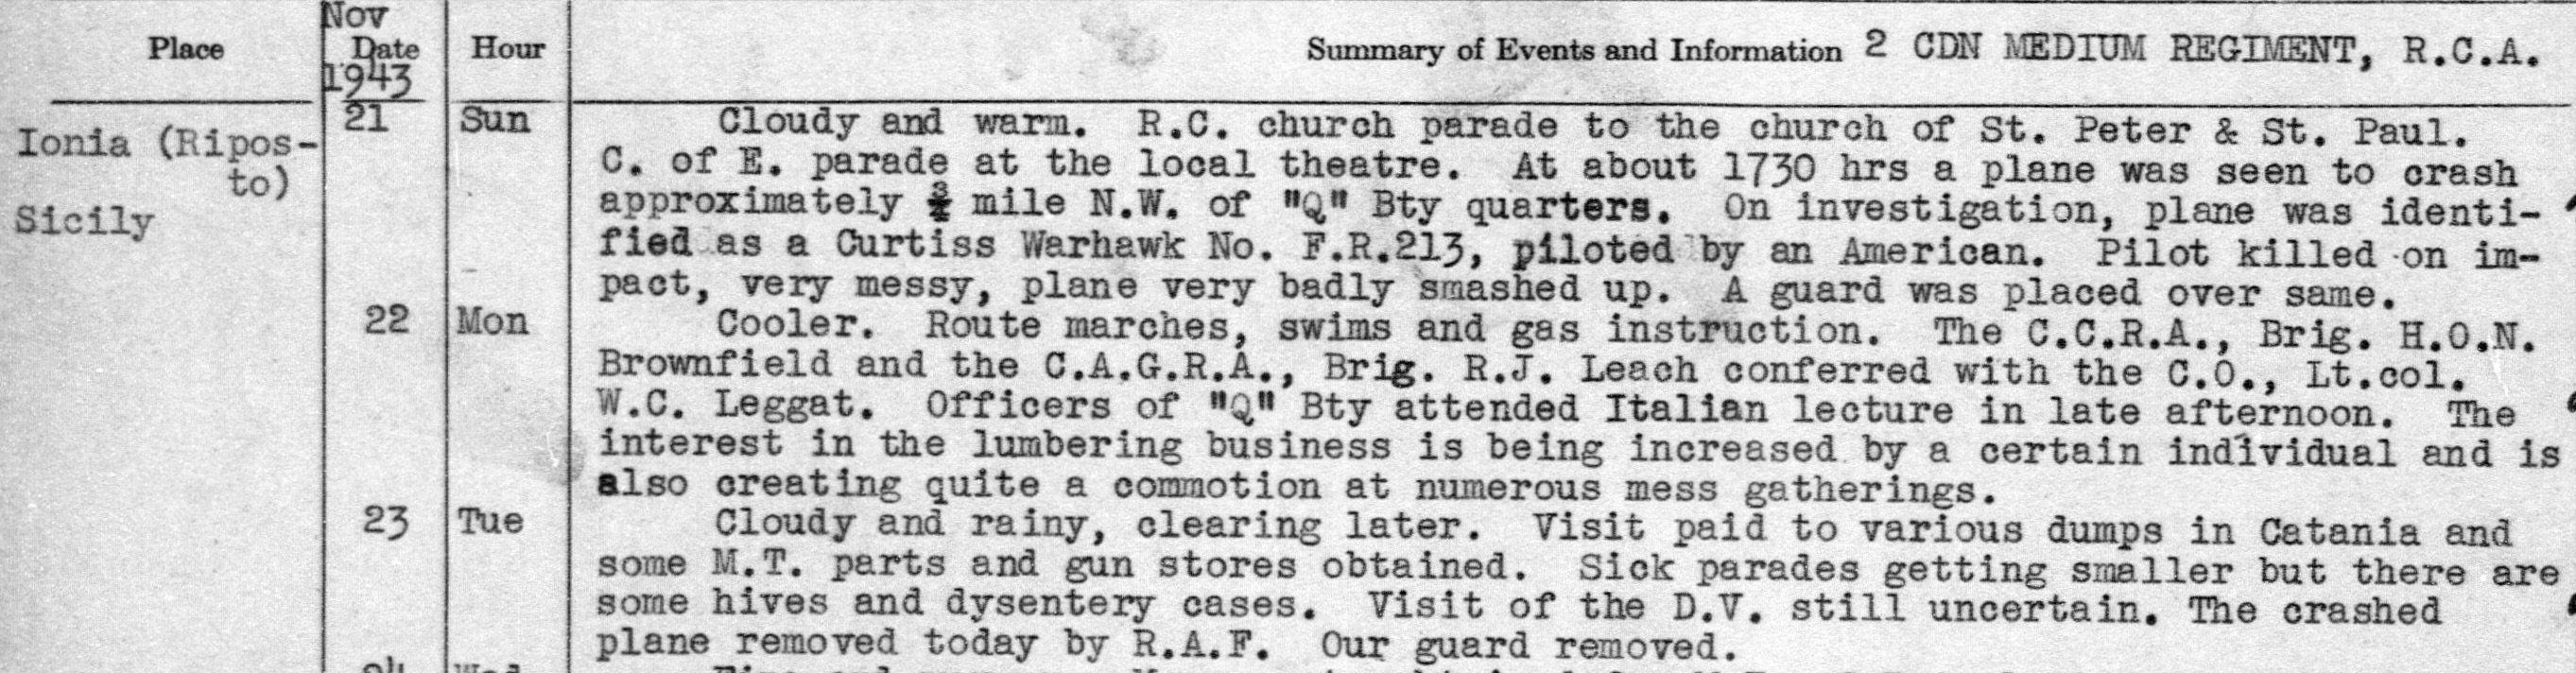
My great uncle and his regiment arrived in Sicily in early November 1943. As part of the wheeling and dealing that saw the Canadian forces in Italy brought up to Corps strength, they arrived without any of their heavy equipment (no transport, no guns, just the packs on their backs). They remained in Sicily until the end of the year, before moving to the mainland in January '44. While the regiment's time in Sicily was largely uneventful, one particular occurrence caught my eye.
On the evening of the 21st of November, a plane was seen to crash near one of the regiment's battery HQs:

My uncle was assigned to "Q" battery, so I'm certain he was well aware, if not involved in, the aftermath of the event. The war diary recorded few details concerning the plane that crashed, including the type and the serial number. This provided a great jumping off point and I was able to find some interesting information, and a bit of a mystery.
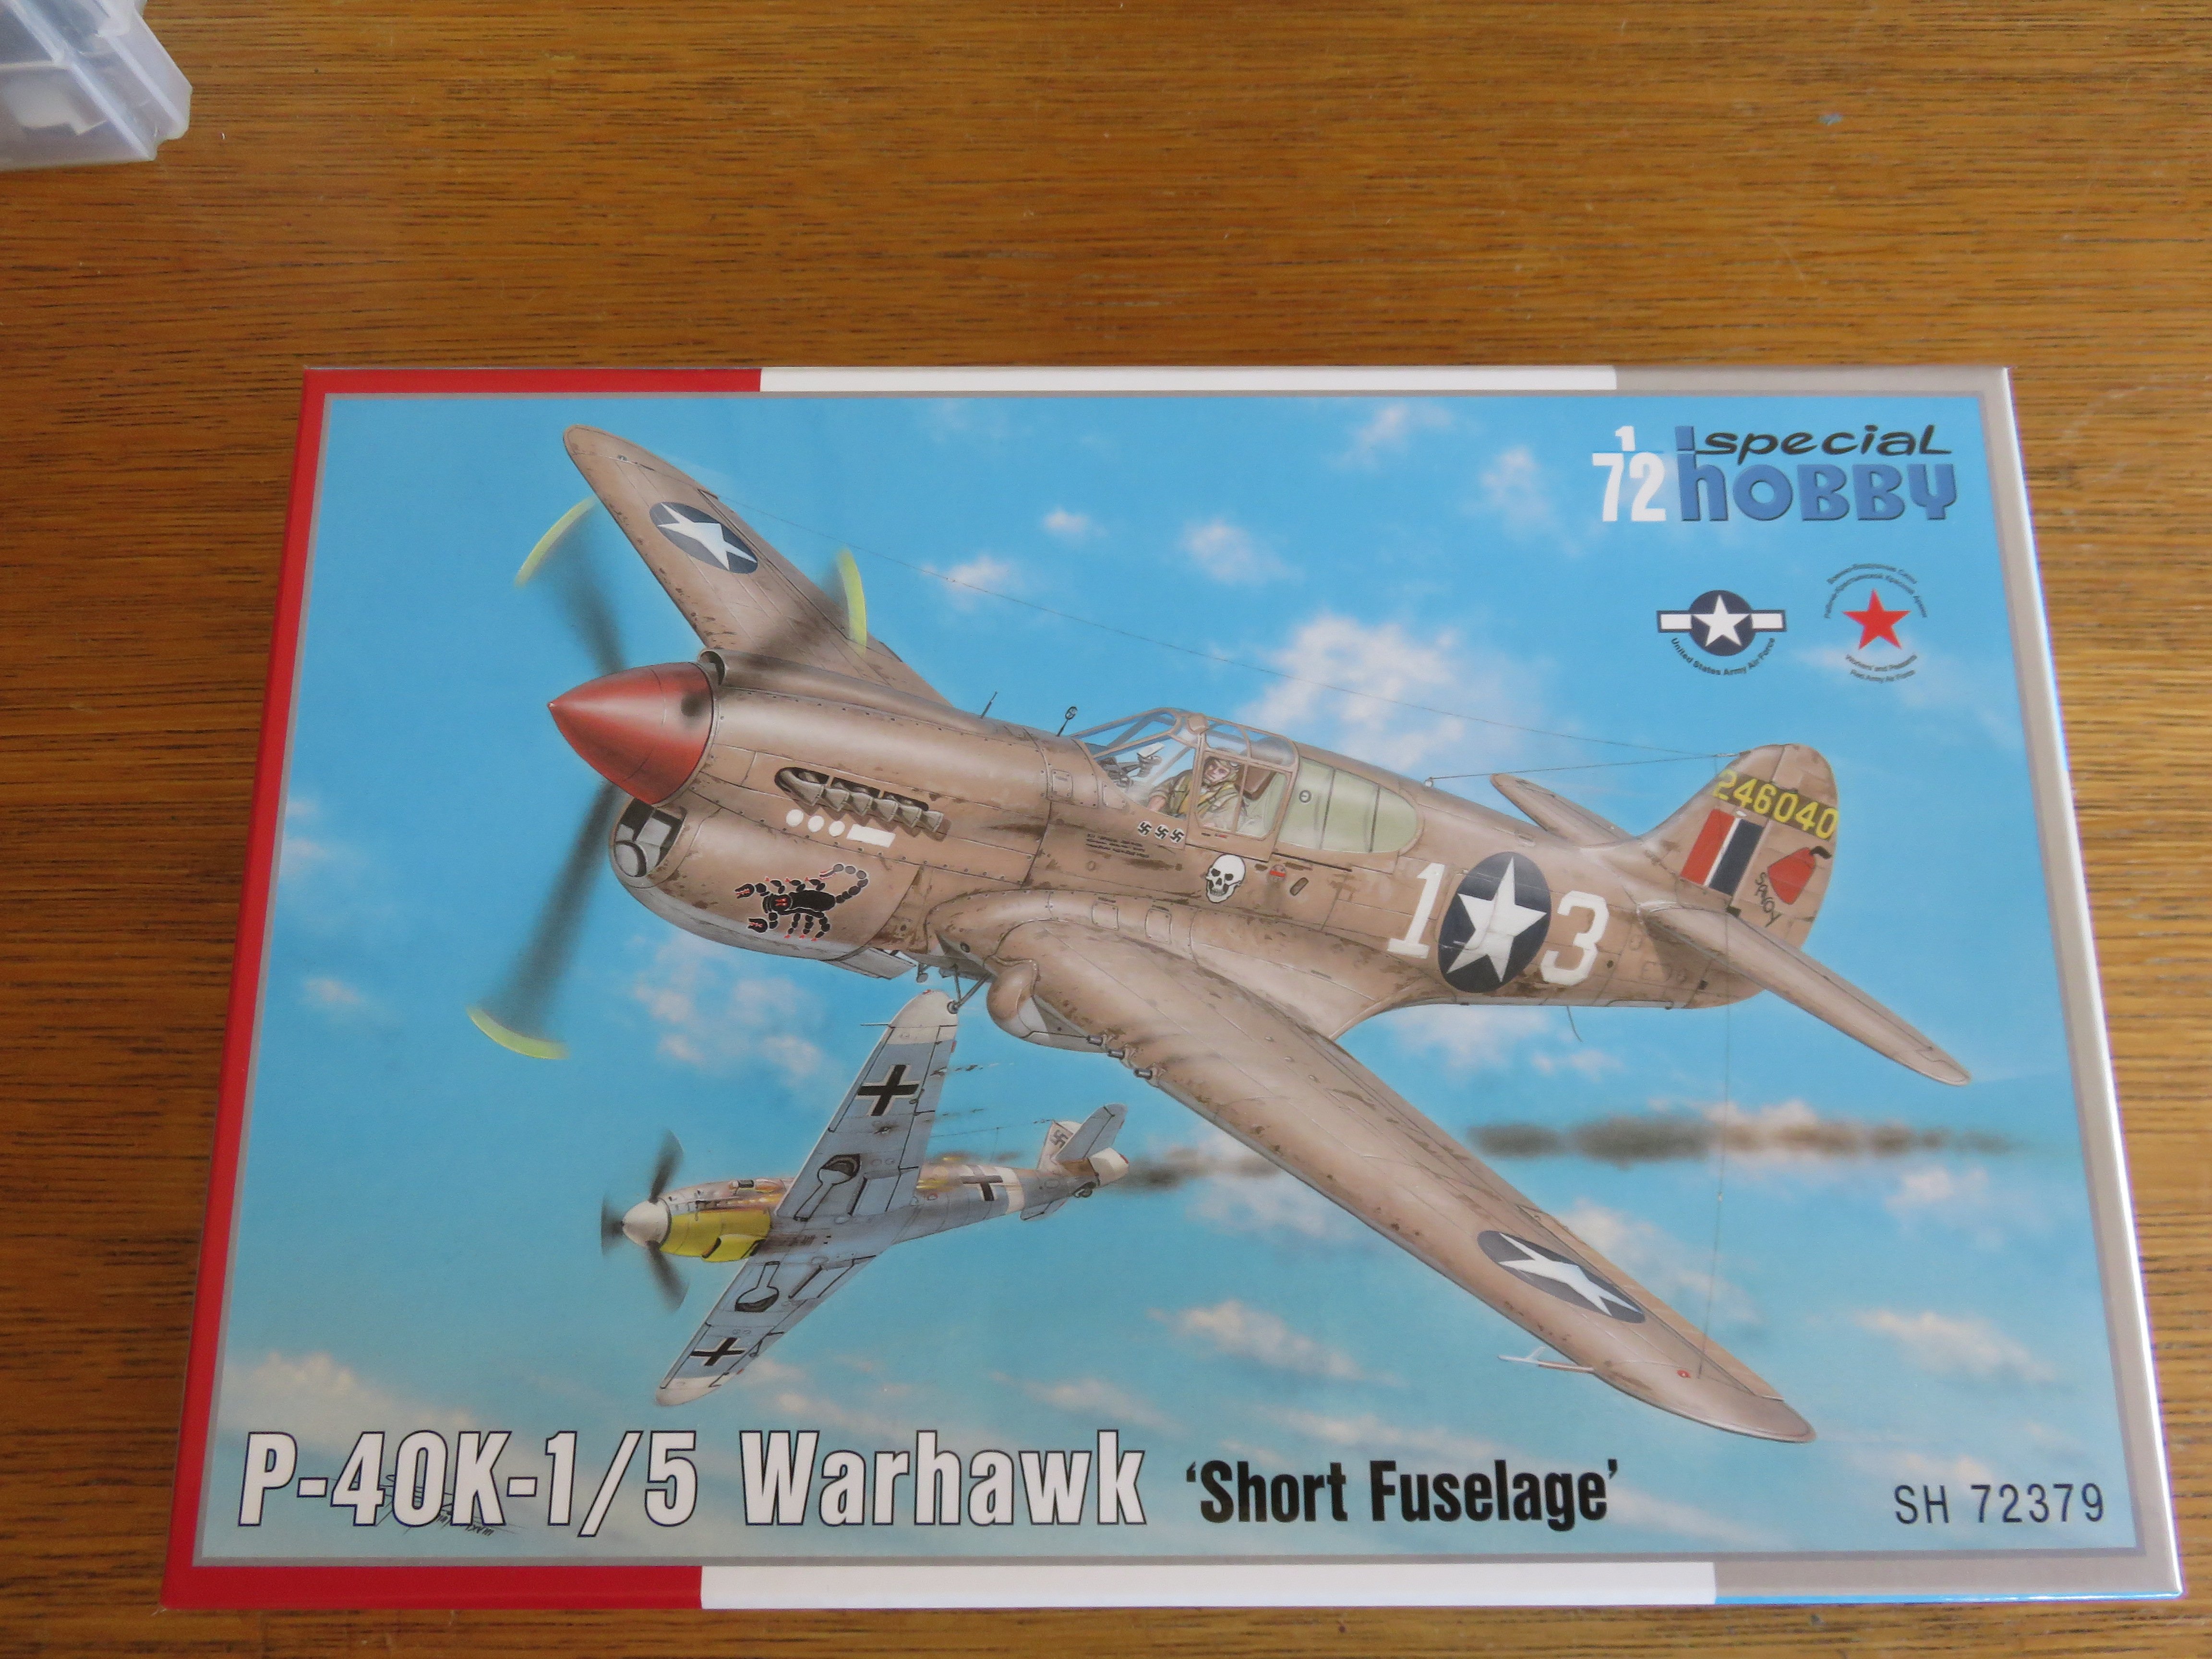
Researching the serial number, I found an online compilation of aircraft flown by the somewhat legendary 112 Squadron RAF. FR213, 42-45817 was delivered to the squadron as in July 1942, and assigned the code letters GA Q. It occasionally wore the code GA ? when used by squadron leader Billy Drake. The record I found doesn't note much else about the plane, other than it was a short tailed P-40K-5. The fate of the plane is recoded as "unknown".
From my research, 112 squadron was based at a place recorded as "Mileni" towards the end of October 1943, and didn't move again until early '44. Although I can't locate the exact location, I think it was in the Foggia area. This brings up the first of many questions. If FR213 was still assigned to 112 Squadron, what was it doing in Sicily while the squadron was near Foggia (on the Adriatic side of Italy)? Secondly, it seems to have been quite an old plane by WW2 standards, almost 18 months, to still be in (front line?) operation, especially for the rough service conditions it would have experienced in the North African desert, maybe it's a good testament to the durability of the P-40 (its sister plane FR215 was struck off charge in April 1944, and some others made it until 1945!!). The third mystery is who this American pilot may be. Nothing else is noted, so was the plane returned to the USAAF (which should have been recored somewhere)? If so when?
These questions aside, the thought of modelling FR213 (or at least, a version of FR213) proved to be very tempting. I will continue in part II with a description of the kit as well as some of the extras I've bought to go along with it.

Andy
-
2 hours ago, ccoyle said:
Then it was on to the exhaust stubs. These proved to be an unmitigated disaster. The parts were flimsy, difficult to shape properly, and had no internal support structure. Assembly did not go well. 😑 So, instead of mucking around with them anymore I simply ordered a set of 1/32 scale 3D-printed exhausts from Squadron. "What a fascinating modern age we live in!"
Would you prefer building another double row radial engine? 🤪😆Looks great sitting in its own feet!
Andy
-
2 hours ago, ccoyle said:
Here's a question for all of you true Hurricane know-it-alls out there. On the underside of the port wing fillet is a very small, oval structure, as seen in the image below:
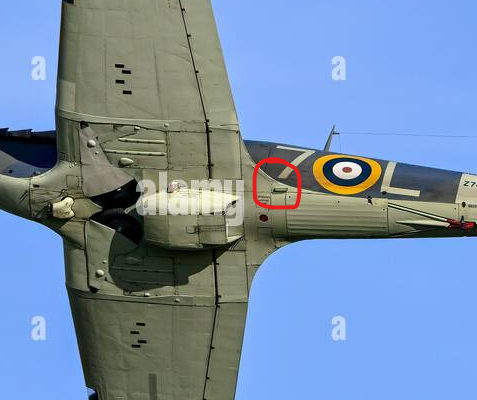
The kit provides parts for it, but I have no idea what it is. Possibly a step rung? Photos differ on its shape, and some aircraft appear not to have the thing at all. Whatever it is, it appears to be overlooked on many models.
Anyone able to shed some light?
I’m fairly certain that’s a retractable step. You can see it here in the deployed position.
Andy
-
A lot of Airfix’s 1/35 armour kits are reboxes from Academy. So any aftermarket designed for the corresponding Academy kit should also fit the Airfix kit.
Andy
-
There seems to be quite a bit of online controversy generated by Eduard’s switch to these kinds of decals. The film doesn’t peel up cleanly, the decal can get torn and/or partially lifted by the process and their print quality isn’t very good.
I had a taste of these decals with my Blackburn Skua build last fall, however I think I may have stumbled on to a reasonably reliable method to deal with them.
After allowing the decal to really set on the model, be sure to allow at least 24hrs for curing, apply some Micro Sol, and after a couple of minutes, gently scrub the decal film off with a stiff bristle paint brush. It’s a bit counterintuitive, but managed to make it work with some small stencil decals, which are the trickiest to do. I’ve seen some folks advise using mineral (white) spirits, I think with Micro Sol there’s less risk of ruining the paint finish.
Personally I’m not a fan of having to take all these risky extra steps.
Andy
- Canute, Egilman, Old Collingwood and 6 others
-
 9
9
-
26 minutes ago, thibaultron said:
Does the protection take into account the containers falling off the ship when it impacts the barriers?
Comparatively speaking, a container is fairly light. The heaviest containers are generally stowed low down, in the hold, rather than in the deck stacks. If the bridge was that vulnerable to collapse from a hit from a heavyweight container, I’d be more concerned every time a semi-truck jack-knifed (which happens waaayyy more frequently than a ship strike).Andy
- Harvey Golden, Jack12477, bridgman and 7 others
-
10
-
It’s slightly more than just the angle of elevation that classifies whether a piece is a gun/howitzer/mortar. It also has to do with the trajectory of the shell, and the ratio of propellant to shell weight.
To lob a mortar shell into a high looping trajectory takes far less propellant proportionally to the weight of shell than an anti-aircraft gun, even though both are designed to fire at high angles of elevation. However, you could technically turn an anti-aircraft gun into a mortar by reducing the amount of propellant from the cartridge.
Jumping to WW2 British artillery practice, the QF 25 pounder field artillery, as well as the BL 4.5” and BL 5.5” medium artillery were considered to be gun-howitzers. Because their shells were loaded separately from their propellant charge, the charge weight could be altered on the spot, by the gun crews, as required. With this flexibility of trajectory, the pieces could be fired at low or medium angles. Both field and medium crews were trained in indirect fire as well as anti-tank shooting (the latter being done over open sights, direct fire, flat trajectory), although they seldom practiced the latter in actual combat.
Andy
-
39 minutes ago, gak1965 said:
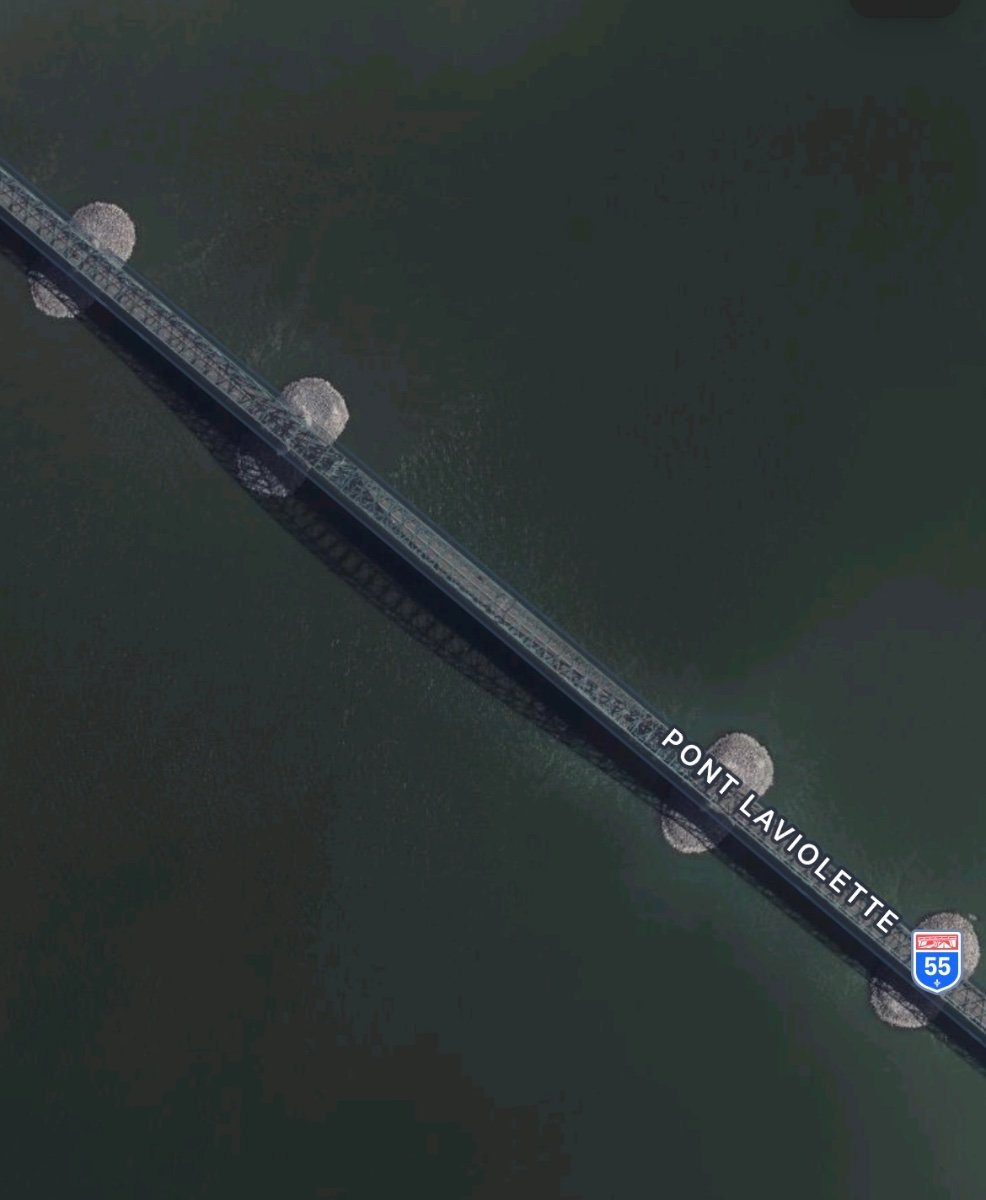
I wonder if this will prompt calls to have tugs nearby when any ship goes under some of these crucial bridges. MV Dali was registered at 116,000 DWT and was almost as tall as the bridge itself, nothing like the ships that were being used (or even considered) when the bridge was being designed and built. It's not even clear to me what exactly how you would engineer against a quarter of a billion pounds of anything striking a pier.
A better, long term and cost effective solution that could be applied to any potentially vulnerable bridge, no matter how old, is to put stone fill around the base of the piers abutting the channel. This would deflect any ship that strayed too close, regardless of size. The warning signs were there when the Sunshine Skyway collapsed in 1980 due to a ship strike.
This is the LaViolette bridge across the St Lawrence river at Trois Rivières, about halfway between Montreal and Quebec City:

You can see the stone armouring around the main piers.
Andy
- Rik Thistle, GrandpaPhil, druxey and 7 others
-
10
-
28 minutes ago, chadwijm6 said:
After the disaster that was the Scrappee today, burning out a motor, I'm pleased that I've still got my sea king.
Yeah, when it comes to electronics, once you release the magic smoke, it’s all over…. They usually only have one good puff in them….Andy
-
-
2 hours ago, Old Collingwood said:
Thank you kindly, alas the smoke is off the table.
OC.
Have you considered, perhaps, a model smoke generator?https://www.walthers.com/smoke-generator-chimney-ready-for-model-buildings-667-117e
This one from Seuthe has been around a while on the market and is relatively inexpensive. With one or two hidden in the base of your diorama, at strategic locations, you could add some ambient smoke when you want to.
Andy
- Canute, FriedClams, robert952 and 4 others
-
7
-
This painting is by Adam Willaerts dating from 1607:
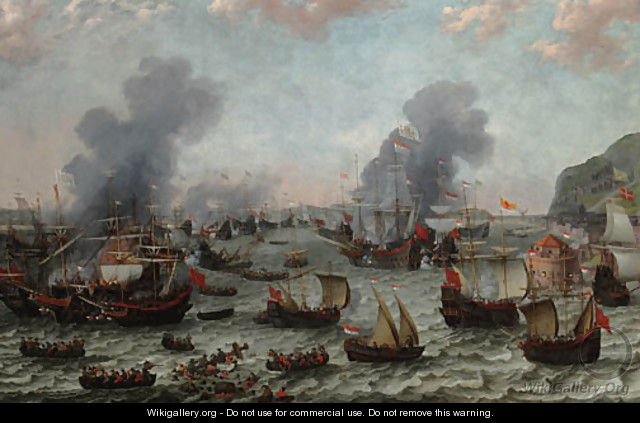
Almost front and centre is a small schooner with what could be considered a proto-Bermuda rig. Note that these are not lateen sails (lack of a vertical mast).
Andy
- Mark P, Harvey Golden, Martes and 3 others
-
6
-
Always the fun of dealing with Eduard PE.
From my personal experience it has been more like assemble some plastic and PE components, look ahead six or seven steps in the Airfix instructions, study the Eduard instructions, wrack your brain trying to figure out how the next PE piece is supposed to be added/folded/bent, then turn the Eduard instructions over and realize that a different PE piece can only be applied two steps earlier in the Airfix instructions… try to add missed second PE piece without destroying anything done previously, then, after making a complete hash of it, go back to puzzling over the first PE piece….🙄
Andy
-
17 minutes ago, Rik Thistle said:
Thanks Ken.
It's now happily sitting on the Study shelf next to the Churchill tank. But shelf space is disappearing quickly....I might need to scale down!
Richard
A bigger shelf is a better idea…. 😁Nice job on your Archer and scene!
Andy
- Rik Thistle, Canute, mtaylor and 3 others
-
6
-
16 minutes ago, wefalck said:
On static grass seeding: when Faller or Noch (don't remember who) first came onto the market with these grass flocks in the early 1960s (before that it was dyed sawdust), they sold for it application PE bottles. When I was into railway modelling in my teens, I have never been very successful with them, but at that time the fibres were sticking too much to each other or I put too much into the bottle.
I think it was the early to mid 00’s when Noch brought its static grass and electric applicator to the North American model train market.
The model scenery “industry” had come a long way from the days of dyed sawdust!
Andy
- Egilman, Old Collingwood, mtaylor and 1 other
-
4
-
4 hours ago, Egilman said:
Excellent Video Andy...
Proves one thing, absolute speed is relative...
Personally, Test aircraft should not be lumped in with service aircraft, and thankfully he didn't include the whole transonic arguments and the claims made in that genre...
I tend to stick with combat aircraft.... Within the role they played in combat... Below 5,000ft the Tempest could walk an FW190, The Mustang couldn't do that... (in any configuration) Between 5-20,000ft they all flew in the same envelope and performed very similar.... Above 20,000ft there are only a few and of those only one saw significant combat.... And the Mustang, the Merlin powered Mustang, was that airplane.... In My Humble Opinion of course.... {chuckle}
If you haven’t seen it, this might interest you:Andy
-
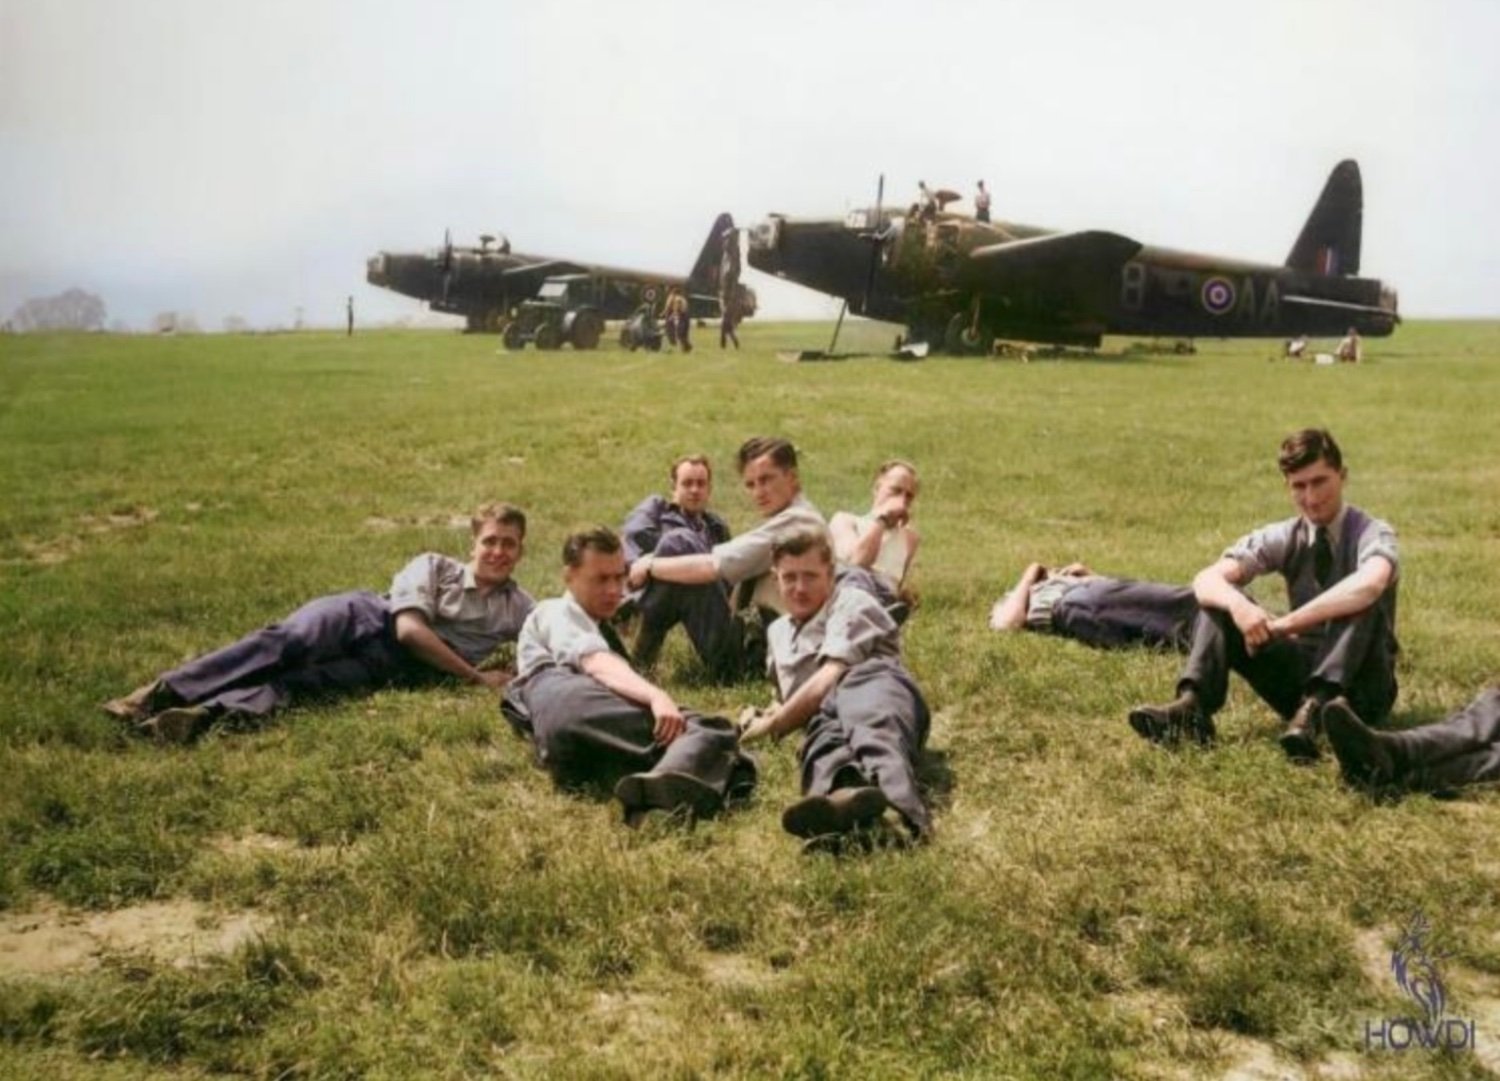
I’ve been basing my scenery on a few photos from a museum pdf file I found online.
One colour photo in particular:

According to the label on the package, the 4mm grass I used is supposed to be roughly 8” at 1/87th scale, so probably a little over 6”-ish for 1/72nd. Not much different in height from the grass these guys are lounging in. Admittedly, the grass in the photo is much more beat up than mine!
Andy
-
1 hour ago, CDW said:
Thanks for sharing that video Andy. I really enjoyed watching it.
Ed has some very interesting videos, his channel is well worth checking out. If you like the technical aspect, Greg’s Planes and Automobiles really dives into the nitty gritty of airplane performance, by the numbers (If you haven’t seen it already). He’s even done a recent set on human factors, why some WW2 planes are better than others from another perspective outside of performance.Andy
- Canute, Dave_E, Old Collingwood and 2 others
-
5
-
16 minutes ago, Canute said:
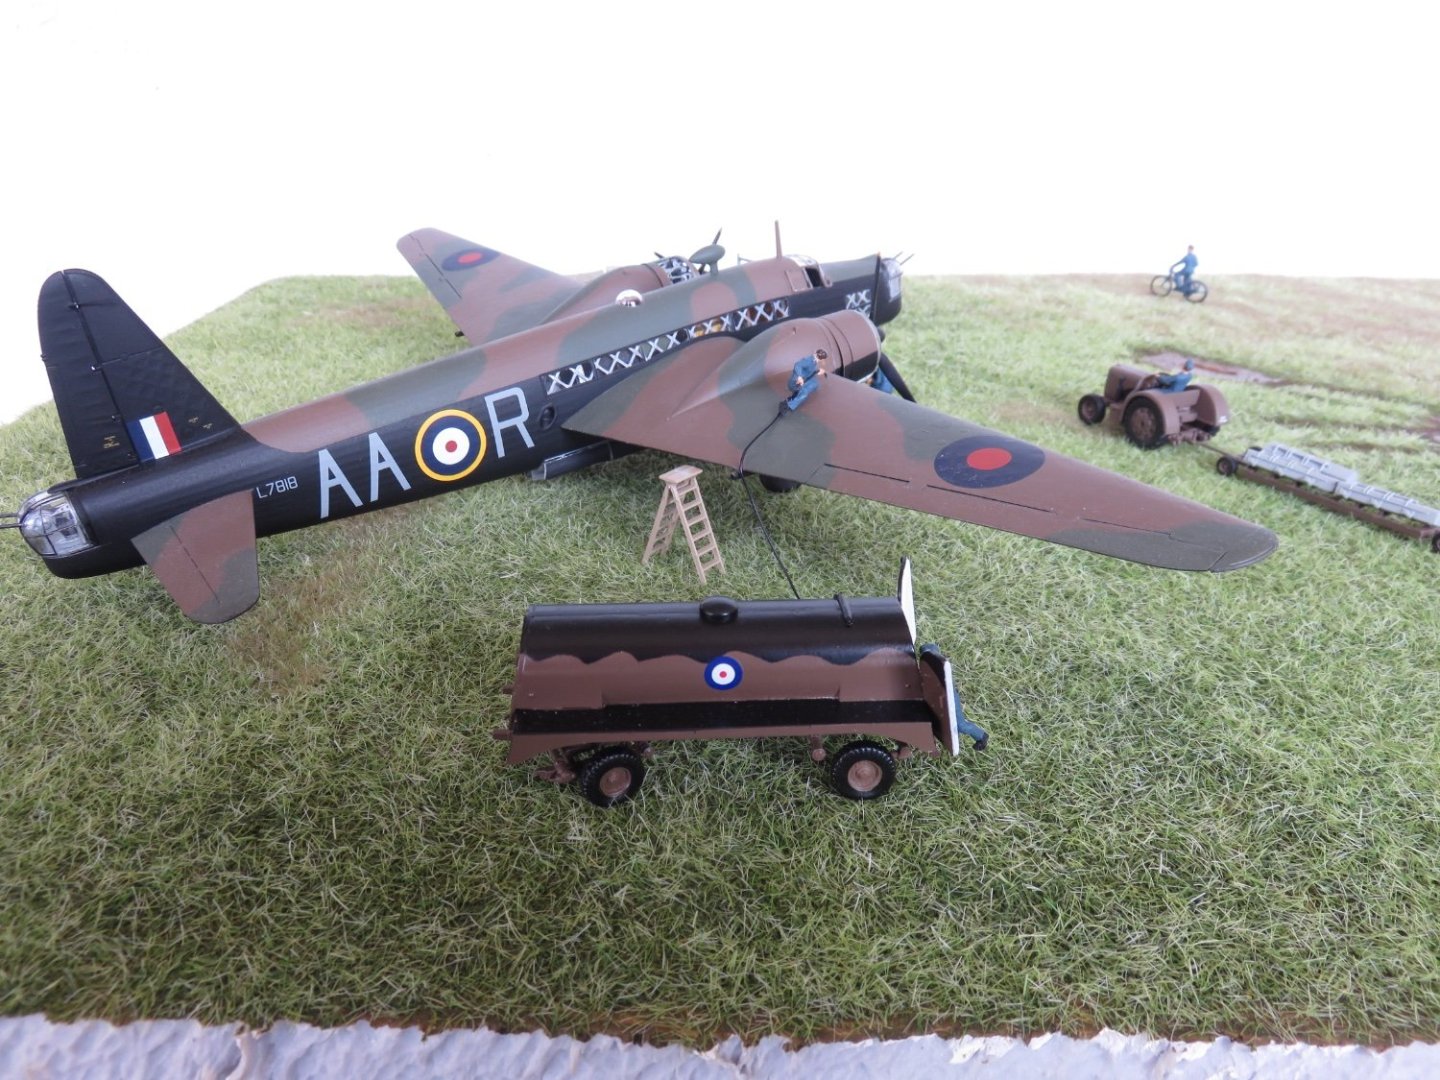
Nicely done, Andy. The erks are toiling away, getting the Wimpy ready for another go against Festung Europa.
And like any typical public works type job, a suitable number of “supervisors” observing (there’s at least three standing behind the Bedford…..) 😜Andy
-
Ed Nash did a great video on piston engined fighters. More than anything (agree with him or not), there’s a lot of caution needed when looking at an airplane’s alleged top speed:
Andy
- Egilman, Old Collingwood, AJohnson and 6 others
-
9
-
Thanks everyone for the kind comments and likes!
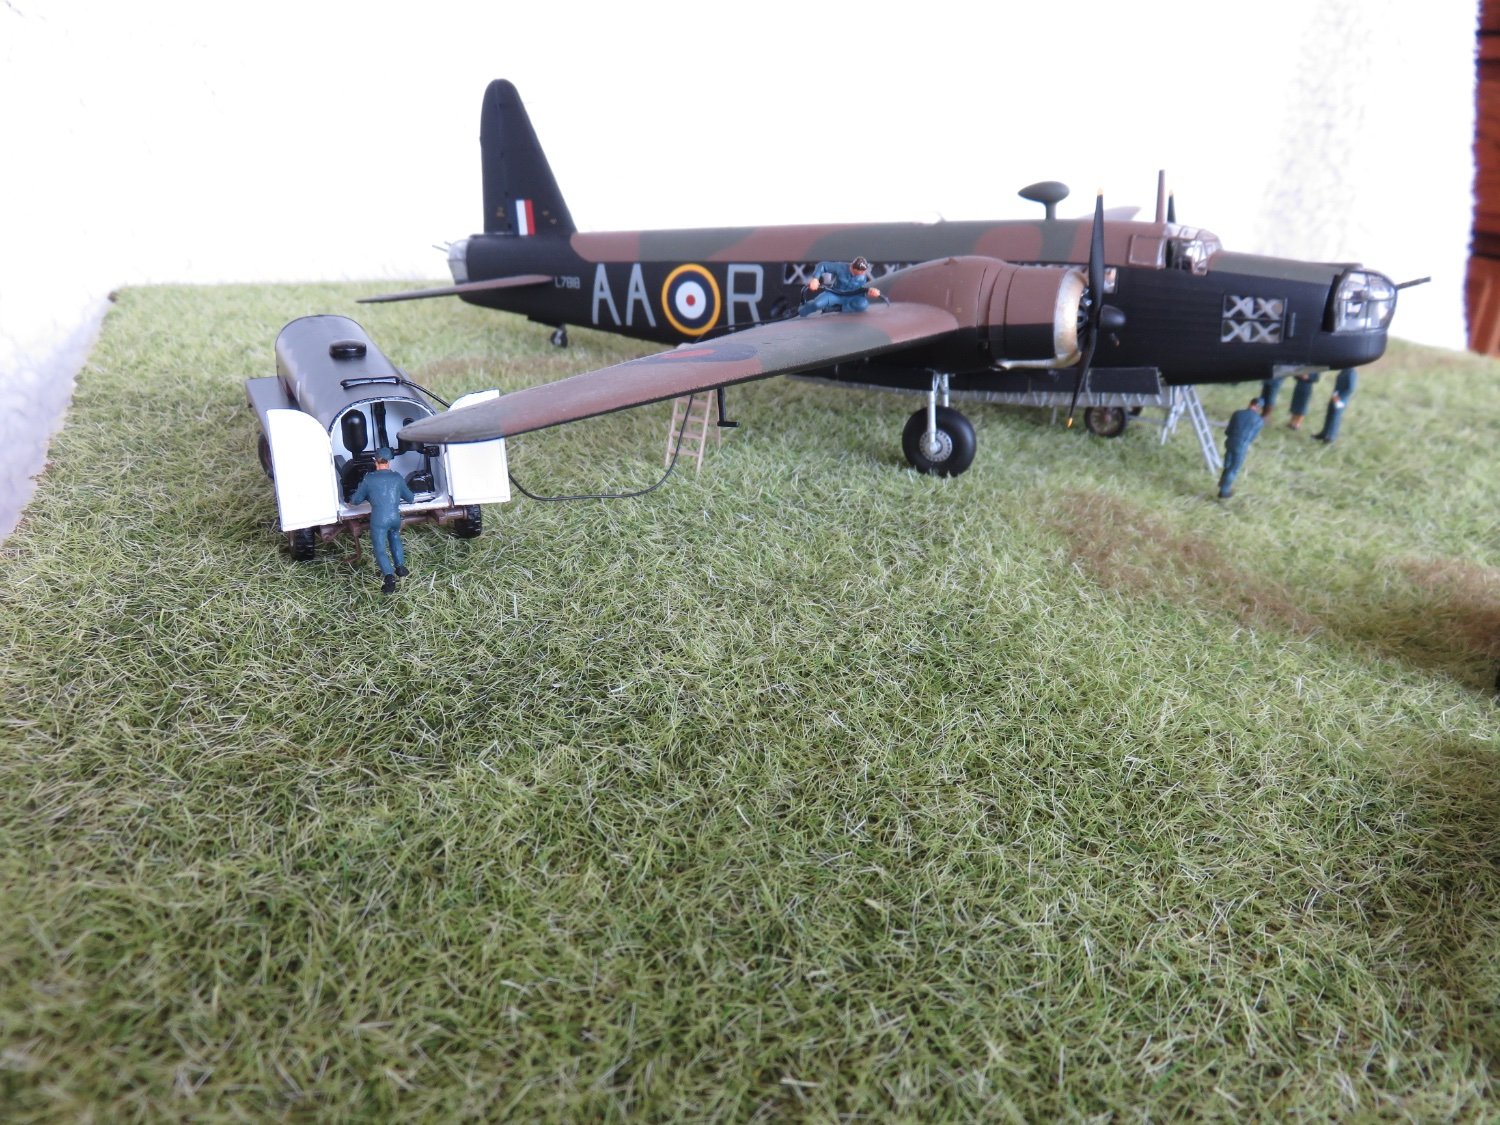
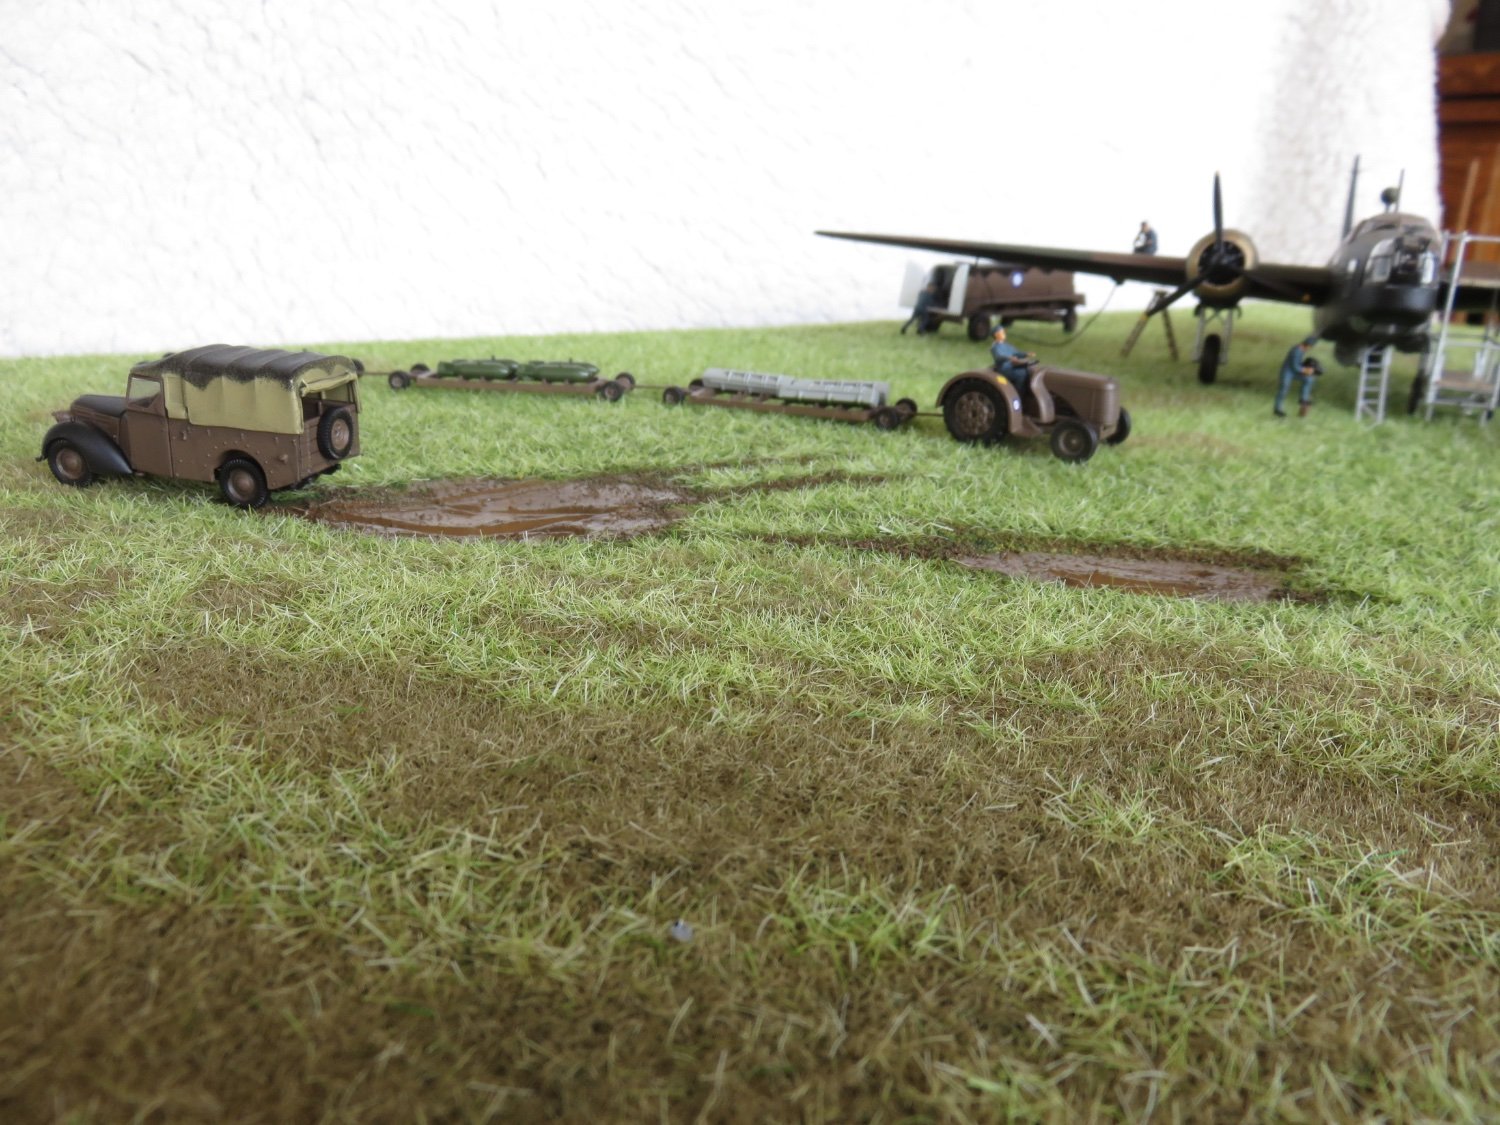
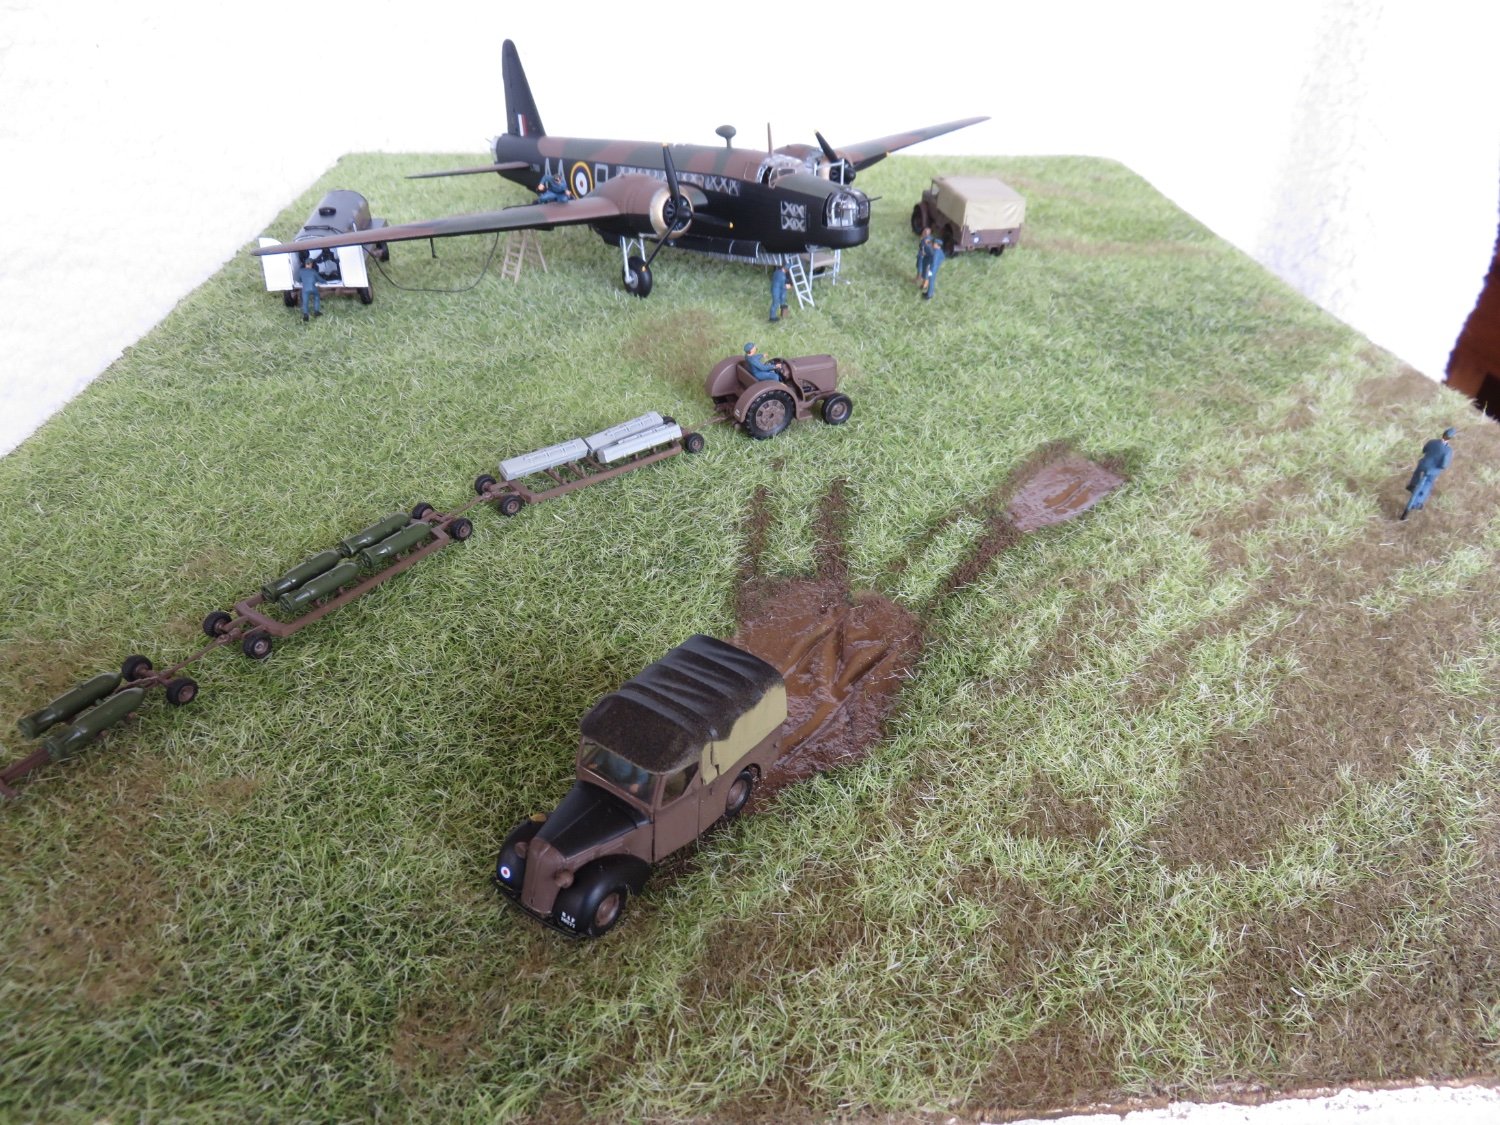
Well, I think my grassy field is finished. Overall very happy with the way things turned out.
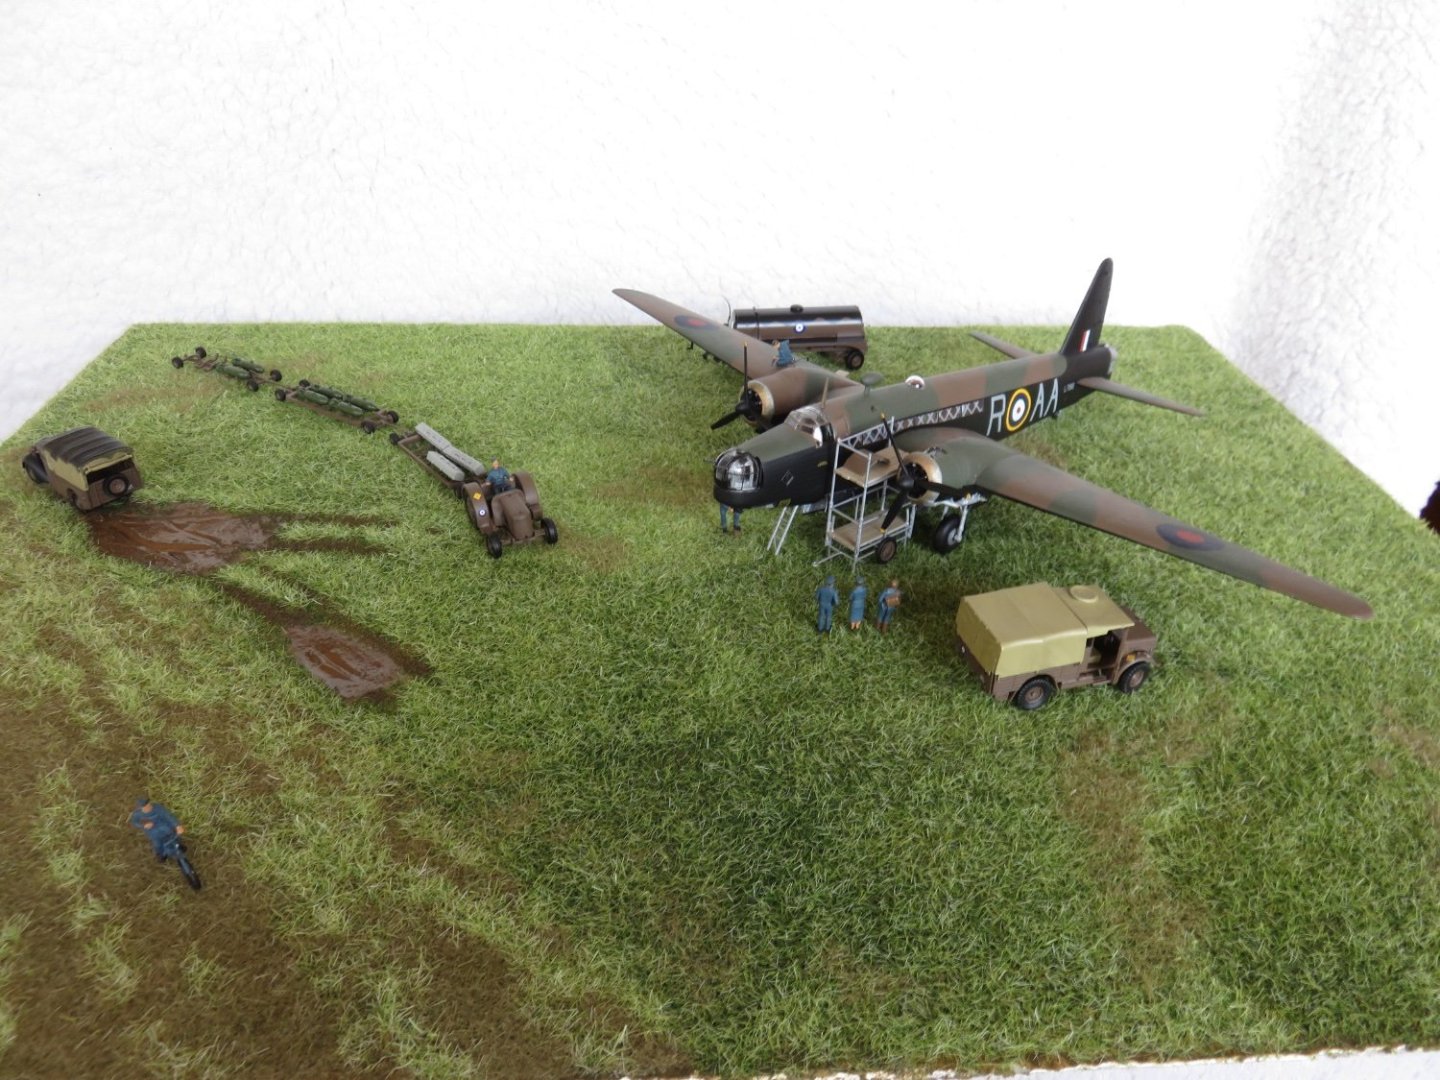
There's a nice variation in the colour of the green grass , and I've added some patches of burnt grass to add some further colour changes in select areas. In the "runway" area I added more green grass towards the edge, gradually lessening the amount as I worked towards the hypothetical centre.
All the characters have had their bases removed and a length of 0.012" stainless steel wire inserted, usually into one leg, and then into the scenery base, so they can free stand securely. I haven't added the mechanic yet, he will be glued to the trestle after I add a bit of weathering.
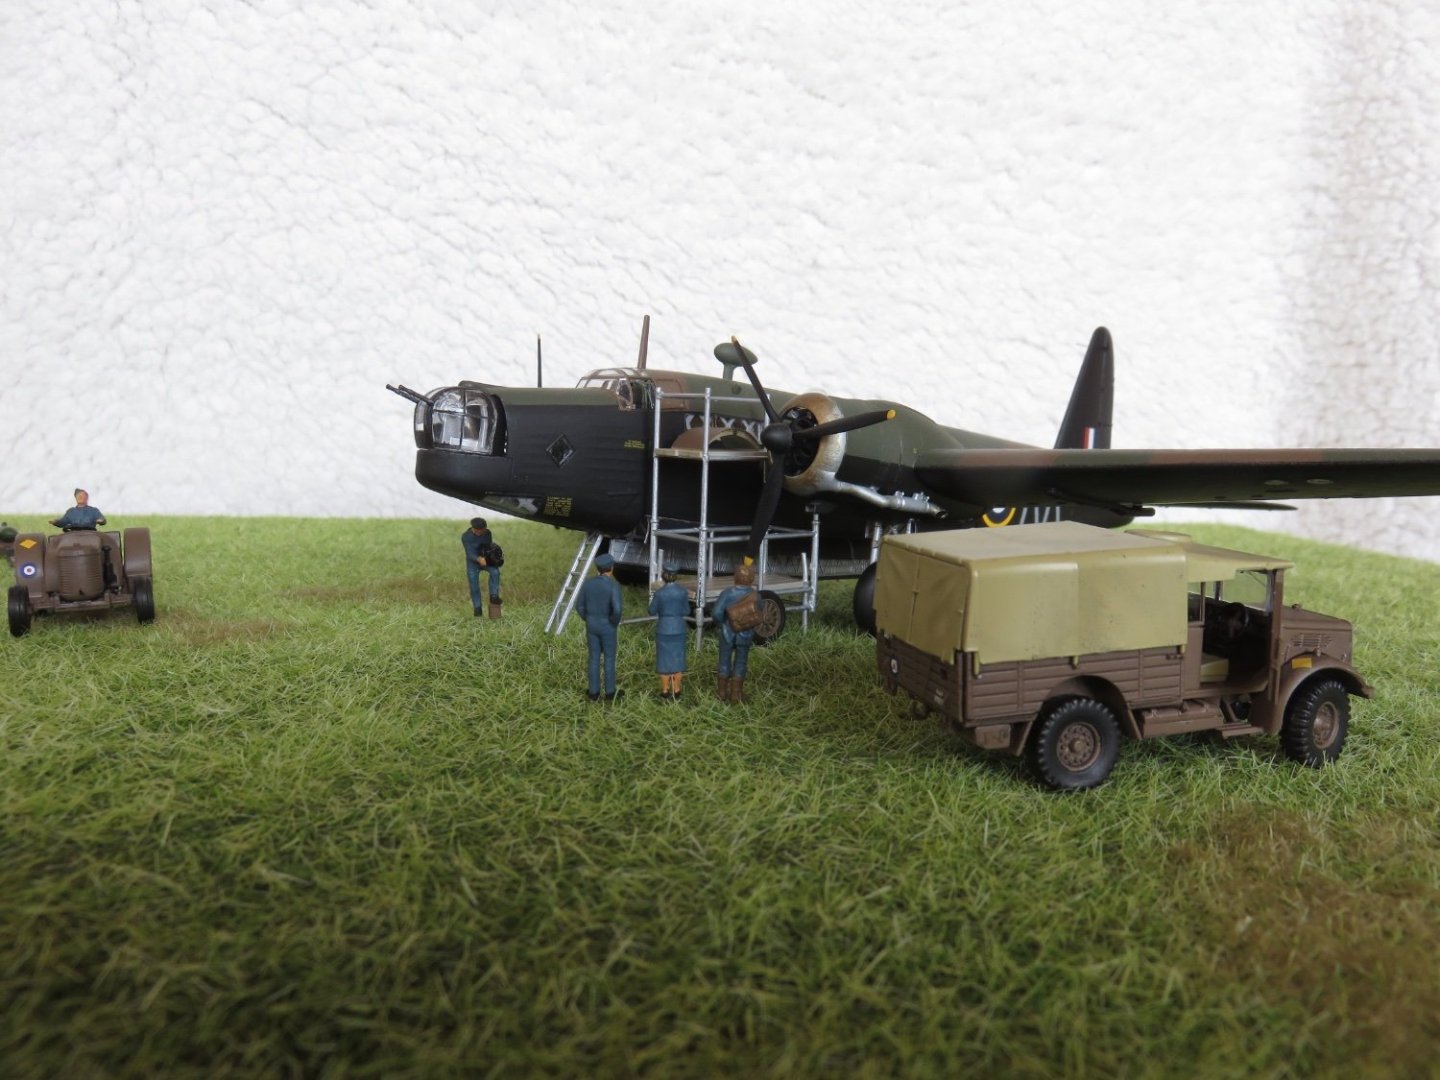
I connected the refueller to the bowser with a length of wire. I kept the black rubber sheathing on, and it looks like a proper hose. Its a close enough match to the short length of moulded hose he is holding.

I still need to add a few final details, touch up some paint work, and add a little weathering to the vehicles and other objects. But things are slowly coming together.

Adding some "mud" to the back of the Tilly is going to be interesting.....
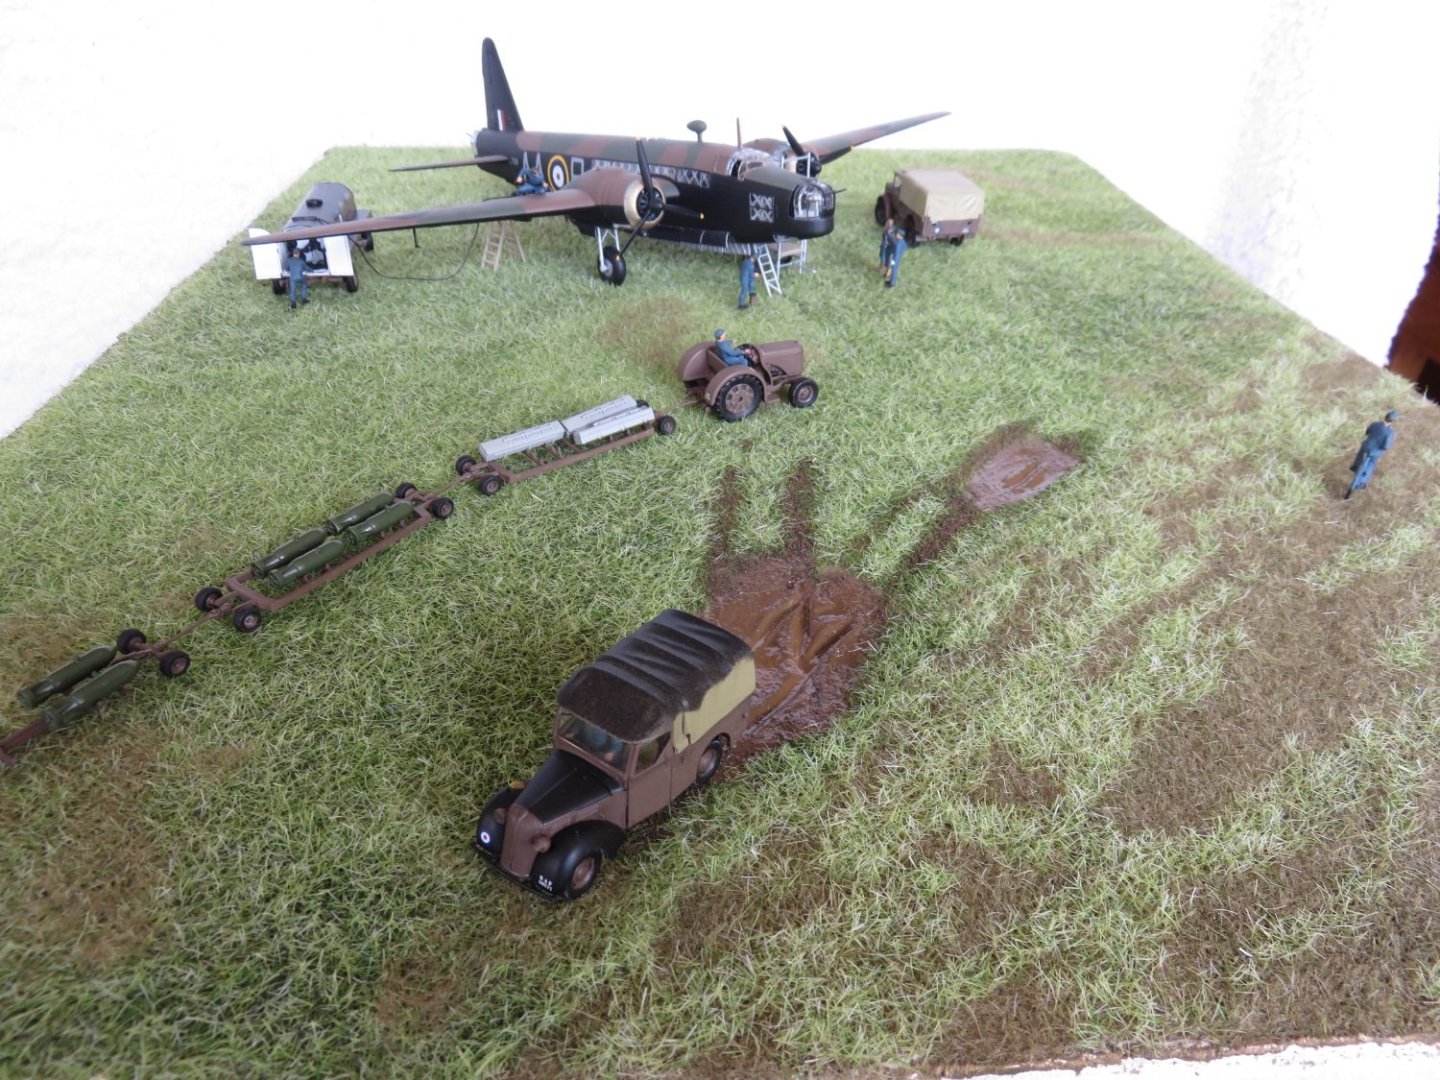
I will also have to figure something out so the bomb train sits down in the grass, rather than floats on top of it...
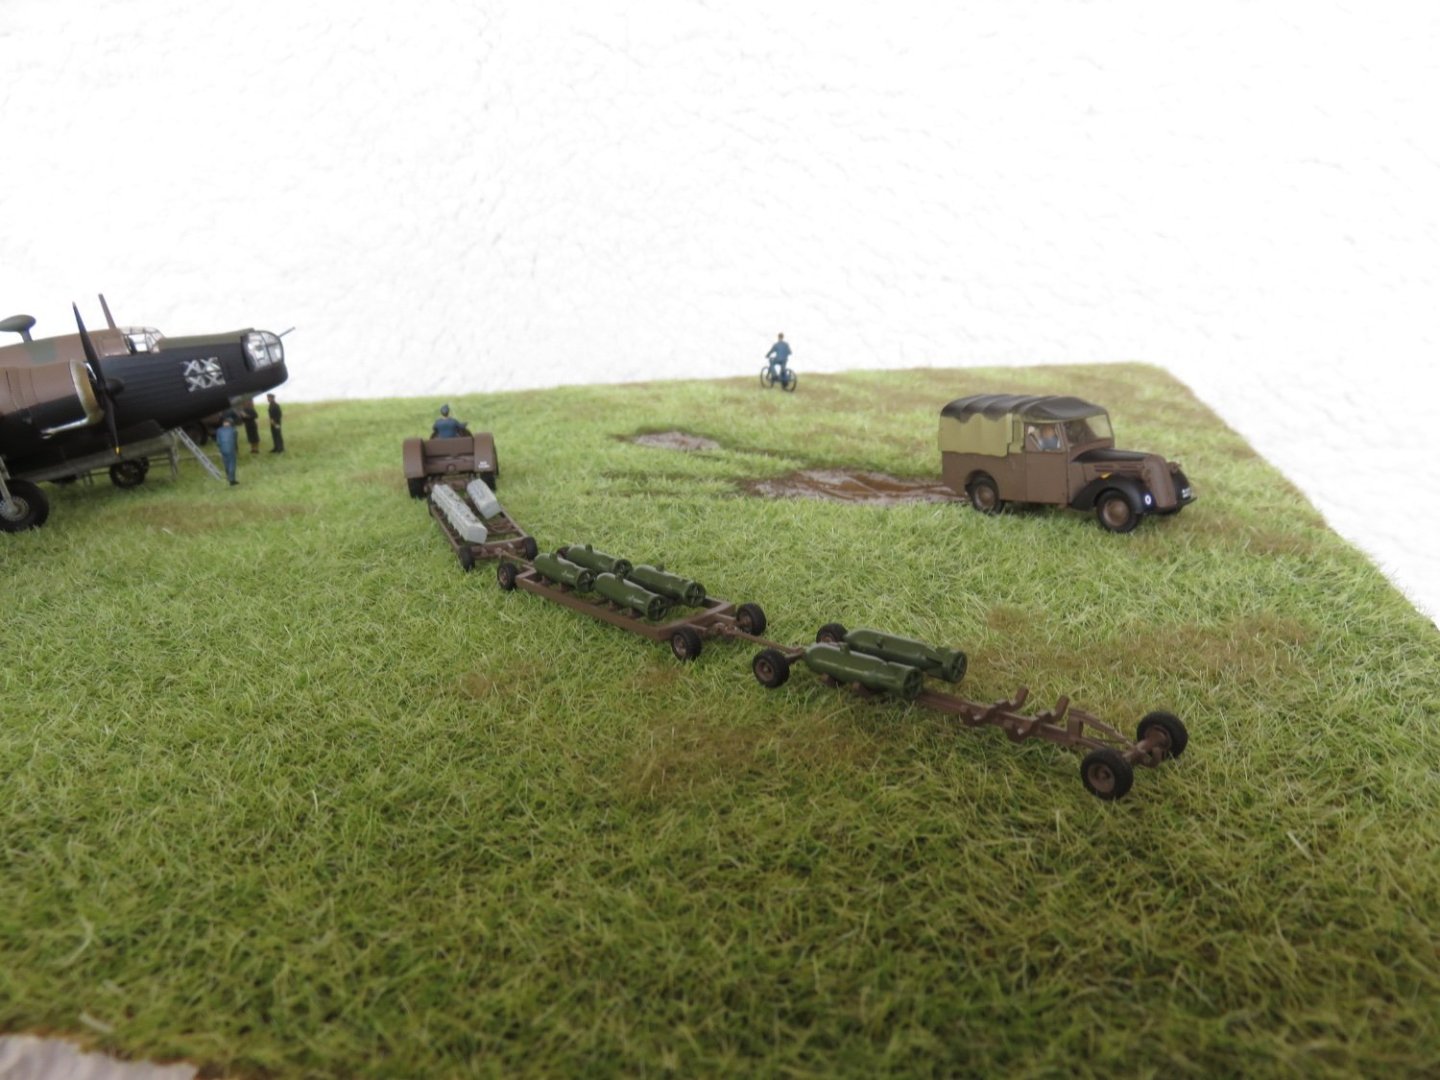
Even the other vehicles will need to be settled down a bit. It will probably require a little bit of delicate grass removal from directly under the wheels, we shall see what I can come up with.
Andy
-
I’m glad you haven’t thrown in the towel on this one yet!
Andy
- Scottish Guy, AJohnson, mtaylor and 5 others
-
8
-
Are there lots of photos in the threads you view?
I have an iPhone and while it does start at the “unread” line, as the photos load, the line gets pushed “down” until I’m somewhere in the middle of the page. Any thread I jump to without photos (or maybe one or two small ones) does start exactly at the “unread” line and stays there until I start scrolling. It’s likely a quirk inherent to Apple devices and systems, (how the web browser chooses to loads photos), and not something anyone here has control over.
I may be wrong, but that’s my observation.
Andy


Curtiss P-40K Kittyhawk Mk III by realworkingsailor - Special Hobby - 1/72
in Non-ship/categorised builds
Posted
Thanks Chris!
Interpreting the war diary has proven to be a much bigger project than I anticipated, but it’s really fascinating. Especially during combat, the entries are very abstract (dates, times and map coordinates), being able to “zoom out” and see the bigger picture, although sometimes complicated to piece together, has definitely provided much needed context.
My hope is, when it’s all completed, to get it printed and bound in a hardcover book to share with my entire extended family (well, I will have multiple copies printed so there’s no squabbling 🤪)
Andy