


Kevin-the-lubber
-
Posts
1,232 -
Joined
-
Last visited
Content Type
Profiles
Forums
Gallery
Events
Everything posted by Kevin-the-lubber
-
 I’ll second that. It also had me looking again at the museum model you posted; I too want a fairly busy looking deck by the end of the process but haven’t yet given much thought to how I’ll achieve this. I’m not too keen on making loads of figurines but they do give the model some life. About as far as I’ve got is to have some random coils of rope and other ‘stuff’ dotted around. What are your own plans? In that vein, I’ve wondered and wondered where the fourth, missing from the kit, ships boat would have gone. On the quarterdeck cabin roof perhaps?
- 481 replies
-
- 2
-

-
- Cutty Sark
- Revell
- (and 2 more)
-
I have more pairs of glasses than model kits and only this morning have been re-trying random pairs to see what works best this week. I’d almost give my right arm to not need glasses for close work, but as I actually need three arms, going down to just one would be a major setback. If Darwin was right, maybe we’ll eventually evolve a spare: one to hold the piece, one to hold the screw, one to take the drill from between the knees while not dropping the screw or piece. And if it could be an extra long size that’d be nice. Marc, I think where you are really making the difference is in your eye for the part, and then the finishing. Even I could probably rough out some of these parts in a 2D fashion, but seeing the compound angles and relationships is a special skill - I for one would probably have a workbench littered with discarded attempts, if I even had the patience. And then the finishing, because all of that careful smoothing is what brings it to life, makes it a miniature sculpture rather than a small block of hacked plastic, along with the paintwork. As I’ve said before, I could certainly make these parts using 3D modelling, but I’m not at all convinced I could give them any life with that as the process. It’s that engineering vs art conundrum and your work is very much in the latter camp.
- 2,699 replies
-
- 13
-
-

-

-
- heller
- soleil royal
- (and 9 more)
-
Leo, if there's one thing all of us modellers must have in common it's patience. We'd go mad otherwise 🙄. I'll feed back over on my log when it arrives. My own thinking was that until I've seen what's on the market I'd have nothing to compare with, but also, if good rope is not too expensive, I'd just be giving myself another distraction for no good reason.
- 481 replies
-
- 2
-
-
- Cutty Sark
- Revell
- (and 2 more)
-
I very much doubt you'll be disappointed. While there, note how cheap the amati rope set is for the Cutty. I don't yet know if it's any good, until it arrives in another few days but it seemed like a very good deal to me.
- 481 replies
-
- 1
-
-
- Cutty Sark
- Revell
- (and 2 more)
-
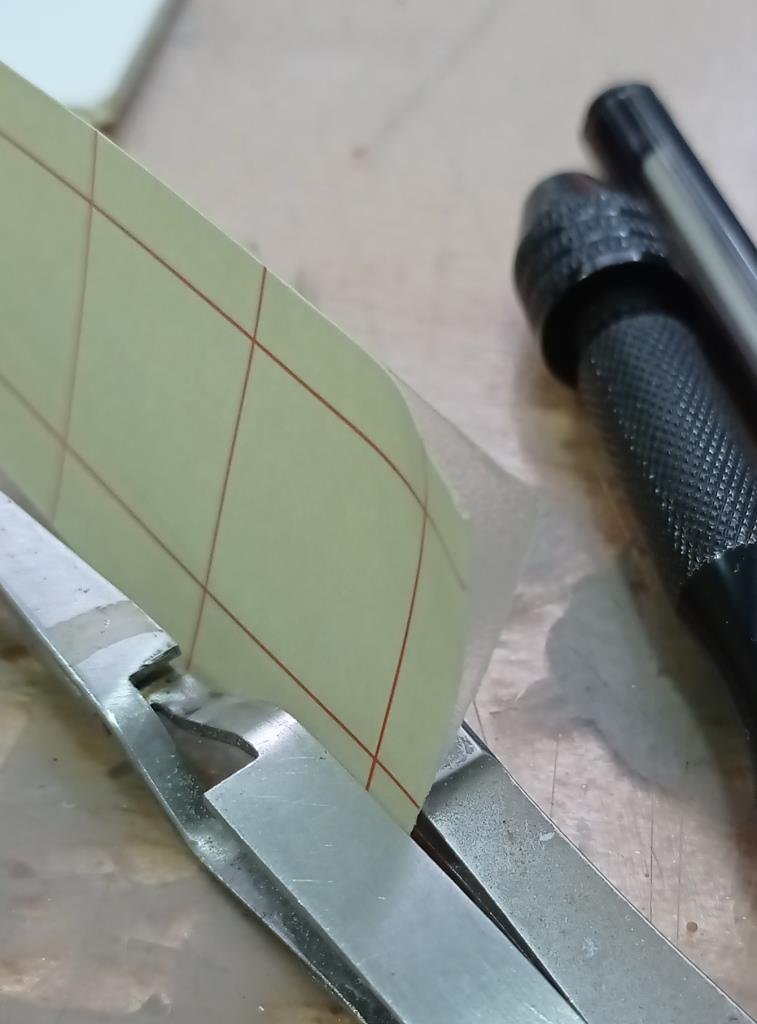
I thought he might but didn't like to presume. I like dealing with people like him, micro businesses, would much rather buy from these than keep lining Mr Bezos pockets. This is the transfer sheet. As you can see, the yellow backing peels off from the translucent film. This is tacky rather than sticky (as would be the case for scotch tape). I wouldn't mind betting that you can get a few placements done with it. I guess you could also use that tacky-but-not-sticky translucent tape you see in stationery stores but this looks better. It also appears easy to source more transfer tape or paper. I like the thinking behind this, I also have fat fingers and this process should make it a little easier to get the placing just right. But I'll practice on scrap stuff with CA gel first as I'm sure you need to get the smallest dots to avoid it squeezing out. I expect too that you can use this transfer sheet to hold the ornament in place while the glue sets i.e. the glue can have a longer setting time, which is good. I use medium setting as my default but still have to be quick about it.
- 481 replies
-
- 2
-
-
- Cutty Sark
- Revell
- (and 2 more)
-
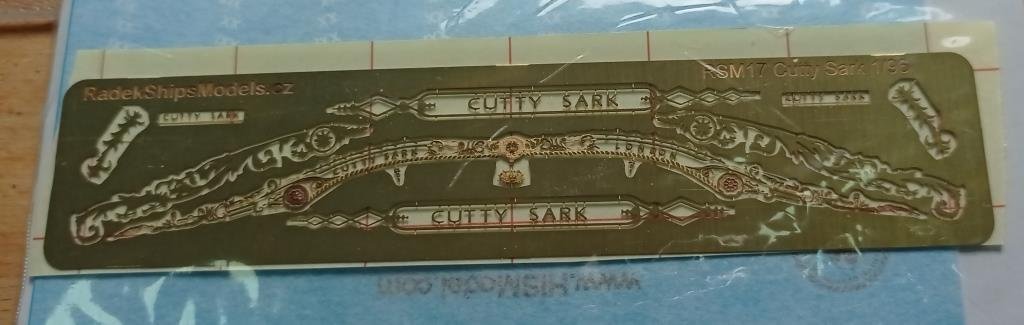
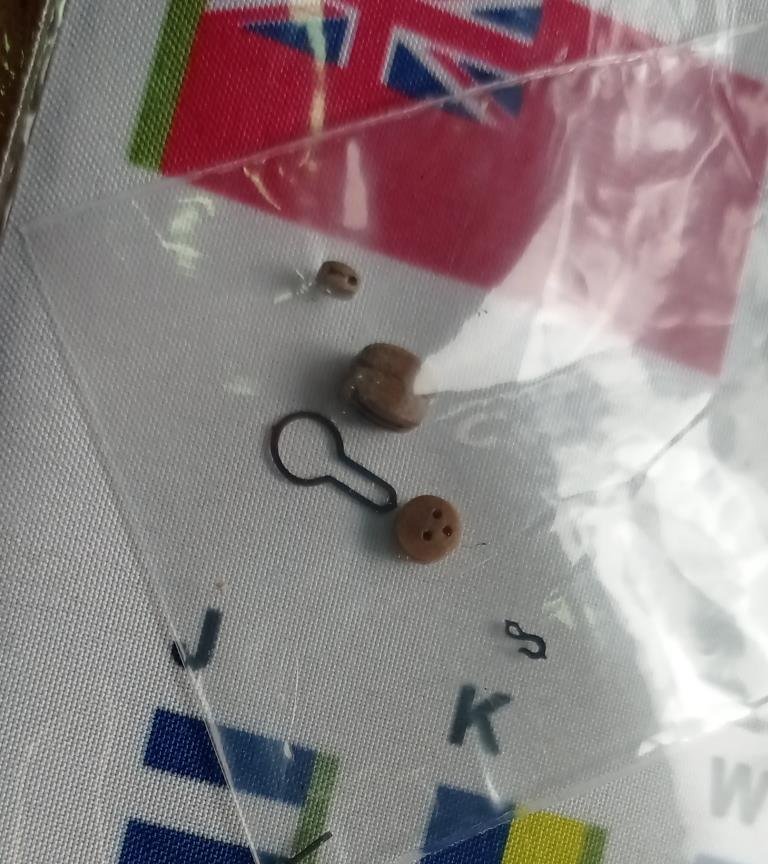
This is what I got. I imagine the yellow sheet is the transfer sheet. Also a pic of the samples, the sail hooks (or whatever they are called) are especially nice . I'm so glad you posted those instructions, in all honesty it hadn't occurred to me to look on the site nor to paint the supports black etc before glueing.
- 481 replies
-
- 2
-
-
- Cutty Sark
- Revell
- (and 2 more)
-
3d printing process
Kevin-the-lubber replied to henrythestaffy's topic in 3D-Printing and Laser-Cutting.
Also take a look in your local garden centre, watering trays come in all sorts of sizes. I find the thermal covers quite good for the smell as well, though in my case I use them more to keep the temperature up and the dust out. -
Commiserations. I'm not at that stage yet but can see it being tricky. If you contact heller in germany they will probably send you a new sheet of decals, at least they did for me. It took maybe 6 weeks and in between times, as I didn't hear back, I bought the hismodel PE. I don't remember exactly how I contacted them, it was probably through finding a support/spares link on their website. But I'm also sure hismodel will give you some advice, he appears to be an enthusiast.
- 481 replies
-
- 2
-
-
- Cutty Sark
- Revell
- (and 2 more)
-
That looks good, do you mean the type where you mix the two tubes e.g. araldite?
- 481 replies
-
- 1
-
-
- Cutty Sark
- Revell
- (and 2 more)
-
I'll give them a go presently. White is my bugbear - always seems to require too many coats. The pens I'm using aren't sharpies or ordinary felt tips, they are Posca acrylic paint pens. Whether there's any real difference (other than price - they are of course pricey) I don't know.
- 444 replies
-
- 4
-
-
- Cutty Sark
- Revell
- (and 2 more)
-
Well Ian, if you ever get tempted you know where to come for a pair of cat's heads. I should have mentioned, as the STL is freely shared by the museum I'd assume there's no issue with me sharing my re-working of it, so anyone who wants it, just send me a PM.
- 444 replies
-
- 2
-
-
- Cutty Sark
- Revell
- (and 2 more)
-
To you bcochran - earlier in the log you mentioned you were using decals for the lozenges and, I think, white side stripes. DIY decals are another thing I mean to try out sooner or later and was just wondering if you made yours yourself and, if so, what products did you use? I also have the hismodel etch so am listening closely to this conversation. It's such a critical piece and I'd hate to make a mess of glueing it on. I've wondered about spray mounting adhesive, like 3M SprayMount Permanent Spray Adhesive. I've not had much luck with the 'glue the centre, then work along' method. I tried that with my deck but found it difficult to get tiny amounts of CA behind the object without some getting on the edge. Might be easier with the PE, but I'd also be concerned about it ending up with small ripples through being bent back. I'll probably experiment with the blank first.
- 481 replies
-
- 2
-
-
- Cutty Sark
- Revell
- (and 2 more)
-
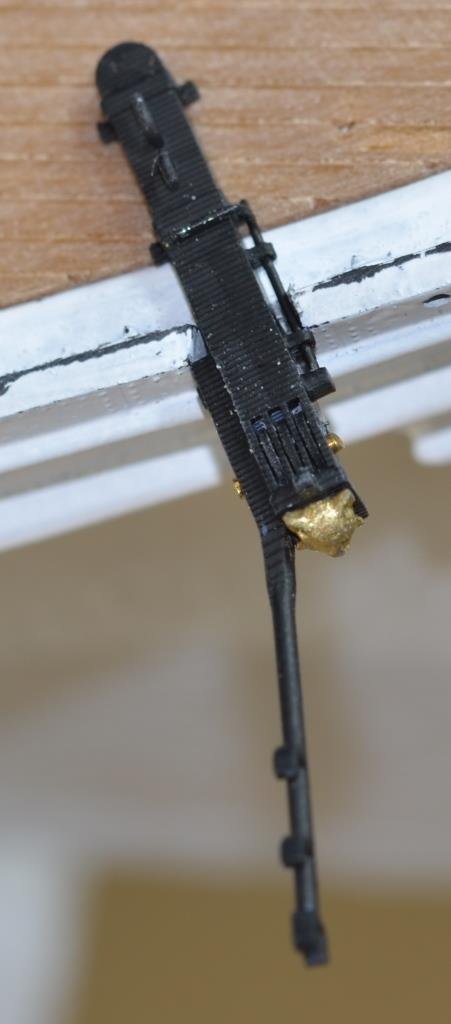
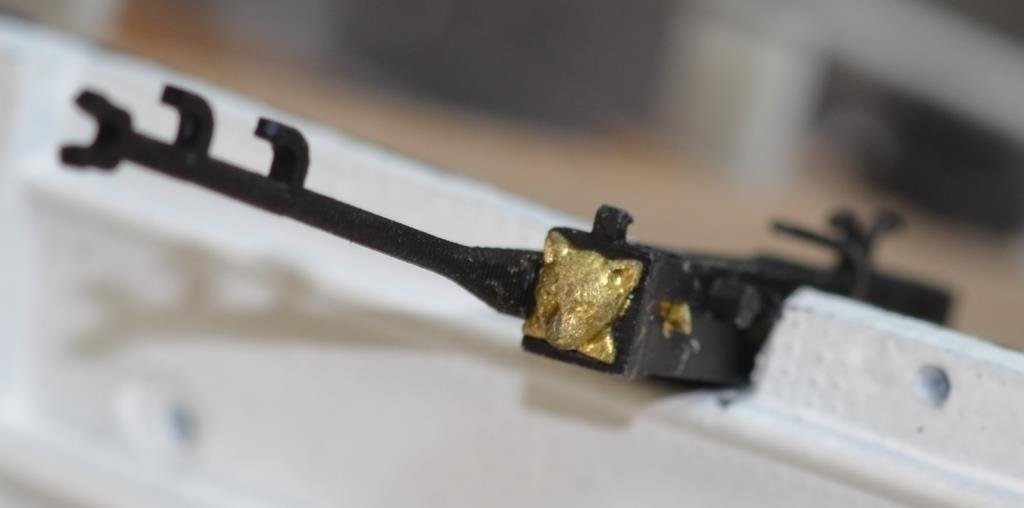
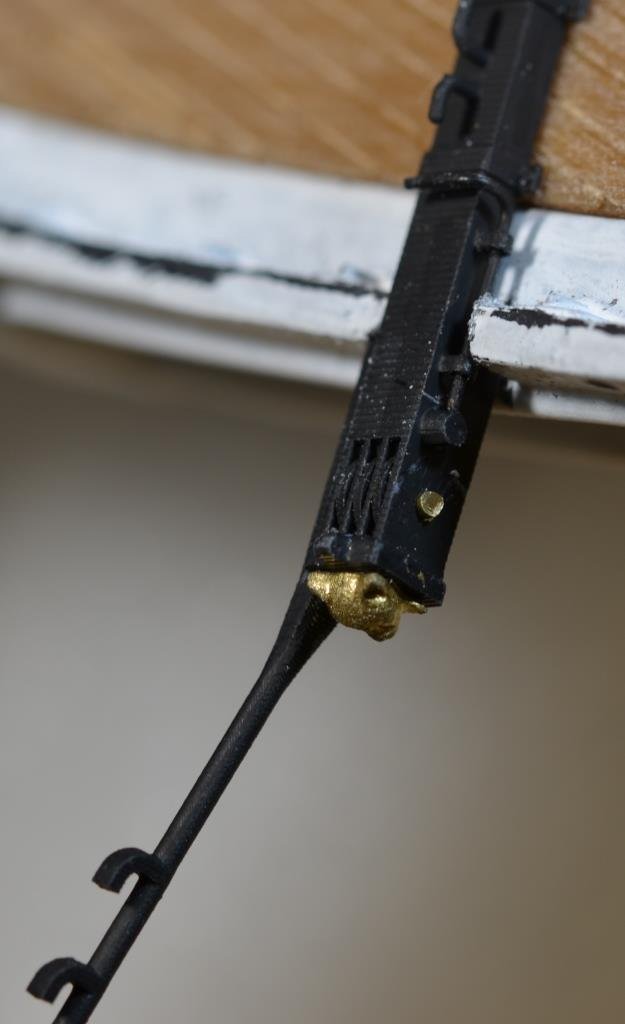
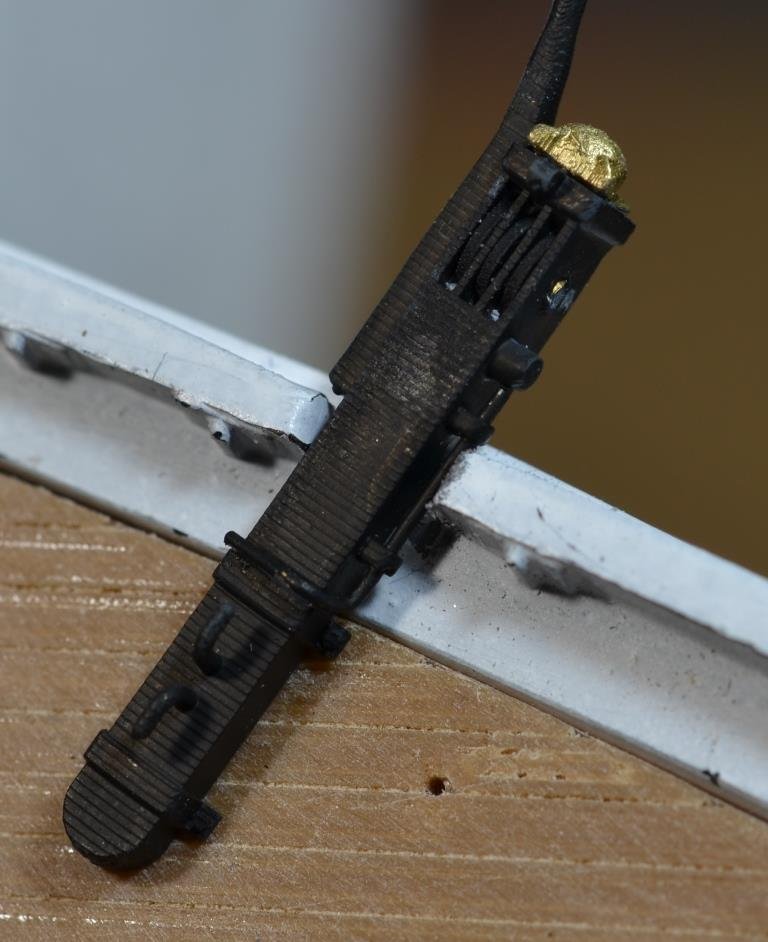
I managed to get a few hours for modelling today. I think we have too many beds and borders in our garden for my age now, they seem to eat up every available hour and the weeds regenerate as soon as my back is turned. Anyway, today has been more foredeck work, particularly the catheads, along with a little experimentation on the lines of using acrylic paint pens rather than airbrushing. I like that no detail gets lost and, even though these photos make it seem otherwise, the gold comes out a lot smoother than normal painting. I'm a little undecided about the black, it does seem to take on that bronze-ish, metallic hue that you get with ink. Regarding the pictures, photography is a cruel mistress and the lines you see on the parts are not actually readily visible in real life. They are layer lines, an artifact of resin printing. I could probably reduce them or just lightly brush with emery. I've left the brass 'sheave bolt' in it's natural colour for now, as I kind of like it. Might blacken it in due course. These catheads may not be the final objects as this particular resin is a bit too soft and the whiskers are quite bendy. Even as I write the alternatives have just finished printing so I'll compare presently. I only went so far with the anchor release, there's micro detail and barking mad detail. I did tinker a little with the cat's head file downloaded from the museum, just plugged the bolt holes and accentuated the eyes, mouth and nose. Though at only 3mm square you'll need the eyes of a hawk to see that.

- 444 replies
-
- 6
-
-

-
- Cutty Sark
- Revell
- (and 2 more)
-
Microscale - which reminds me - did you make the decals yourself?
- 481 replies
-
- 1
-
-
- Cutty Sark
- Revell
- (and 2 more)
-
I'm planning on doing the Kearsage after this, in between resuming work on the Victory. But I'll be content to complete the CS this year, if that's not too ambitious.
- 481 replies
-
- 1
-
-
- Cutty Sark
- Revell
- (and 2 more)
-
I like that (the wheelhouse). I got hold of a copy of Longridge and have been doing some reading up this weekend, usual case for me, make it, then read how I got it wrong. You're quite right about the colour scheme and I have a feeling the white on the cabins may give more shape and texture to the model. But I don't think I could face painting over my faux teak. Reading Longridge also explains a few oddities with the kit, such as the forward hatch being in the line of the chains, and there being one too many fife rails at the foremast. I'd make a mess of plugging the holes now so will probably leave it as is. I've been in need of something like pledge; I can make very precise translucent windows etc, but would like a method to make them transparent, so I'll add this to the memory bank.
- 481 replies
-
- 1
-
-
- Cutty Sark
- Revell
- (and 2 more)
-
That’s a lot more than quite reasonable Alan, I’d be extremely pleased with that. Same for the life raft.
- 460 replies
-
- 2
-
-
- Finished
- Flower-class
- (and 1 more)
-
Thanks, as I said over on yours, there's an awful lot of trial and error underneath the parts and if you have the luxury (and patience) of being able to easily remake and remake, sooner or later you're bound to come up with something reasonable. I'm hoping that over time I'll build up a bank of knowledge that will allow me to eventually get things right first time. Cross-referencing with yours, I bought 0.3mm jewellery making wire on ebay, there were lots of sizes and metal colours and it's quite cheap, I just went for gold and will either blacken or whiten. Shipman, although I half-dread it, I'm looking forward to getting to the rigging. Half of the reason I'm so tentative about glue-ing things in place is because I can't yet visualise how the many ropes lie, so don't have a workflow plan. That's uncomfortable territory for an engineering type like me, I'm used to being able to see the whole in my mind and follow my own logical sequence and imagine that the hull and furniture were to a large extent designed around the rigging rather than vice versa. For instance I'll be placing the deadeyes in the pinrails according to Campbell rather than Revell. Will the difference in positioning matter? At this point I have no idea.
- 444 replies
-
- 3
-
-
- Cutty Sark
- Revell
- (and 2 more)
-
I think I may do the same, I have some very thin wire which might work for this. Are the belay pins too long, short or just plain out of proportion, which is the impression I get from photos? I've made a load but haven't attached them to anything yet.
- 481 replies
-
- 1
-
-
- Cutty Sark
- Revell
- (and 2 more)
-
I saw the discussion about the belay pins but not what was wrong with them?
- 481 replies
-
- 1
-
-
- Cutty Sark
- Revell
- (and 2 more)
-
I completely get that; I think for me, given that this is my first attempt to build a model properly (I'm not counting the parked Victory) and I simply don't yet know enough about the whole process, or sailing ships, it'll be enough to be able to look at it afterwards and feel it was a decent effort. Even at this stage there are things I'd do differently next time - my deck colour is one of them - it was intentional and I like it well enough, but doubt I'll go in this direction again, in part because I've learned a little about model painting along the way. 3D printing is just a tool, it allows me to learn from my mistakes and learn about the parts. Behind those finished items are a heck of a lot of binned versions and if I was building this straight out of the box I'd either have given up by now or been too embarrassed to maintain a build log. However, the 3D process itself can get quite boring and time-consuming as half the battle is finding ways to print what you design. I'm also going to do the deadeyes and rigging from scratch as I don't like the kit parts at all. I wasn't going to do the stanchions to the pinrail, was going to more or less replicate the gussets as I'm fearful that the rails might not be strong enough for the rigging, but I might rethink that as it definitely looks better having stanchions. I'm amazed that you got such a fine, thin coat of gold from a rattle can. After seeing yours it occurred to me to try a gold paint pen and wish I'd used that.
- 481 replies
-
- 2
-
-
- Cutty Sark
- Revell
- (and 2 more)
-
Hi Hans, thanks for the compliment but, as you rightly observe, that took me forever and, for the time being anyway, killed my interest in working on the Victory. Don't get me wrong, I'm not at all evangelistic about F360 and will change horses in a heartbeat when I'm ready to take on another learning curve, not least because I really dislike the trend towards subscriptions, aka 'renting'.
-
Thanks again Shipman, I bookmarked probably every existing revell 1/96 build back when I started (including of course Bruma's) but it never occurred to me to check for new starters. My philosophy is 'I dont really know what I'm doing so I'll just do whatever seems right on the day' 🙄. And that really is the honest truth. I'm not a very methodical researcher, I just don't enjoy that side very much, probably because my day job involves reading and writing endless, dry papers. So I just steal nuggets from those of you that do, or if something catches my eye I'll follow through! In other words, I'm a bit of a magpie. Even this too high deck business - I'm less concerned with it being historically inaccurate as that it means I can't install an 'in yer face' windlass! Anyway, glad your enjoying both logs, slightly bogged down here right now as I have too many competing things going on and haven't got solutions for the foredeck area clear enough in my head yet, but still managing to maintain a bit of forward progress.
- 444 replies
-
- 5
-
-
-
- Cutty Sark
- Revell
- (and 2 more)
-
Thanks for the linking, Shipman! Hello bcochran, you are ripping along with yours at an impressive pace, especially given all the fine modifications you're including. I'm a veritable snail by comparison. I've picked up several good ideas from yours - decals for the lozenges etc, what a smart idea. I'm replacing the whole of the pinrail with a 3D printed version in which I'd included the lozenges, but it still needs a bit of work on those so if that doesn't work out too well I now have a plan B. I also chopped out the wedges/gussets even though there are a few on the real thing; though I'm not sure if these are original as they look very crudely made. Can I ask what you used to colour the binnacle? Yours is a much better finish than mine, on which I used vallejo gold paint. I couldn't bring myself to spend £80 on a wood deck when the kit itself only cost me £40, so re-made it. I realised today that the kit has it set about 4mm - 5mm too high. I'm re-making quite a lot of parts while trying to avoid over-obsessing, as you rightly say, all the fun can go out of it if you spend too long on detail. I'm also absolutely fearful of rigging, having never done this, and I'm avoiding glueing stuff down for as long as possible until I can see what would be better left until later. I'm just finishing up on the catheads as we speak, and those may well be in the 'later' category. Incidentally, if you have access to resin printing take a look at my latest page, in case you're interested in adding an easy micro-detail (the cat's head).
- 481 replies
-
- 3
-
-
- Cutty Sark
- Revell
- (and 2 more)
-
I've been trying to get the windlass to look right compared to the real thing, and finally realised why I'm chasing my tail on this one: shock, horror, the main deck on the Revell is sat about 4 or 5 mm too high. This bears out when compared to both the real ship and Campbell plans and a number of oddities now make more sense. When I was roughing out the pinrails I seemed to have very little height to play with for the oval recesses in the woodwork above the rail (still work in progress); I couldn't get the proportions of the chicken coops to map to the real thing, and the bad news for the crew is that it's budgie for dinner on this particular ship, don't eat it all at once; and I can't give the windlass the girth it should have, so a bit more elbow please, all round. This also explains why the cabins etc have seemed to sit a bit high. Oh well, I'm too far along the way to do anything about this now, though as I remade the deck I wish I'd spotted this earlier.
- 444 replies
-
- 3
-
-
- Cutty Sark
- Revell
- (and 2 more)