


Kevin-the-lubber
-
Posts
1,232 -
Joined
-
Last visited
Content Type
Profiles
Forums
Gallery
Events
Everything posted by Kevin-the-lubber
-
 Resin upgrading is cheap as chips. But if I was doing this to sell and make some profit, I'd need to factor in the development time, running costs and low volumes. That's what pushes the price up; and up further still once you sell through a third party as they also need a cut. It's like everything - you makes your choice and pays your money. I think within 5 or 10 years you'll have the option to buy complete, incredibly accurate, detailed resin kits but they'll probably be expensive because each one will be being printed individually. We're already seeing kits where you get the files and print them yourself, but I think that may be trickier once people start sharing the files.
- 444 replies
-
- 1
-

-
- Cutty Sark
- Revell
- (and 2 more)
-
The strange thing about these kits - because it’s equally true of just about all of them that I’ve read up on - is that a lot of work would have gone into the design and the ‘errors’ must have been conscious choices to stray from the plans. I understand why you’d do that around fine points of detail that might be difficult to mould, or where you want to recycle parts like the boats, but not those like the deck height. I did and maybe still do have thoughts of selling the Victory stern as an aftermarket kit, but haven’t even thought about this for any of the Cutty stuff, mostly because I haven’t done anything yet that solves a major problem. It’s all just making it a little more detailed etc. However, a friend has offered me use of his laser machine and very large filament printer, which I’ll make use of when I do the Kearsage, and if that goes well I might revisit the Cutty.
- 444 replies
-
- 2
-
-
- Cutty Sark
- Revell
- (and 2 more)
-
I think GranpaPhil might have been referring to styrene sheet e.g evergreen. I don’t know how easy it is to mill, given the relatively low melting point. If I had your machine I’d have been tempted to get a sheet of 3mm aluminium. The hull wrapping is an interesting technique. There’s a lady on here, Doris, that builds the most extraordinary card (paper) models, I must have a look at her technique one day. Card modelling seems popular in Eastern Europe, at least I often see card plans from there on eBay, but that looks like a level of skill that I don’t even aspire to.
- 454 replies
-
- 1
-
-
- Union Steamship Company
- Stepcraft 840
- (and 3 more)
-
I don’t think yours will look plastic in the ‘plasticky’ sense, it’s already had too much tlc for that. And I bet that, over the years to come, many a person will assume it’s something other than a kit. I’ll probably be happy with standing rigging if needs be. I barely understand where any of the ropes connect to at this point so the whole thing will be a learning curve. My trouble is that I’m reluctant to settle for a kit part if it looks relatively easy to make a better version, one thing leads to another and I end up where I’m at, remaking almost everything. ps. The boats in the kit are also out of scale compared to Campbell. They should be about 15% bigger. I’m just playing around with remaking one at the moment, to understand how to do a hull in F360, and noticed that when I brought the plans into the software.
- 444 replies
-
- 1
-
-
- Cutty Sark
- Revell
- (and 2 more)
-
The fife rails tip is one thing that really lodged in my head. Is CA gel the same as CA thick? Or even thicker?
- 481 replies
-
- 1
-
-
- Cutty Sark
- Revell
- (and 2 more)
-
Thanks, and sorry, I didn't mean to give you heart failure 😁. That settles it, Campbell it is then.
- 399 replies
-
- 2
-
-
- cutty sark
- revell
- (and 2 more)
-
The glue tip is going to be useful for me. Although I tried to make the new deck as close as possible there will still be some slight gaps here and there. You said it’s white glue, does it dry grey or did you paint it? Note to self: if I ever use my spare kit I’ll replace the entire waterway; this issue could be easily avoided by having the deck sitting on top of, rather than butting up to, the waterway, and be more true to the ship into the bargain.
- 481 replies
-
- 2
-
-
- Cutty Sark
- Revell
- (and 2 more)
-
I got a few myself several years ago when I discovered our sterile services dept was throwing them away if they had the slightest damage. I wish now I'd been greedy and taken the whole crate.
- 3,560 replies
-
- 1
-
-
- clipper
- hull model
- (and 2 more)
-
Looking good. Music wire is a good idea - it occurs to me that the thinner wound guitar strings might pass for served cables if blackened.
- 481 replies
-
- 2
-
-
- Cutty Sark
- Revell
- (and 2 more)
-
Marc, I can’t take too much credit, the software has a handy gear generator and the rest is just simple engineering. It was a nice little side project as I’ve paused for a moment while I build a heated enclosure for the resin printers. I’m getting too many fails right now, which I think may be down to the garage always being a bit cold. This is a very simple machine to make and I’ll happily share the (scrappy) F360 / STL files with anyone that wants them.
- 444 replies
-
- 2
-
-
- Cutty Sark
- Revell
- (and 2 more)
-
I’ve never done any casting, it’s another method that I must try sooner or later. PE still knocks spots off resin in terms of super thin parts, but I didn’t see anything in the Titanic resin add-ons that isn’t do-able on our home printers. However, as we’d all testify, there can be a lot of pain between do-able and done. For sure there are industrial grade resin printers out there like the big Formlabs, at a cost of £15k - £20k, but I suspect the difference is probably as much about the choice of resin and design work as the printer itself. However I can’t bring myself to spend £100 per litre and then some. I’d love to see a professional resin kit like those parts up close, see how they orientate and support. My impression is that their supports are beefier. You’re right that printing can be pretty slow. Even if I had all the parts done perfectly for the Cutty sark I expect it would take two or three weeks just to print them.
- 454 replies
-
- 2
-
-
- Union Steamship Company
- Stepcraft 840
- (and 3 more)
-
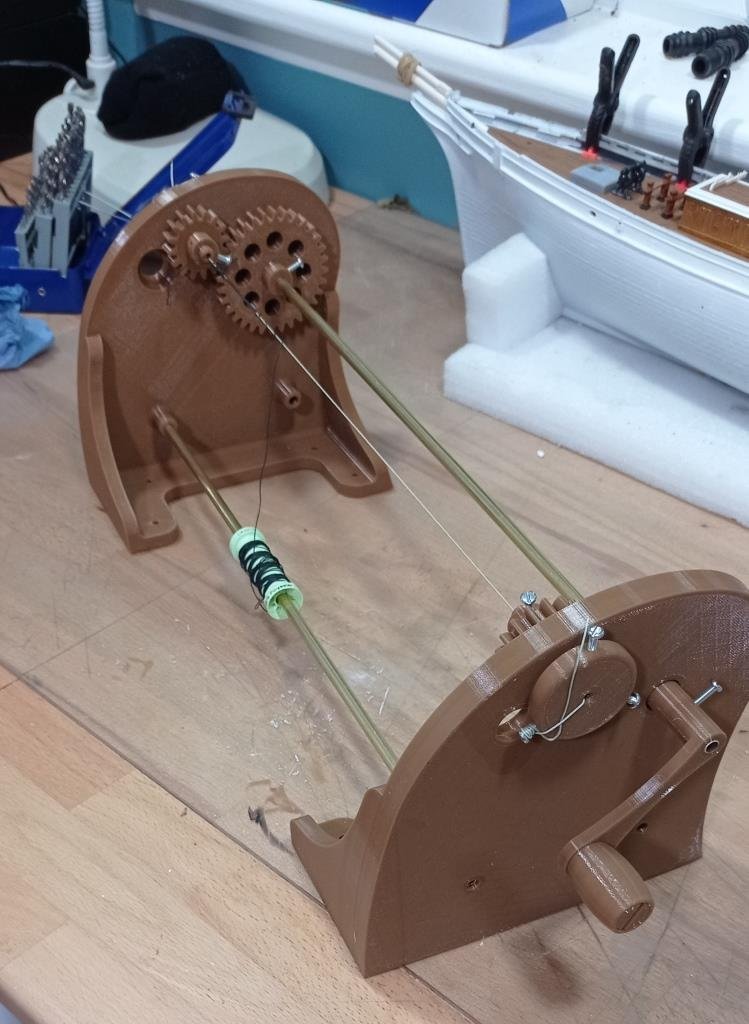
Made myself a serving machine 🙄. I hedged my bets, gave myself the option of 1:1 gears and 1:2. The latter works fine. The gears are a bit noisy, even though it has bearings I found in a drawer, but serving is quite a relaxing thing to do, isn't it. I'll sort out those long set screws once I've found a bit of wood for the base.
- 444 replies
-
- 9
-
-

-
- Cutty Sark
- Revell
- (and 2 more)
-
3d printing process
Kevin-the-lubber replied to henrythestaffy's topic in 3D-Printing and Laser-Cutting.
That makes sense, doesn't it. I did wonder how the the writer drew those conclusions but decided he knew a lot more about it than me. Re' enclosures: I've decided it's about time I got a stable temperature sorted out, after thinking on your earlier advice. My larger resin printer is on a worktop in the (usually quite cold) garage and I've been noticing more fails compared to the small one, which is in my warm office. So I've just bought a large kitchen base unit i.e. a big mdf box with doors, and a small thermostatically controlled greenhouse tube heater. That should do the job. -
To be honest, if I had your CNC machine I'd probably be using that instead of printing a lot of the time, I at least always know where I stand when working with wood or metal. However, printing has it's place. Only being able to print one at a time: I'd check my FEP tension, you can do this with various apps that measure the wavelength or something, but I just look for it to have a tinny pitch when I tap it with something. But be careful, it dents easily and if you get any pinholes it's a right PITA. Regarding curling etc, you can just heat the part in a cup of hot water and bring it back into shape, handy if, like these window frames, they're going to be glued to something substantial. I noticed on the spec for that CNC machine that it had the option for a filament printer head, have you done any of that? The scope, scale-wise, is huge, way bigger than the desktop printers. Some people pooh-pooh filament as not able to give anything like an acceptable finish for scale modelling and unable to do micro detail, but in my view that's exaggerated. I'd expect to just about get away with those window frames. While writing, would you mind me sharing your library of Cutty Sark photos with another guy who's looking for detail pics? I wouldn't want to do so unless you were okay with it.
- 454 replies
-
- 2
-
-
- Union Steamship Company
- Stepcraft 840
- (and 3 more)
-
Are all the settings identical? That looks like something is slightly different in Lychee. I use both lychee and chitubox, generally prefer the latter as I hate having to wait for the ads to finish in lychee, but I do like being able to mirror supports. One thing I have learned with resin is that changing the exposure by just a small amount I.e. half a second, can make the difference. But it can be hugely frustrating. One other thought - Brisbane can get damn hot, and temp plays a part, though in your case I’d have thought it should be needing slightly shorter exposures.
- 454 replies
-
- 1
-
-
- Union Steamship Company
- Stepcraft 840
- (and 3 more)
-
That should made them pretty solid. While I'd like to print on the plate more often, I don't like the elephants foot effect, especially if the part has to fit to another, so in these instances I use supports and, contrary to logic, put them on the facing side, so I still get a reliable mating surface. Most of the time it's fairly quick to polish up the face
- 454 replies
-
- 2
-
-
- Union Steamship Company
- Stepcraft 840
- (and 3 more)
-
To be honest I'm not sure I can, which makes my day. You've made a very good job of the painting, that's for sure. If I had to guess I'd say the two pairs in the middle are mine? Have you tried the blocks yet? In both instances, please critique freely, it'll only lead to improvement.
-
While messing around a couple of weeks ago aimed at making whisker booms from copper wire, I just used my plumbing blowtorch and plumbers lead-free solder, as I always have some of that in the toolkit. I prefer using a flame rather than soldering iron, just because it's quicker and you can draw the solder to where you want it a little more easily. As and when I see myself doing this for real on models, I'll look for a true mini-torch, for ease. There's are loads of 'mini's' on amazon but they mostly look like standard size. I wouldn't spend too much either. A torch is a torch.
-
Soldering is great for stuff like this, it’s bombproof. It can take a little practice to get it to flow only where you want though.
-
3d printing process
Kevin-the-lubber replied to henrythestaffy's topic in 3D-Printing and Laser-Cutting.
Dr PR, thanks, that's given me some ideas. I hadn't even thought about the squeezing aspect. But most of all you're confirming that there's nothing wrong with the machine, this is user error, which is good, because I can fix me but not the machine 🙂. I think my problems fall into the category of '99% of the time you'll get exactly what you sent to the printer. 1% of the time you're going to have to work at it'. I read an article a while back about ideal angles and I don't think it was 45 degrees. It was all about the arrangement of the pixels. Generally, I just try to reduce the amount of surface tension, balanced against the wasted cost of supports. -
That looks more like it. The resolution capability of these printers is, as you say, outstanding. I haven't tried the phrozen resin. I find elegoo abs very good, but unrestrained objects can warp a little over a few days post-curing; and I've been using syratech fast for when I want more strength or rigidity, but at a slight loss of detail. I'm going to splash out on one bottle of syratech blue shortly, just to see whether it really is the bees knees, as I have some very, very small load bearing things that I'd hate to have to replace if they break along the way. I'd reiterate that it's worth paying close attention to the detailed settings, usually available on the manufacturers website, and not just altering the exposure time. Slowing down the lift speed has been a game changer for me on a few objects. On a completely different topic, Richard, I'm going to try my first hull shortly - only a tiddler, a simple little jolly boat, but I'll be going back through your video for all the tips and tricks.
- 454 replies
-
- 2
-
-
- Union Steamship Company
- Stepcraft 840
- (and 3 more)
-
It seems unlikely there'd be two GF Campbell's, both writing about clippers, but who knows! I picked up somewhere in my recent reading that he was a naval architect.
- 481 replies
-
- 1
-
-
- Cutty Sark
- Revell
- (and 2 more)
-
Ps. I’ve also found that adding some meat to frames where that is hidden can make a lot of difference i.e. do a flange around the back and recess it into the bulwark if necessary.
- 454 replies
-
- 2
-
-
- Union Steamship Company
- Stepcraft 840
- (and 3 more)
-
Richard, I’m guessing that your walls are about 0.3 to 0.5? It looks too like you’re printing straight off the plate. I’ve found with small, delicate pieces like these that it’s best to angle them and use thin supports. However, anything this thin will be inherently fragile unless you’re going to put strength back with the glazing. It’s also worth trying different resins and religiously using their recommended settings as the base, paying attention to things like lift speed. I’ve just started learning that these can make the difference between ‘perfect’ and ‘fail’.
- 454 replies
-
- 2
-
-
- Union Steamship Company
- Stepcraft 840
- (and 3 more)