Kevin-the-lubber
-
Posts
1,232 -
Joined
-
Last visited
Content Type
Profiles
Forums
Gallery
Events
Everything posted by Kevin-the-lubber
-
 Yes, this is a 3mm size printed using a strong, slightly translucent resin. The strop bracket along with nut & bolt stand out more once painted, but are too small to really add to the model. I included them because it give more purchase for the pin.
- 444 replies
-
- 2
-

-
- Cutty Sark
- Revell
- (and 2 more)
-
Great photo. It'd look like the cat had got at it so I definitely won't go down that tack. I guess I'll have to make my mind up about the sails sooner rather than later, to factor it into the workflow. Once I've resolved the deadeyes and pinrails etc, maybe I'll then start experimenting on sails. Meanwhile... inserting a pin into the lower deadeye works out fine. In this test both the pin and rope holes are a bit over-sized at 0.8mm, I wanted to see how far I could push it in terms of remaining wall thickness. The breaking strain is excellent, I had to pull quite hard and eventually the glue gives way. On the other hand, my first attempt at stropping the deadeyes through to a dummy shroud was another education. It came out fine, using 0.8mm rope for the shrouds, but I rubbed every scrap of paint off both deadeyes along the way. I think these might need to be enamelled before stropping (obvious I suppose, they'll be totally unpaintable afterwards).

- 444 replies
-
- 3
-
-
- Cutty Sark
- Revell
- (and 2 more)
-
Not quite, but they still allow for the fact that you can't bend cables into a tight angle; my guess is that the diameter of the cables has been slightly reduced for today's display ship, to reduce the strain, and taking into account the masts are never going to be subjected to the stresses of being under sail. I wouldn't mind betting that those hearts/thimbles were in fact steel or even cast iron, but that is just a guess. Interesting, isn't it, that the modern equivalents are still called thimbles

- 481 replies
-
- 1
-
-
- Cutty Sark
- Revell
- (and 2 more)
-
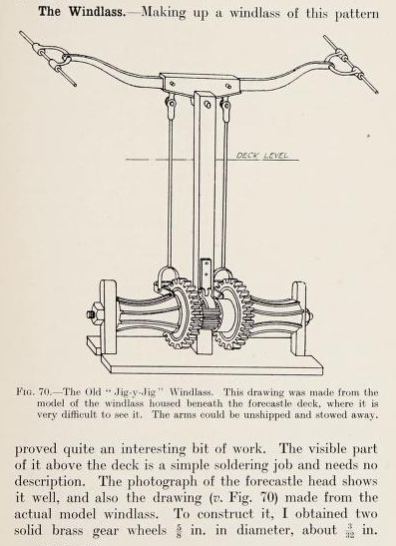
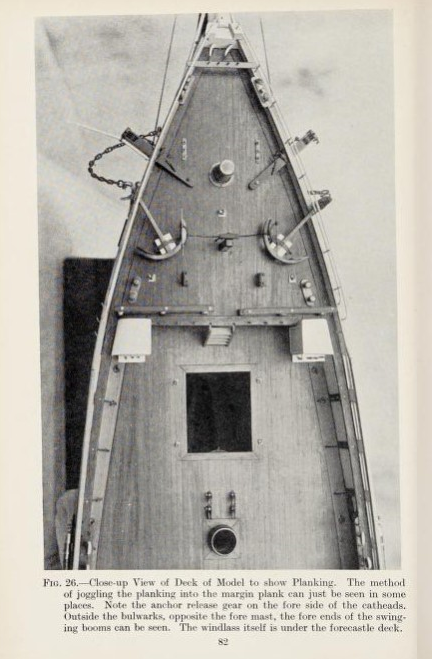
There's more; campbells forecastle protrudes further aft than revell, the capstan is further forward, and the catheads further back. I prefer campbells forecastle, to my eye it accentuates the sharpness of the bow profile. Even if Underhill was the definitive plan I think I would still go with campbell in this area, just for the aesthetics. However, the more you seek to work from these plans the more you realise they are representations rather than true plans. I have a feeling campbell didn't always take the trouble to measure things! For instance, the profile of the carrick bitts on both campbell and revell are out of proportion, they are wide skinny little things whereas the real mccoy are hefty chunks of (I assume) hardwood. Given what they do, you'd want them to have a bit of girth. To complicate things further, in Campbell's 'last of the famous tea clippers', his descriptions are based on the square cut forecastle, presumably underhills model; so I imagine the plans we all know and love are from a different time. In the same book Campbell shows a slightly different windlass to that on his plans or revell. So, I think it's really down to whatever you think is in keeping with your intent. I'll stick my neck out and suggest that clippers were no different to any other complicated machine in one respect; bits were constantly swapped, changed, ditched, added, as part of normal repair and maintenance and whatever we work from now is probably only ever a representation of how it was for a relatively short period.
- 481 replies
-
- 3
-
-
- Cutty Sark
- Revell
- (and 2 more)
-
Shipman, I positively welcome it, and that of others. No, I don't think I'd like the flat, drying look. I think it would be hard to pull that off in such a way that it added to the vista, though I imagine someone, somewhere has done so. I'll stick with the plan, or at least head in that direction. I have my first play with PVA'd tissue paper/loo roll coming up shortly, for a tarp, so that should give me some idea whether I'll be able to do it.
- 444 replies
-
- 2
-
-
- Cutty Sark
- Revell
- (and 2 more)
-
You've probably started a stampede for that chain 🙂. Periodically I go to the one remaining model shop in this neck of the woods, which fortunately is very good and covers everything imaginable. You could spend hours in there. Whatever I've gone for I graze as well, just to see what might come in handy, and you're right that there's a wealth of stuff for the model train community. Also RC planes and boats, some of which readily crosses over and is already well known to ship modellers i.e. silkspan, carbon fibre etc etc. It seems like mine is going to be a wool clipper - but only because I've stuck a load of wool bales in the main hold as cargo. I was going to put tea in there but tea chests at 1/96 just look like a miniature rubics cube.
- 481 replies
-
- 1
-
-
- Cutty Sark
- Revell
- (and 2 more)
-
Shipman, you’re a goldmine of CS knowledge! Hemp-wrapped explains it. Even though the eyesight is not quite what it once was I’d expect to still be able to spot a hawser from a mile away. I can confidently say I’ll never take on any model less than 1:100. Even at this scale I’m challenged to make and use some parts, and grab every extra 0.1mm of size that I can justify. 1:168 would be a step too far. But I will see if I can get a copy of Hackney, I could do with something that explains things more succinctly and simply. KimW, you’re dead right that this kit lends itself to extra detailing, in part because there isn’t a heck of a lot to it so there aren’t too many critical dependencies I.e. you could easily lower the main deck without this throwing everything else out of kilter. I also have a second kit and, if I ever decide to use it, that’s where I’ll start. I don’t know how I’d make things like the cat heads and cat’s head without a resin printer though looking at the level of detail on Marc’s Soliel Royale (Hubacs historian), you could try carving them from styrene. I reprinted the cat heads assembly using a better type of resin this week and the whiskers are now much stronger. This was going to be the subject of my first foray into photo-stacking but I have a bit of learning to do there, it’s not as straightforward as I hoped. Now, I suspect I’m about to open a whole can of worms, but I’m still thinking of having furled sails hanging from the yards. I know furled on top is correct, Rob’s Glory had me noticing this more on historical photos, but models always used to have them underneath (didn’t they?) and, probably because that’s what my minds eye expects, I like that look. Is it simply incorrect, a fiction?
- 444 replies
-
- 3
-
-

-
- Cutty Sark
- Revell
- (and 2 more)
-
3d printing process
Kevin-the-lubber replied to henrythestaffy's topic in 3D-Printing and Laser-Cutting.
There could be two things that I did wrong when I tried to clean the IPA. First, I used clear plastic bottles, second maybe I left it too late. One 2l bottle turned into an almost solid object. The others just didn’t work, I still had very cloudy IPA even after several weeks, with a lot of sludge in the bottom. I also tried filtering it through a double layer of coffee filter papers. Took ages. I’ll have to try again with glass, and also try using the wash and cure as described. I’d like to do it as much as anything because it feels bad to be putting this in the trash in a liquid state. -
That's more or less my plan. After testing the wire in the hole bit already and seeing how strong this is, I don't think it'll need glueing at the pin rail, just down at the bottom, which should mean the wire itself can flex at the pinrail and find the natural angle. Less risk then of the deadeye itself breaking, which is a real risk with very thing resin parts. That's the theory anyway, and I'll test this out over the weekend on a mock up.
- 481 replies
-
- 1
-
-
- Cutty Sark
- Revell
- (and 2 more)
-
I've noticed that in the plans, but think I'll try rope. Not least because until I read that they were steel, after visiting the ship, it never occurred to me that they were anything but rope.
- 444 replies
-
- 1
-
-
- Cutty Sark
- Revell
- (and 2 more)
-
Thanks again, and now I also understand the tpi. Gosh, I don’t think I’m going to bother getting that technical (the tpi), an ‘artists impression’ will do for me at this scale. Painting the strops is going to be hard enough.
- 481 replies
-
- 1
-
-
- Cutty Sark
- Revell
- (and 2 more)
-
Thanks everyone, much appreciated. So for the lower gangs, roughly 0.5mm +/- 0.1 should be fine. I bet I find it printed loud and clear the next time I look at a plan or reference.
- 444 replies
-
- 1
-
-
- Cutty Sark
- Revell
- (and 2 more)
-
That looks good. The white panelling gives it a bit more shape than the all teak scheme. I've asked over on my log but hope you dont mind me asking here too - what size rope should be used for threading the lower deadeyes?
- 481 replies
-
- 1
-
-
- Cutty Sark
- Revell
- (and 2 more)
-
I'm falling at the first hurdle today: I need to do a test piece of setting up the deadeyes for the lower shrouds. Can anyone tell me what size rope should be used for the deadeyes, and how I could have readily figured that out for myself? I have plans and reference material galore, so must be missing something. I know the sizes for the shrouds, just not the rope that connects the deadeyes to each other.
- 444 replies
-
- 1
-
-
- Cutty Sark
- Revell
- (and 2 more)
-
3d printing process
Kevin-the-lubber replied to henrythestaffy's topic in 3D-Printing and Laser-Cutting.
I suspect most of us make almost all of these mistakes early on, I certainly did! I hadn’t thought of adding a scrap print when cleaning the FEP, that’s a good idea. Elegoo’s have a ‘tank clean’ function that prints a thin raft across the whole FEP for removing failed prints and I now always use this rather than trying to pop them off by hand. It also saves having to drain and clean the tank. I don’t change the IPA after each print session, that would become way too expensive but also way too annoying. I keep using it until the prints are starting to have a residue on their surface, then for a while I rinse them in a smaller tub of clean IPA, and then eventually I replace the dirty IPA. I tried both filtering and sunlight cleaning, neither were very successful. At some point I’ll probably buy another washing tank and do a two stage clean, first wash while dirty, second to remove any fine residue. -
Bill, I think modelling is just like the trades; when you know exactly what you’re doing from the outset, you do it all way quicker and better, and it wouldn’t surprise me if you got to rigging stage on another Cutty in a week or so, given the speed you work at. But everyone, no matter how good, seems to spend ages on the rigging. If I was to start over, one thing I would do is lower the main deck.
- 444 replies
-
- 2
-
-
- Cutty Sark
- Revell
- (and 2 more)
-
Much the same here - although I’m trying to do the best CS that I can, as a build in it’s own right, it’s still all aimed at gaining enough proficiency through these less complicated kits to build the Victory that’s in my minds eye, and being a detail person, it would niggle if I thought I could have done better by buying or making really convincing rope. And part of it, I’m sure, is what the rope is like to work with. Fortunately the Heller rope (I think) appears to be cotton whereas the Amati is polyester, so that’s one comparison I can make early on.
- 444 replies
-
- 3
-
-
- Cutty Sark
- Revell
- (and 2 more)
-
If my experience is anything to go by, listen to your gut feeling Richard. I've been the same with my tiny (by comparison) Cutty Sark until I got fed up with myself and got glue-ing, and of course almost immediately realised why I wasn't ready. On the brighter side, my heel dragging was all about the (pointless) quest for perfection, that I could have done X, Y or Z just that little bit better, but in the grand scheme of things the difference will be insignificant. Maybe also try heating the styrene and then rolling in the pattern? It might give more predictable behaviour. If that works you could stick a batch in the oven and pre-pattern it in one session, then use a smooth roller to press it into the grooves when cold and firm again. I don't even know if styrene glue will stick to wood but I'm sure slow setting, thick superglue would do the trick..
- 454 replies
-
- 3
-
-
- Union Steamship Company
- Stepcraft 840
- (and 3 more)
-
I think I'd best get some from Chuck and compare. I'm quite hesitant about embarking on making my own, a little related to it being another rabbit hole, which as you know I'm very good at going down, but mostly because my forte is getting or making machines to do things for me. From what I've seen on line, short of making a motorised ropewalk, there's still a fair bit of manual skill required to get the consistency. I've seen a motorised design that wouldn't be very expensive to make, given I have all the kit to make my own gears etc, so I might explore this as and when I want a break.
- 444 replies
-
- 1
-
-
- Cutty Sark
- Revell
- (and 2 more)
-
That's the one, I bought two at the same time as you but couldn't remember what lpi they are. Hopefully 4 lengths will be enough.
- 444 replies
-
- 2
-
-
- Cutty Sark
- Revell
- (and 2 more)
-
I think the revell Beagle is a reworking of this, isn't it.
- 481 replies
-
- 1
-
-
- Cutty Sark
- Revell
- (and 2 more)
-
Yes, I've spotted that. I'm not sure yet what I'll do in respect of the cables but provided I can source small enough chain I'll use that where indicated. I revisited the discussion, possibly on Bruma's build, last weekend, so know 40+ LPI is out there. I'm kind of planning on furled sails; not tight to, and on top of, the yards as per Rib's Glory but reefed (?) up loosely underneath (there's probably a term for this). But this is the loosest of plans, hinges on whether I'm able to make a fist of Maurice's (Blue Ensign) method of sail making.
- 444 replies
-
- 2
-
-
- Cutty Sark
- Revell
- (and 2 more)
-
By the way, I did a little experiment; drilled a small hole in the bottom of a deadeye and superglued in a piece of thin brass rod. It's rock solid, so having the rod/wires glued into a similar hole in the waterways at the other end should mean there's no strain at all on the pinrails. I don't know how I keep missing things in the Campbell plans, the fourth boat (a little jolly boat) is upside down inbetween the two lifeboats. I may have a go at scratch building this presently.
- 481 replies
-
- 2
-
-
- Cutty Sark
- Revell
- (and 2 more)
-
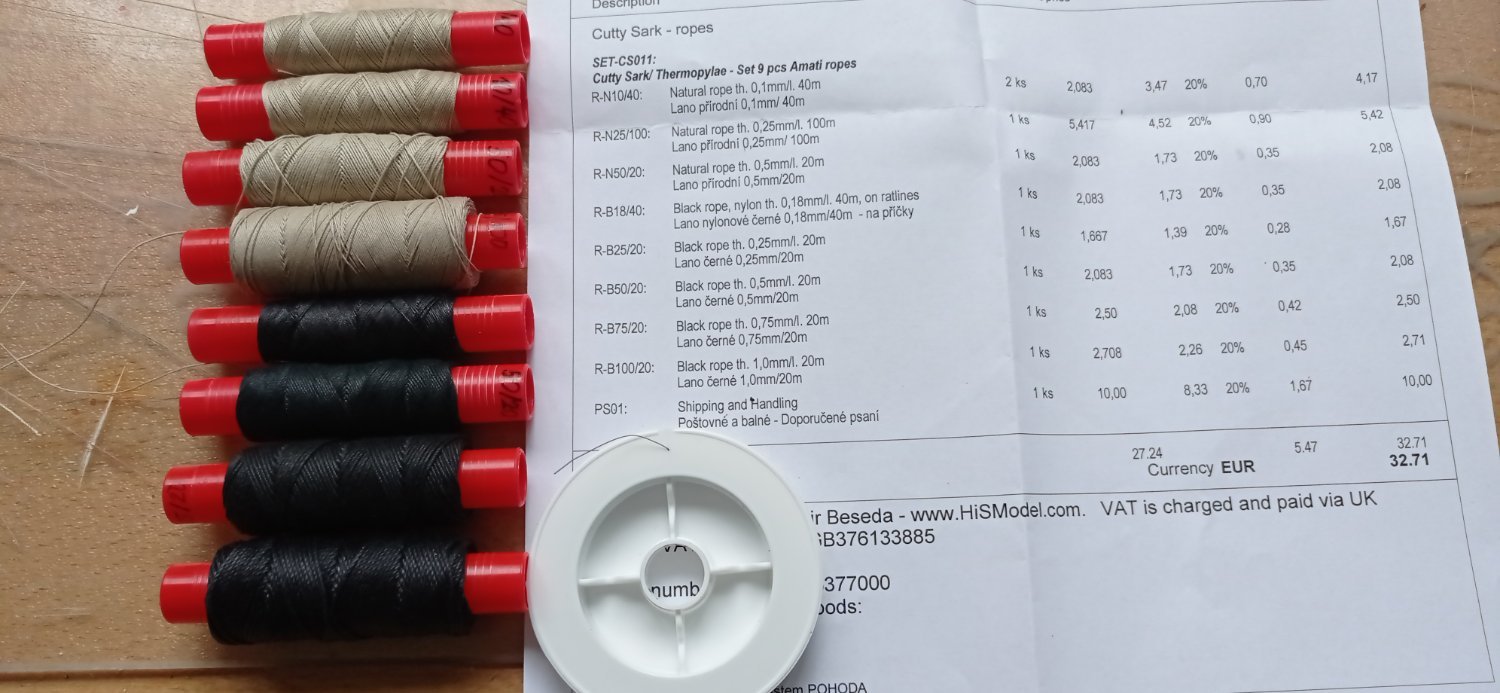
Received my Amati rope set from hismodel today. It all looks quite rope-like to me though at the smaller sizes you'd need the eyes of a hawk to spot this. It's all polyester as far as I can see, apart from the very, very thin one on the white reel which is nylon. It looks much the same as the smaller white rope that came with the Heller Victory (the larger one on that kit is more braided), and much the same as the two beige ropes that came with this CS kit. I wouldn't say I'm blown away but neither am I disappointed. I think Bill (Bill97) went for similar quality on his Victory and that looks great to me so I'm sure this will be the same. However, I think I will probably get one or two of the smaller sizes from Syren just to see if there is that much difference. In other news, I'm messing around with photo-stacking (not very successfully so far) and picking up on the pinrails again as I'm a bit bored fiddling around with the deck furniture, which I know is just a subconscious device to avoid the tricky pinrails. I'm glad I've delayed though, as all this procrastination has spawned a plan.

- 444 replies
-
- 3
-
-
- Cutty Sark
- Revell
- (and 2 more)
-
Re' the deadeyes, I'm planning to reeve these off the ship, using some sort of jig, and then dropping the wires (that we've discussed previously) of the lower deadeyes into their respective holes in the pinrail. Is that not going to work?
- 481 replies
-
- 1
-
-
- Cutty Sark
- Revell
- (and 2 more)