


Kevin-the-lubber
-
Posts
1,232 -
Joined
-
Last visited
Content Type
Profiles
Forums
Gallery
Events
Everything posted by Kevin-the-lubber
-
 To be honest, not entirely. The trouble (benefit) of 3D design is that, as you’ve said yourself, it’s often quite quick and easy to correct mistakes, tweak the design and so on. Couple that with it being quick and often very cheap to print objects and you have a recipe for winging it. I know that if I was having to make the designs by hand, or outsource the printing, I would take a great deal more care to try to get the design right first time, think through the whole workflow for dependencies and so on. For the printing itself I always try to get it right first time because its such a pain when the supports fail or you find a plate of spaghetti in the morning. But even after a couple of years of printing, there is still quite a bit of trial and error to get the optimal result.
 -
Ditto, both models are fantastic pieces of modelling. I haven't read the Okie log yet but I'm sure I'm going to find all kind of good tips in there.
-
That’s quite a reassuring thing to hear from someone like yourself. I often find that what I’m really doing is a trial and error process, especially as it’s so easy to print objects. The first go usually highlights what I got wrong, and I then finesse. Recently I’ve started to do something I probably should have done from the beginning - treat 3D as just another tool and use other methods where appropriate, I.e. at 1:100 I’d probably print the body of that lamp but use wire for the guard.
-
For what it’s worth I’ve been very happy with both elegoo printers, they’re well built etc, and the aftersales service is excellent.
- 460 replies
-
- 5
-

-
- Finished
- Flower-class
- (and 1 more)
-
I was racking my brains for a comparison and this nails it nicely! It could be especially good if they go big and make the resin build capacity the same as a standard FDM plate!
- 460 replies
-
- 5
-
-
- Finished
- Flower-class
- (and 1 more)
-
John, I don't even know myself so welcome to the magical mystery tour 😊 By way of a general update, I thought I was going to move on to the pin rails this week but haven't had the three or four hour stretch it needs for me to really focus and, meanwhile, have decided I want to rework the forecastle area, which also needs concentration. Hopefully I'll get some time this coming weekend as I got most of the spring gardening done last weekend.
- 444 replies
-
- 2
-
-
- Cutty Sark
- Revell
- (and 2 more)
-
Just in the vein of resin vs filament, I read recently that amazon are developing their own marque of 3D printers and aiming at these having the capability for both resin and filament. That could have been an april fools joke but it didnt seem so. How they'd do this will be interesting to see, given the difference in functional designs, but I'm sure it's perfectly possible; and if so, I would expect this to be the next game changer, where for hobbyists it wouldn't make any sense to choose a single purpose machine.
- 460 replies
-
- 3
-
-
- Finished
- Flower-class
- (and 1 more)
-
Hi Alan, one or two years back I ran up against the same issue, where I just couldn’t get the quality of finish on small parts, especially on round objects that had to be printed in the horizontal. I remember trying to print cannons for the victory, going round and round in circles with the settings, trying different nozzle sizes and so on. What I can say is that 0.2mm nozzles will give a finer result, but were more prone to zits and suchlike and still couldn’t give me what I wanted. However this was before I had a heater and upgraded springs so you might find you have less problems. Which is when I took the plunge and bought a resin printer. My view is that having both types is the best solution for modelling. You get immaculate, incredibly detailed prints from resin, there is virtually no tail-chasing with set-up, but there are, nevertheless, drawbacks. Almost everything needs supporting so you have a good side and a bad side, though you can often polish that up. Resin parts tend to be a bit fragile so aren’t so good where a bit of strength is needed, and warping / dimensional accuracy can be an issue. And there’s the additional outlay, plus resin is a bit more expensive than filament. However I virtually guarantee that you would have chosen to print 99% of what’s in your pics in resin and been delighted with the results. The one thing where I think FDM still has the edge is on objects with a flat face. They come out more accurate, don’t shrink or distort and the surface finish can be easily sanded or filled. If you follow my link to the Cutty sark you’ll see the decks I printed, which I think are not too far off being as good as wood veneers. If I’ve tempted you to look at buying a resin printer can I offer a word of advice - don’t get the smallest one, you’ll probably regret that quite quickly. Bite the bullet and get something like the elegoo Saturn. That extra build size will allow you to print a much wider range of items, as the Mars capacity is really quite limited. I did it the hard way and now have two resin printers. It’s not worth selling the Mars as they go very cheaply second hand so I just use it for small stuff.
- 460 replies
-
- 4
-
-
- Finished
- Flower-class
- (and 1 more)
-
Thanks John. That’s a bit counter-intuitive, don’t you think, for it to be rigged from so high up, where the masts are thinnest. But I guess the wind forces would be much greater than any loads being shifted so probably not an issue. If I did include this I think it would be when I’m well into the standing rigging so quite a while away yet, and I can see how it looks when I get that far.
-
Hi John, they’re both very fine looking models; at this end, I’ll probably look at the Kearsage next, just because it’s so unusual, or pick up where I left off on the Victory for a while. I’d virtually dug myself as far as Australia on that one and started the Cutty as a means of taking a breather. Changing horses has been one of my better ideas, the Cutty is a much less complex ship and easier to for learning the ropes of proper modelling. I’m planning on the furled sails approach on the Cutty, just because I like that look, but having never rigged a ship before, nor made sails, (in fact nor done any serious modelling!) I could see myself bailing out with just the standing rigging. By coincidence I ordered a set of ropes for the CS from Hismodel yesterday, having been mighty impressed by the PE nameplate that I bought a couple of months back. I was sorely tempted to splash out on the beautiful Syren ropes but thought I’d better try the Amati first given they are more affordable. Radimir also does various bits for the Kearsage so I may well become a customer for life. I’m not too far off retirement myself, just another couple of years, and can’t wait. It’s hard, some weeks, to make any headway at all, with only an hour spare here or there. As for the Connie, definitely ‘for later’. I’ve had eBay searches running for all the big 1:96 kits for two or three years as these kits seem hugely expensive new, at around £180. Both the Kearsage and Connie came up recently and I was able to get each of them for about £40! So that’s the next 10 or 15 years taken care of! I think all that remains to buy is the Soliel Royale, which looks like the most difficult of them all. At this stage I like the plastic models as I can relatively easily remake most parts, via 3D printing, if I want or need to and have something concrete to work from.
-
Jim, that's very useful, thanks. Forgive me being dense but is the gin block this one;

-
John, that's what I thought at first, but when you look more closely they are tied off to the fife rail. I'm more interested in that chain coming off the main mast; what's that all about? that and where the tied off rope goes to. From the angle it's evidently to the foremast (or there's some big fella stood on the roof of the fore cabin holding them aloft for no obvious reason other than you have to have a bit of rope and chain in a ship photo, don't you 🙂). I'm a bit of a lazy researcher so I guess I'd best get less lazy and see whether any of my dust-covered tomes shed light. Mine is also the revell 1:96 and in principle I was going to build this out of the box and see if I can actually finish a first model (!), but as I have a penchant for 3d printing and modelling I have once again gone down the rabbit hole and, unlike most rabbits, have yet to learn when to stop digging. More seriously, I'm just adding a little bit more detail where it's easy to do so and most of the cutty sark furniture is relatively simple to play with.
-
Hans, you’re dead right about the devil being in the detail. I know I could get a reasonable basic hull done quite quickly but getting exactly what I want, or what it needs to be, in terms of detail and dimensions, is another matter. That broader project sounds fascinating, albeit hard to get my head around, given the seemingly unique nature of the detail on most old ships.
-
Once you’ve done Allan’s cannons, I need a hull that’s an exact replica of the 1:96 Heller victory and, if you’ve got time, the same for the 1:96 revell Cutty sark 😆. I’d add that, while I definitely couldn’t do the cannons fit to print as quickly as you (probably a couple of hours for me, including the carriages and fine details) they’re fairly simple to model and quite a good thing to learn how to do in a 3D package if you’re a beginner. Along the way you’d learn about simple shapes and extrusion, planes, revolving, cutting and combining and, if you really want to go the whole hog, surface projections. After which you’ll be able to make a very wide range of things for ships. For anyone interested, there’s an excellent beginners tutorial for f360 in an online magazine called diyode, Google it.
-
That's a very nice looking model and, as others are saying, you are probably light years ahead of the rest of us who have only recently got into 3D modelling and your knowledge would be very welcome here. Despite meaning to switch to Rhino a few months back I'm still just using Fusion 360 and, one day, will attempt a hull. Everything else in CAD/3D modelling apps is, as you say, fairly straightforward once you've learned enough. But I know a hull is going to suck up weeks of my spare time so I'm still ducking it for now. What do you do with your designs? Print them, or are they purely for the pleasure of the exercise? I'm sure there is going to be a market for 'download and print' models
-
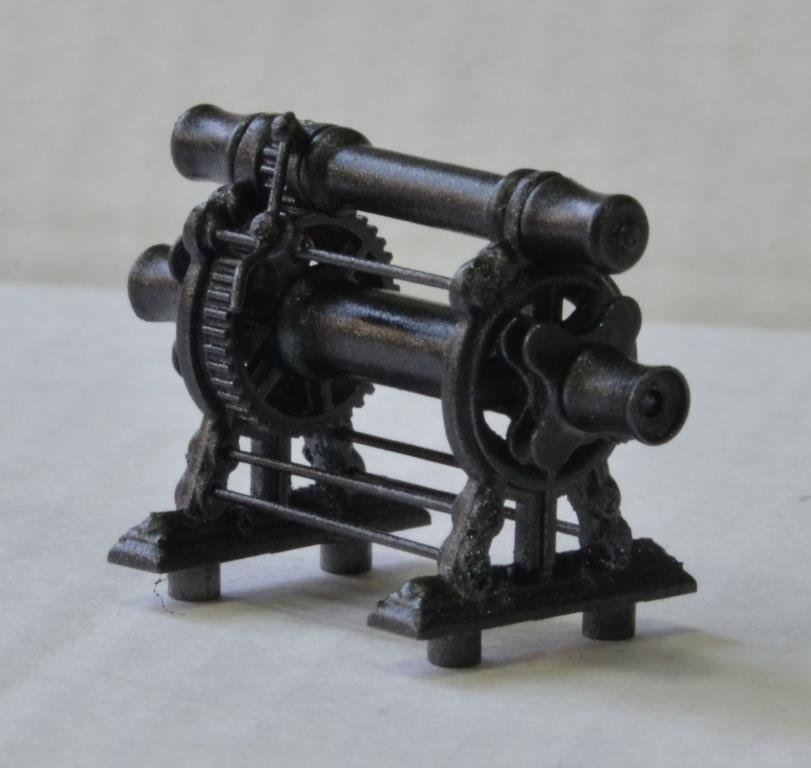
Thanks John. If that chap with the laced top would just move out of the way a bit... :-). It's a great photo though, isnt it. And thanks for the compliment, it took me hours and hours to fettle all those teeth - only kidding, it's 3D printed with a bit of wire for the tie-rods and was fun to make.
-
Could anyone tell me how the cutty sark's (or clippers in general) cargo winches were rigged? I have a hazy notion that there would have been ropes or chains running from high up on the masts, and a hanging pulley from where they join, spooled onto the lower roller of the winch. But how then were loads moved outboard? Just pulled across on a rope by hand? Any sketches or photos would be most appreciated. I'm thinking it would add a nice little detail to my 1:96 if I rigged one of the winches and slung a load! (Obviously I have more time than sense). Here a picture of one of the winches I've made.
-
The snaking is very neatly done, in fact it’s all looking very accomplished Bill. Good work!
-
I’ll add it to my saved searches on eBay. Those that I see at present are still just a little too pricey for me, given I have the plans and Underhill so probably wouldn’t make much use of it. Although I’m upping some of the detail vs the kit I’m not going for super-fidelity, that feels like another rabbit hole. I too manage to pick up bargains from time to time, I got the 1:96 Constitution last week for about £40, think the only large kit that I still want ‘for later’ is the Soliel Royale, but I don’t think I’ve ever seen that going cheap.
- 444 replies
-
- 3
-
-
- Cutty Sark
- Revell
- (and 2 more)
-
Shipman, what are the titles of each of those books? ‘The ship and the model’ is readily available, though pricey.
- 444 replies
-
- 1
-
-
- Cutty Sark
- Revell
- (and 2 more)
-
Thanks both, I think that gives me enough to work on. I don’t have Longridge but his description is in keeping with Campbell so I’ll go with that. Shipman, you may well be right that the elegant entrances were added later but the one just aft of the windlass is shown on Campbell and, as I’m going to have a look at remaking the foredeck and windlass using Campbell’s drawings, I might add that hatch too, just because it’s a pretty feature. The remake of the foredeck is driven by dissatisfaction with the revell-based windlass. The real thing is a very imposing bit of machinery whereas the revell part is somewhat innocuous. However, making it more dimensionally accurate means changing the profile of the foredeck to accommodate the larger girth of the windlass. I’m as perplexed as everyone about the chains routing over the hatch. Even with them draped over the forward winch, I’d still expect the hatch to suffer constant damage at either end of the anchoring process, when there’s slack in the chain. Plus this is heavy stuff. I’d guess manhandling that onto the chain gear every time you want to anchor meant lifting 100lbs or more of dead weight. Or maybe they just left it draped over the gear? That doesn’t seem terribly plausible, I’d think you’d want everything held firmly in place when out at sea.
- 444 replies
-
- 2
-
-
- Cutty Sark
- Revell
- (and 2 more)
-
You’ve made a good job of the stern, Tom. It’s a shame the moulding is not quite sharp; even more so that this whole section isn’t multi-part, with the builder in mind. If Heller ever re-mould I hope they do that. I’ll be very interested in your view on the new instructions, once you receive them.
-
It’s the hatch in front of the mizzen mast. It’s no longer present on the ship, that space has been re-used for the visitor stairs and I haven’t been able to find any decent pictures of the real thing.
-
A question: is anyone following able to explain the workings of the booby hatch? Is it supposed to be a small sliding cover that would be slid back to allow access down a ladder into the hold? I've seen various interpretations.
- 444 replies
-
- 1
-
-
- Cutty Sark
- Revell
- (and 2 more)
-
Paul, there's a 3D forum on here https://modelshipworld.com/forum/34-cad-and-3d-modellingdrafting-plans-with-software/ where you may get a variety of helpful views. My tuppence worth, as an ender 3 pro user is yes, you won't go far wrong with one of these, they are hugely popular for a reason. It's cheaper direct from Creality by the way. While there's some value in starting with the basic machine so you see the benefit of upgrades, I'd recommend three from the outset; a glass platter; capricorn bowden tubing and a filament heater (mine is a sunlu which is, I think, pretty good). Oh, and a multi-pack of spare 0.4mm nozzles and some 3DLac spray. That'll add maybe £60 or £70 to the cost but you'll get good mileage out of these and have a much less painful learning curve.
- 321 replies
-
- 5
-
-

-
- Finished
- Flower-class
- (and 1 more)