


Kevin-the-lubber
-
Posts
1,232 -
Joined
-
Last visited
Content Type
Profiles
Forums
Gallery
Events
Everything posted by Kevin-the-lubber
-
 I’ve found that locally, is there anything I should look out for i.e. are there any bits that might be missing second hand?
- 444 replies
-
- 1
-

-
- Cutty Sark
- Revell
- (and 2 more)
-
Oh, I do like that Rob, very appealing. Another for the list... and you say you did this from a CS base... and I just happen to have one on it's way. Your deck is much more what I was aiming/hoping for, but cleaner, my crew would be slave-driven :-). What is that 'fabric' on the winch, is it a leather cover? While you're here, I received my copy of Michael Mjelde's GoTS today but I don't see any plans within! Should there be any? And back to teak, a moment of inspiration has me looking at our model train cousins, who do this a lot. Some good pointers there, including the obvious - just varnish it with ordinary teak colour varnish.
- 444 replies
-
- 2
-
-
- Cutty Sark
- Revell
- (and 2 more)
-
Thanks chaps. I also like the deck effect. Now that I understand better what happens with the ink wash and varnish I’ve got a baseline for next time, next model, and do more of mixing my own shades. I used the Vallejo wood kit more or less neat, but the variations in the kit are a little too strong for a deck. The problem with the teak is that the ink puddles here and there and you have to try to catch that before it sets, which I’m not yet that good at. In part because what I like about the ink is that, if you leave it alone, it creates it’s own, very attractive random pattern. Notice the spottiness on the deck. Anyway, all good fun and interesting for a man more used to using an emulsion roller.
- 444 replies
-
- 1
-
-
- Cutty Sark
- Revell
- (and 2 more)
-
I haven't had much time for doing the doing over the last week or two but picked up the brushes again last night to get going again. I'm happy enough with the re-painted deck colour, it's a bit darker than intended but I'll know next time. I still don't really have a handle on the varnishing-with-ink, all remains a bit hit and hope. It looks worse in a photo than real life so I'll probably settle with this for what's in the photo and keep on trying with the bucket rail etc. Though as nothing is glued I can revisit if I crack it. Perhaps try doing the staining effect with paint and just use inks to accentuate joins and mouldings. Along the way I picked up a second kit cheap on ebay the other day. No idea why as so far I've only used the hull, but I'm sure it'll come in handy sooner or later! Maybe a Thermopylae in waiting, or Glory of the Seas (ish) if I don't get anywhere with a bottom up approach.
- 444 replies
-
- 4
-
-
- Cutty Sark
- Revell
- (and 2 more)
-
Hi Simon, sounds like you’re right at the beginning of the kit, and yes, you could certainly do that. If you’re not bashing the kit in any way the revell instructions look fine. Although I’ve swerved a bit from an OOTB build on mine, I was able to hide the deck joins fairly well by bevelling the adjoining edges, glueing, filling, sanding. I lost a bit of the faux wood grain but not as much as I feared.
-
From here, Marc, there is so much going on around the stern that I doubt the issue will notice. It certainly doesn’t stand out in the photos.
- 2,699 replies
-
- 6
-
-
- heller
- soleil royal
- (and 9 more)
-
3d printing process
Kevin-the-lubber replied to henrythestaffy's topic in 3D-Printing and Laser-Cutting.
It is indeed. Daz downloaded, will play with it presently and pay attention to what you’ve all been saying on here. -
And knees, hips, ankles and all the other bits you broke or damaged while having fun in your youth! Give me naivete any day, I'd rather still believe I'm immortal and there is no way on earth I'm going to fall off THAT. Wisdom says I might....
- 444 replies
-
- 3
-
-
- Cutty Sark
- Revell
- (and 2 more)
-
3d printing process
Kevin-the-lubber replied to henrythestaffy's topic in 3D-Printing and Laser-Cutting.
This is partly why I haven’t yet moved on to Rhino, because it’s seems surface based rather than the easier-for-me-to-get-my-head-around F360. That’s an excellent bit of figure modelling though - how long did that take to do? -
Via another thread, where I’ve whinged endlessly about the downsides of F360, I’ve been pointed towards Rhino3D. It’s not free but, as I could access an educational licence, it’s not too expensive and you buy rather than subscribe. (I hate this gravitation towards subscription for everything, but especially software). Apparently it’s the industry standard for shipbuilders and is very, very good. The only reason I haven’t done so is I couldn’t face another huge learning curve right now, but if you’re ready for that you might want to use the free trial opportunity which is good for three months. I’d balance this by saying I still have a lurking suspicion that the problems I encounter in F360 are somehow related to my PC; I built it a couple of years ago and deliberately went down the AMD route rather than Intel, and I think F360 doesn’t like AMD graphics cards. And also that, as I become more experienced in it’s use, I’m better able to avoid problems through better methodology. Otherwise, F360 is excellent.
-
Now here’s a funny thing. I used to be a very keen climber and would cheerfully walk along a knife edge mountain ridge without the slightest worry. But these days it would scare the life out of me. But I will probably give this a go as and when I go back. Probably not very soon - unlike the Vic, there isn’t a tremendous amount of detail on the CS that I could carry across to and enhance a 1/96 model, other than the rigging, and for that I’ll probably tailor my ambitions to my abilities. Update-wise, I’m experimenting with a few different approaches to painting the bigger pieces on the deck, but work and home projects have been taking priority lately. Hopefully I’ll get some time this weekend and have something worth posting.
- 444 replies
-
- 1
-
-
- Cutty Sark
- Revell
- (and 2 more)
-
3d printing process
Kevin-the-lubber replied to henrythestaffy's topic in 3D-Printing and Laser-Cutting.
Meshmixer, also free, fixes leaky stl’s, but I assume you all know this and it somehow doesn’t do what you want. -
Very beautiful work. When sculpting a figure for the Vic (in software) I almost lost the will to live, trying to get the proportions right and gave up in the end. You've done an amazing job here.
-
I take it that the variance is too big to bodge with a bit of styrene to bridge the gap? Or a bit of both, slightly trim one side and build up the other, as T_corret suggests? And while it's a crazy idea, that there's no scope to flex the hull to bring it more in line (though you'd just be transferring the problem)? Re' my build log, not much to see over there right now. I don't want to photo-bomb yours (Oh but I'm down with the kids, know all the lingo) with what I've done since but, briefly, I used double-sided tape to join the decks, worked well, and repainted such that it's much closer to my lucky test piece. I doubt I'll post until I've finished the deck section as there really isn't much to show, but I have made some nice (in my eyes anyway) small tweaks to some bits and pieces after visiting the ship a couple of weeks ago. Wefalck, that's more advice that I'll store and experiment with. I love the inks though, as they also dry quick but go through a setting stage where if I catch the moment I can guide them close to what I'm trying for. But I emphasise I'm an absolute beginner at all this and still have mountains to learn. I think Marc's suggestion to varnish each layer will address your correct observation that subsequent layers result in a puddle of pigmented mess. As I've learned!
- 2,699 replies
-
- 3
-
-
- heller
- soleil royal
- (and 9 more)
-
Marc, thanks, I simply hadn't even thought of varnishing between coats and I think that'll be the thing to try. I was getting a fairly good (for me) first ink layer, then losing it with the next one. I have thought discovered that washing up liquid and a nail brush is very good for stripping off paint and ink! Keith, ditto thanks. I've used much the same approach on the CS deck MK2, which I'll post about on my log once I've got the 'teak' items finished. The deck wasnt at all hard to do, just time consuming and, for me, very much part of the learning journey. Mine has come out a bit darker than I was aiming for and not nearly as nice as Marcs' decks, but it'll do and I'll know next time to use a lighter range of colours..... and seal in layers as here again I've slightly lost position when washing with ink. All good fun though, and probably my favourite aspect of the build.
- 2,699 replies
-
- 5
-
-
- heller
- soleil royal
- (and 9 more)
-
You may well be right - it's hard to know without having the model in front of oneself, there probably is no 'standard' answer and, as you say, it's best to go with whatever best tricks the eye.
- 2,699 replies
-
- 4
-
-
- heller
- soleil royal
- (and 9 more)
-
Re' the problem you've set out; I think I would veer towards what you're proposing, exaggerate the curve. What's the difference at the top measurement-wise? I do agree with amateur that any material twist may be visually noticeable. I guess a factor for me would be whether there is furniture or better still a mizzen projecting out over the stern that would break the view into two halves and somewhat change the perspective. Another line of enquiry would be two arcs off the centreline rather than a single arc; exaggerated, to create a 'pointed' face with each side true to the centreline but slightly different to the other side. The one sure thing for me is that whatever I did I would stay true to the centreline, to avoid an optical impression of a twisted model.
- 2,699 replies
-
- 4
-
-
- heller
- soleil royal
- (and 9 more)
-
Nothing to do with my build but just thought I'd share that Greenwich is allowing people to book to climb up to the cross trees on the Cutty Sark this year, for about £50. I saw riggers working on it a couple of weeks ago, imagine this is what they were setting up. I'll probably do it if only to get a close-up look at the rigging up there!
- 444 replies
-
- 3
-

-
-
- Cutty Sark
- Revell
- (and 2 more)
-
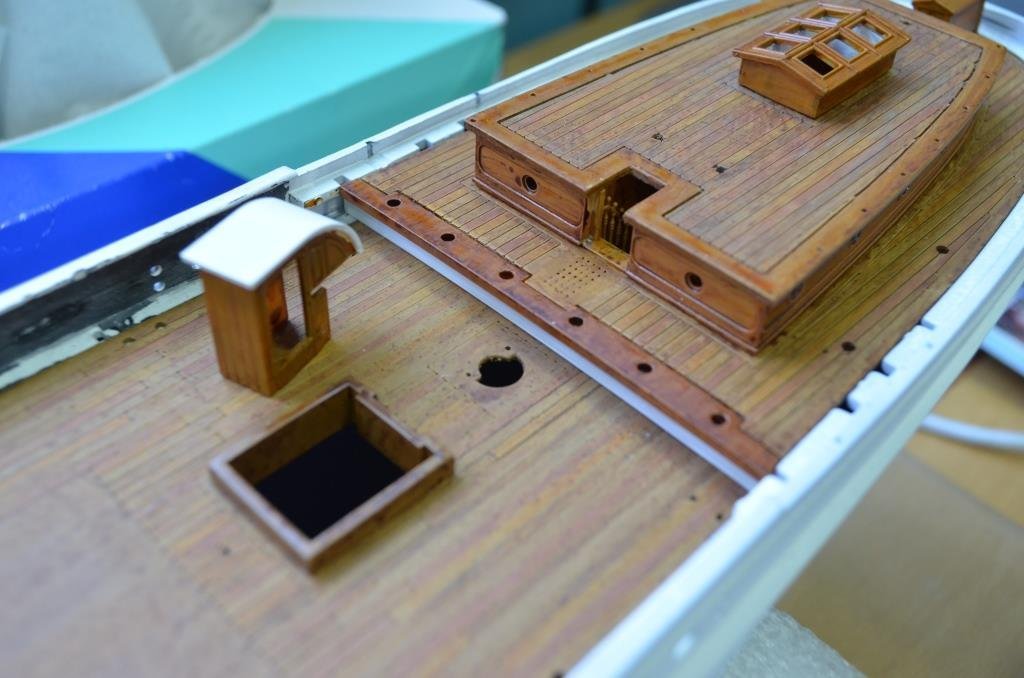
Marc, could I seek your advice please. For the Cutty Sark I want to paint the cabins so that I have a kind of varnished teak effect - how would you achieve that? What base colour and others would you use and how would you get an even finish with ink? I'm getting not too far off it using a light wood (kind of sand coloured) base layer, then dark brown ink followed by a yellow-orange ink, and while the colour is generally about right, I'm struggling to avoid the ink becoming a bit blotchy here and there. I find too that if I go back and re-wet the dried ink it just clumps up and spoils, so think whatever is the best way has to be done during the initial laying on.
- 2,699 replies
-
- 4
-
-
- heller
- soleil royal
- (and 9 more)
-
Same here for the rope decor on the vic stern, again in F360. It still drives me up the wall sometimes when it's uncooperative but it does have some very nice features and, of course, a wire rope like this takes a minute or two when you know how and can be finessed/revised later to your hearts content in a few moments.
.thumb.JPG.335b8d8509eb2d97e079834e5a41c362.JPG)
-
3d printing process
Kevin-the-lubber replied to henrythestaffy's topic in 3D-Printing and Laser-Cutting.
More’s the pity there isn’t a reference file like this for the elegoo series, but I have found a good single setting alternative on the syratech site. I wasn’t even aware of such things so thanks for the tip, likewise the resin, I may try that one presently. -
3d printing process
Kevin-the-lubber replied to henrythestaffy's topic in 3D-Printing and Laser-Cutting.
Good stuff - can you tell us more about the reference file, I have very little hair left but would quite like to hang on to it 😬. That looks like the Syratech resin? I’ve discovered this week that either it or my baby printer (elegoo mars2) is way out dimensionally, but bigger rather than smaller. -
As you've previously said, Ian.....all together now .... 🙂. Maurice's stuff is/was pretty amazing, I think he's on here too isn't he? I made note of Pegasus on my list of ships I'd like to build when I'm all grown up.
.JPG.d8e6273632dad9441cb3baffe4d074f3.JPG)