Kevin-the-lubber
-
Posts
1,232 -
Joined
-
Last visited
Content Type
Profiles
Forums
Gallery
Events
Everything posted by Kevin-the-lubber
-
 Me too. I sometimes wonder why I'm doing this as I know already that I'll retire in another year or so and go straight from doing that full time to this full time, and still be looking forward to holidays! Looks very nice Bill, I can feel that soft, warm breeze even from here.
 -
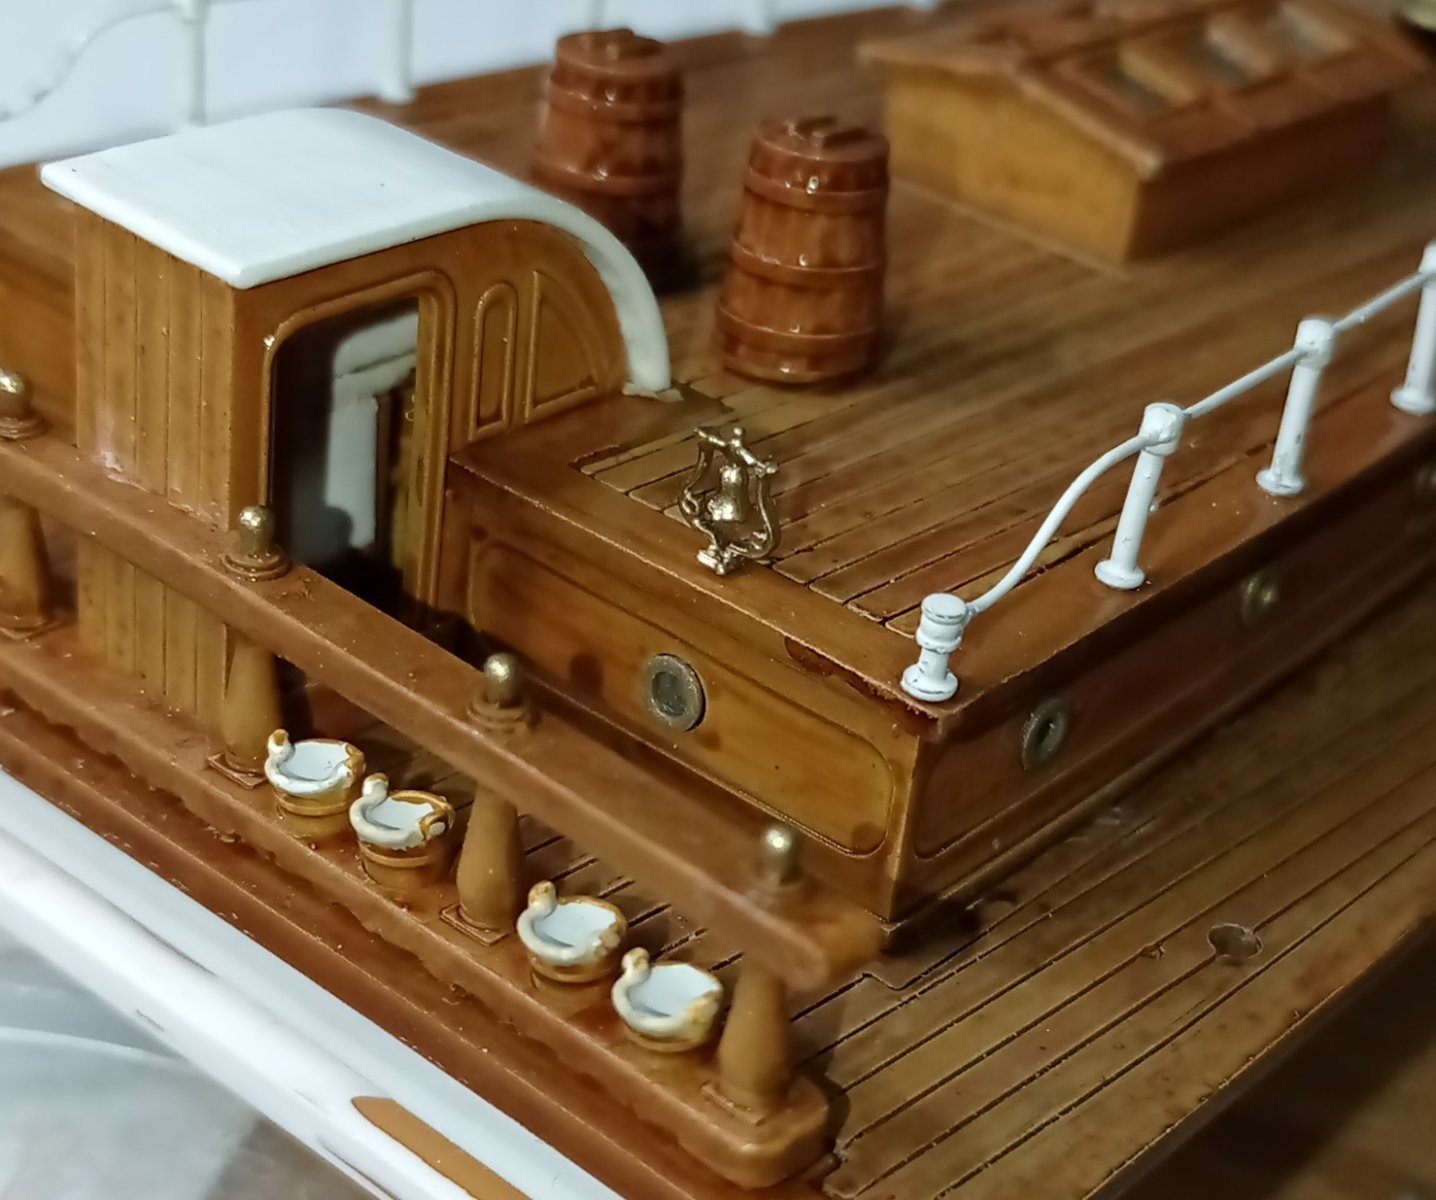
Do you simply apply an oil wash over the acrylic and, if so, what do you use to thin it? And why oils rather than just more acrylics? As I sit here with my 95% painted hull in front of me, I can see that it is a little shapeless if you know what I mean, especially the coppering, despite the way it catches the light. Too 'perfect' - I don't mean my painting, which is very average, but the even-ness of the colours. Even when new copper or brass sheet came into the factory for working the colour wasn't that uniform. I'd always intended to give it a bit of verdigris, though would need to practice first.
- 399 replies
-
- 2
-

-
- cutty sark
- revell
- (and 2 more)
-
You're a braver man than me, OC. I've never seen this done and follow with fascination.
-
That made me laugh. Perverse as it may seem, I have also developed a fondness for acetone over recent weeks; it means I'm far enough along to be slapping my forehead almost daily at my stupidity, unsticking whatever it was that I've stuffed up, doing it right or better, and then moving on to make the next mistake. I've been painting the hull for the last couple of days. Jeepers but that's a trial of patience and perseverance. I don't know how some people, you included, breezily announce that you painted yours 'today' as though this is just a 'by the way' thing. I could be on it for weeks, maybe even months! My wife poked her head in the workshop this afternoon, looked at the ship, looked at my wobbly hand, opened her mouth to say something 'helpful', looked at my face, and beat a hasty, silent retreat. If you learn anything in a marriage, it's that some things are best left unsaid. Anyway, have a good week.
-
That's a pretty good idea. Even though my pin-in-the-bottom worked on the test piece, I still feel a bit nervous that the base of the 'strop' might break. It would all be so much easier if the eye was at the top 🙂. Also, painting the strop parts is challenging, as they say. So I'm still thinking I'll at least see whether I can form wire strops from the 0.6mm or 0.8mm brass wire I have, and solder or glue them closed at the base of the deadeye.
-
I don't think you'll regret that Bill - the ship is so lovely so far and, like Marc says, you might kick yourself otherwise down the line. Two of many things I've experimented with in recent months, from this forum, are acetone for removing CA and matt nail varnish for sealing/glueing rope ends. Both of which are readily available from any cosmetics counter. I've used the acetone a fair bit as it's also good for cleaning brushes if I forget to do this straight away and it certainly strips CA (and paint). I've only tried the nail varnish on a test run of the serving machine but it does seem to do the job, just not quite as quickly as CA, and of course it's virtually invisible. Painting those blocks is going to be a bit of a chore. Has to be done though, not just for the cosmetics but because the resin will gradually degrade with repeated exposure to UV light. Don't worry, you won't wake up next week to find a pile of dust and loose string, I have stuff sat on my windowsill for 18 months without any evidence of change so I think we're talking years and years.
-
I have a feeling the smallest I sent you, Bill, were 4mm, plus some at 5.5mm and 7.5mm. I'm not sure if used McKay's p.114/115 as the reference but even if I didn't, the 4mm would correspond to the yard tackles (H11 - 15"). The 7.5's roughly correspond to jeer blocks (H12) and the 5.5's don't correspond to anything (!), they were just a halfway house and for that matter making these was mostly just a random break from what by then had become the tedium of modelling the stern. I think I tried making the 10" common blocks (H19) at either 2mm or 2.5mm but may have struggled with the printing, though I'm not sure now why that would have been a problem, I'm printing equally thin sections these days without any issues.
-
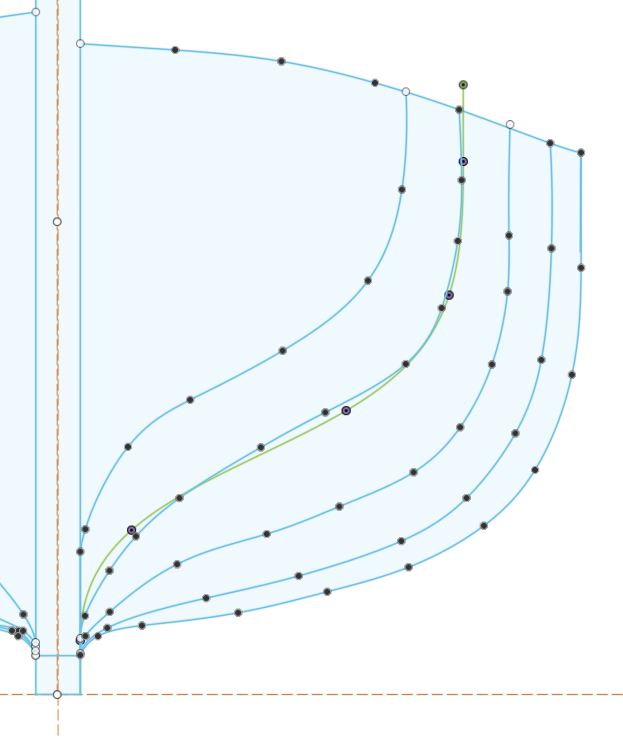
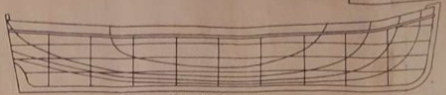
Richard, I'm working off a scan of underhill's drawings of a jolly boat, which came from a book so has a bit of distortion. It's also fairly small scale so the lines become a bit fuzzy, even at 1:96 scale, when drawing the splines. I think I know the answer to this question but it's always good to check with an expert - having translated the waterlines and station sections, the waterlines suggest profiles that are fairly different to the station profiles. In the picture below, showing the 2nd station profile, blue are the station lines from the drawings, green is the implied section based on the waterlines, the purple points are the projected intersection of the waterlines to the station plane. So, is this variance most likely just the sum of the translated drawings being a bit hit and miss through distortion etc? Or am I making a fundamental error in interpretation of the line plans? Can I also check this logic with you - I'm inclined to follow the waterlines more than the station lines i.e. move the latter to the former, as I think this will naturally lead to a more faired hull. Is that the right/normal/sensible thing to do? In other words I more or less forget about the station lines from the line plans and let the waterlines give me station profiles? One other thing - the line plans give me a plan view of the waterlines, which I'm working from, and a side view. Is that side view important, do I need to use these lines to get the right end result? The station lines do line up on the drawings by the way,

- 444 replies
-
- 2
-
-
- Cutty Sark
- Revell
- (and 2 more)
-
Yes, that’s very useful Richard. It gives me all sorts of reference points. The paintwork is exceptional , isn’t it, both in execution but also choice of colouring. If I’d seen this two or three months back I think I’d have gone for that wood colour for all the furniture as it would contrast better with the deck. I’ve muddled through to lofting the basic jolly boat shape and now need to do all the fairing, keel and detailing. Fairing in f360 is more complicated than in Rhino and I haven’t quite worked out the best way yet to translate your approach but I figure this is a good time to learn that, on something where it doesn’t matter too much if I’m unsuccessful. I realised the other day that, while the Campbell plans for the ship itself may not be completely accurate, the hi-res size means they will be excellent as line plans and modelling the hull would be no more difficult than the jolly boat. And I was going to ask you, unless it’s in the video, how to ascertain the deck curvature from the plans? Is the ellipse constant fore to aft?
-
Missed that. But now you mention it, I may have a job that needs doing..... pm me, so no-one knows it was planned 🤣
-
Well done! I don't know how I'm going to go about these, I'm not at all good at placing things accurately so will have to come up with some kind of plan.
-
Mine will most likely be black now. Apart from anything it'll better hide my likely sins.
-
Shall I forward the address for Greenwich, they had riggers working her back in February and they may still be there? 🤣 I think some things on the Cutty Sark may no longer be true to anything more than what makes it pretty and more suitable for visitors. Tarred rope at touching level...
-
Rob, that makes perfect sense, but on the museum ship they are tan. Poetic license?
-
Thanks for those suggestions. I found some graphite powder a while back in the 'making' drawer, along with loads of drawing and watercolour pencils, must belong to the other half because I can't draw to save my life, but I'll experiment and get some chalks too this weekend. Rob, I often find the printing bit quite hard going. Finding a way to place supports on tiny things can be tedious, getting them off at the end even more so. I printed the pump mk2 as one piece earlier, along with another three piece as insurance, and while I've proved to myself that it'll print well as one piece, I'd have to spend another hour on the supports for that to be practical as right now I've broken a couple of the wheel spokes during the cleanup. The fun part for me is the design work in CAD, as that's where you see the thing take shape in front of your eyes. You basically see absolutely nothing with a resin printer until it's done, sometimes hours later. Horses for courses though. Astrophotography.... I haven't tried that yet. I was going to sell my telescopes as I hardly ever use them now, but thought I might give photography a go before I do. I started playing with (focus) stacking, on this model as it happens, two or three weeks back but initial results tell me I have some learning to do. I'd have to get my tripods and motors working properly first though, I've never managed to get a setup that tracked properly. Doesn't help that there's a damn great tree that blocks the pole star, from the only good observing spot in our garden.
- 444 replies
-
- 2
-
-
- Cutty Sark
- Revell
- (and 2 more)
-
A question now - this metallic black paint is all very well but it does make things look like they've just been unloaded off the factory lorry. How do I make them look a little more aged... weathered I guess? (The gold stays as it is, hands off my shiny bits 🤪)
- 444 replies
-
- 1
-
-
- Cutty Sark
- Revell
- (and 2 more)
-
Rob, you would have an absolute blast if this was your thing. But I have a feeling you might not find it very satisfying. I look at your work on the Glory, Bruma's yards, Dafi's Victory, Marc's Soliel, and countless others, and wish I had those skills. However, it's not a bad way to learn stuff or try things out. And for those of us who make mistakes at every turn while we're learning, it's heaven. Stuffed it up (yet again)? No prob, just print another. You should see my scrap bin, especially last year's.
- 444 replies
-
- 1
-
-
- Cutty Sark
- Revell
- (and 2 more)
-
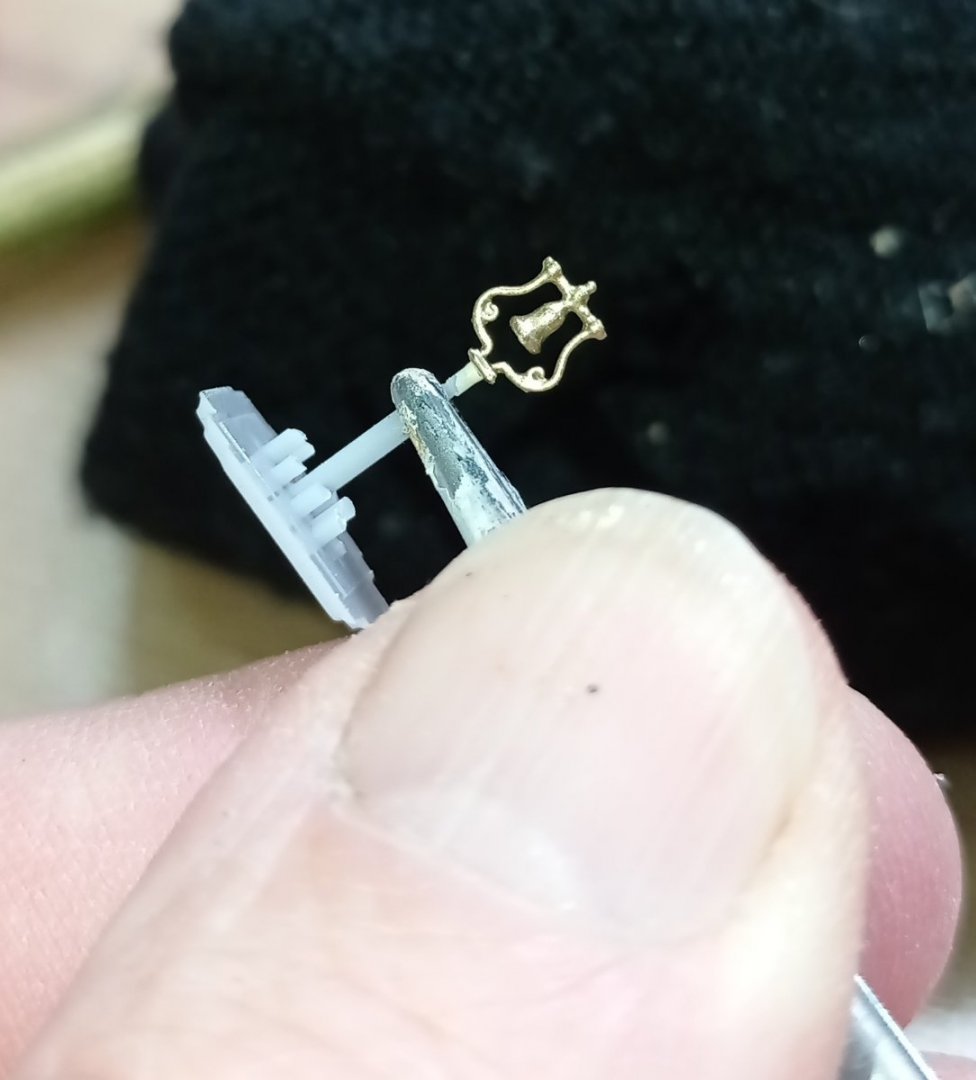
There won't be that much more detailing, I think. I am on a bit of a roll though, it's like 18 months of learning Fusion 360 and 3D printing is starting to pay off, such that I'm now able to make most things quite quickly and easily. I made this tiny little poop bell last night while waiting for the bilge pump to finish printing. A year ago this might have taken me hours. This is so small and fine that the single coat of gold paint has bridged the space in the little scrolls. The 'pin' just above the tweezers is 1mm dia. The thing is, there is nothing that complicated on the Cutty, especially with having the Campbell plans in very high resolution.
- 444 replies
-
- 2
-
-
- Cutty Sark
- Revell
- (and 2 more)
-
Send me a pm with your address, I have a spare set of decals. Don't get too downhearted, modelling at this standard is bound to have some really bad days but the quality of your work so far tells me you're perfectly capable of dealing with the rigging. By the way, do you have a first name, it always feels a little impersonal to refer to you as bcochran!
- 481 replies
-
- 1
-
-
- Cutty Sark
- Revell
- (and 2 more)
-
Complicated looking things. I think at 1/150 you’d be hard pressed but at something like 1/72 they’d look great.
- 444 replies
-
- 1
-
-
- Cutty Sark
- Revell
- (and 2 more)
-
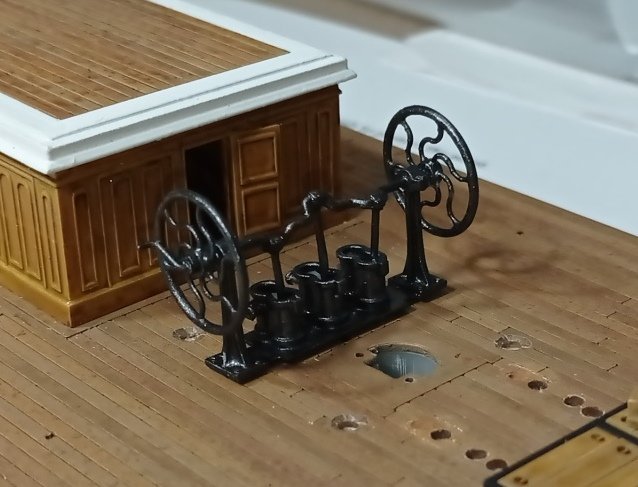
First print. A little bit of tweaking should see it right, the crankshaft is a bit too heavyweight, you'd want a couple of Popeye's on steroids to get this going (and good luck getting it stopped).
- 444 replies
-
- 4
-
-

-
- Cutty Sark
- Revell
- (and 2 more)
-
They look fantastic. I think this may be one area where I'm still going wrong, using pure black and white. My white's especially just looks unnatural; I also hate painting white because it's so hard to get good opacity. Any tips?
- 399 replies
-
- 2
-
-
- cutty sark
- revell
- (and 2 more)
-
Thank you, I've been following your build, and a few others, and learning a lot. Yes, resin, I don't think I could have got the lozenge sections with FDM as at their thinnest they are only about as thick as a sheet of paper. I've used an ABS-like resin which isn't very brittle at all unless you really abuse it. The plan is to run brass rods glued into the bottom of the deadeyes, through the pinrails and glue into the waterway/bulwark junction. This should avoid any real pull on the pinrails themselves. But I'll also be epoxy glueing the pinrails to the bulwarks in between the lozenges - I've masked these areas on the bulwarks and tested it on scrap so hopefully that'll be strong enough. To be honest I'm not sure I remember how I got the curvature in the end, probably just using the Campbell drawings. There's more than enough give in them to curve to match the model hull, without distortion. I have to be honest - this was the best of three, where I tried out different combinations. sand coloured primer, raw sienna basecoat, burnt sienna wash and windsor & newton nut brown ink. All done using a brush this time as airbrushing small things is so much messing around.
- 444 replies
-
- 3
-
-
-
- Cutty Sark
- Revell
- (and 2 more)