
whitejamest
-
Posts
213 -
Joined
-
Last visited
Content Type
Profiles
Forums
Gallery
Events
Everything posted by whitejamest
-
 That's an awfully nice looking deck, and personally one I would be very happy with as is. That's probably not helpful though. Have you applied any finish to it so far? If so, I expect that would have to be removed/ sanded out first. Do experiments off model of course, but you might find tung oil would make the colors and the seams a little darker and richer.
 -
Very nice. The paintwork came out lovely. It's a nice feature that you will be able to see through the windows.
- 142 replies
-
- 1
-

-
- alfred
- solid hull
- (and 2 more)
-
Glad to hear there will be cutouts in the deck so the lovely details below will be visible.
- 142 replies
-
- 1
-
-
- alfred
- solid hull
- (and 2 more)
-
I'm following this with interest. I would find a complex solid hull build like this one very intimidating, but yours is coming along wonderfully.
-
This is looking really spectacular. Great photography too.
- 800 replies
-
- 3
-
-
- snake
- caldercraft
- (and 1 more)
-
The model itself is looking beautiful, but moreover that is a fantastic photograph. Real eye candy there. Well done.
-
Thanks VTHokiEE. Yes I think a lighter pencil would be a better way to go, and that is something I will play around with on a later build. For this one, I'll go forward without penciling the seams. And yes, I will be cutting the planks into shorter 'realistic' lengths. I'll try to use the color variation in the wood to let the joints stand out just a little. SpyGlass, I have a feeling you are going to be two builds down the line by the time I finish this thing. What other woods do you have available for the 2nd planking? Nothing wrong with the pearwood of course, I'm just curious about what other candidates people like to use.
-
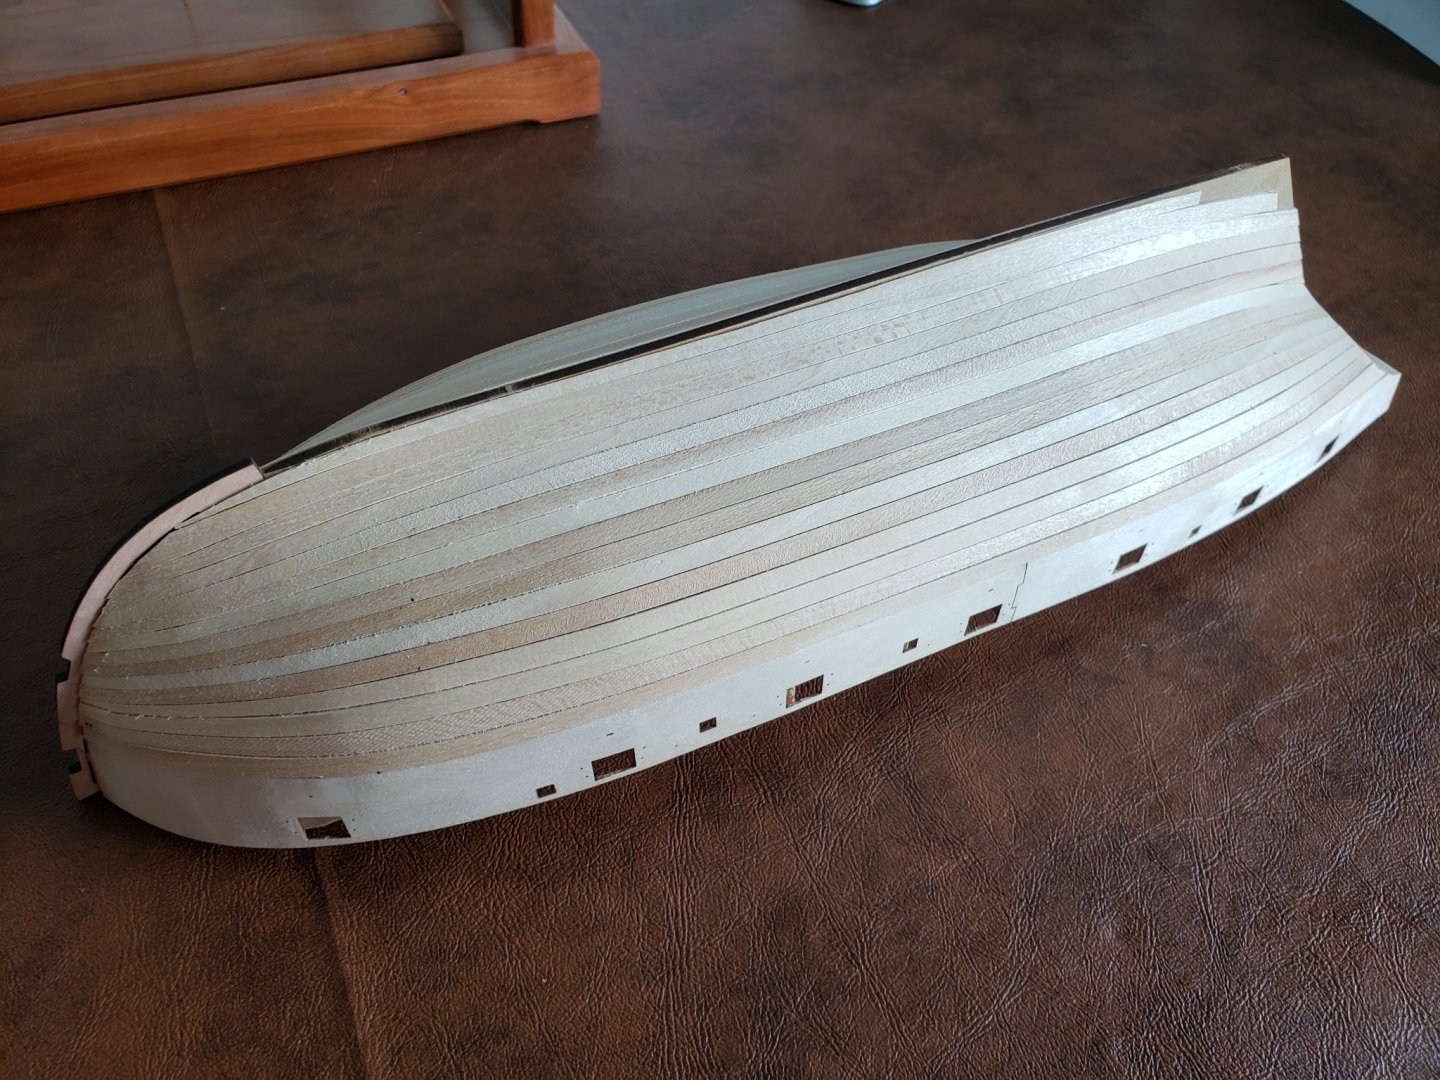
Well, I've been engaging in what can only be described as a pretty ridiculous amount of hemming and hawing over the question of whether or not to emphasize the seams in the planking. Just when I thought I had made up my mind to continue as I began, coloring the sides of the planks with a pencil, I made an about face. I stripped off the planking at the stern and did it over again without the pencil. Better to explore the options now, while it's still early days. I do think it looks better this way. I tried to use some of the natural variations in the color of the wood to make sure that the separate planks are still apparent. I think for the rest of the hull I will aim for less variation, and it will still be clear enough. I'm going to have to be a little more decisive going forward if I am ever going to finish this thing!

-
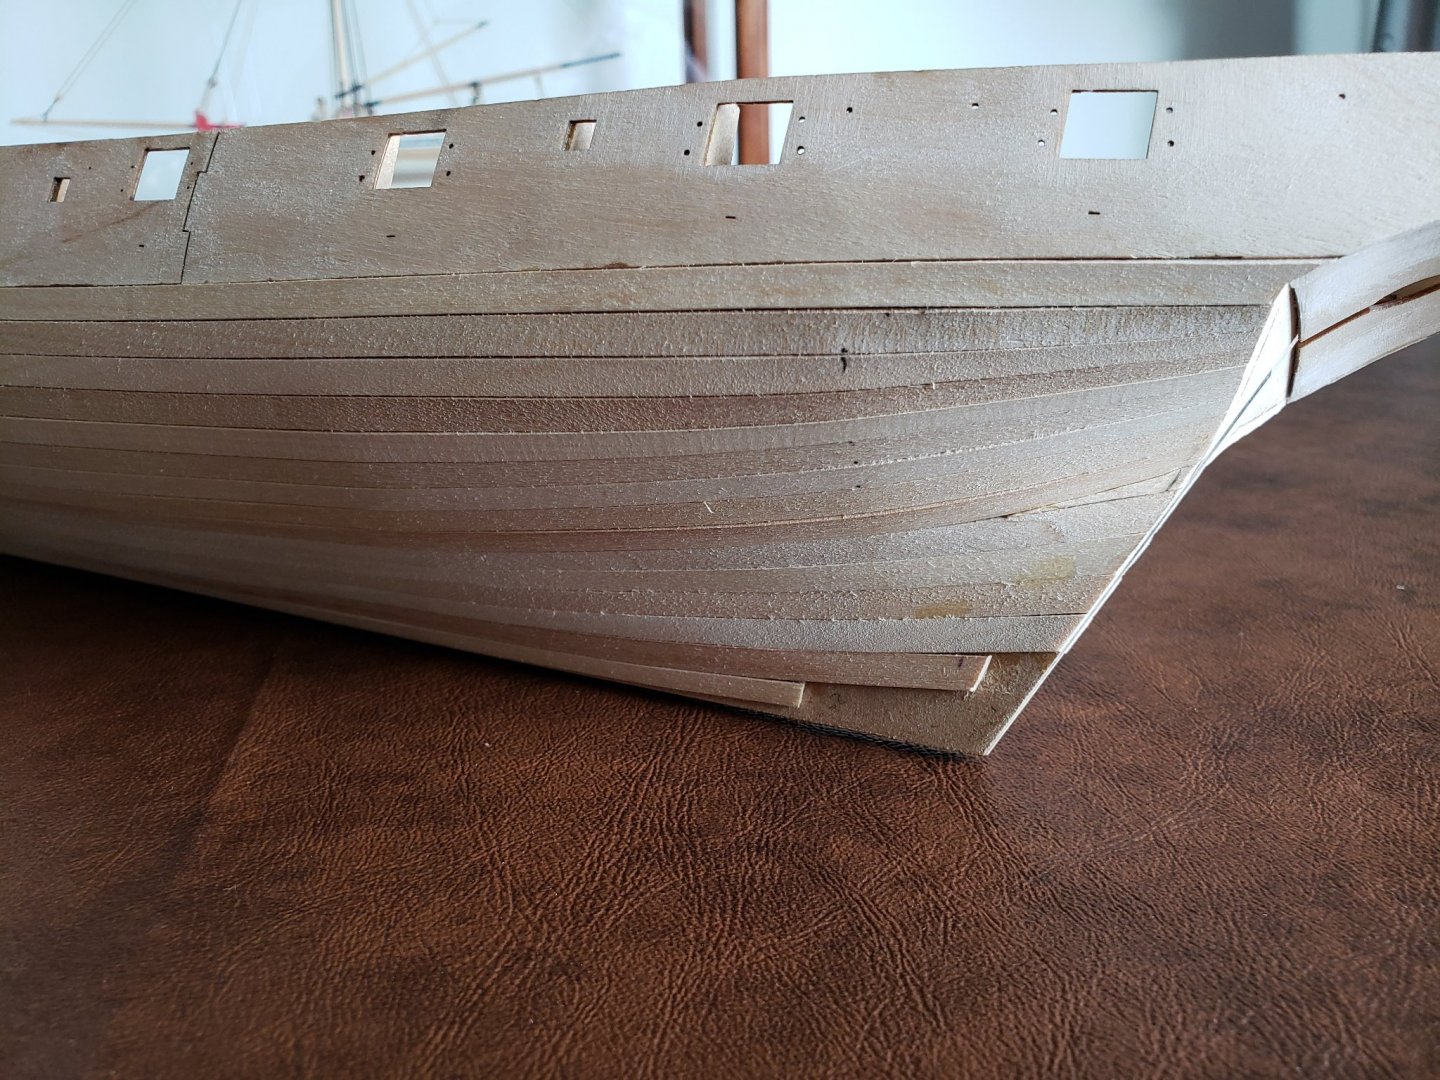
Thank you for the input guys. I expect this is as tight as the planking is going to look anywhere on the model, since it's the simplest surface. But we'll see. I'll continue with the pencil coloring of the seams and try to keep it as neat as possible. Next I need to figure out how to stagger the butts of the planks. I've seen lots of great examples of other people's work, but the hardest part for me to understand is the way the lengths of the planks nearest the bow are determined, as that will determine all the rest of the spacing. I'll start another thread in the planking message boards to pick some bigger brains than mine. EDIT: Doing a little poking around I see Derek answering exactly the question I am trying to figure out, 6 months back: https://modelshipworld.com/topic/24308-looking-for-the-correct-sequence-and-terminology-for-deck-plank-butt-shift/?tab=comments#comment-714835 "Longridge in his Anatomy of Nelson's ships uses the sequence 5:3:1:4:2, and in his case he's using inches. He was building Victory to 1:48 scale, so a 20 ft deck plank was exactly 5 inches long. If he started a line of decking with a five inch plank then every plank in that line would be five inches for as long as possible. The next line up, he started with a 3 inch plank, then finished the line with 5 inchers. The next line up started with a one inch plank, the next 4, then 2 then back to 5. Alternatively, if you work from the other side of your original 5 inch plank, the sequence becomes 5:2:4:1:3" "If you're working to a different scale and/or plank length, you can still use the same ratios. So on my current 1:64 Speedy build a 20 ft plank works out at 95mm. So my sequence/ratio is 95:57:19:76:38." That could not be more helpful, thank you Derek of six months ago!
-
At this point I've attached the first of the second layer planks on the sides of the hull, at the main wales positions, but am pausing to consider a major aesthetic point before moving on. As I glued on the wales, I realized at the stern that there is a real danger of the glue spreading a little bit, and getting on to the stern planks before they are varnished, which could affect coloring. So, after conducting some experiments with a few different finishes I decided on tung oil, and applied it to the stern. Well and good, except that the tung oil made the seams a little more visible than I had anticipated. Now I find I am of two minds about how the seams between the planks look. I can't decide if I would rather continue as I began, coloring one side of each plank with a pencil to simulate the caulking, or if I want to strip off the planks and begin again, without emphasizing the seams. (It's early enough in the planking process that starting again is not an appalling prospect) I'm curious about what others would do. Keep the seams, or redo without?

-
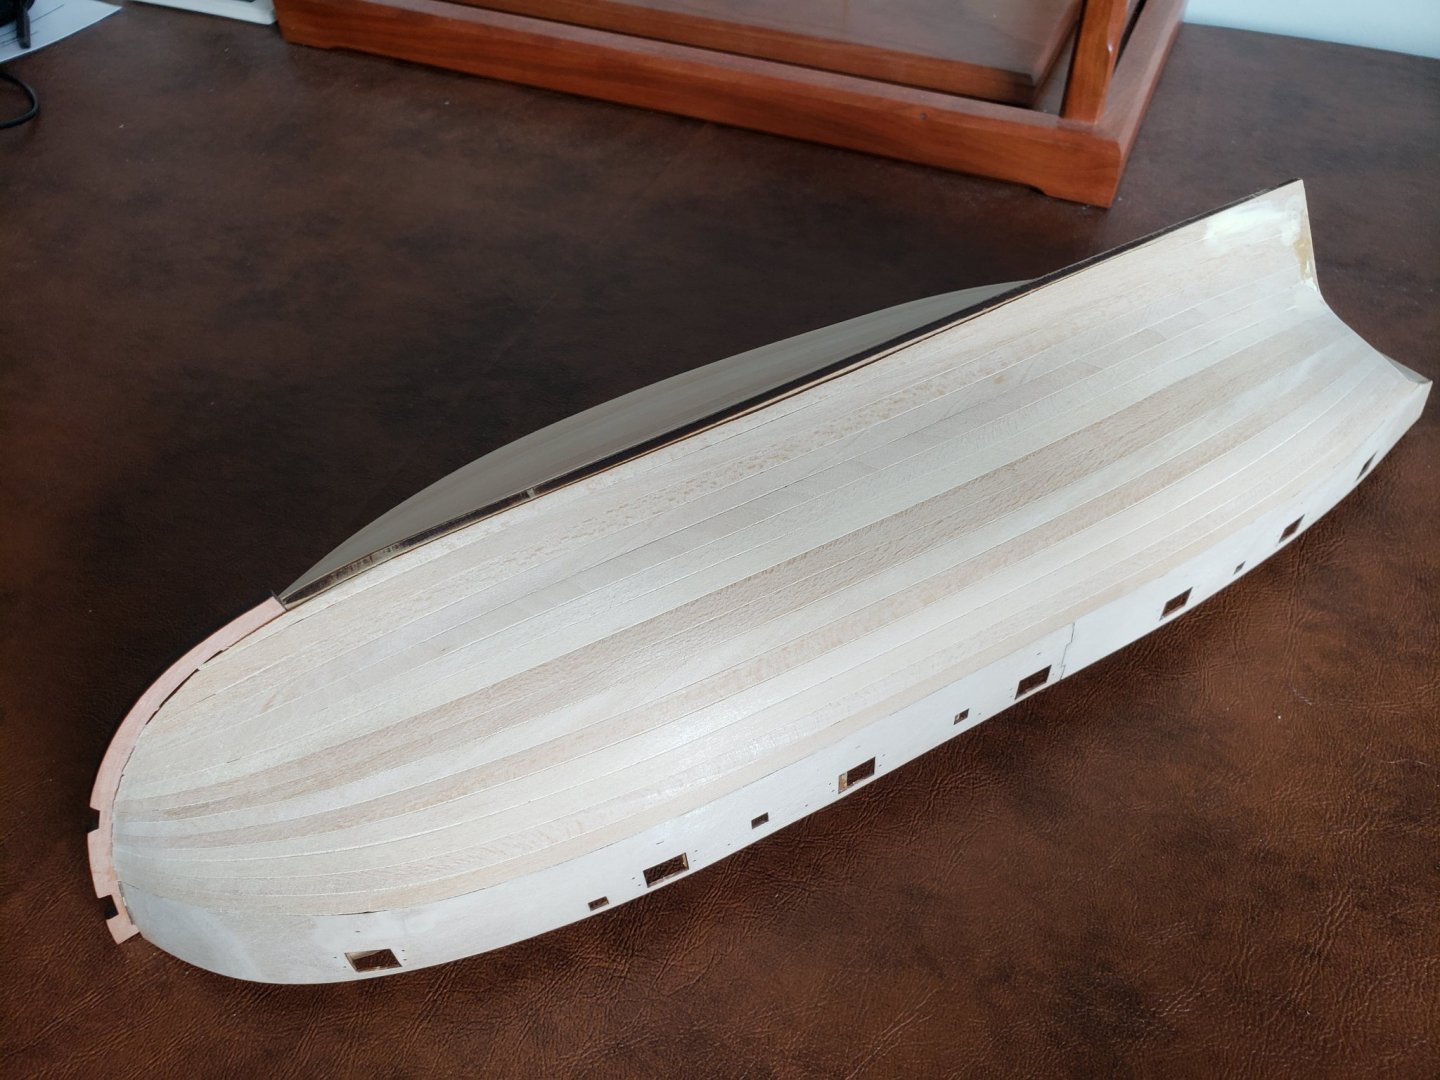
Progress on my Speedy slowed to an even more glacial pace recently, for several reasons. First, I had shoulder surgery about a month ago, and am only slowly getting back into shipyard mode. Physical therapy is helpful, though not fun. Second, I had decided I wanted to plank the model in Alaskan yellow cedar after seeing many beautiful examples of this wood on the site, but the only place I could find that would ship pre-cut planks couldn't deliver the size or quality I would need. I don't have the tools to cut it myself, and for space and money reasons purchasing a small table saw was not really an option. Hopefully somewhere down the line that will change. I was just starting to think cedar was not going to be an option for me, when I received an extremely kind and generous offer from Gregory Gatz, who had seen my posts about trying to find planks. Long story short, Gregory - whom I had never even interacted with before, and certainly owed me no favors - used his considerable skills to cut me some really beautiful planks, easily the cleanest and most uniform I've worked with. He cut them from Syren Ship Models' cedar planking sheets, which Chuck was conspicuously generous with when the order was placed. I'm very grateful to both of them for their generosity. Now I just need to achieve results worthy of it! Below you can see the beginning of my second planking, which begins at the stern of the model. I'm trying to keep the simulated caulking between planks noticeable but slight, so I am coloring just one side of each plank with a number 2 pencil. I expect the seams will come out a bit more when I apply varnish. I decided to plank the transom horizontally, rather than vertically as the instructions indicate, really just because I prefer the look. Reading through discussions in other build logs for the Speedy it seemed there was sufficient ambiguity about what the historical practice would have been for this particular vessel, so that I felt I could get away with it. The next step will be to add the planks at the wales on either side, and I think for those I will use the pear wood that came with the kit. I think it will be easier to keep a good consistent, subtle curve if I am using a single plank for the whole run, rather than using several shorter planks. And they will be covered by a second, painted layer anyway, so that the difference in the wood will not be visible. Then I have some serious practice to do in lining off the hull and shaping the planks before I start glueing...
-
Lovely work, and very helpful to see in such detail.
- 725 replies
-
- 1
-
-
- vanguard models
- speedy
- (and 1 more)
-
The boat is looking really lovely, well done. I found it pretty challenging to drill the holes in the brass bands, especially because all I had to work with at the time was my little pin vise. It was hard going by hand. I managed to do it for the lower band that receives the hook on the boom, but for the two upper bands I actually cheated. I glued a couple of spare ringbolts to the bands, snipping most of the long end off first. You can see photos in the gallery on my profile page if you want to see how that looks. It was a minor enough detail as far as I was concerned.
-
I want to say thanks again for the enormous expertise members on this site share with newbies like me. And more than that, I've had a couple offers like Bill's from members moved purely by generosity to offer their help. It's another sign of what a great community this is, and it is, for lack of a better word, pretty heartwarming. I was also very pleased a few months back to learn about the Ship Model Society of New Jersey. I've made it to only a couple of the zoom meetings, as my schedule has been all over the place lately, but it's a very welcoming group, and I hope I will have more opportunities to pick their collective brains in the future. I hope when the pandemic subsides I can meet folks in person. I know exactly 0 ship modelers in a face to face capacity, and it would be very nice to change that.
-
That's a beautiful job on that hull JJ. If my planking looks half as tight I'll be a happy camper indeed. Can I ask what you have coated the wood with? Is that just wipe-on poly?
-
Thanks for the replies guys, and for the recommendations for the Byrnes saw. It does indeed look like a great piece of equipment, and owning one will be a goal for me down the line. I know it will be extremely useful to be able to cut my planks in future. It's not workable for me right now, but when my budget and space have expanded a little I'll aim to get one. I did check with Ocooch - looks like a good source for lots of wood, though they don't have Alaskan cedar in stock at present. You sir have a deal! Joking aside, the point is well taken. I imagine the profit margins must be incredibly narrow - as I imagine they must be across most of this hobby.
-
Hi folks. I'm trying to find a US supplier of Alaskan cedar planking strips, and am not having a great deal of success at the moment. I've been going through the list of vendors on this site, but so far have not had any luck. Cutting my own strips from larger blocks is not really an option for me. Even if I were prepared to put the money down on a saw, space limitations in my tiny apartment would prevent it. I received an order from the Lumberyard, but they were too thick and I have been told that's the best they can do. I know Syren supplies cedar, but they don't offer pre-cut planks. Has anyone recently had good luck with a US source? Thanks for your help, James
-
Das-Werk New U-Boot SM U-9 in 1/72nd scale
whitejamest replied to yvesvidal's topic in Plastic model kits
That looks like a neat kit, and certainly a fascinating subject. You don't see a lot of models of WW1 subs around. -
A very brief update here. I've done the bulk of the sanding of the first planking, and just need to do a little more fine tuning where a few bumps remain. I added a small amount of wood filler at the stern to smooth things out. I've never worked with Alaskan cedar before, but looking at some of the gorgeous examples of other modelers' projects I decided I needed to give it a try. The pear wood supplied in the kit looks to be of very nice quality, but I just prefer a lighter color. So I've placed an order for some. Meanwhile I'm watching videos on measuring and bending and shaping planks. Hope I can post some more updates soon!
-
Thanks for the picture Derek, that is helpful. Did you sand the MDF adjacent to where the sternpost gets attached prior to beginning the planking?
-
You're definitely right about the bumps SpyGlass. I'm currently working on removing those, and a few others as well. I'm relying on the thickness of that lime wood to wash away a number of sins. I admire your perseverance for restarting the build - it will be all the better for having had a practice run!
-
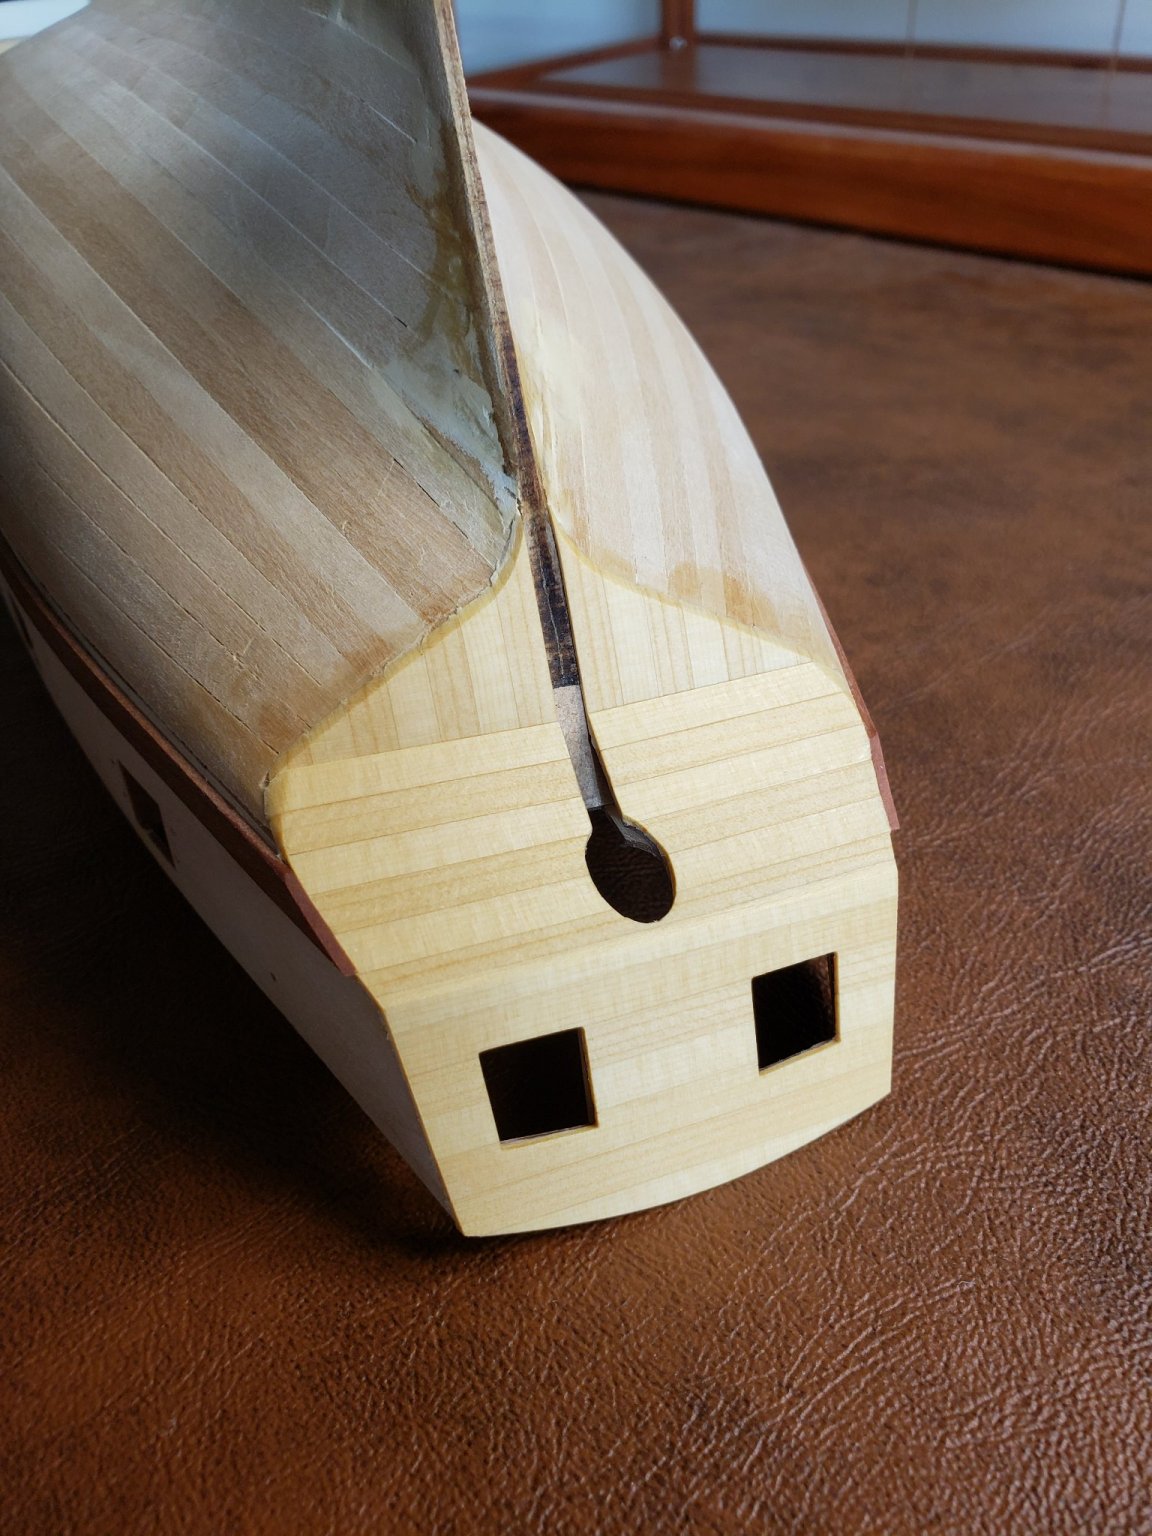
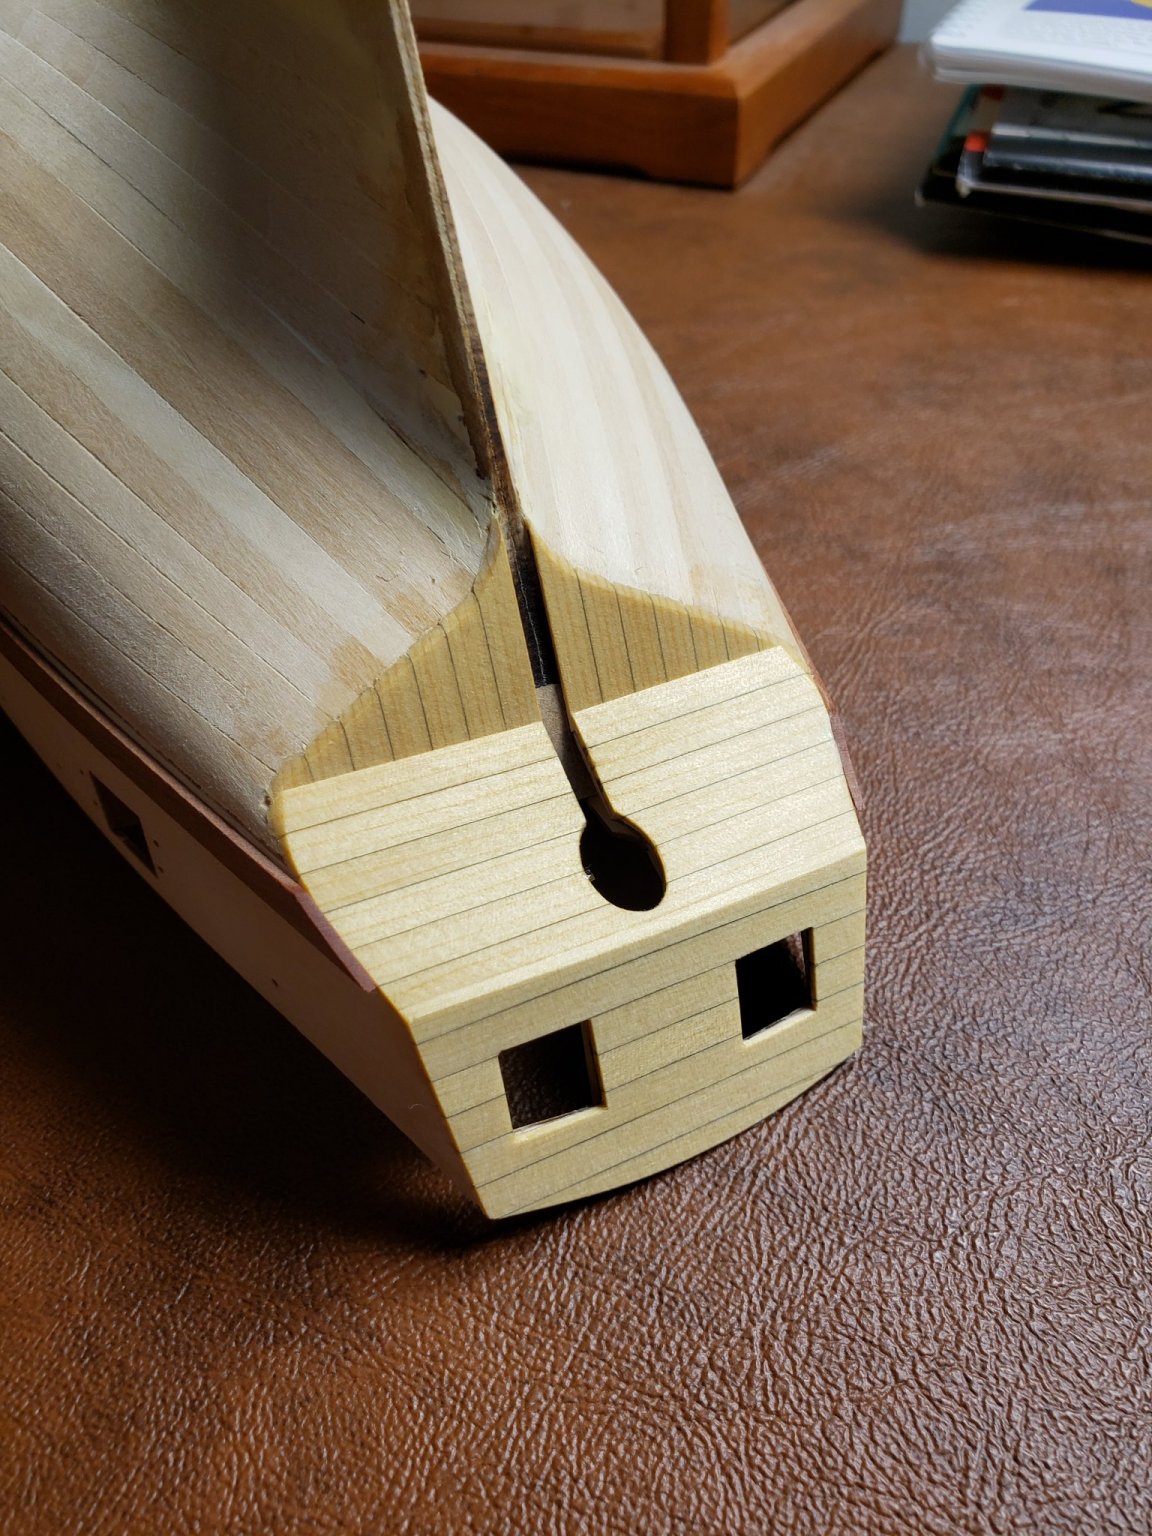
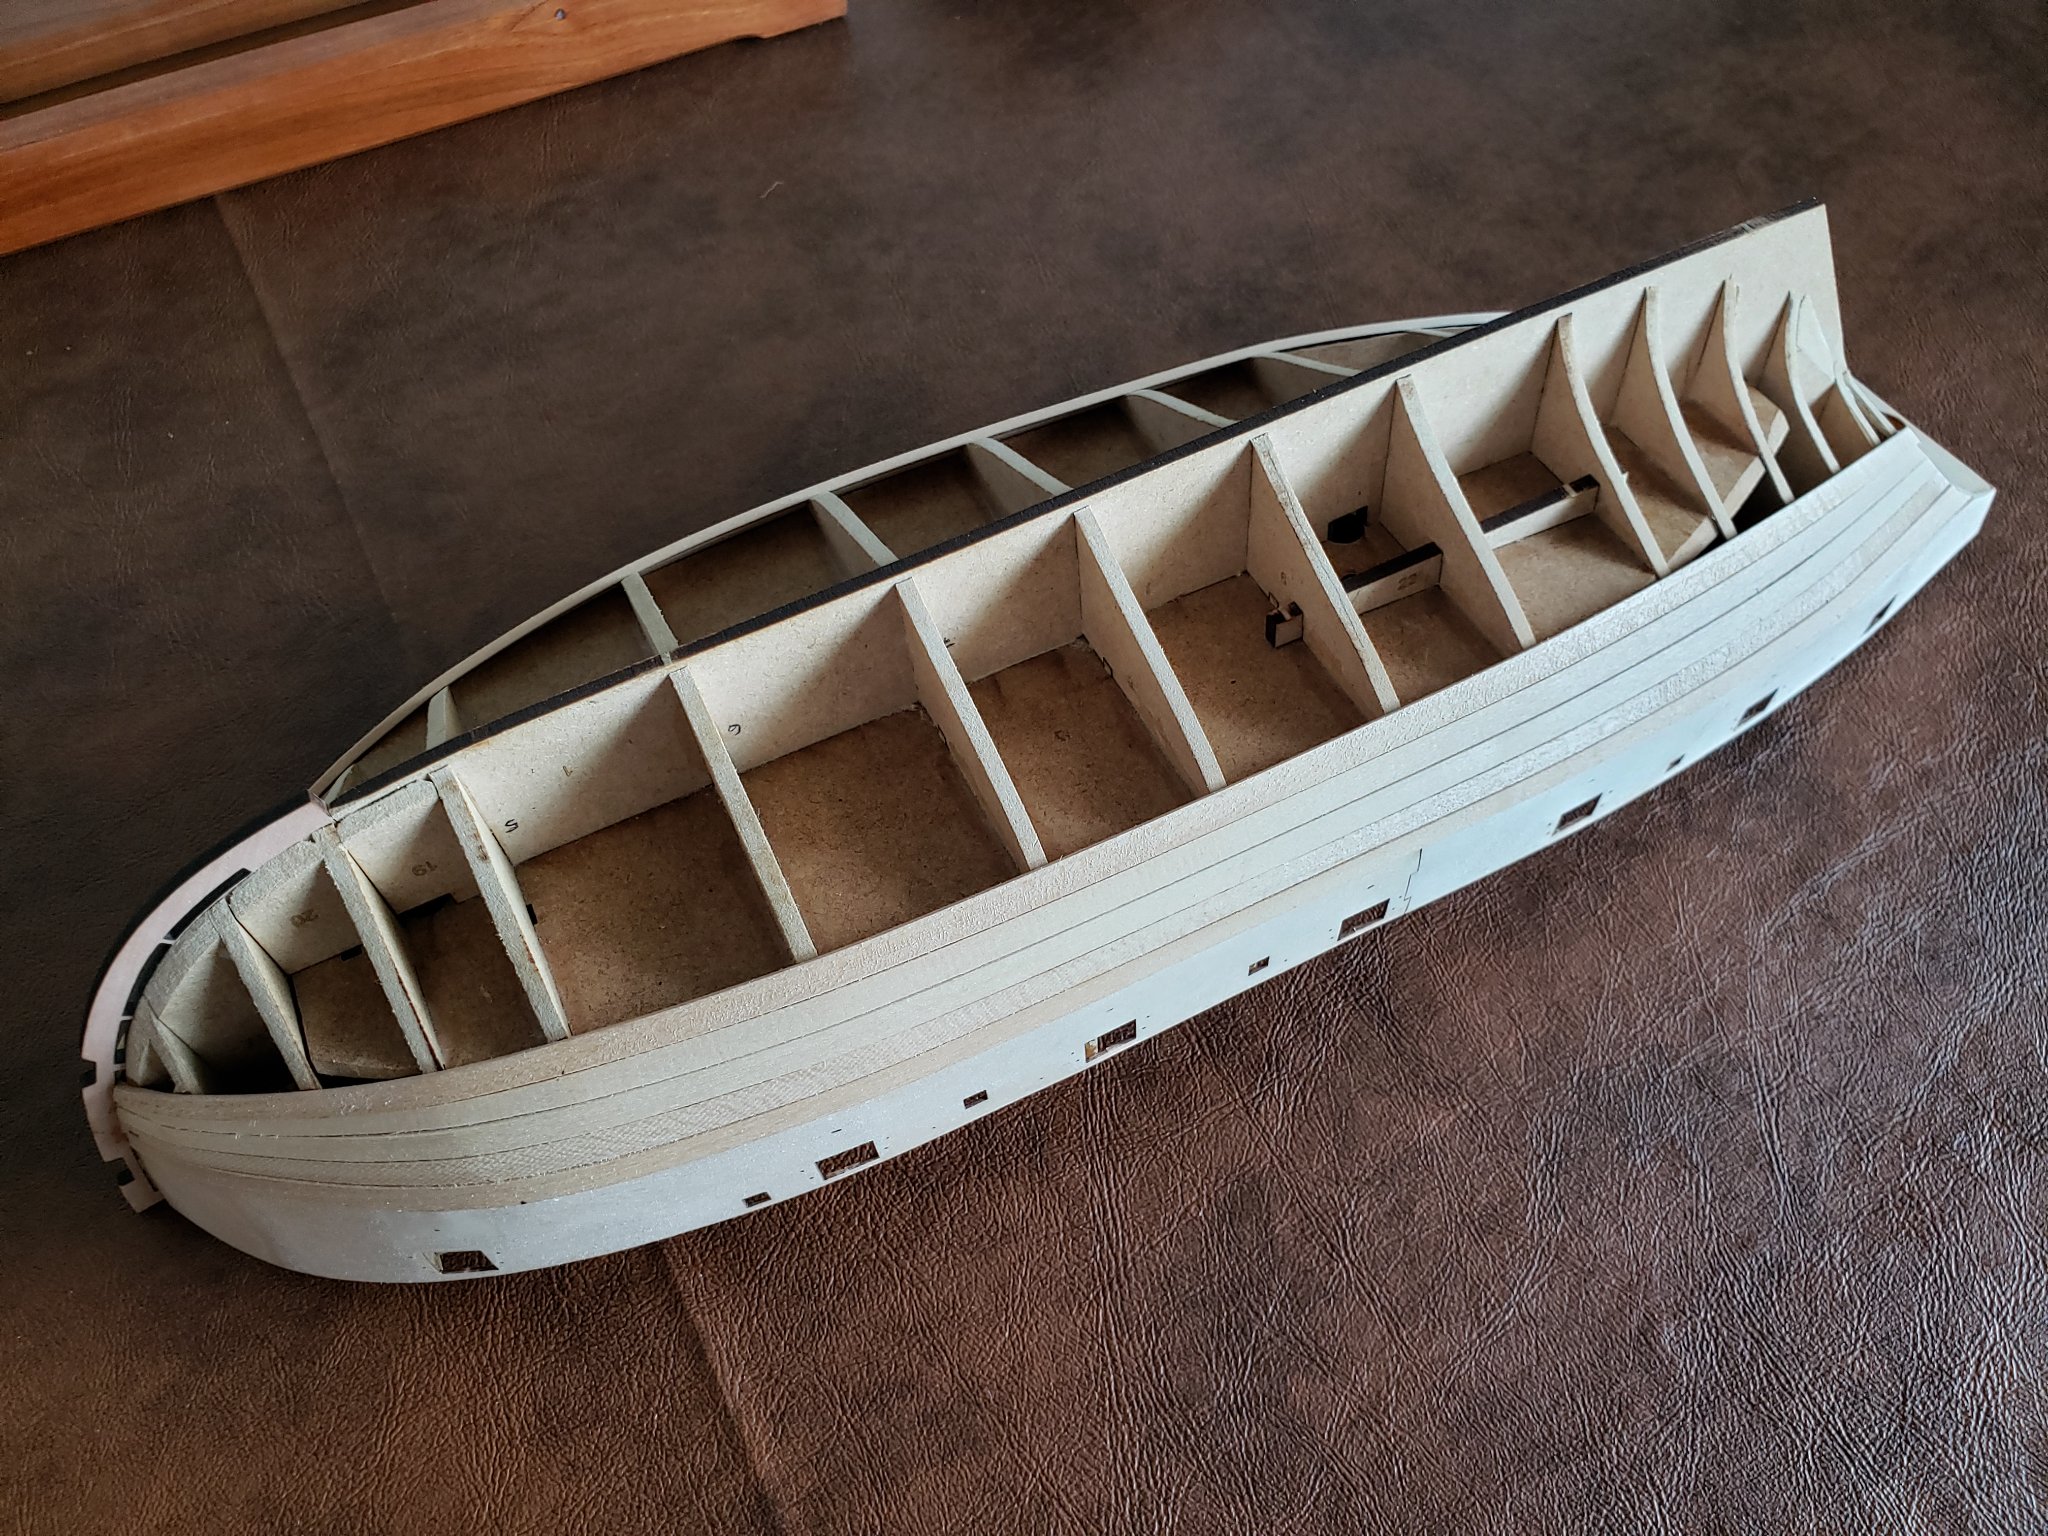
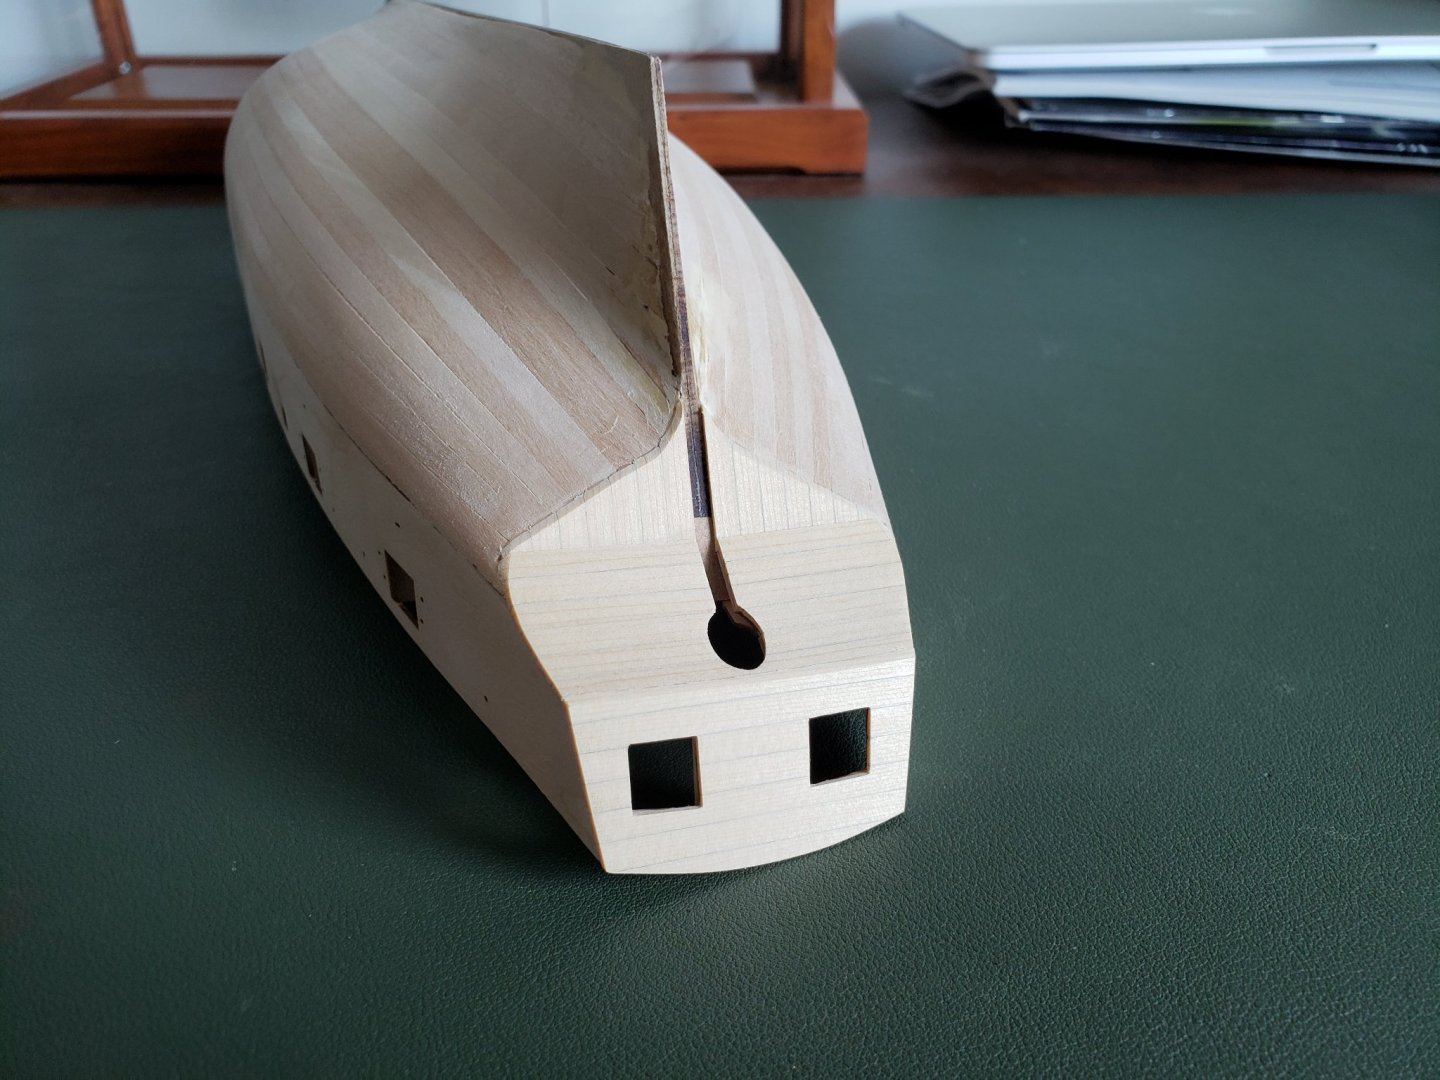
I think mine is probably the least speedy of Speedys on this site, but I did finally manage to finish installing the 1st planking layer on the model. Now I'm sanding away at it to smooth it out. I bought myself an electric sanding mouse to help out with that part. I'd never used one of those before, so first I built myself a little test section from leftover scraps of limewood, so I could see how fast the sander ate it up. Fortunately it was slow enough not to cause alarm. I could make multiple passes over the same area, check it, and go back for more. The sander has made the process easier than expected, though I'll be going back over it by hand to fine tune it. Here are some pictures before any sanding has taken place. As you can see, I experienced a little confusion at the stern. At first I had intended to plank over all of the mdf for consistency, and then sand my way down through it. That seemed to be what the instructions were recommending, though I may have just misinterpreted them. But as I worked my way down I balked at how much extra work that was going to mean, and terminated the last few planks early. I wish I had marked out a bearding line and sanded the mdf before beginning planking. A lesson for next time. I put in just two tiny triangular stealers at the stern, and those were fairly clumsy. But as they won't be seen in the end I felt they didn't have to be too pretty.

-
I have a lot of fond memories of that game. Your models are an enormous improvement over the originals.
-
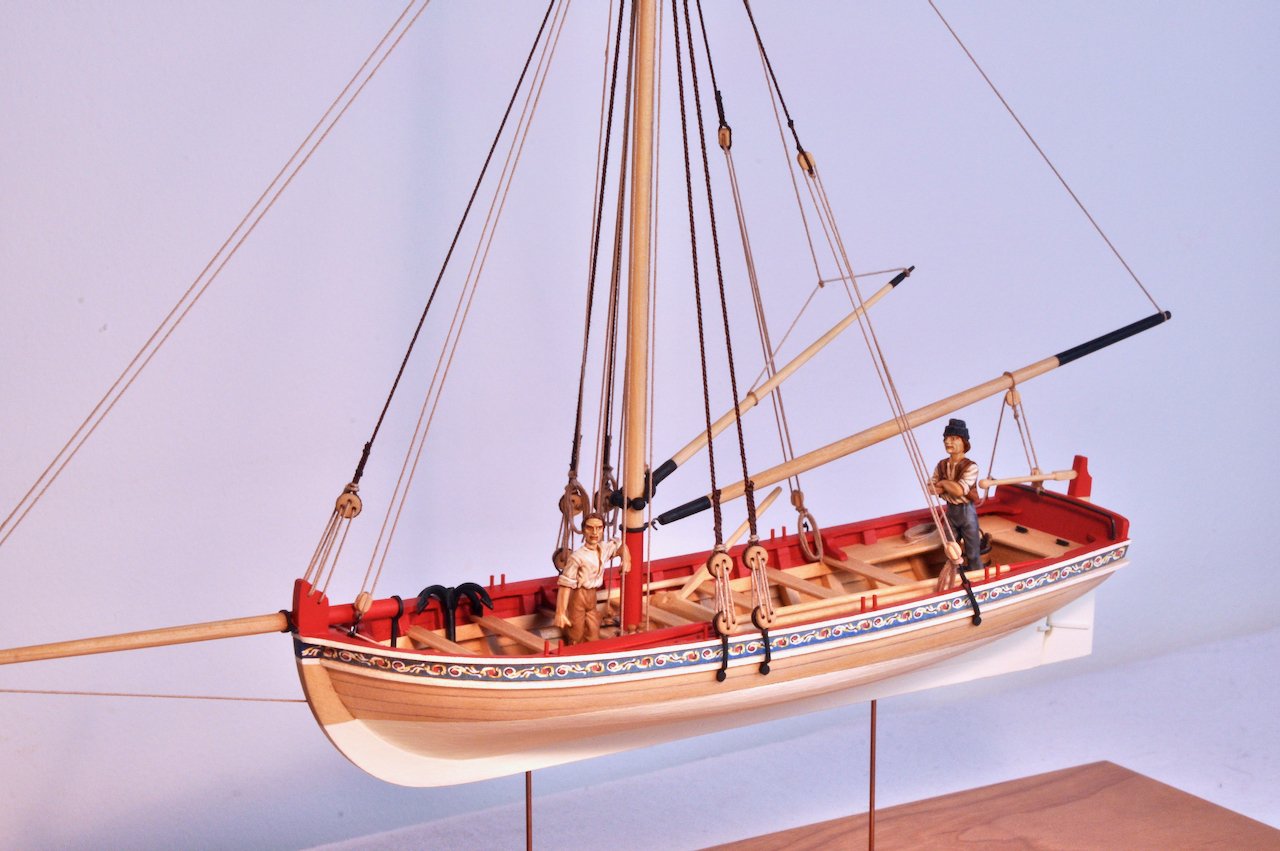
You might try some of the Amati 25mm figures, which should be about the right size. You can see illustrations of them here: https://www.woodenmodelshipkit.com/product-tag/crew/ Note that the first 6 figures on that page are 35mm, or about 1/48. The 25mm figures follow. I painted up a couple of the 1/48 figures to stand in my Model Shipways longboat, and was happy with the quality. The proportions are nice, the detail decent. You can see them in the gallery from my profile page, if it helps to see painted examples.