
.jpg.8f8939eb11584d346cdeb2a7ec4e1e42.jpg)

Kusawa2000
-
Posts
386 -
Joined
-
Last visited
Content Type
Profiles
Forums
Gallery
Events
Posts posted by Kusawa2000
-
-
-
-
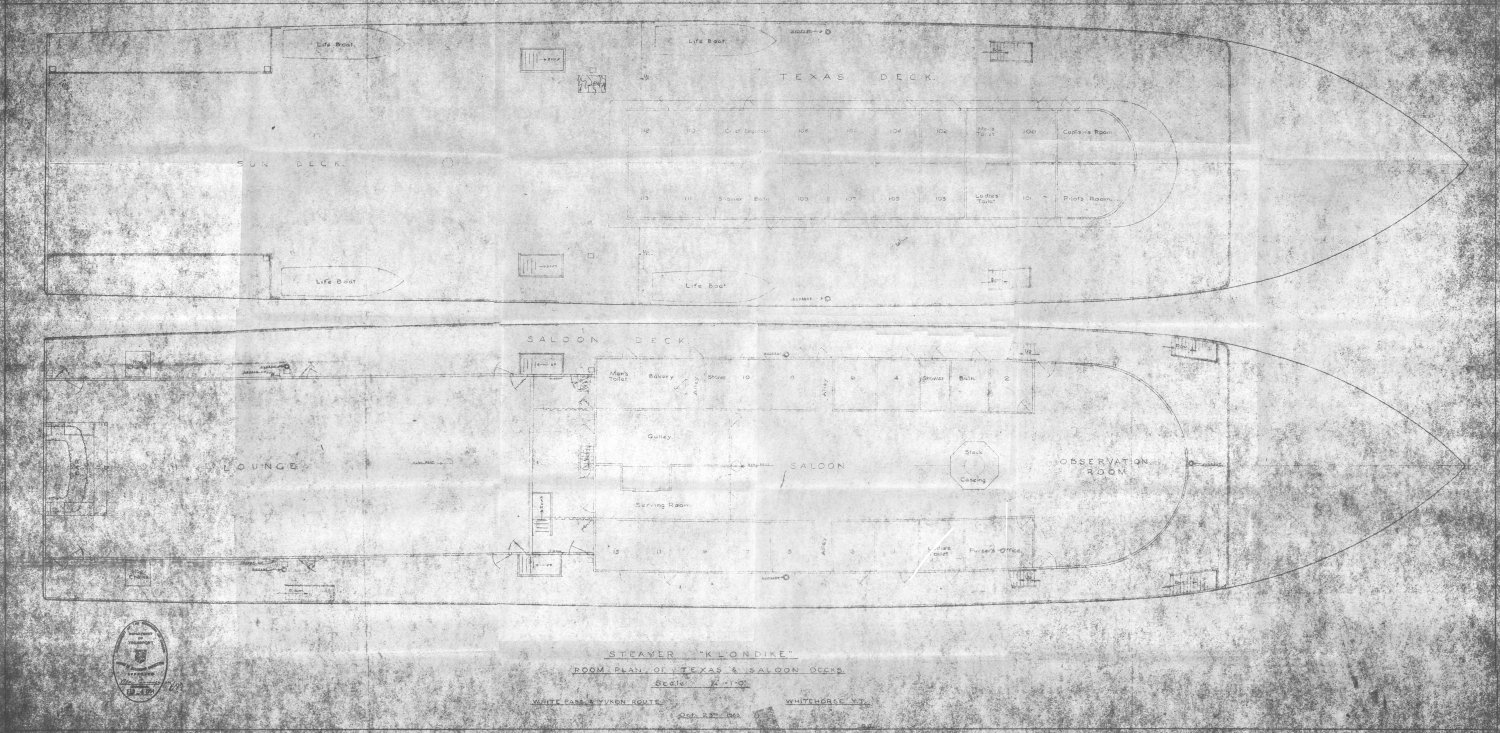
Here are more pics for your review. Open the PDF files into a separate window
SS KLONDIKE MODEL DWG sht 1.pdf
SS KLONDIKE MODEL DWG sht 2.pdf
-
Met up with Richard Zaiden of Parks Canada today and was able to get some diagrams of the SS Klondike on a thumb drive. I will post those pics below. His phone number is 867-334-6837 (email Richard Zaidan richard.zaidan@pc.gc.ca). He made sure to mention that if anyone needs more detailed pics or diagrams of a certain section of the Klondike that email him and he will see what he can find on file. Apparently they have quite a few pictures and diagrams on file of all parts of the Klondike. Here are the pics he passed along to me.
Open these files in a new window A-0A-01.TIF MAIN or CARGO DECK .pdf Paddlewheel assembly.pdf
Dwg Proposed Steamer for WPYR.pdfDwg Proposed Steamer for WPYR.pdf

-
-
-
31 minutes ago, Ian_Grant said:
Just noticed the activity in this thread....I did receive an email acknowledgement from Terry Karlsen at Parks Canada, who was forwarded my message by his colleague Richard Zaidan. This was the 19th December; he requested some more details as to what I was after. I replied but have not heard back....Christmas and all that.....
I was going to wait another week or two then ping him again.
Ian: Just got off the phone with Richard Zaidan from Parks Canada (867) 334-6837. He is going to send me some pics and drawings of the Klondike's stern and bow as well as any deck drawings they have. I can forward them to anyone who is interested.
If you have any specific questions he said feel free phone him. I will have his email address once he sends me the pics/drawing that he promised (in the next day or 2) . He also mentioned that they are doing a total restoration this summer on the Klondike so if anyone has any specific questions regarding any details of the ship, they could get some pictures your way (im going to see if I can get onboard as a volunteer to help! 🙂 )
So.. this is a good start to 2024!
Mike Draper
Whitehorse, Yukon
-
-
9 hours ago, dvm27 said:
I certainly hope that is the case Mike. Jim was not only an incredible machinist but also a staunch supporter of our hobby. He'd be a tough act to follow.
Greg: No argument from me on him being a amazing machinist and supporter of the hobby. Its my hope that a new owner can keep Jims products out there for purchase. His tools are invaluable for the hobby..
MIKE
- pjofc4, Canute, Ryland Craze and 1 other
-
 4
4
-
2 hours ago, dvm27 said:
Probably a mute discussion as the Byrnes saw will most likely be discontinued due to Jim's recent passing. I would say in general that the Byrnes saw is machined to much tighter tolerances than the Proxxon saw. For example I found the Byrnes fence is virtually impossible to deflect while in use and their extended fence is a press fit with four steel pins. My Proxxon had a slight bit of wobble when the fence was pushed. Perhaps such tight tolerances are not essential to the average ship model maker but keep in mind that many other hobbyists (such as luthiers) require .001" tolerances and I don't think you could repeatedly achieve these on the Proxxon without some modifications.
Greg: My understanding there is still interest in selling the Byrnes business so I dont think the final decision has been made yet on what is to happen with the business. Lets see what happens and what is announced.
Mike Draper
- Ryland Craze, mtaylor, JpR62 and 3 others
-
6
-
-
update.. I forgot to go to the Parks Canada office on Monday but was down there today and there office is all locked up, I left a voice mail with them on the posted number (867-667-3910) and I will go down on Wed and check again as well as give them another call if I dont get a return call.. I may got down there too late for today.
I will keep everyone posted.
Mike Draper
-
2 hours ago, Ian_Grant said:
Mike, that would be incredible!
All I am looking for is any other Klondike drawings they may have; front/rear elevation, midships cross section; deck details, anything really which would help build an accurate model.
Thank you very much for taking an interest!
Regards,
Ian
i will talk to them on Monday.. I suspect I will get a contact person that get you that material directly from. If they prefer to give it to me we can talk about getting the material into a envelope to you. I assume you want to have the original plans as I remember they had a set of plans for modelers that were modified from original plans
If you need details on any aspect of the ship let me know... I can also go down to the SS Klondike and take pics as well. its a 2 block walk from my office.
Also.. I would recommend a book to get the link on amazon is The Klondike Gold Rush Steamers: A History of Yukon River Steam Navigation: Turner, Robert D.: 9781550178876: Books - Amazon.ca
And there was a good model of the Klondike in one of the hotels in town. I can check to see if its still there..
Mike Draper
Whitehorse, Yukon
Canada
-
3 hours ago, Ian_Grant said:
Addendum: I've just emailed the Parks Canada SS Klondike historic site to ask after any other drawings they may have, which may have been judged not sales-worthy enough to print up for the general public. Fingers crossed!
It seems the site may be temporarily closed at the minute. Don't know about the email address.
Ian: What do you need? The Parks Canada office is one floor below my office in Whitehorse. I can easily knock on their door.
Mike Draper
Whitehorse, Yukon
Canada
- Ian_Grant, Landlubber Mike, Mirabell61 and 2 others
-
4
-
 1
1
-
Go to the search engine at the very top of the MSW forum page and type in CAF models and you will get all the conversations about his models. His avatar name will be attached to one of those discussions and just click on his name and send him a personal message. He is good in responding
Mike Draper
- bruce d, mtaylor and Ulises Victoria
-
3
-
We lost one of the good ones.. he was good friend and a master when it came to taking a concept or a idea and making it a reality. He will be missed.
- Canute, Chuck Seiler, thibaultron and 3 others
-
5
-
 1
1
-
Ian: I live in Whitehorse (been here for over 30 years) and if you ever need pictures or plans (I know staff at Parks Canada) let me know. There is also a great book called Klondike Gold Rush Steamers -a history of Yukon river steam navigation by Robert Turner that is full of pics of the paddle wheeler. There is also a model of the klondike in one of the local hotels as well that is a good model of her. I prefer the SS Whitehorse.. she had nice lines but she was lost in the 1970s to a fire along with the Kaska. There are also 2 graveyards along the Yukon River of old paddlewheelers.. one in North Dawson and one in Hootalinqua.
It will be great to see someone on MSW build a model... they are beautiful ships.. a lot of people didnt know they burned firewood while working on the rivers.. no coal in our neck of the woods!
Mike Draper
Whitehorse, Yukon
- Roger Pellett, Canute, mtaylor and 1 other
-
4
-
Chuck: I noticed you have the 3mm single, double and triple blocks in the sold out listing.. will there be 4mm available sometime down the road.. just curious..
Thanks for any info
Mike Draper
- mtaylor, Canute and thibaultron
-
3
-
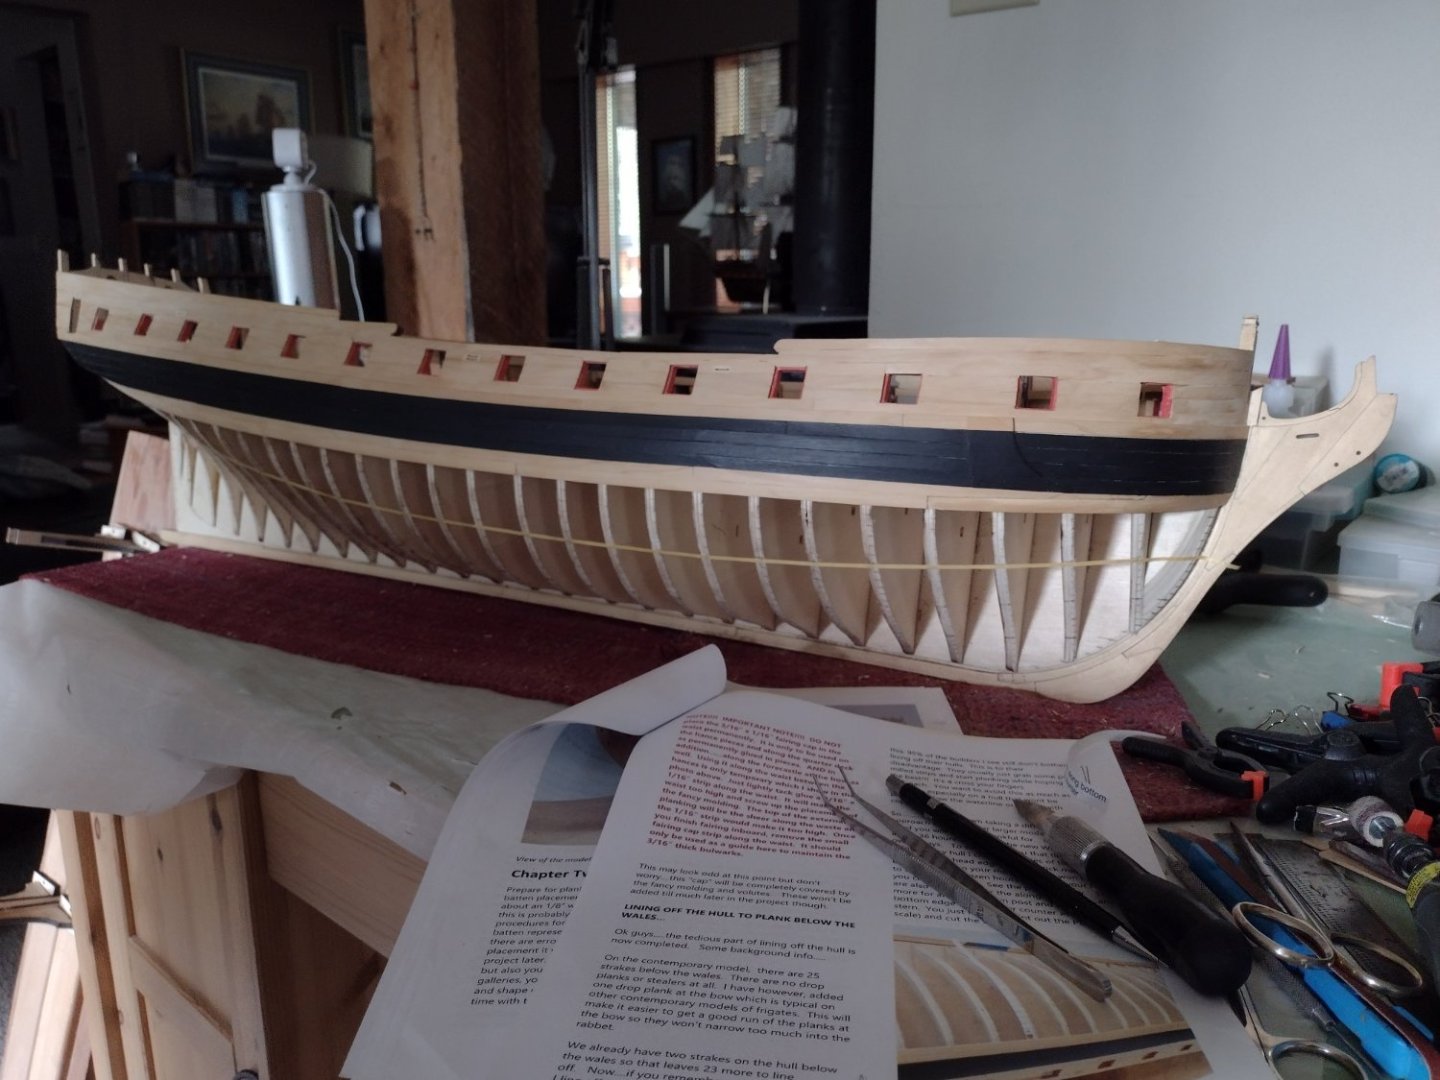
Everyone: Its been a while since my last post. With the snow gone and into summer, been busy trying to get firewood cut and projects done. I have managed to get the upper planking above the wales completed on the Winchelsea. I do love that boxwood I am using for the hull planks! its a joy to work with!
I havent added any sealant yet but once I get the hull planking I will be giving it a few coats of Tung oil.
I have also managed to get the starboard planks marked using the plank template guides. Will get the port side done tonite and start thinking about planking that hull. Been doing a lot of measuring twice, cutting once. I hope it pays off when I get into the planking. As I imagine everyone has discovered who has tackled this project, I have quickly noticed there is pretty low tolerance for measurements being slightly off.. I have been taking my time.. 🙂
Also.. thanks to all those that did a great job documenting their construction process. Your photos and posts have saved me some grief..
Mike Draper
- Rustyj, GrandpaPhil, scrubbyj427 and 8 others
-
11
-
15 minutes ago, garyshipwright said:
Thank's Mike. Maybe one day I just might be able to say she's finished.
Gary: I used to know that feeling but I managed to get the Agamemnon finally finished..... But looking at your pictures, you must be able to see the light at the end of the tunnel?!
MIKE
-
-
3 hours ago, Chuck said:
No only one package with plenty of leftovers. Only ten ports have lids…20 hinges.
Chuck: Ok.. thanks.. was thinking ahead and I havent read that chapter just yet.. I assume they will be available for a while?
Mike Draper
- mtaylor, Canute and thibaultron
-
3
-
5 hours ago, Chuck said:
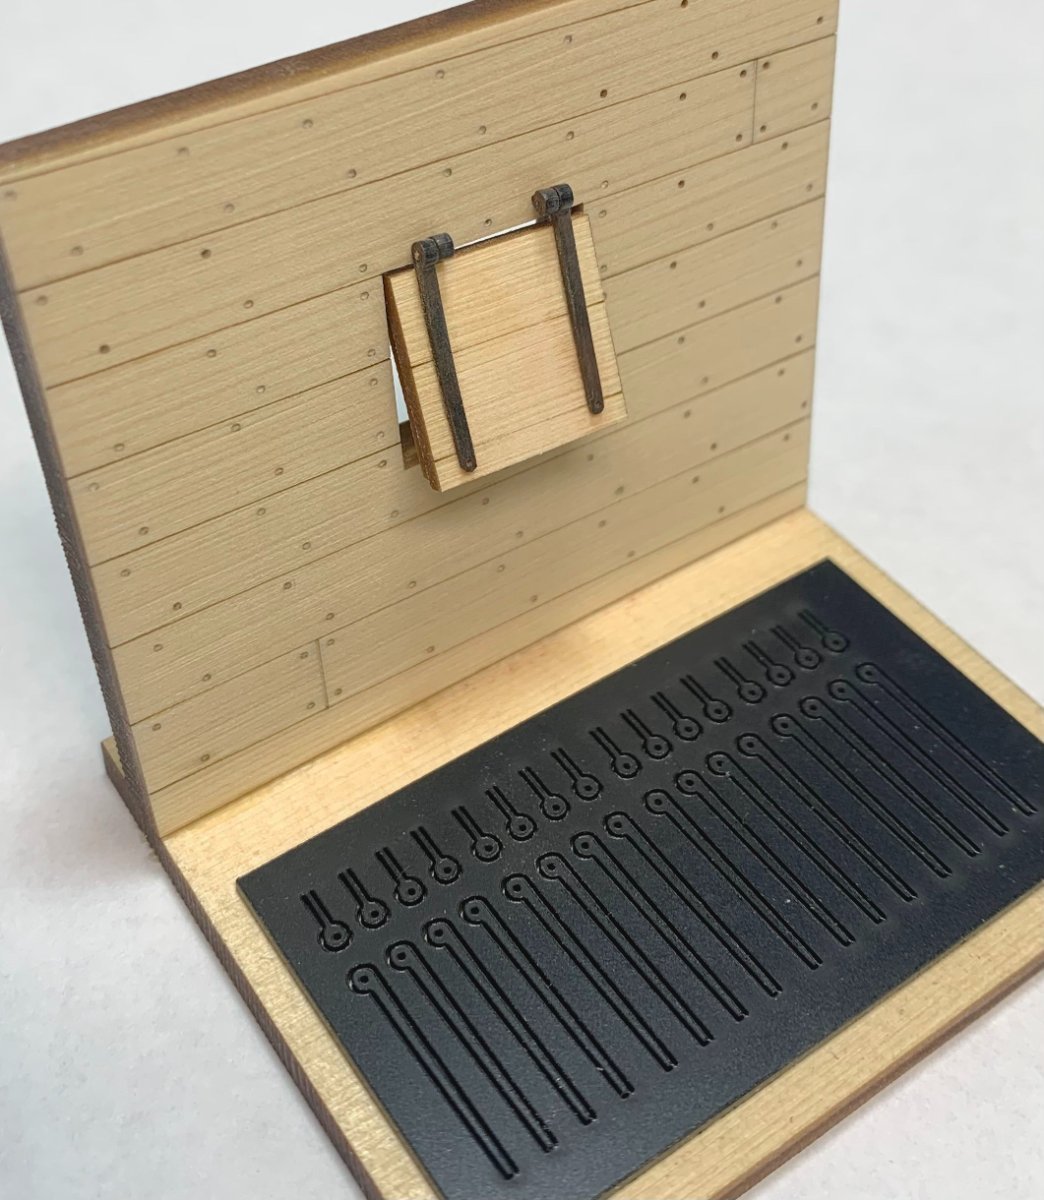
New Gun port hinge mini kits will be available tomorrow. They are laser cut from a special high density plastic. These were made specifically for the Winchelsea but I am sure they will fit other models. They are .040" wide and 21/32" long. I have ordered some material that will also produce 1/16" wide hinges (slightly wider). But that hasnt arrived yet. Some prefer a wider strap. Those can easily be shaped differently too being extra wide. I will show that after I get them. But these are the narrower ones and perfect for the Winnie or even Cheerful. There are 36 hinges per package. They can be made shorter if needed as well.
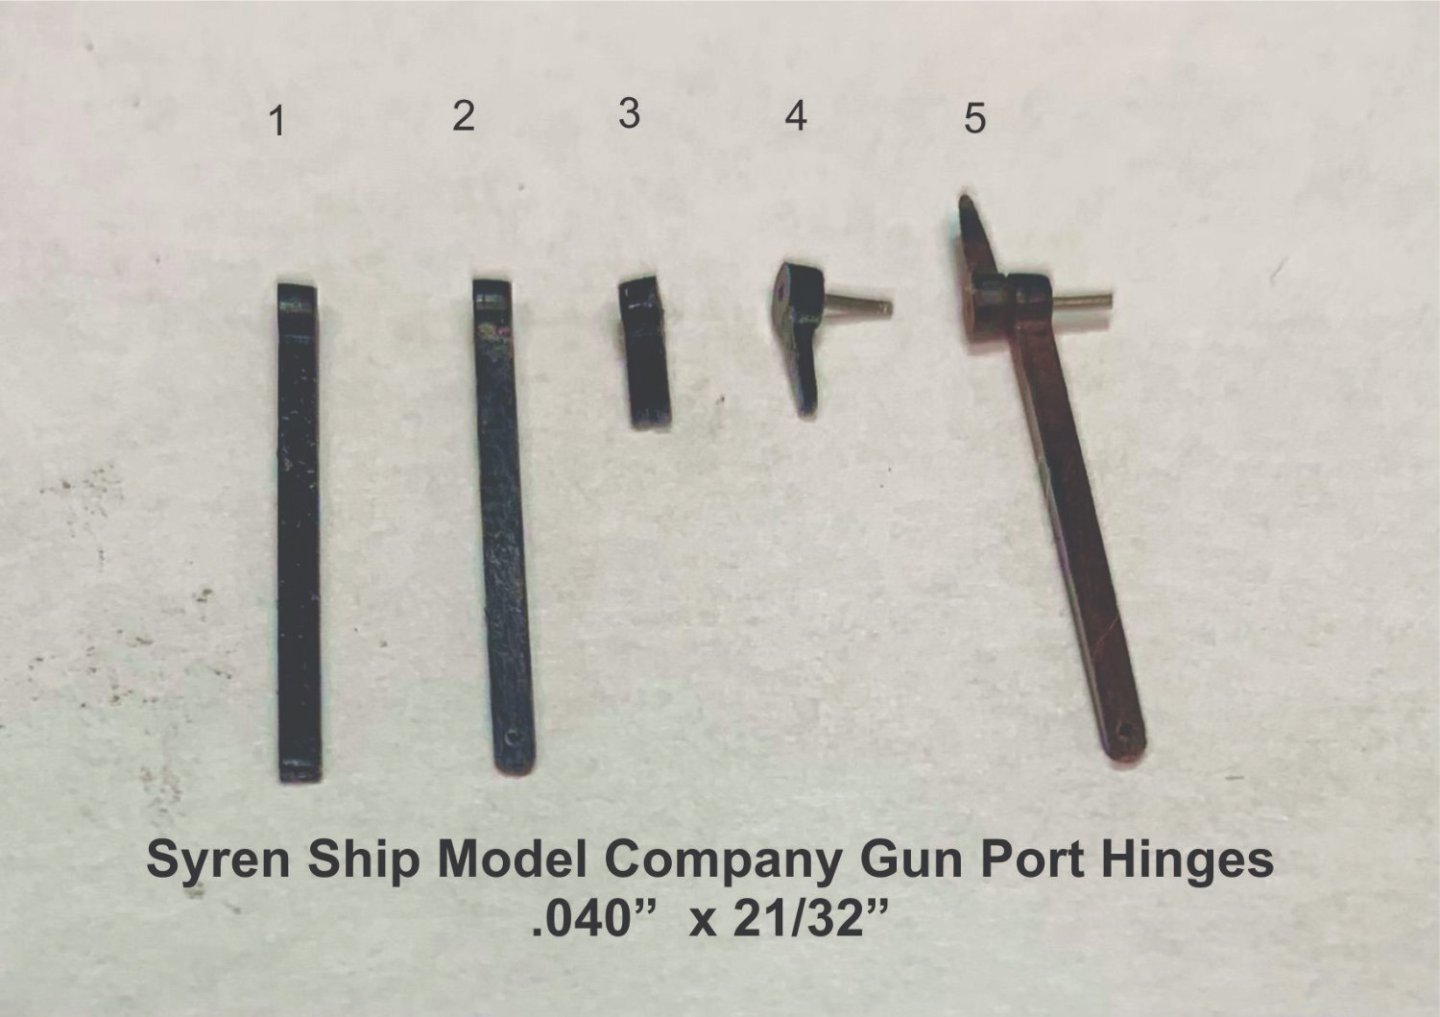
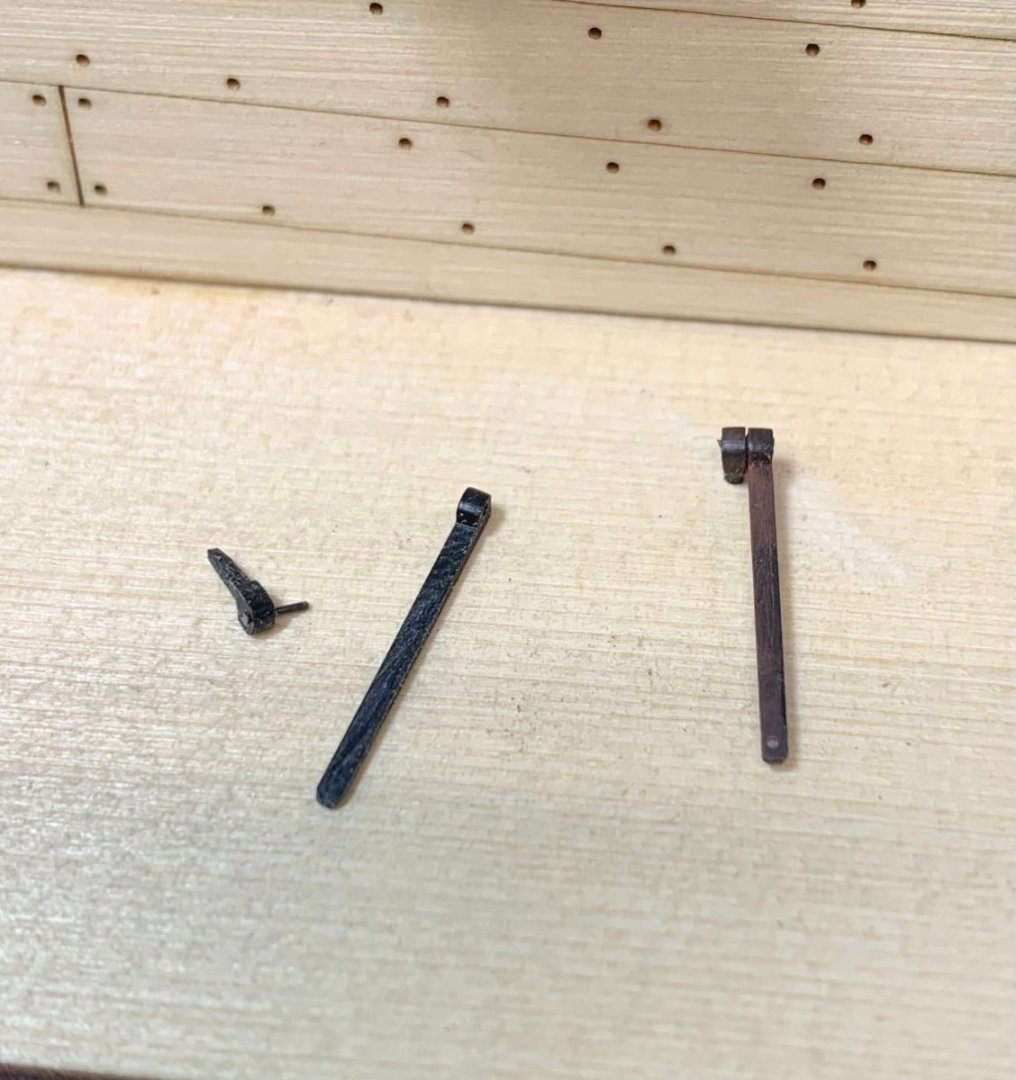
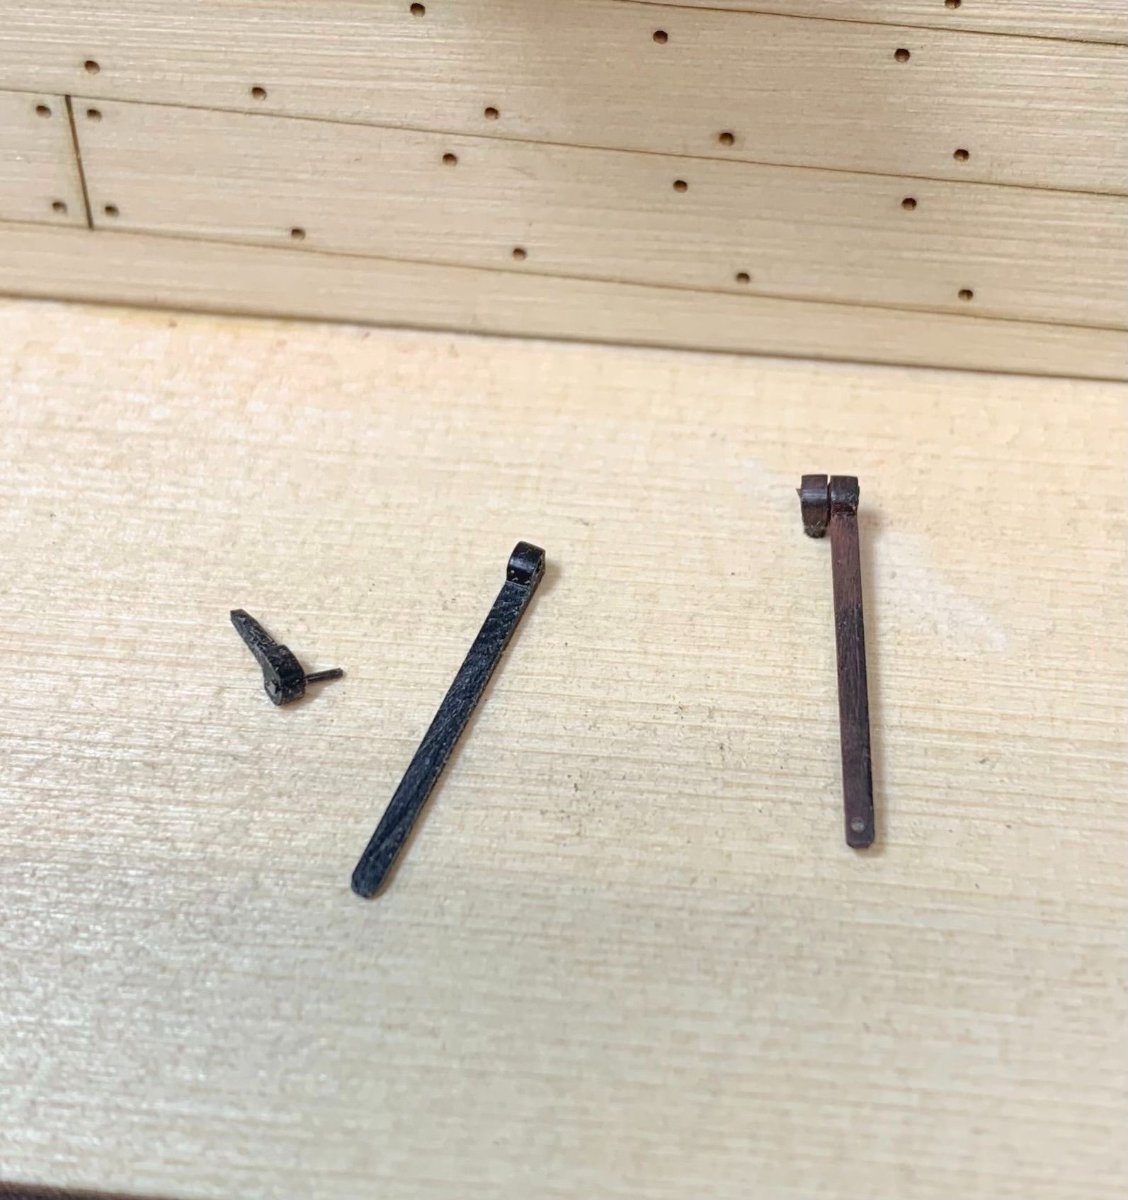
1. What a hinge looks like straight off the sheet.
2. Round off the bottom with fine sandpaper. Drill a small hole for the split ring if needed. Use a #76 drill bit for a 28 gauge wire ring.
3. What the gport hinge pin looks like straight off the sheet.
4. Sand the actual pin slightly thinner and to a point. This will be inserted and glued into the hull above the port. Also insert and glue a length of 28 gauge black wire into the laser cut hole and cut off the excess as shown. Use CA glue as it is plastic.
5. Join the hinge strap and hinge pin by slipping the wire pin into the hole of the strap. This makes a working hinge.
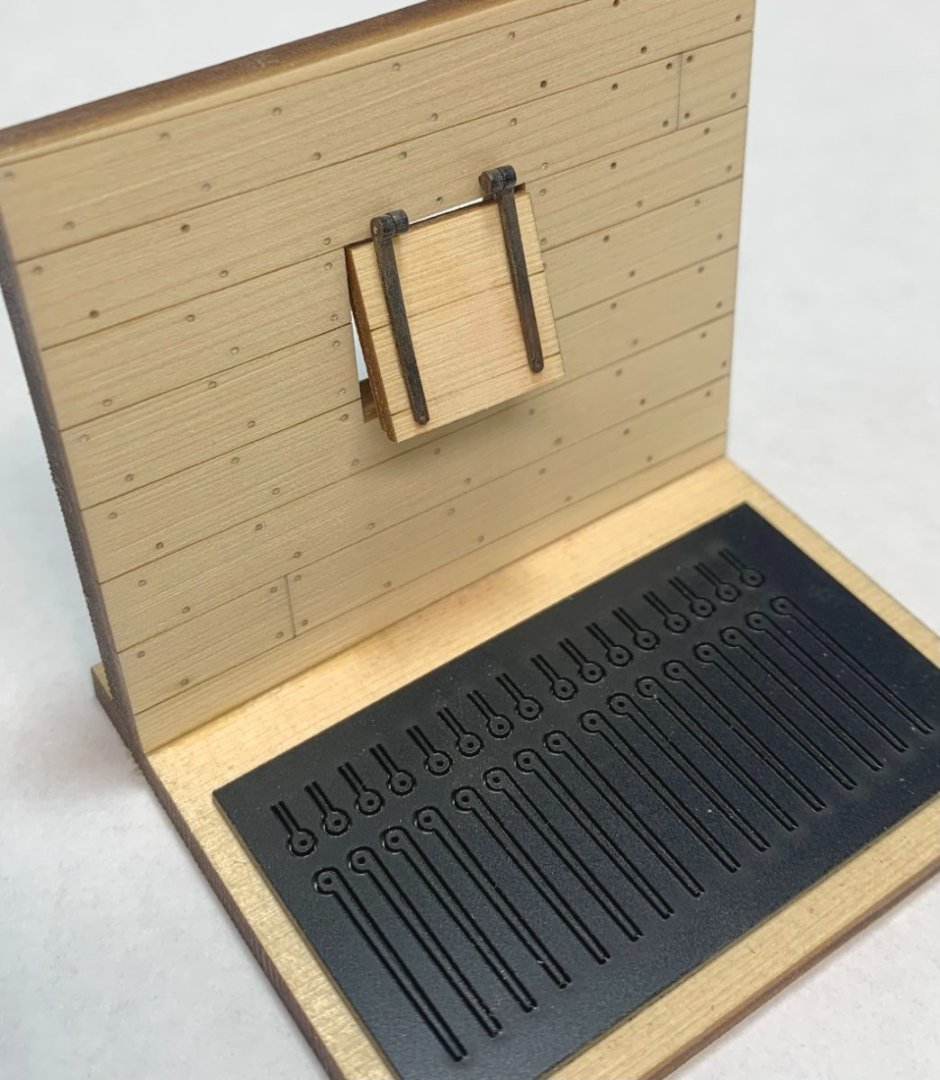
Once glued onto the port lid, you can sand the straps even thinner. Just gently sand the face of the port with fine sandpaper and taper the hinge straps even thinner if you like.
Apply weathering powder if you like that look. Make some split rings (not shown) and add them on the hinges as is typical.
The store will reopen tomorrow as I am mending from a really bad flu....cant do much so I am just hanging around the shop till I get over this. I had to shut down the store because I am out of stock with other things and just cant make any more rope until I feel better. But there are about a dozen packages of these in stock.
Chuck
Chuck: So doing some quick math, if you were wanting to use these hinges for the Winnie, you would only need 2 packages? Enjoying the Winnie project! The boxwood I am using for planking is giving the Winnie a interesting look. Sorry to hear about your cold.. had one of those earlier in the year.. not fun....
Mike Draper
- Ryland Craze, Canute and thibaultron
-
3
-
2 hours ago, Rustyj said:
Hi Mike. Chucks version of Speedwell Is high on the list.
Thank you B.E. I get so much inspiration from you, Chuck and so many other fine modelers here I can't name them all. Thank to you all. Thanks for the likes to!
Rusty: I will definitely be keeping a eye on your posts on that project.. that will be interesting to see develop
Mike Draper
- FrankWouts, James G and Rustyj
-
3


SS Klondike
in Nautical/Naval History
Posted
Everyone: just in case you missed it I have downloaded some PDF's of the SS Klondike last night... it gives more detail to the ship decks and stern. Hope that helps
Mike Draper
Whitehorse, Yukon
(-38c)