


drjeckl
-
Posts
196 -
Joined
-
Last visited
Content Type
Profiles
Forums
Gallery
Events
Posts posted by drjeckl
-
-
22 hours ago, Roger Pellett said:
If localized areas of your planking are pulling away from the substrate it is probably because your “first planking” has not been properly faired.
Maybe I didn't make my point sufficiently enough. The bulge is quite infinitesimal. And I pre-bent the planks to fit the form of the first planking before gluing. I believe that my glueing of some of the second planks missed some spots and I'm trying to fix that.
John
-
I'm about halfway through 2nd planking my Lady Nelson, my first build. Started at the bulwarks, working down toward the keel. Halfway down and now starting at the keel and working up. I use CA for this. I start at the bow; apply about 1/2 inch of CA and hold down the plank for about a minute, tight to the hull and against the plank above. Then use a glue looper to get under the loose section of the plank and spread about an inch more of CA and hold down that section. Repeat until I get to the stern end. Been working pretty good so far:
.thumb.jpg.b0badd2459fe3dfbeadbdd4ac025e693.jpg)
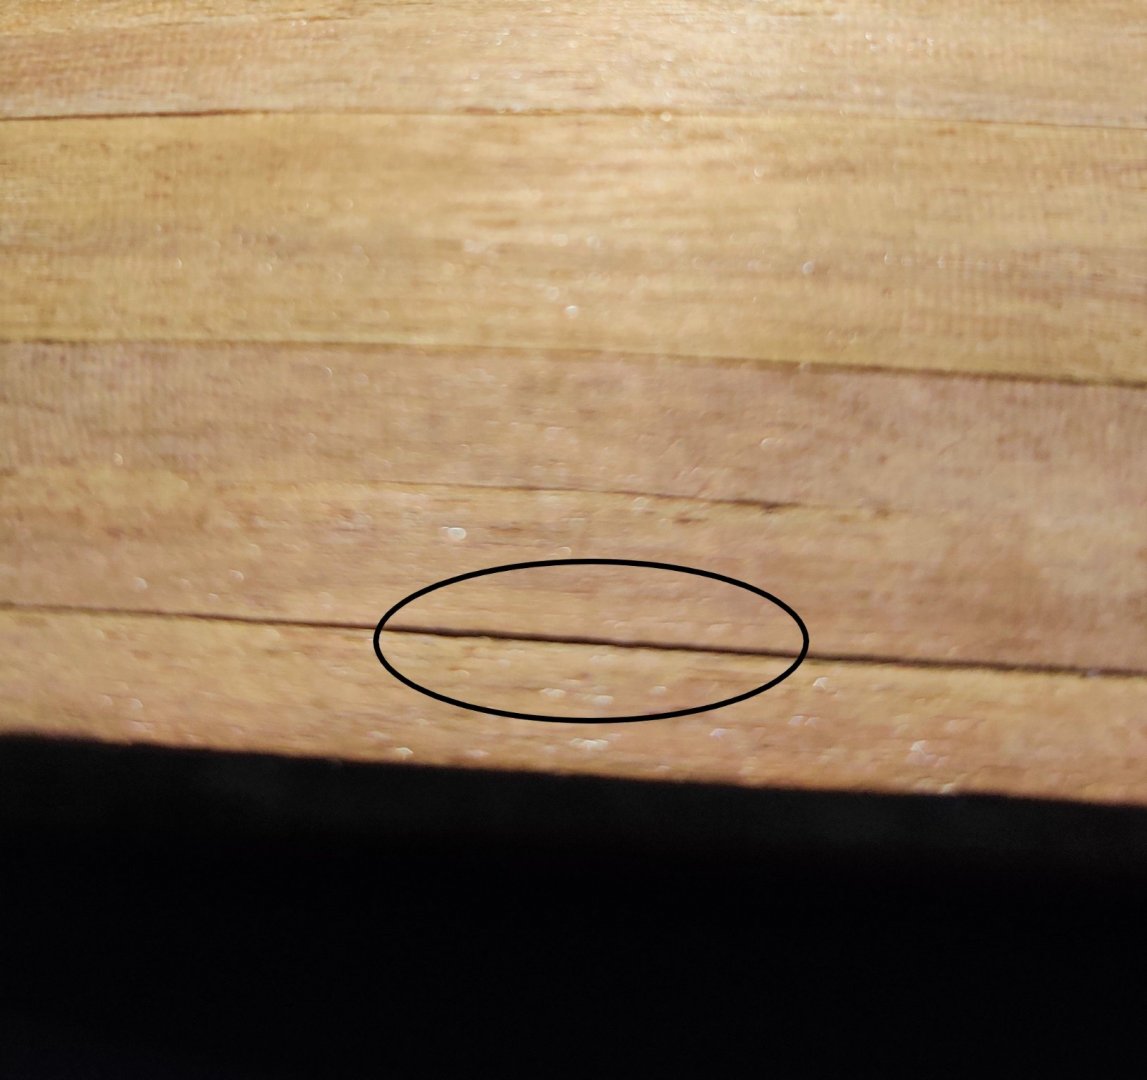
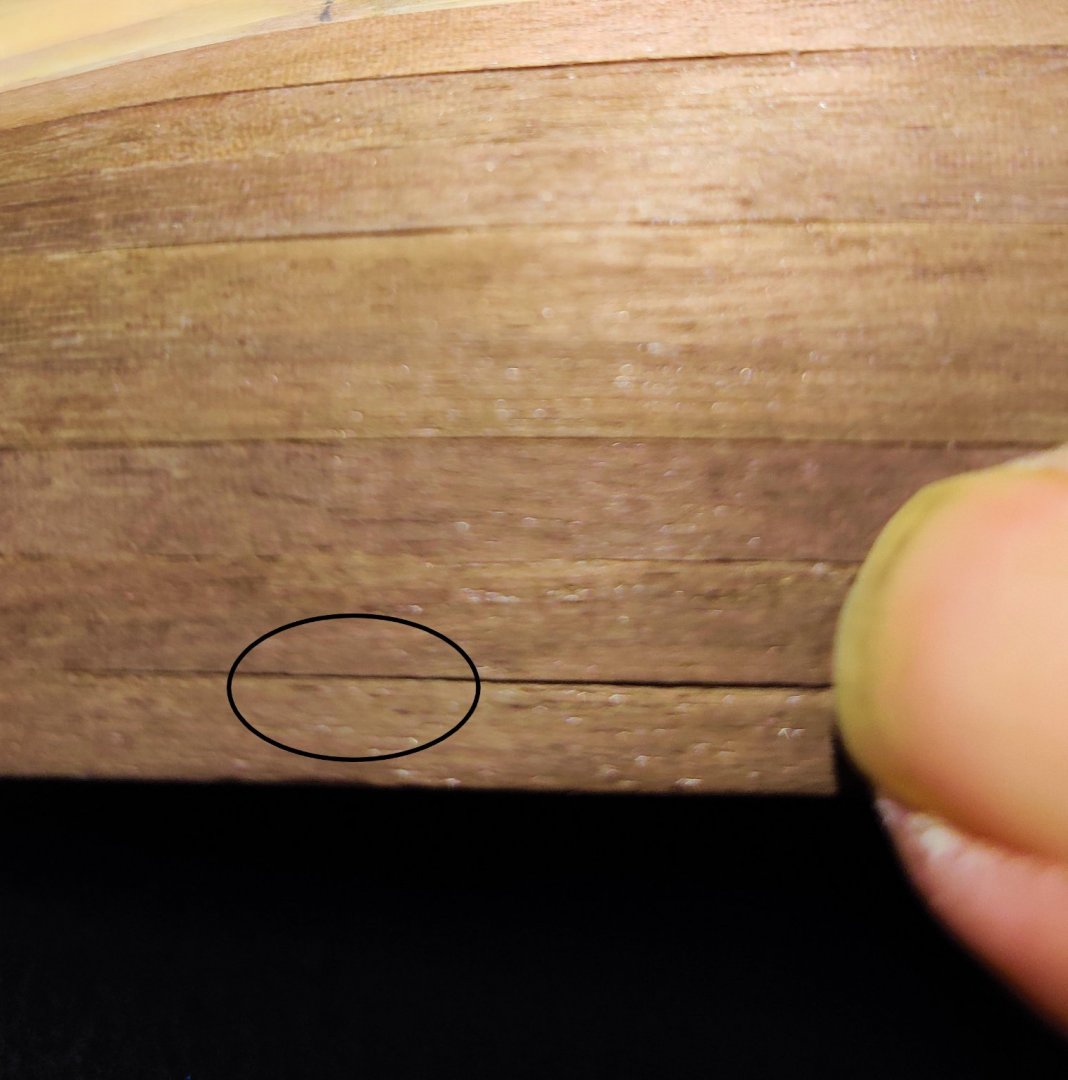
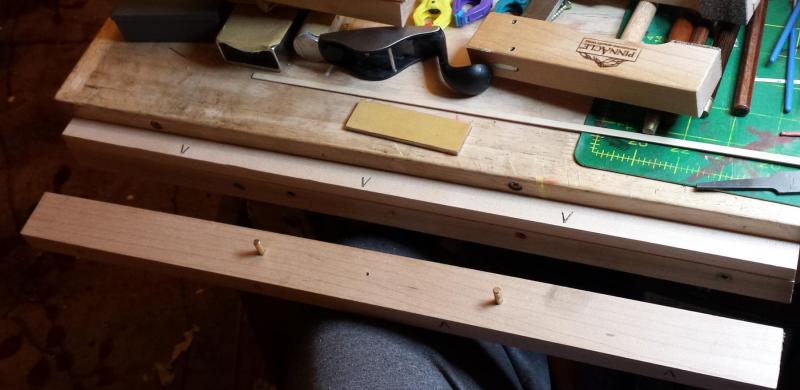
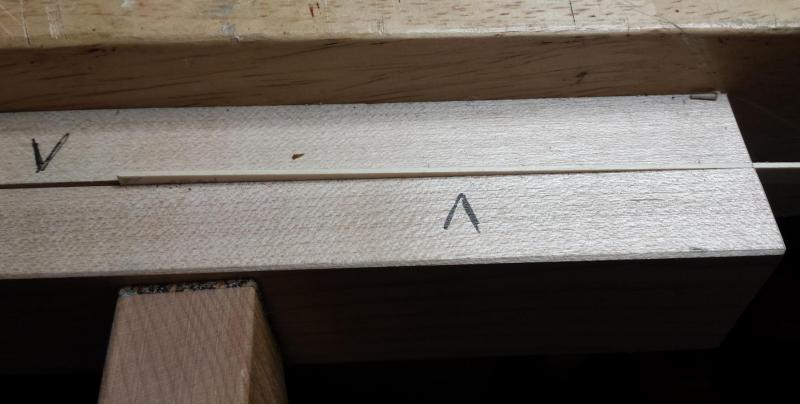
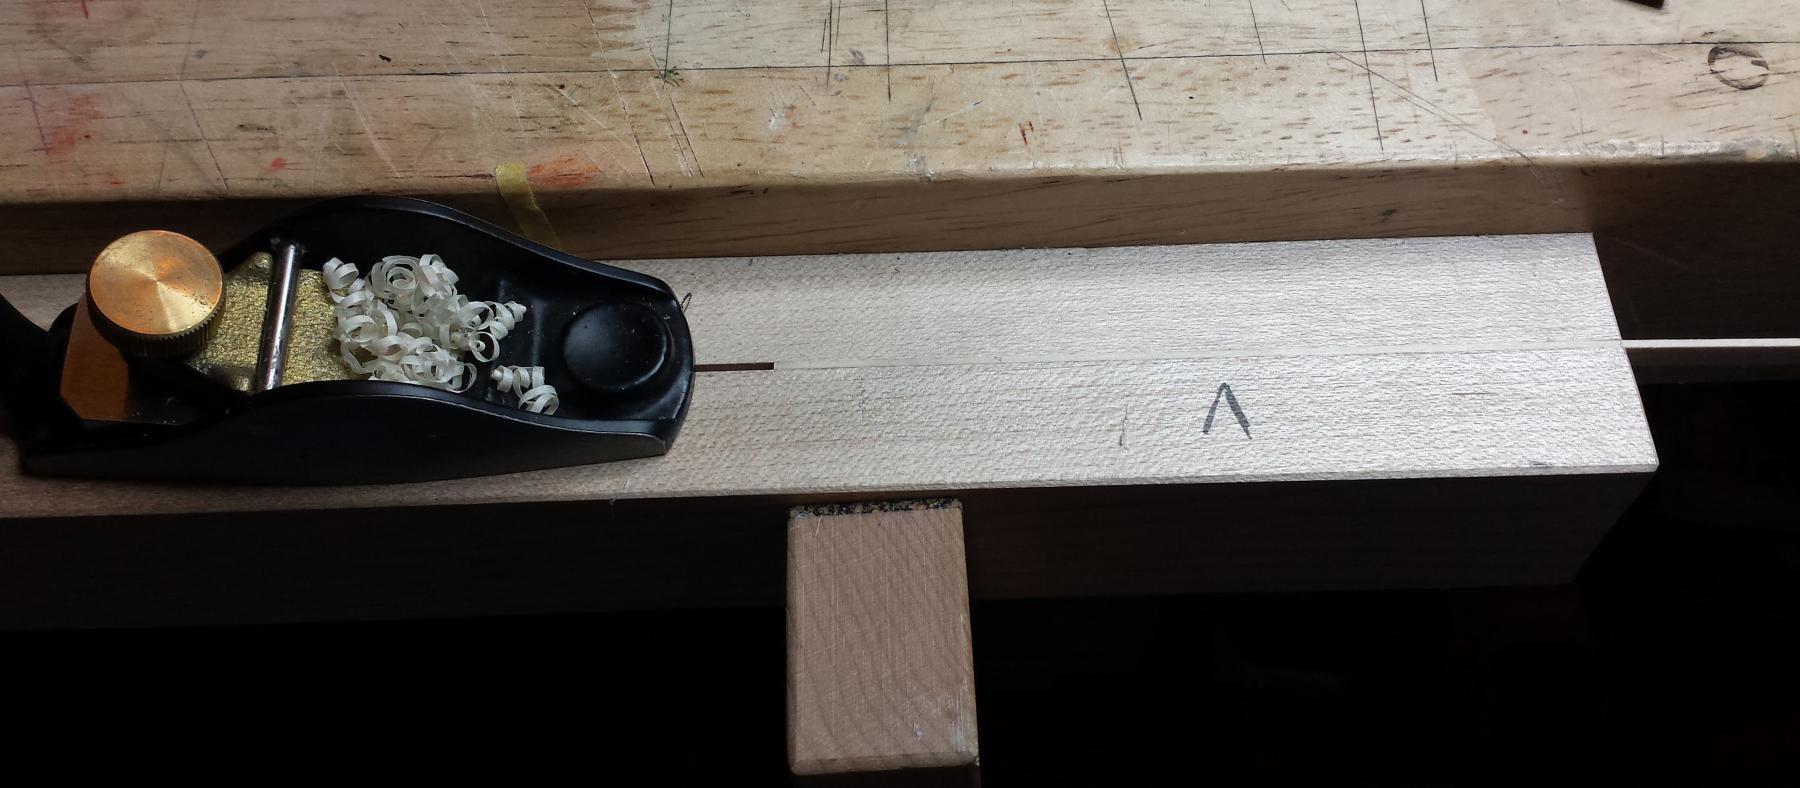
However, as I am waiting for a plank at the keel to dry out after form-fitting it, I'm noticing that a few of the installed 2nd planks, in certain spots, are 'bulging' out; i.e. I can press on them and they move in tighter to the hull. Here are 2 photos of an example. The difference is only slightly noticeable and I've notated an area that you can see the difference:
So the obvious questions are:
- Is this a problem I should be worrying about? I'm willing to put in the work to rectify this if necessary. I've installed half the planks so far and there are only about 4 or 5 bulging spots so far. But do I need to fix this?
- If I should fix this (I think I should), what's the best technique? I could brush in some diluted PVA where the bulges are but how do I hold down those areas while the PVA sets where I can't get clamps to work? I've seen some people use rubber bands with erasers holding down planks while the glue sets. I may try that. Any other thoughts?
- Should I tweak my gluing process? I'm not really getting CA on the edges of the planks. From what I've read, that is not absolutly necessary. If it is, how would this be done? Any other tweaks? I'm comfortable using CA and would not like to switch to PVA.
Thanks...John
-
Yeah, the hearts look great!
John
- VTHokiEE and Old Collingwood
-
 2
2
-
Here's the rhythm I get into when planking (after all the planing; bands, planks per band, taper at each BH per band):
- Taper at least a pair of planks; one for port, one for starboard (I'm struggling a bit with two pair; we'll see)
- Note that when installing a plank, the straight edge goes topside, against the tapered edge of the plank above it
- Bevel the inside edge of the straight edge of the new plank and test fit as best you can against the above plank
-
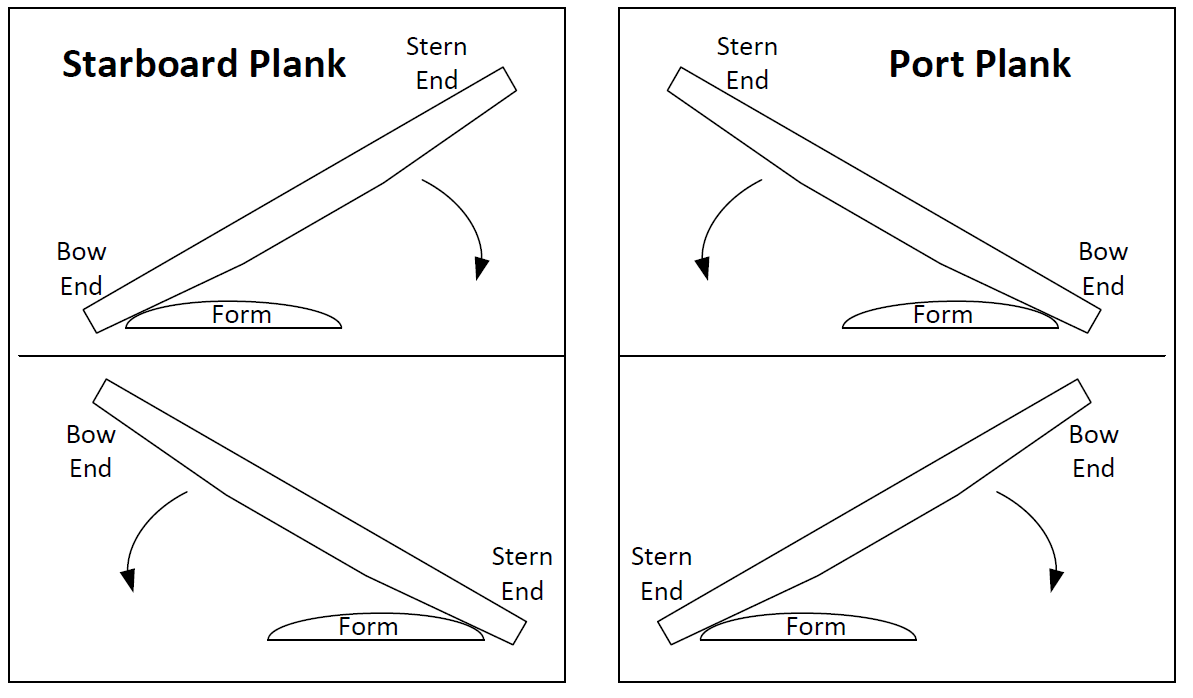
Edge bend the new plank:
- Each end of the plank will be bent, at the bow end more extensively and just slightly at the stern
- Place the tapered edge against the form, with the side that will show, face down (i.e. the side you will glue to the hull will be the side you iron)
-
Use the chart below to show how to bend, depending on starboard or port plank
- Follow Chuck's video on the actual process of bending the edge, here:
- Test fit after every couple of bends to see if you need any more bending
- Once it fits along the edge plank above, then using the "curling iron" to curve bend the plank to fit the form of the hull
- Glue the plank to the hull. I use CA. Check the forums on other gluing techniques.
John
-
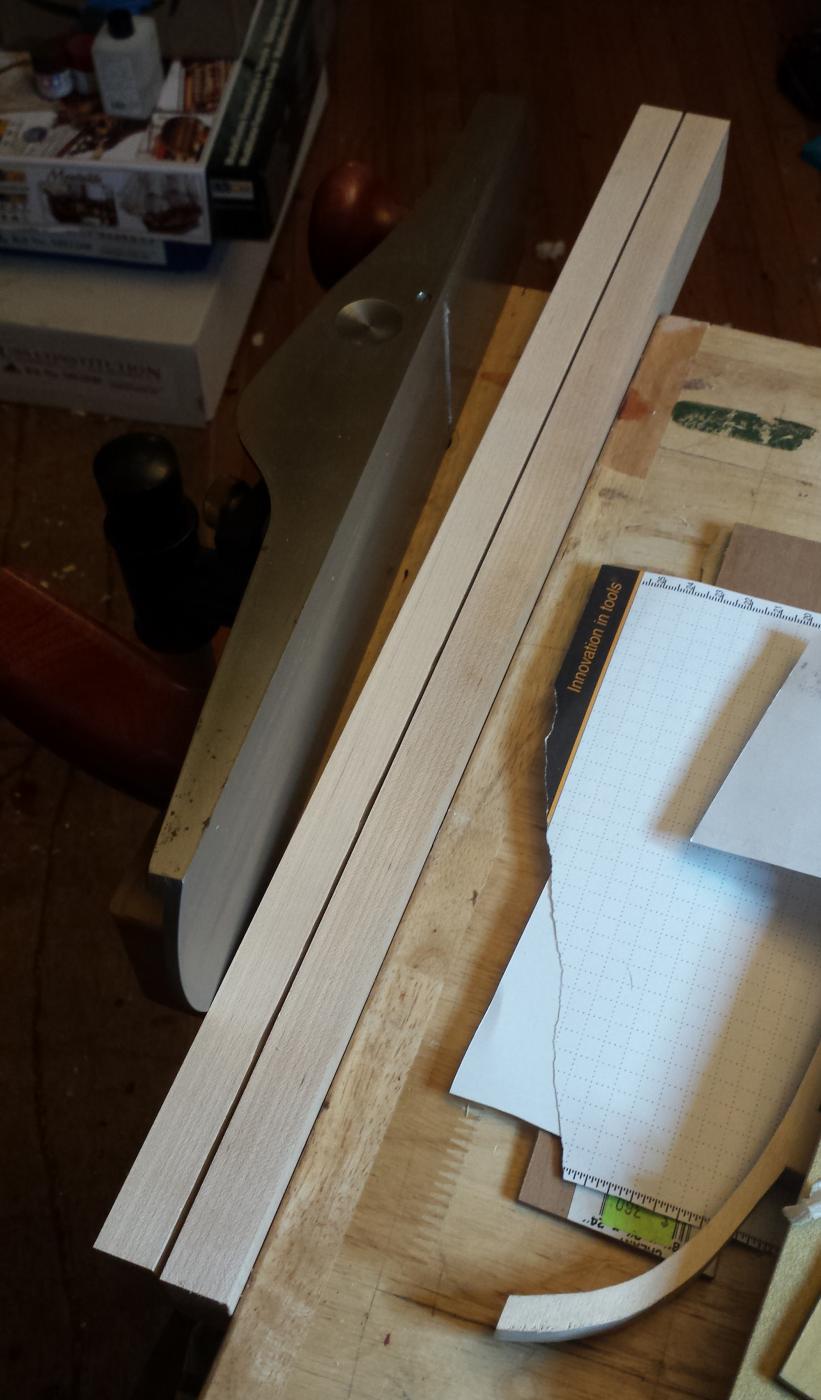
Yes, about halfway through the 2nd planking. I had to take a couple of steps backwards and regroup. Got a new plane to do the tapering of the planks and then the tools to tune it up. I decided to go that route since I was not getting consistent results from using a knife to cut the taper. I have rigged up a shooting board, similar to what Vossiewulf, but certainly not as exact his, see below:
I decided that I wanted a shooting board for tapering the planks and a little male bending jig like Chuck uses to go along with the female one that comes with the plank bender. Lots of steps in here getting 1" x 1 1/2" rock maple ready. I then cut two pieces about 28" long, and added telescoping brass tube/rod registration pins, one side drilled for a glued-in tube, other for a fitting rod.
Once that was done I could true the shooting edge, I have just done that here with my jack plane.

Then more drilling and screwing and countersinking and things to get it mounted where I wanted it.
This shows how it works, you can see the registration pins that keep the pieces perfectly even.
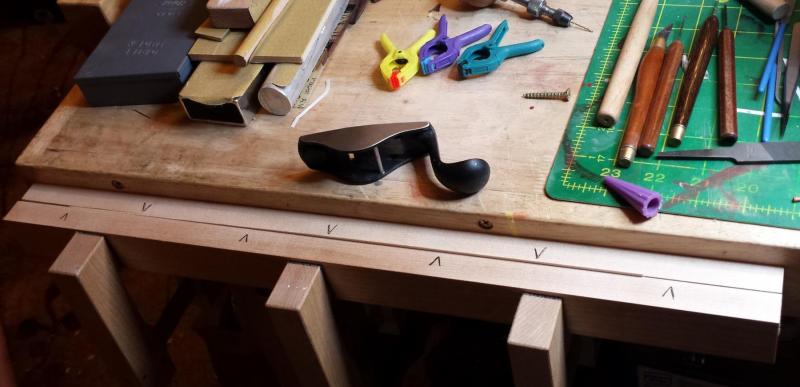
Mark the required tapers on each end, for these planks it's .108" on the bow and .140" on the stern, and then position them in turn on the shooting board and plane the taper, this step literally takes about 30 seconds.

Instead of rock maple, I have aluminum bars that are not exactly aligned. I also taper 4 x strips at once; 2 for the port side and 2 for the starboard.
.thumb.jpg.08cb56417d4f7a76669049a251095355.jpg)
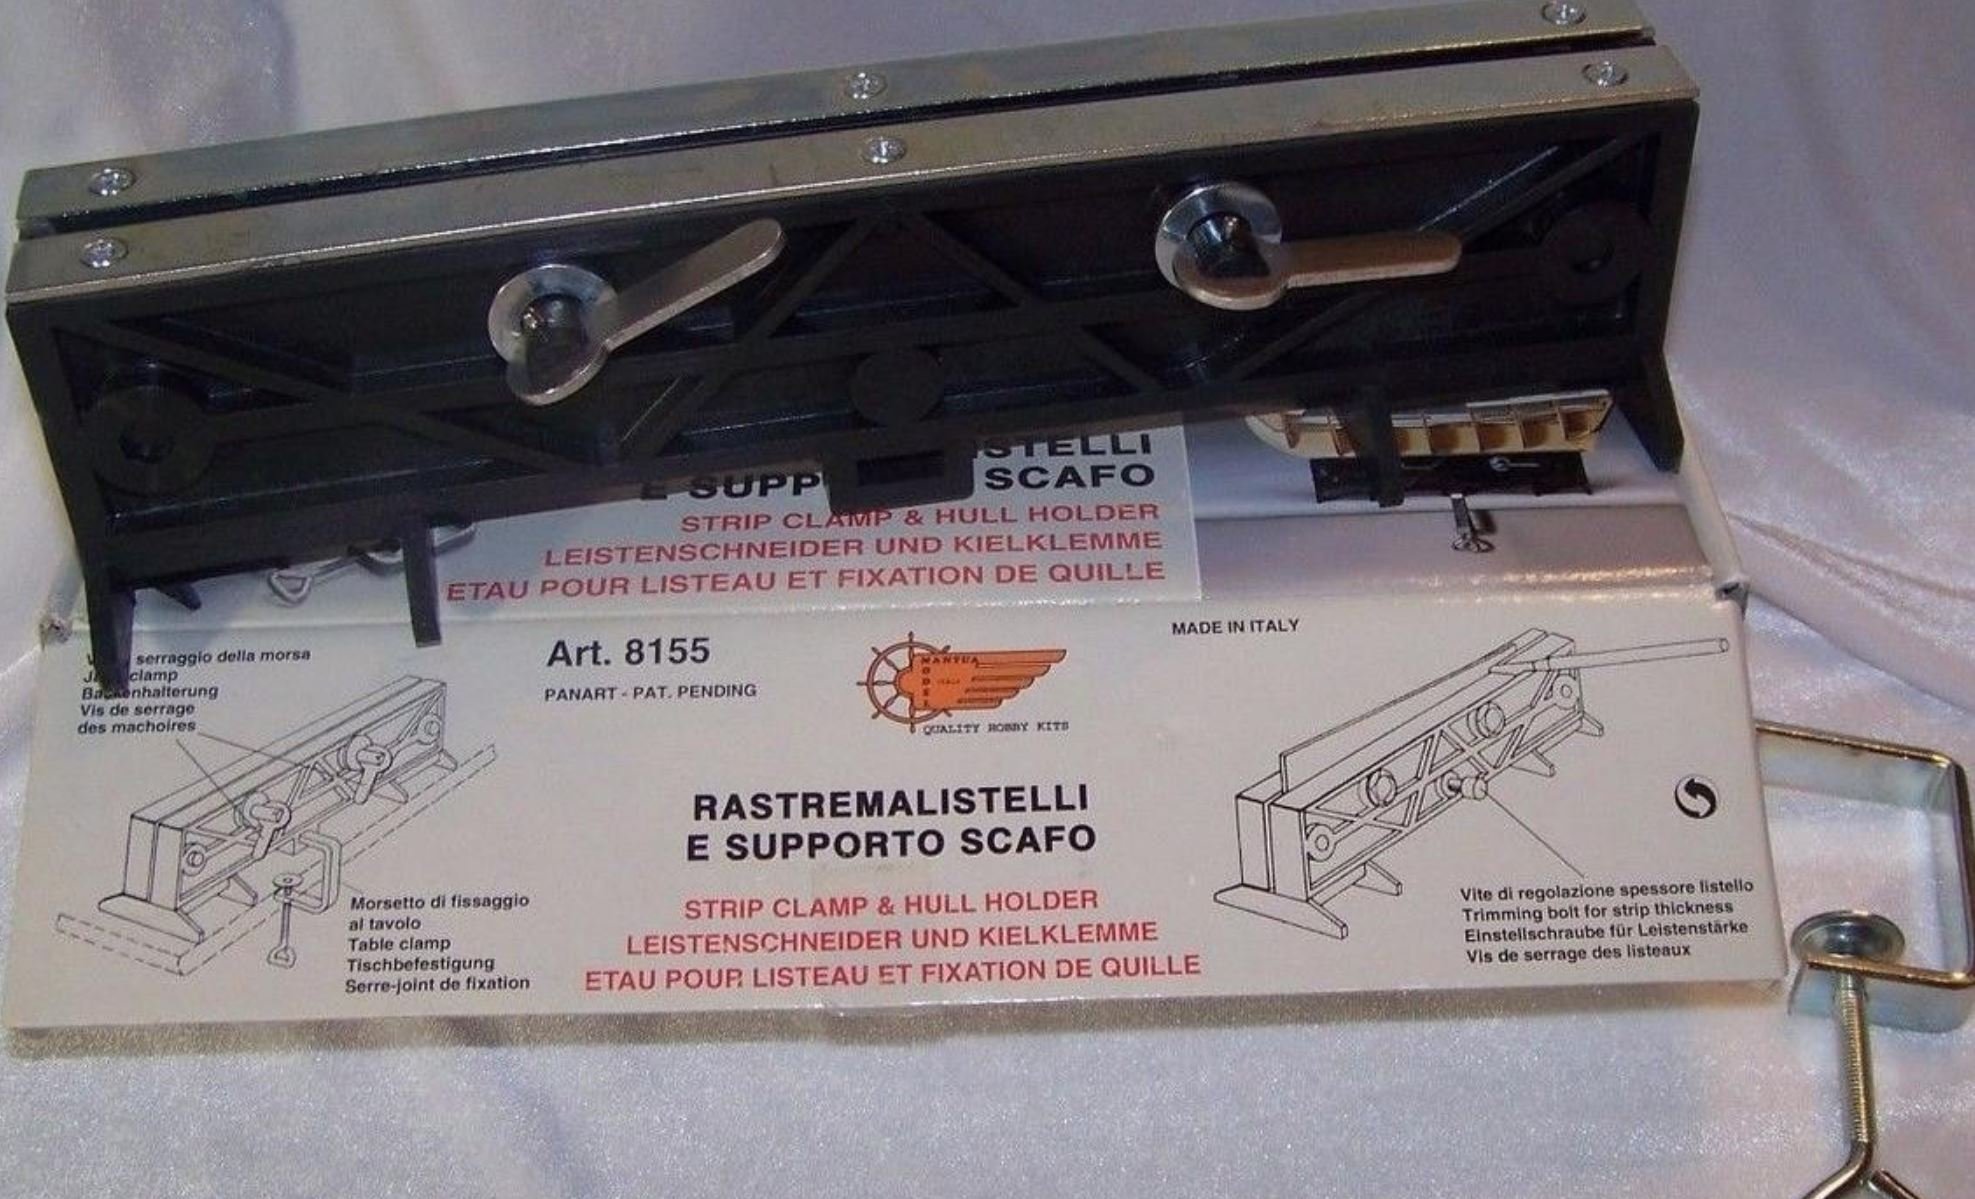
I used this rig for the 1st planking and it worked OK, but I only did a pair of strips at a time. It's a little tougher to line up 4 at a time; maybe I should revert to do just a pair. I was also looking at this:
Mantua Model 8155 Strip Clamp and Hull Holder for Model Ship Building

I checked around MSW and there were only a couple of remarks about this; one negative, one neutral. Other forums have indicated positive comments. Any input on this?
Here's how my LN looks so far:
.thumb.jpg.9a1fe0cc114acb8a31601eb944529d66.jpg)
I'm pretty happy about how it looks. Splitting a few strips during the edge bending, so I have purchased additional units.
What do you think? Happy New Year!
John
-
Kirby, my first build was also the LN. I did a lot of researching on this site before I got too far along. There are two build logs that I highly recommend.
The first is:
Vossie is a very experienced carpenter who sometimes goes off on way off tangents but I learned a lot about this hobby and how he built the LN from this guy. Unfortunately, he fell off the map before completing the build. But it's worth going through his entire log.
The other log is:
Glenn is an experienced builder who got back into the hobby with the LN. Same here: learned a lot about this hobby and how he built the LN from this guy too. His log is shorter but very informative.
Good luck and welcome to MSW and the LN club.
John
-
That was a very useful video for me; glad I found this thread. I'm in the middle of the 2nd planking and I will be coming back to watch this again. Thanks for posting it, Gary.
John
- gsdpic, Ryland Craze and mtaylor
-
3
-
And not to make things anymore complicated for you, but you should understand the verb "serving" where applied to shrouds, lanyards and other purposed ropes. It involves wrapping a specific rope with a thinner line to protect it from chafing. This wrapping can be done manually or with a "machine". Not an expert here, so I will let others expand on the concept or you can go exploring. Good luck!
John
-
I know it's patent pending, but could you share the ID/OD of the tubing you used? It looks like a great idea! And great work so far!
John
-
On 12/4/2020 at 5:51 PM, Vane said:
Hmmm... minor mistake... when you measure and decide where to add things you really need to think about what lines of the model are most important. Should u measure against the whale or the canon ports or something else? Well later on you you see the consequences of your decisions...
I'm interested in what you would have done differently. You can't really move the aft channel up, blocking the gun port. Aesthetically (and probably structurally), the fore channel looks perfect. So does that point to that the aft portion of the wales should have been a little lower? From the beautiful picture above, it looks pretty well lined up; maybe it could go a little touch lower. That would lead to having to figure out where the chainplates go and the channels go before laying in the wales. Am I getting close to the point you were trying to make?
I only ask because Speedy is my next build. Thanks.
John
-
Hi. Not sure I understand your question. Not sure how you would get there. Most best practices I've seen are to install the false deck before the first planking, to give the hull more stability when you plank. Maybe you could supply more info or some photos. Photos are big here.
And BTW, welcome to this site. It is a fabulous place to learn many techniques. There is a forum where you can introduce yourself and share your interests. You'll get some attention from the crew here. Also opening a build log here is a best practice. When you hit a roadblock and post to your log, it's a place where some of the veterans can advise on solutions.
Welcome and good luck.
John
-
Yes, indeed, very neat work. Interested to know how you make out with that Ropewalk. Do you know if anyone else has used that model before? Is that the Model Shipways version? Looks relatively inexpensive. Good luck!
John
- Edwardkenway and Vane
-
2
-
9 hours ago, DelF said:
Hope this helps. What model are you working on?
Derek, Yes, this helps. My first model is the Lady Nelson but I'm following you here because I already have in my possession as my second, the Speedy.
John
-
Thank you for the tutorial. One question: Do you use the same seizing technique as you showed for the deadeye as for seizing the shroud lines as they loop around the mast at the top?
.John
-
Professional looking rope; very nice first try.
.John
- VTHokiEE and Old Collingwood
-
2
-
Lynn,
Well, on that note, I will be following you as you have selected a section build, which I have thought about, but will be at a minimum, my 3rd build. I have already purchased and received Vanguard Models' Speedy for my 2nd build. Still learning on my first, the LN, including acquiring the appropriate tools for this hobby. I'm taking a deep breath on embarking on the 2nd hull planking. Hope I remember how I did the first; it turned out pretty good after the second try, but it was a couple of months ago.
Hey, welcome to this site, start a build log, check the existing logs for your build and don't be afraid or intimidated to engage other members (i.e. follow other related builds, like individual posts; I see that you have done both; keep it up).
Good luck dude...John
-
Gary,
This ask was relative to shifting a hatch location. My thought was, in a single deck build, does it matter if you cut out the deck planks over the cutouts or just build the fittings over where they should go, with, if it's hatches going over the space, make sure to black paint the deck under them. This affected how I built out the deck planking. What I was concerned about was that deck planks would not be supported by the false deck because the false deck holes had expanded. As I built it, I marked, with pin holes, where the cutouts were centered. In fact, the only cutout I needed to make was obviously the hole for the mast. The deck hatches and the companionway will sit on top of the deck, where I want them to go.
Thanks for your advice...John
-
10 hours ago, Chuck said:
This is something we have been trying to improve but you must understand that with so many build logs.
Just read your "Take the "2 build log challenge"!!!. Any Takers" Seems like I'm a poster child for that promotion. Keep it up!
-
4 minutes ago, MEDDO said:
The tone and encouragement from everyone here on the forum makes this the best place to be
Michael and to everyone who's posted here:
Yes, indeed. I have been so impressed with the responses to my ask; I don't know what to say. The compassion (especially by Chuck) shown to a new guy like me is a testament to your efforts to make this a world class source for this hobby, notwithstanding the aims of the NRG. And it was worth it: I have gained a new understanding of why and how this site works. And it may be required reading by all new guys (and girls)! Just a thought.
Thank you again for your comments...John😂
-
Michael, that's what I figured. I've posted in the tips forum with:
I got good, quick answers to all but the "Are deck cutouts necessary?"; got none there but that may have been due to my short reply. Nobody advised that these should have been from my build log so I guess I have the feel for this.
Thanks for your help...John
- Canute, Ryland Craze, MEDDO and 4 others
-
7
-
48 minutes ago, Matt D said:
My biggest problem with this website is that it makes me want to build about a hundred more ship models.
Same here, Matt. I'm not far on the Lady Nelson and I have already bought and received Vanguard Model's Speedy, figuring it would be out-of-stock during the pandemic. Should not have bet against Chris Watton.😁
34 minutes ago, Old Collingwood said:Also an easy way to show interest just by a way of saying "Hi" without using words - is to look down the current activity down the Right hand side list and click on any subjects that you like / have some interest in / or subject you know about, even if you dont leave a comment you can just click "the like button".
Thanks OC. Another good tip. Just liked your post.
35 minutes ago, garyshipwright said:but if you have any question hope over to my log and will be happy to help any way I can, not only your self but other's. Gary
Very generous offer, Gary. Thank you.
13 minutes ago, mtaylor said:There's more resources here than build logs.
Thanks Mark. I've already posted into the tips & techniques area. Was curious about whether to post a question there or in my build log. Can you advise on what the protocol is? Or point me to where that is discussed?
Did not know about the ship model kit discussions. Looks like another useful resource.
- MEDDO, Ryland Craze, mtaylor and 8 others
-
11
-
-
5 hours ago, Matt D said:
I assume you’re concerned about spreading graphite all over the planks. That doesn’t happen in my experience. Feel free to take a look at my build logs.
Matt, yes that was my concern. I've seen that caution several times here. I'll take a look at your logs. Thanks.
5 hours ago, VTHokiEE said:Are you mixing your own WOP? I was under the impression that water based WOP wasn’t sold?
Amazon has it:
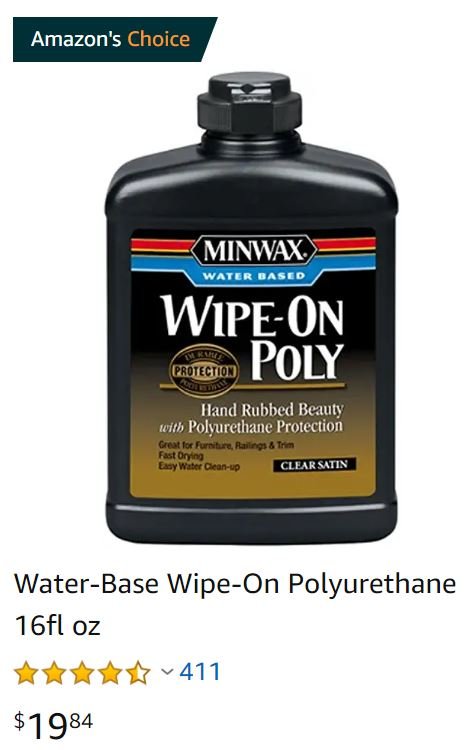
Figured that PVA would have better adhesion over this product.
All, since this is my first build, I did not want to chance that I would screw up with installing anything but a full size deck plank. And there are numerous topics on MSW regarding simulating plank butt edges. But you're probably right, I should abandon that idea. Maybe next build I'll install accurate size planks.
3 hours ago, glbarlow said:I agree on this little model the breaching rope is enough.
I'll probably just add one train tackle, but I agree, side tackles would be too much.
4 hours ago, glbarlow said:Careful with the stem, at least on mine it was soft wood, I broke it and had to repair it, I’d never had that happen on any model before.
Yeah, I already broke mine; twice!
3 hours ago, glbarlow said:Glue will stick to areas with WOP, but it’s best to rough sand it for better adherence.
Thanks Glenn, that's what I'll do.
Gents, thank you for your advice...John
-
All,
I really appreciate the advice.
2 hours ago, Chuck said:That is the key!!! And the point I was trying to emphasize. The easiest way to get feedback and engagement is to get out of the “bubble” of your own build logs and topics. Show an interest in others and others will show an interest in you. Its pretty simple really.
I get it, although it is somewhat intimidating to insert my humble opinions into topics when I have so little experience. I guess I was somewhat spoiled since when I posted on some issues outside of my build log, e.g.
Edge of Deck Plank Layout: Spirketting, Waterway, Margin Plank
I got responses fairly quickly. And in fact, after I updated my build log, I saw another LN build log. The last post in there, by Shickluna Searcher was reaching out for help and I posted the following:
Searcher,
I'm in the same (no pun intended) boat, the Lady Nelson. And I had the same issues you had with the first planking. I was pointed to the definitive site videos here: https://modelshipworld.com/forum/98-planking-downloads-and-tutorials-and-videos/ . The key one is the 3rd I think, where Chuck shows how to edge-bend the planks. It puts a curve into the plank that when bent in the normal sense, it lays right on top of the forward bulkheads. Yeah, I also followed Leon, but after 5 x planks, I reached for help from the wizards around here. They convinced me to start over, which I did. I left the 1st plank on and edge-bent the rest of them. And we will likely need to do the same for the 2nd planking.
I would also recommend that you go through Chuck's build of the Cheerful, which is close to the LN. You can find that here: https://syrenshipmodelcompany.com/revenue-cutter-cheerful-1806.php. There is a PDF for each chapter.
I'm just a little bit ahead of you in the build and you can check out my log. I would recommend that you create your own log so you can post your own questions and not be lumped in with whadozer's log.
Good luck...John
(Still haven't figured out how to copy between topics.)
3 hours ago, glbarlow said:Have a look at my Nelson log.
Believe me Glenn, your log is the go-to log for me when I hit a snag.
3 hours ago, JpR62 said:I spent and still spend many hours going through the logs to find different solutions and tips. It is never wasted time and is well worth it.
I probably spend several hours everyday scouring different areas of this forum and others and usually I see things that click.
Again, thank you all for the advice. I'm trying to be a good community person; will just try to be better. And now to review the comments I got on my last log post. Thanks Glenn.
John
.jpg.abf23c39816587a591a4b877425d5779.jpg)


.jpg.7b7b6f0c52c4ce94ac51322438c7eb27.jpg)
.jpg.e1f72875406df8c9fd78b62b5b09b1ee.jpg)


Lady Nelson by KirbysLunchBox - Amati/Victory Models - 1:64 - First Ship build
in - Kit build logs for subjects built from 1801 - 1850
Posted
Glenn is spot on. Take your time and don't settle. I started my LN in July and here's what I've accomplished so far:
And yesterday, I ripped off the plank above one garboard plank because I didn't like the way it landed in the rabbet on the stem post. Did it over and now it looks better.
Boy, do I want to finish the hull and get to the deck fittings, get to the mast, yards and rigging. But, I'm taking it like the turtle, not the rabbit. It's the only way.
Stay the course, Kirby.
John