Bill97
-
Posts
2,730 -
Joined
-
Last visited
Content Type
Profiles
Forums
Gallery
Events
Everything posted by Bill97
-
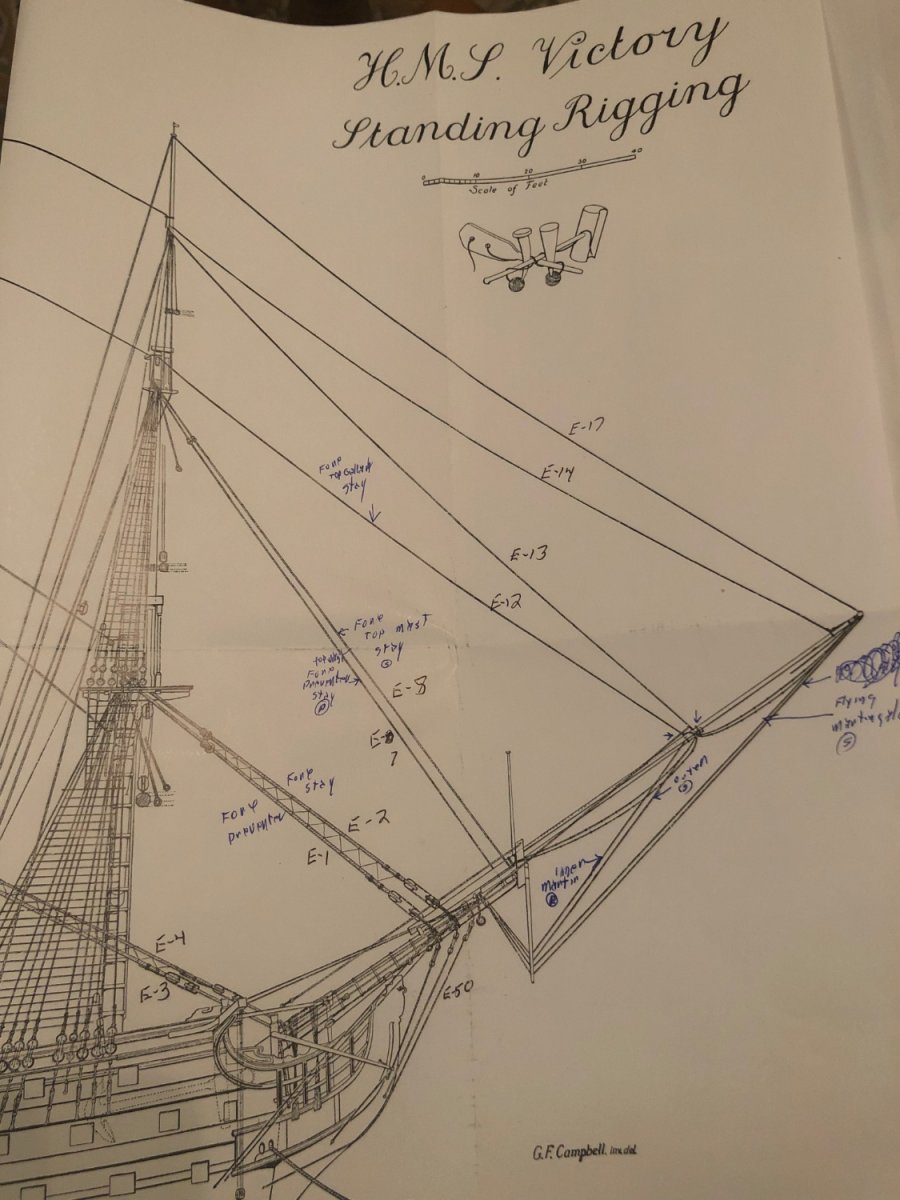
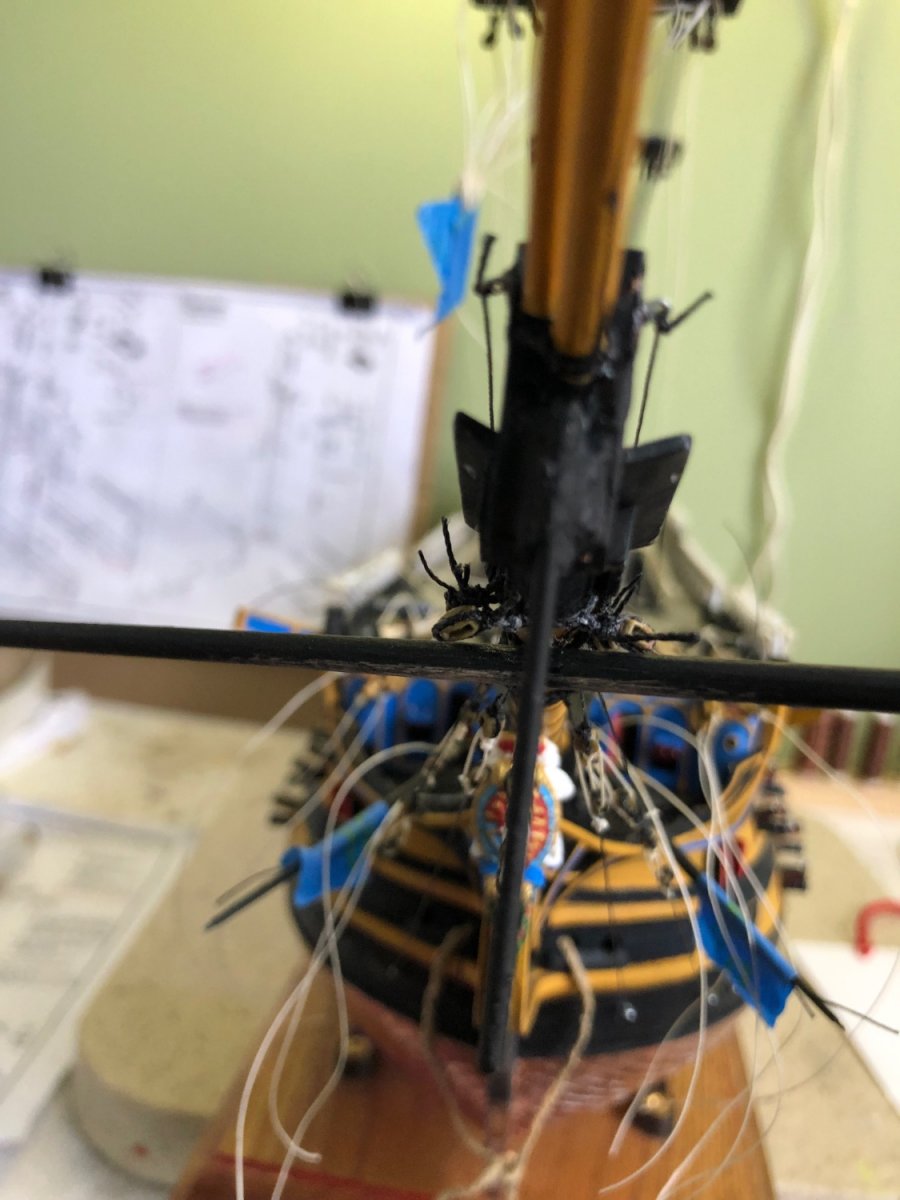
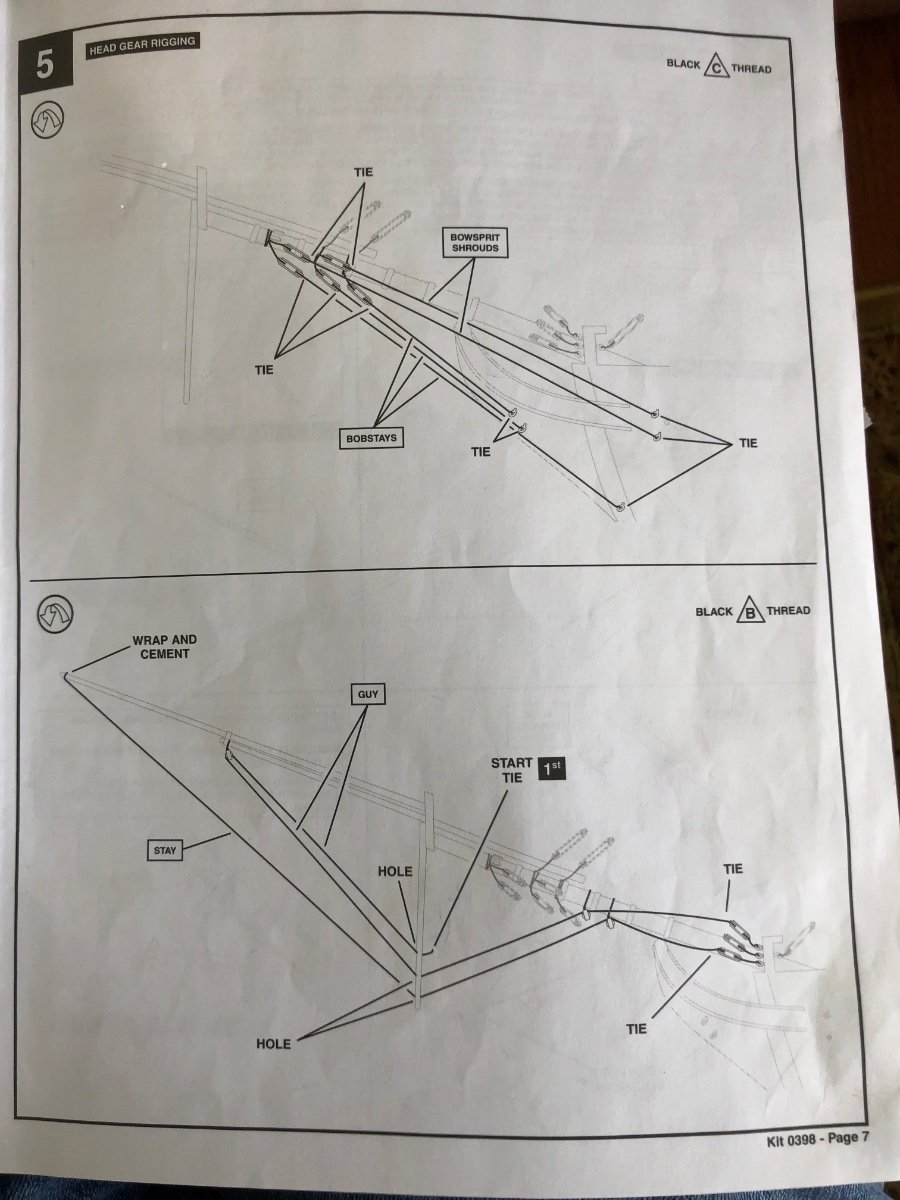
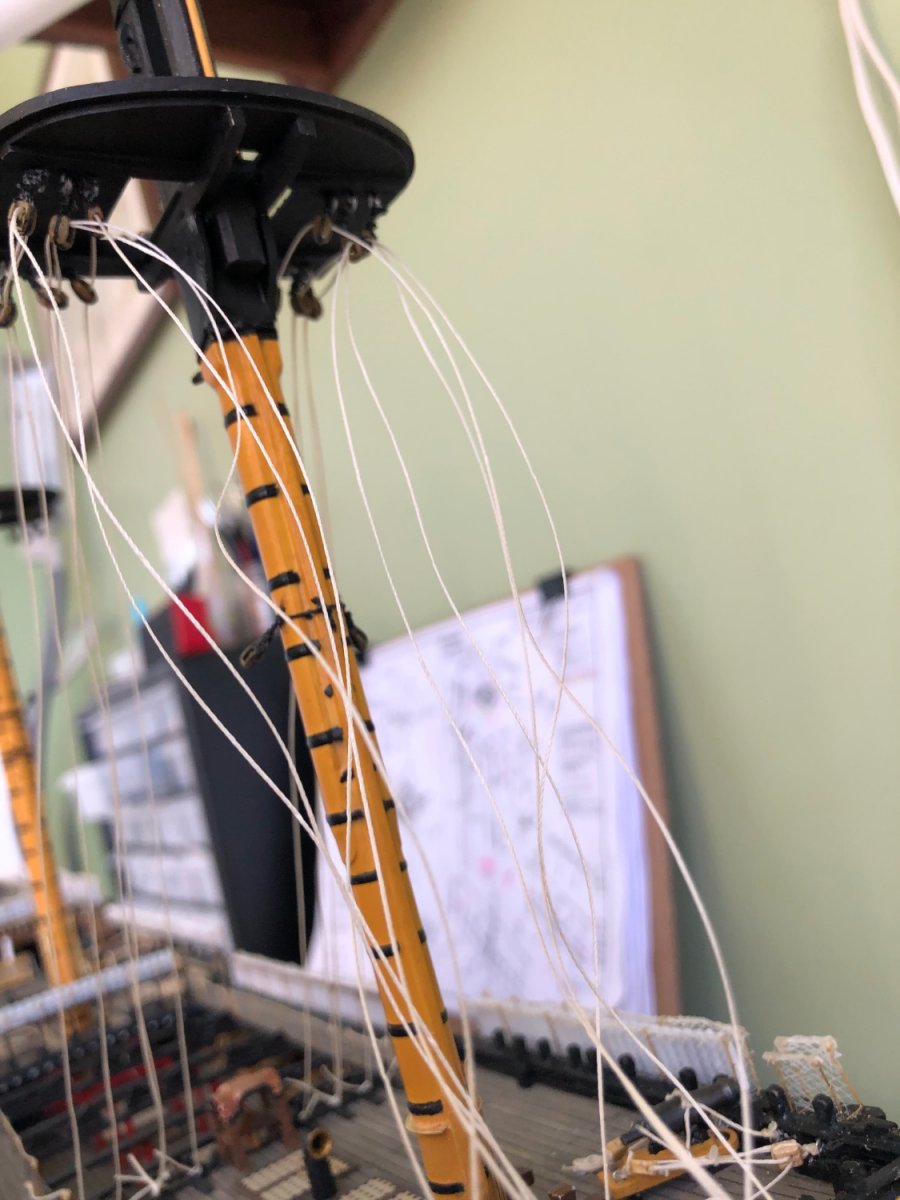
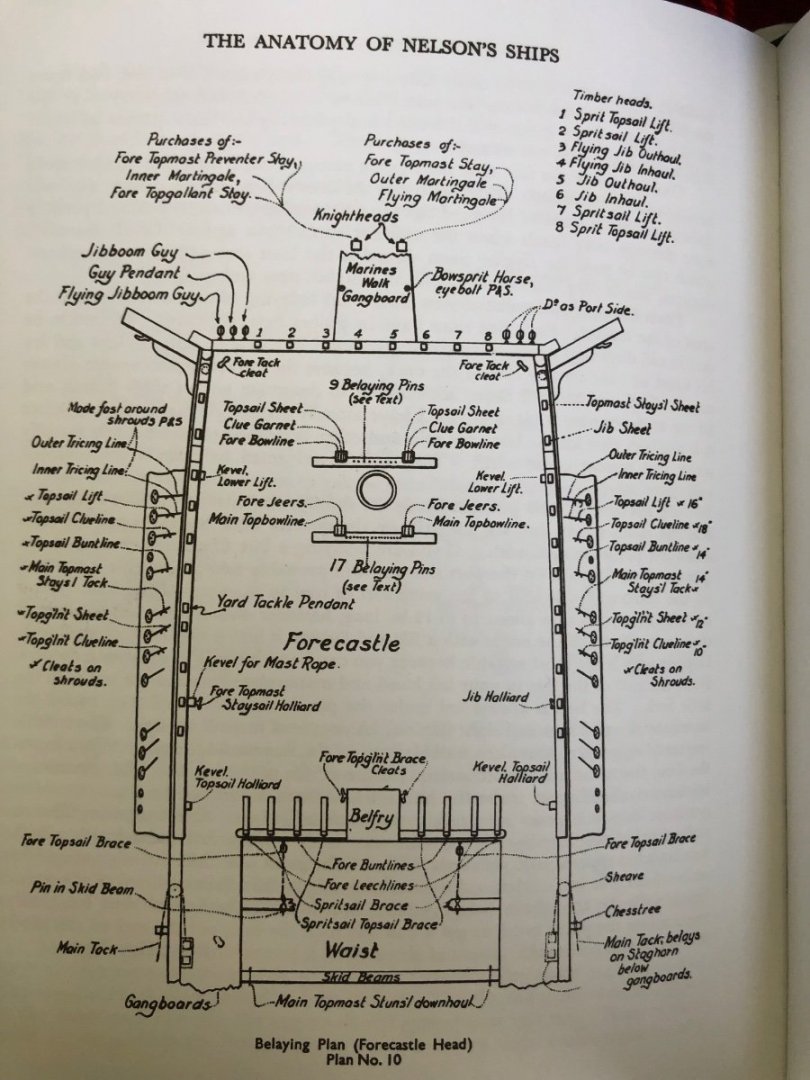
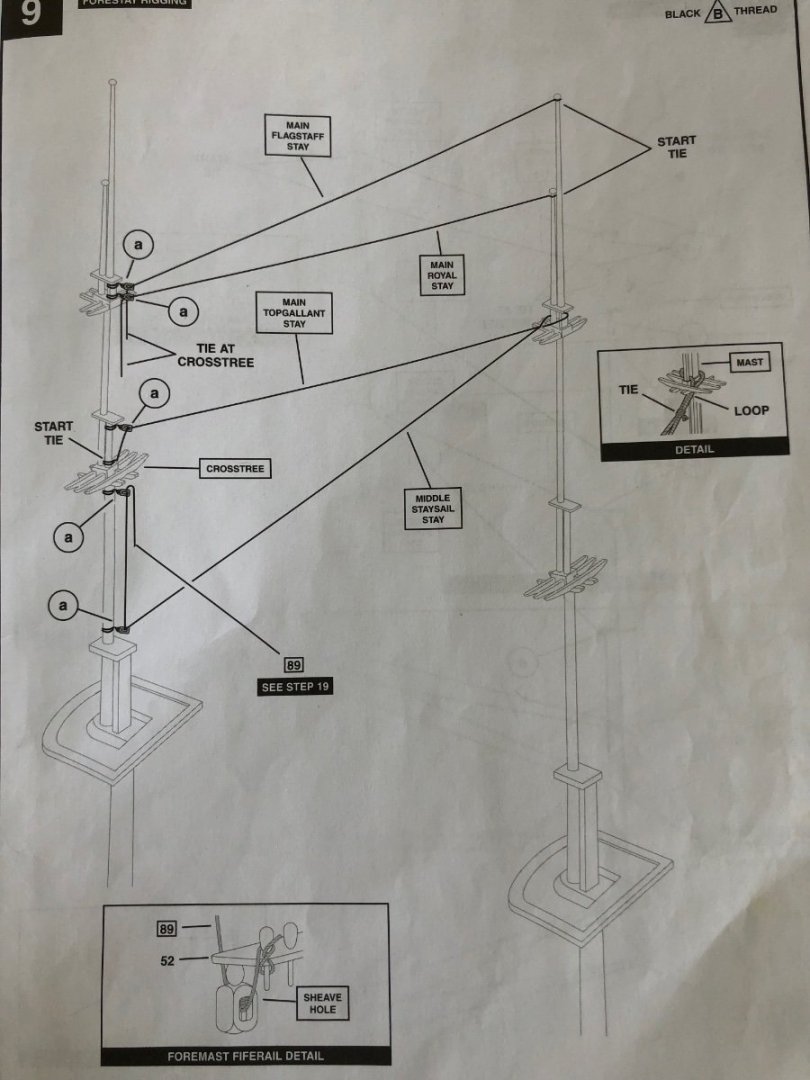
OK guys give me a hint. I am again learning nautical terms. As I learn them I can research Longridge’s book for the route of the line. Reading through the book I think I have the names of 5 of the 8 fore stays identified (maybe not). What are the names of the fore stays in the picture from the top down? Once I know their names I can determine their rigging in route to the knightheads.

-
Thanks Popeye2sea. I will review my new instructions to see if this makes since. Bill
- 2,699 replies
-
- 4
-

-
- heller
- soleil royal
- (and 9 more)
-
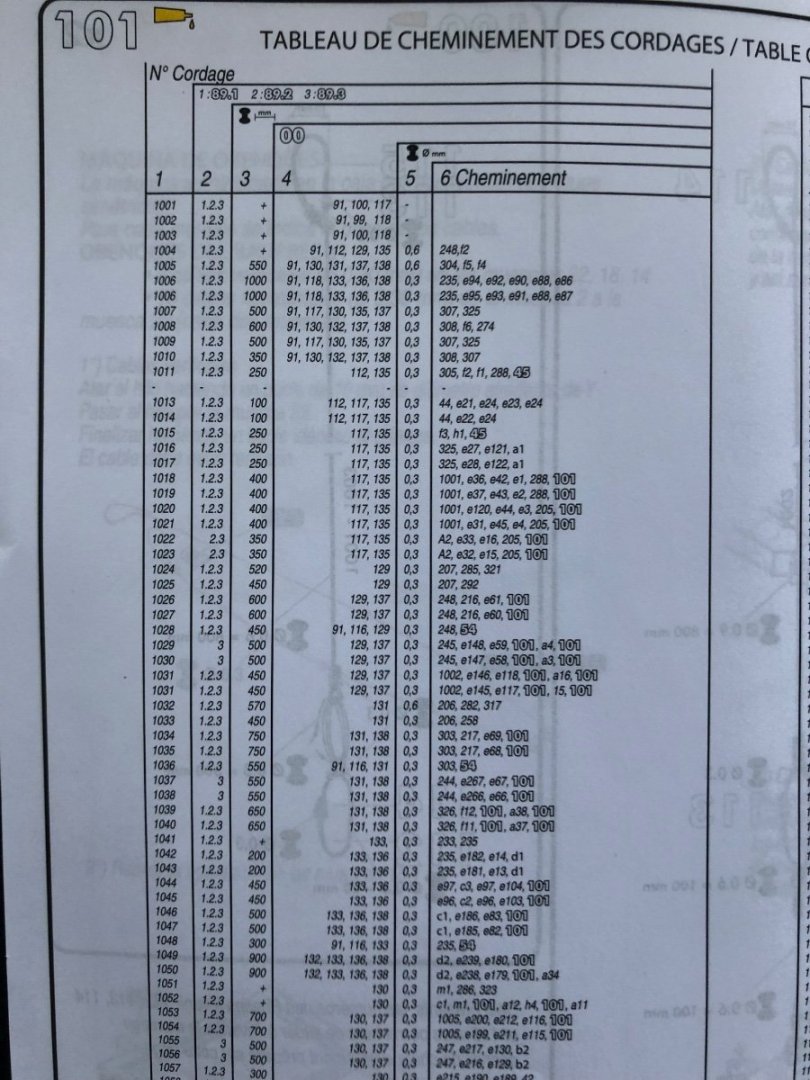
Marc is making the new deck something you felt had to be done because the Heller deck sections were wrong or something you wanted to bash to improve it, but would not have to be done. Thinking about where I might be later. By the way does the Table of cords above make any since to you?
- 2,699 replies
-
- 4
-
-
- heller
- soleil royal
- (and 9 more)
-
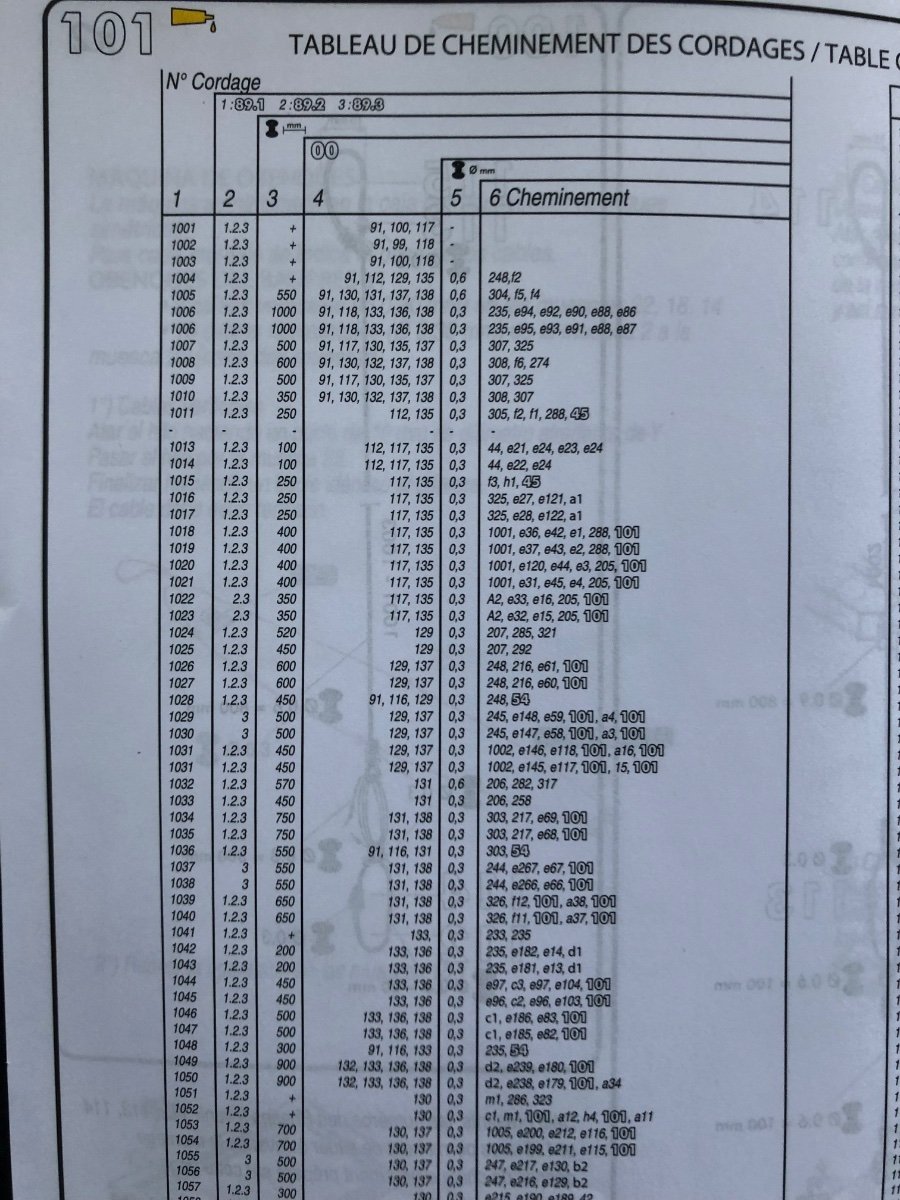
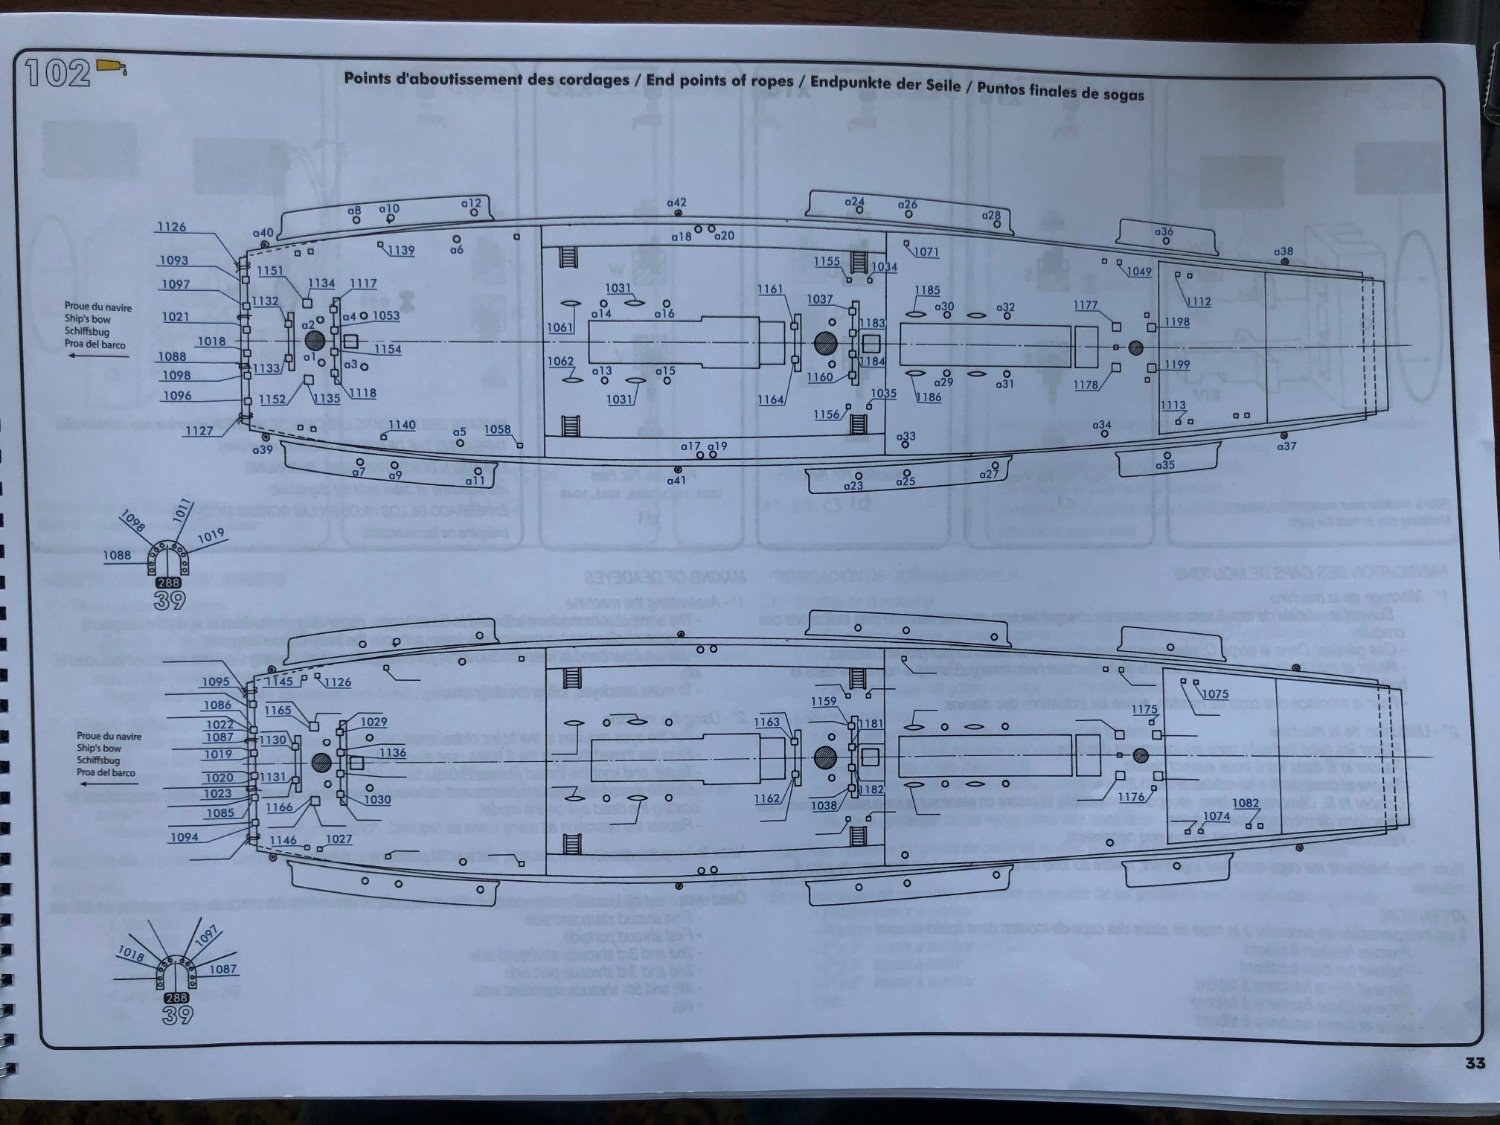
Marc I pulled out the new Heller box instruction book for my SR. Attached are a couple pictures showing the belay point diagram and a Table of Roping. Does the diagram look any better than what is in the old instructions? Looking at the table I am not sure if I understand it. I can see column 1 is the line number, column 3 is the thread length, and column 5 is the thread diameter. No idea what columns 2, 4, and 6 are. Instructions don’t say. May have to email Heller and ask unless one of my great friends here on MSW can figure it out. Of course a long time before I approach this.

- 2,699 replies
-
- 6
-
-
- heller
- soleil royal
- (and 9 more)
-
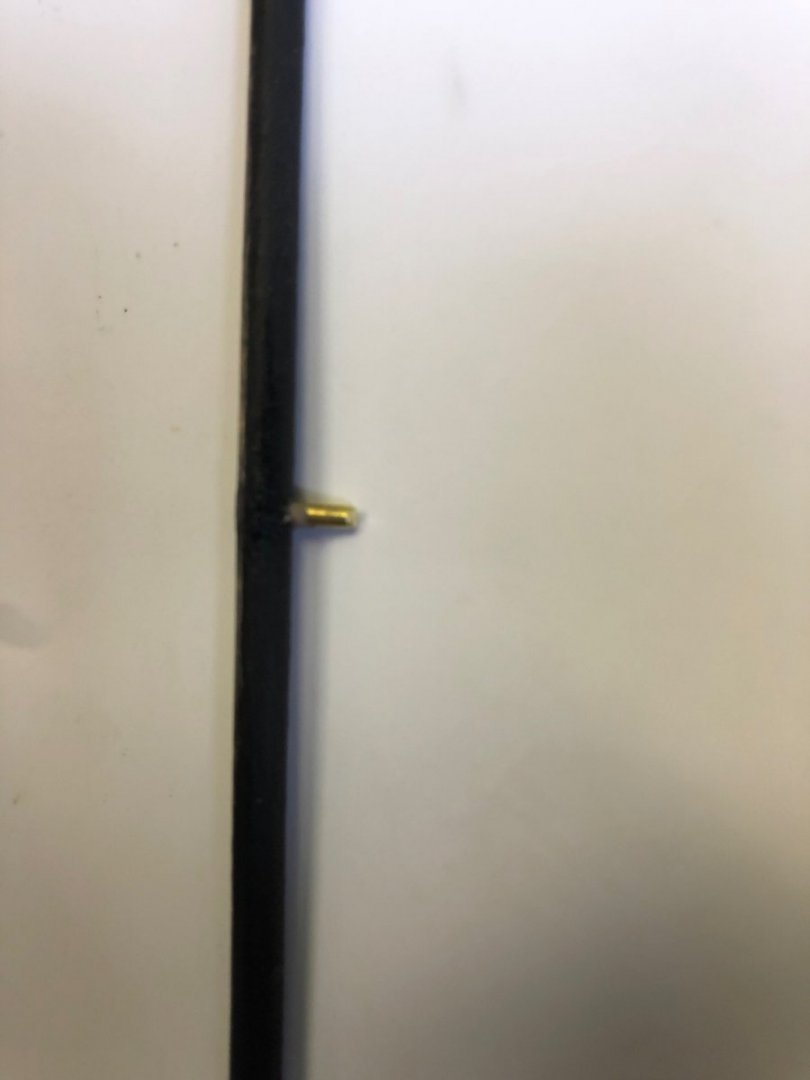
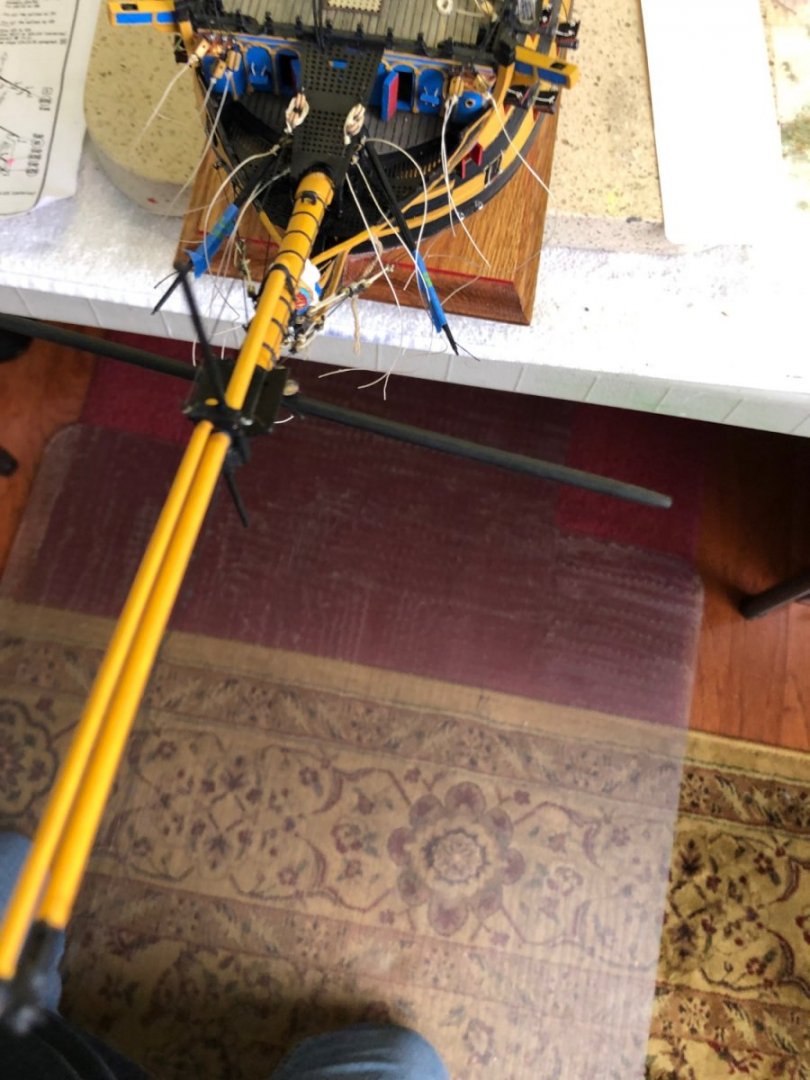
Was able to engineer how I am going to attach the spritsail yard based on your recommendation. I drilled a small hole at the center of the new wood yard, inserted a small length of copper rod with CA glue, and drilled a matching hole in the underside of the bowsprit. Once I attach the foot ropes and necessary blocks I will attach the yard and the attaching rigging. Still need to figure out the brass forward spritsail yard.


-
You are so right Marc about your dad. I always thought it is much harder on the family than it is on the patient. They are happy in their mental world. Fortunately for my mother, if I can say that, she passed before she got real bad. I wish the best for you and your family as you deal with this. Hopefully retreating into your modeling from time to time gives you periods of respite. Hang in there my friend. On a happy note I will look at the new SR instructions and see what their belaying point diagram looks like. Bill
- 2,699 replies
-
- 6
-
-
- heller
- soleil royal
- (and 9 more)
-
Marc I bookmarked your SR build and am enjoying reading about your build now that I have the Heller SR in my stash for after the Victory. Once I get into it I am sure I will look to your build for advice. Sorry to to hear about your dad. I understand completely as my family went through the same experience with my mother just a few years ago.
- 2,699 replies
-
- 4
-
-
- heller
- soleil royal
- (and 9 more)
-
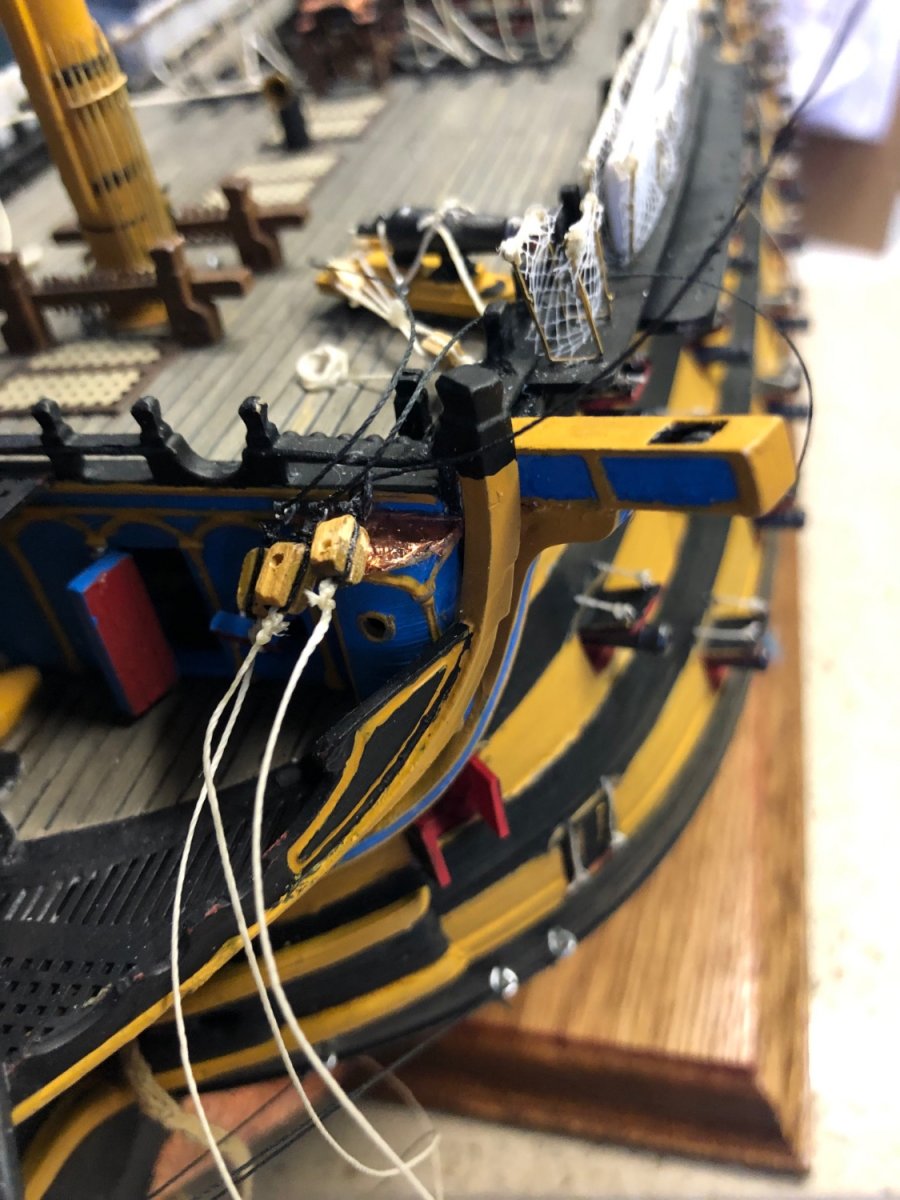
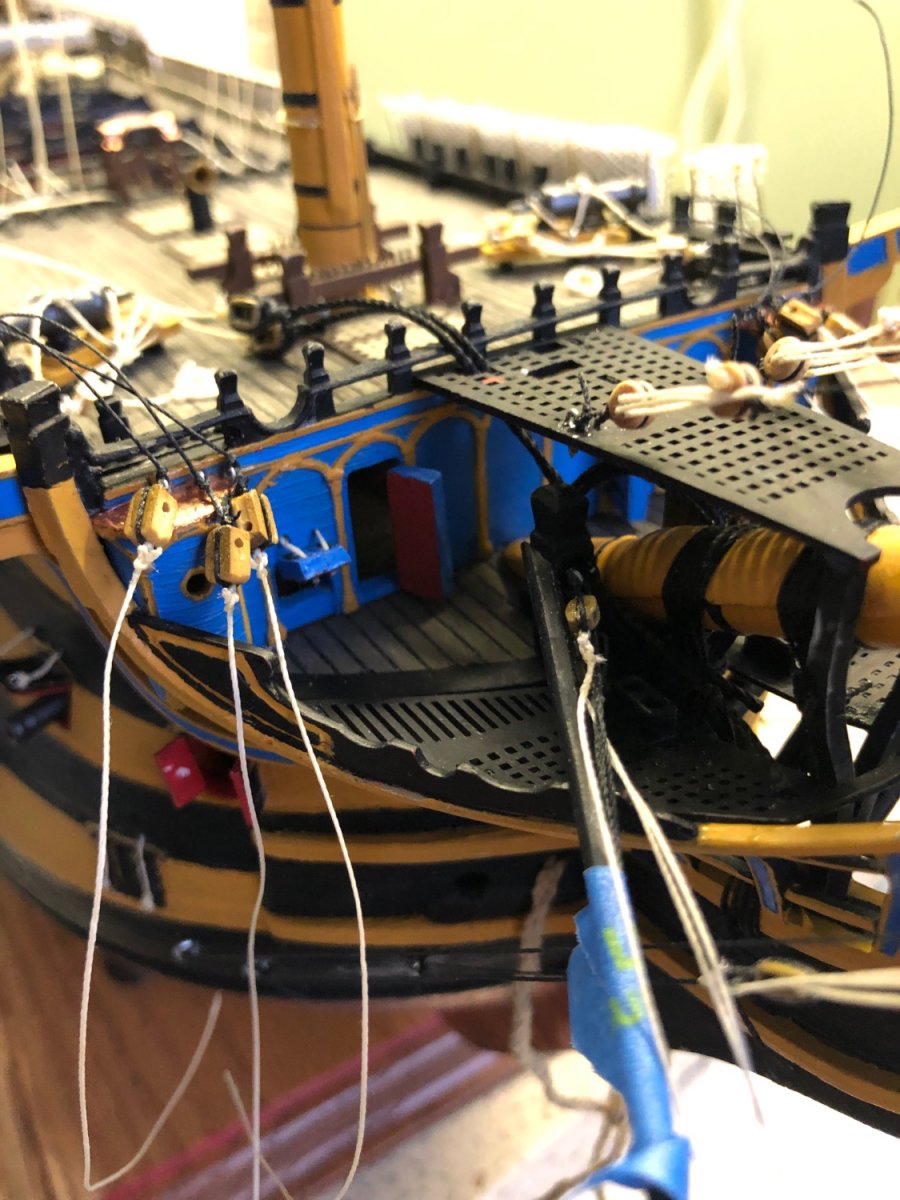
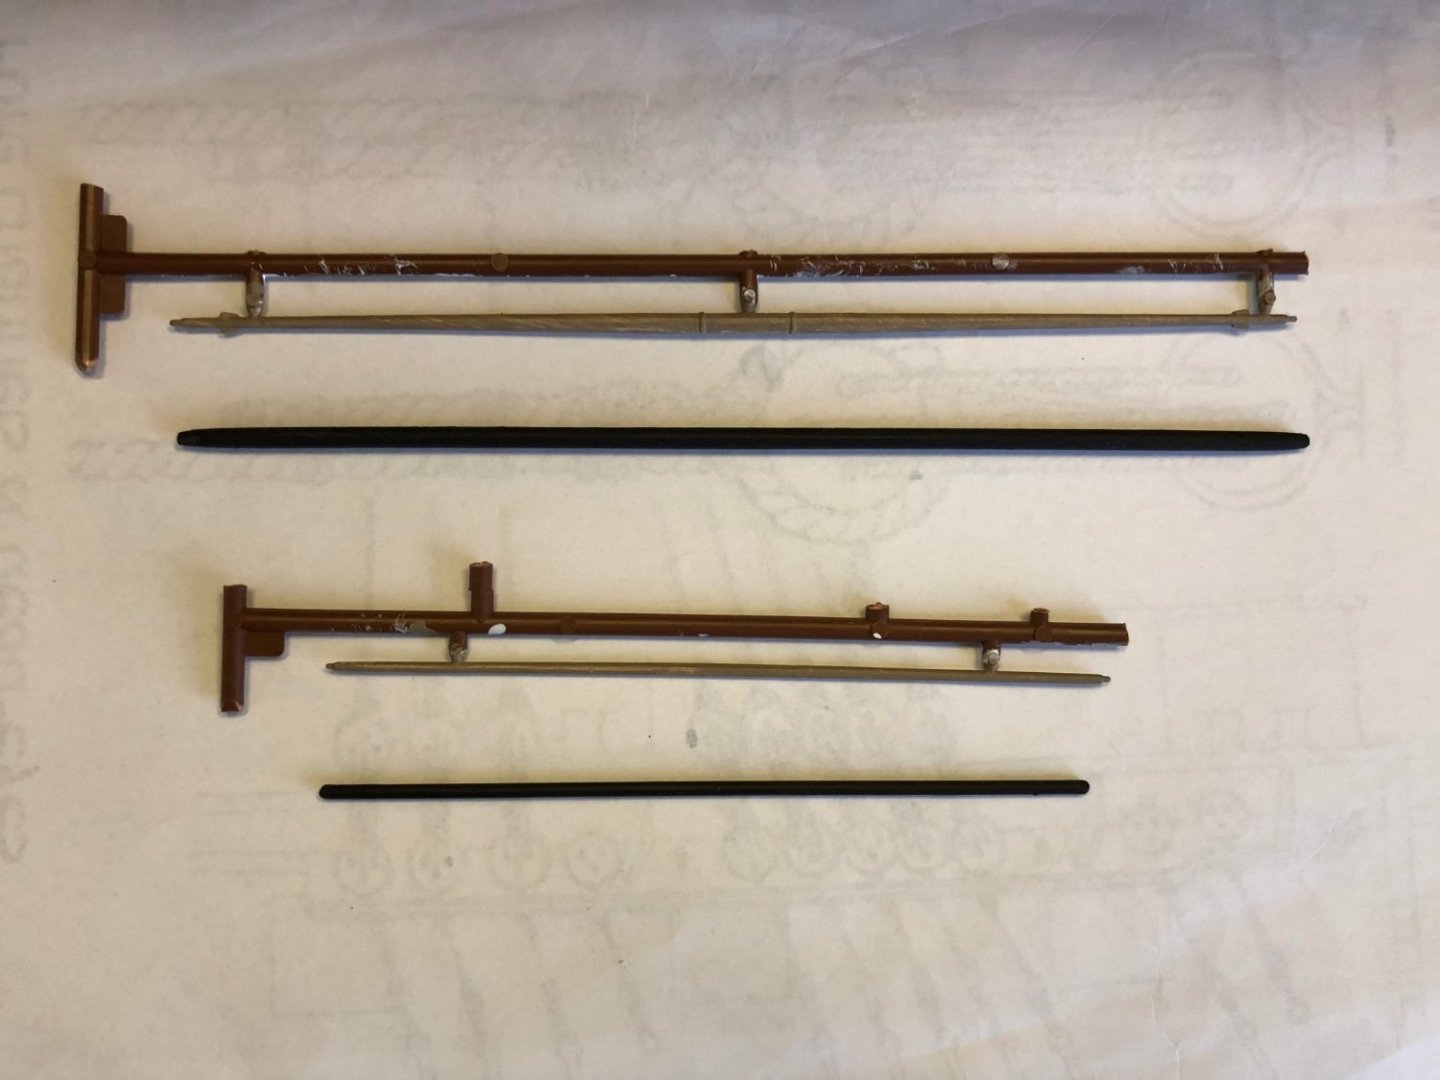
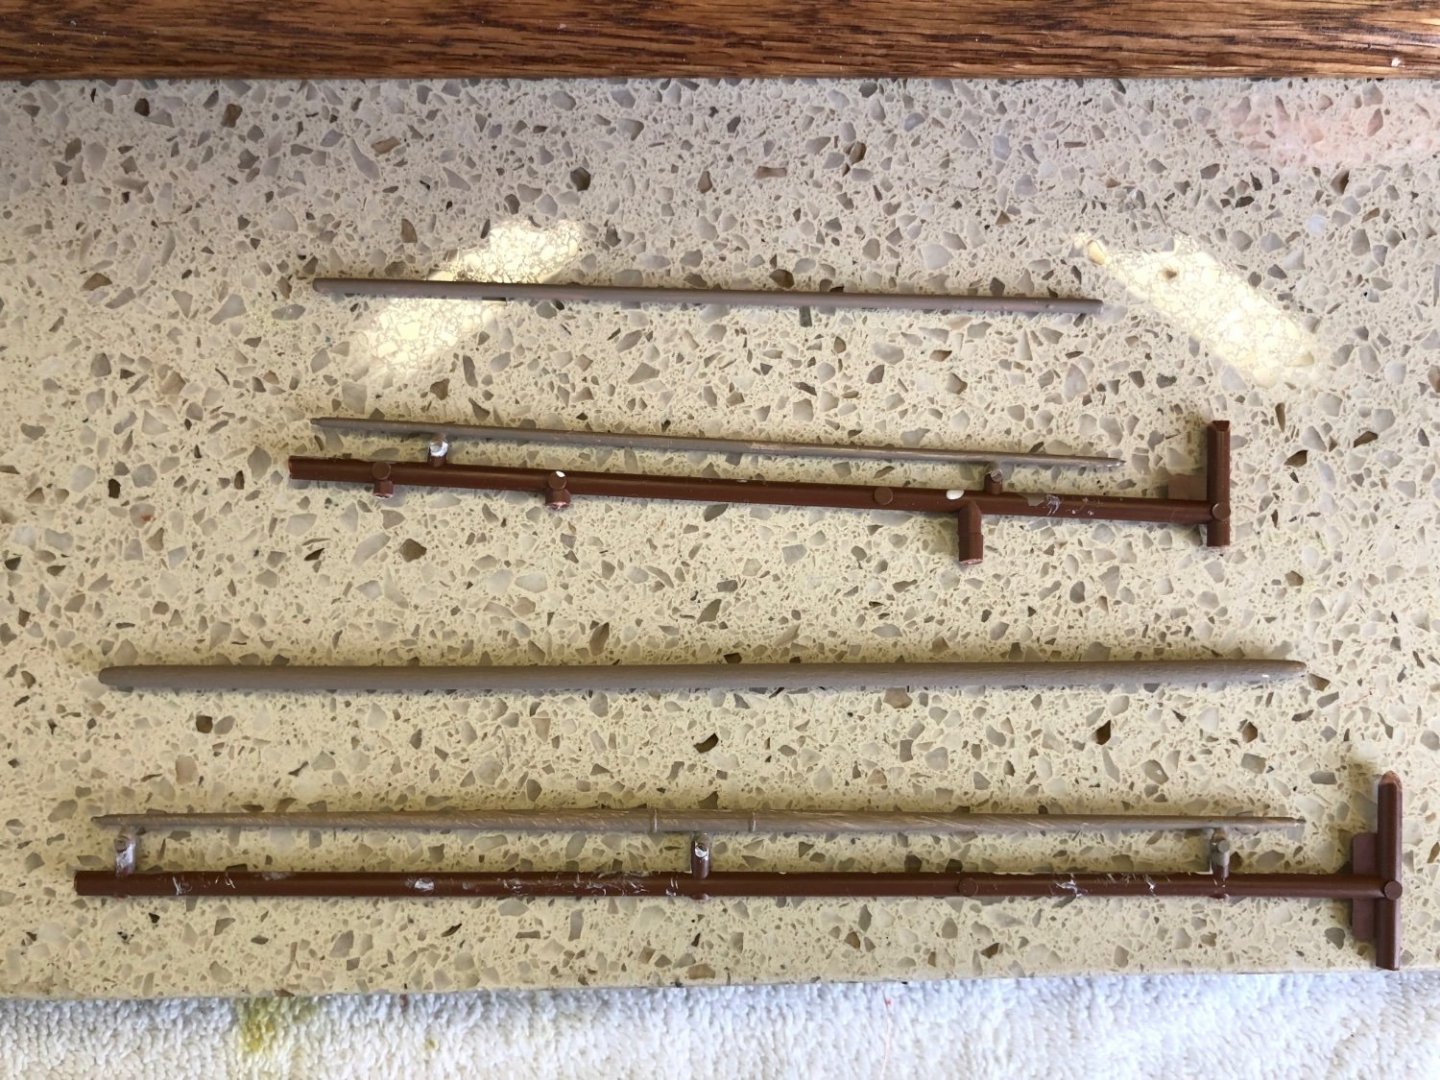
Worked on adding eyebolts and blocks to the knightheads and roundhouses which will be used for later rigging. Thanks again Ian for the photos and Longridge reference. I did not tie the blocks off to the eyebolts yet. I am debating rigging these lines in reverse. Cut a length of appropriate thread and attach the double block to the end of it. Then use a laniard to connect it to the corresponding single block on the knighthead or roundhouse establishing the most appealing space between the matching blocks. Then rig the line in reverse to its end (beginning point). I think this process will be easier especially for the 6 blocks on the knightheads. I also made two new spritsail yards. Wanted to make yards that were stronger than the ones included with the kit. The lower spritsail yard I made from a wooden rod sanded to shape. The upper yard is so thin I did not think one made of wood would be much stronger so I went with a copper rod. It is satisfactory for strength. I will need to use some ingenuity to determine how to attach a copper rod to a plastic bowsprit


-
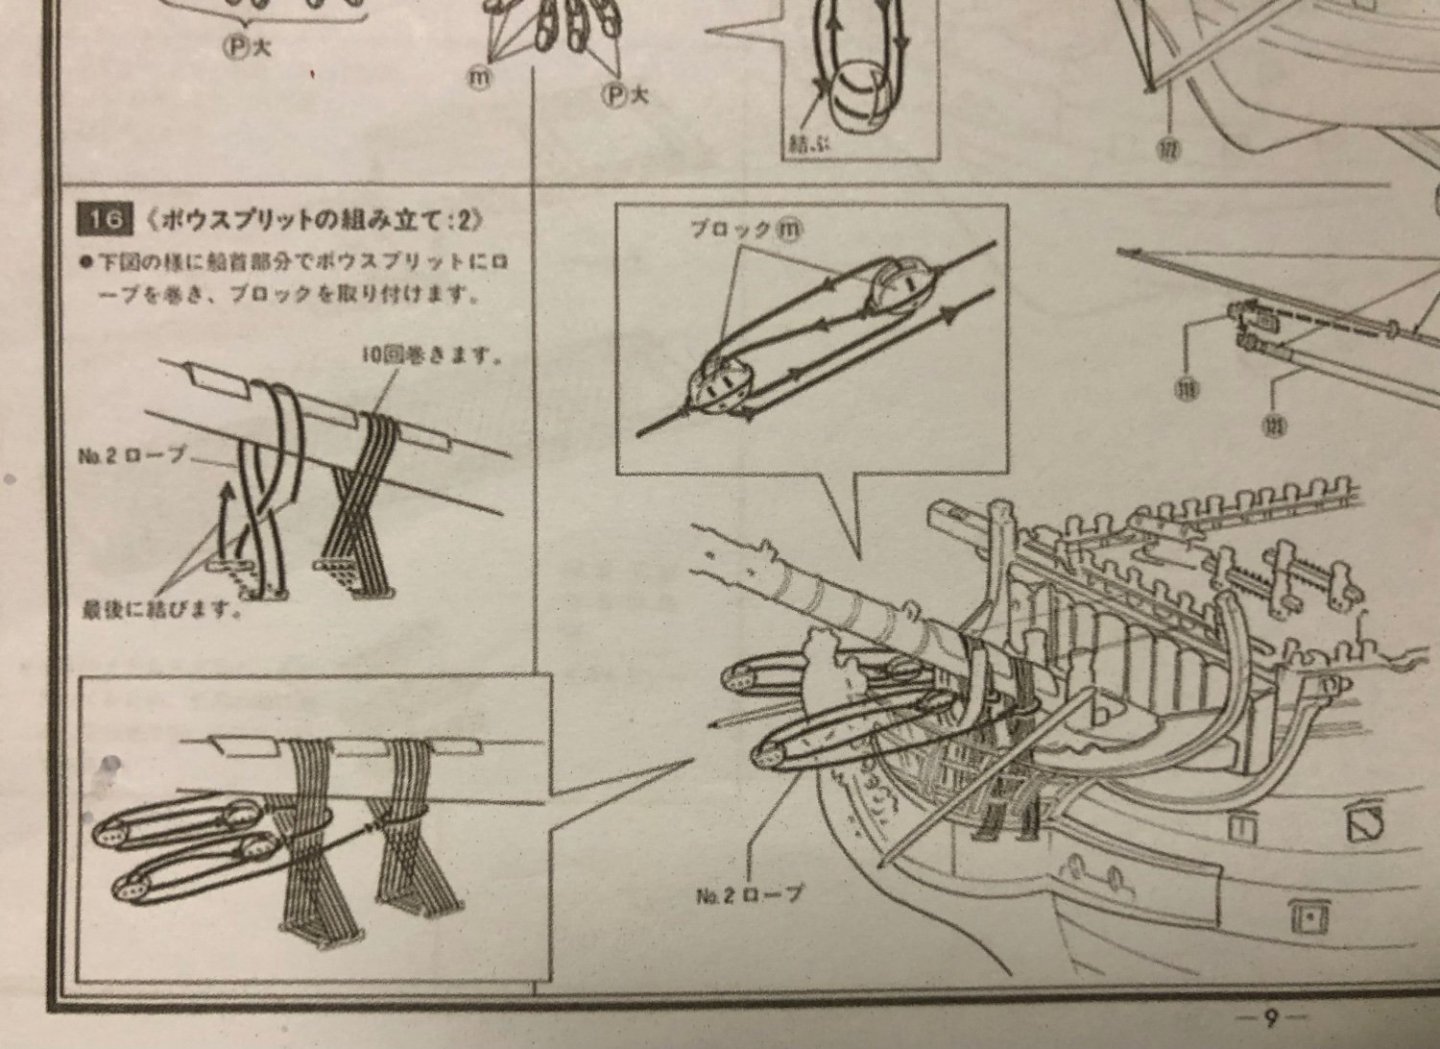
Any of you guys recognize this? I have a set of HMS Victory building instruction that are not in English. I think they are Heller because the part numbers seem to be the same. I the section on rigging (one of the several references I look to) there is this diagram of blocks rigged to the gammoning. I do not find a similar instruction in my English version and I have not found anything similar in Longridge’s book. I may very well be guilty of overlooking it in the book.
-
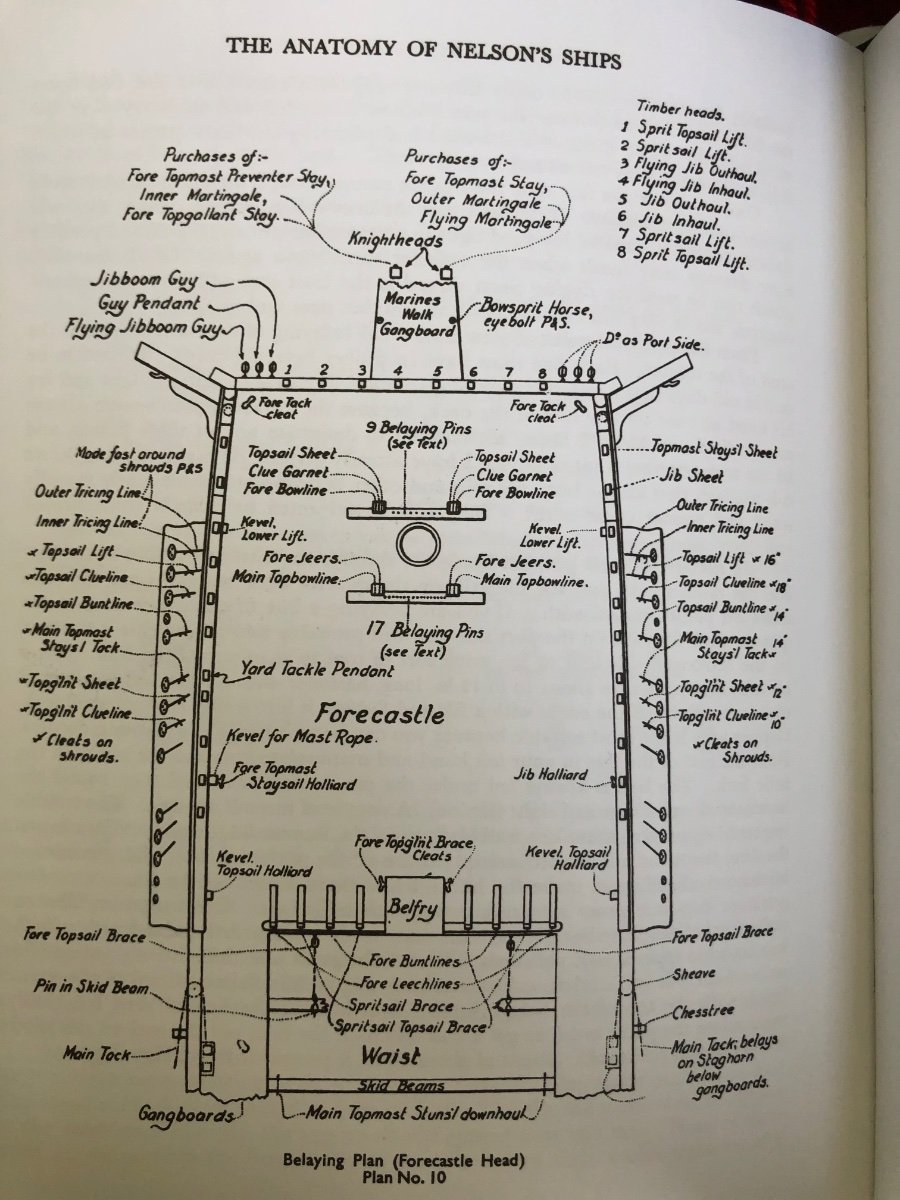
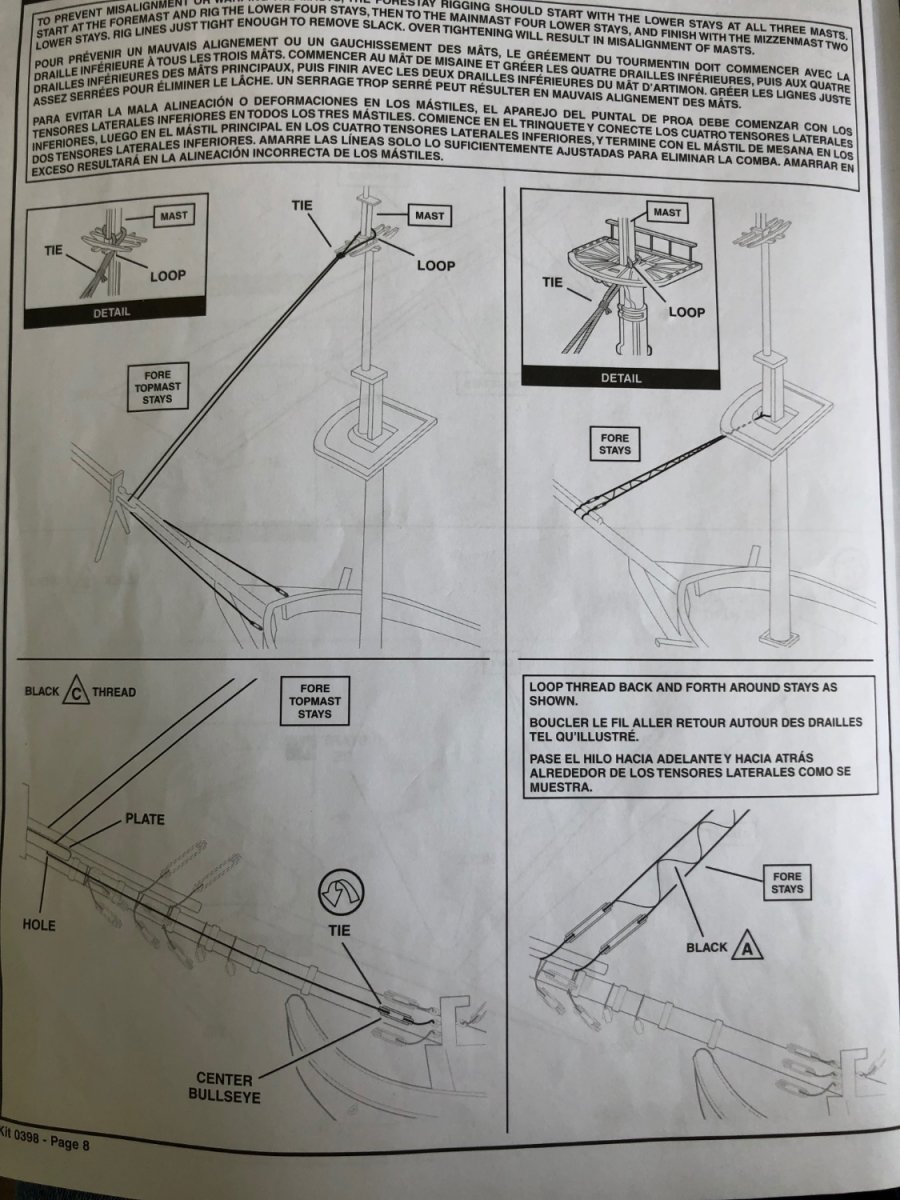
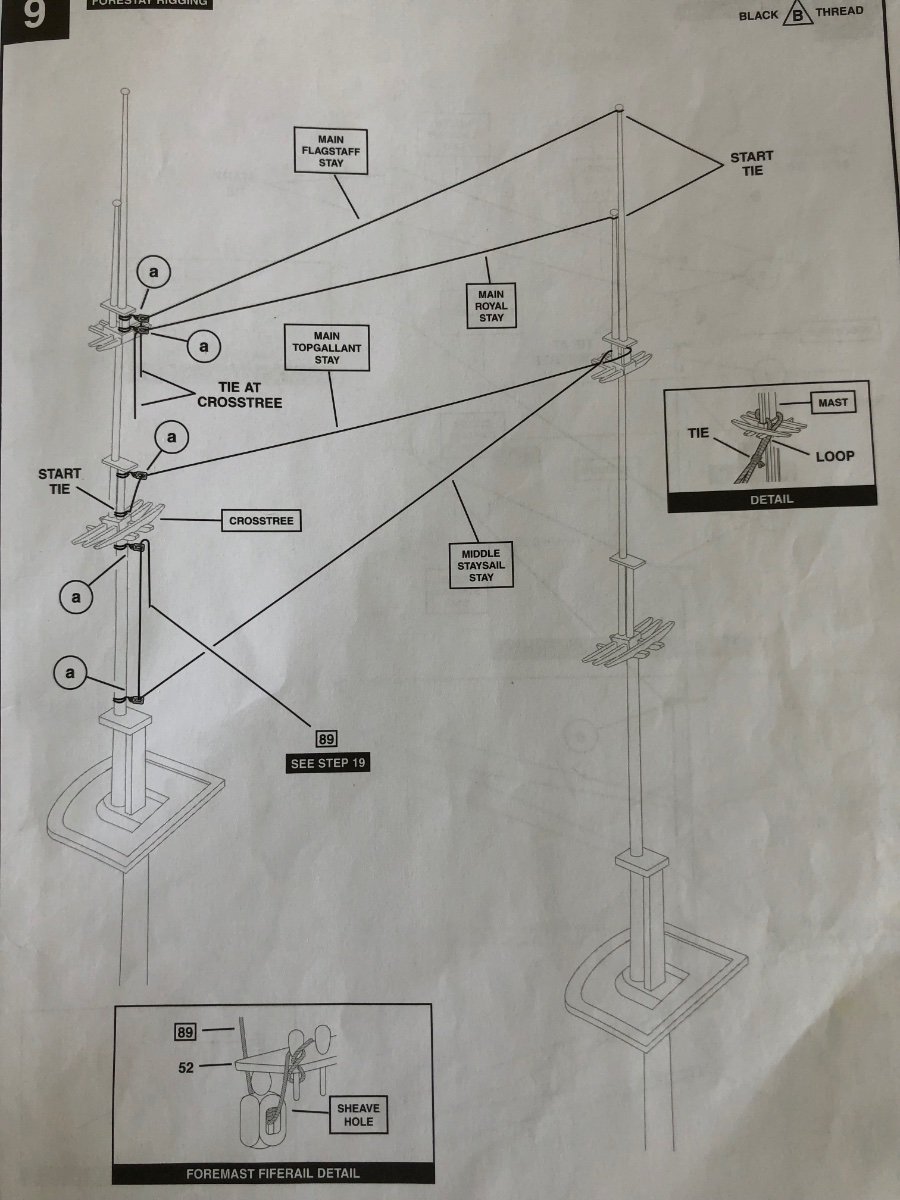
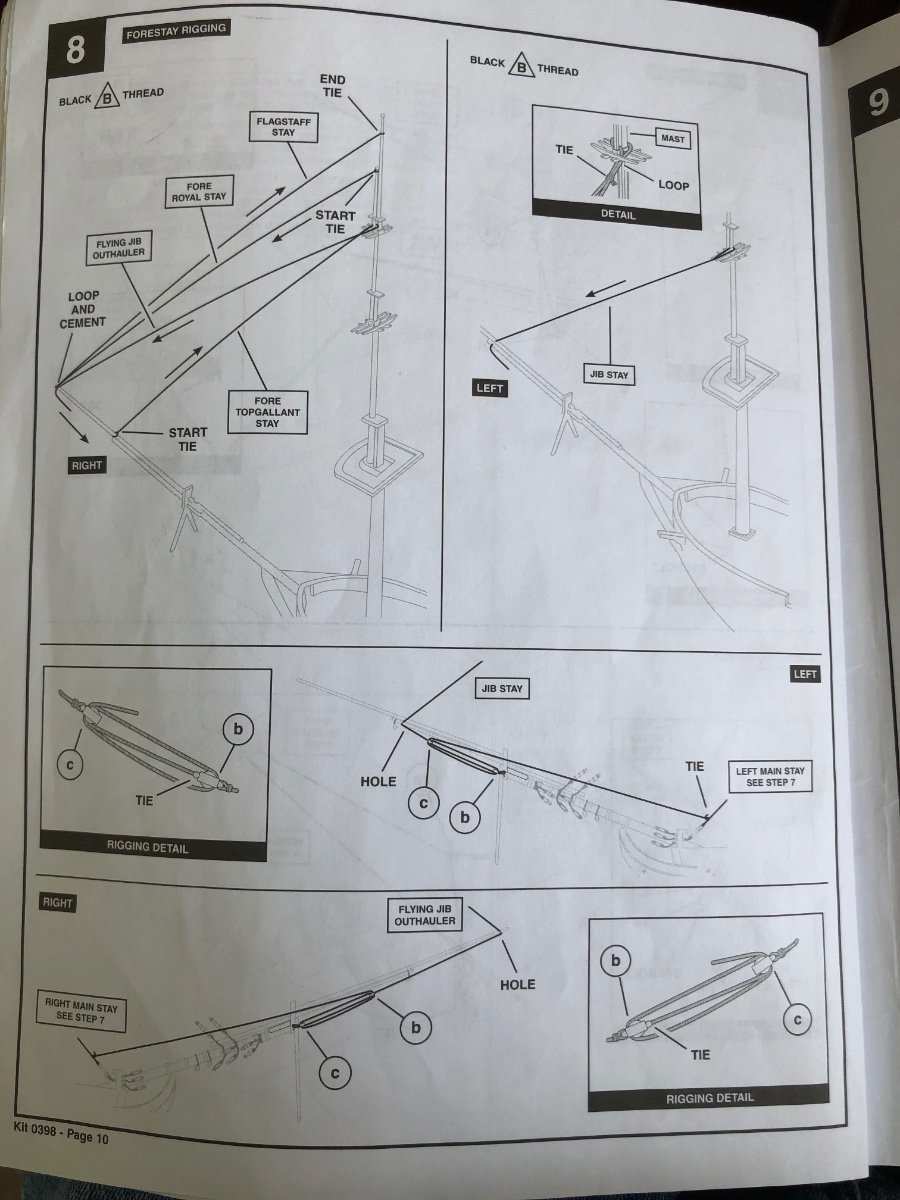
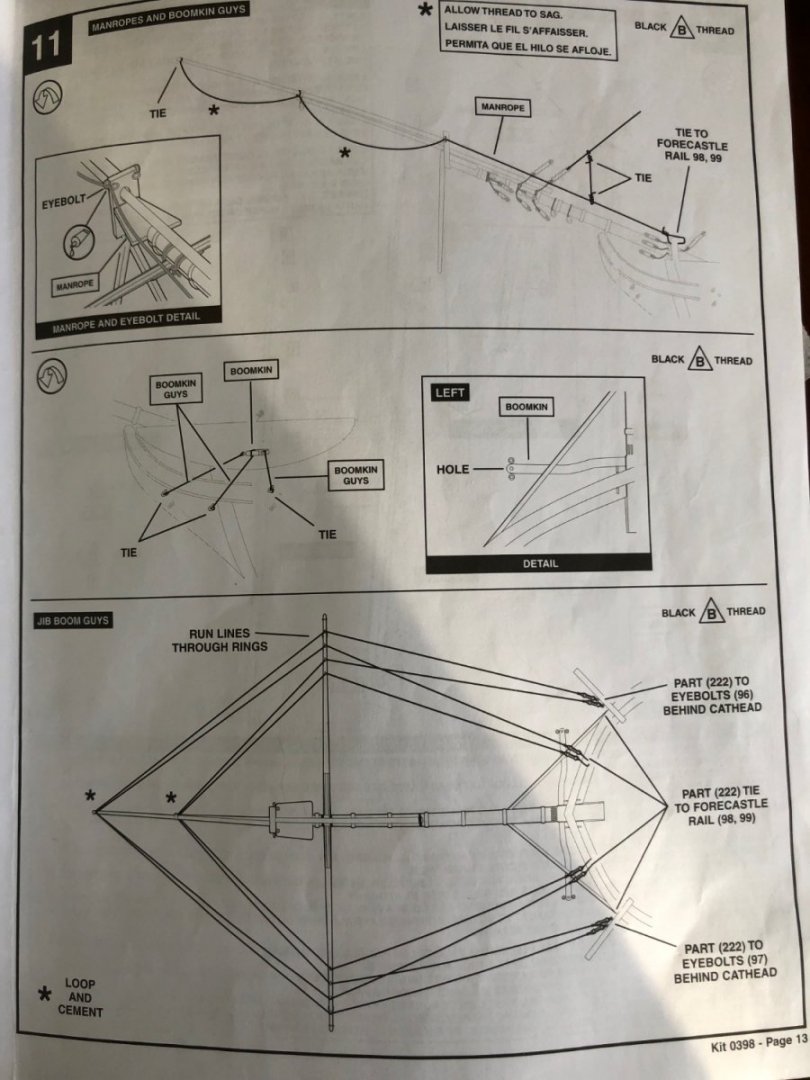
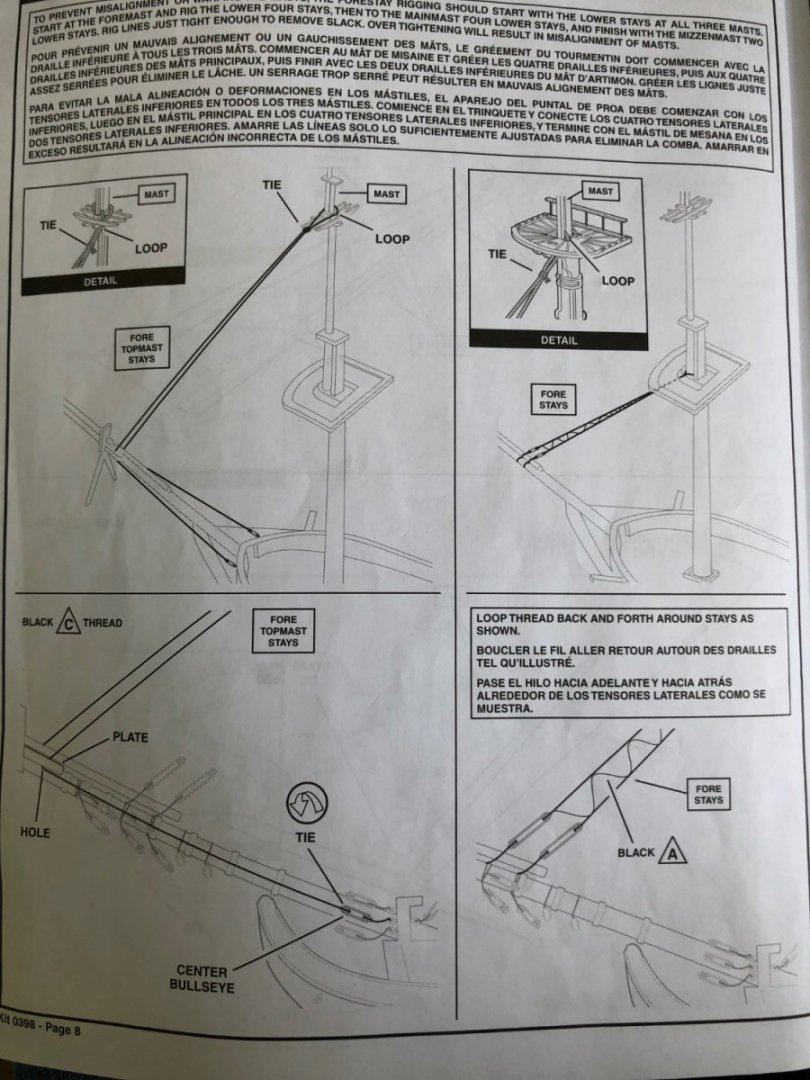
Ian that is exactly what I am talking about. I look at Plan 10 in Longridge’s book and see the different lines tied to the eyebolts and blocks over the round house: Jibboom Guy, Guy Pendant, and Flying Jibboom Guy. My mind immediately says what in the frick frack are those. So I turn to the index in the back, find the name, go to the page the index refers me to and find text explaining the line with an inclusion of a plate, figure, and or plane number to actually see it. Four steps for any line I am not familiar with. Of course this is 100 times better than trying to use Heller instructions by themselves. Luckily I am familiar with a number of terms (stays, shrouds, etc.). Those I can go right to work on. I don’t know if you have seen any of Revell’s 1/96 rigging instructions. They are great and I admit I am even looking to them for help. If you have not seen them, I attached a few photos. '


-
Ian after looking over your photos and instructions above I have come to the conclusion YOU ARE LONGRIDGE! Come on admit it. Am I right? Am I the first to unmask you? 😀 You wrote the book, right? What is so crazy to me is the way you connect the dots in YOUR book. When you spell it out to me (that line is aaaa line and it passes through a double block before attaching to timber bbbb), and then you provide the Figure, Plates, Plan, and text page from the book, it is perfectly clear. The information is right there in front of me. I may have read over that chapter in the book once or twice but still unable to connect with he dots. Very impressive my friend. I still think a big handicap for me is not being fluent in the nautical names of the particular lines. I STILL THINK YOU ARE IAN LONGRIDGE! 😀
-
Fantastic Ian. So appreciated. This should help me a lot.
-
Kevin I have never tried using one of those line jigs. Airfix included one with their Vasa. I plan to just tie them the old fashioned way. Up around the mast with a served thread and to the deadeyes. Once all shrouds in place I will prepare a card with lines parallel and spaced. Put it behind the shrouds and tie knots to follow the lines. Takes forever but I like it.
-
Ian as usual you have come through perfectly! No way I could do this without your help. The brass rod through the yard and into the mast is exactly what I needed to know. I am still so amazed at you finding the answers in Longridge’s book as proven by your references. Since my plan is either no sails or all furled, I know Heller here is a difference in where the yard is placed. I still look back to my Revell 1/96 USS Constitution instructions for hints. Of all my builds so far it was the only one that gave instructions as to the options of where to mount the yards with and without sails, how to rake the yards with are without sails, and where to place the extensions for the yards (I forget what they are called) if fully rigging with sails or not. I know the Constitution is a US ship and the Victory a British but I assume some of the building engineering was similar.
-
Thanks guys. This information is very helpful. safemaster I will now research the slings for the bowsprit and truss pendants for the lower yards.
-
👍 thanks OC. I will see if I can find a technique to make them. Do you assume the yards on the model are actually lose and held in place by the parrel and rigging, or somehow glued in position with the parrels just for appearance?
-
Wow OC I did not expect an answer so quick! Is a parrel used on all of the yards? How about attaching the two to the bowsprit?
-
OK let’s throw out another area for discussion that I will be encountering soon. Attaching the yards to the masts and bowsprit. We all know Heller does not mold anchor points into the yards and masts to accomplish this task. From reading Longridge’s book I see a mechanism called a parrel (did I spell that correct?). Is this mechanism used for all 3 yards on each mast and the two on the bowsprit (11 total)? If not, which ones use the parrel and which don’t? Is there a good technique for making these things and how do you actually use them on the model? What attaching method is used to attach yards that don’t use the parrel? Ian I promise I am going to read through Longridge’s book several times to see if I can find this answer.
-
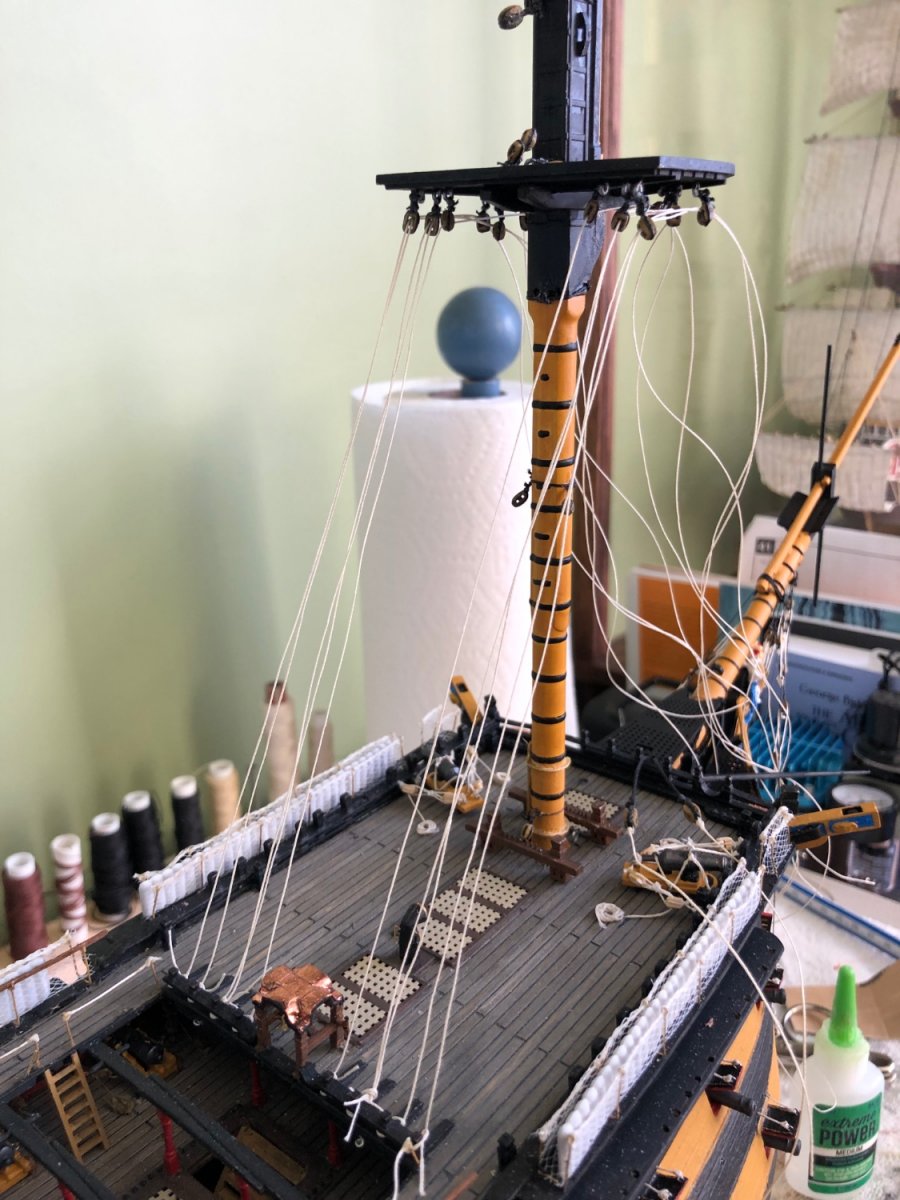
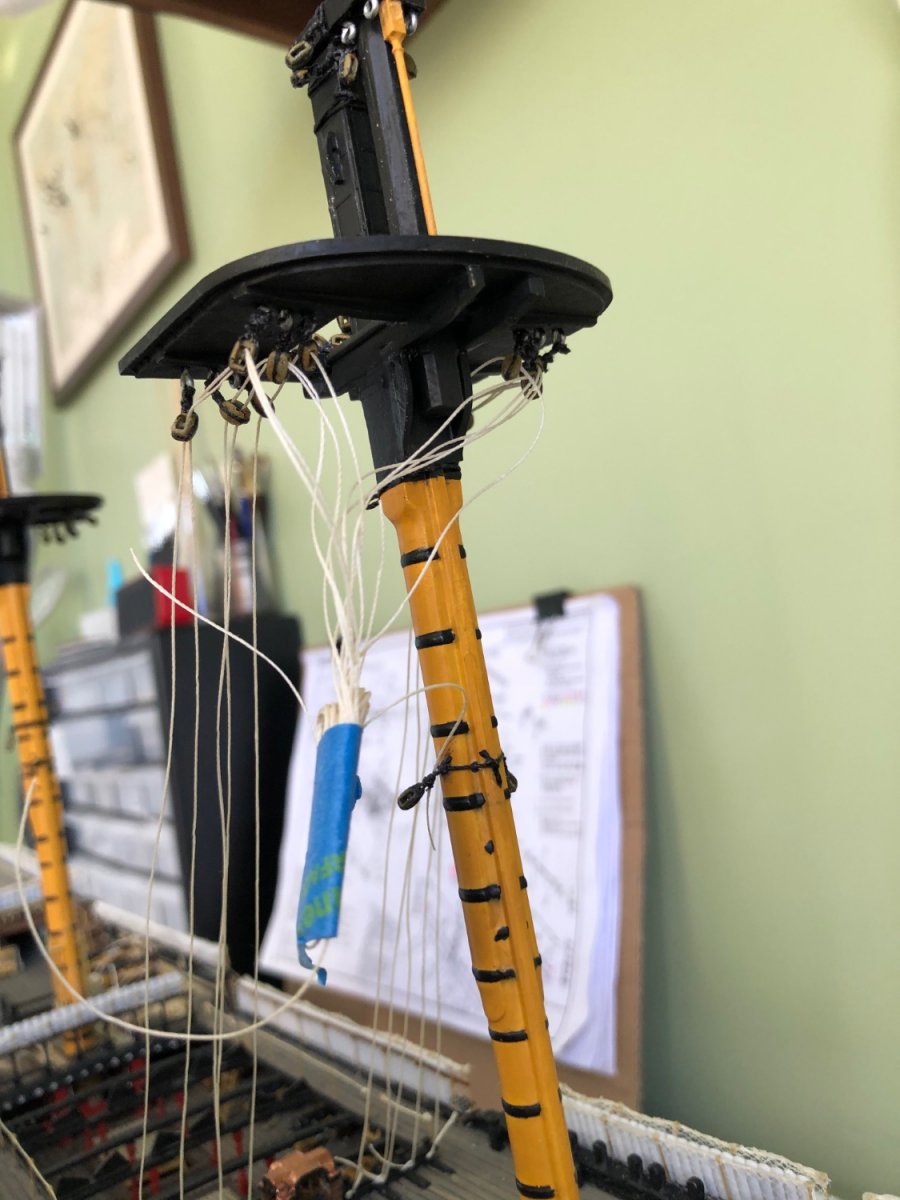
OK Ian based on your instructions and clarification of Longridge’s book, I think I have the running rigging lines that run from the left and right of the belfry up through the paired sets of blocks under the foremast top and coiled for future rigging to their designated end points. Is it correct that the lines run on an angle directly from the rear blocks down to the belfry?


-
I will do my best Kevin if I don’t wear out Ian and he put me on caller ID so he can ignore my request 😀. As you know I have the Heller 1/100 Soleli Royal in my stash just waiting for me to learn everything I need from working on the Victory. Looking through my cabinet yesterday I remembered I also have the Airfix Golden Hind unopened in my stash. Forgot about it. Not sure I want to go back down to that scale again.
-
Ian I read through your instructions in comment #775 while looking at Longridge’s book and his plan 7 and 8. This was perfect! I understand exactly what to do. So very much appreciated. So you are telling me you were able to figure this out pretty much by reading Longridge’s book (the part on rigging) numerous times? I am impressed. I have read through t twice and still have the same look on my face as I do when watching Jeopardy 😕. I think as I gradually memorize the name of the lines, and what they do, that little light will go off. Thanks again my friend.
-
Thanks Ian. I could not get through this out you my friend. Just knowing the name of each of the lines helps so much. At least that way I can research that line in my reference material and see where it goes. I plan to make all my sails furled so will adjust for that, or no sails as I did on my USS Constitution.
-
That’s right Marc. I remember the color discussion. As you know I ultimately went with the red base color. Now that my Vasa is safely ensconced in its case and I am deep into the Victory, I have not thought as much about the color discussion as I did during the build 😊. Not sure what that says about my analysis paralysis. Ian I have not used that jig before either. I will just hand tie them. Ian I have a question for you. In our earlier comments we discussed running some of the interior rigging lines before doing the shrouds. I am looking at the 12 (double and single) blocks I have tied under the fore and main mast top. I know this will be running rigging so will be light colored thread, and that I will just coil it up with a bit of tape until I am ready to rig the ends. Do you just guess at the length to cut? I am not exactly still where each of these lines that pass through these blocks will begin and end.
-
OK Marc thanks that makes since about the duplicate posts. I have built the Airfix Vasa. I have a build blog here on MSW if interested. It is a fun build. The scale makes painting the beautiful stern very delicate!