DocBlake
-
Posts
1,811 -
Joined
-
Last visited
Content Type
Profiles
Forums
Gallery
Events
Everything posted by DocBlake
-

HMS Pickle by mtbediz - FINISHED - 1:40
DocBlake replied to mtbediz's topic in - Build logs for subjects built 1751 - 1800
Great job coppering! -
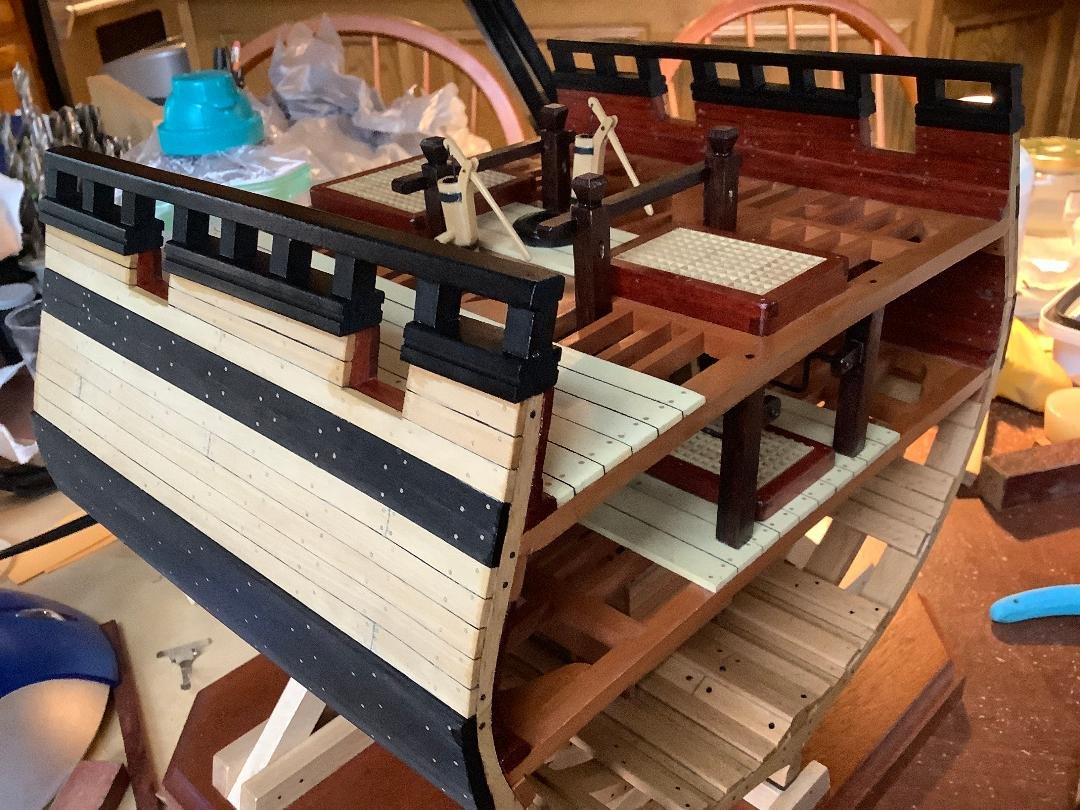
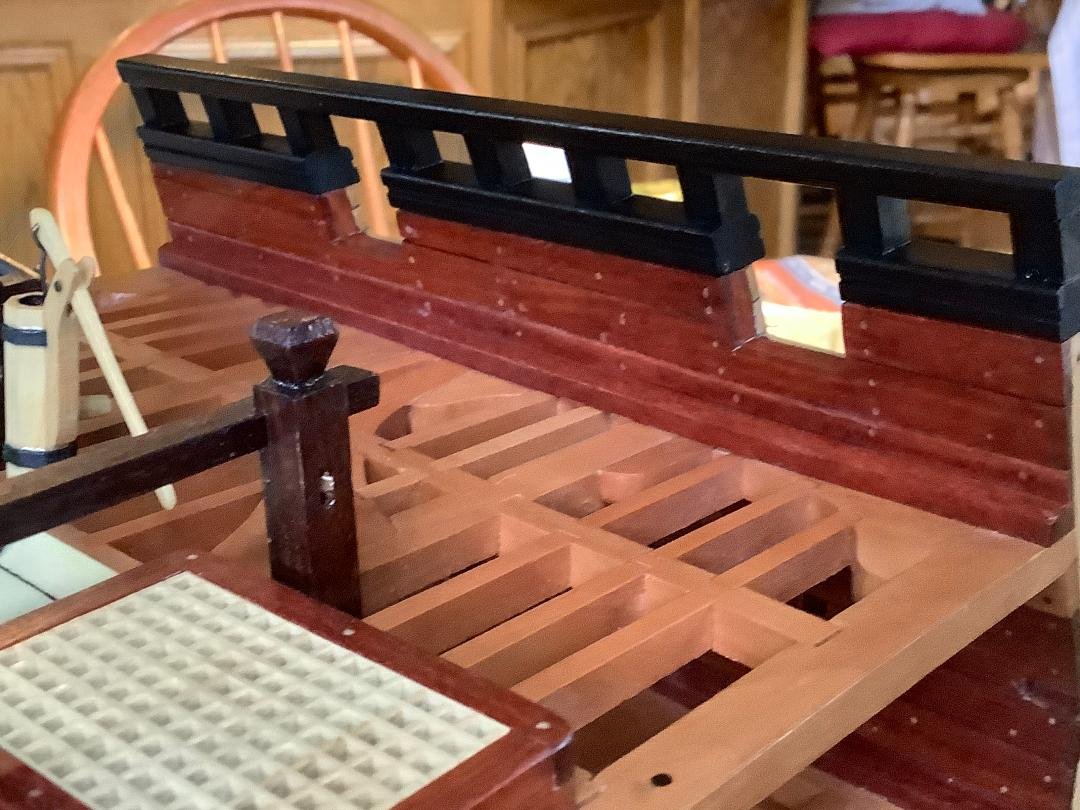
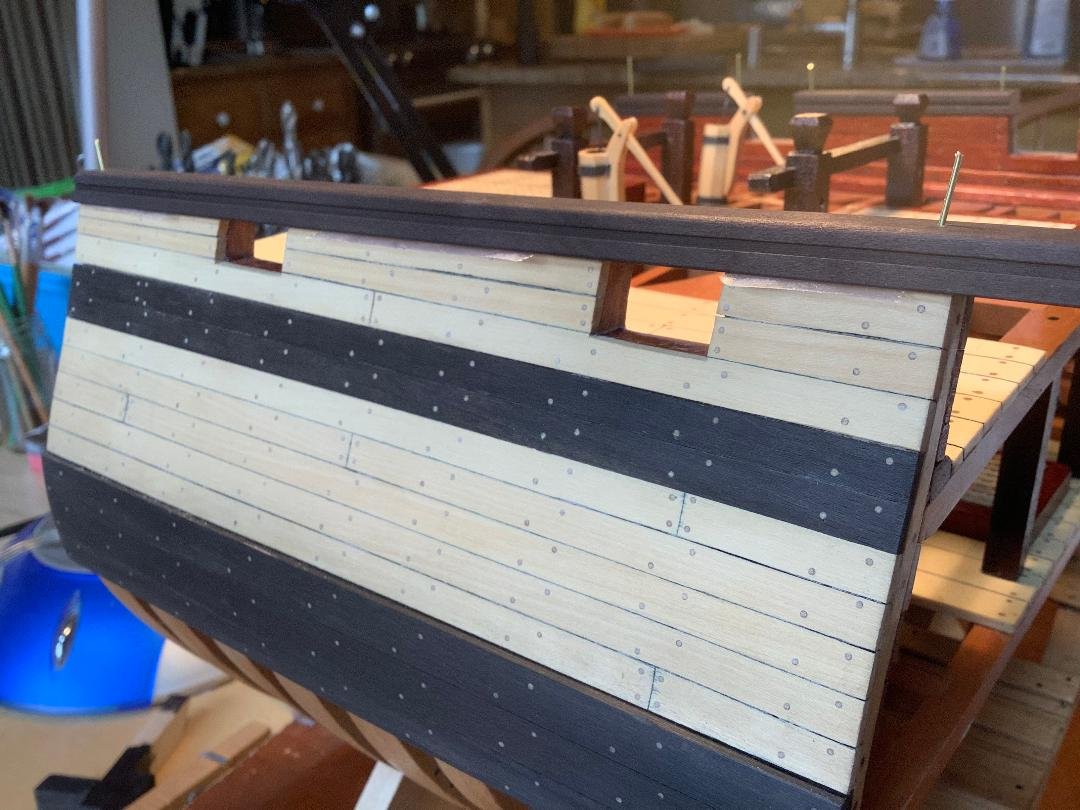
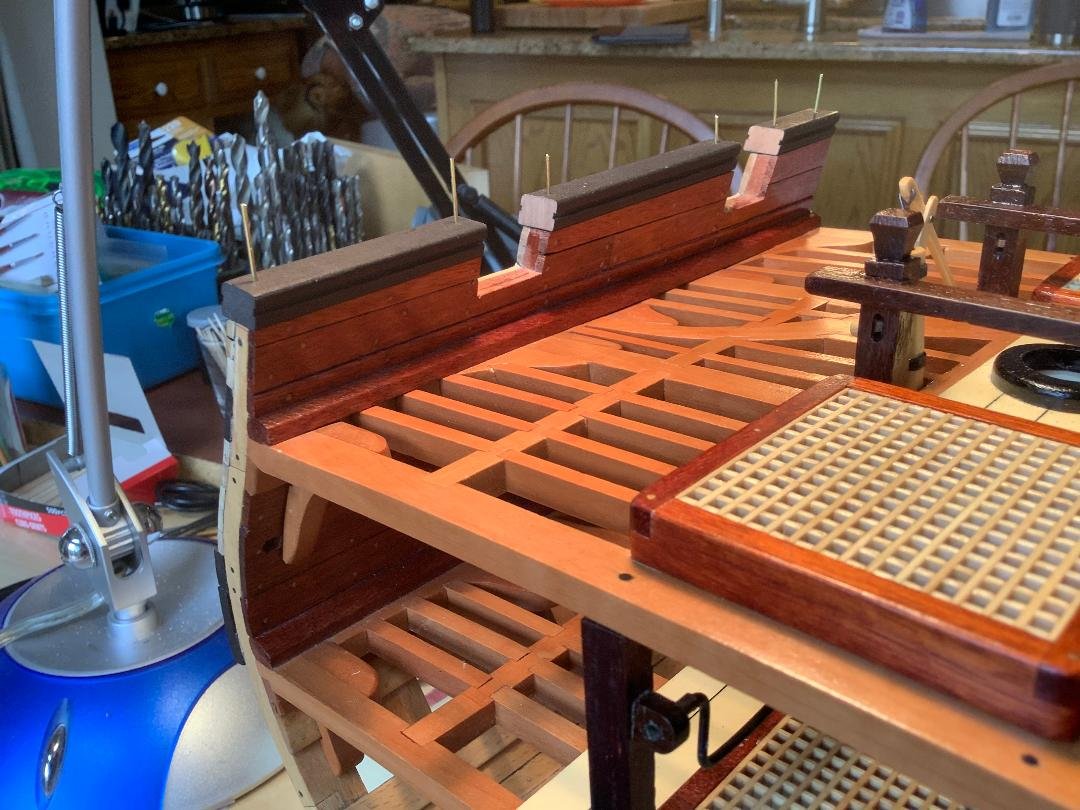
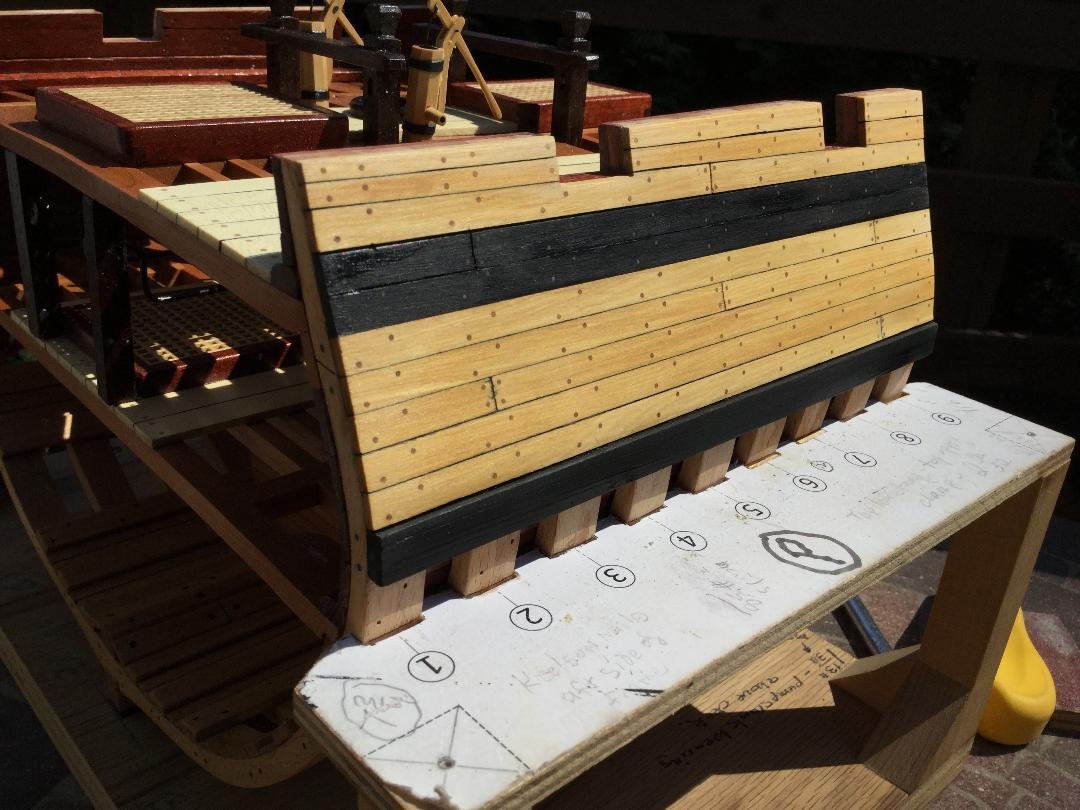
Thanks guys! I'm back from vacation. I spent the last couple of days prepping and installing the sheer rail with it's supports. Again, made of pear, stained black. I don't have a mill, so to make assembly easier and more sturdy, I beefed up the sheer rail supports a bit compared to Mike's plans. This is OK, because the supports aren't even shown on the NMM plans or some contemporary models, but are on others. In any case, I think the rails turned out OK. The gun ports are a little taller than they would be a little further forward on the ship. This is due to the rising rails moving aft, and is shown on the plans. There is a little decorative groove plowed into the waist rail as a decorative trim (see arrow)


- 164 replies
-
- 22
-

-
Great idea, but don’t sweat the 11” X 17” copies. Take a thumb drive to FedEx Office and they’ll print the 11” X 17” pages for about $0.35 a page.
-
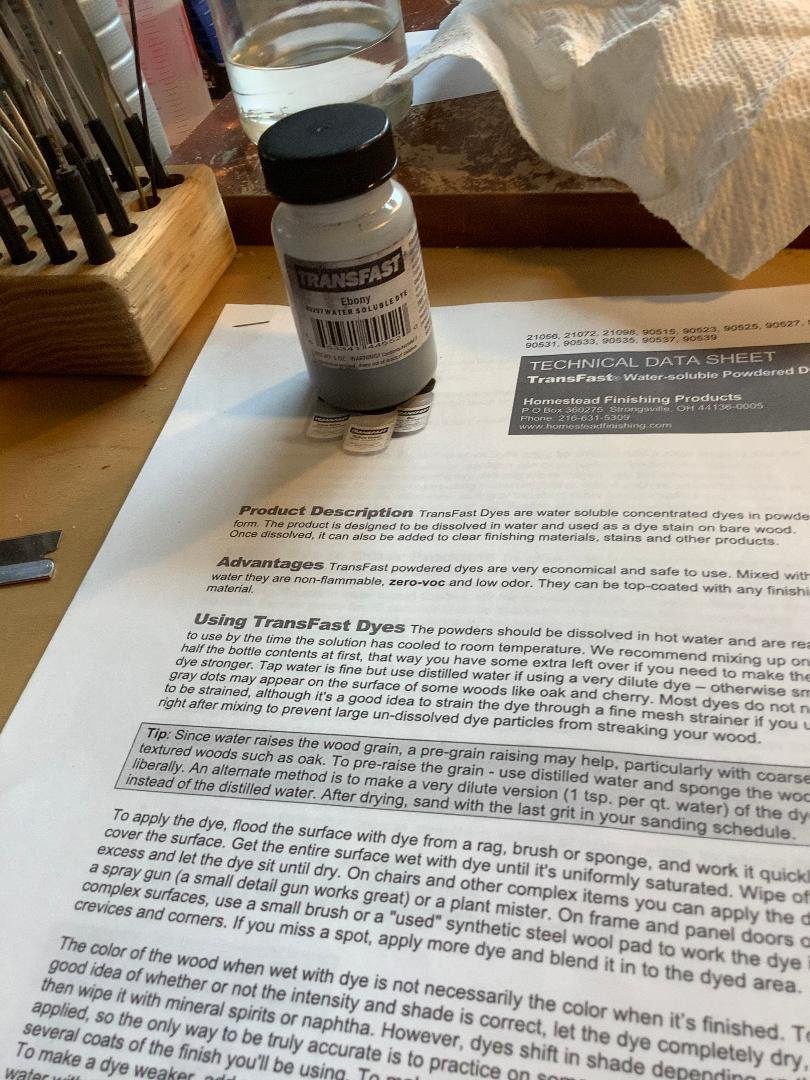
Thanks, guys!! I started working on the the waist rails. I opted to make them out of swiss pear and dye them black. I used TransFast water soluble wood dye, available at Rockler woodworking supply store. I made the concentration twice as strong as the standard. One ounce of dye will give 2 quarts when dissolved in water, or 1 quart when doubled like I did. One ounce runs about $13, so the final cost is comparable to other preprepared dyes and stains. The great thing about the water based stain is that you can glue the stained wood! I did tests with PVA, epoxy, WeldBond and CA and they all performed as well as they would on undyed wood. I did pre-raise the grain on the swiss pear parts with water before dying, but with hardwoods at this scale, very little grain raising occurs with the water based dye. Be careful with bass wood, though!! The waist rail leans inboard (tumblehome) at 15 degrees, so I ripped the waist rails and planksheer rails at 15 degrees. I then dyed a 1/4" piece of stock black and cut it off at identical lengths (also at 15 degrees) to make the planksheer rail supports. The fenders were cut out, shaped and dyed. To fit the waistrail, I used double sided tape on the top bulwark surface and placed the rail in position. I drilled small holes to pin the rail to the bulwarks at places where the planksheer rail supports go so the holes wouldn't be visible on the finished model. I then marked the overall length of the rail on the underside and cut it to length, also cutting out the parts that spanned the gunports. The photo shows the fitted waist rail pinned temporarily in place. The cut ends need some dye before final placement. Next is to glue the waistrail in place and fit the supports for the planksheer rail. The last photo showas the rail in place with the ends dyed.

- 164 replies
-
- 25
-
-
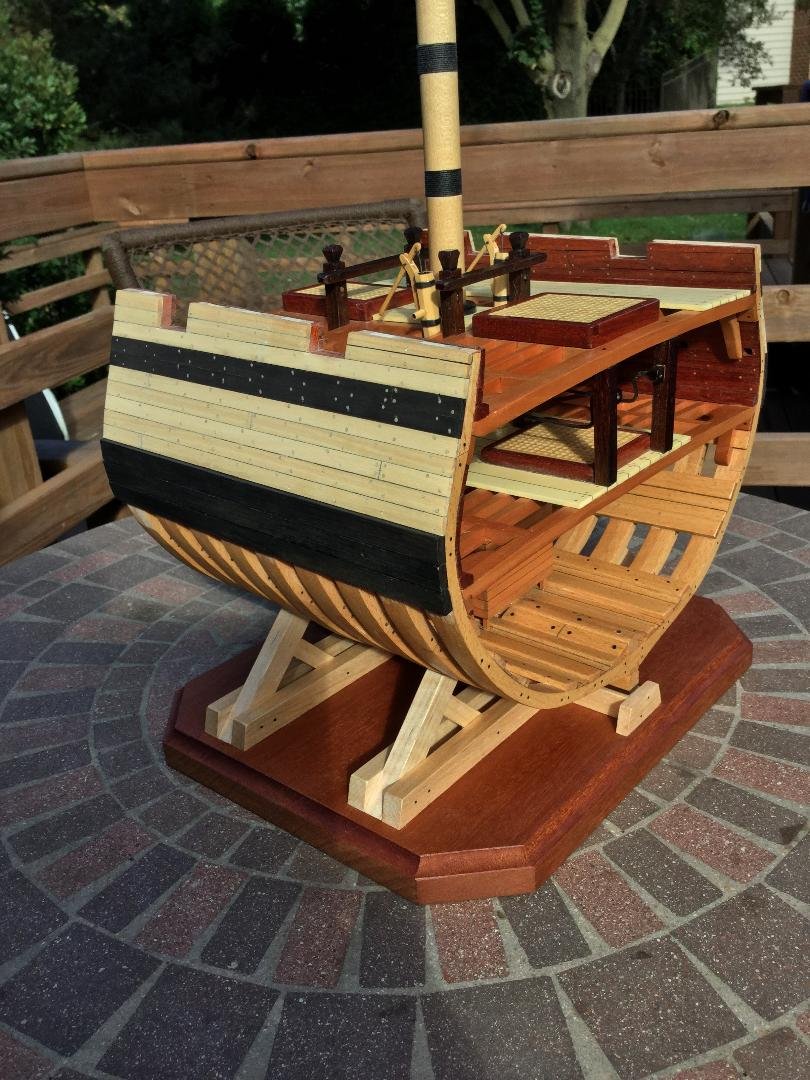
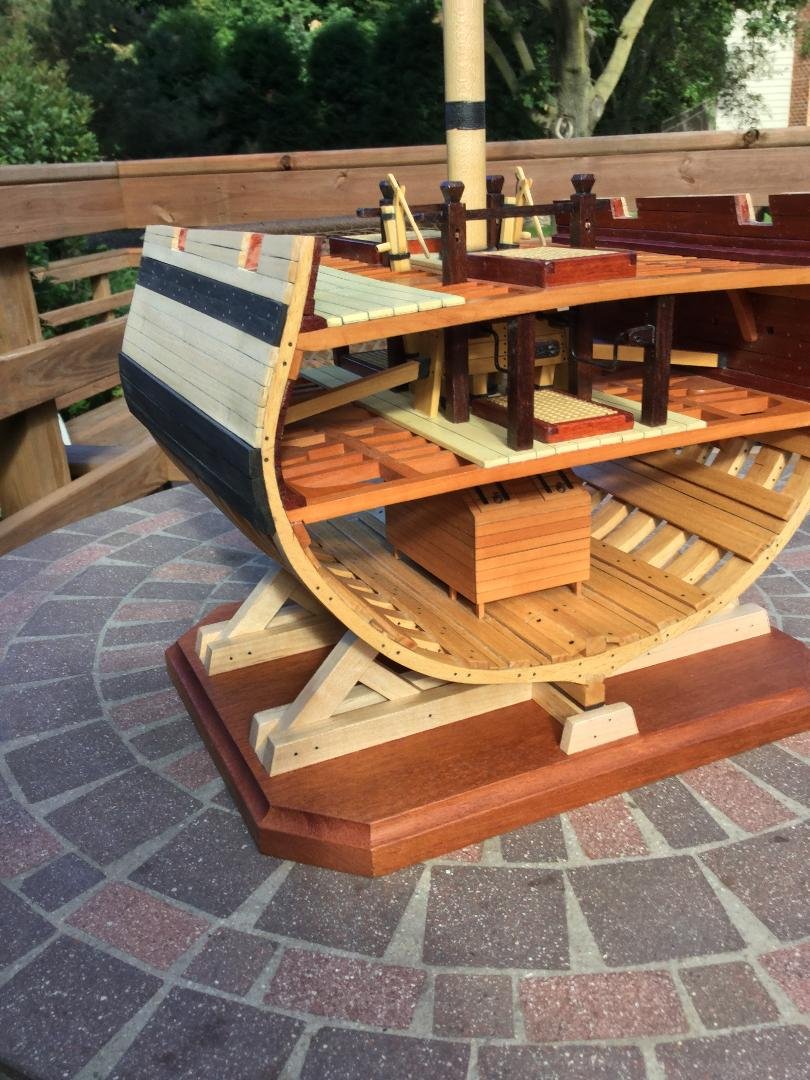
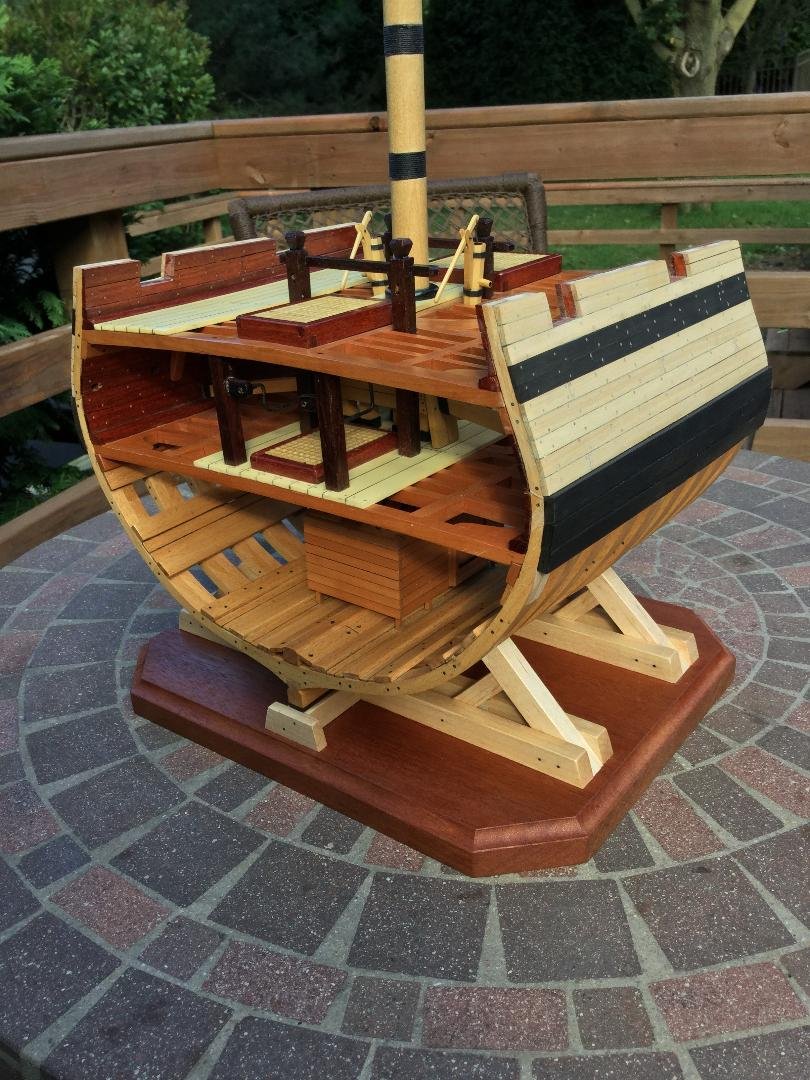
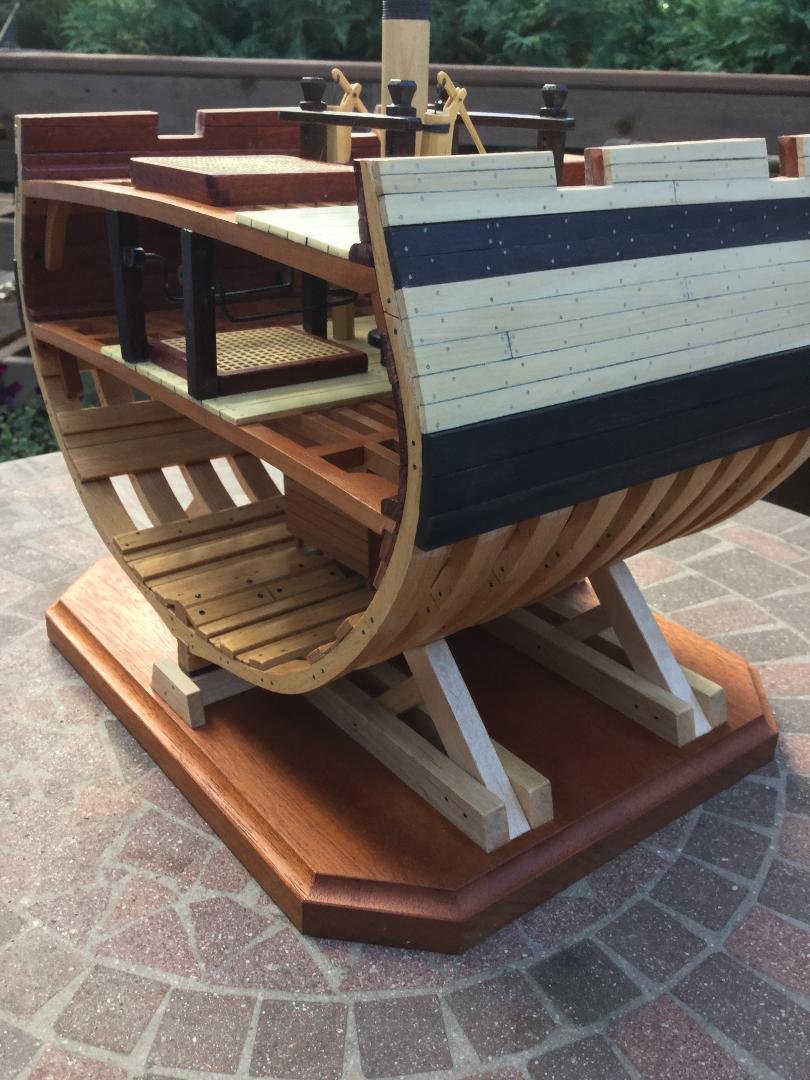
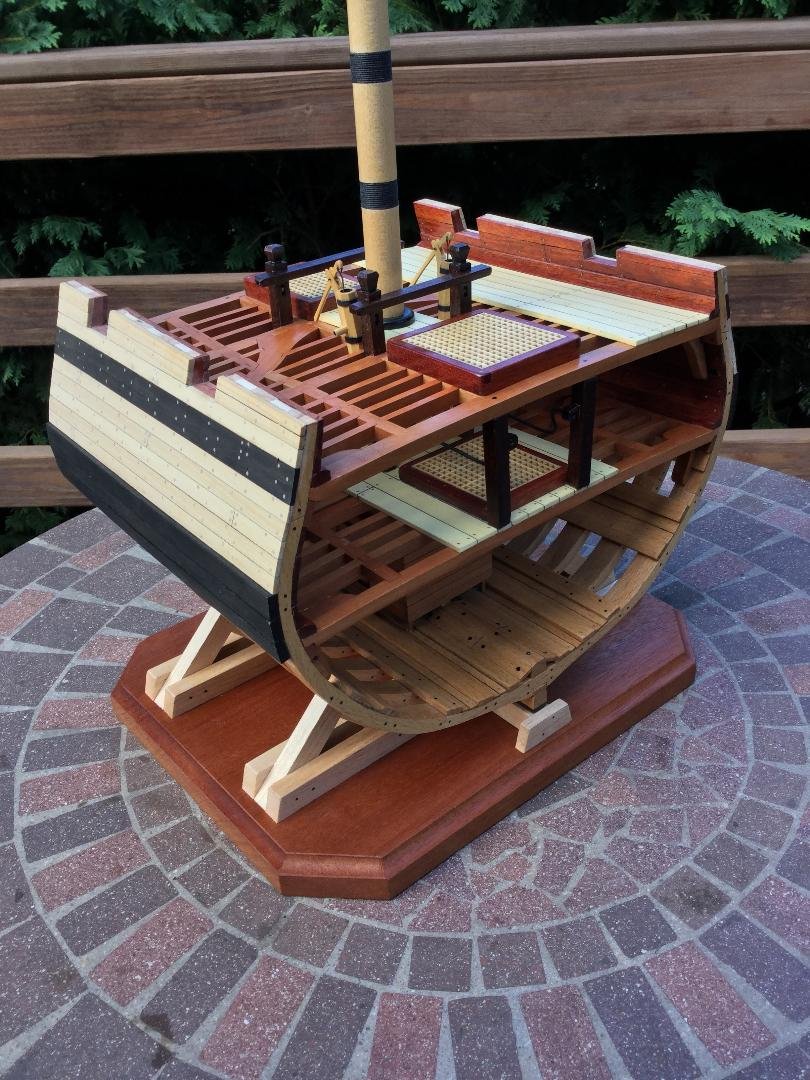
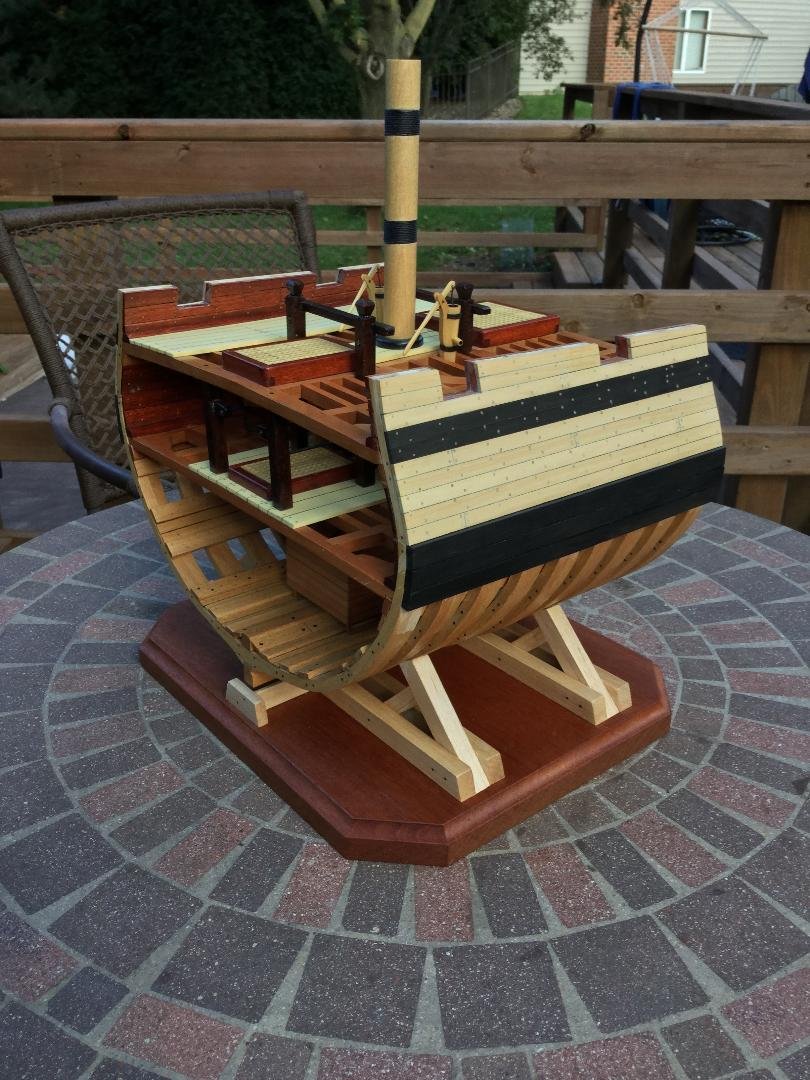
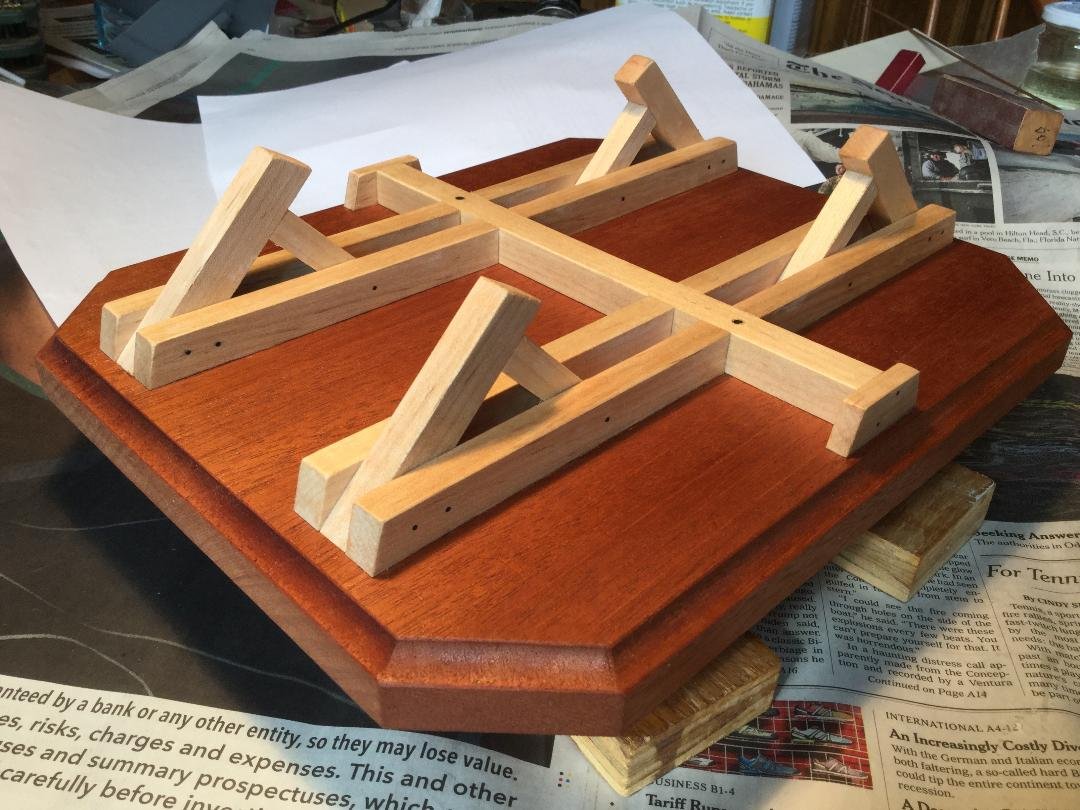
Here are some photos of the model on the stand. Making the support was really not too hard, but took a little time. The trick was sticking to standard angles (45, 60 and 15 degrees) so that all cuts are identical and reproducible.
- 164 replies
-
- 21
-
-
Now that the wales have been glued into place, the model no longer fits in the building jig. I finished up the final stand. The supporting timbers are maple, and the base is mahogany. It turned out pretty good. I didn't want the display stand to be so involved as to overshadow the model. Simple.
- 164 replies
-
- 18
-
-
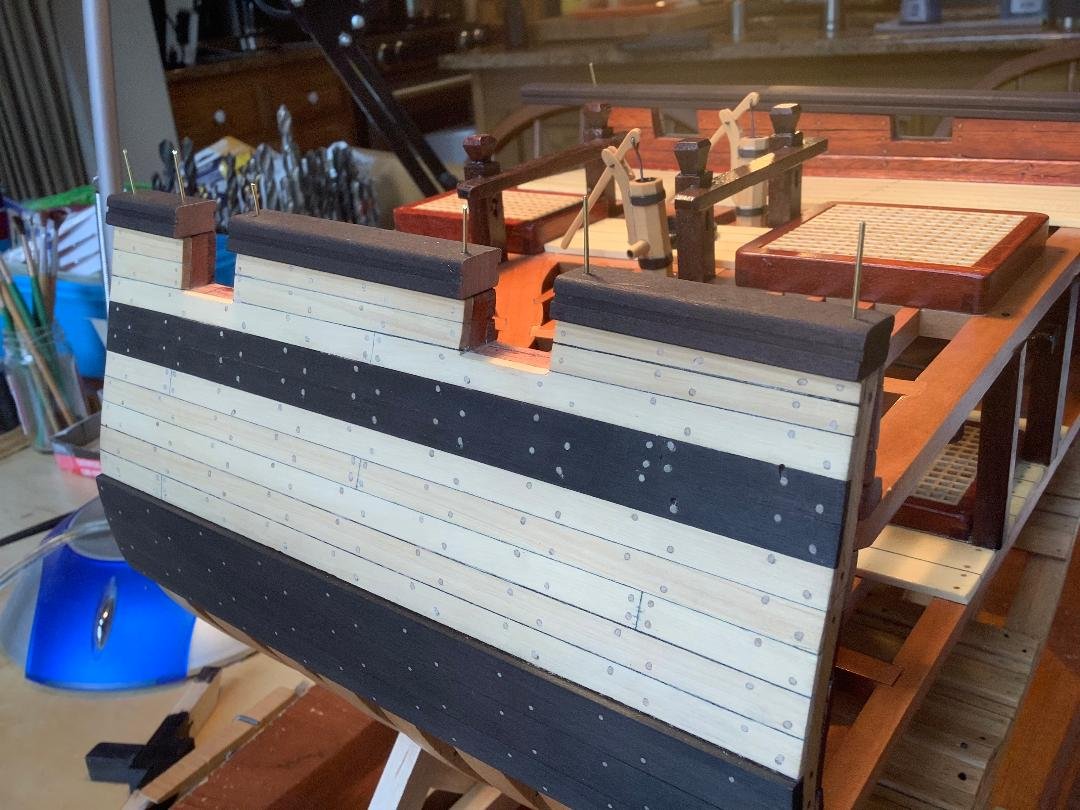
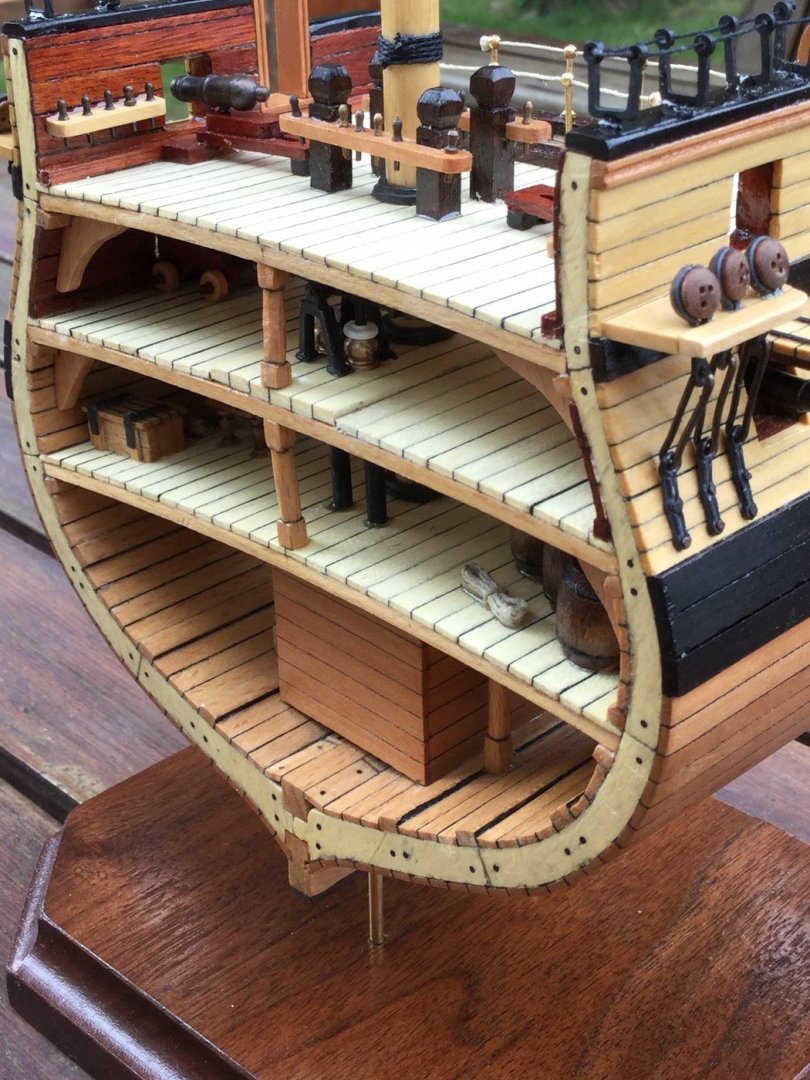
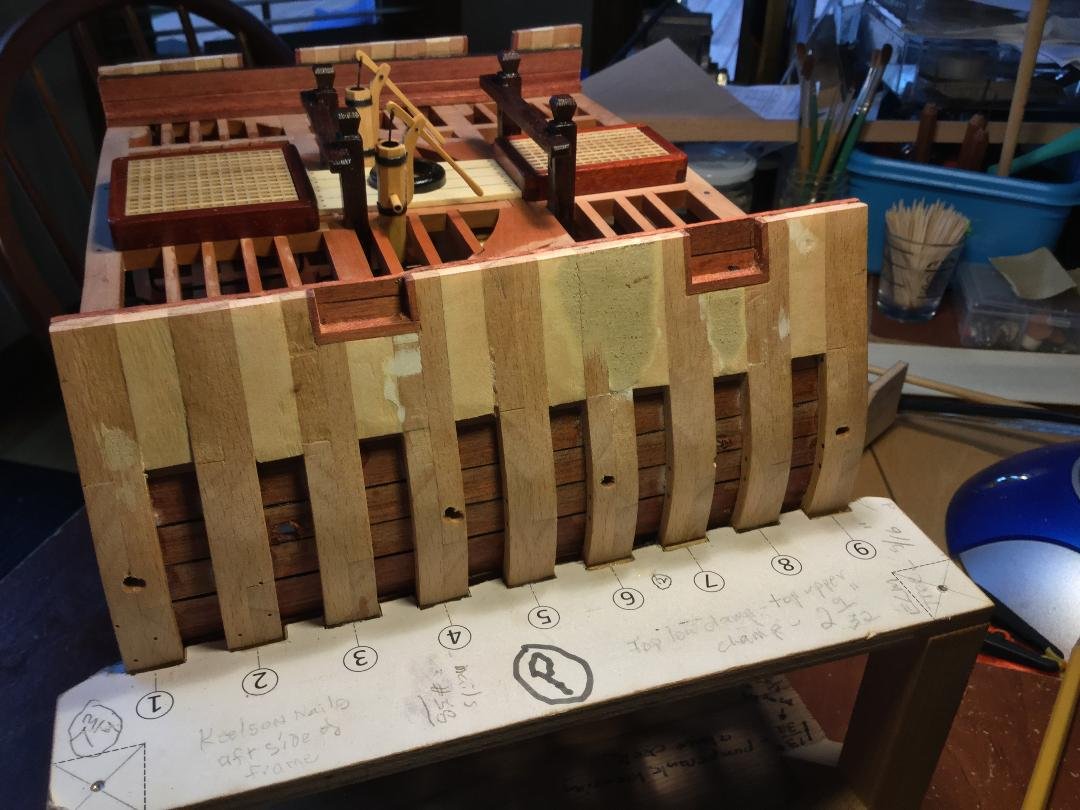
I planked the bulwarks down to and including the first plank of the wale. I drilled holes for the treenails with a #65 drill. Everything looked good. Once the treenails were glued in, clipped and sanded, I noticed a tiny bit of bleed through at the planking butt joints. Especially the but joint on frame #2. I thought this was odd because I used acrylic paint, not Magic Marker, and I didn't expect bleed through. What I'll do from now on is seal the butt joint ends with some CA glue (quick drying) before painting with black acrylic. Should stop any problems. The joints will be less noticeable once all the external hull details are added. I do plan to treenail the wales.
- 164 replies
-
- 13
-
-
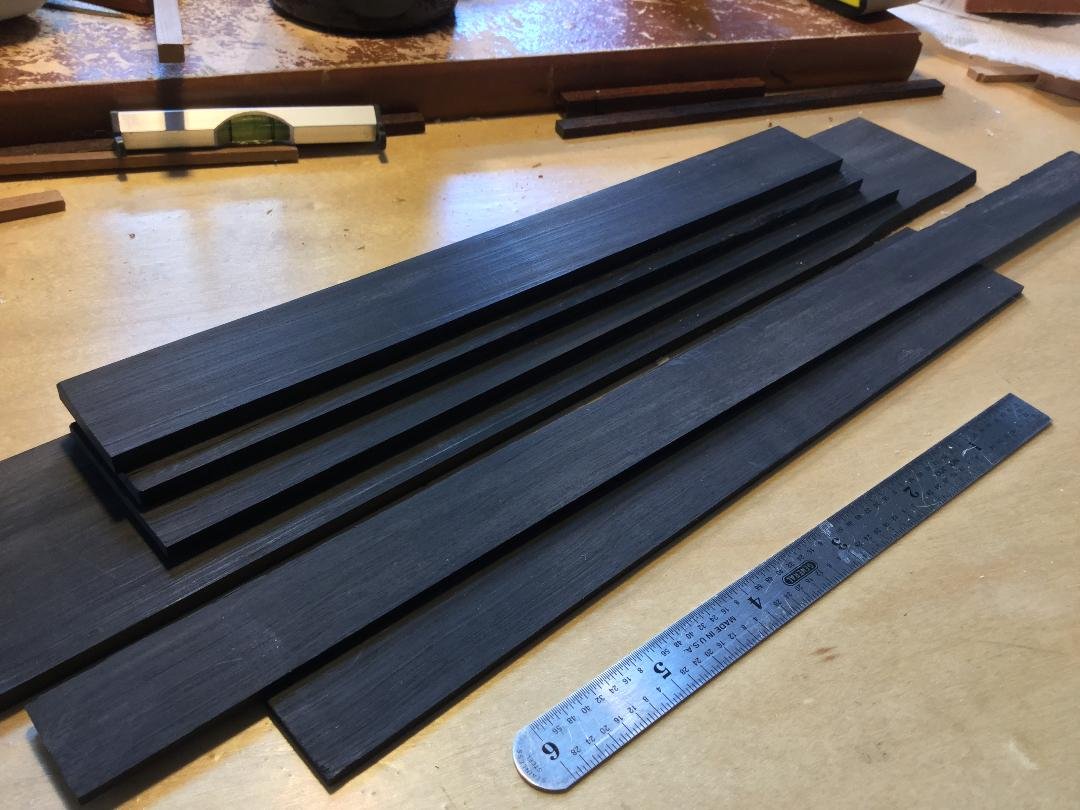
Ebony is tough on tools, so I have dedicated carbide bit blades for both by 10" table saw and my Byrnes saw, I use them just for ebony. I also HATE to change sand paper in my Byrnes thickness sander, so I want the piece of ebony to be close to final size when I begin the final thicknessing. I use my jointer to get flat surfaces to bear against the fence and table on my table saw. I raise the blade and slice off a piece less then 1/32" thicker than final thickness. In then finish the dimensioning with the Byrnes thickness sander, using a couple of passes with the coarse grit and then the fine grit. Essentially no hand sanding required.
-
I've built 4 models with yellowheart as the outboard bulwark planking, simulating ochre. In my 18th Century Ship of the Line build, I used boxwood. I liked the look and it worked well with the ebony, bloodwood and holly. I think I'll go with boxwood for Blandford. The ship of the line had the channel wale I mentioned in my last post!
- 164 replies
-
- 14
-
-
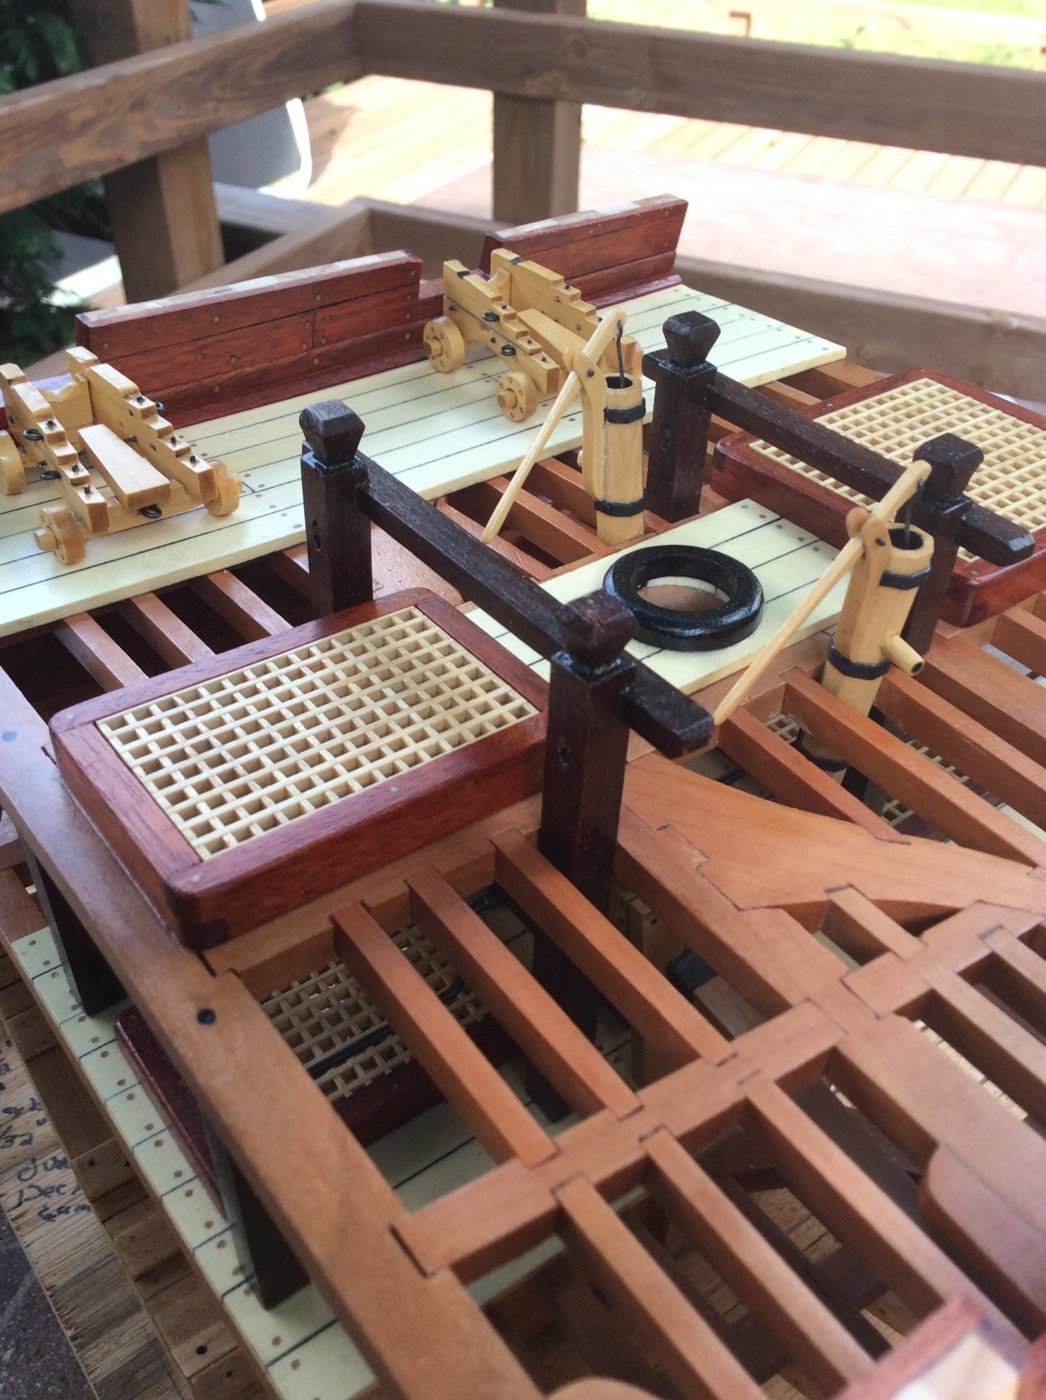
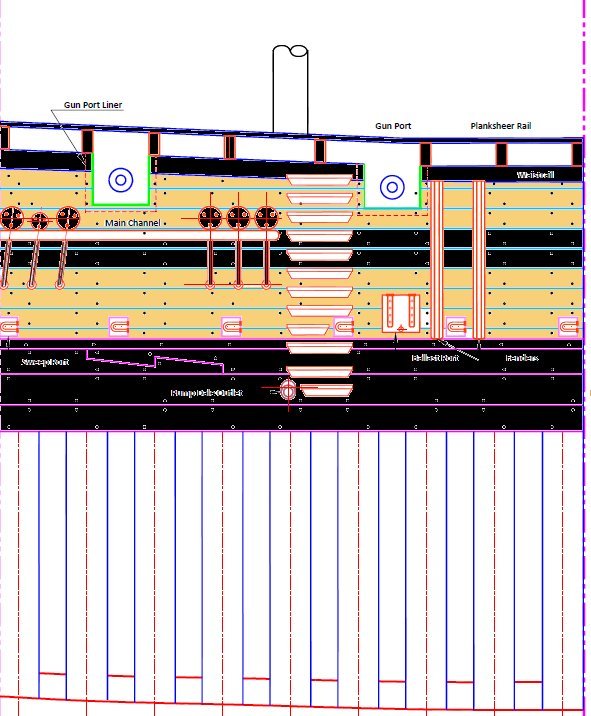
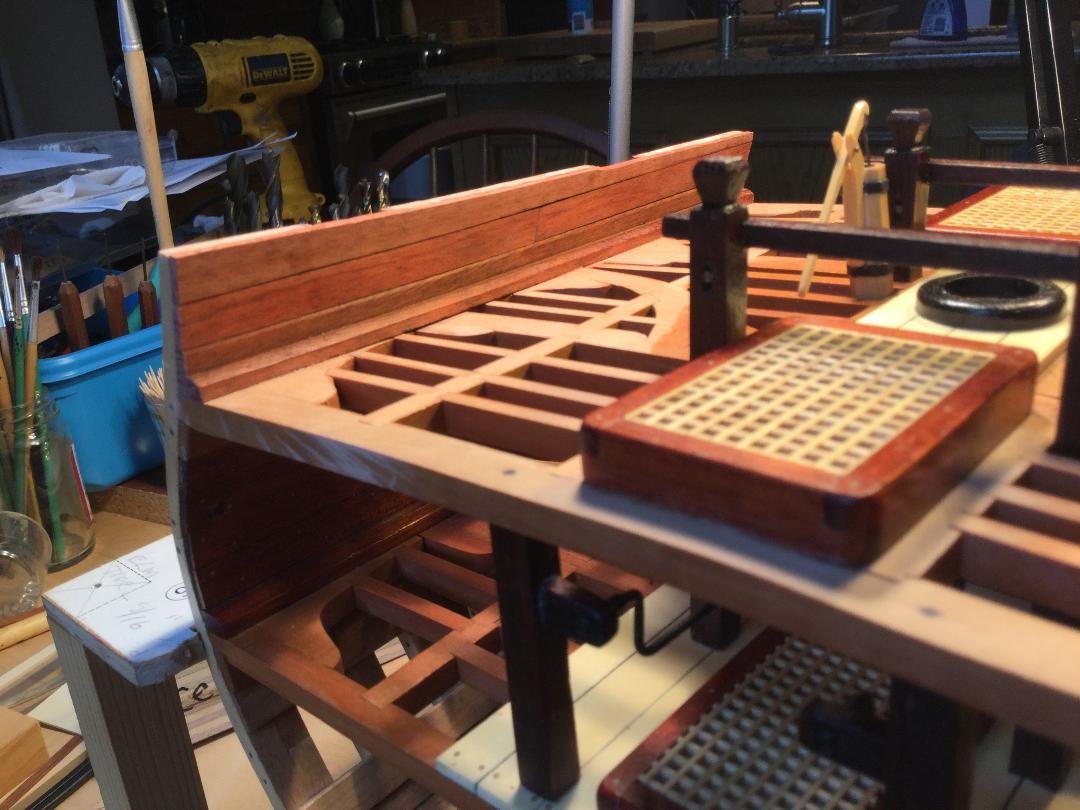
In Goodwin's AOTS book, he states pretty definitively that the decoration/paint scheme of Blandford is speculative, as no definitive evidence of what was actually done exists. Depictions are based on what was common practice and on contemporary models. This gives a current model builder a lot of latitude in deciding what to add! Obviously the wales will be ebony (black). Some might opt for an ochre color for the middle of the three wale planks, but I think that's too "busy" for my taste. The bulk of the outboard planking should be ochre (yellowheart or boxwood). 17th century, and early 18th century British ships often had a couple of thicker planks at the level of the channels, known as "channel wales". Blandford did not. But adding two black strakes where the channel wales would be does add a pleasing visual effect. Here is a rough plan of what I intend to do: I'll probably make the fenders of ebony, also!
-
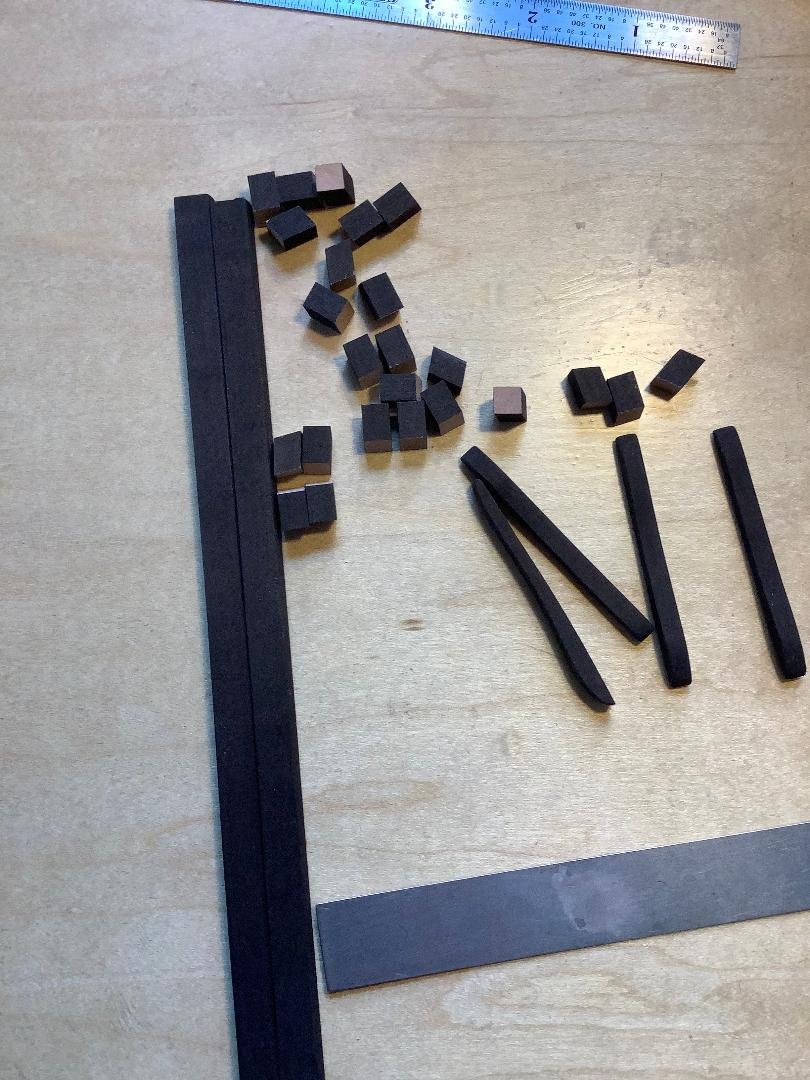
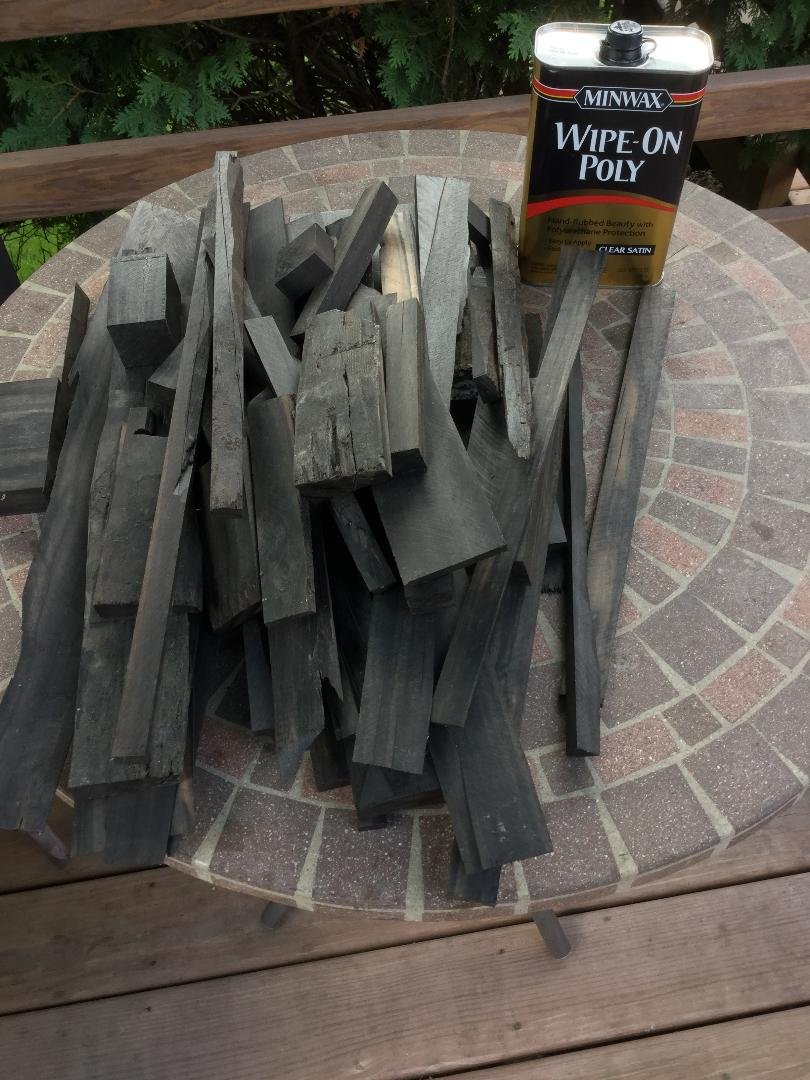
I couple of years ago, I picked up a box of scrap ends, cutoffs, split/cracked pieces and other un-sellable wood pieces...all of ebony! The cost was about $30. The wood is useless for full size woodworking except to make pegs or contrasting small inlays etc. but for modelling, it is very usable. It does take some preparation, though. All the ebony parts we included in our three kit project "17th Century Battle Station" came from this stash. I just completed the blanks for the wales and black strake as well as for two black strakes to be used at the level of the channels for some contrasting visual interest. The photos show the wood and the thicknessed blanks.
- 164 replies
-
- 10
-
-
Great idea for sanding slots. I'll steal it!!😁😁😁 Thanks!
-
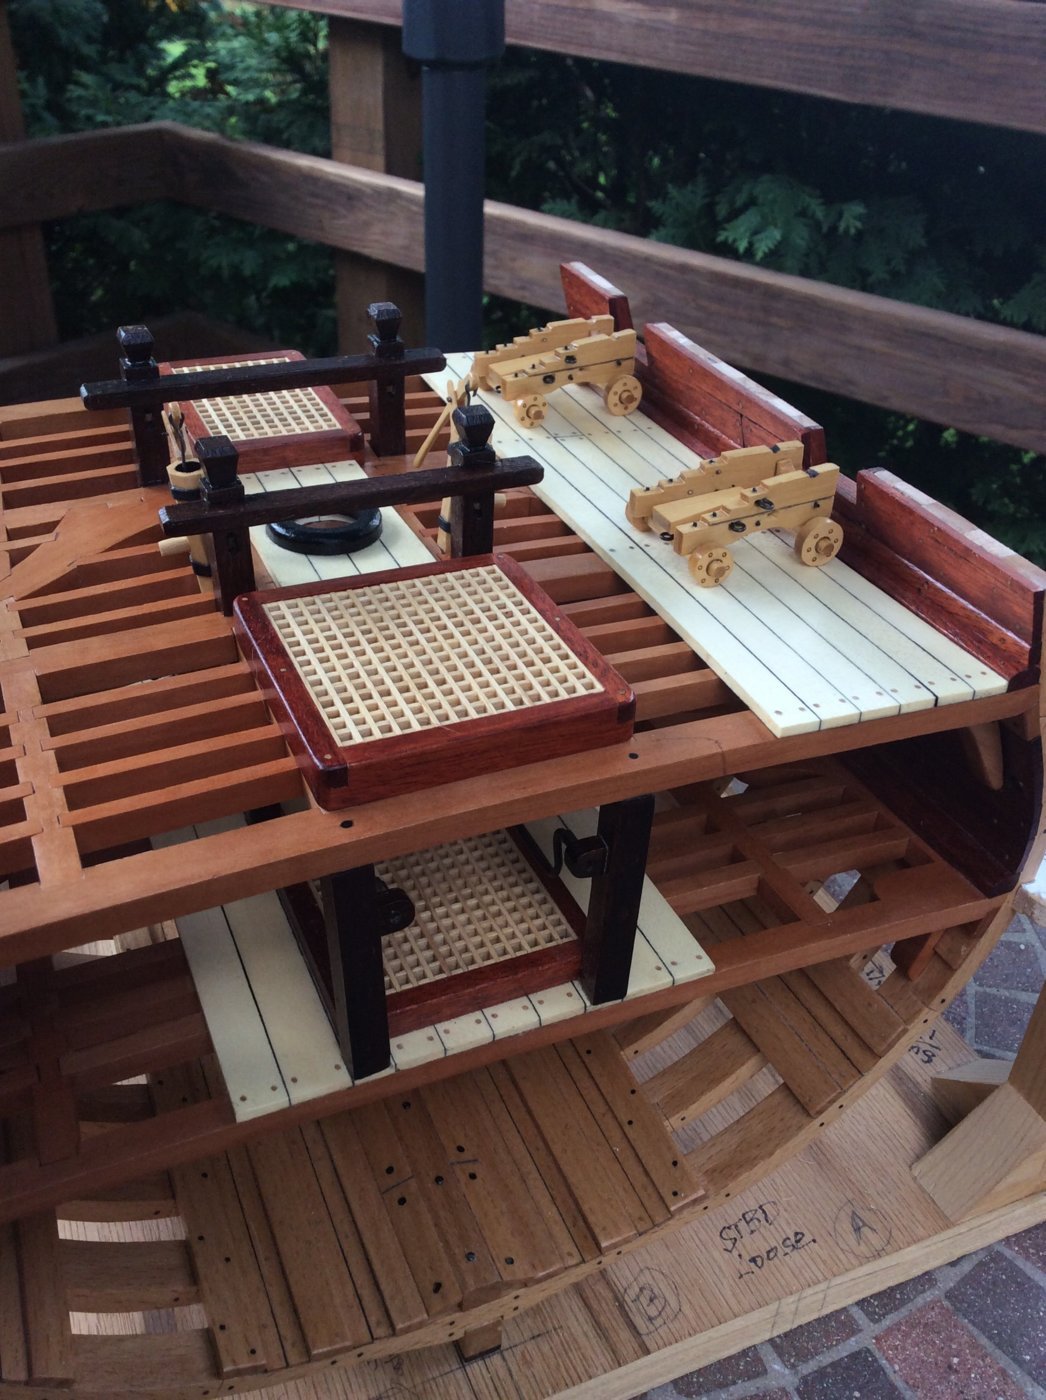
I cut out the bulwark planking covering the gun ports and trued the pot sides and sills with some small files. I treenailed the inboard planking and laid the deck on the port side where the cannons will sit. Here are some shots. I need to put on a couple more coats of poly and begin work on the outboard planking.


- 164 replies
-
- 15
-
-
I fit the gunport liners before planking the inboard bulwarks. The plans called for the vertical liners to be the same thickness as the horizontal liners (sills). By making them a bit smaller, I was able to cut the rough gunports along the line where the frames glued up, making the cuts much easier and straighter that cutting through the solid beech. I then planked the bulwarks. I also added thicker spirketing planks above the waterways.
- 164 replies
-
- 14
-
-
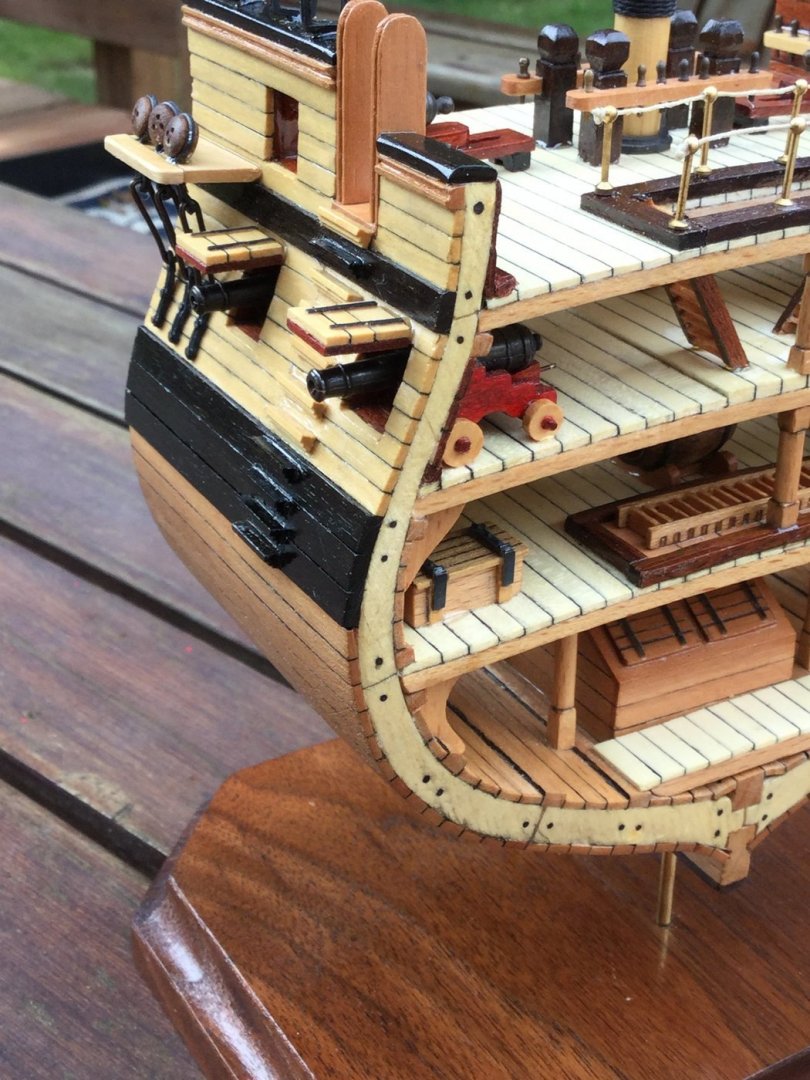
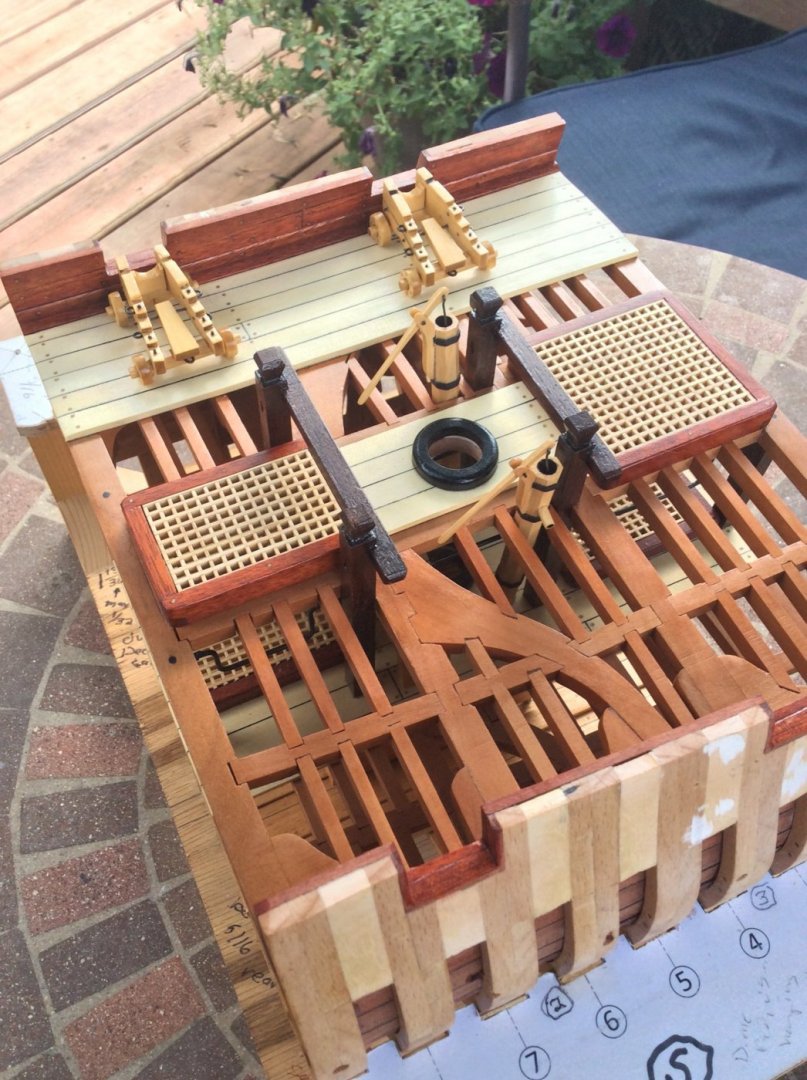
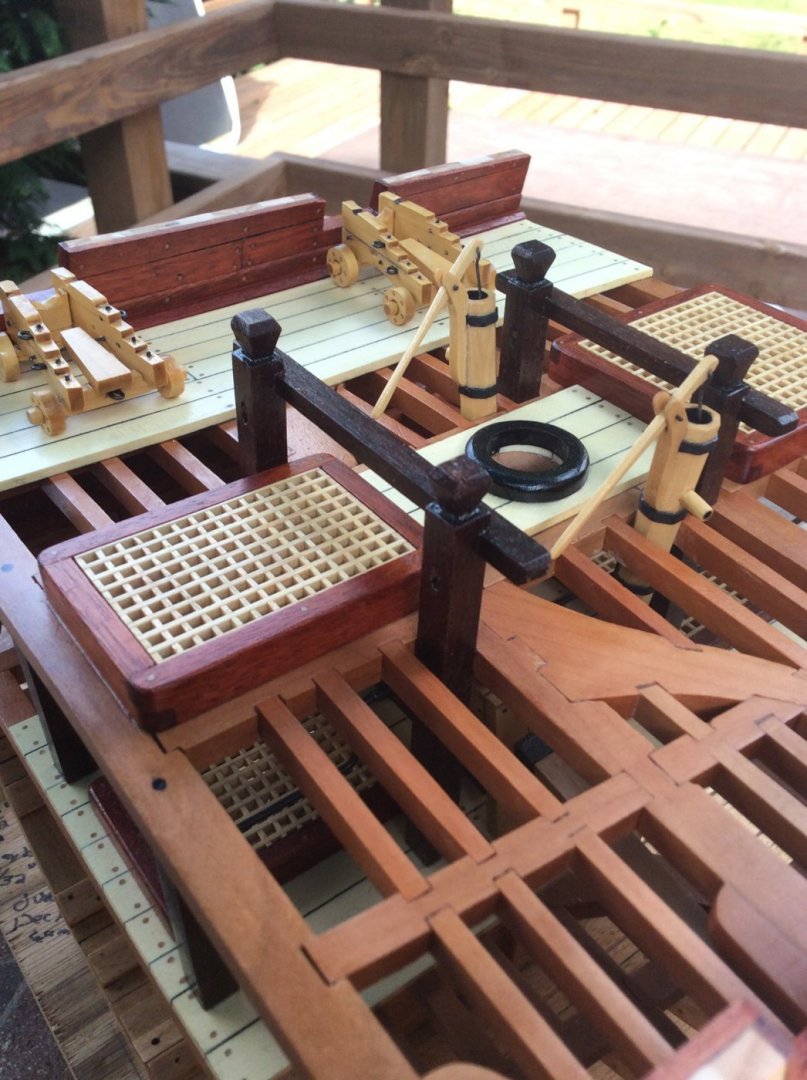
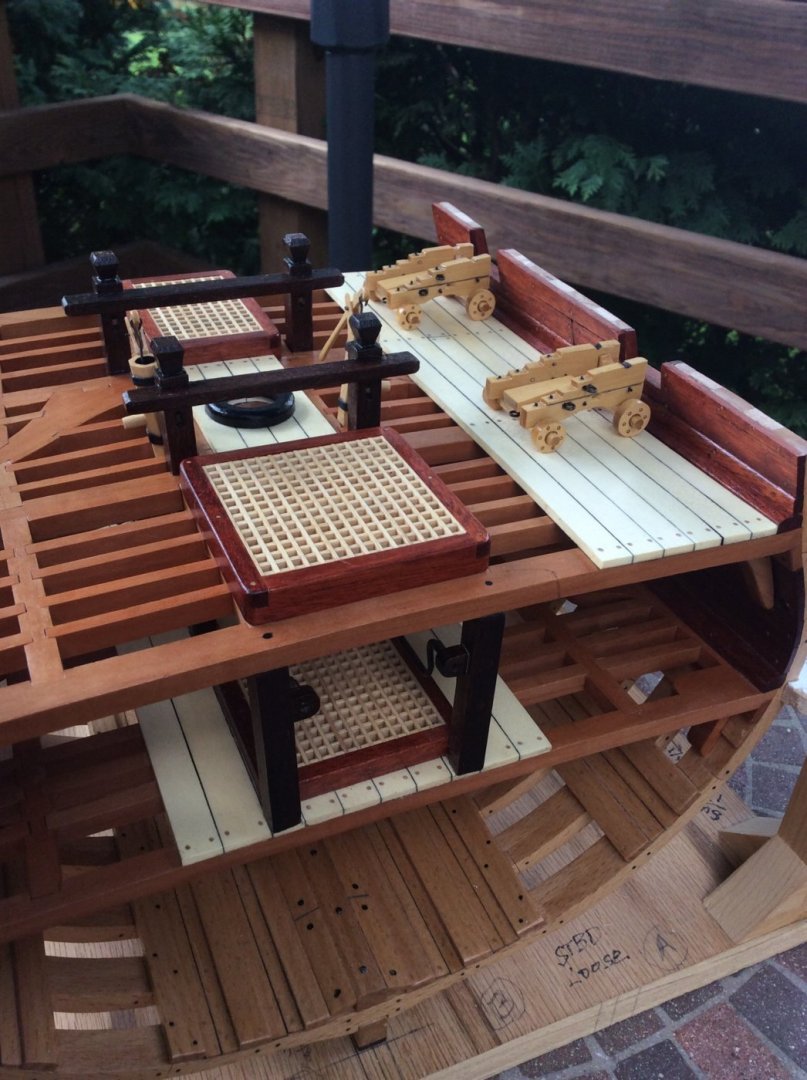
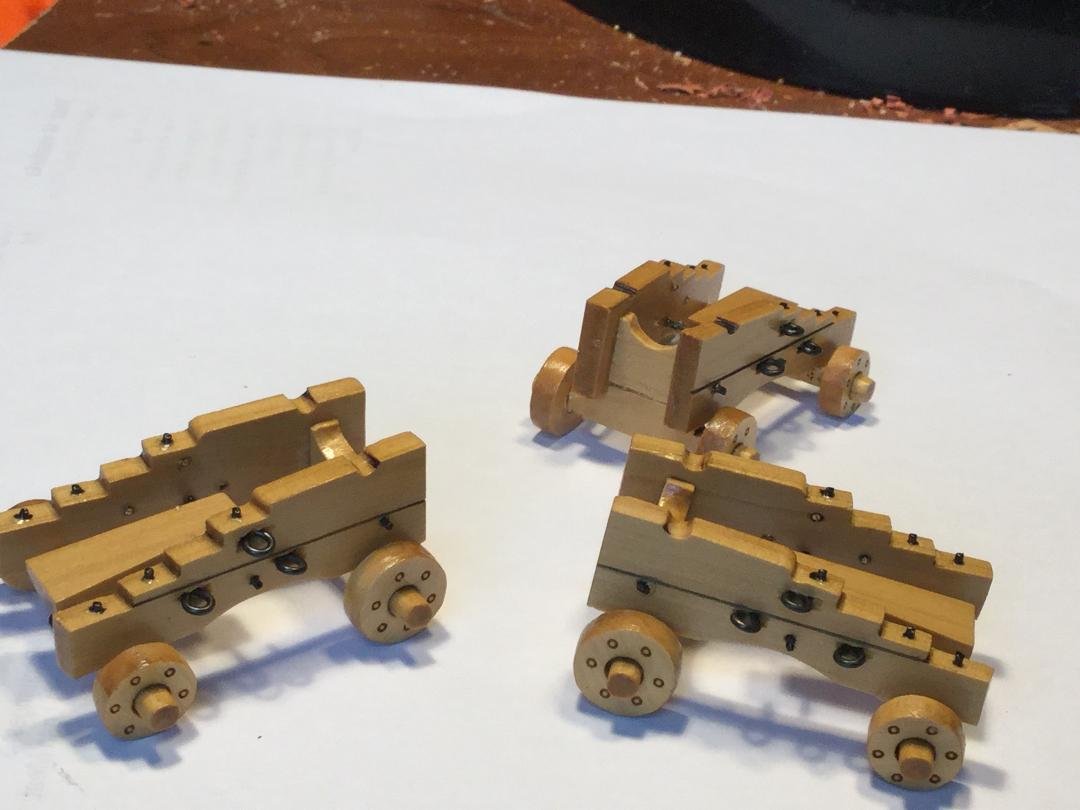
I've been working on some odds and ends. I finally decided I'd like to make the gun carriages out of boxwood. I liked the look of the boxwood carriages we used in the 17th Century Battle Station build. We used Mike's plans, and I had the carriages cut out of boxwood. Here they are, without the cannons. We have another idea for those!!!
- 164 replies
-
- 17
-
-
Good job! I like the sails. I have always felt furled and flaked was best for sails on a model. Turned out well.
-
Following! Wherever did you find commercial 1/4” plywood that is thicker than 1/4”?? It’s ALWAYS thinner in my experience!
-
8-9 for the bulkheads. How about the false keel with the birch ply? 2 sheets? Seriously considering the build!