Dan Vadas
-
Posts
3,261 -
Joined
-
Last visited
Content Type
Profiles
Forums
Gallery
Events
Everything posted by Dan Vadas
-
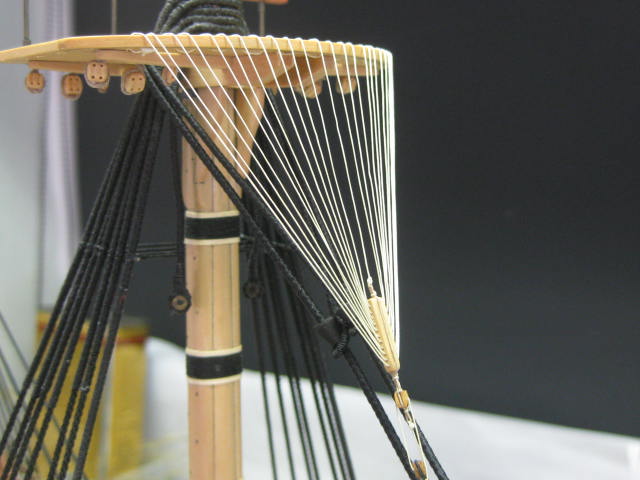
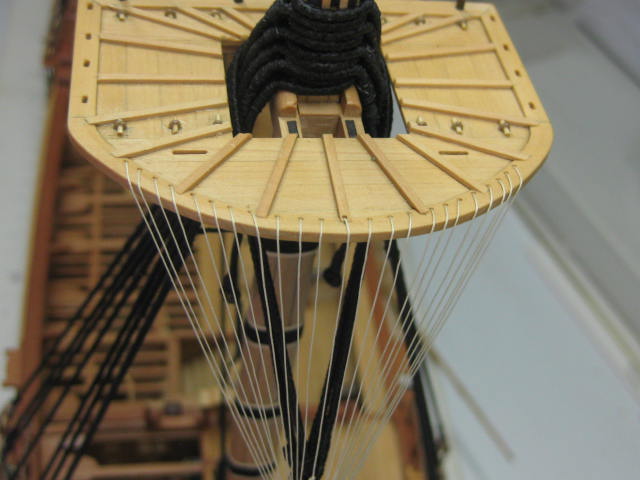
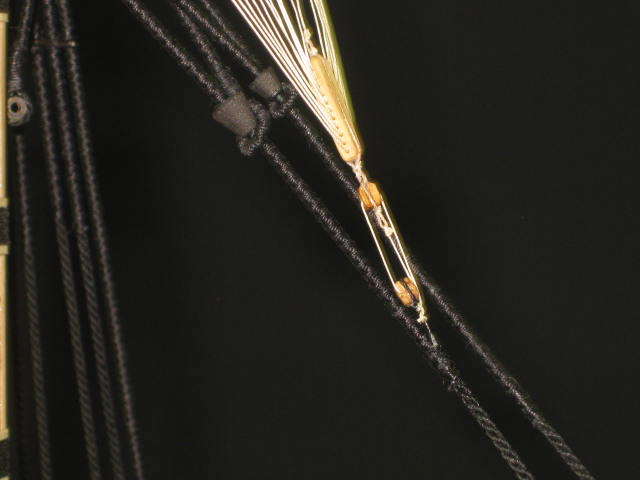
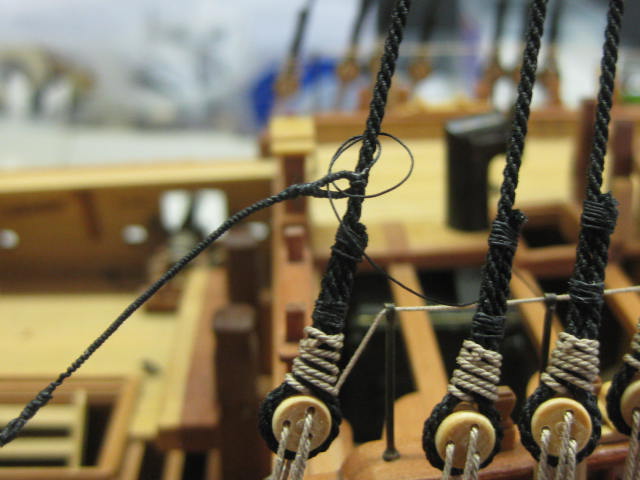
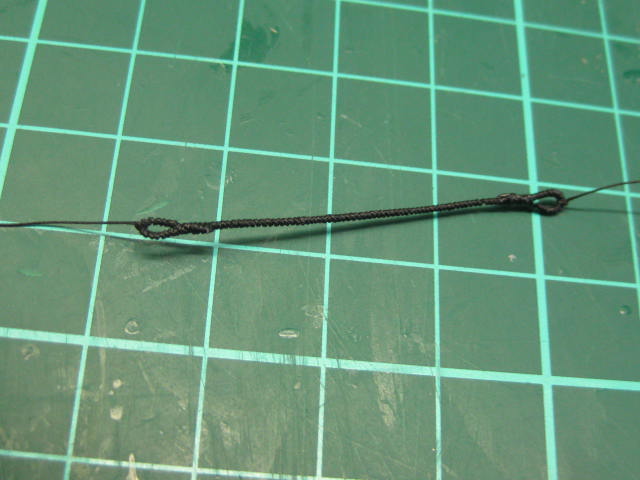
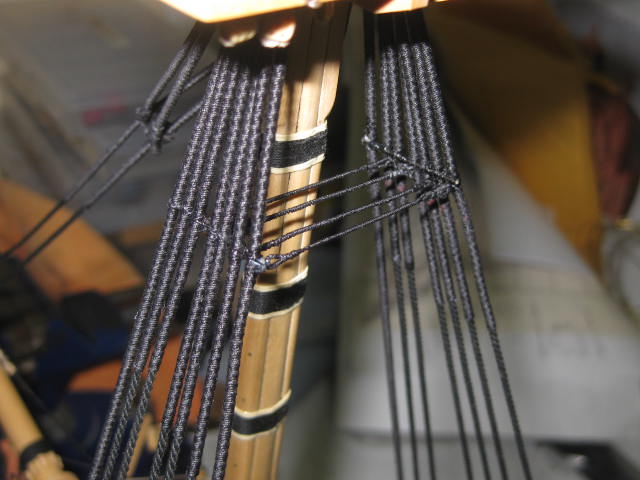
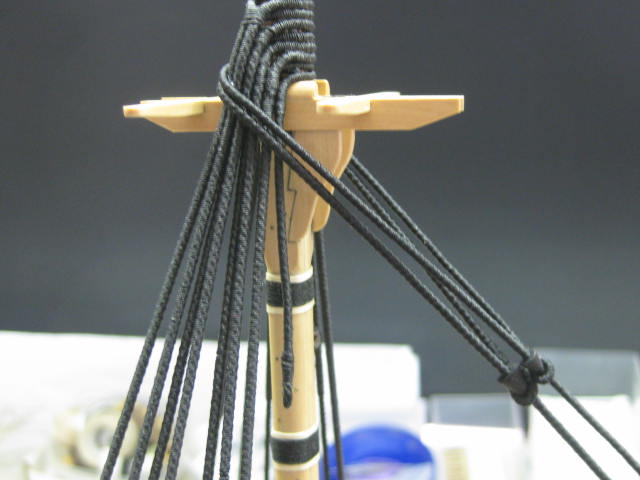
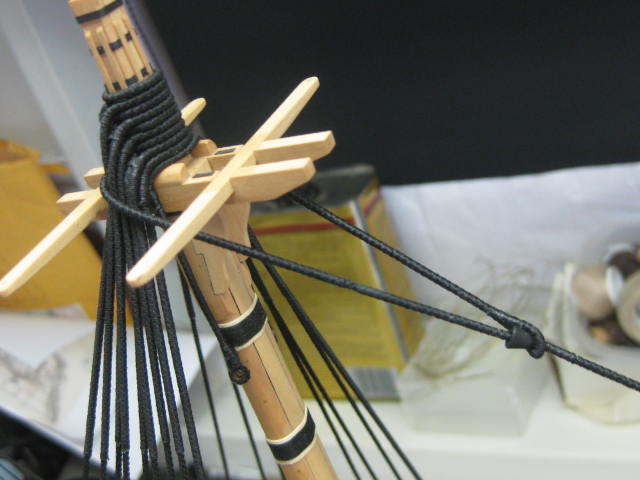
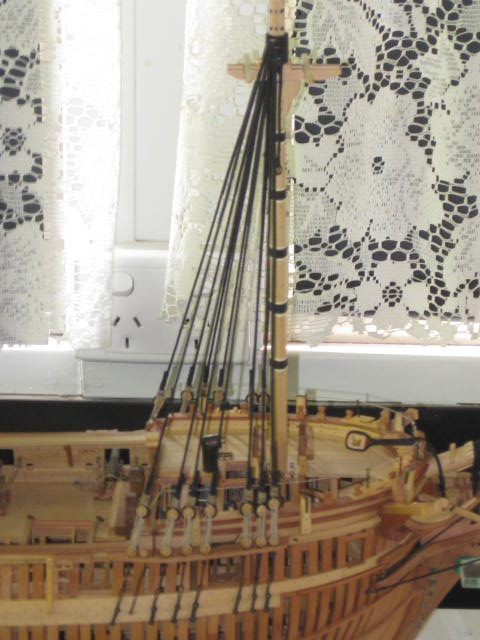
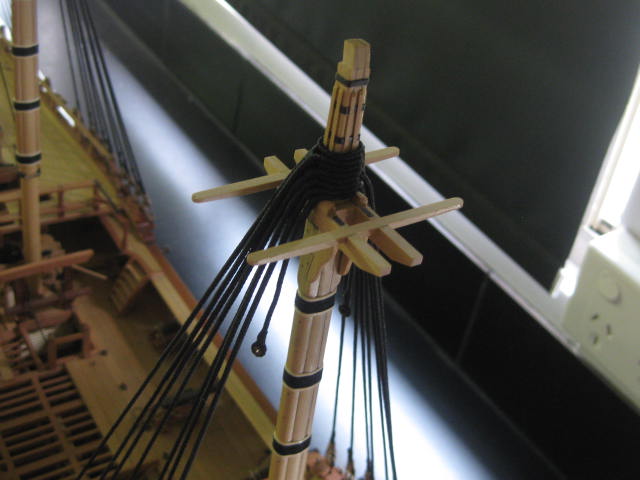
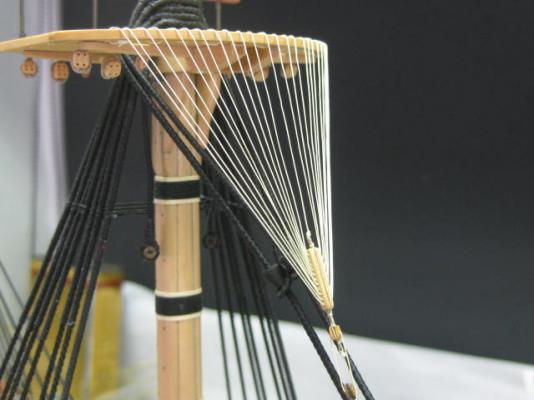
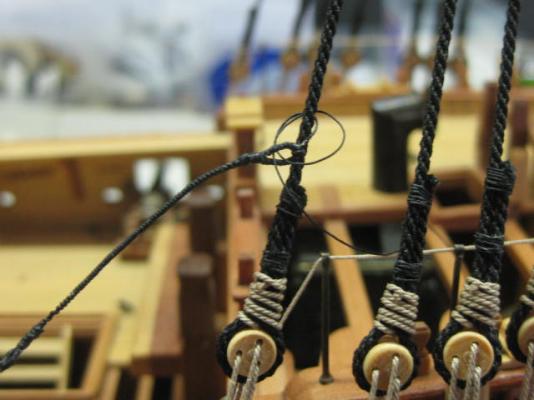
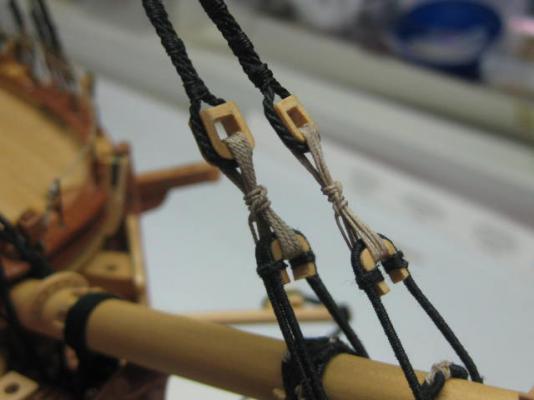
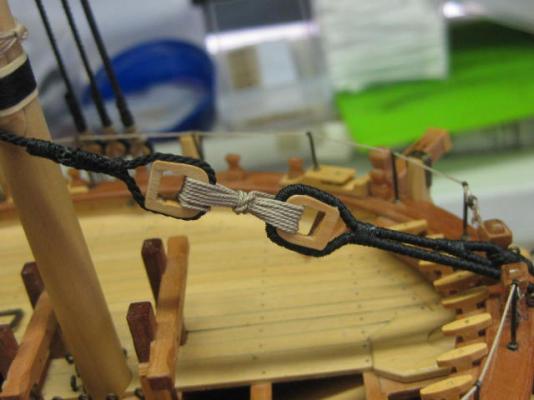
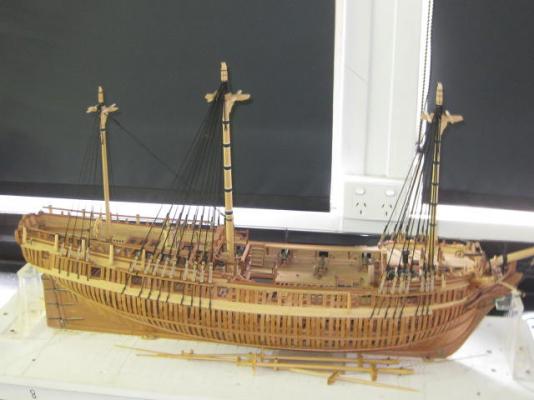
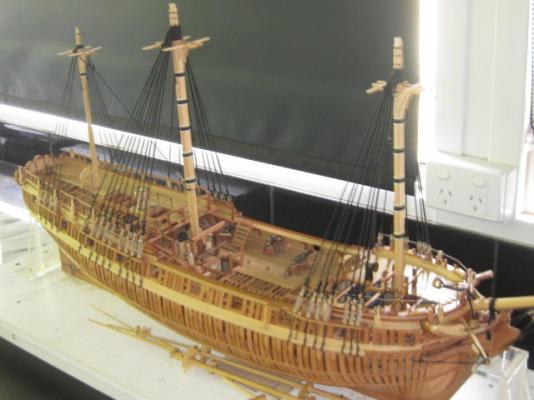
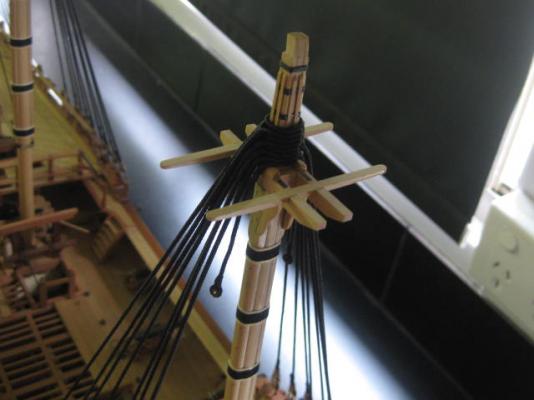
Crowsfeet The Crowsfeet prevent the topsails from chafing the lower stays, and also stop them from getting snagged in the tops. I used Gutermann Quilting Cotton for these. It's not quite the same color as Chuck's running rigging line, but it is the closest match they make. This stuff is made from cotton and has a polyester coating which makes it a little more rigid than normal cotton - this makes threading it through tiny holes a lot easier. It also has NO fuzzies at all . The line starts on the strop at the top of the euphroe and passes over the forward edge of the top and through the middle hole. Then it comes back up through the adjacent hole on the port side, down to the uppermost hole in the euphroe and through the top on the starboard side. These steps are repeated for the remainder. The last line is tied off to it's adjacent partner underneath the top. It was a difficult job to get even tension on all the loops of line. I had to go back over all the loops a few times to get an acceptable result : The euphroe tackle : Danny

-
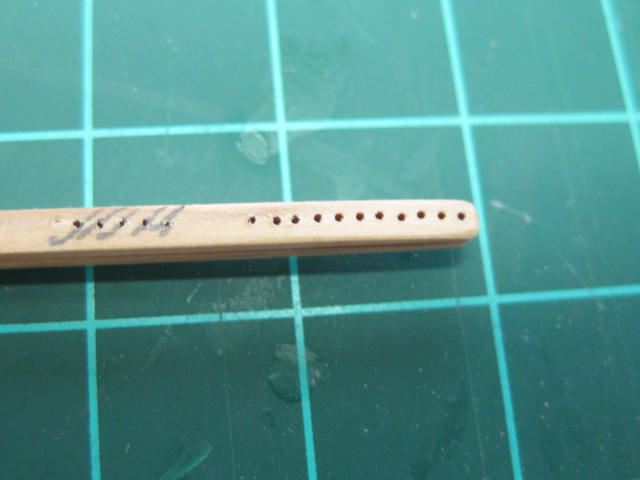
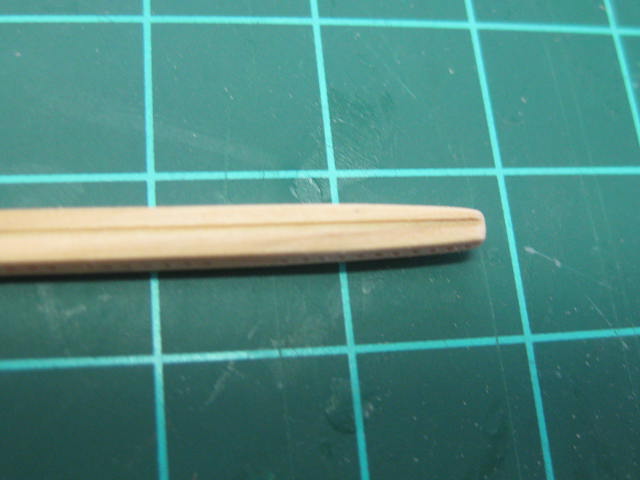
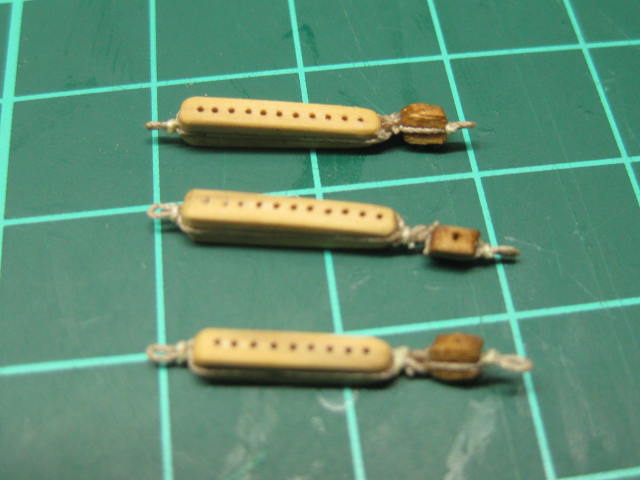
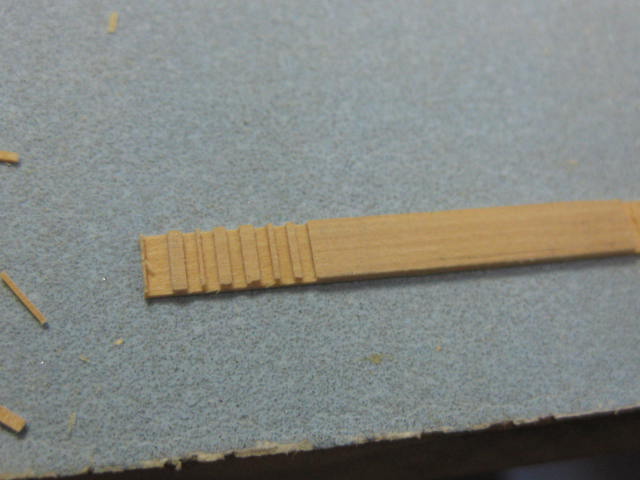
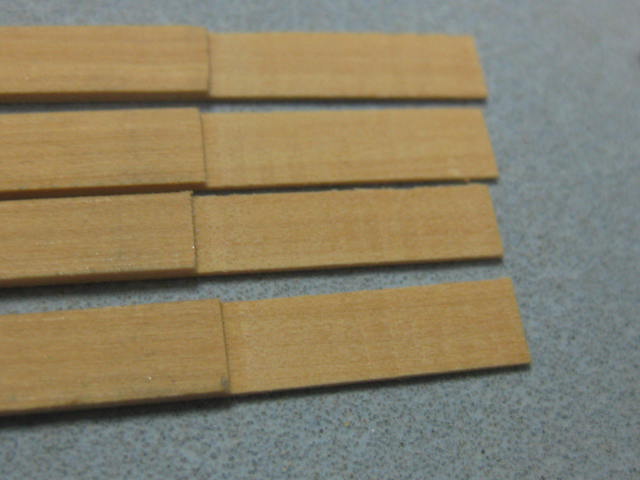
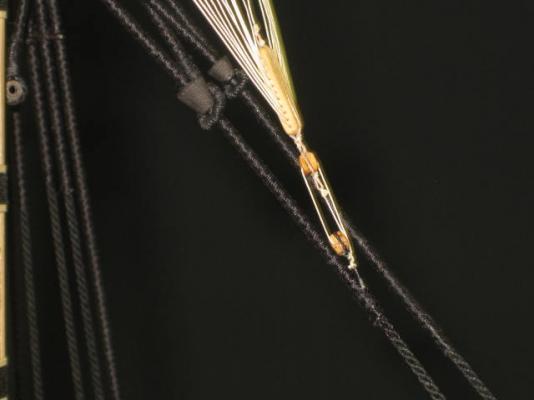
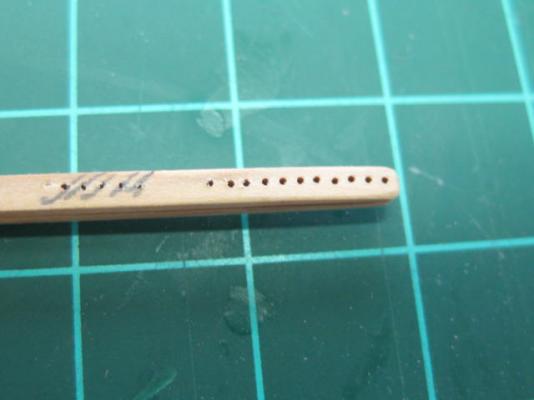
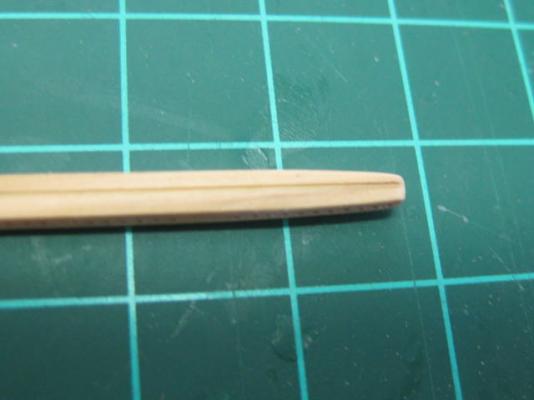
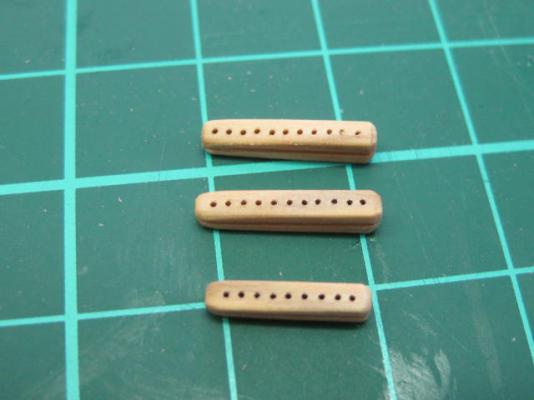
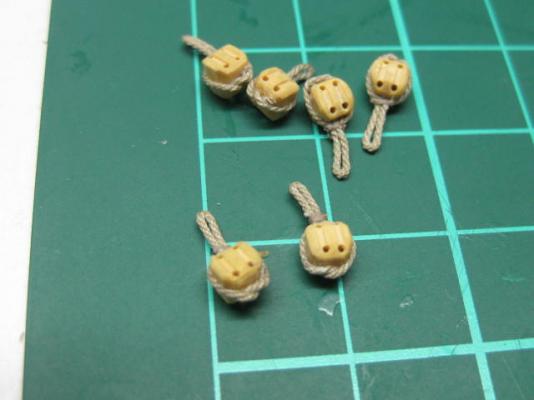
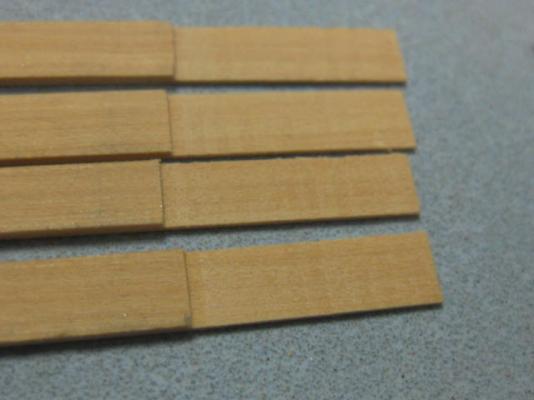
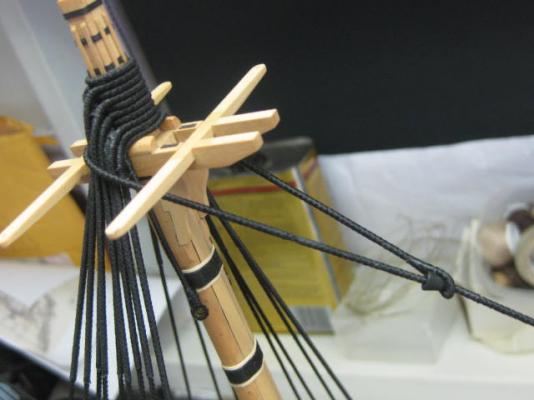
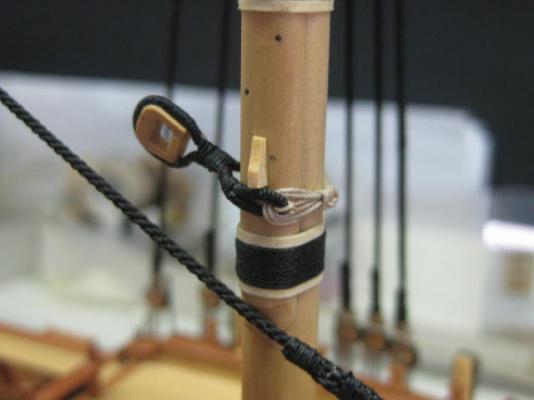
Thanks very much George, Mark, Maury, John, Nils and David. Your comments are appreciated. Yes they are Mark. You may be confusing them with the Futtock Shrouds, which do have hooks. Euphroes The Euphroes are used to attach the lower parts of the Crowsfeet to the stays. They are only 12mm long for the fore and main masts, and 10mm for the mizzen mast. This is slightly longer than the ones described in TFFM (by 20%) but with the slightly larger thread I'm using for the Crowsfeet I had to make the holes a bit bigger (0.45mm) to get the thread through. There are 11 holes in the fore and main and 9 holes in the mizzen. I started by cutting the stock for all three to width and thickness from English Box. I ran the stock through the table saw to cut the grooves for the strops. Then I drilled all three pieces in my mill : Then I cut the three pieces to length, tapering each one first. Final rounding was done with a sanding stick : Final job was to attach the strops and a 4" block for the tackle. This is a rarely seen detail on models : Danny

-
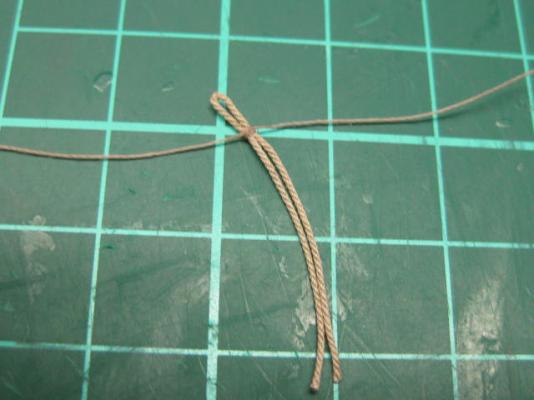
Thank you Eamonn, George, Maury and Jan. Catharpins A rather tricky step in the rigging, I've fitted these before starting the ratlines as it gave me better access. Some careful measuring was needed (along with a bit of trial and error) to ensure that the catharpins would just slightly pull the shrouds together when fitted. They also had to all be EXACTLY the same length. The eye splices also had to be taken into account. First job was to serve the 8 pieces needed, leaving some extra length in the serving line that would act as a "splice". Then the eyes were "spliced" in a similar fashion to others I'd done before. The seizing lines were tied to each eye : One end was loosely seized near the bottom of the shroud where it was a bit easier to do : Then the unit was raised into position. I used a self-closing tweezer to hold the opposite side in position while I finished off the seizing. The foremast catharpins fitted : Danny


-
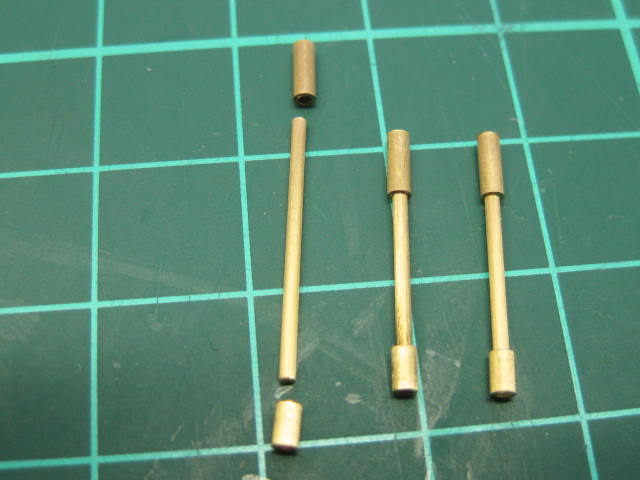
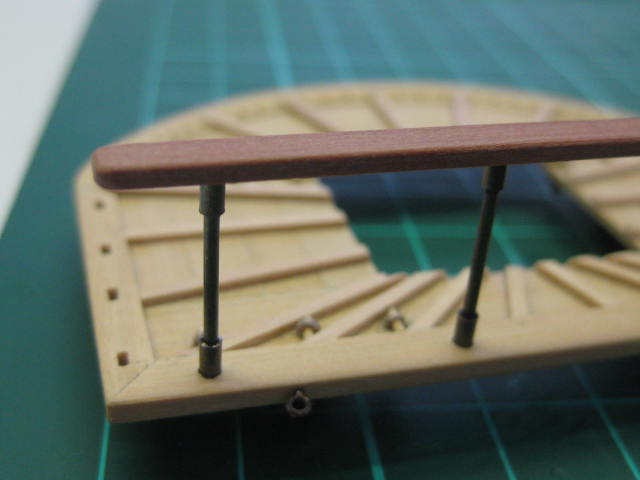
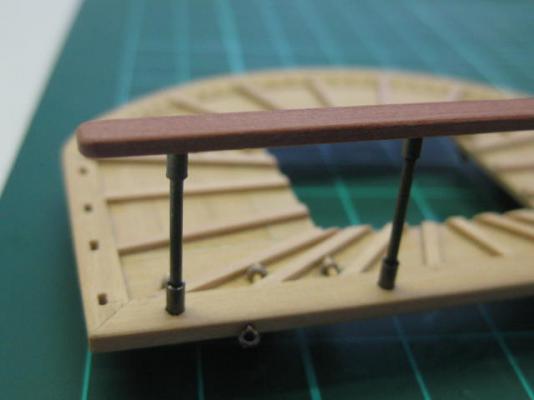
Top Stanchions and Railings The final things to add before attaching the Tops are the Stanchions and Railings. TFFM advise against doing it at this stage as they may get damaged whilst rigging, but I found them difficult enough to fit on the bench let alone when they are on the ship. I'm confident that they will stand up to any punishment later on . I made the stanchions from 1.0mm brass rod and 1.6mm brass tube. The tube's ID was only 0,8mm so every piece had to be drilled. I did this on the lathe, and also cut the pieces of tubing from the stock using the parting tool held about 1mm from the chuck. They are a rather tight fit, and didn't really need soldering so I didn't bother : The stanchions were also a tight fit in the previously drilled holes in the tops so I glued them in with CA. I drilled the rails 3/4 of the way through, and once again they were a good fit. I glued them on to the stanchions with PVA : Danny

-
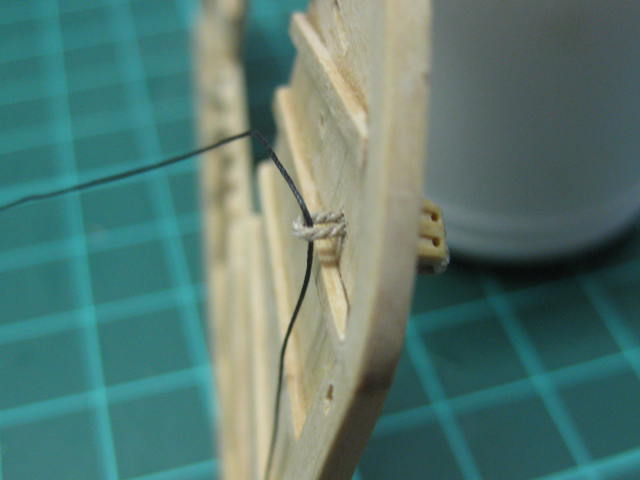
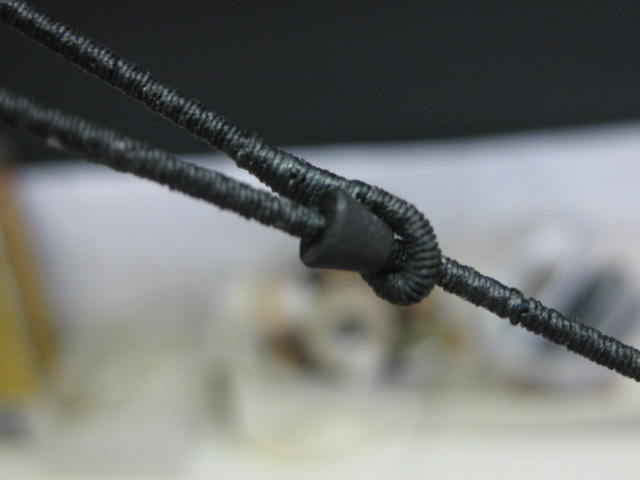
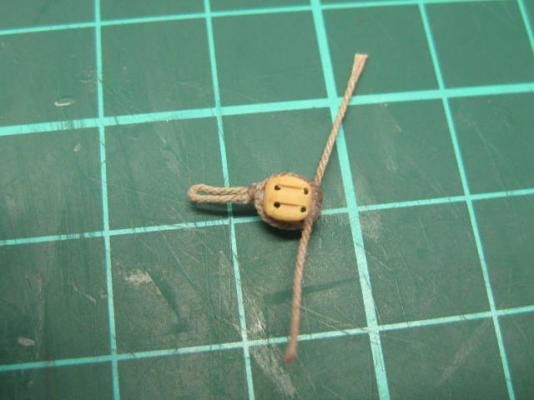
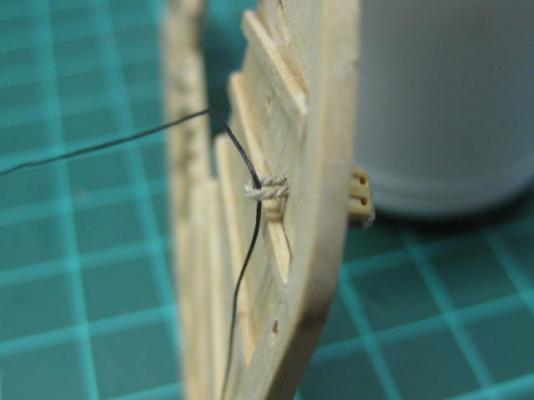
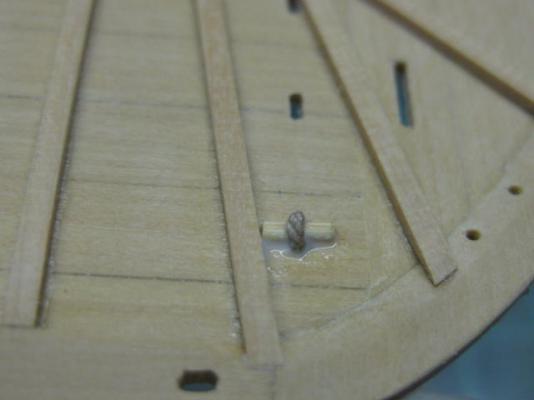
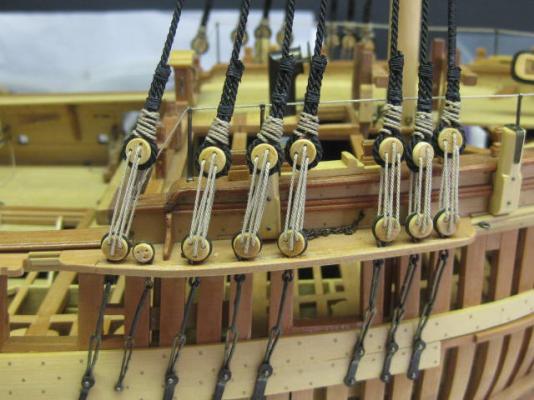
Thanks John. It was harder to make than it looks . Blocks under the Top Returning to the tops. The blocks are held under the tops by a strop which has a wooden peg through it's top end on the top floor. Here are a couple of pics of my method of stropping a block. The "splice" is a simple overhand knot held in place with PVA and neatly trimmed. It's very difficult to tell with the naked eye that it is a fake seizing : I pulled the end of the strop through the top using a piece of thread : The top view of a pegged block strop : Danny
-
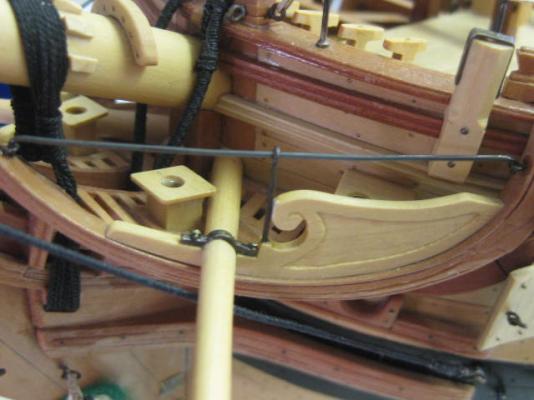
Thanks for that Grant. I might just try that method next time . Berthing Rail A slight departure from the masts/rigging while I remember it. Before I get too much more rigging around the Head it was time to make and fit the Berthing Rail. This is an iron rail supported by a stanchion in the middle. It fits into a small eyebolt at each end (I'd fitted these earlier) : Danny
-
Thank you Grant. I used David's method in TFFM, I think it's similar to Chuck's??? I haven't really seen his. Do you have a Link? Danny
-
Thank you George, John, Greg and Alan - much appreciated . Not with this method Greg, I placed a sheet of glass and a heavy weight on top of them until they dried thoroughly. However I DID have major warping problems when I tried to use David's method with the very thin sheets laminated together. I used PVA glue instead of Aliphatic which I didn't have any of - not a good idea, the one I tried was a throwaway . Danny
-
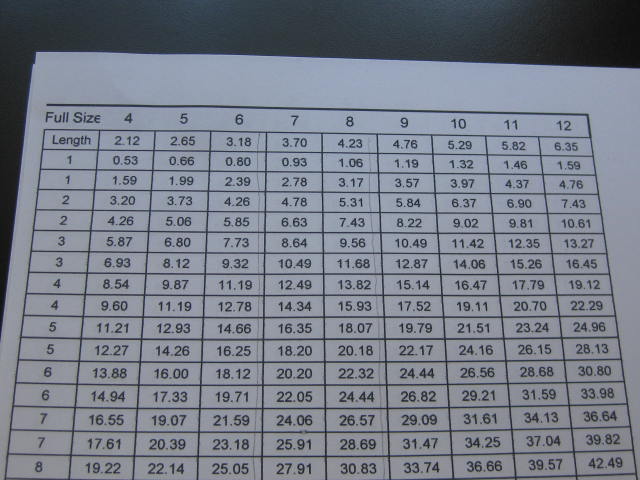
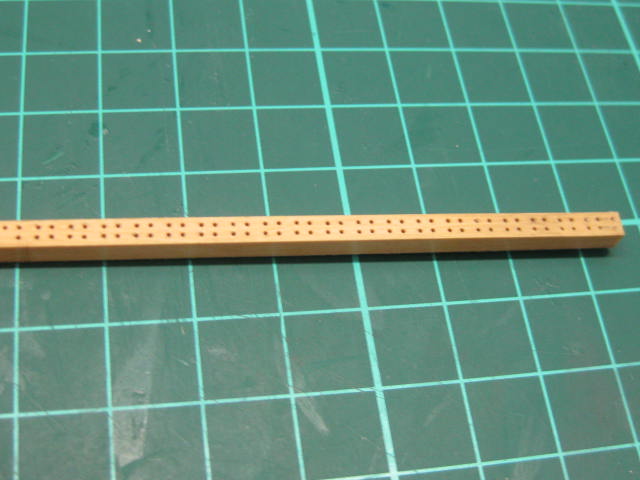
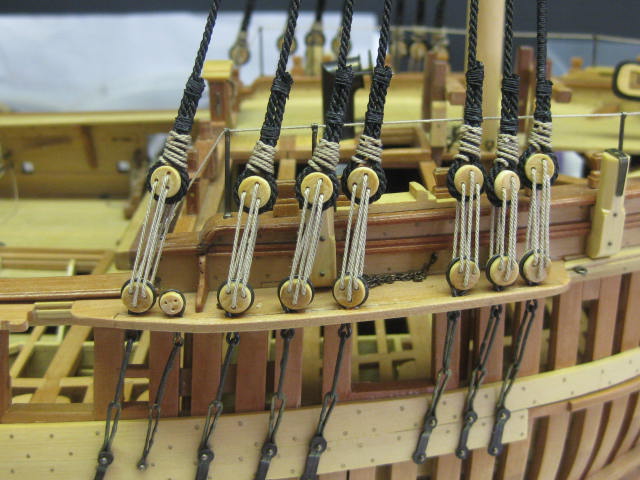
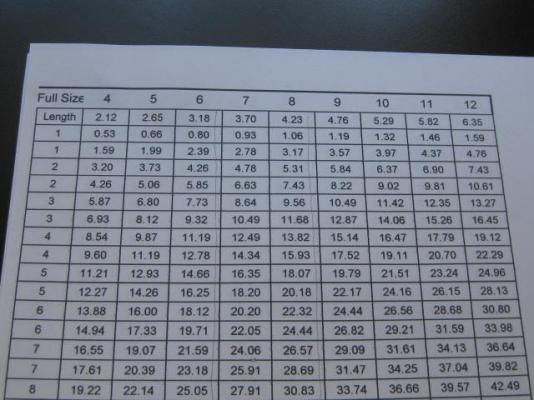
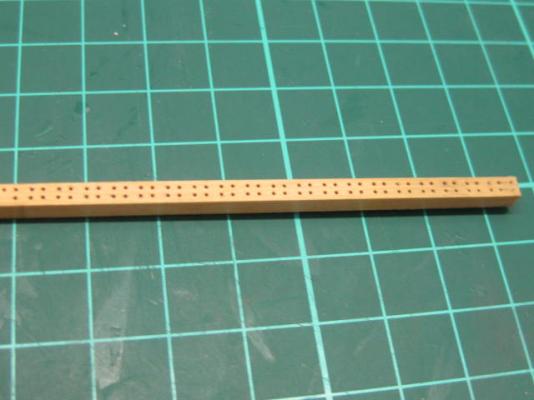
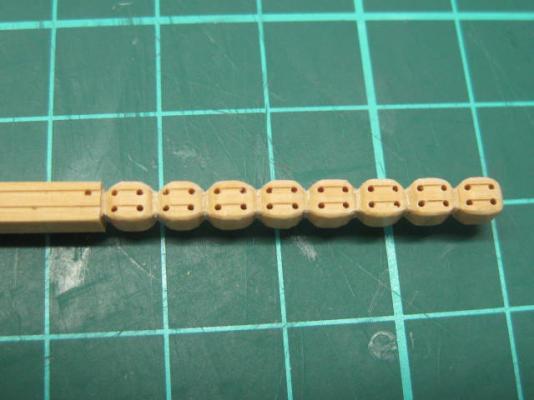
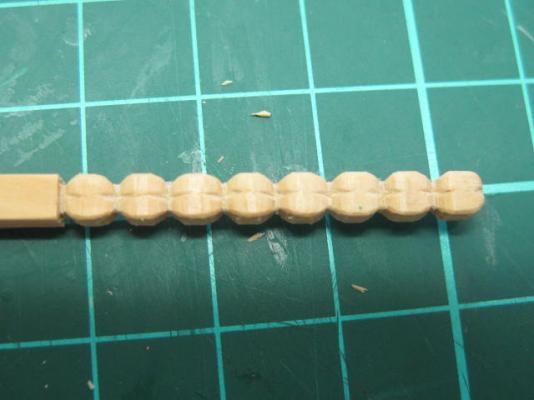
Thanks Popeye and Dave. Probably a museum. Not yet - I'm going to finish Vulture first, and then I have a model of Norske Lowe to finish off for another guy. Making Blocks There are 24 blocks attached beneath the Fore and Main Tops. Each has 4 Buntlines, 4 Leechlines and 4 Tricing Line blocks. The buntlines are 8" double sheaved (4.23mm long), the leechlines are 7" doubles (3.7mm) and the tricing line blocks are 6" single sheaved (3.18mm). I started by cutting the stock to the appropriate sizes for the three sizes of block. Next I cut a shallow groove (or two) for the representations of the sheaves the full length of each piece of stock. Then I made up a Spreadsheet for the co-ordinates of each hole. The spreadsheet has co-ordinates for all sizes of block from 4" to 12" : I set the stock up in my mill and proceeded to drill (a Digital Readout is a MUST for this operation). I made about twice as many blocks as I needed. The co-ordinates allowed for twice the thickness of my smallest saw blade (0.20" or 0.54mm) so that I could make all the blocks with a minimum of setting up : Next came the most labour intensive part of the exercise, shaping the blocks using a sharp Xacto : The grooves for the strop were cut last before cutting each block from the stock and finishing the cut end : EDIT - After making a few sets of blocks I found it easier to saw the grooves for both the "sheave" and the strop in the stock before drilling the holes etc. Danny
-
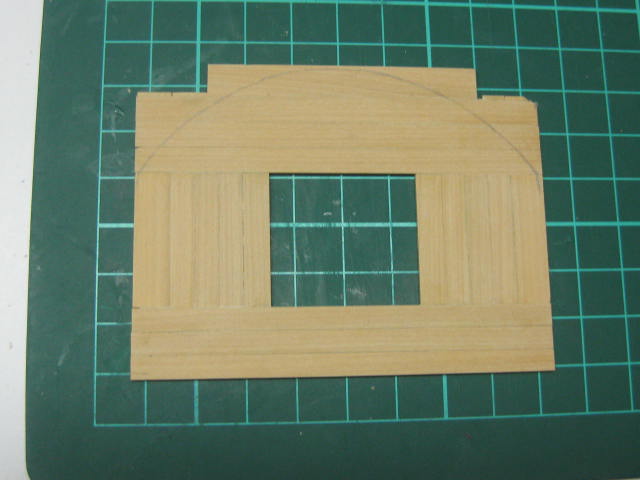
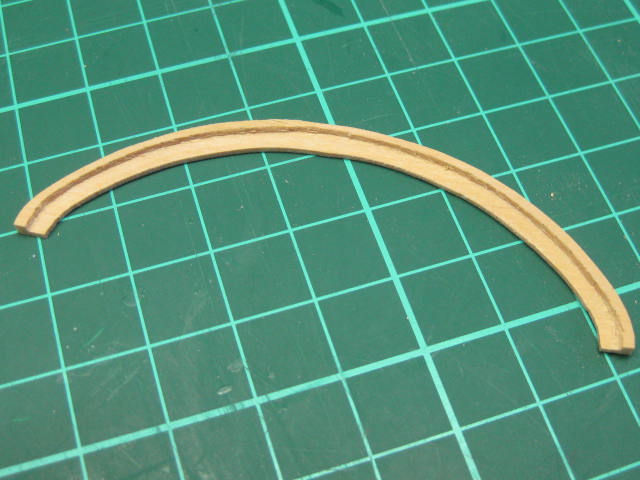
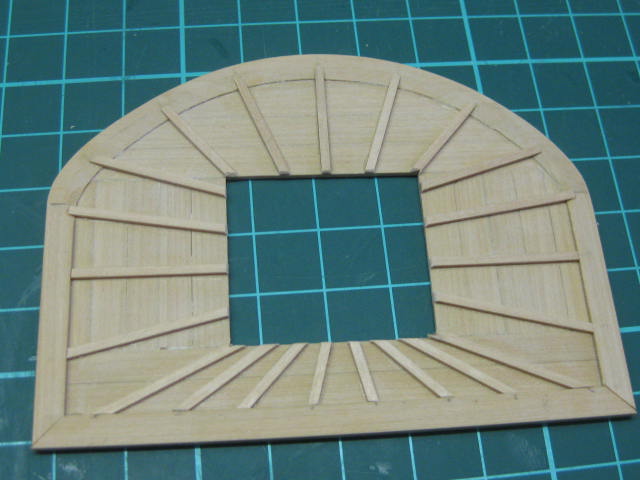
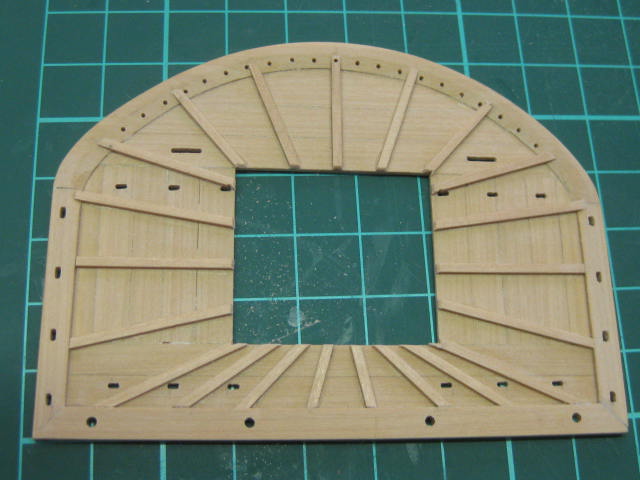
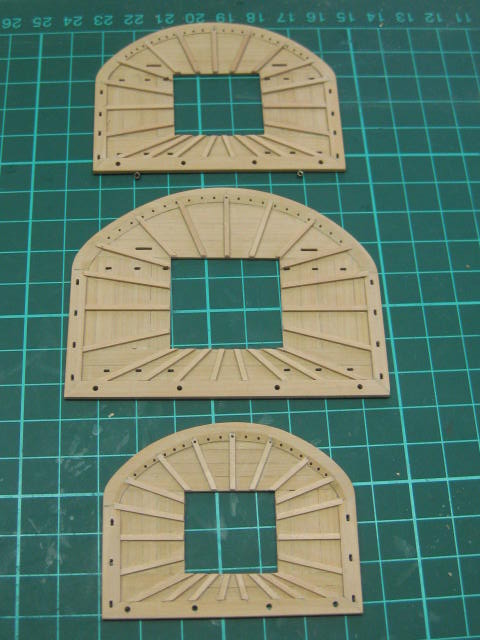
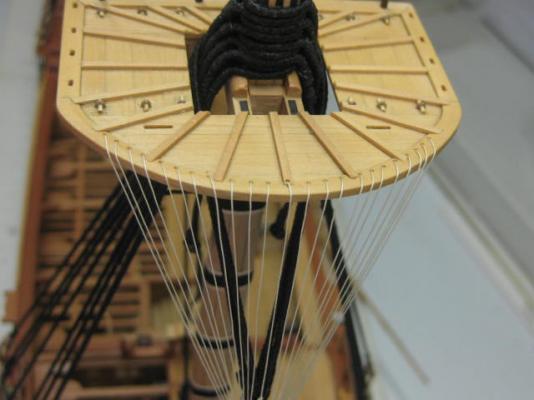
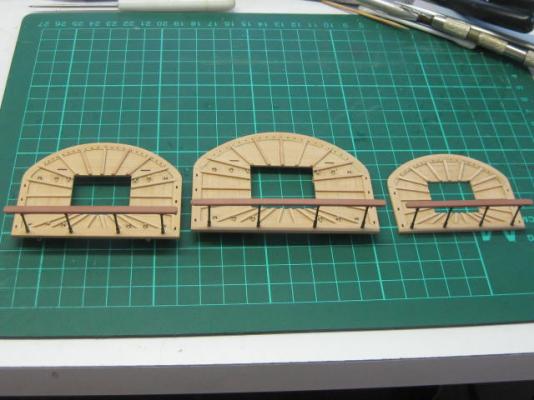
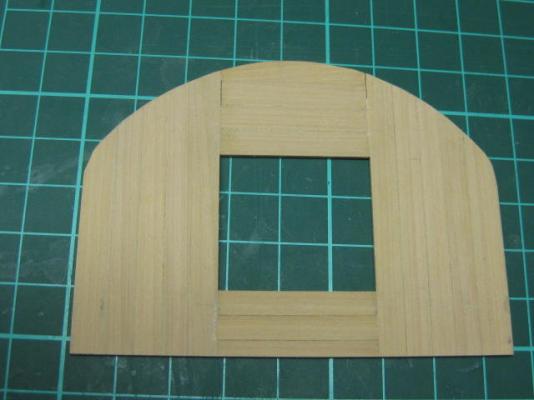
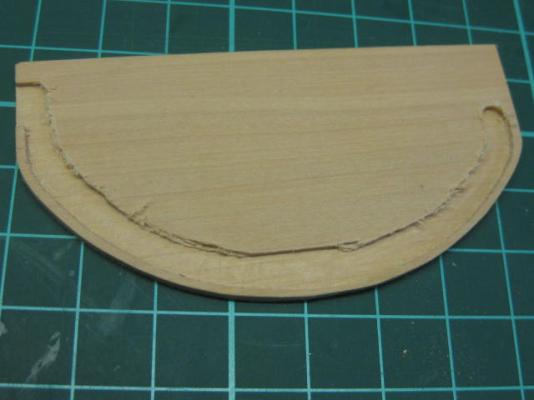
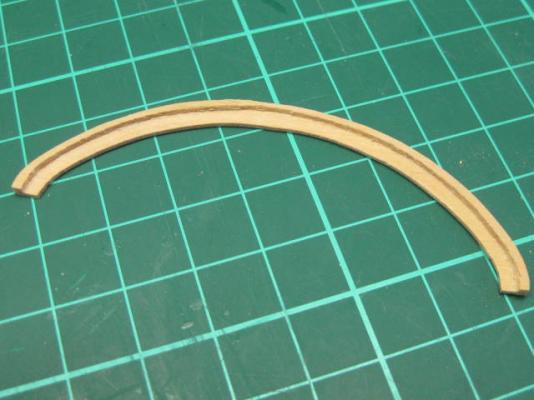
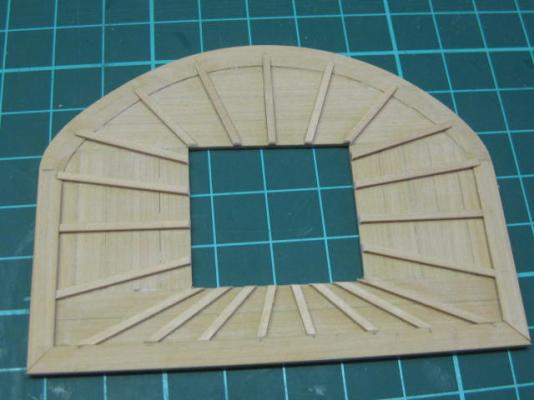
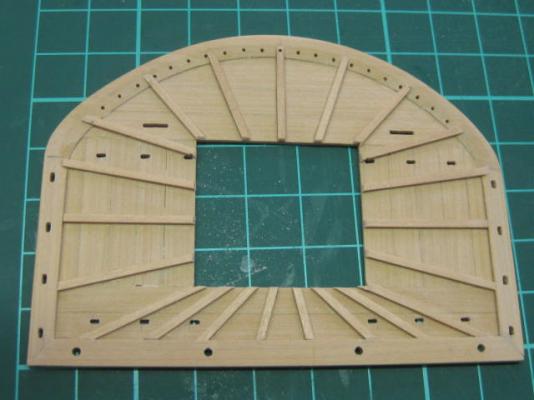
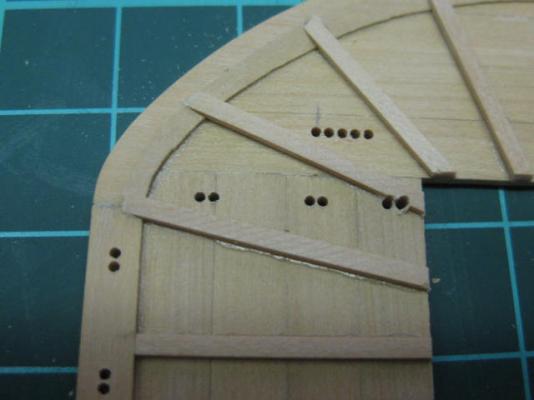
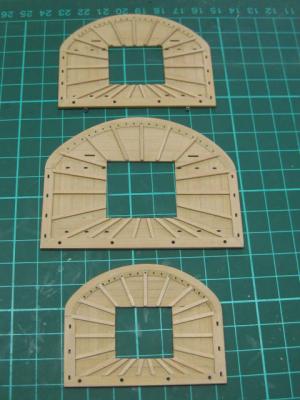
Thank you Michael. The planks were overlapped and glued together. Note the change of direction in the fore-aft and athwartship planks : Then the outer edge was trimmed to shape : To make the outer rim I rebated the straight sections with the table saw. The curved forward piece was milled and trimmed with an Xacto chisel : The four pieces were glued to the platform and a sloping angle was cut into the curved section using a sharp Xacto blade : The Battens were fitted next : Finally, all the holes for the topmast deadeyes, stanchions, crowsfeet and blocks were measured, drilled and filed : Danny

-
That's true, but it's an easy fix. Betty, I'm sure you're right about the extra blocks - quite a few are used for rigging the sails. A tip - finish ALL the Standing Rigging before you start on the Running Rigging. The Standing rigging supports the masts, and is colored either black or dark brown - it's tarred on the original. I suggest you start off with the Shrouds, the ones that keep the masts straight across the ship and also put tension on them rearward. Danny
- 23 replies
-
- 2
-

-
- brig
- restoration
- (and 1 more)
-
Hi Betty, Oh dear, you have some problems. You have the Gaff on the foremast - that's the "pole" that is attached just under the mast top and pointing toward the bow. It belongs on the main mast (pointing toward the stern), but in the position where the other similar one (the Driver Boom) is. That one belongs near the base of the main mast - you'll have to lower it. It's a little hard to tell from the angle that you've taken the above pic which is the longer of the two booms. The longer one goes to the bottom. The forestays look a lot better now . Danny
-
Hi Al, Correct. They only run long enough to pick up the lower ends of the chains. I've done a similar thing on my Vulture, but this time I ran the planks the full length of the hull on the unplanked starboard side. See THIS POST. Danny
-
Hi Al, Yep, I also added a couple of extra planks to the Wales that the kit didn't have. No other way of fitting the Chains properly. I don't know why they didn't do that with the kit in the first place. Check out THIS PIC from the Gallery. Danny
- 265 replies
-
- 1
-
-
- finished
- artesania latina
- (and 1 more)
-
I sense a redo coming up - don't even try to bend it, cut a new one from thicker timber and shape it in both planes. Much easier. Danny
-
Betty, it's my "HMAT Supply" - built from a VERY poor Artesania Latina kit with a LOT of corrections. I used to have a complete build log of her construction but it was wiped out in the Great Crash of a couple of years ago. You can see a few pics of her in the Gallery by clicking HERE. Danny
- 23 replies
-
- 2
-
-
- brig
- restoration
- (and 1 more)
-
First thing I can tell you is that the lines DON'T cross over at the fore end of the bowsprit. You must have the flying jib line way too high. Check out this pic of an overall side view - different ship, but the rigging is pretty well the same for any brig : Danny
- 23 replies
-
- 5
-
-
- brig
- restoration
- (and 1 more)
-
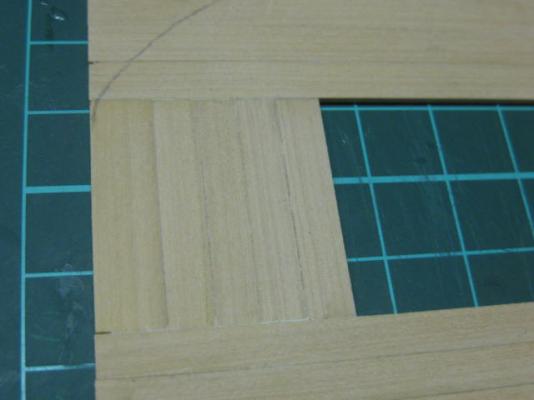
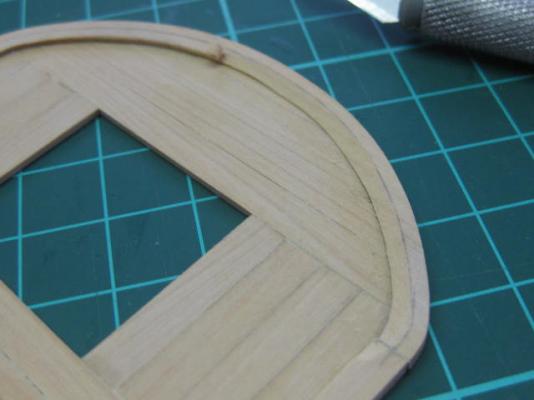
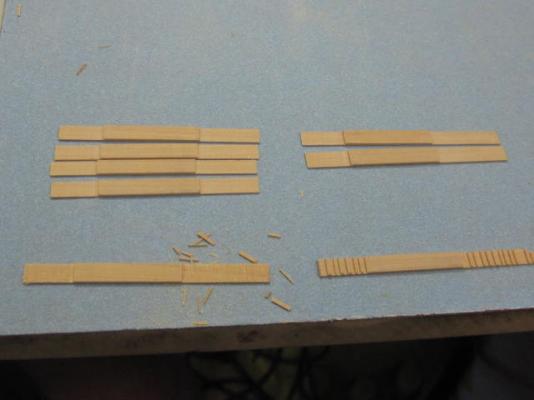
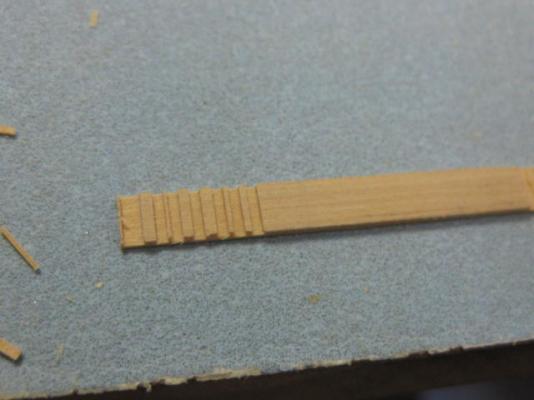
Thanks very much David, Sherry, Dave, John, Greg and George . John - George has hit the nail on the head. None of my previous 12 or 13 wooden model ships have turned out anywhere near as good as this one, although each was better than the previous one. It all comes with practice . Mast Tops Construction of the Mast Tops begins by rebating each plank to half it's thickness where they will overlap. This was done on the Byrnes saw by first cutting a series of slots to half thickness : The excess was cut off with an Xacto knife : Finally they were finished with a sanding stick : Danny

-
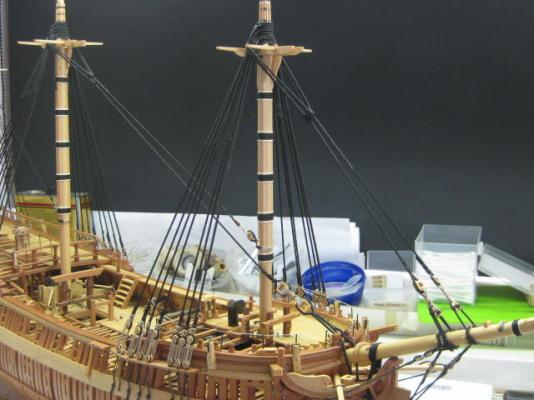
Thanks again David, George, Juergen and John . Fore Stay and Preventer Stay The Fore Stay and Preventer Stay are very similar to the Main Stays : This concludes the lower part of the standing rigging. I'll be fitting Ratlines for the next week or so . Danny

-
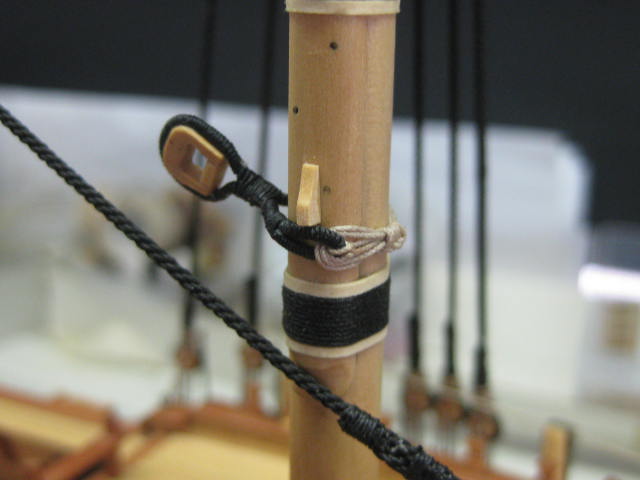
Thanks Dave, make sure you wipe your screen and keyboard every now and then . Main Preventer Stay The Main Preventer Stay is smaller than the main stay (1.0mm diameter) and fits around the mast head above the main stay. It's lower end lashes to the preventer stay collar on the foremast : Danny

-
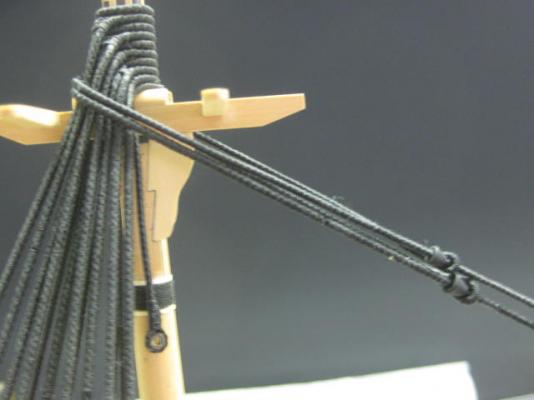
Thank you mhegazi and Nils (I'm still not sure about how many sails I'll be fitting, if any). Main Stay Apart from the Anchor Hawse the Main Stay is the largest rope on the ship at 1.4mm diameter. It fits to the mast top in similar fashion to the mizzen stay, and is lashed to the stay collar at it's lower end. The upper end is served to a few scale feet below the mouse : I'd forgotten to fit the Main Preventer Stay Collar before I'd permanently fitted the foremast. It made the job slightly more difficult. To prevent the collar from shifting upward two cleats are glued to the sides of the foremast : Danny

-
It's one of my MOST favourite things Brian, especially when they turn out well. I love all things associated with rigging, yes even tying Ratlines . Danny
-
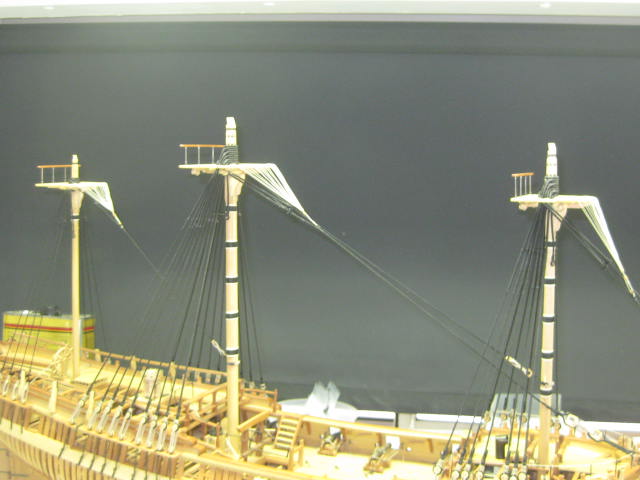
Thanks for the kind comments Ben, John, Sherry, Piet, David, George, Greg, Nils and Popeye - much appreciated . Nils - the holes in the Tops are just large enough to slip over the shrouds. Fore Mast Shrouds With the completion of the Fore Mast ones I've finished fitting all the lower shrouds : My apologies for the poor quality of the pics - it's very difficult to take good ones with the lighting and backgrounds in my caravan . Danny

-
Hi Betty, and welcome to MSW. My condolences on your loss as well. You've taken on a bit of a monster, but nothing that can't be finished with time, patience and help . It will help a lot if we can get this model identified. Do you have the plans for it or any other information ? Danny
- 23 replies
-
- 1
-
-
- brig
- restoration
- (and 1 more)