Thukydides
-
Posts
1,366 -
Joined
-
Last visited
Content Type
Profiles
Forums
Gallery
Events
Everything posted by Thukydides
-

HMS Sherborne - Caldercraft vs Vanguard
Thukydides replied to nheather's topic in Wood ship model kits
If money is no object then yes I think the Vanguard one is a better choice. That being said if you take your time you should be able to do a fine job of the Caldercraft one. Another option I would throw my two cents in for is Vanguard's Alert. A slightly bigger cutter I feel it has more scope for kitbashing if that is your thing. -
Yes I know the feeling. Trying to puzzle out technical french with a combination of google translate and my limited high school French is a difficult process. Looking forward to seeing what you find.
-
She is looking fantastic Derek. Good to see you back at it.
-
I am always in favour of more painting so give it a try you have nothing to loose painting onto the paper. Just painting over it will give it a more natural look than a printed design will. If it doesn’t turn out well you can always default to just using the printed version.
-
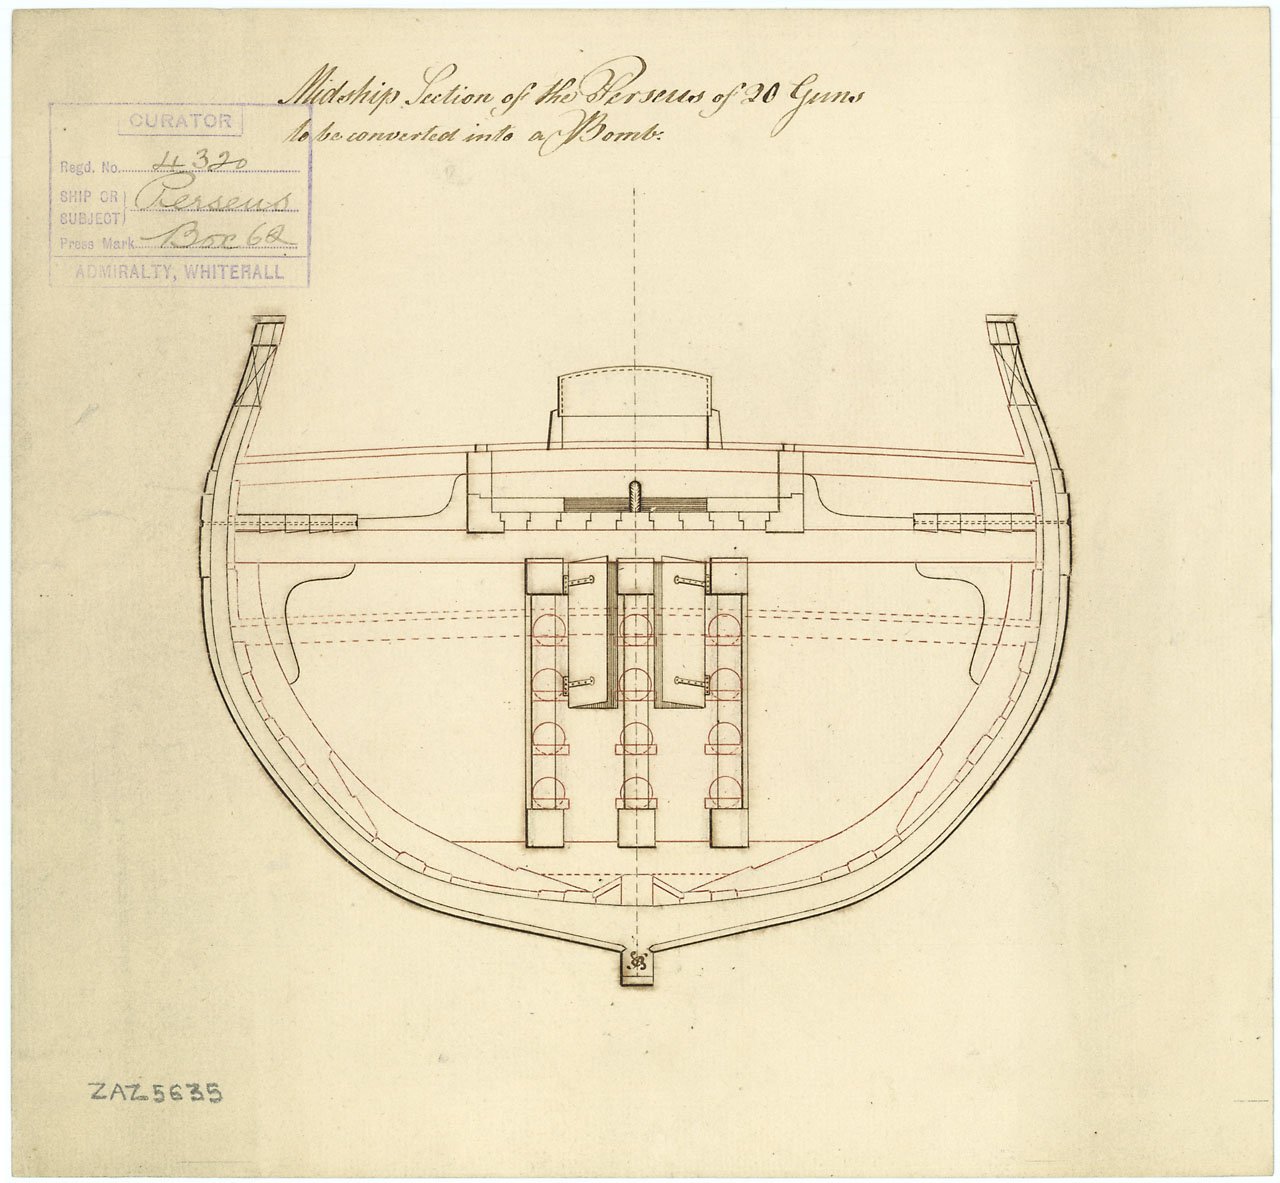
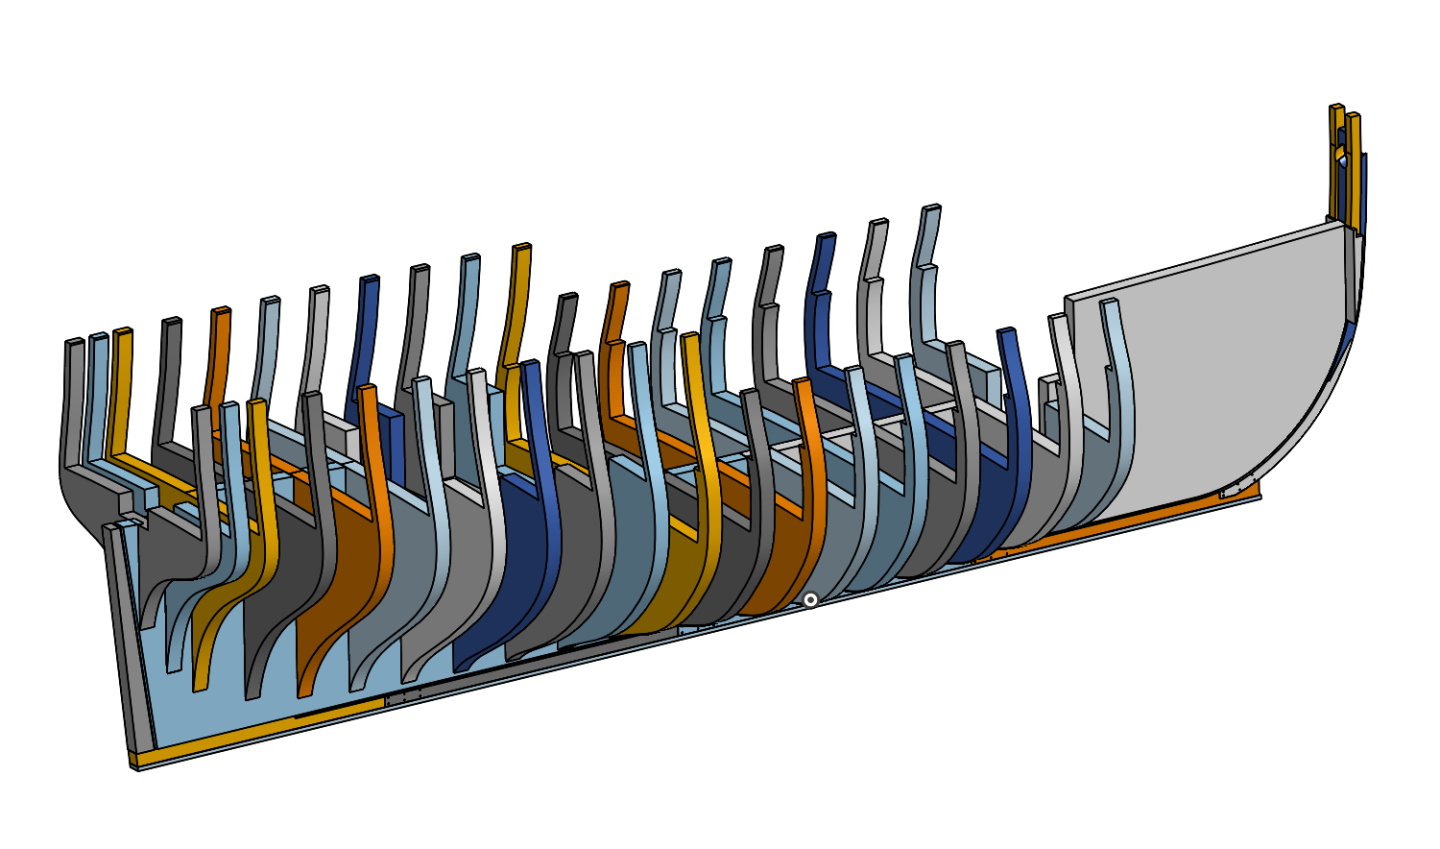
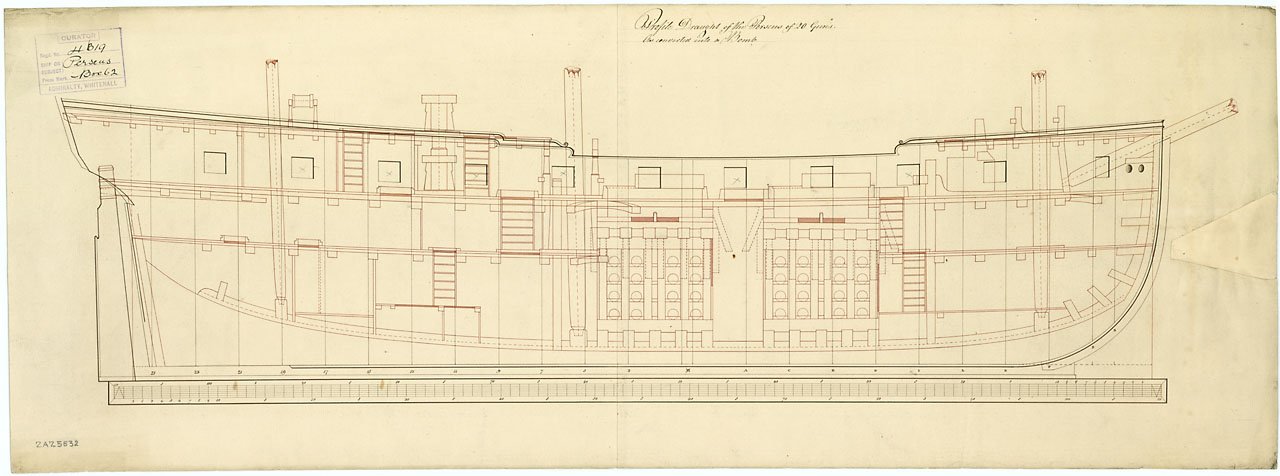
Log #8: Service History Part VI - Conversion to an Unrated Bomb Ship Perseus’ time as a 6th Rate Post ship came to an end when she was converted to an unrated bomb vessel. The plans for her conversion were drawn up sometime in 1797 and in May of 1798 she was commissioned as a 10 gun bomb ship under Commander James Oswald. The plan for her convesion is interesting as it shows a number of changes to her layout including an extra bulkhead under the quarterdeck and changes to the positioning of the ladderways. The former likely occured early on in her career as I have a letter from George Keith Elphinstone to the dockyard requesting the alteration, but in the case of the ladderways it is impossible to know for sure if they represented changes made at the time of conversion or if they simply were documenting changes previously made. The sectional plan confirms many of the timber dimensions in the contract indicating that there were limited changes in this regard to the ship over her lifetime. She served under Oswald until August 1799 when he was succeeded by Lieutenant Henry Compton who was subsequently promoted to commander. Perseus served in the Mediterranean for this period participating in the blockade of Malta. However, by this point Perseus was showing her age and sustained so much damage in a gale that she could not be repaired on station. Compton was ordered by Lord Keith (the same Lord Keith who was her first captain) to return to England with a convoy. The poor state of the Perseus resulted in her being ordered to Woolwich for repairs. In March 1803, Commander John Melhuish took command of Perseus. The most notable action of Melhish’s command was the Bombardment of Dieppe in September 1803. In company with HMS Immortalite(36) and HMS Explosion, another bomb vessel, Perseus bombarded the Dieppe batteries and seventeen vessels, most of which were in the process of being constructed in the port. They then proceeded to St. Valery-en-Caux and bombarded ships under construction there. However, as historian William Clowes notes, “It is doubtful whether very much damage was done.” In May 1804, Commander Thomas Searl was given command of Perseus. There are no significant events recorded for his time in command and Perseus was broken up in September of 1805 bringing to an end an almost 30 year career. On the design side of things I am slowly working on finalizing the bulkhead structure. I realized during my redesign that I actually had room to increase to a larger thickness of plywood for the bulkheads and so have done so to give greater strength to the design. You can see a picture of the current state of affairs below. Thanks to everyone who has stopped by to take a look and for the encouragement.

-
In terms of which has the most info, there is a surprising amount on all of them (except for narcissus). I would recommend taking a look at three decks (https://threedecks.org/index.php?display_type=show_class&id=229) which lists the history of them all. It is a great starting point for research. There are very few paintings of sphinx class ships so not much in the way of visual representation other than the bowl I mentioned above. There is one painting of Camilla, but very late in her career. There is one other painting claimed to be of camilla, but I am pretty sure it is not her. There is one painting by Serres which shows a number of English ships (two of which are Camilla and Galatea), but it is impossible to know which ones are them. In terms of plans full sets of plans are available for them all, but Sphinx, Camilla, Vestal and Daphne all have plans which include their figurehead and decorations so maybe that makes them a better choice.
-
Fantastic work. I look forward to seeing the carrack, I think that should be a very interesting build.
-
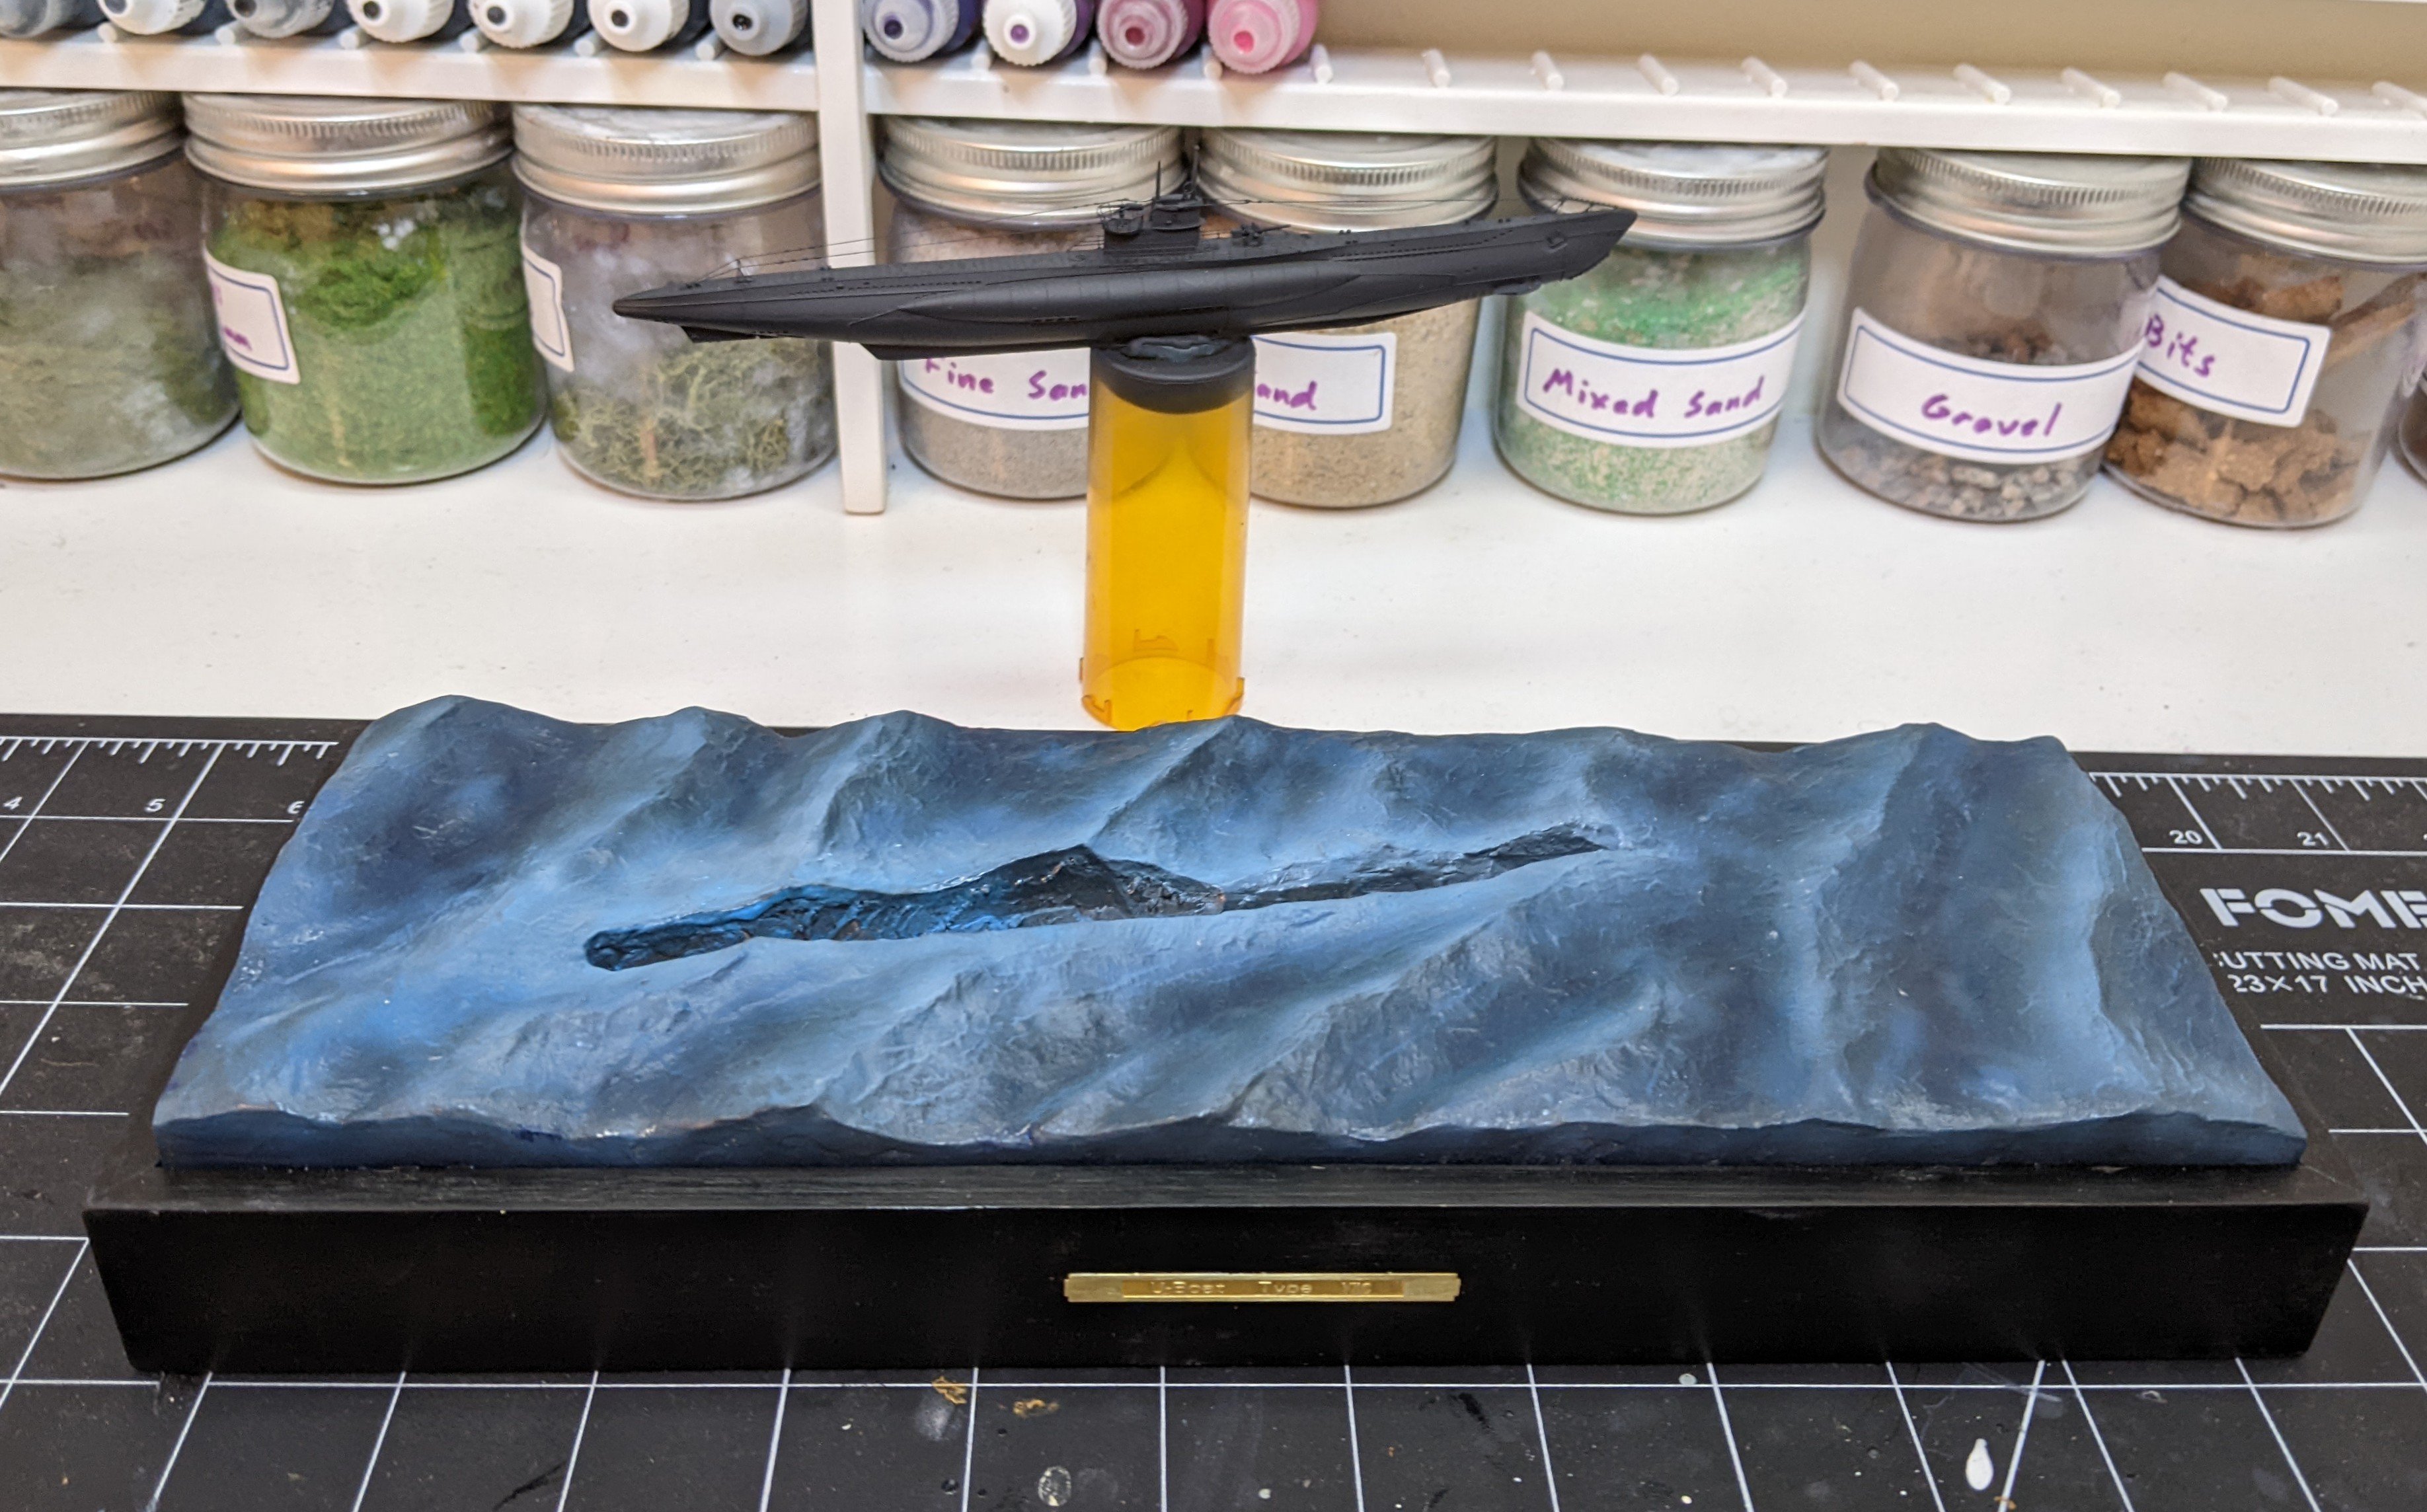
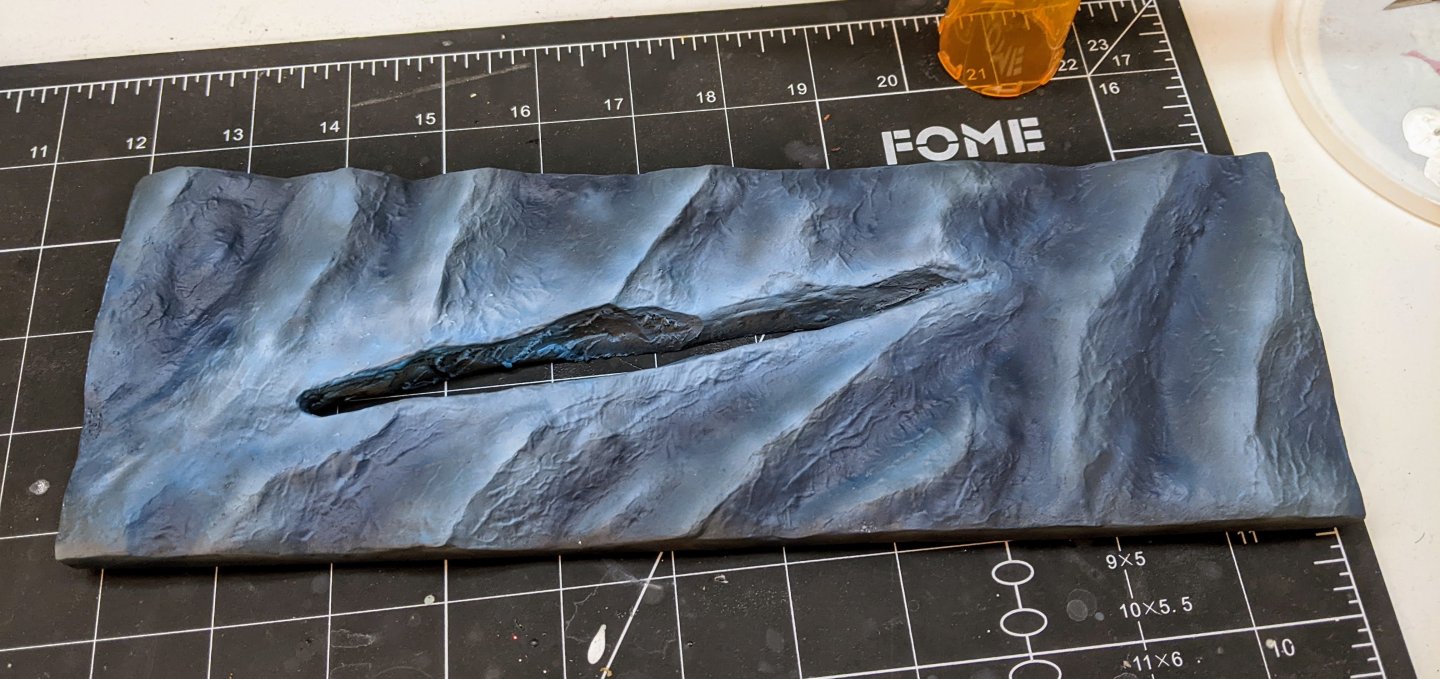
Minor update. I have finished the base of the water. All the foam details still need to be added, but those won't go on till the uboat is ready to go in. I covered the whole thing with two coats of gloss varnish, but it ended up a bit too shiny so I went over it all with a coat of satin. Since I am depicting a relatively stormy sea I don't want a huge amount of reflections. I also glued it onto the base and added the brass label that came with the kit. Next up I need to break out the airbrush again and get back at the uboat itself.

-
Great job Ronald. Those joints look nice and precise.
-
The boats are looking really good. Those ebony Wales do look very nice.
-
If it was me I would do it in the opposite order and not bother with masking tape. Masking tape when hand painting has a tendancy to have paint bleed under it unless it is placed perfectly and on curved surfaces it is pretty much impossible to place it perfectly. I would paint the rail first not worrying about if I go over as the black will cover grey very easily. As a general rule all other considerations aside you paint the colours that cover best last. Also in this case getting a clean line will be much easier with the black. Just drag a round brush at an angle along the flat surface just short of where you want the line to be. Then with you second stroke do it again, but just edge a tiny bit closer. If you are methodical and careful making sure to have your hand resting on something you should get a very clean line. Getting a clean line in the other order will likely be harder as you are having to point your brush in towards the hull to get the sides of the rail. I show the proper positioning for the brush in the picture below (note this is a bad brush, you should use one with a sharper point). Just imagine the black part is the top of your rail and the side I am running the brush against is the hull above it.

-
That is always the problem. By the time I finish the model I sort of know what I am doing. Unfortunately too late to benefit the model...
-
They look really nice. Good job. Those tiny blocks are a real pain. I also didn't bother with the training tackle as I aesthetically prefer the look of the guns without it.
- 114 replies
-
- 1
-

-
- Vanguard Models
- Speedy
- (and 1 more)
-
The figures look good. Nice and neat, great job. A small thing you could do next time to give a bit more depth is try using some washes (particularly for the skin). They are super easy to use and will help the models pop more for only minimal more effort.
-
Looks like you have made a good start Gregory. I thought your previous build was looking good so I will be interested to see how this one develops.
-
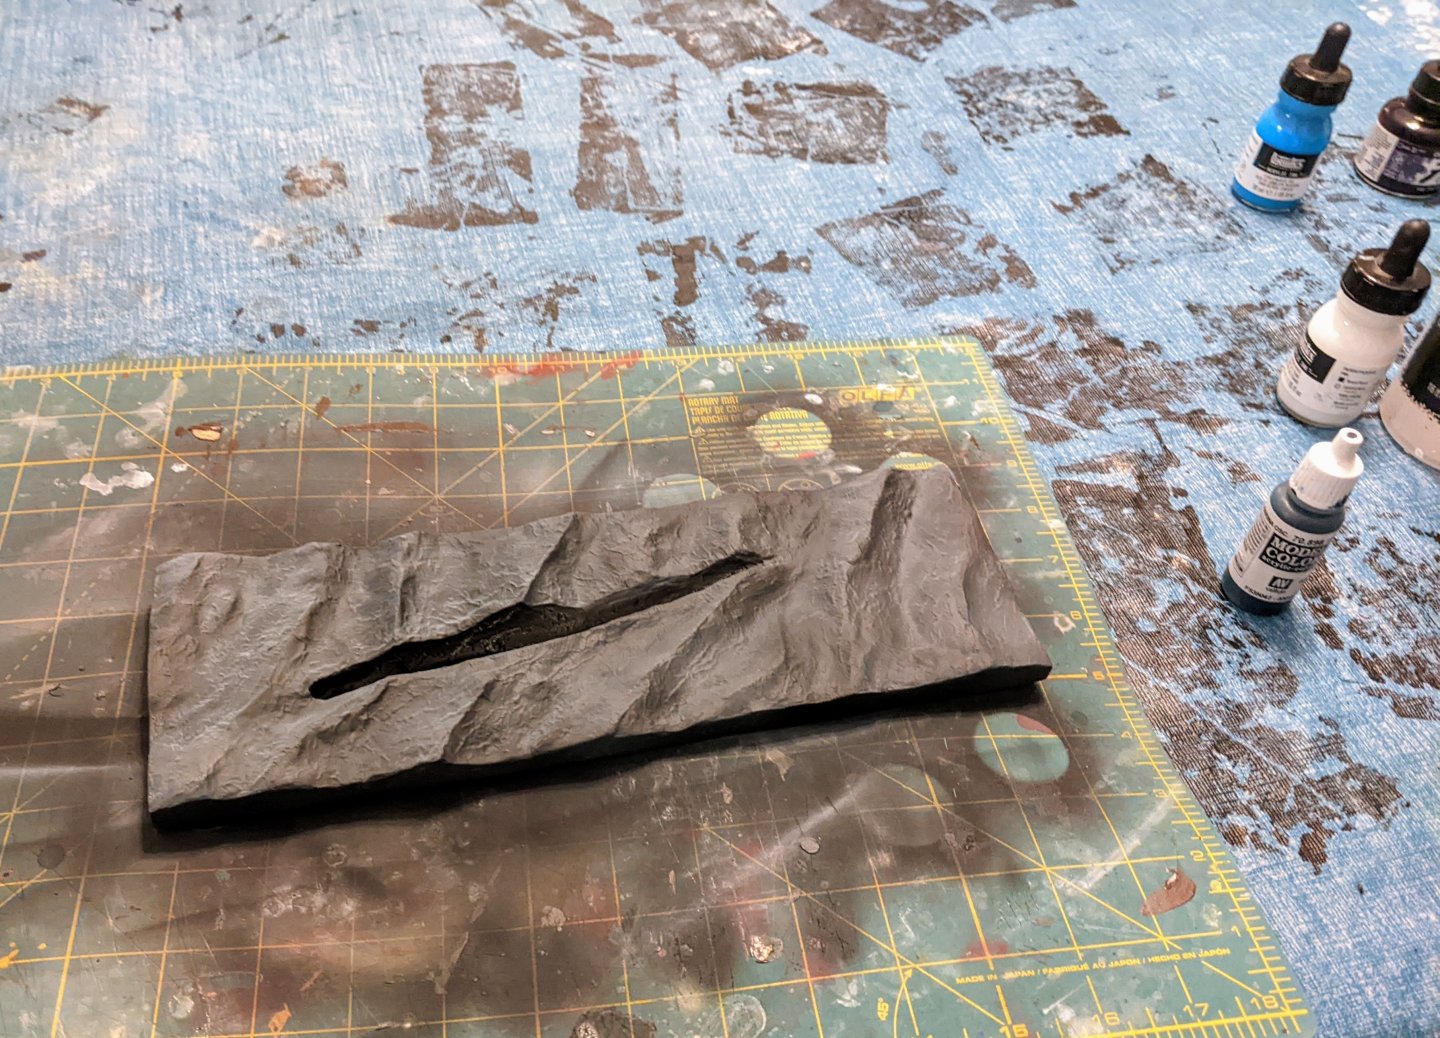
It has been a while since I posted as I havn’t had any progress to report. Life has been busier and I have been spending most of my hobby time doing research for Perseus. However, this evening I broke out the airbrush and decided to make some progress. I love my airbrush, but I dislike the setup and teardown I have to do with it and so I often have trouble finding a free evening where I am in the mood to use it. First up is the uboat itself. I primed it black and then gave it a coat of VMC German Grey. In retrospect it looks a bit on the dark side. I may have to give it another slightly lighter coat for the dark colour. Once it has fully dried I will mask it off and spray the lighter grey. I also primed the water base in black and then gave it a coat of VMC dark sea blue. This did not cover as well as I wanted and ended up just looking a slightly bluey black (see below). So I broke out my inks and started shading and highlighting with various combinations of cyan, white and navy blue ink. The nice thing about the inks is they don’t cover, but are super saturated so you get lots of colour that you can layer on top of itself. I don’t have any pictures of the process as it is hard to take pictures in the middle of airbrushing, but here is the final result after all the spraying is done. This is not by any means done, I have lots of steps yet to do, but I am encouraged that it looks at least somewhat like water. I will chalk it down as a good first attempt.

- 54 replies
-
- 10
-

-
Remove Tamiya paint
Thukydides replied to JoniP's topic in Painting, finishing and weathering products and techniques
I soak the plastic parts in simple green. It works like a charm and just use an old tooth brush to agitate the paint off. -
If you go to their profile you can see their activity. There is an option I believe to see threads started by them. That is how I would do it.
-
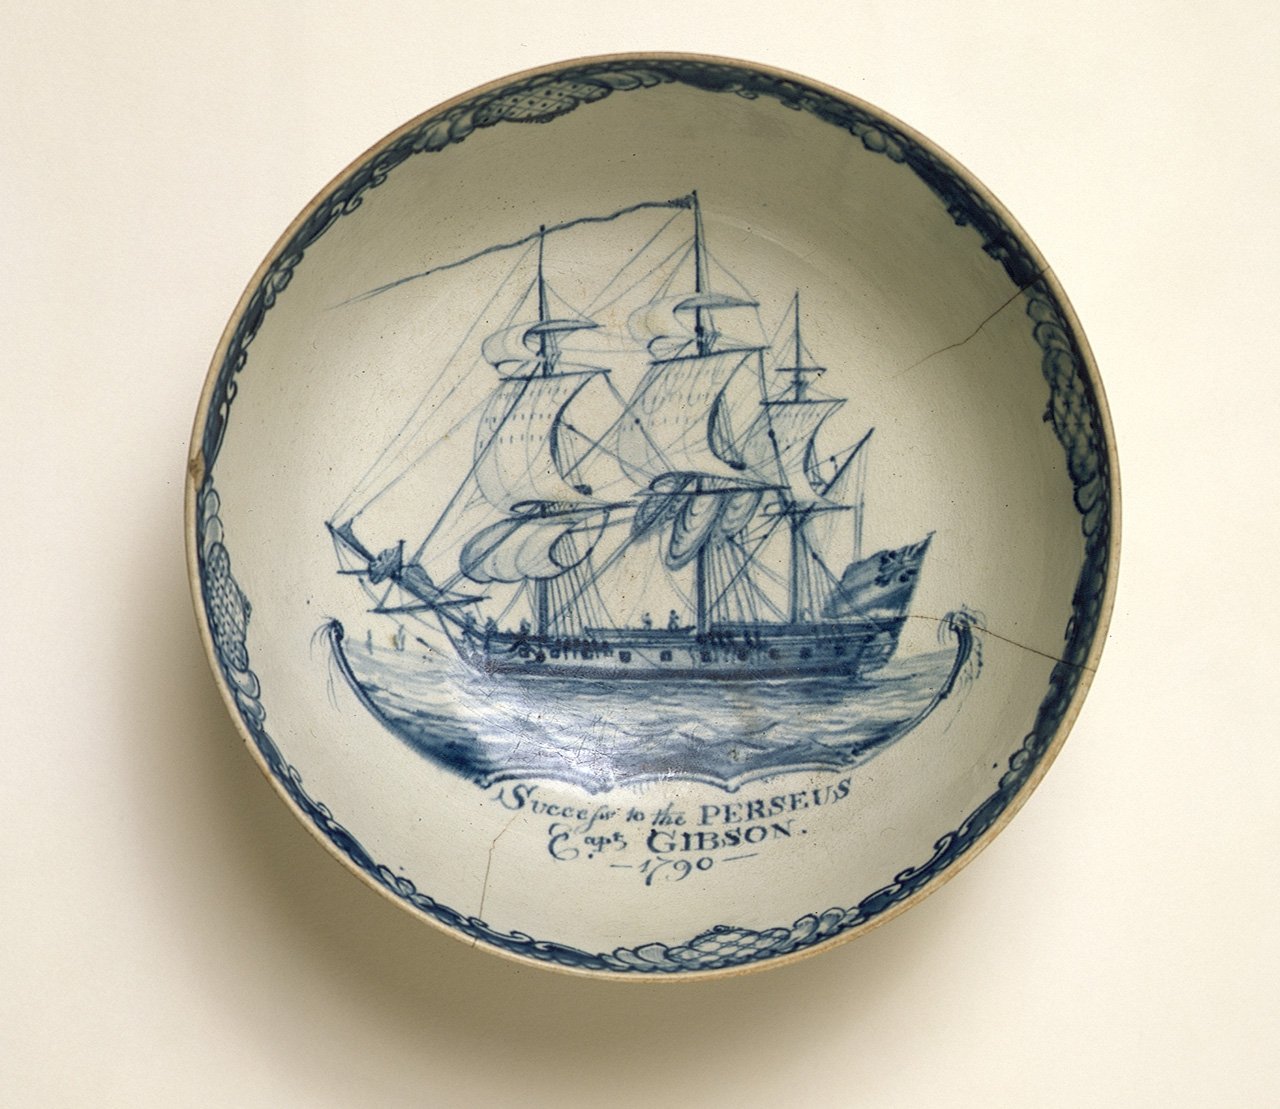
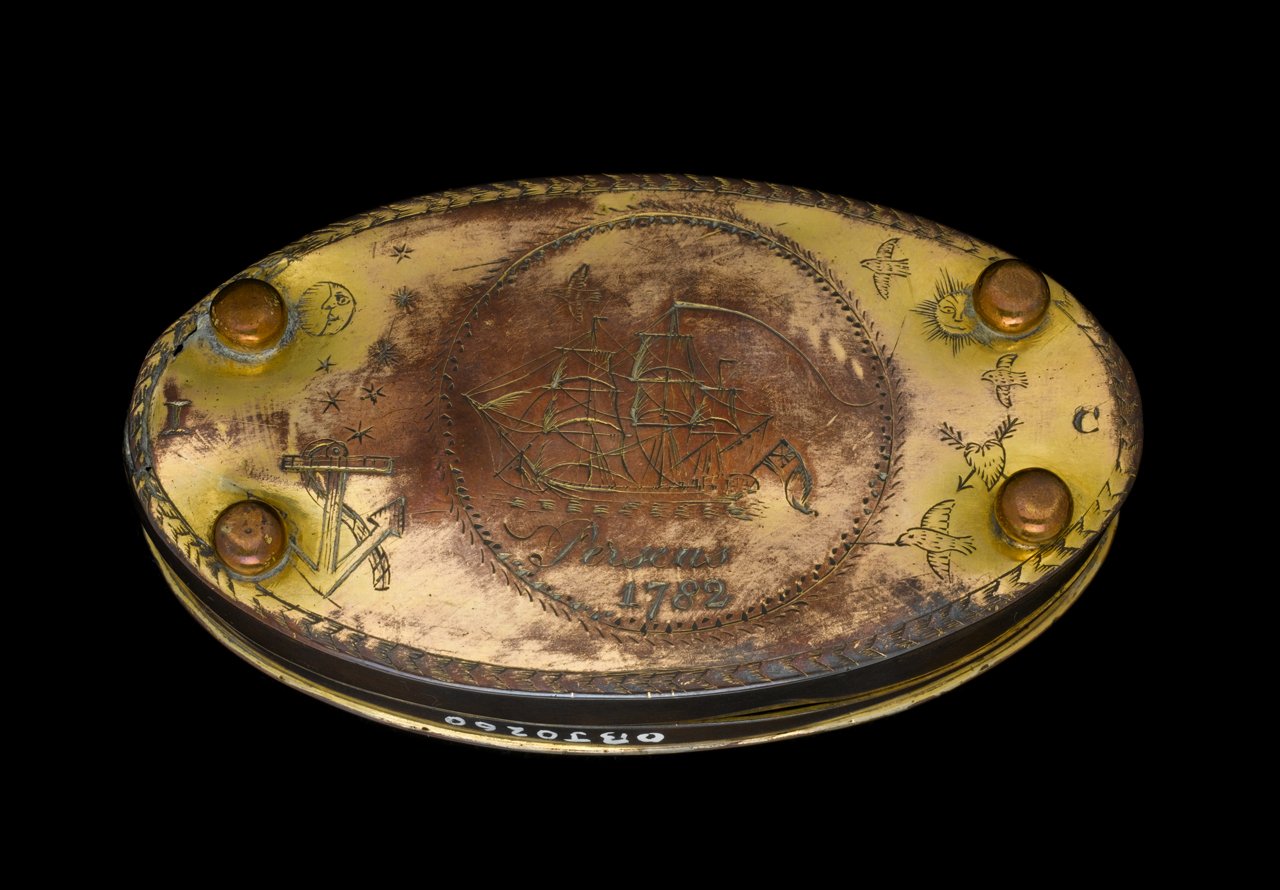
Log #7: Service History Part V - St. Alban Roy, George Palmer and John Gibson St Alban Roy St. Alban Roy was born sometime around 1731 and had a somewhat unremarkable career. He was promoted to post Captain on the 8th of July, 1782 having been given temporary command of the Cato (50) the previous month. On October 21st, 1782 he was given command of Perseus, but no significant events are recorded during his command. Perseus was paid off in March of 1783 and Roy was given command of Perseus’ sister ship Unicorn in August of that year. This was his last recorded service and he died November 1796. Tobacco Box Depicting Perseus Circa 1782 National Maritime Museum, Greenwich, London. OBJ0260. George Palmer George Palmer was born sometime around 1755 and had a successful if relatively quiet career. The vast majority of his service was in command of Perseus during the peace. He was posted captain on 18 January 1783 and briefly appointed to command the Surprise (28) before being reassigned to Perseus in July for service out of Liverpool and off Ireland. This command appears to have passed uneventfully with much of the time spent patrolling the coast. The most notable event that can be found in the logs is the loss of the ship’s cutter when a sudden storm hit while attempting to tow the Perseus. Perseus was refitted at Plymouth in 1784, and after further service off Ireland she was paid off in February 1787. In December 1791 he recommissioned the Perseus 20, going out to Jamaica in March 1792, and at the commencement of hostilities with France in 1793 he was commanding her in the Leeward Islands from where he returned almost immediately to England. At some point around this time he likely captured the American ship Active. An appeal regarding the capture was filed in 1794, but no date is given for the capture. Perseus was paid off in December 1794. Palmer saw further service on the Lion (64) and the Adventure (44) before being appointed rear Admiral on 23 April 1804. He retired having reached the rank of Admiral of the White and died on 8 September 1834 in Surrey. John Gibson There is little to no historical information available on John Gibson. He was born sometime around 1740 and was posted Captain on 23 December 1782 as commander of the Porcupine (24). His time as commander of Perseus, from 8 May 1787 to 15 March 1791, appears to be uneventful with the only recorded events being refits. As with the time under the command of George Palmer, Perseus appears to have spent this time serving in the Irish Sea and the Channel. At some point in late 1789 or early 1790, Gibson was given or had commissioned a bowl with a hand painted image of Perseus under sail. Bowl Depicting Perseus Circa 1790 National Maritime Museum, Greenwich, London. AAA4434. The bowl is notable as it contains a remarkable amount of detail. This represents one of my primary reference points for Perseus. Some notable details that can be seen include: The bulwarks on the quarterdeck are built up, but not on the forecastle. No armament can be made out on the forecastle (unless that tiny bump between the two people is a carronade), but the quarterdeck could potentially have three gunports (alternatively those marks could simply be smudges). No decorations are visible except for the figurehead. Not much detail can be made out of this, but it does appear that the left arm may be extended. There are no visible decorations on the quarter galleries or the stern, but it is impossible to definitively say if this represents their absence or just a lack of detail in the painting. The traditional lighter band above the wales is visible and appears to be larger than traditionally is visible on most depictions of similar sized RN warships of the period. In particular it is wider than the Marshall painting would suggest the band should be. The line runs above the gun ports as opposed to through them on the Marshall painting. The rigging is quite detailed and appears to show most of the principle standing lines as well as some of the running rigging.When compared to the rigging diagram for a 20 gun ship in Steel, there appears to be an extra stay above fore, main and mizzen topgallant stays. The ensign is depicted attached to an ensign staff and no boom is visible. The darker colour of the ensign compared to the sails suggests it was a red or blue ensign rather than a white one. One boat (possibly a pinnace due to its length) is visible on deck and the small bower can be seen apparently rigged to the cathead, but no sheet anchor is visible. Gibson does not appear to have had another command after Perseus and died on 30 June 1824 in Somerset. On the design side of things I had to redo a bunch of my work because I discovered a scaling issue between my different reference plans which resulted in the dimensions being slightly off. So I am still trying to adjust for this. On the research side I am still digging into the knee of the head arrangement and have managed to find at least 6 contemporary examples which likely represent English construction practices. I will do a full post on this subject once I have a firm idea in my head as to what I am going to go with for Perseus.

-
On the button pendants if you look at the diagram of the standing rigging for a 20 gun ship, steel refers to the pendants for the main, and fore topmasts as burton pendants as well as the mizzen. https://maritime.org/doc/steel/part7.php#pg235 There is nothing clear in the diagram to differentiate them.
-
Fantastic, I love it when you find these fun historical details. For me finding these sort of things is as much as part of the fun as building the model.
-
Which period are you building her from? As launched or a later date. Many of the sphinx class saw significant changes over their lifetimes, many of which I have documented. I am always happy to collaborate. My research document where I am compiling all my info is well over 200 pages at this point so if you have some specific questions regarding the ships I may very well have found something interesting. If you are still in the design phase you might want to check out my first post where I include a link to a transcription of the contract for Perseus and unicorn. I had to make some adjustments from Alex's plans because his drawings did not always line up with it.
-
What you said of rope coils is true of so many details on a model ship. Most will not notice them. That being said I do think that though people don't consciously notice them they may in the aggregate grasp the higher overall quality of the model for all those extra details. In any case as you pointed out, you will notice which is really what matters. Fantastic work.