Thukydides
-
Posts
1,363 -
Joined
-
Last visited
Content Type
Profiles
Forums
Gallery
Events
Everything posted by Thukydides
-
 I think they look great. Lots of nice details and folds to highlight and give depth to the models.
 -
It does take a bunch of them to get the hang of it. My earlier ones are not good and even now I would say 1 in 5 I have to redo. I do them as I go along as I find it easier to access the belaying point when I am tying off the line. This also spreads out doing them.
- 152 replies
-
- 1
-

-
- Flirt
- Vanguard Models
- (and 1 more)
-
1779 Frigate color scheme
Thukydides replied to tennfox's topic in Painting, finishing and weathering products and techniques
For British ships of this period it is a time of transition from the more colorful painted friezes to the simple yellow and black. This is also the period when ships start having their bottoms coppered (mass use of copper plates starts around 1776). However much of this depended on the ship in question and you might want to do some research into the specific ship. I took a quick look at threedecks.org and couldn't see much info on the protector. In general the wales and often the strake of thickstuff just above the wales were painted black. Often the planking below the wales was also painted black down to the waterline, but on some the white came all the way up to just below the wales (search on RMG for the frigate Amazon 1773). How much of this practice the American navy copied I can't say. -
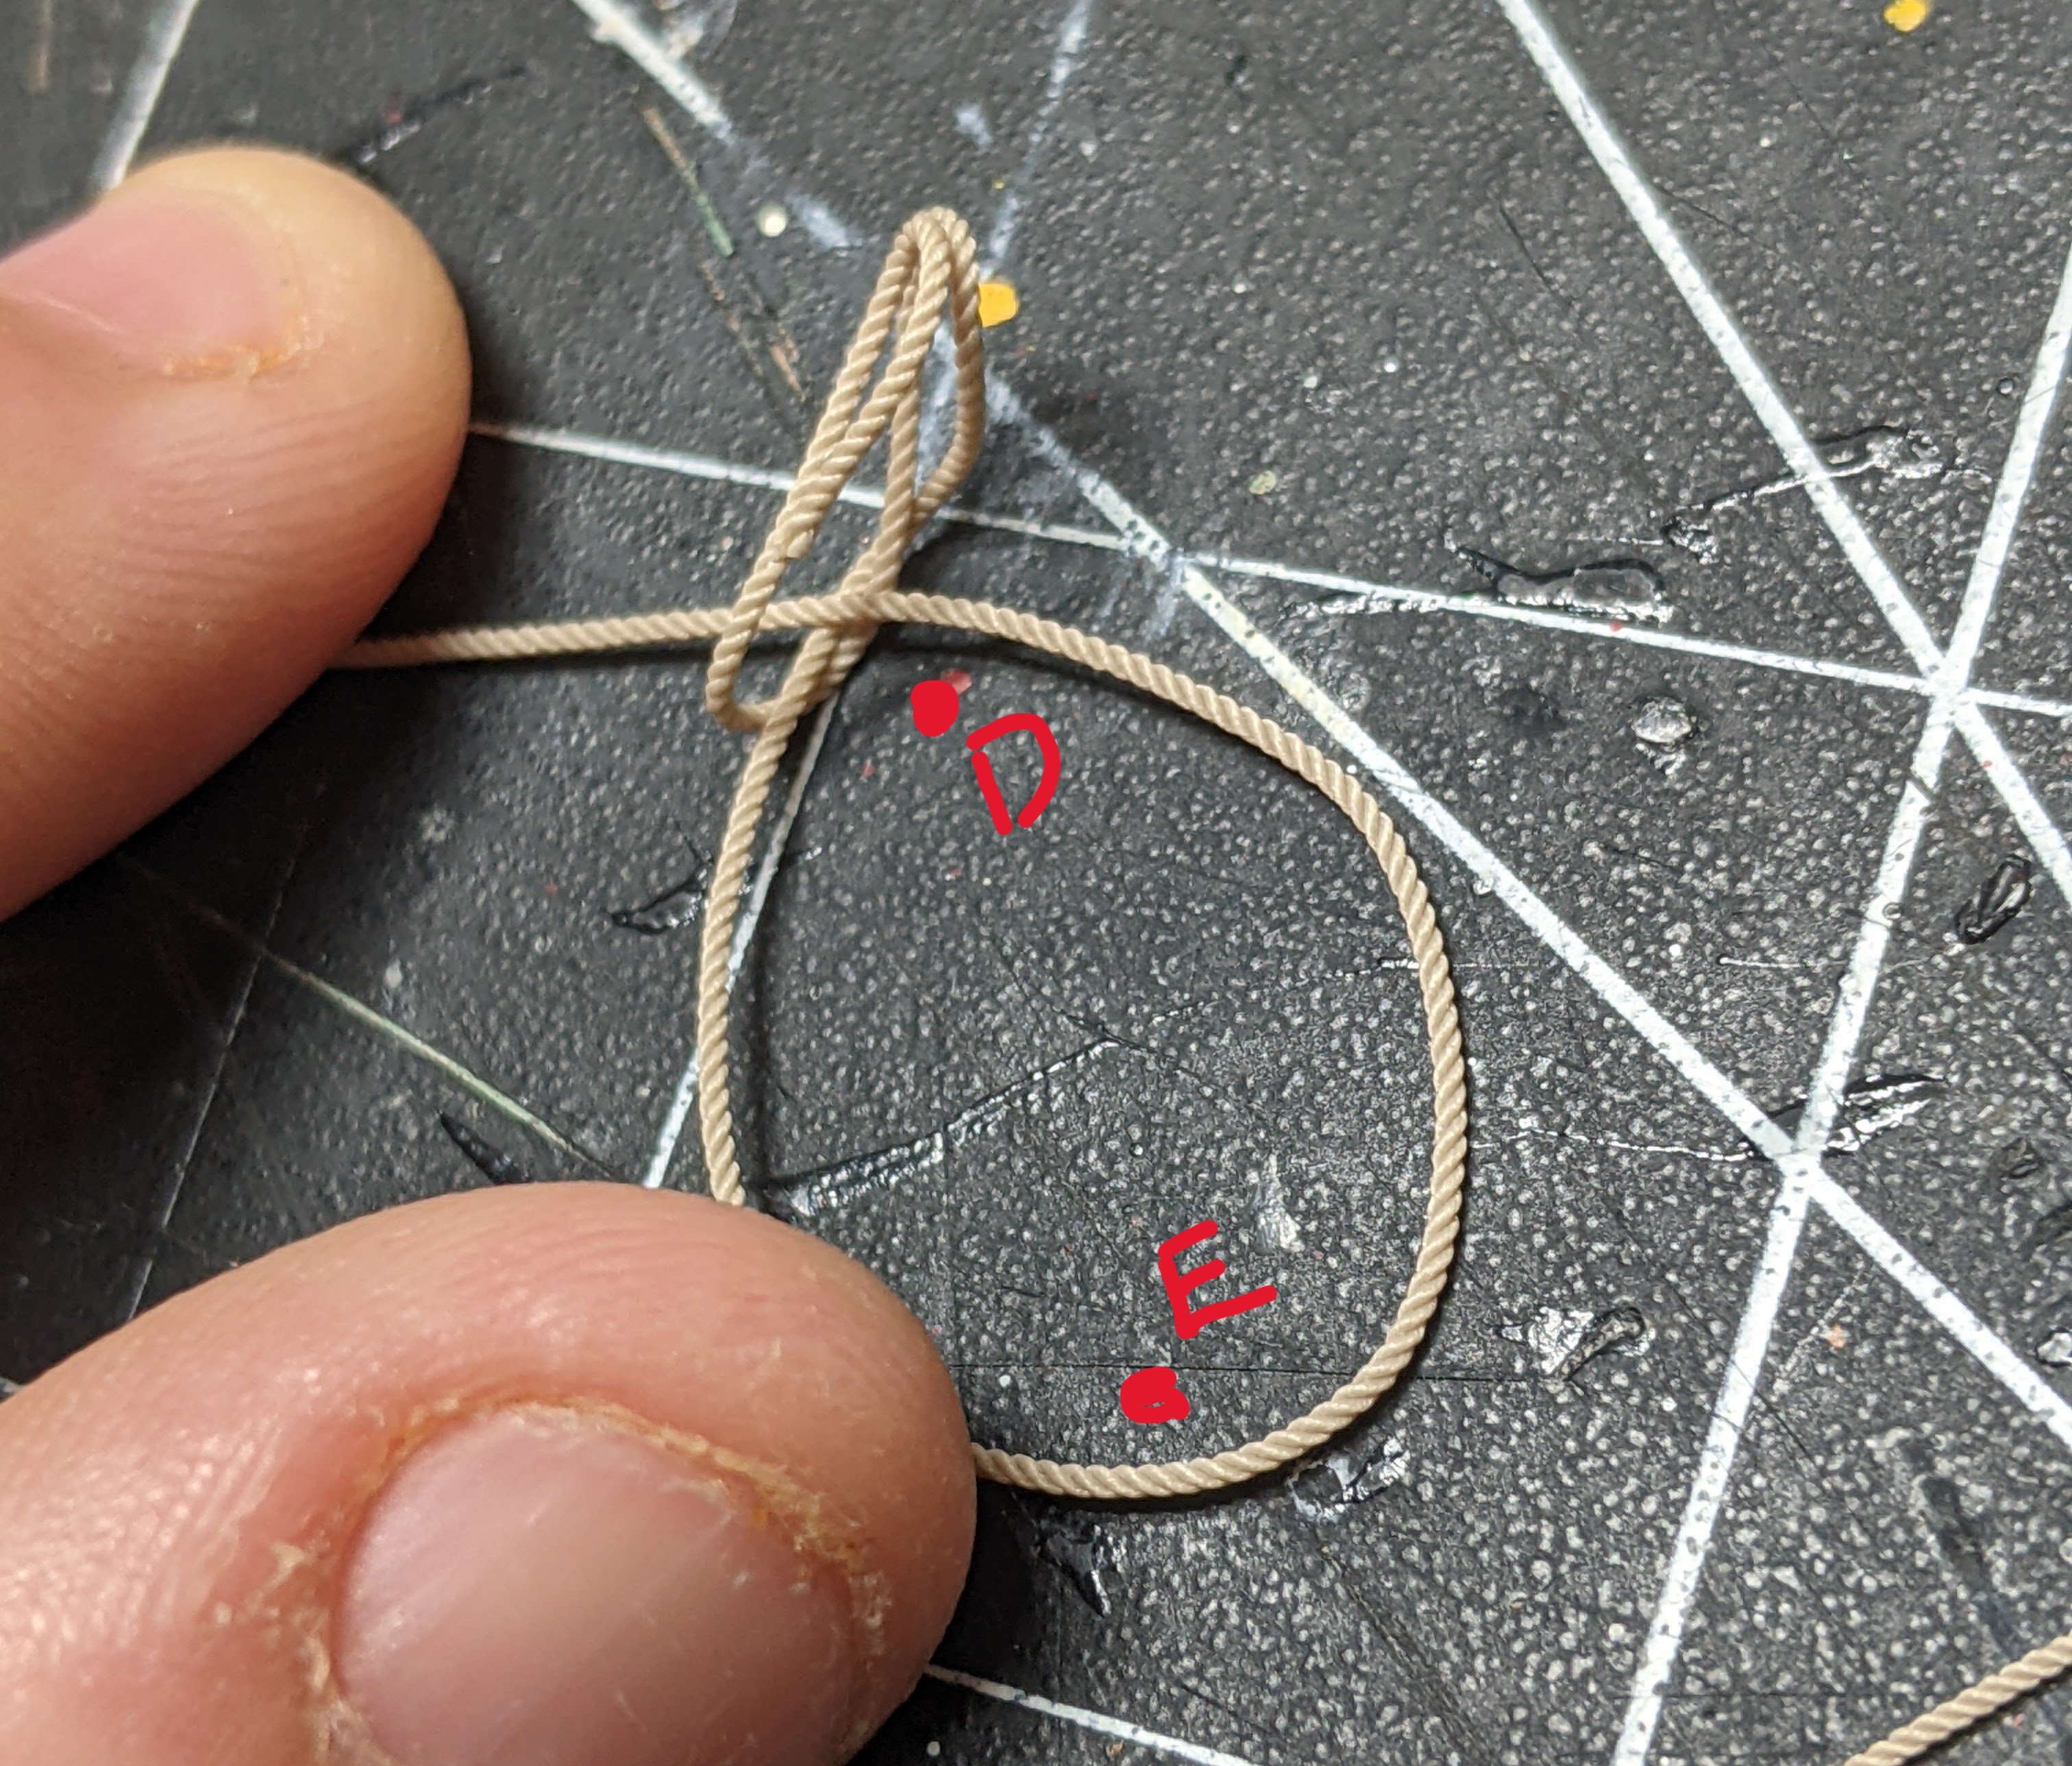
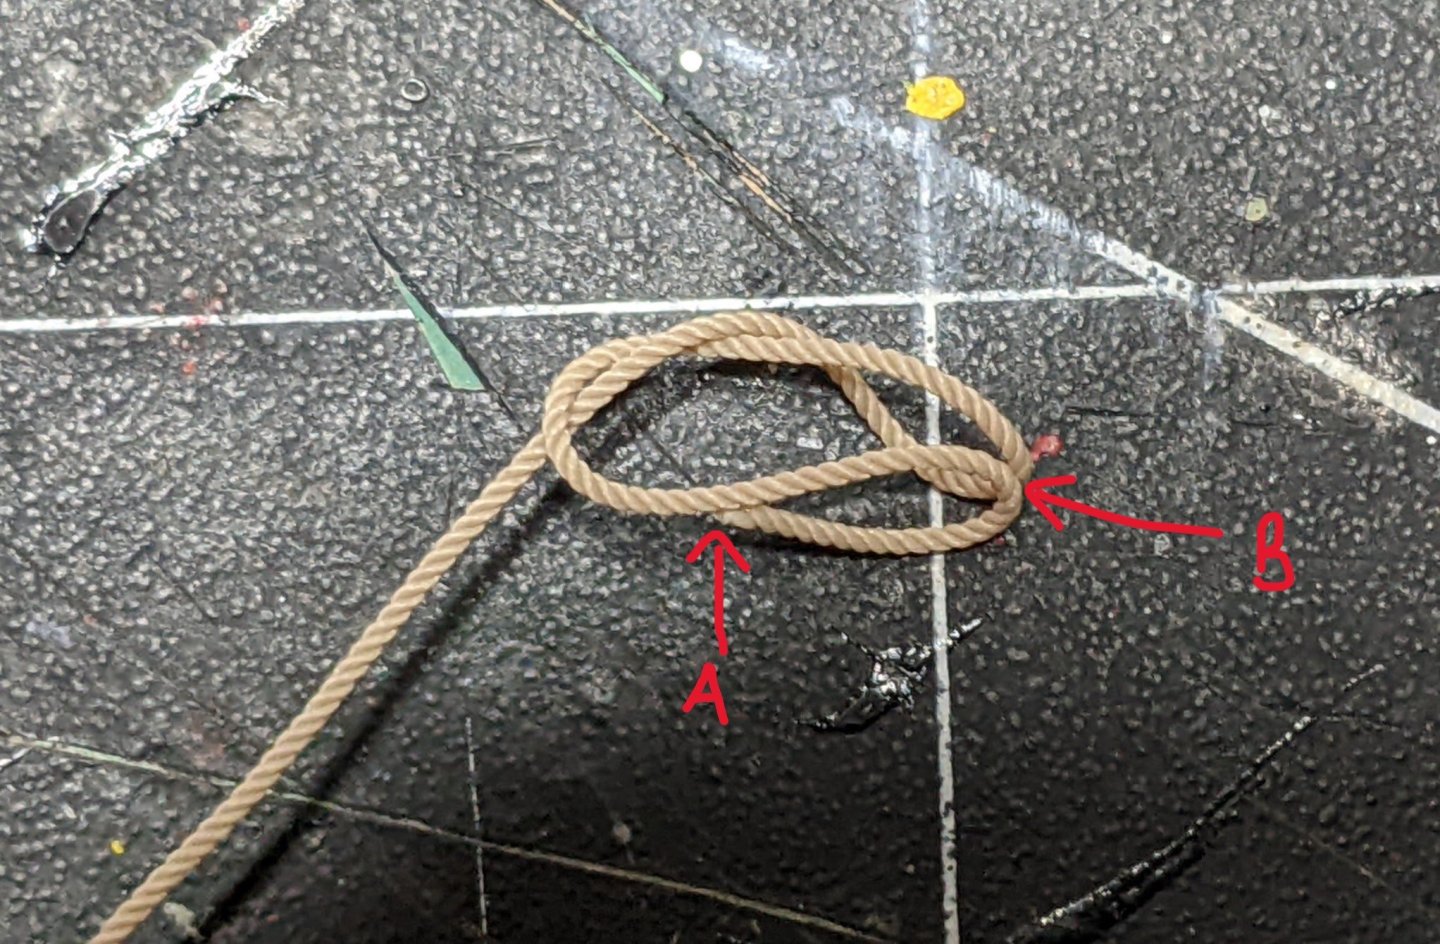
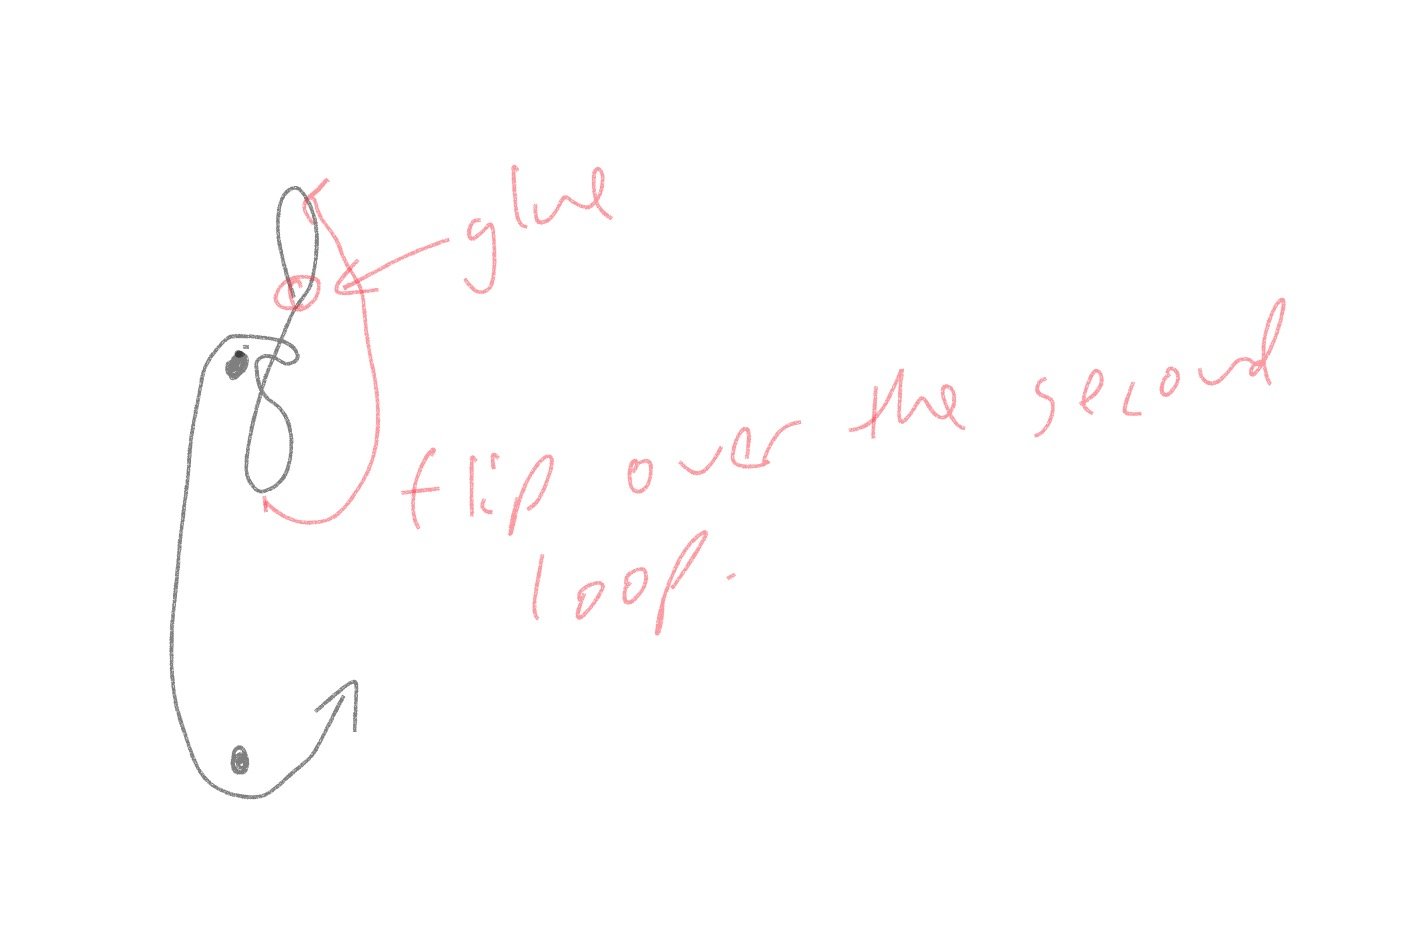
Sorry I should have been a bit more clear. I took a few more pictures to illustrate, but I think you have the idea. First I should note that I am using polyester rope and so that has dictated some of my process. If I was using natural thread I could use white glue to hold it, but that doesn't work on the polyester so I have to use super glue. If using natural thread you might want to experiment with alternative fixing agents. With regard to the super glue I use Bob Smith Medium super glue. It is pretty runny and I only use very small amounts. I really just use it to tack things in place so that they don't move until I can blast them with the hair dryer and then varnish them to fix them in place. If you use small amounts and you are careful to let it fully dry then I find it leave no visible marks other than a shininess. The matt varnish is both to take away the shininess and also to hold everything together. Note I thin the matt varnish with equal parts flow aid to make sure it goes on very thin. you don't want to have the rope looking like it has a coating over it. To apply super glue I put a bit on a yogurt container lid and then use pins I got from the dollar store to carefully apply tiny amounts precisely. These are really cheap so the moment I get much glue build up on the pins I throw them out and grab another. With regard to the actual process I have taken a couple more photos using a scrap piece of rope. You start with a length of rope cut to the approximate size you think you will need. You can see above where I have glued the first loop (A) and then flipped the second loop around and attached it to the first (B). Note that the direction of the first loop will depend on the direction you attached the line to the cleat or pin. You want this to simulate that the end at A is a continuation of your tied off line. Then you loop the rope around through the gap between the loops as many times as you want. D and E show where the pins would theoretically be. I have this upside-down in the picture as you want the glued loop to be the lower one. If you are wondering why my jig has the loops bent over the edge of the wood, that is because polyester rope is stiff and so I need to pre form the fact that the loops will not be on the same plane as the coils when it is hanging. Hope this helps.

- 152 replies
-
- 6
-
-

-
- Flirt
- Vanguard Models
- (and 1 more)
-
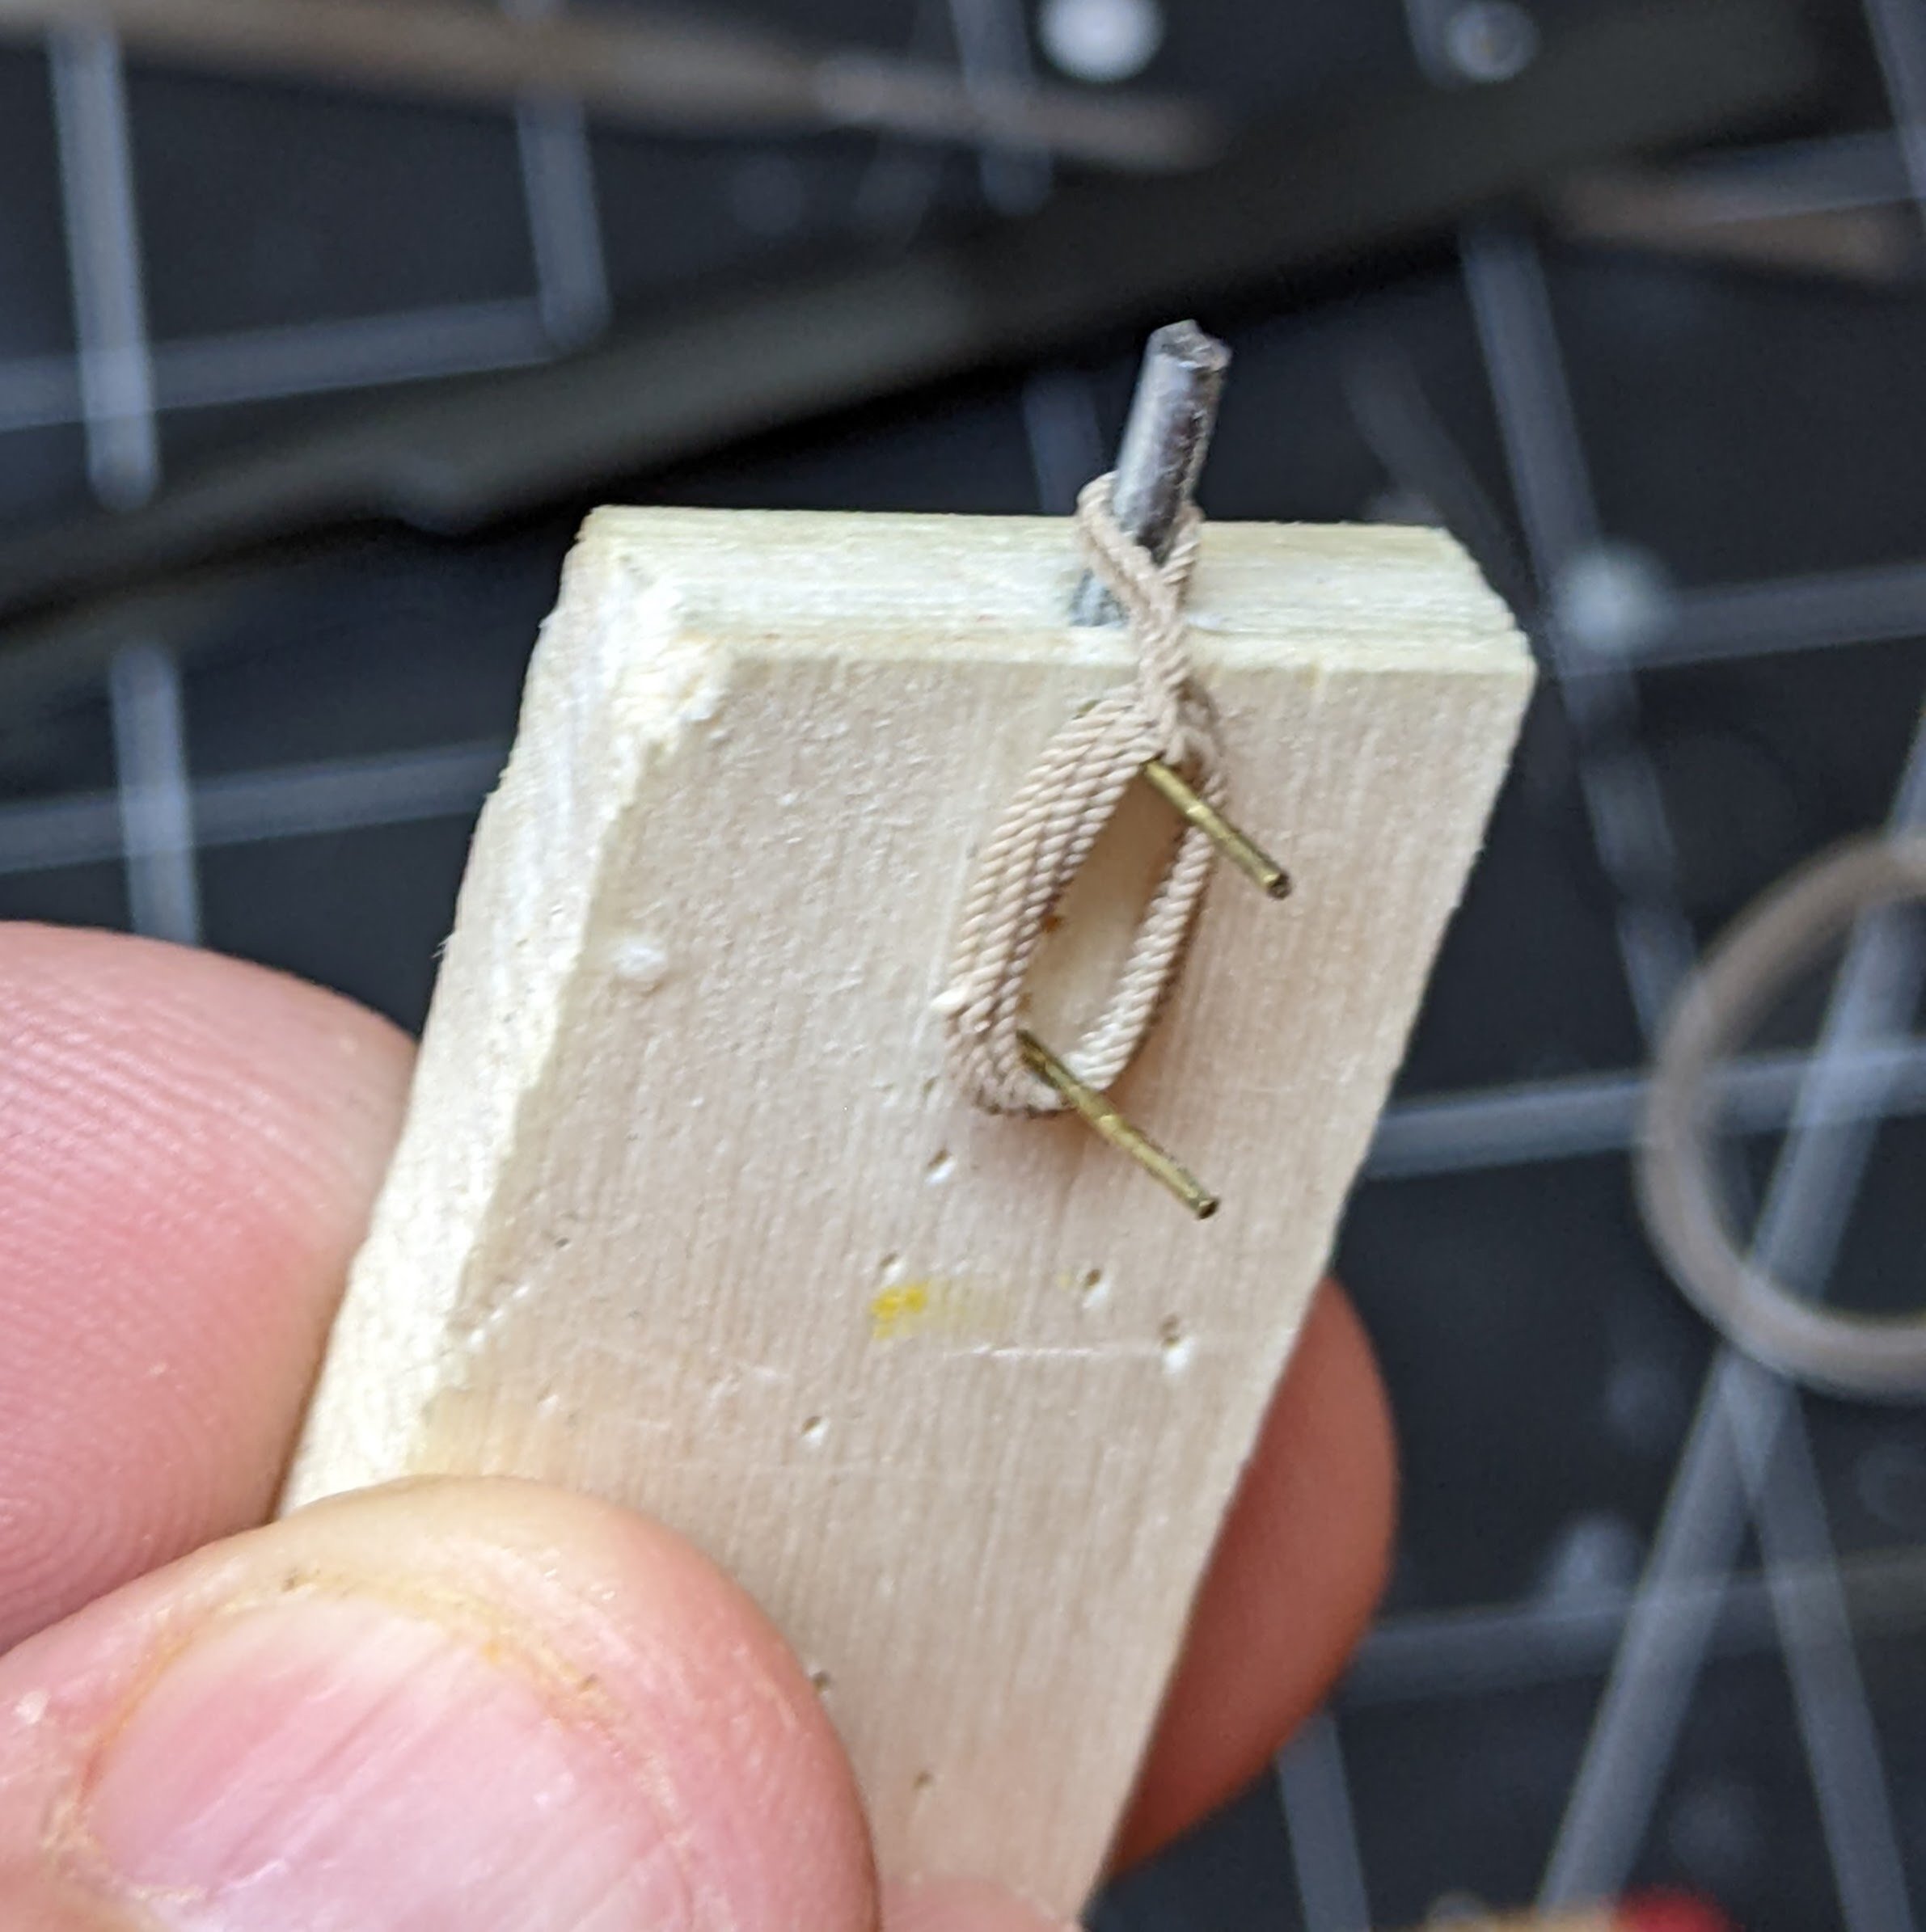
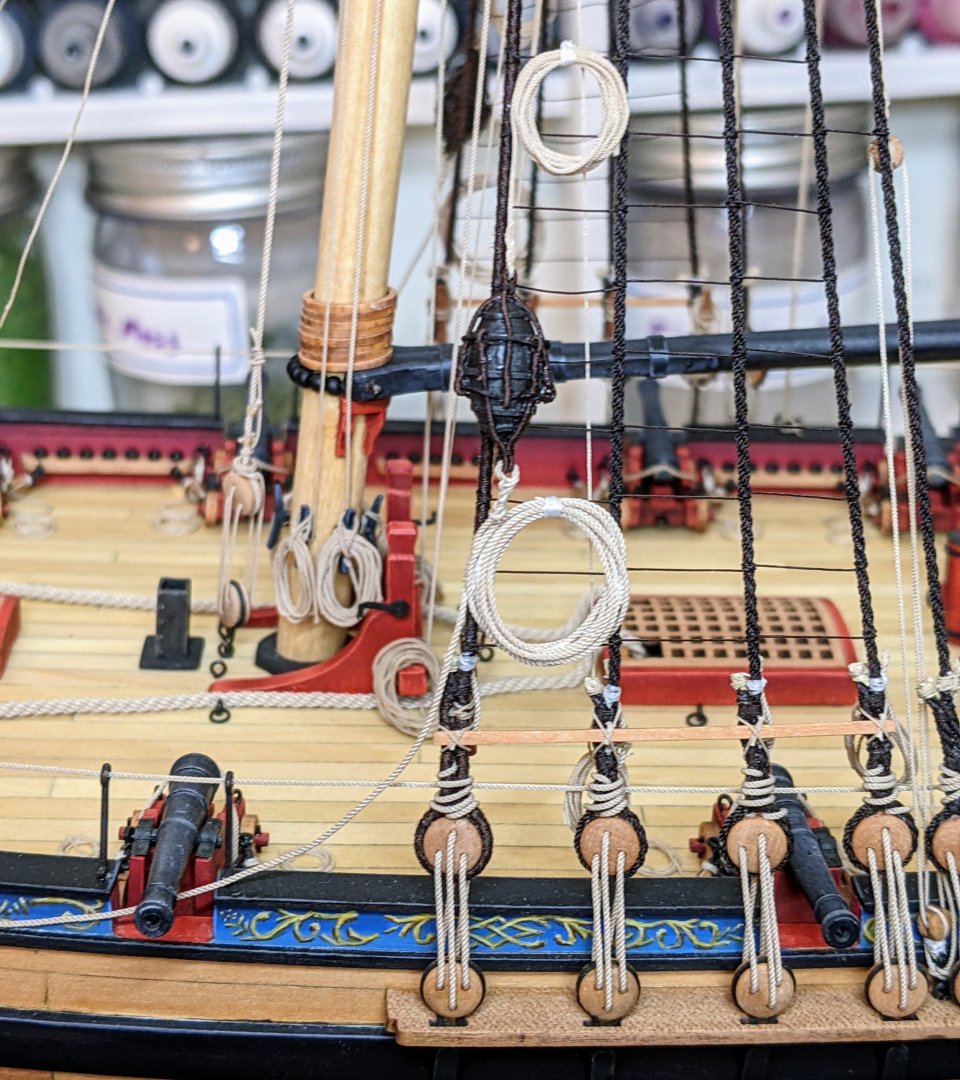
Looks great, well done. See below for a picture of the jig I have landed on after trying a bunch of different methods. The two pins you can space further apart or closer together depending on how big you want the coil to be. I start by super gluing a small loop and putting it on the large pin. Then making a loop in the remainder and twist it and flip it over on the large pin (see below crude diagram). I then loop the remaining rope around the two smaller pins slipping it in-between the two loops until I have enough turns. Finally I super glue the end of the rope against the coil to hold it in place. I then give it a blast with the hairdryer and finally coat it in diluted matt varnish to help it hold its shape. Once all dry I pull out the smaller pins and pop it off and it holds its shape.

- 152 replies
-
- 6
-
-

-
-
- Flirt
- Vanguard Models
- (and 1 more)
-
Can confirm, even the most tedious other tasks I liked at least somewhat. Ratlines were just something I needed to endure.
-
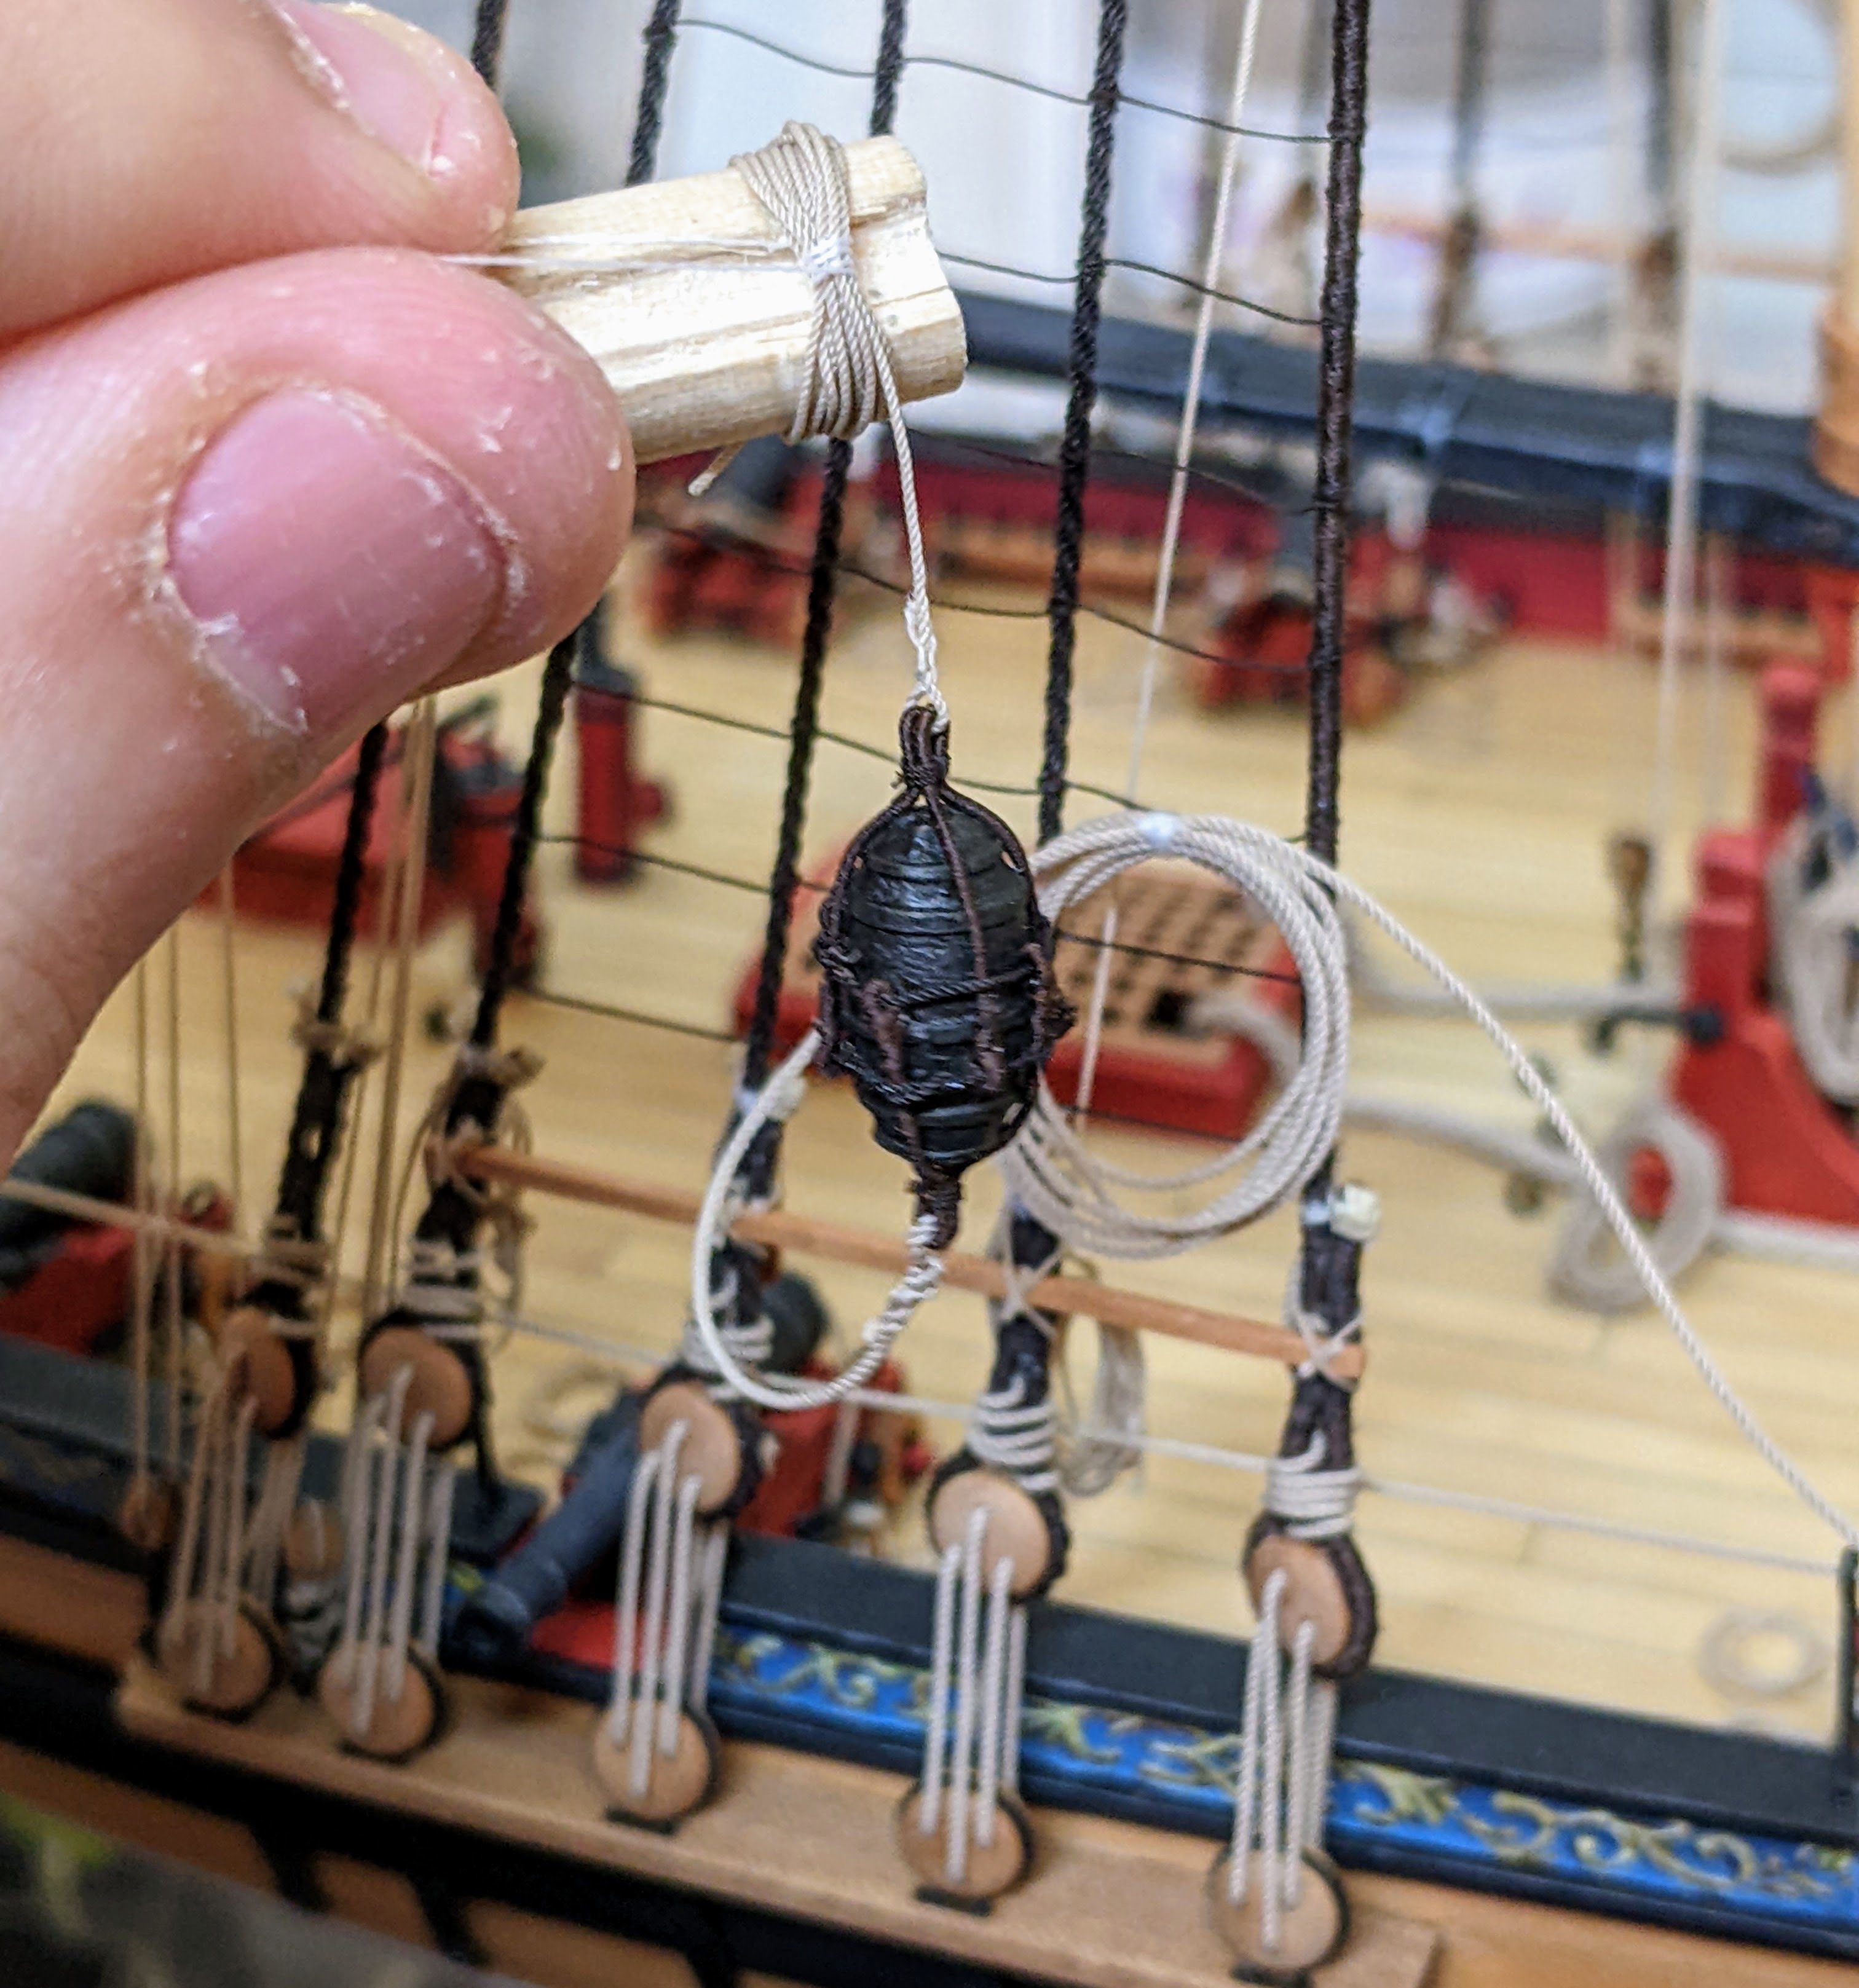
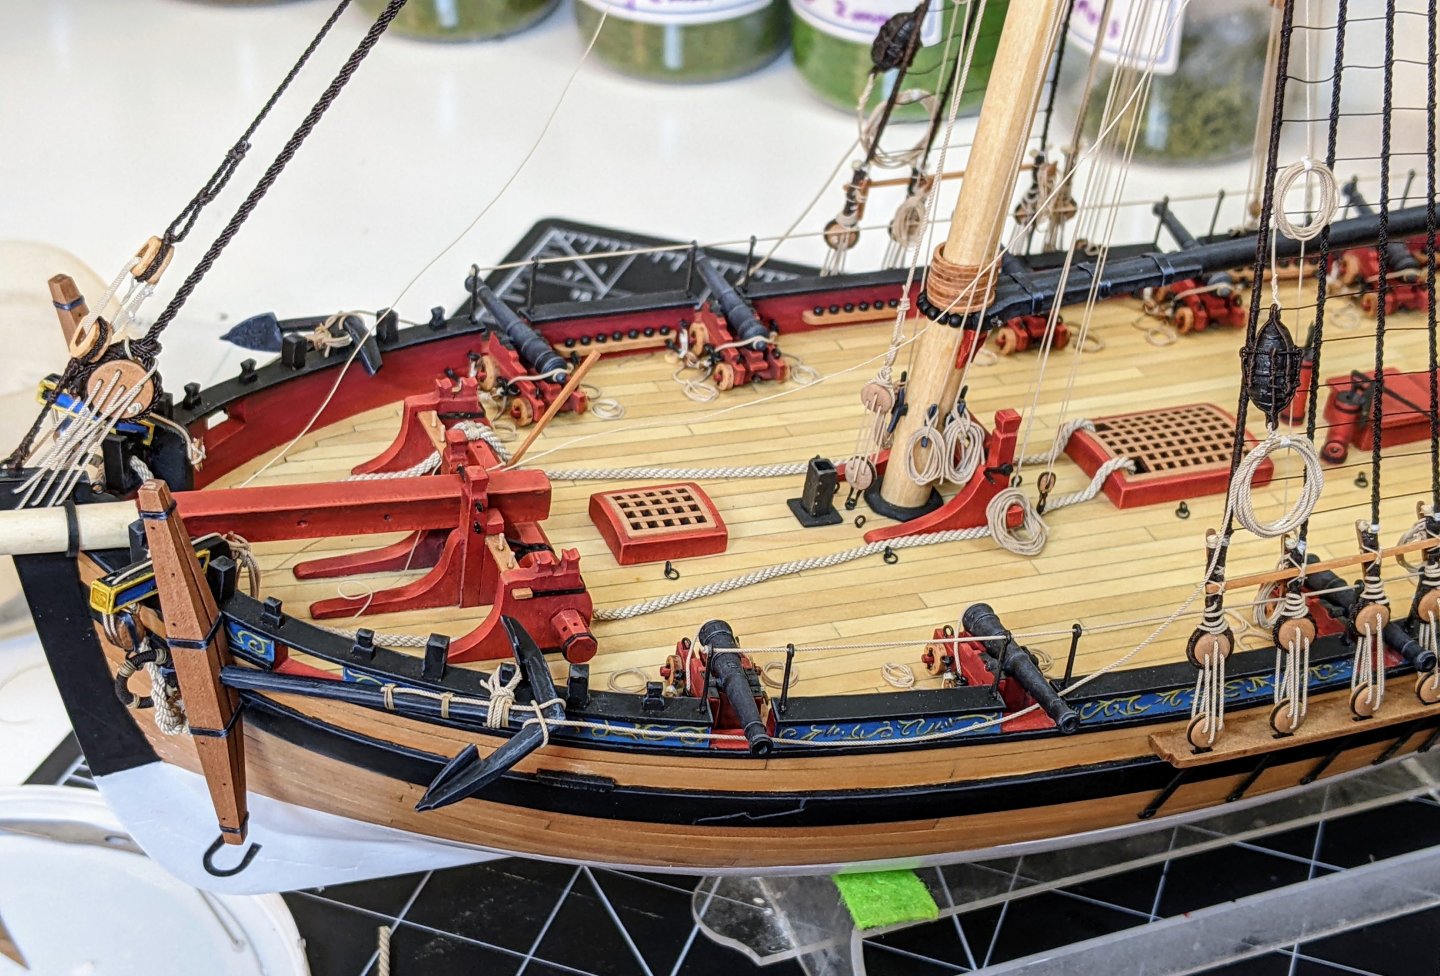
Log #88: Hoisting the Anchors Thank you to everyone for all the kind remarks. Today I finally completed work on the anchors. I don’t have many pictures in progress as nothing I am doing in this post is particularly novel and given the limited wiggle room I had it was hard to get good pictures. I will note that for the small bower I tried making the rope coils first and then attaching the anchor to the cable. For the best bower I tried it the other way round. You can see below a picture in progress where I have attached the coil for the buoy rope while the coil for the lanyard is in progress. I am still not sure which method was better as they both had their advantages and disadvantages. For the shank painters I used 0.5mm rope and just secured the anchors to a timberhead. The coils are simply glued to the shrouds. I though about trying to actually tie them, but it was much easier to tie the coil first and you would have to look very closely to notice. The sizing for the cable was 0.25mm rope and though it is hard to see from the picture I followed the method of securing the cable to the anchors as depicted by Lees. And here is the final result from above. Now the anchors are out of the way I can move on to finishing the final mainmast lines and then it is on to the bowsprit.

- 562 replies
-
- 27
-
-
-
- vanguard models
- alert
- (and 2 more)
-
Indeed she is looking good Glenn, Alert looks so small in the background :).
-
If it was me I would do it again, as every time I have failed to go back and fix something I have regretted it, but in the end it is you who will look at it the most so the question is how much does it bother you. These sort of problems are hard as it is not just a small simple fix. Whatever you decide she is look good. Those 24 pdrs at the front are very imposing.
- 146 replies
-
- 7
-
-
- Adder
- Vanguard Models
- (and 1 more)
-
In general you want to work inside out. Always be thinking about how a line will impact your ability to do others and order them correspondingly. However, as @wvdhee noted in the end this is more about making it easier than a hard and fast rule.
- 152 replies
-
- 3
-
-
- Flirt
- Vanguard Models
- (and 1 more)
-
Fantastic work, I am really enjoying watching your progress.
-
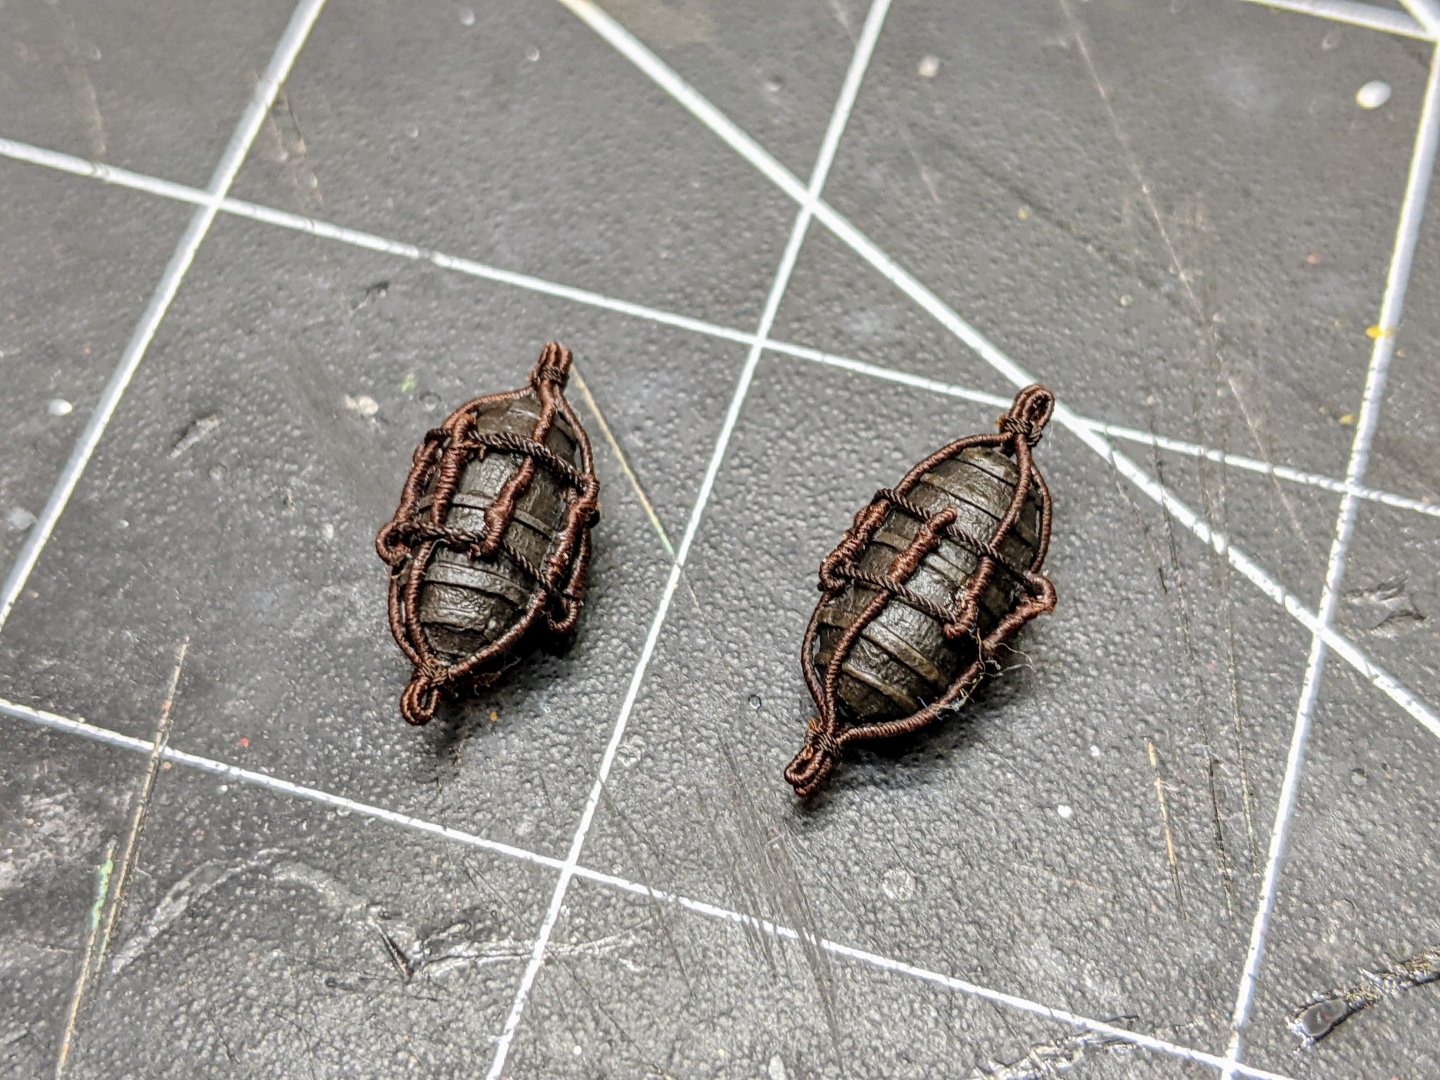
To be honest I am not sure and couldn't find any good answers on this. Lees depicts the buoy with these bands in his illustration and Goodwin does the same in his Alert book. Steel calls them buoy hoops on p167. So you may very well be right, I didn't find many other models depicting them and so almost didn't include them. One thing I forgot to mention in my post which confused me is that steel says the buoy hoops (the ropes in this case) were wormed and served in merchant service, but not in the RN. This seemed a bit odd to me as I would have thought it would be the other way round. Does anyone know why this might have been. It seems odd to serve the slings, but not the hoops.
- 562 replies
-
- 2
-
-
- vanguard models
- alert
- (and 2 more)
-
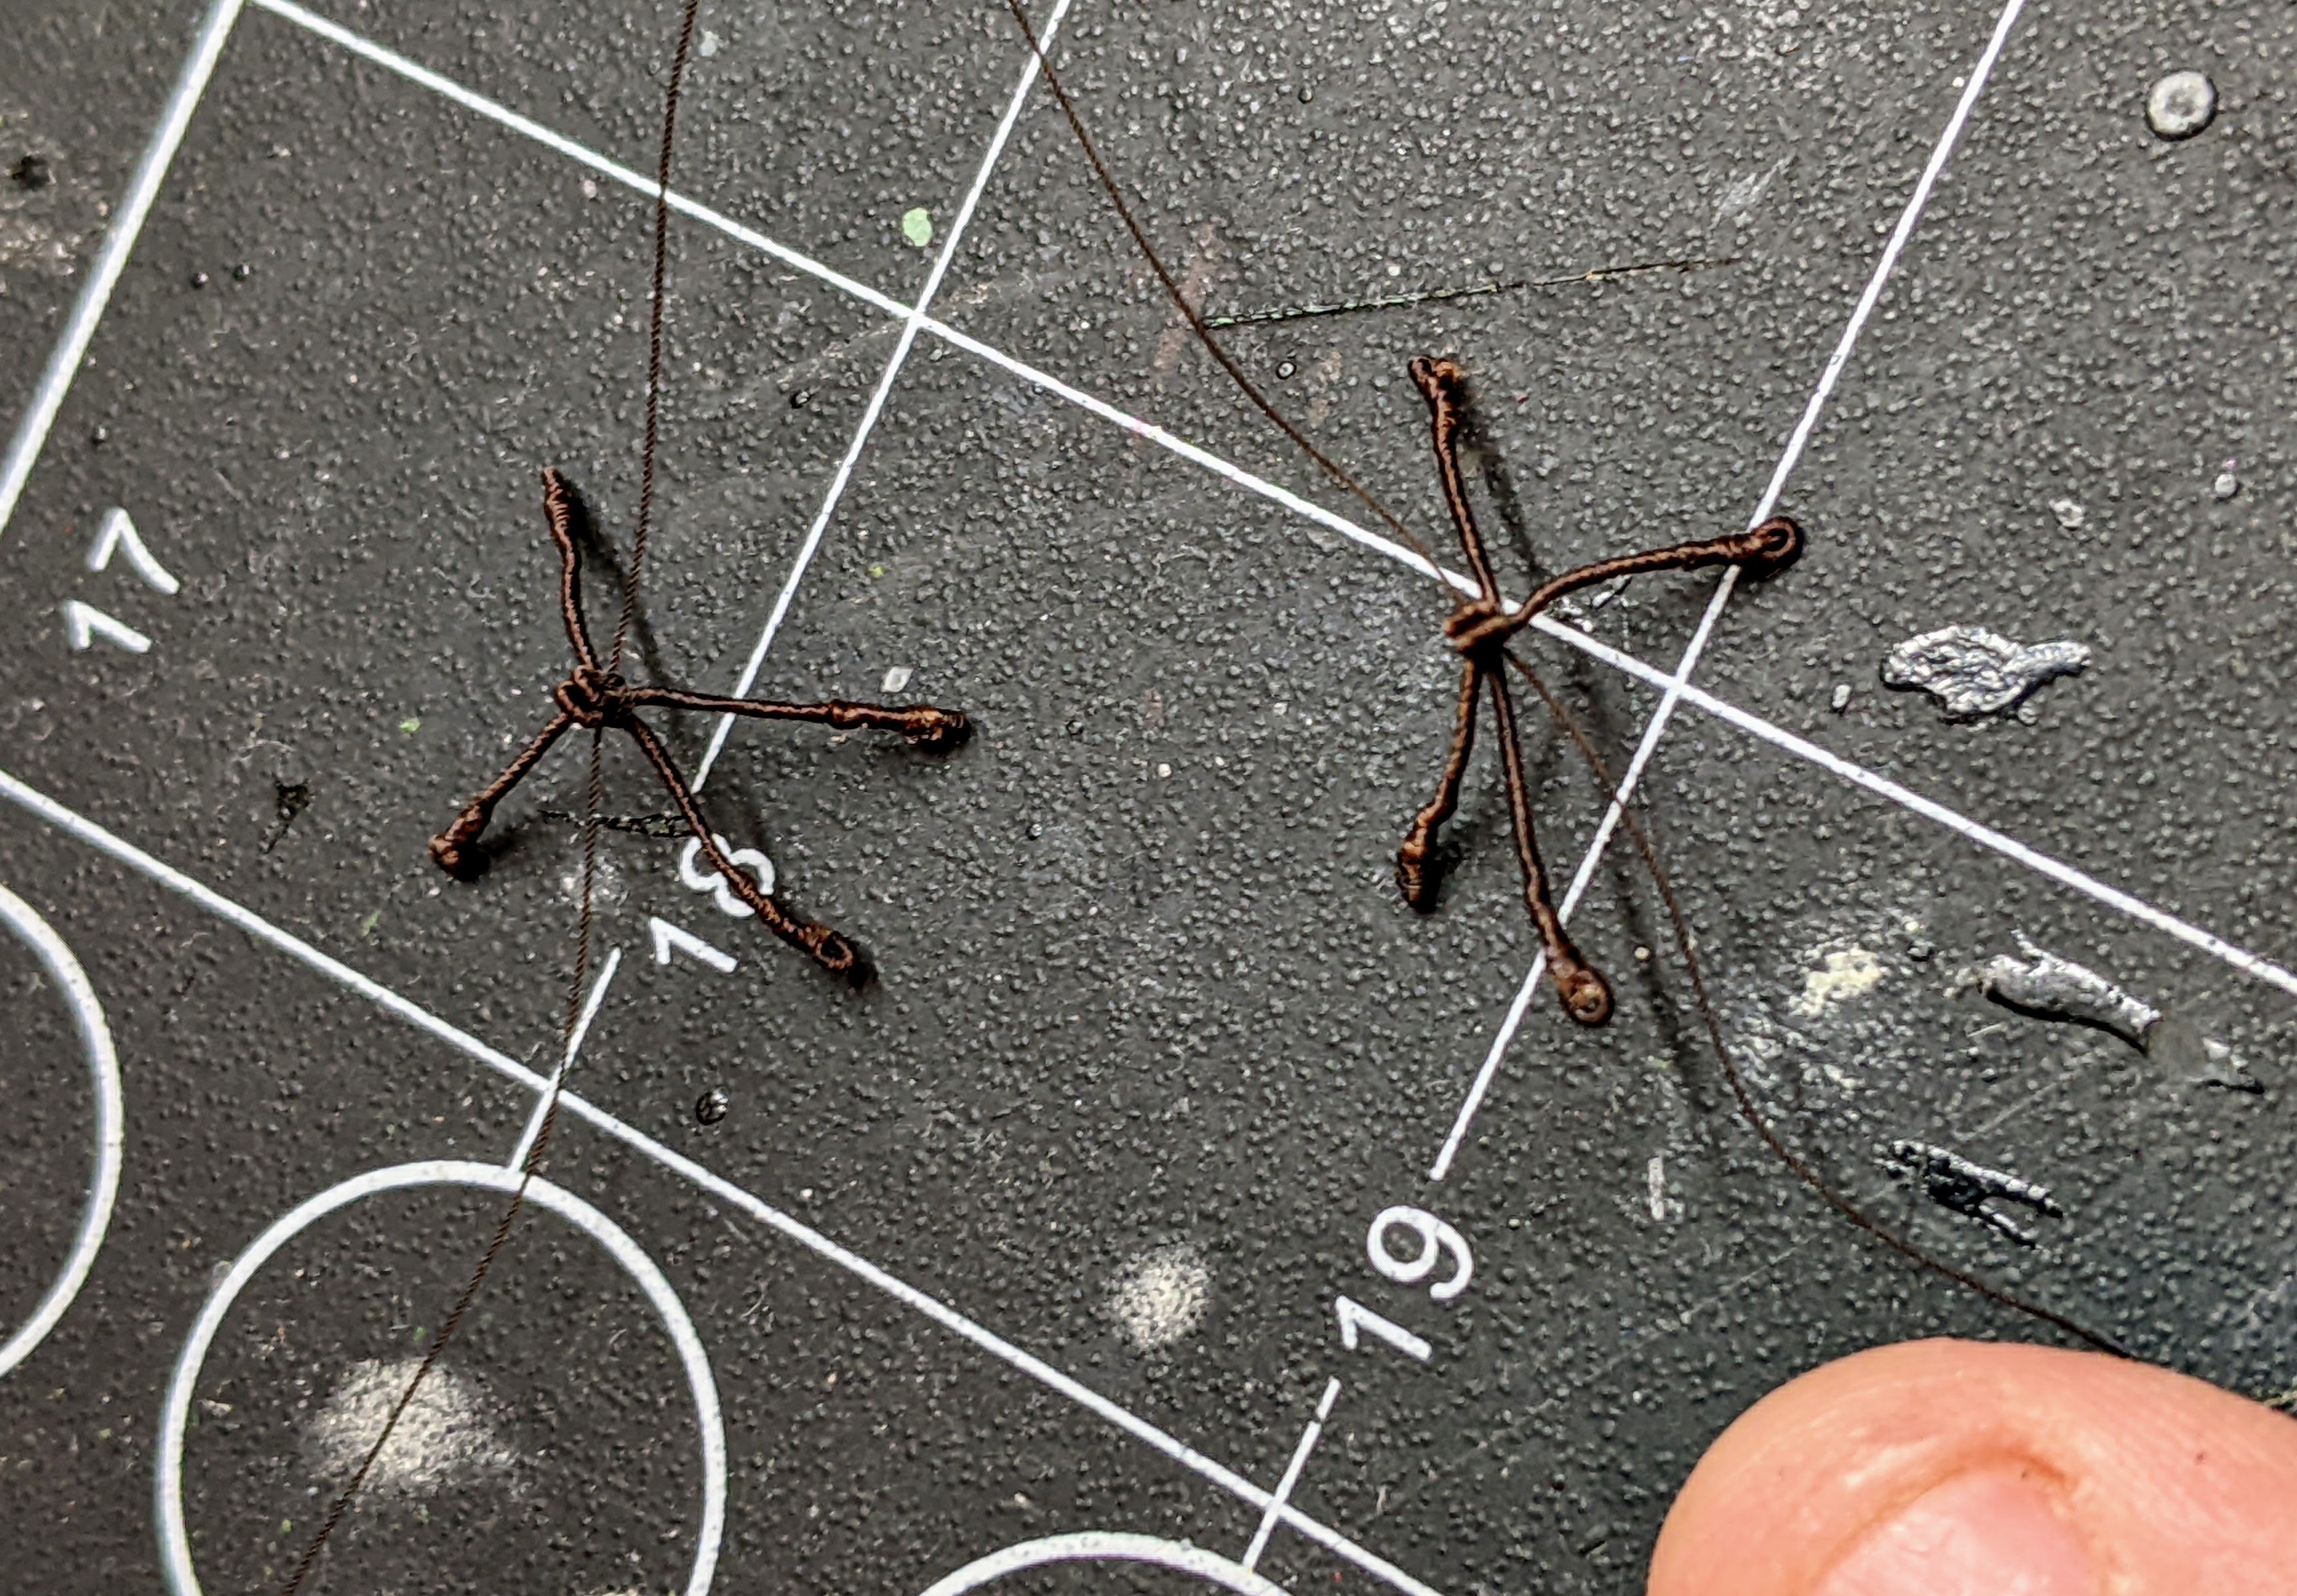
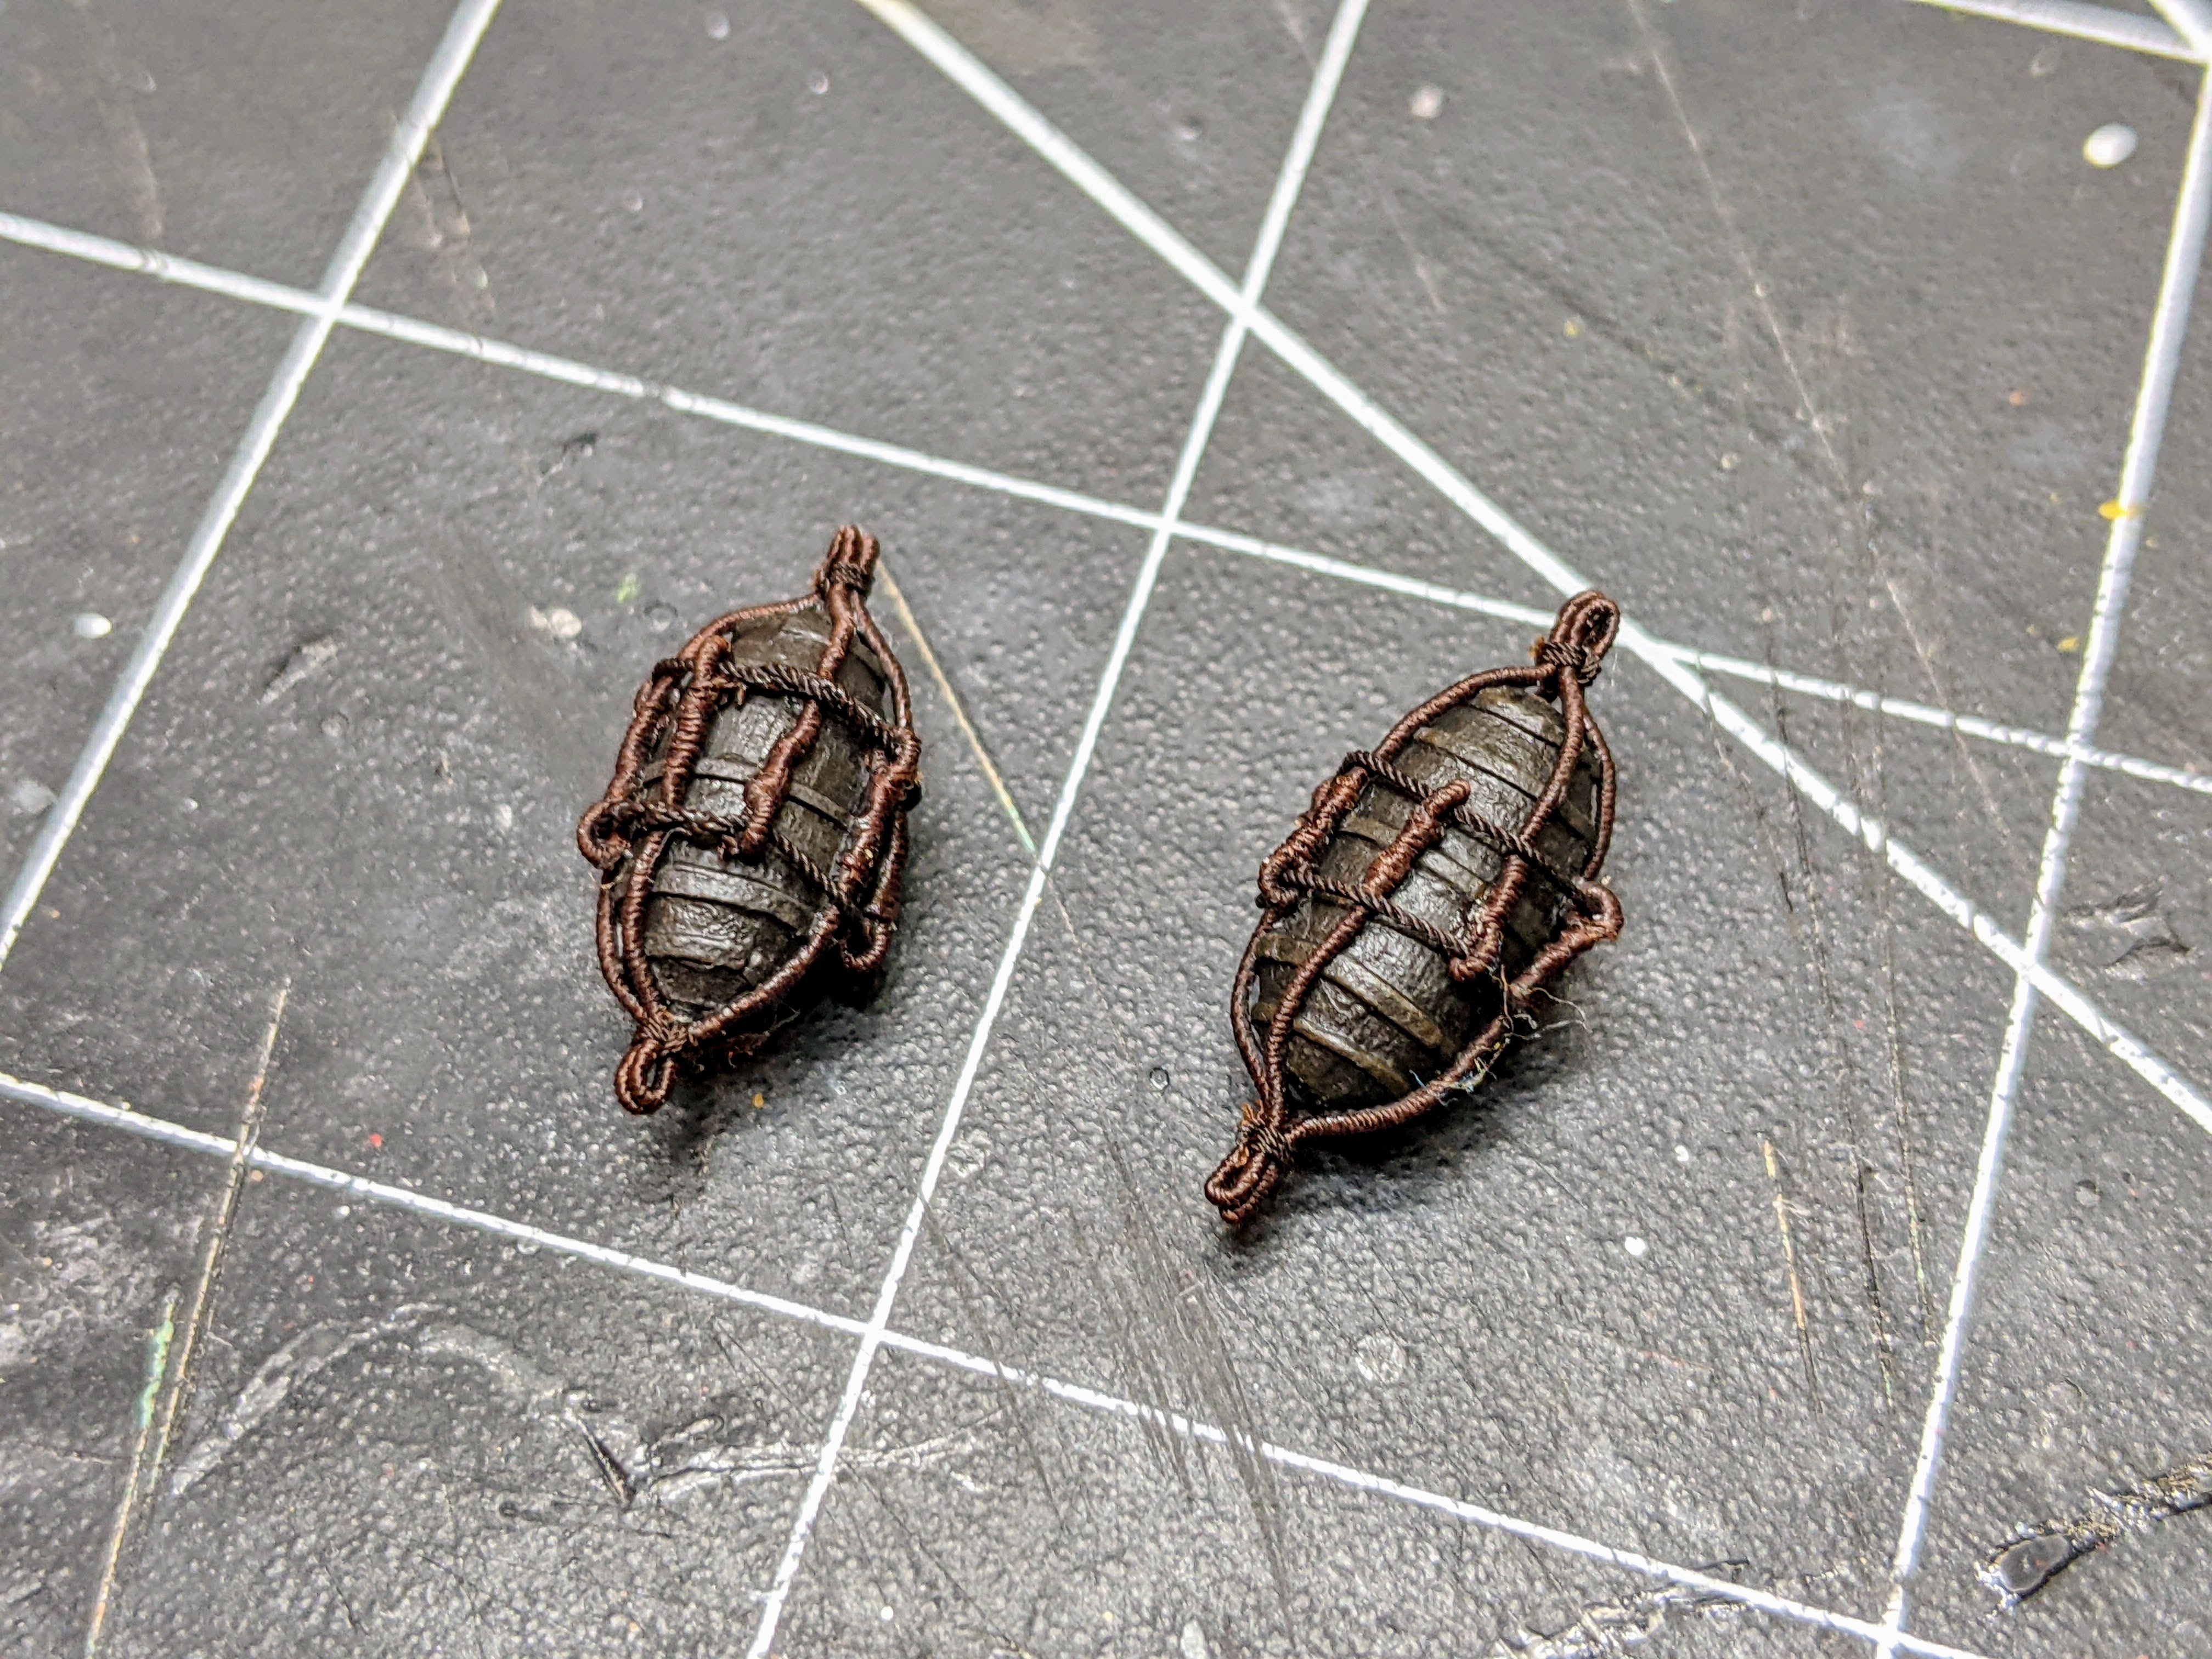
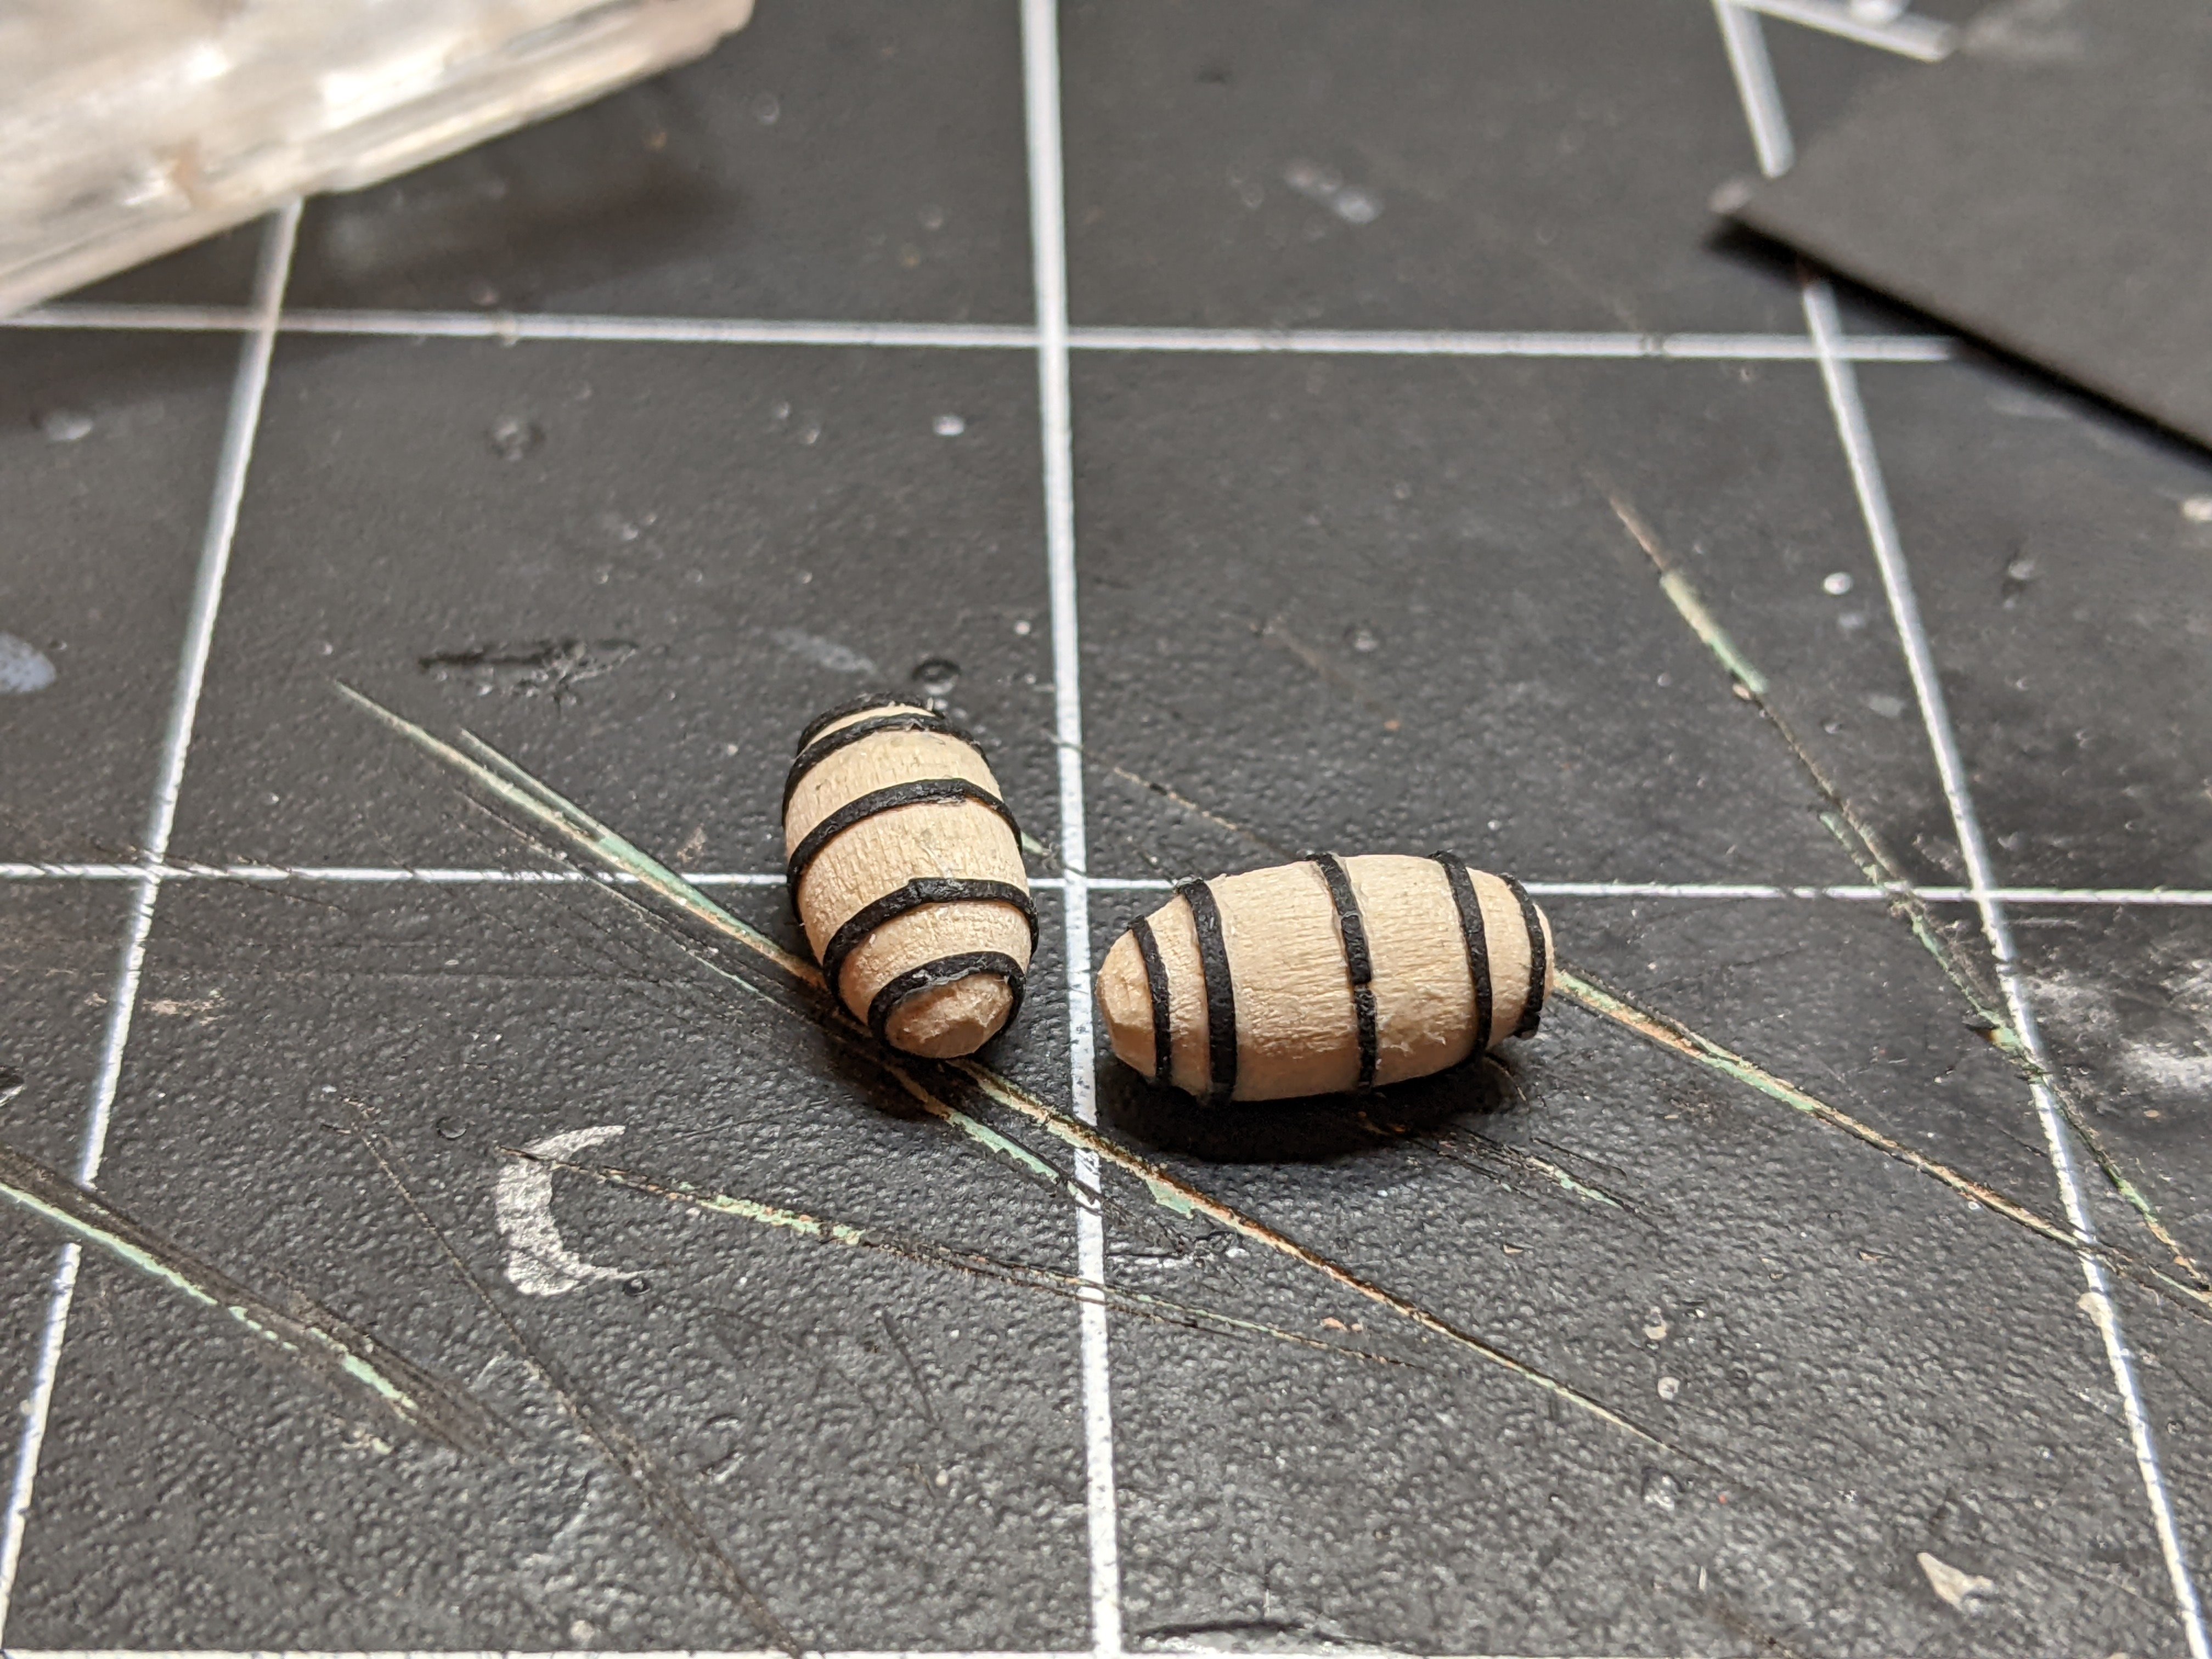
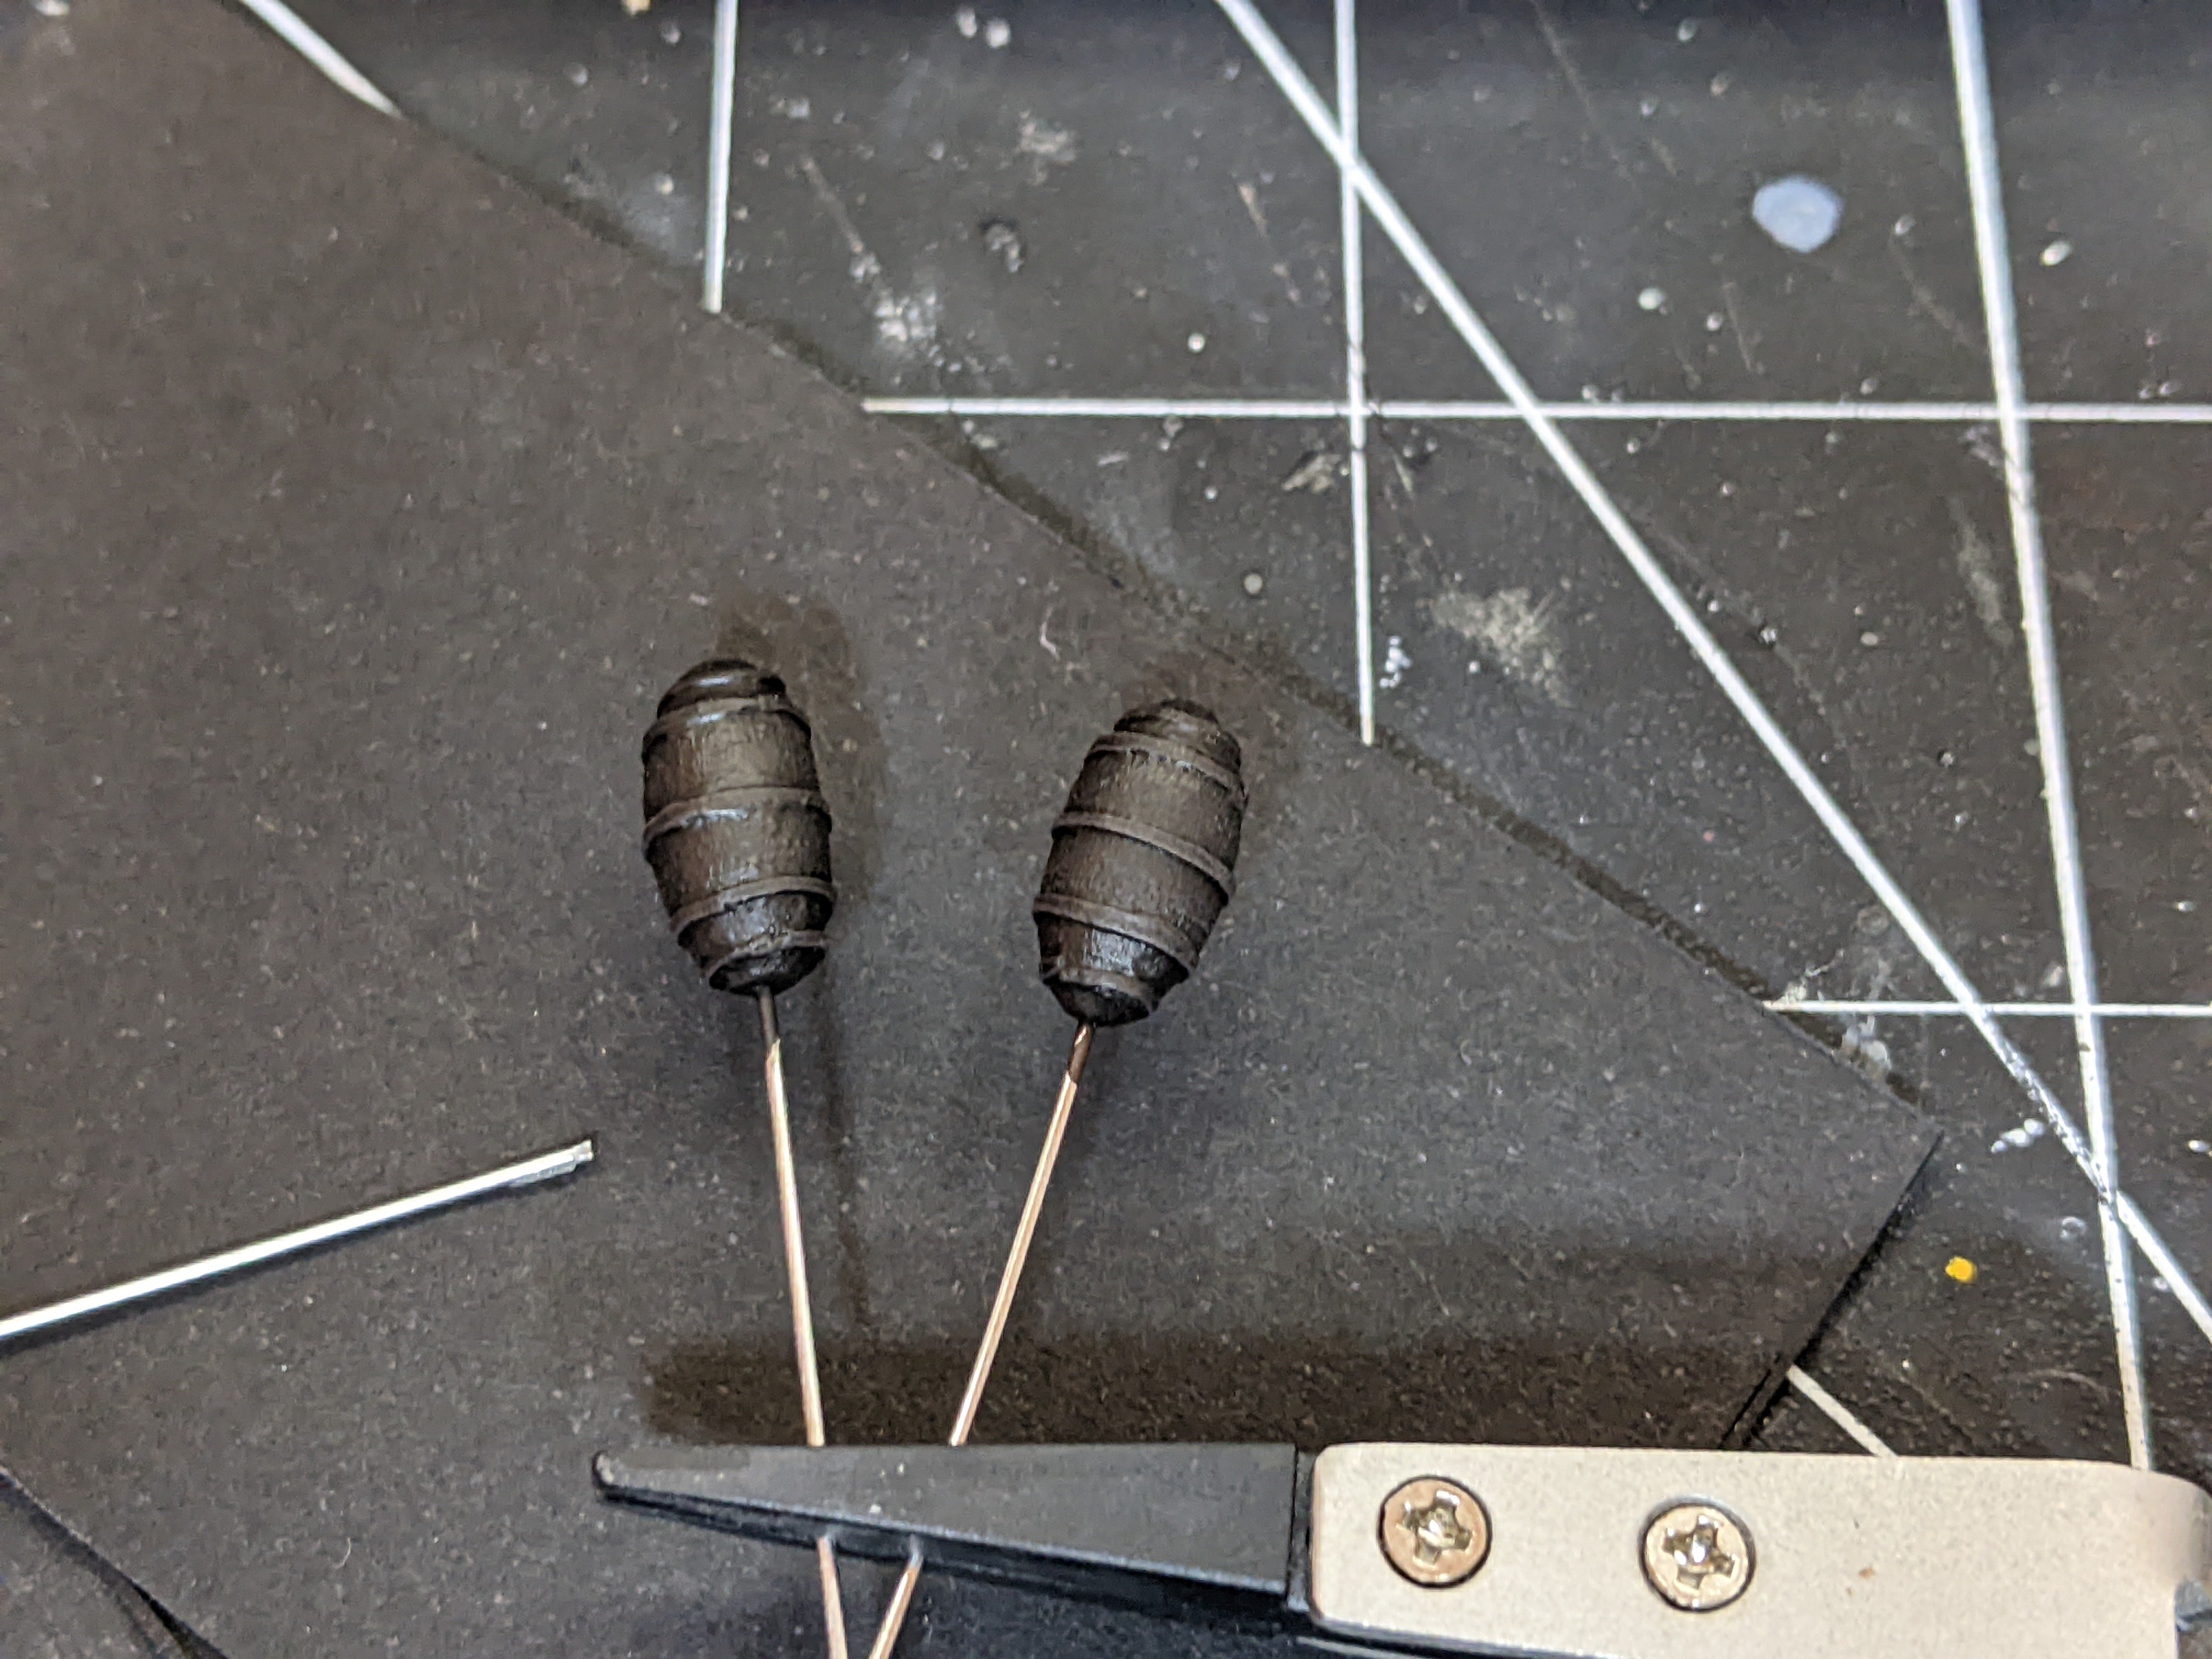
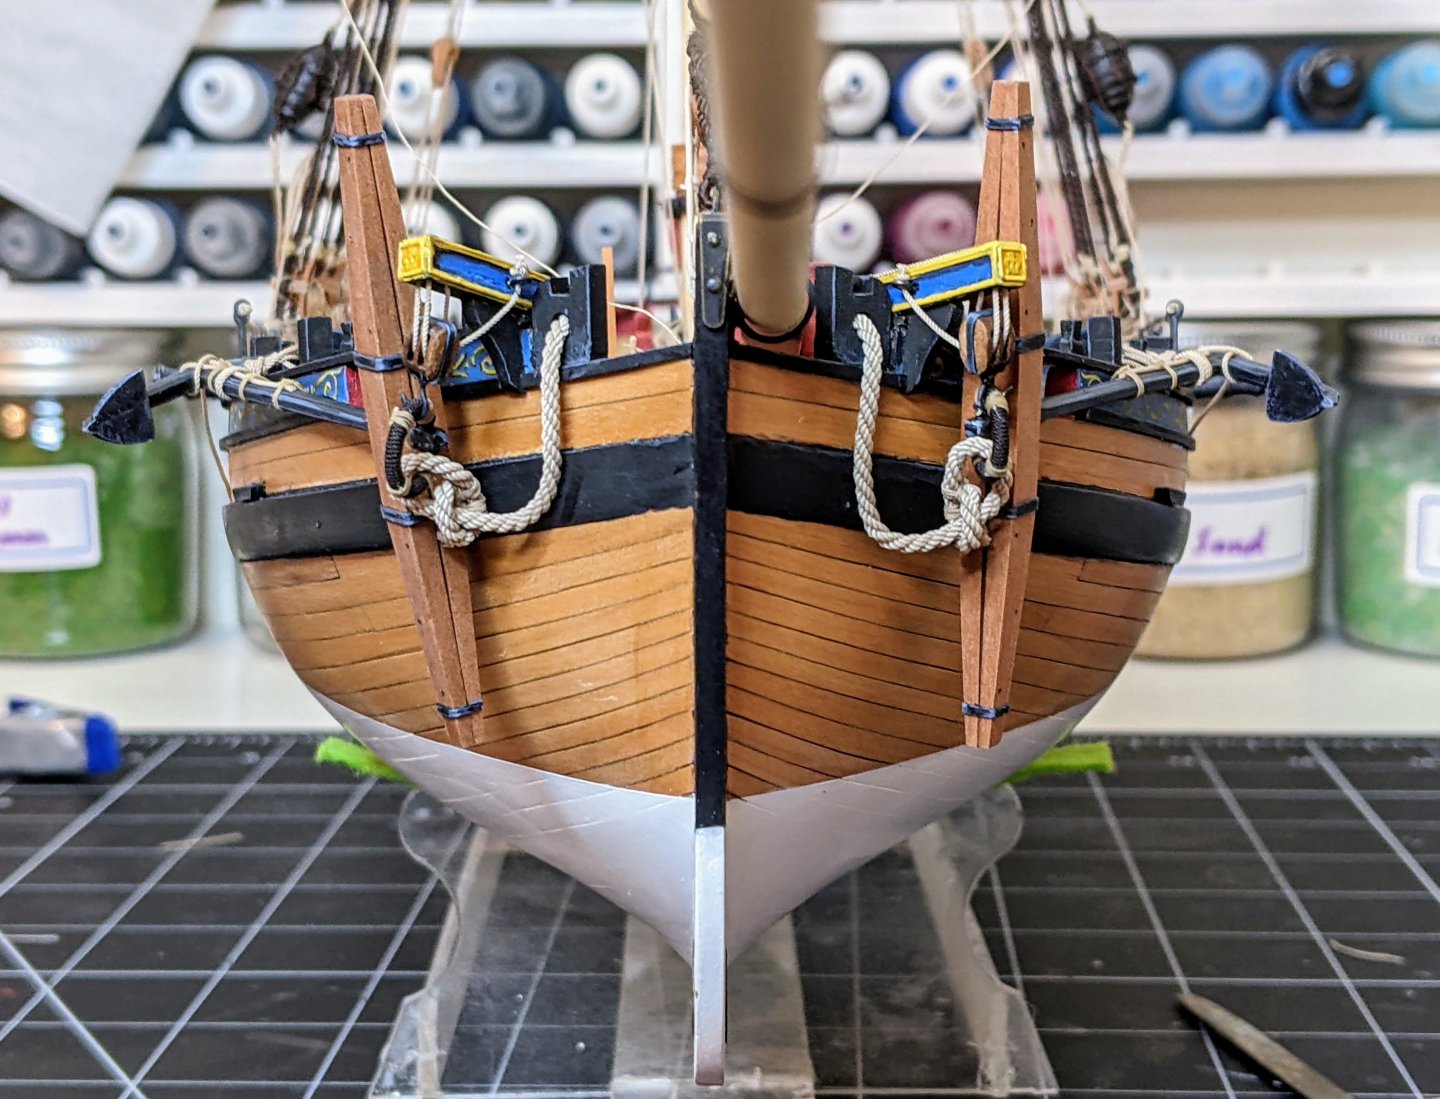
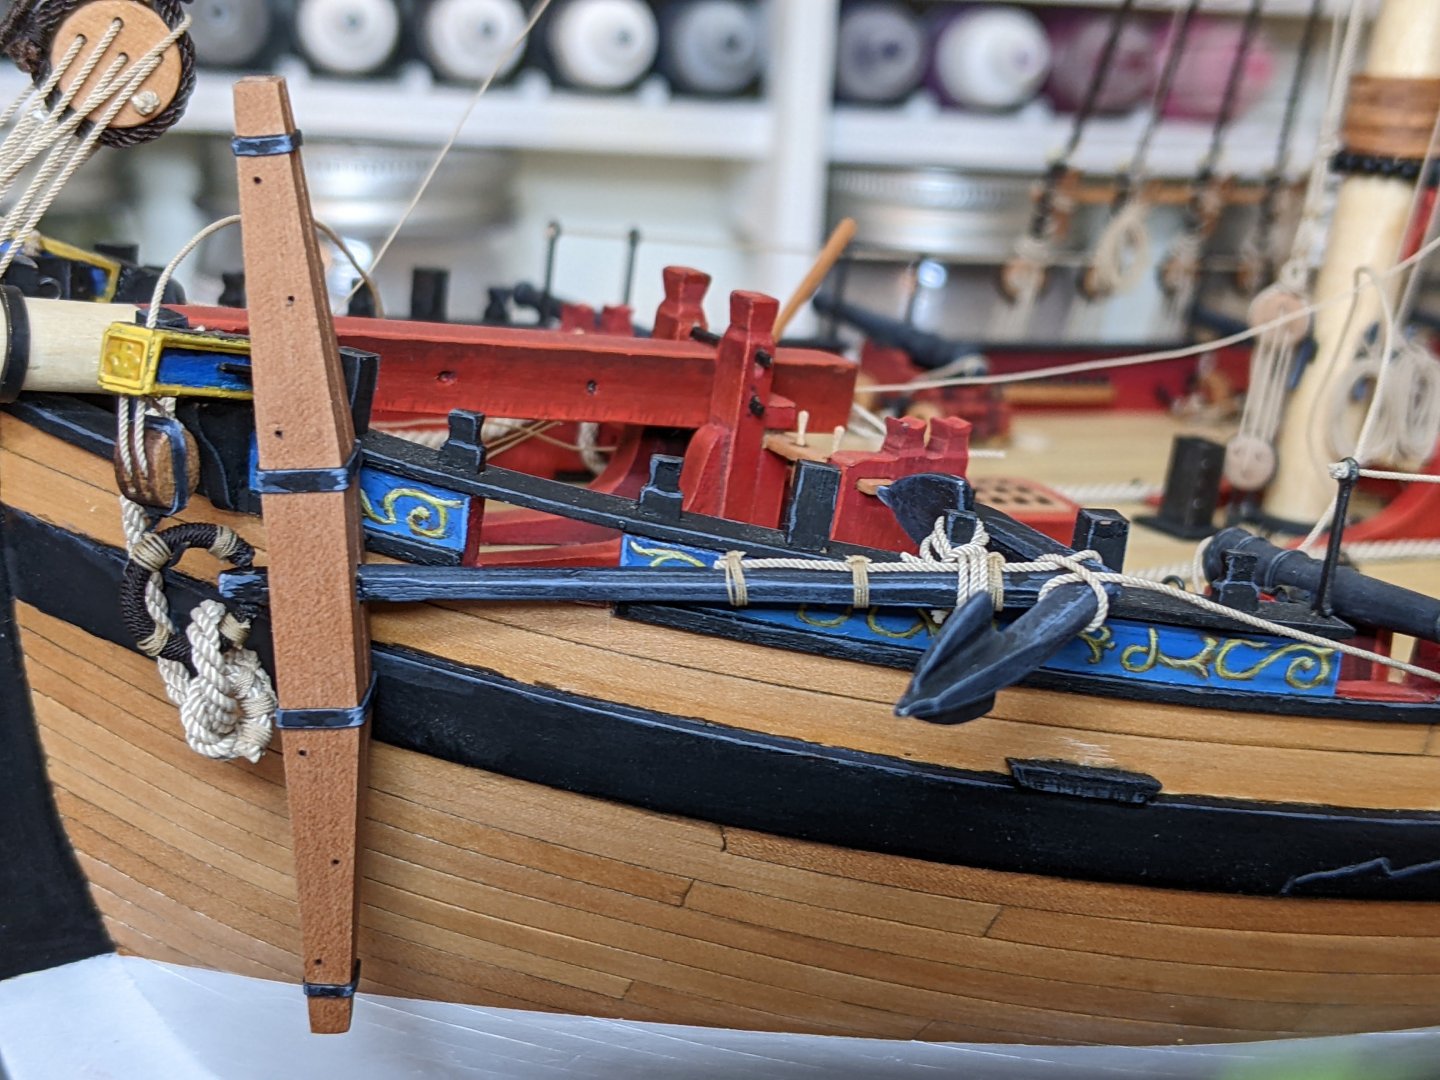
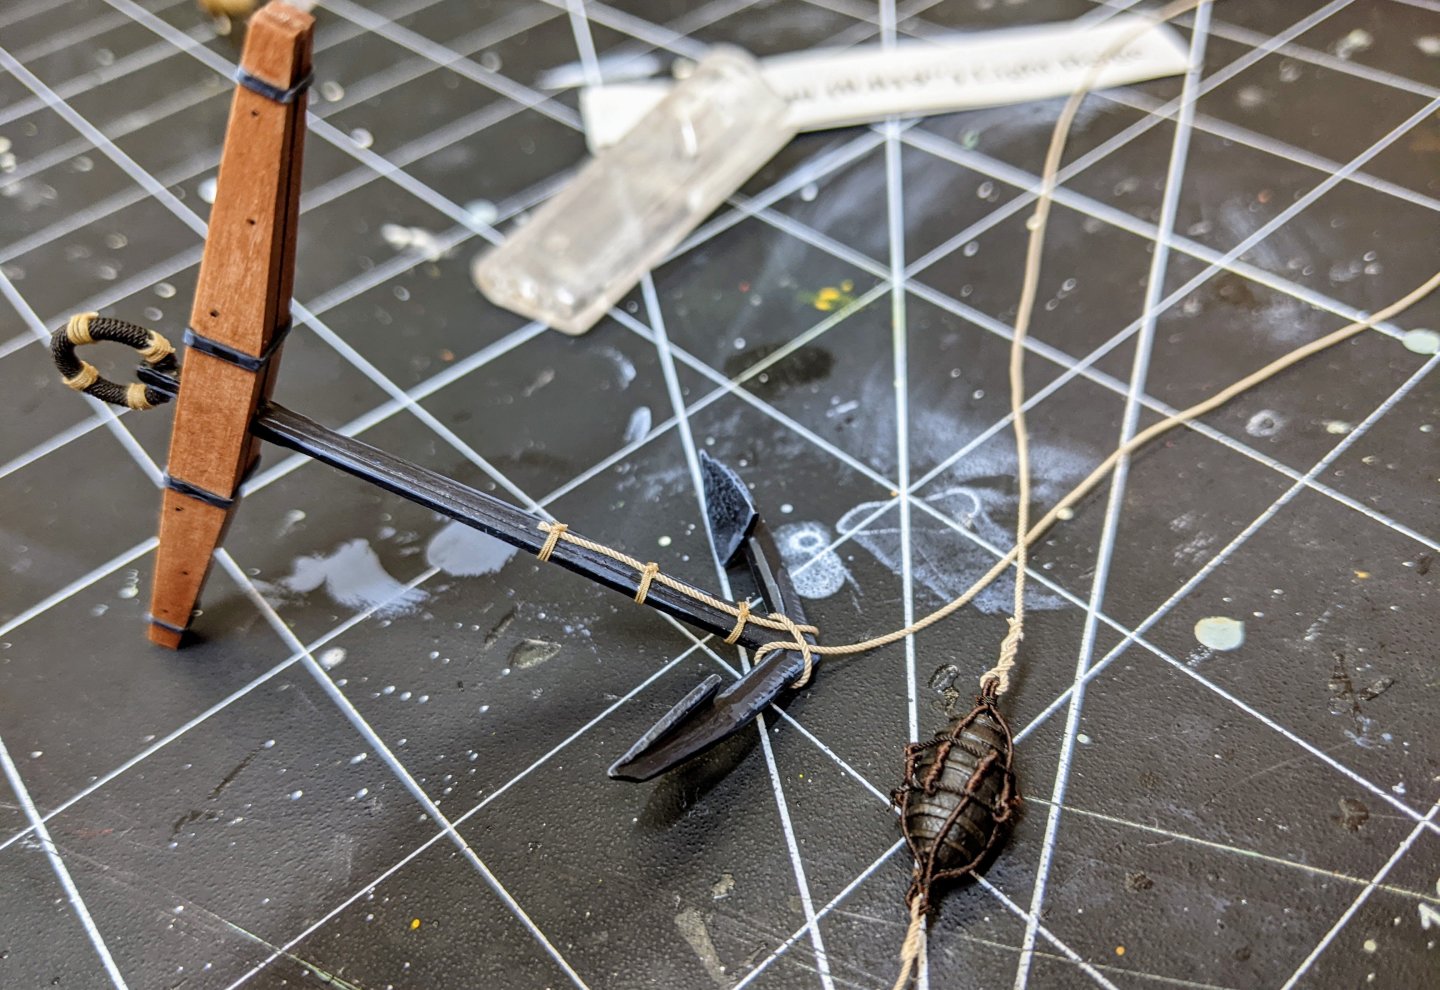
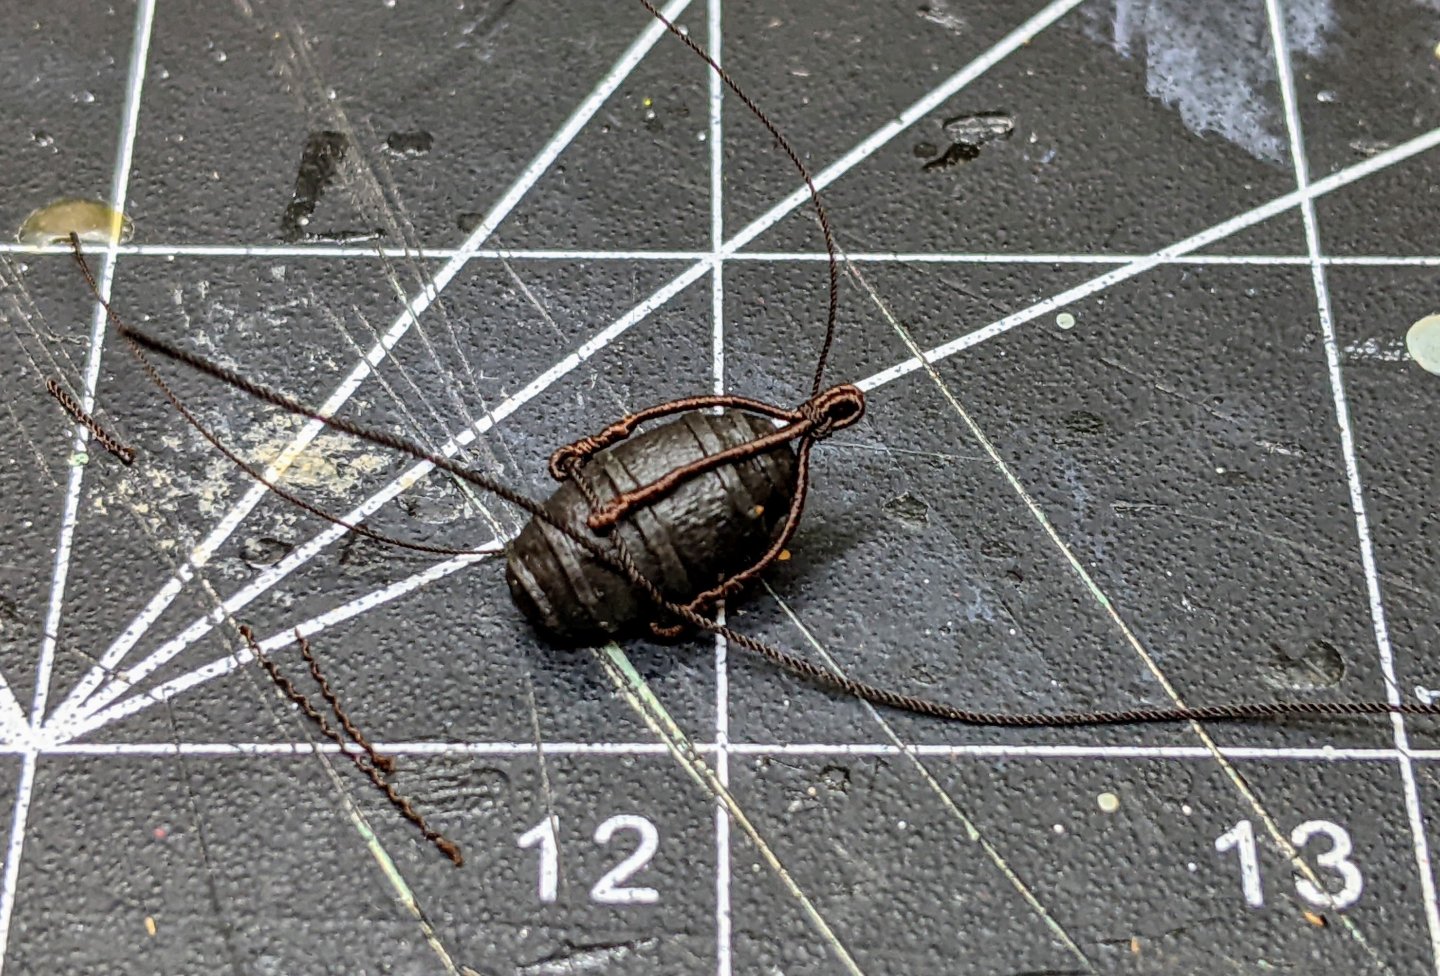
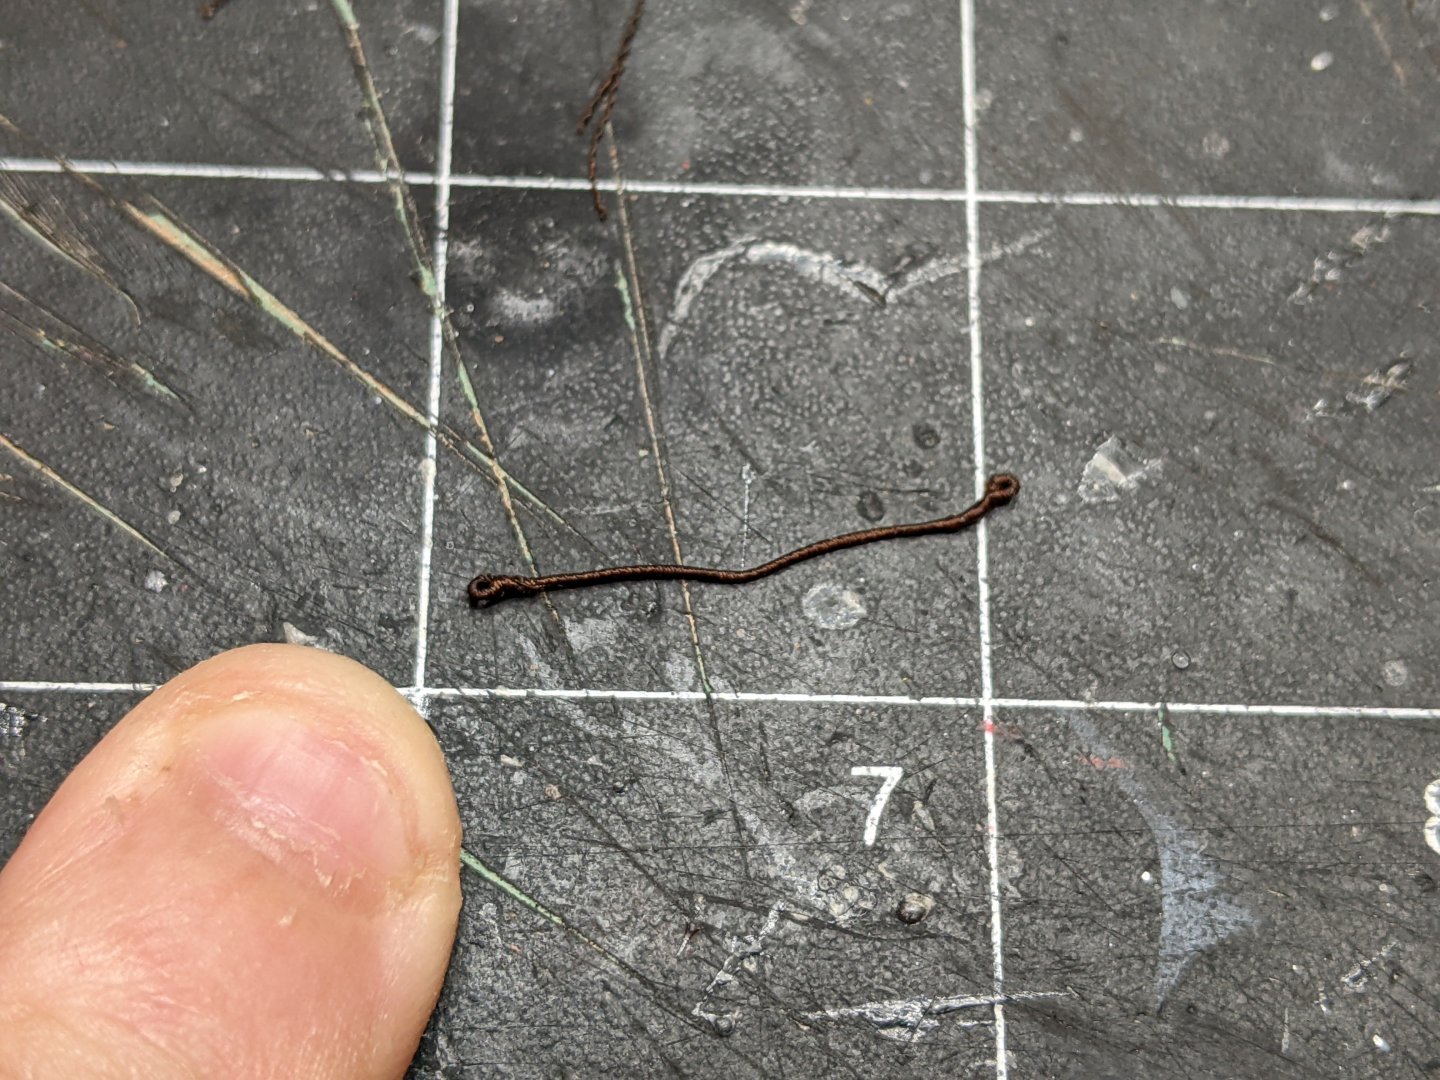
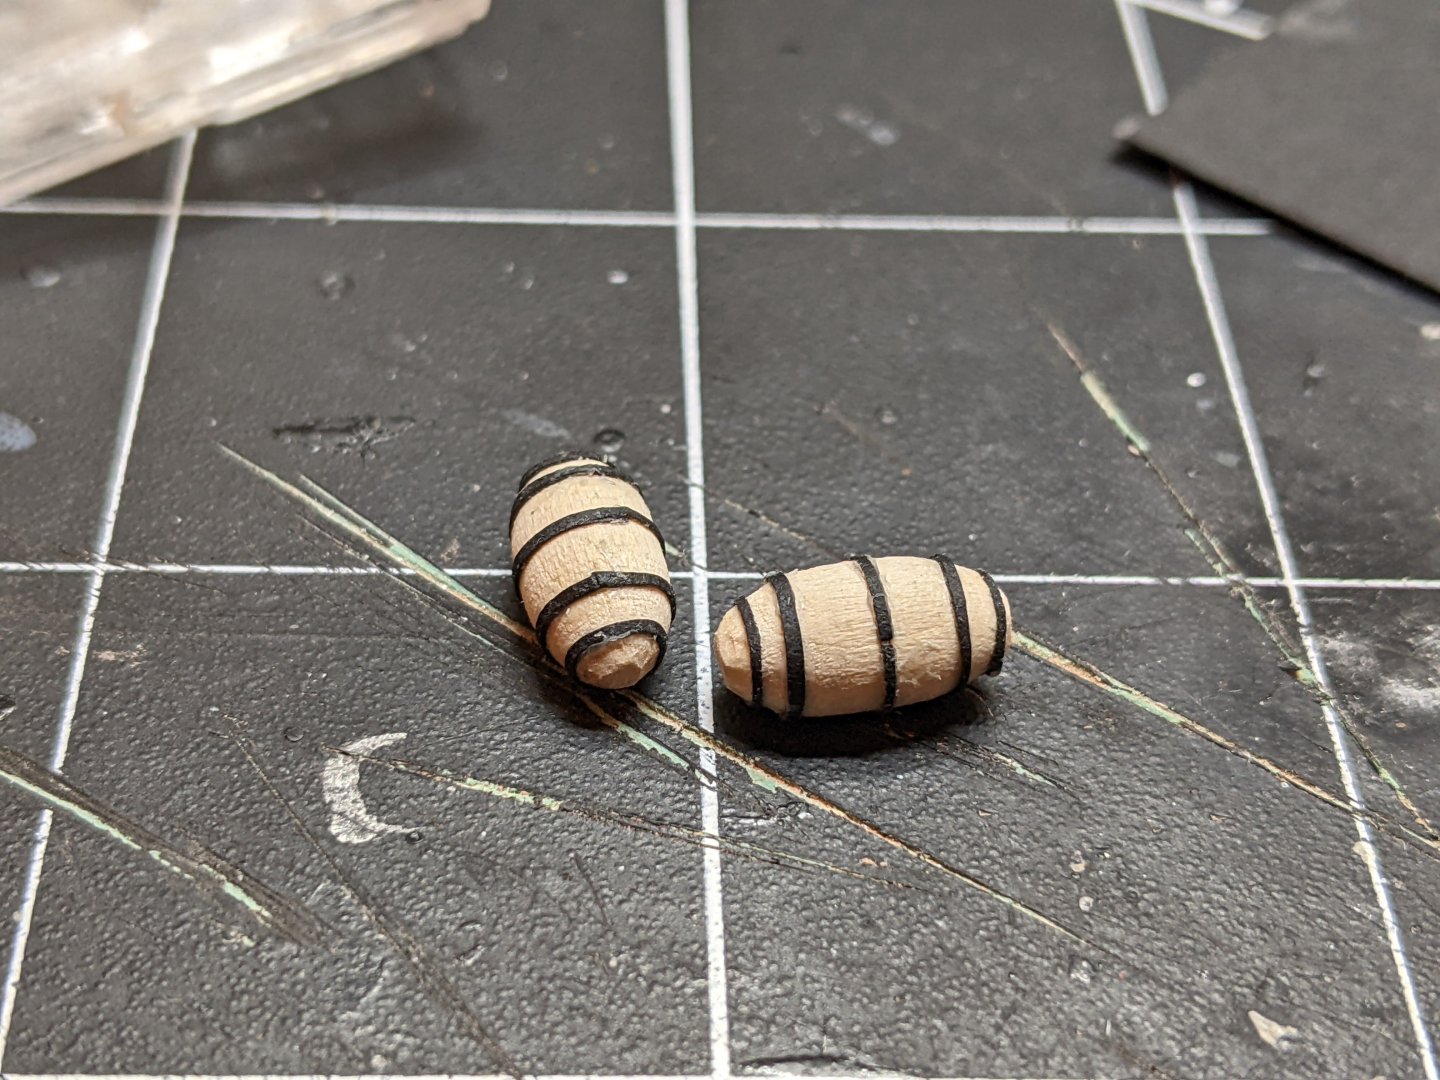
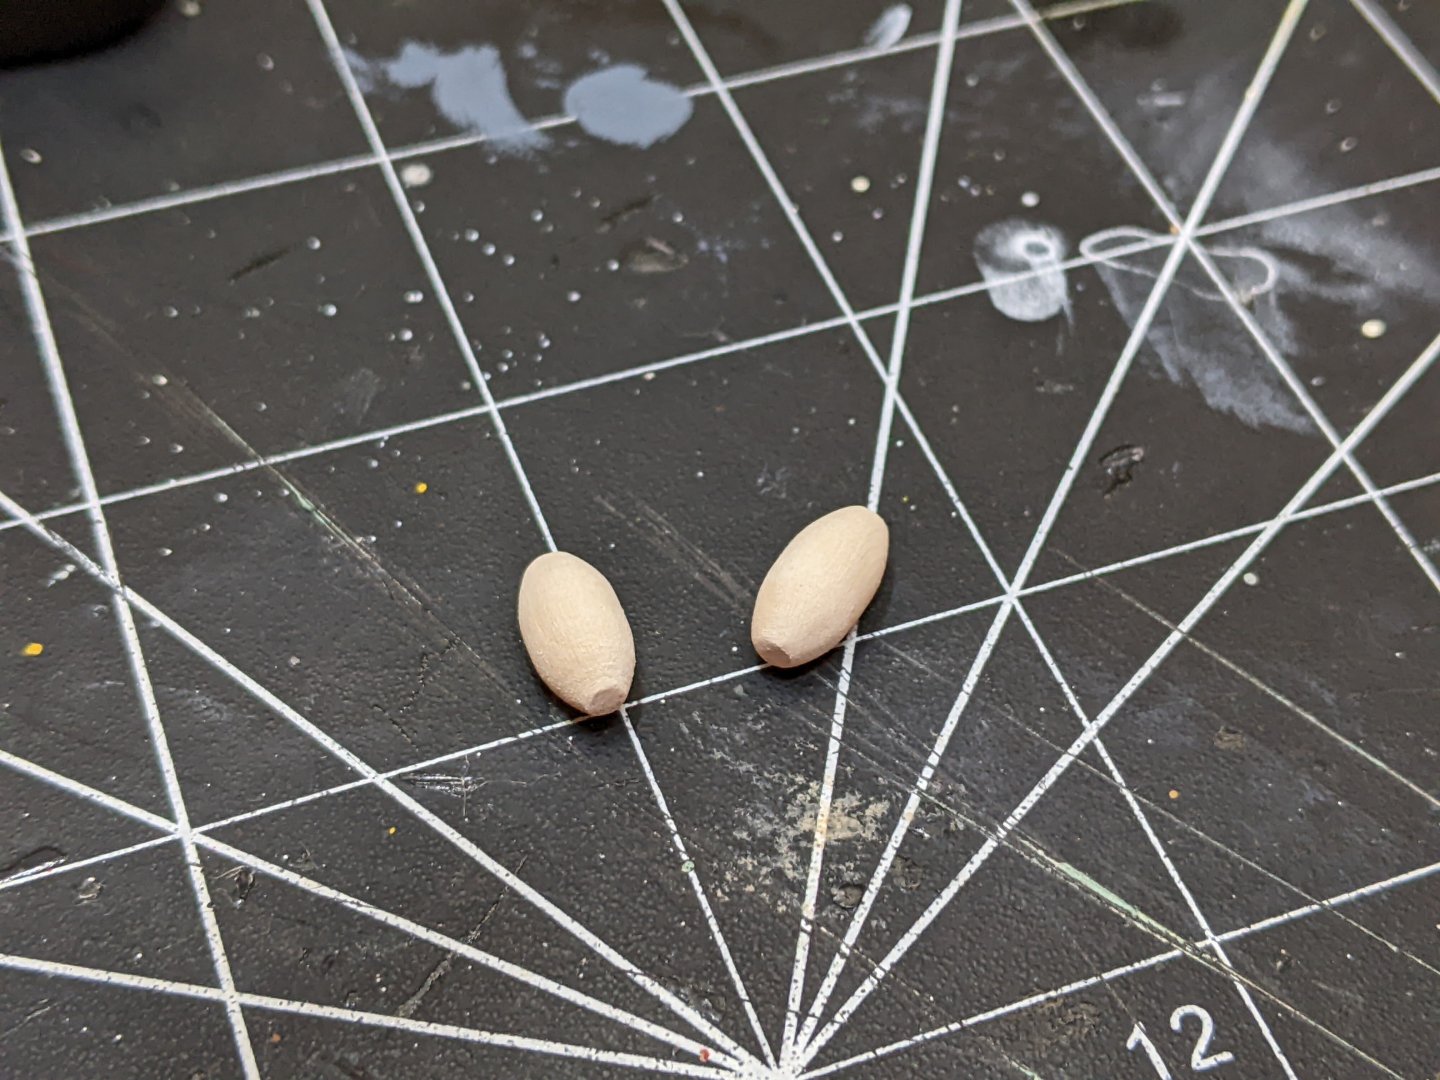
Log #87: The Anchor Buoys I have not posted an update in a while as I have been slowed down by a combination of general busyness at work and my current project on the model being very fiddly. As you will shortly see I think I somewhat achieved the look I was aiming for, but certainly there is room for improvement. I decided to add anchor buoys to the model and so started by shaping some with wood using some spare dowel on my drill. For reference all the dimensions I got from p192 of Steel (https://maritime.org/doc/steel/part6.php). In retrospect I think I should have tapered the ends a bit more. Next up was to add some wooden bands. I couldn’t get any clear answers on what the function of these were, but both Goodwin and Lees depict the buoys with them and Steel mentions them on p167 so I decided I would at least attempt to depict them. I used the black paper from the kits cut into thin strips glued with wood glue. I then painted and dry brushed them. Next came the most tedious part of the process, making the slings. These were very fiddly parts to make. Given their small size and the fact that they all need to be the same size, even very minor error resulted in noticeable differences. I needed to make 8 of these, but I probably made at least 12 in total. They were served along their whole length (as per Steel) using fly tying thread. The eye splices etc were made using my previously described method. Once they were all done I took a pair of them and served with my 0.2mm rope around the end to make a double loop with 4 “tails”. These were then fixed in place using super glue and the buoy hoop (confusingly the same name is used for the wooden rings and the rope that goes round the middle of the buoy) was run through the eyes. And here is the result. I would do a few things differently if I was doing them again, but good enough for this model. Finally I spliced a 0.5mm rope into one end for the buoy rope and a 0.35mm rope into the other end for the lanyard. The buoy rope was attached to the anchor as per the description in Goodwin (though it matches what is in Lees). The lashing is done with 0.2mm rope. The length of each rope is long enough to allow a reasonable coil to be attached to the shrouds. I only have one of the anchors done, but the second will have to wait till next time. Thank you to everyone for all the encouragement.


- 562 replies
-
- 31
-
-
-
- vanguard models
- alert
- (and 2 more)
-
That's what I did.. Built all masts & spars Prior to installing. Actually just finished attaching all completed masts and bowsprit to ship. It's time for some rope! Just in case I wasn’t clear, I was referring to the rope on the spars (eg rig all the blocks and lines to the spars before putting them on the model). Good luck, the only way to really learn how to rig a model is to try it and figure out what works for you and to make the inevitable mistakes you can learn from for next time :). All the thought you are putting in now will pay dividends later. Just always be looking ahead and thinking about access.
-
One thing to keep in mind is it is much easier to work off model than on. So as much as possible do what you can off model (e.g. rig the whole spar before attaching it to the model). It can be a bit of a drag as you don’t see the immediate progress, but it is much easier to deal with tiny ropes and blocks on a desk than dangling from a model where one wrong move will destroy weeks of progress.
-
Vallejo matt varnish or ultramatt. I believe they also have spray cans of it. If using an airbrush I use 1 part vallejo satin to 3 parts ultra matt. I find that mix gives a nice matt finish with just a hint of satin so it doesn’t wash out. In general for small figures like this I would recommend using miniature painting products or high quality artist acrylics. They are a bit more pricy, but they will flow better and the pigment size is smaller so you will get a smoother more consistent finish. One thing you can do for the skin is to use a flesh shaded wash to bring out the details. I like citadel’s reikland fleshade, but any similar wash will do. If you really want to go the extra mile you can then go back in with a lighter skin tone and pick out the raised details such as the cheekbones and tips of the nose. With regard to the porous problem, if you just spray them with a miniature painting primer (vallejo, citadel, army painter, etc… all have readily available spray cans), alternatively if you have an airbrush just spray the primer on yourself. I have never had a problem with that not sealing things properly. Good job.
-
Congrats and great job.
-
It looks great, well done.
-
It is real life, this is a table from the 1700s for an actual ship. Block sizes are the length of the block and rope sizes are the circumference of the rope. In both cases the size is in inches.
-
You could just make one. It shouldn't be too hard to do something like that in GIMP. And you could make it as high resolution as you liked. Alternatively you could easily paint it by hand.