


Nearshore
-
Posts
96 -
Joined
-
Last visited
Content Type
Profiles
Forums
Gallery
Events
Posts posted by Nearshore
-
-
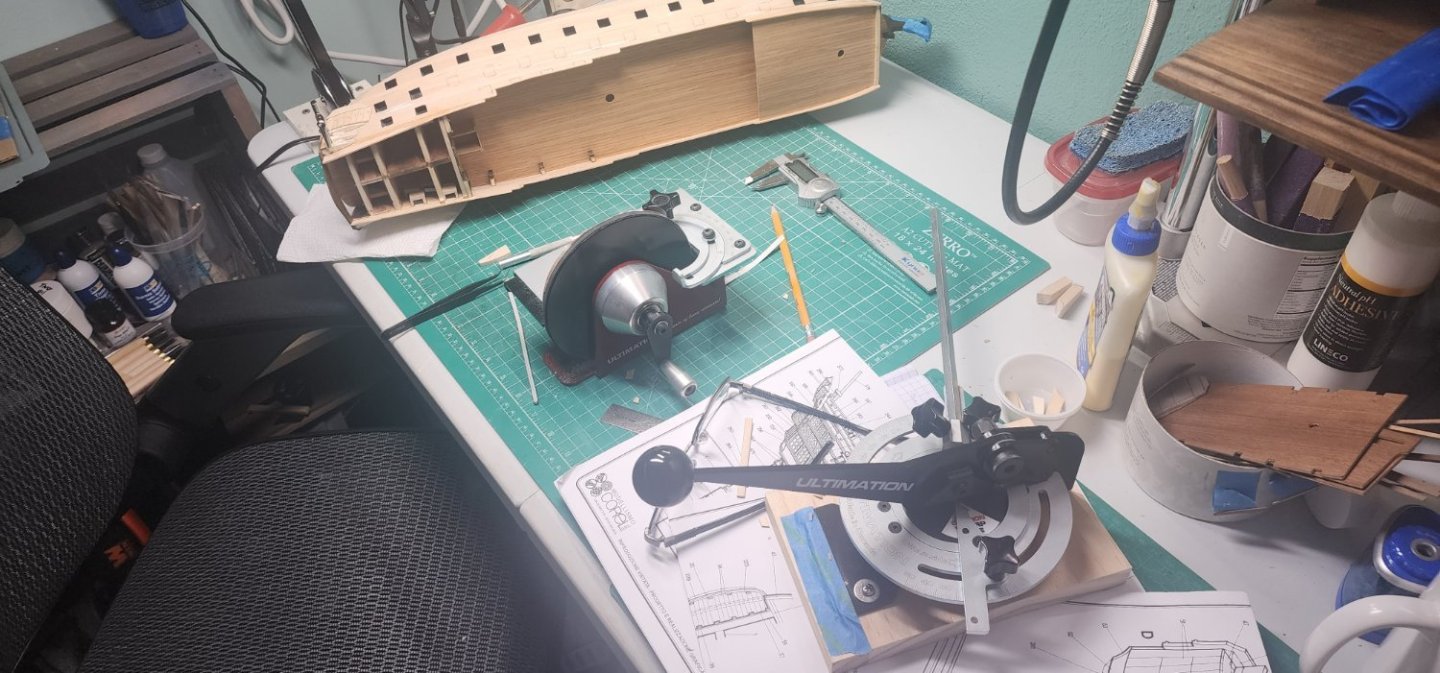
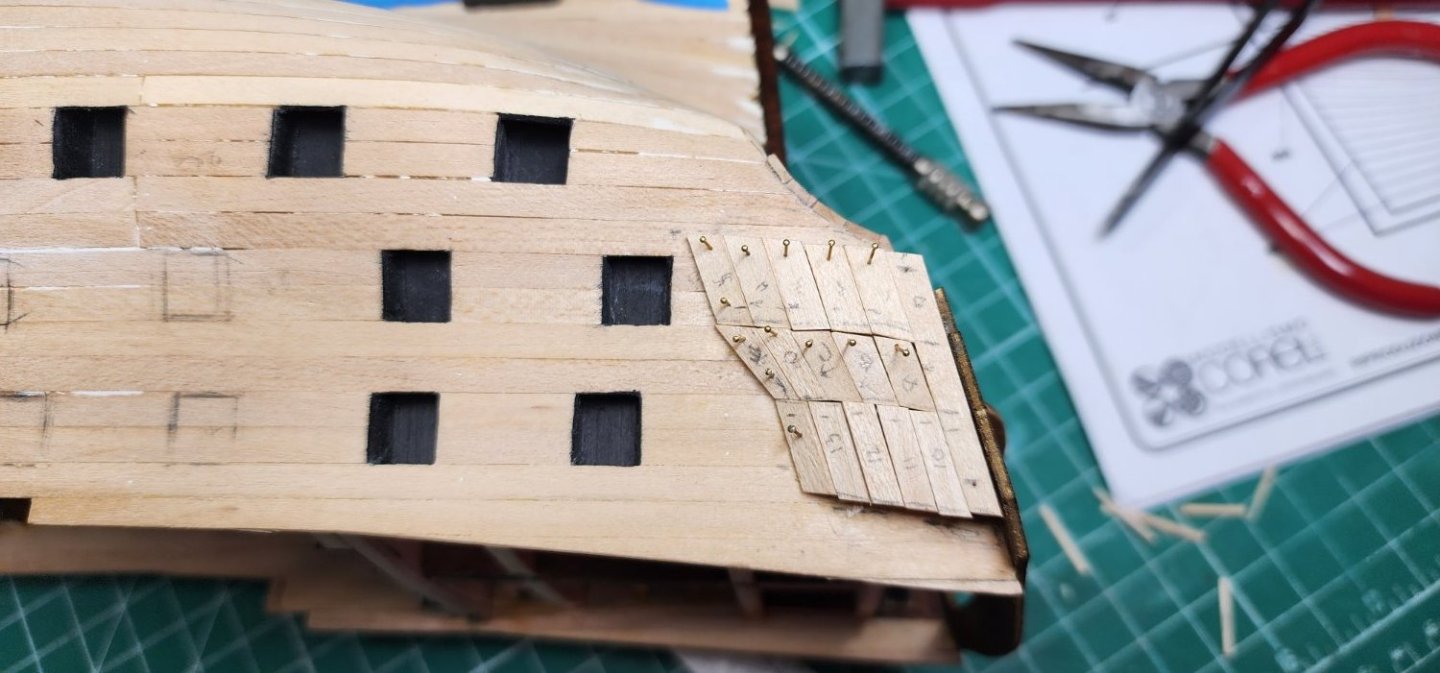
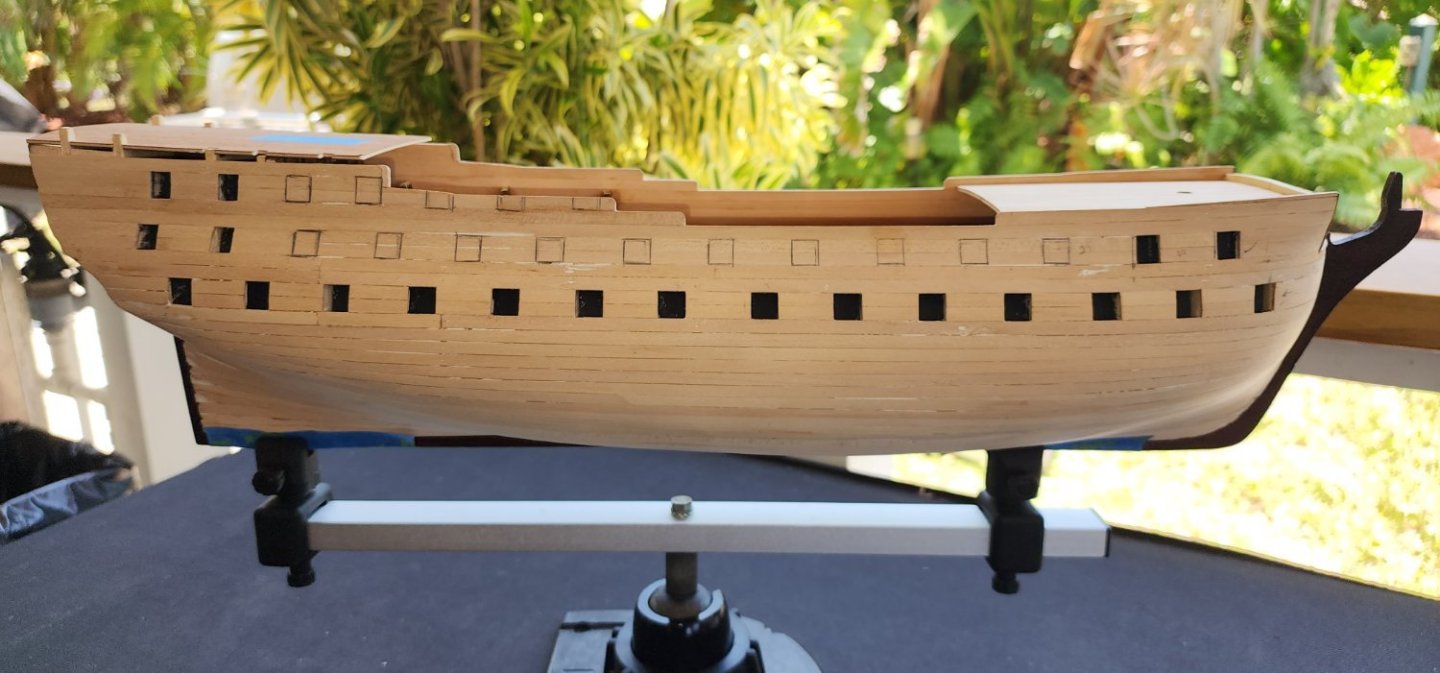
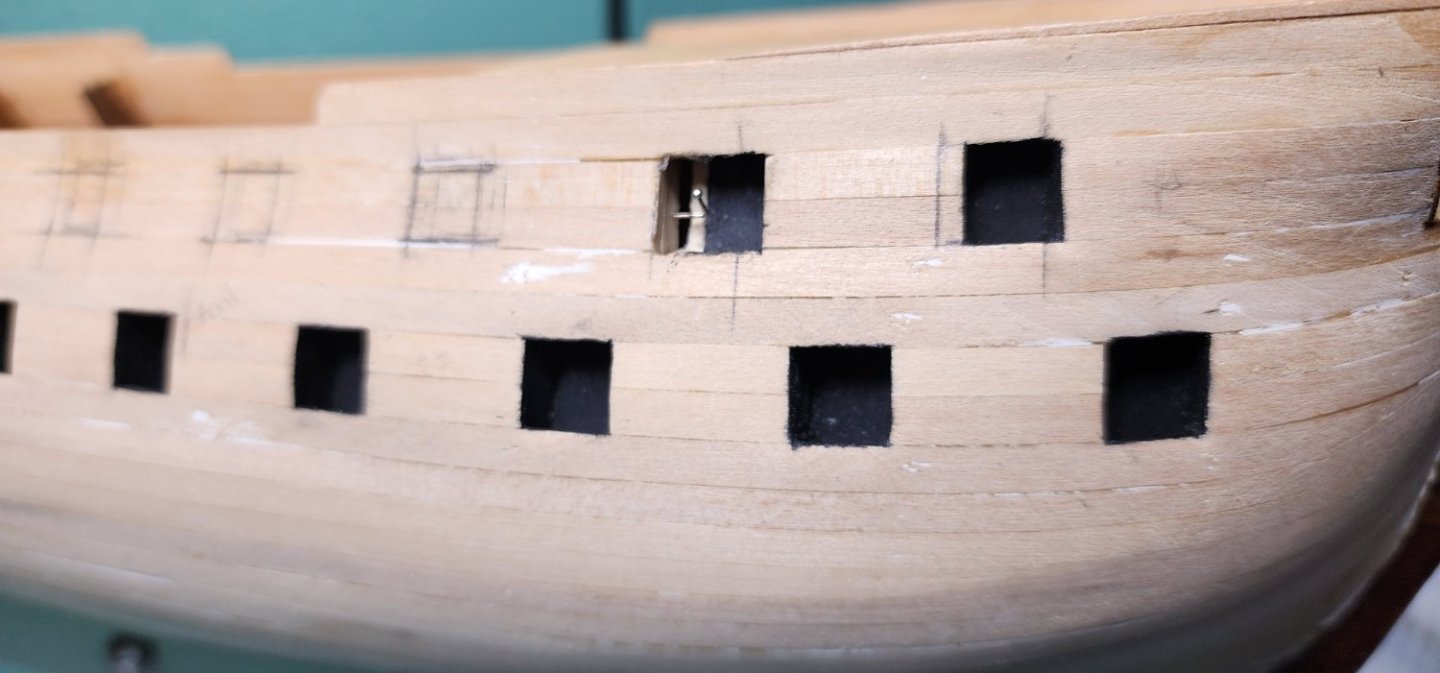
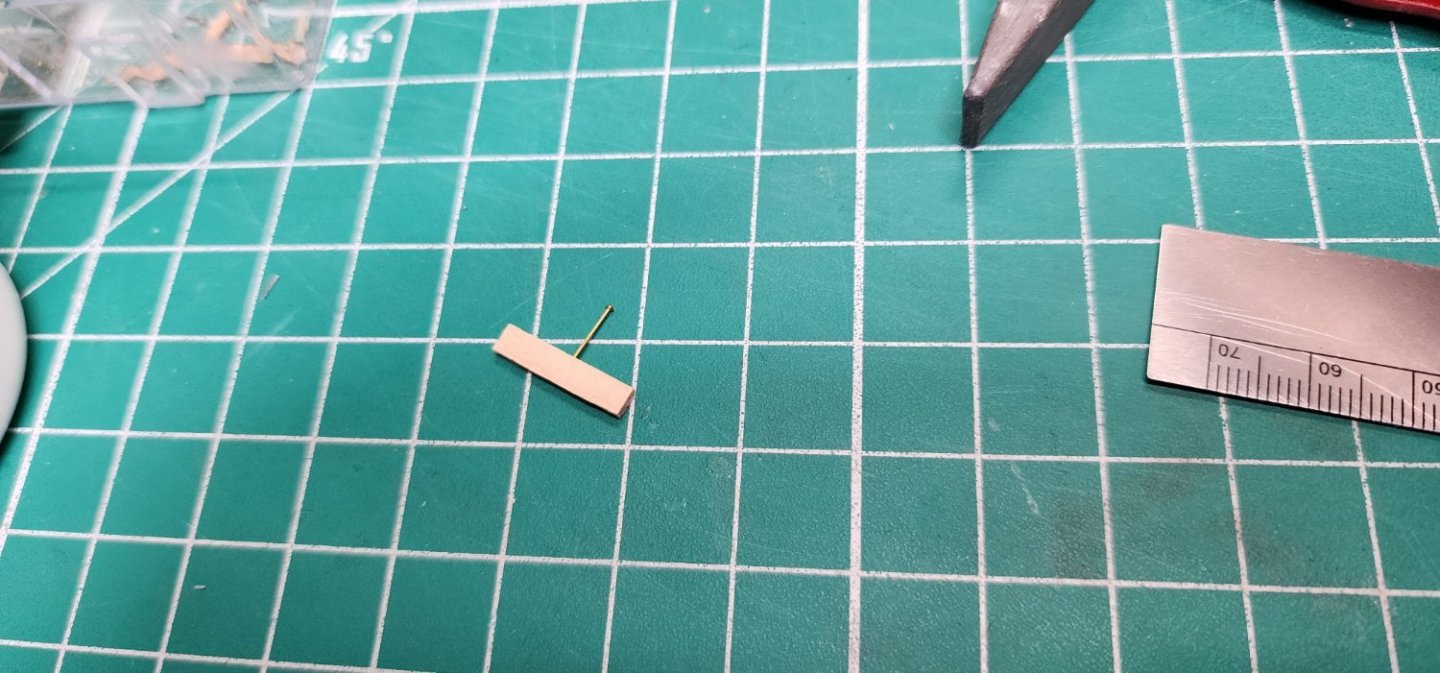
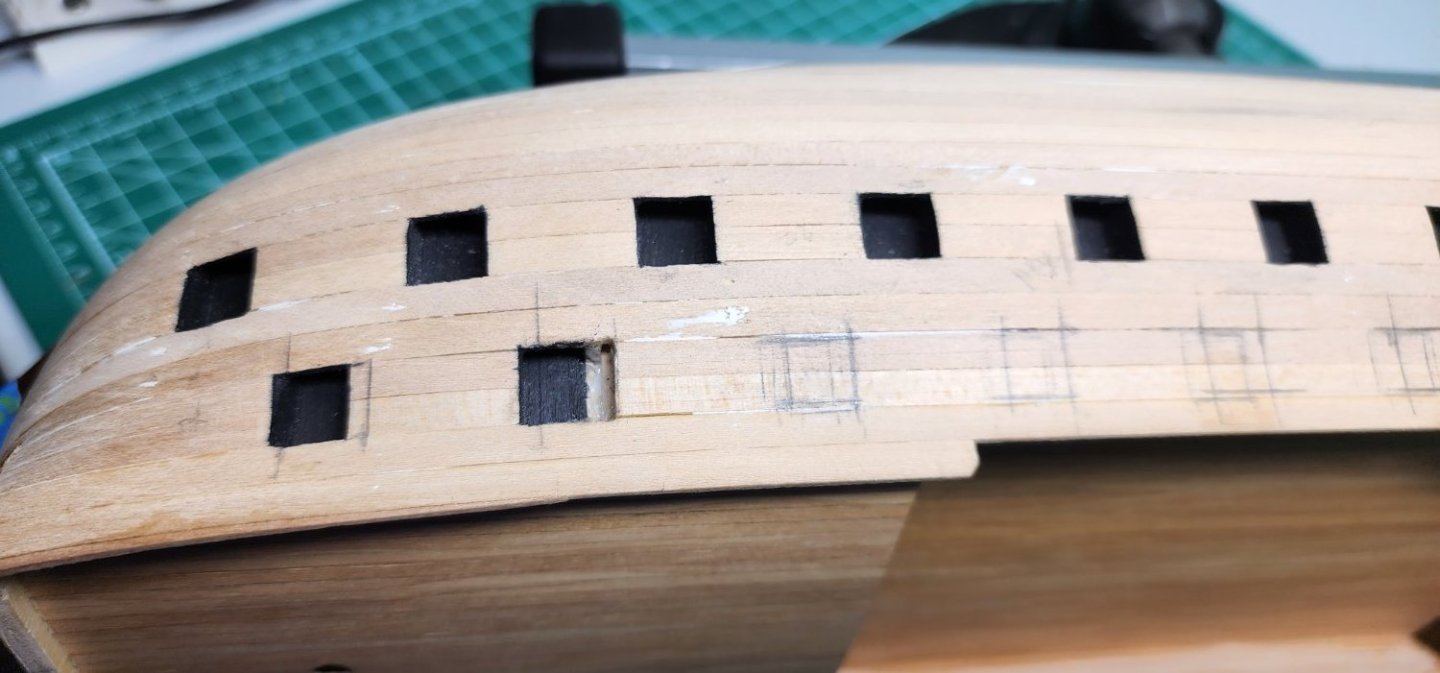
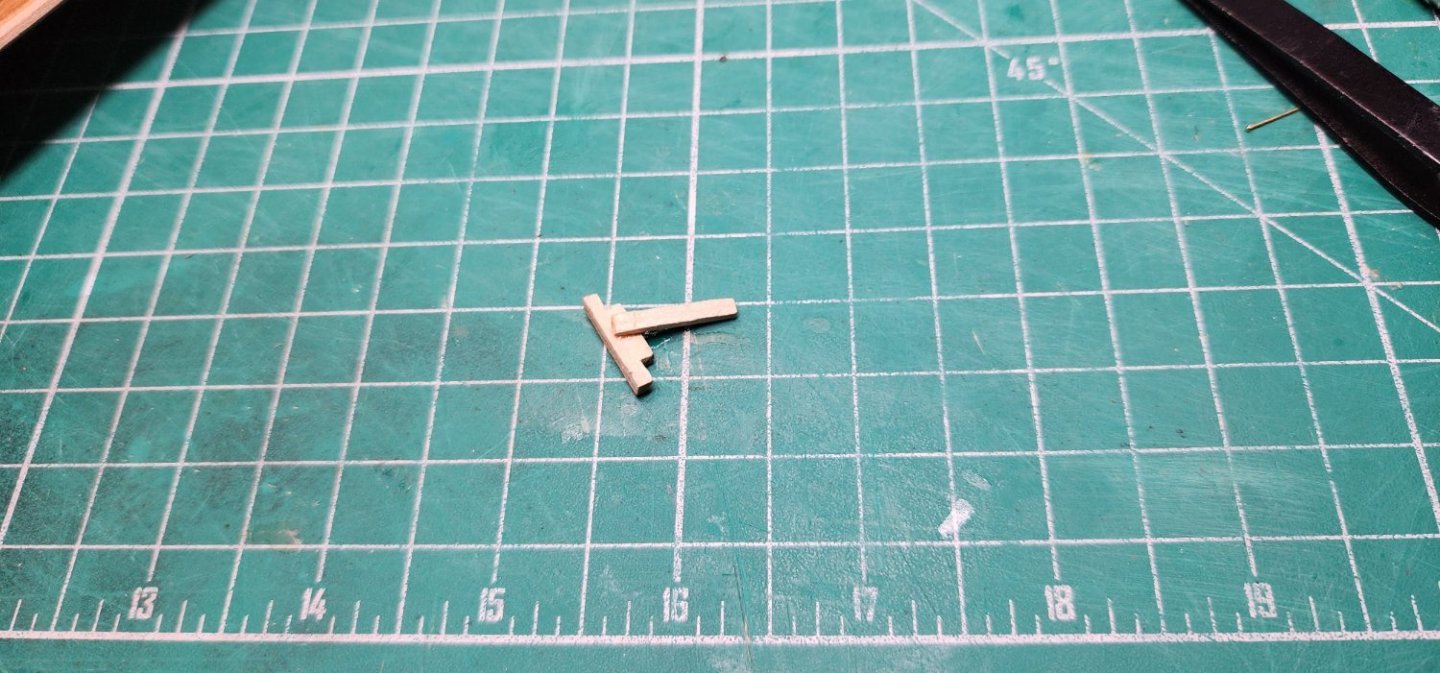
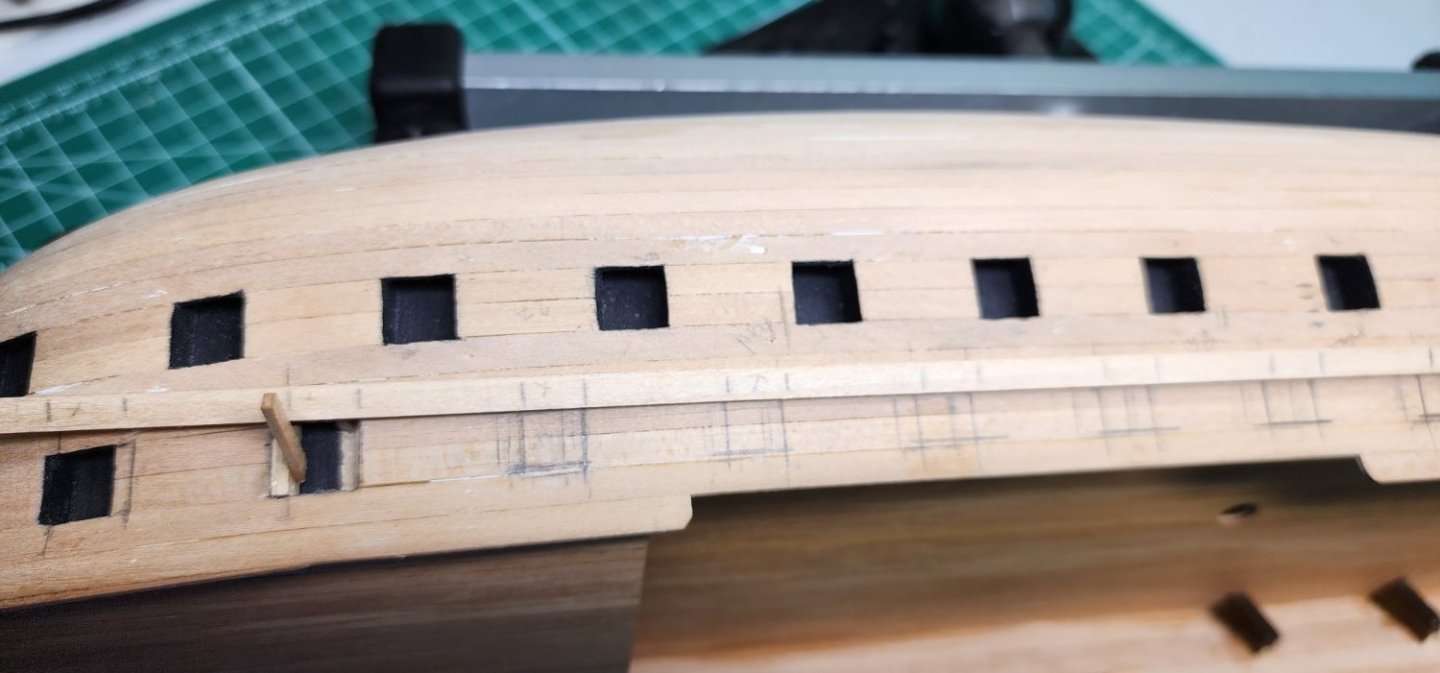
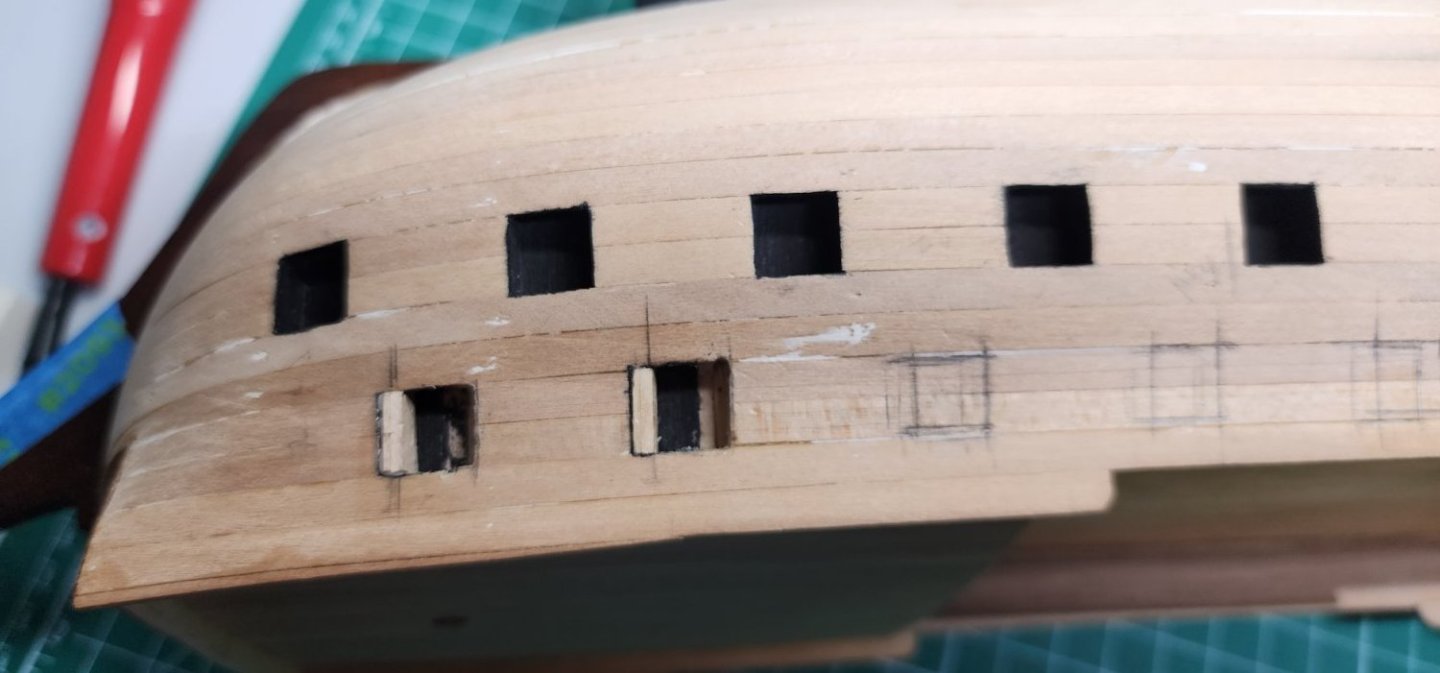
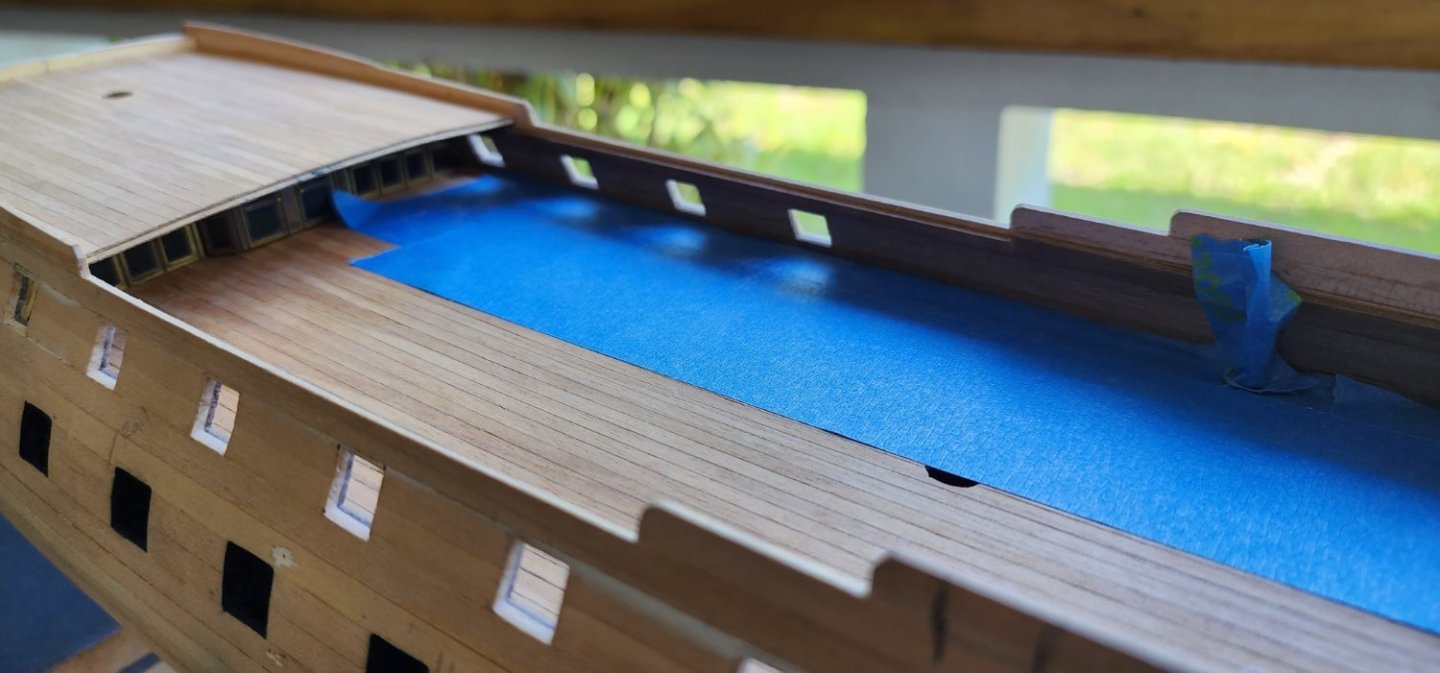
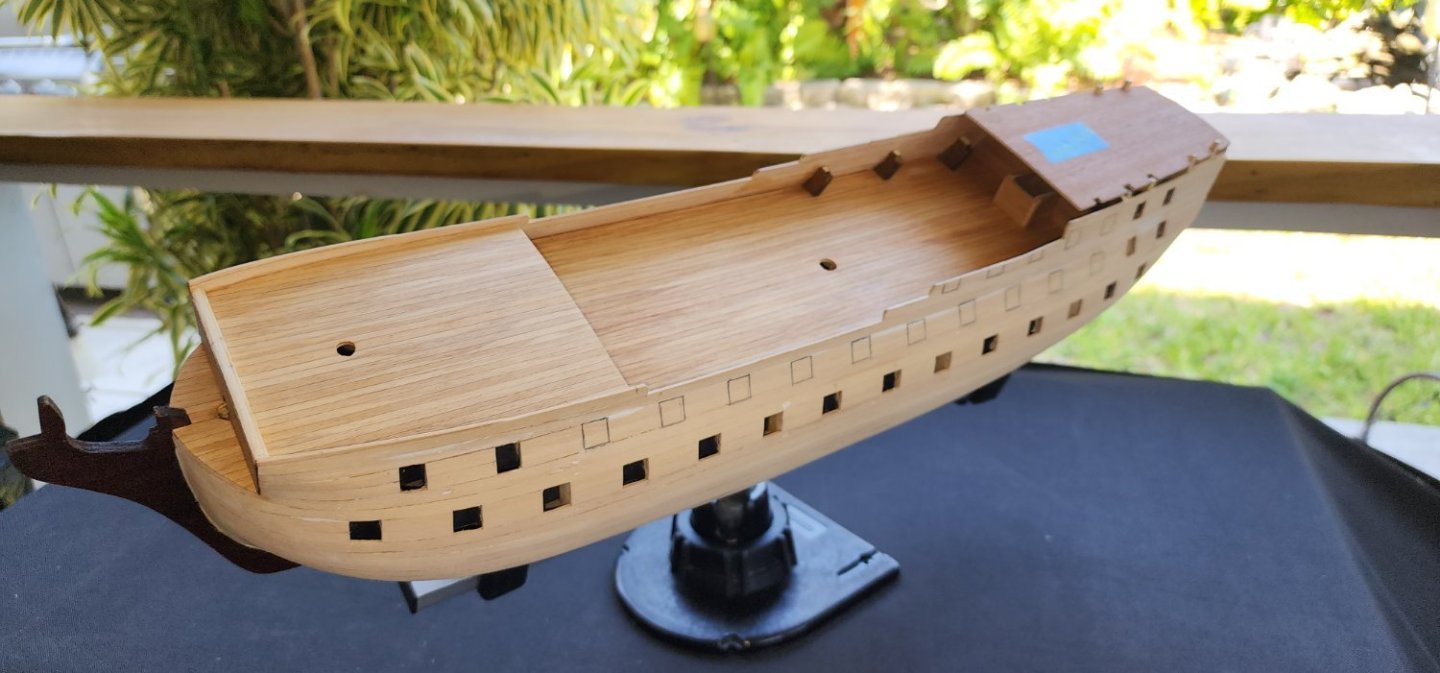
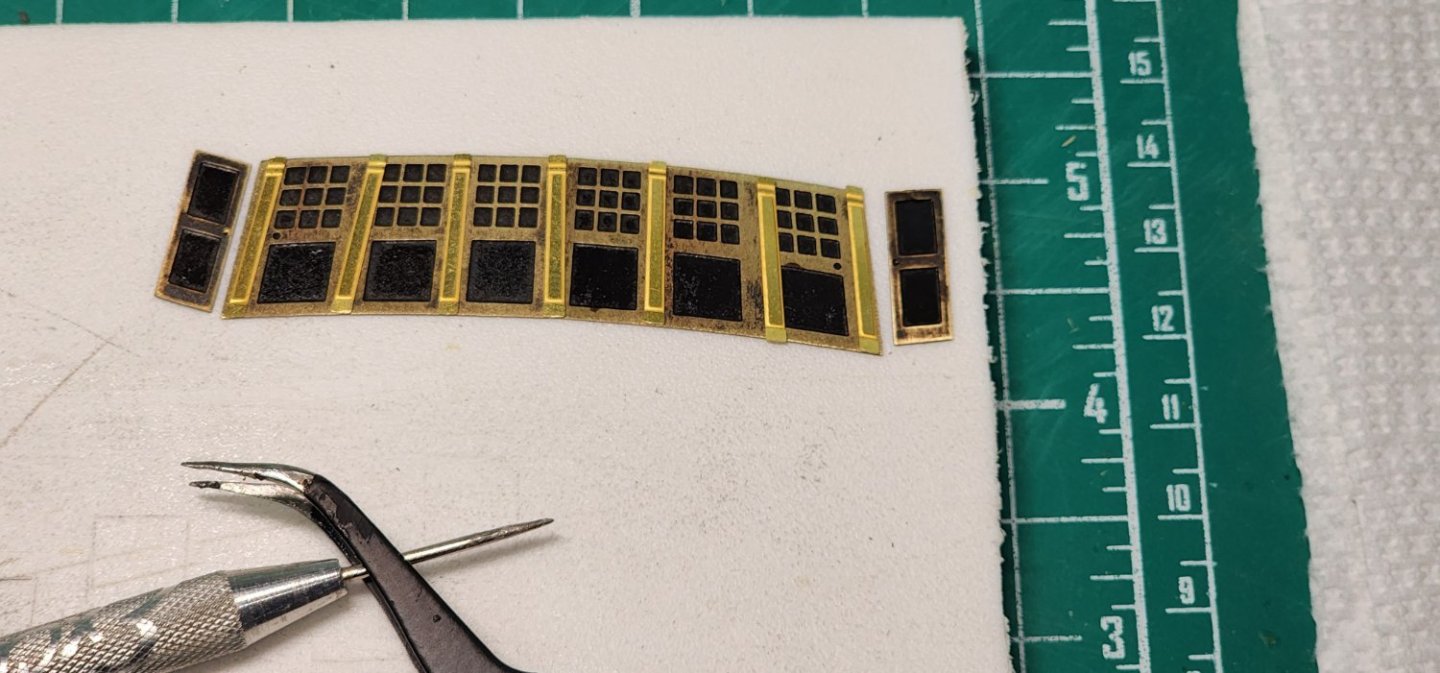
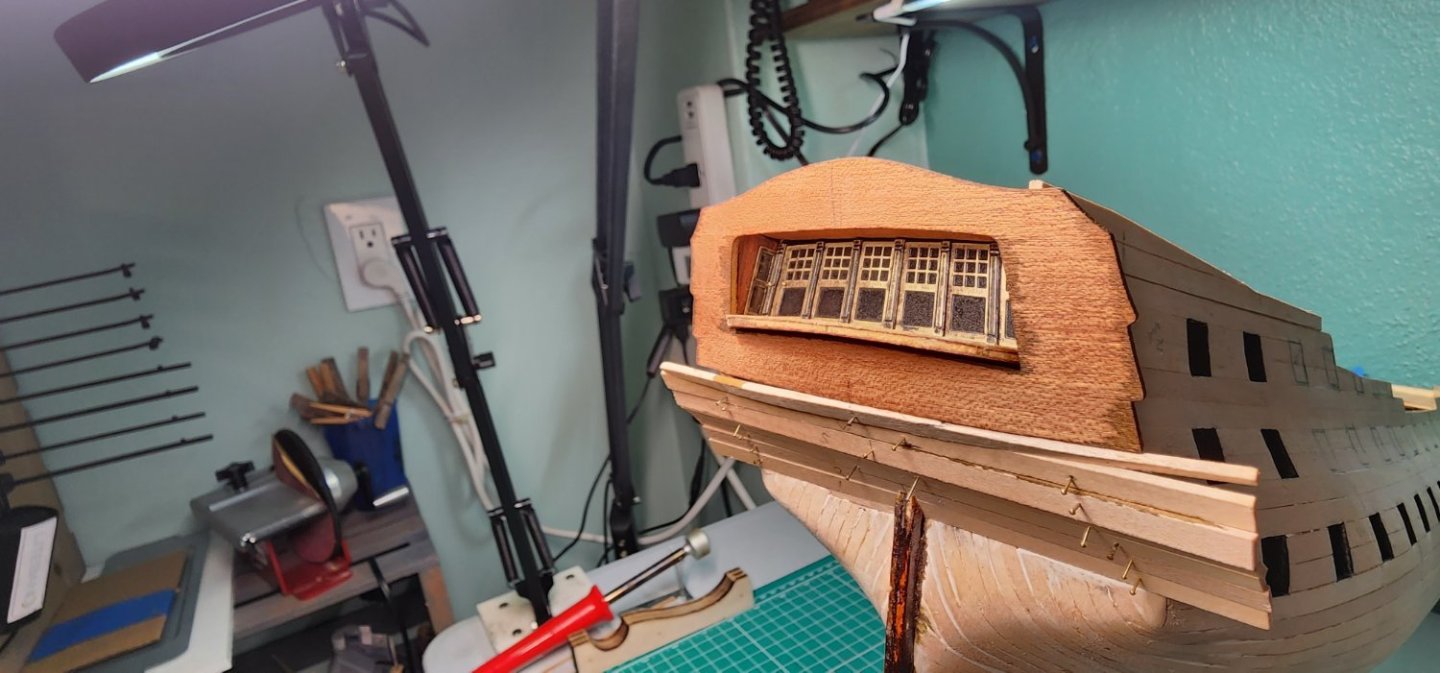
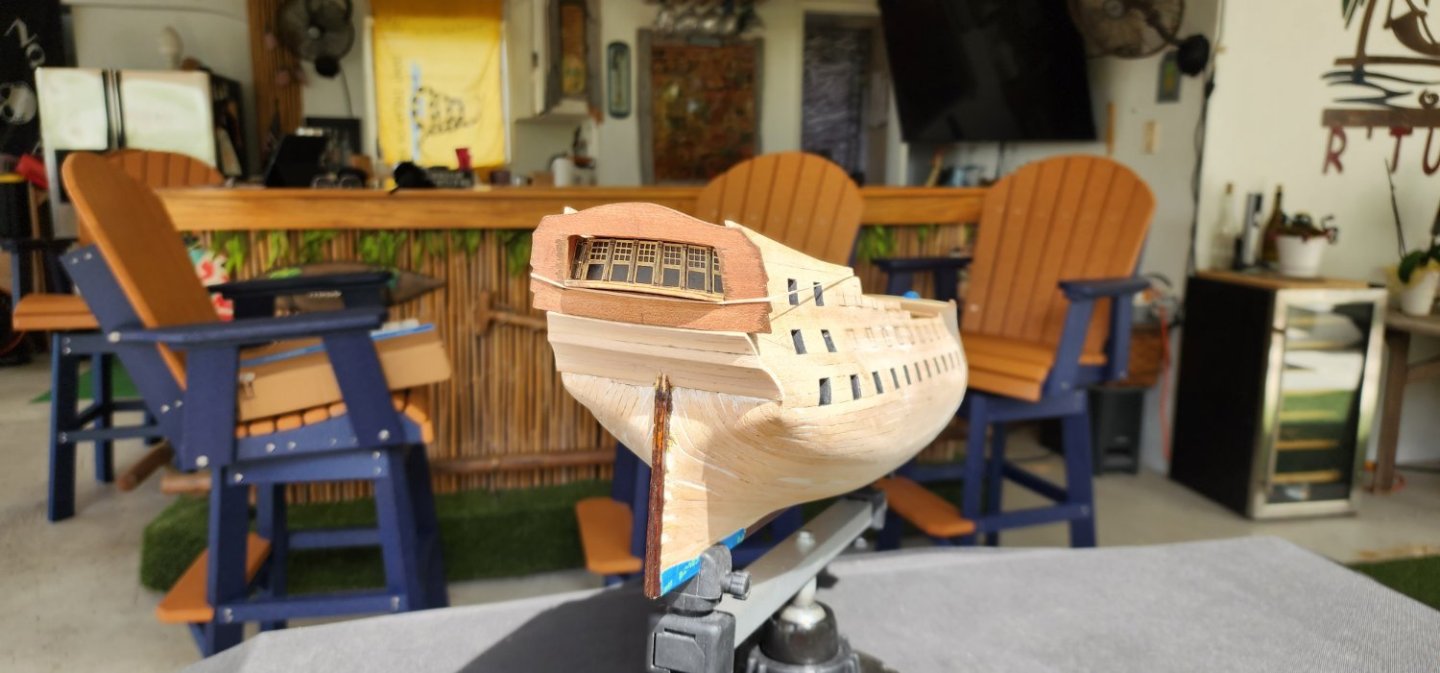
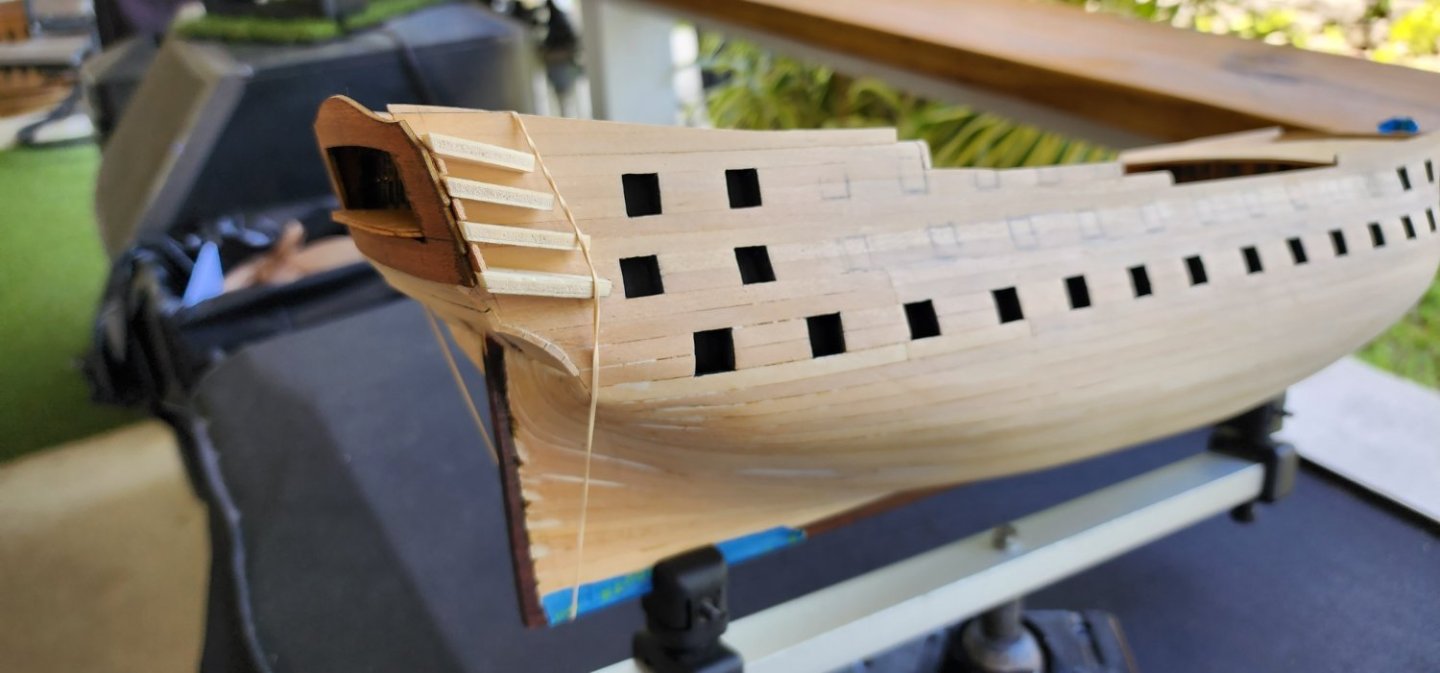
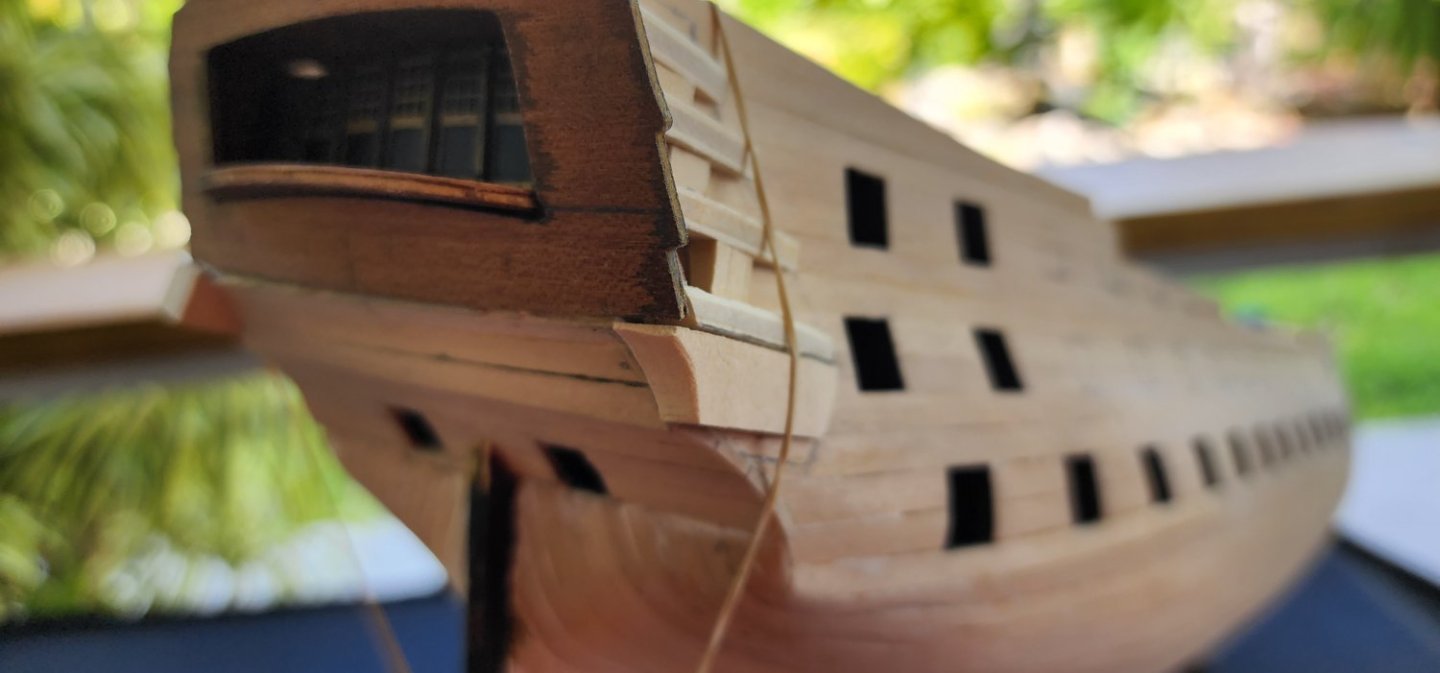
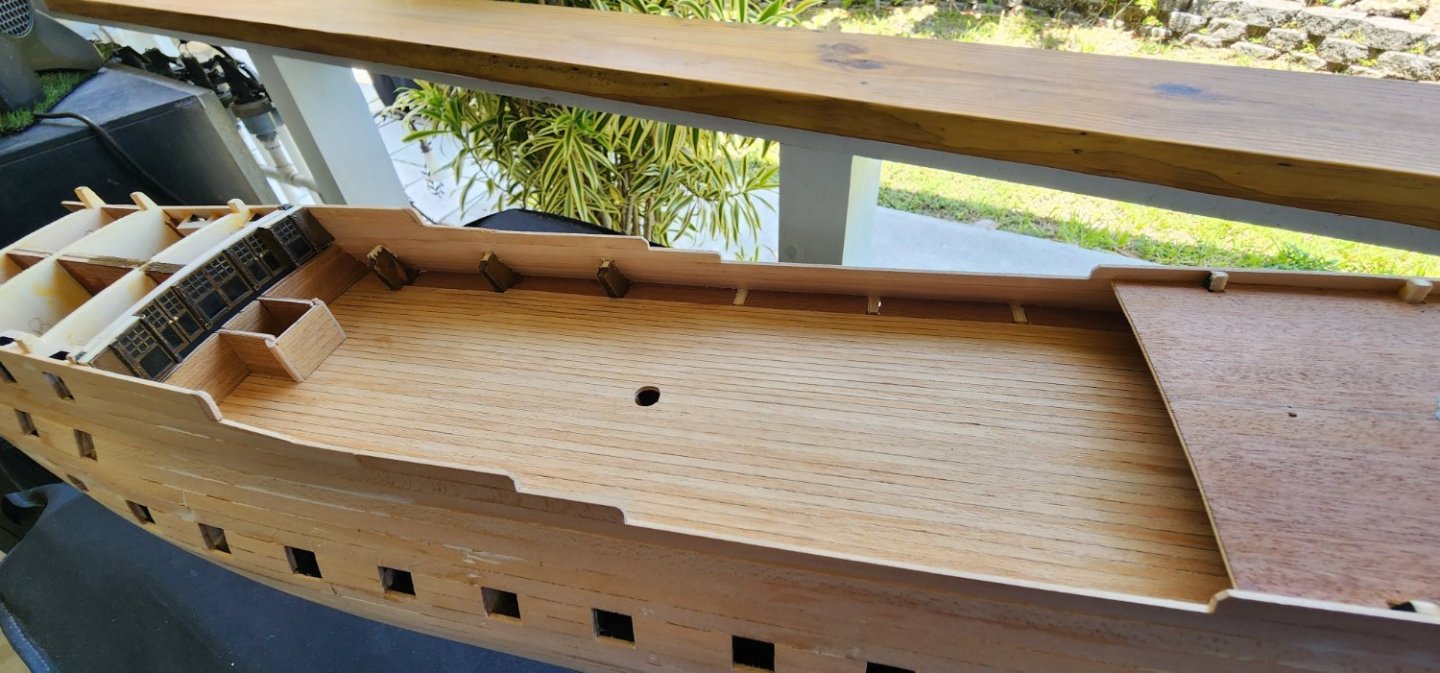
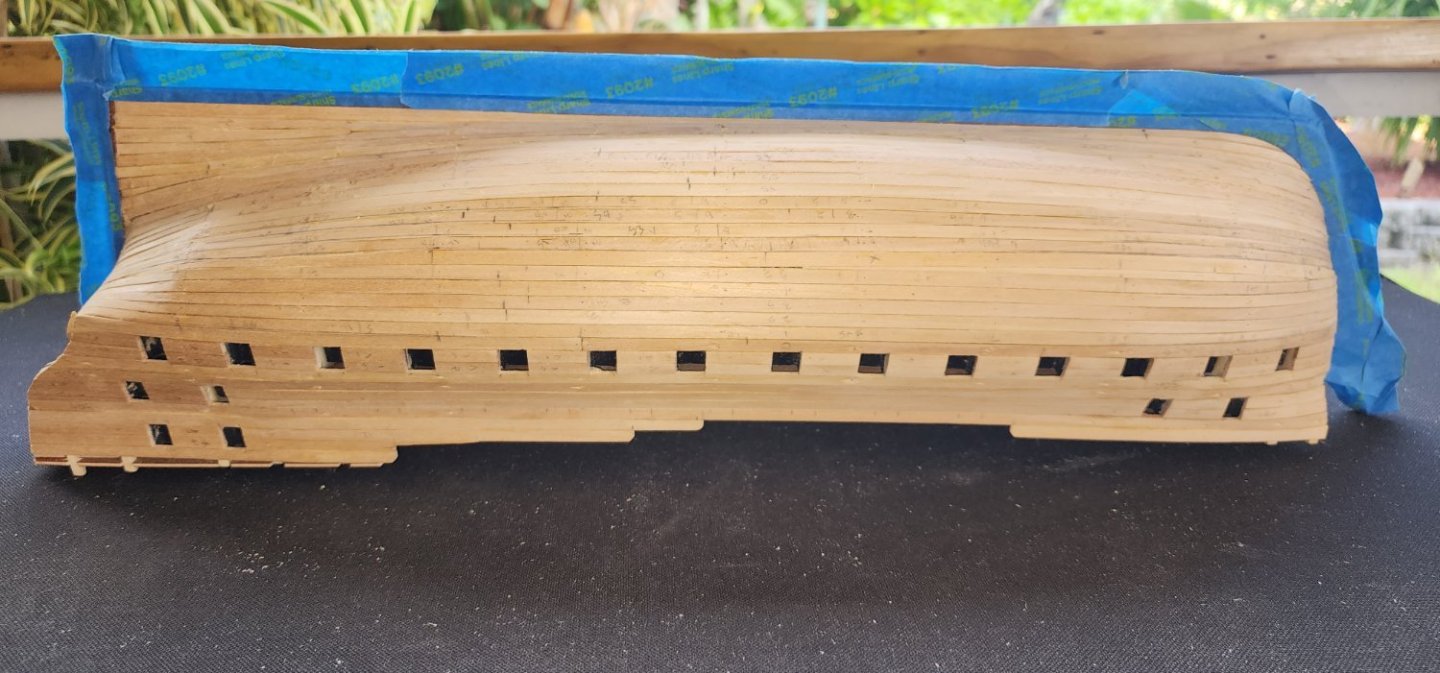
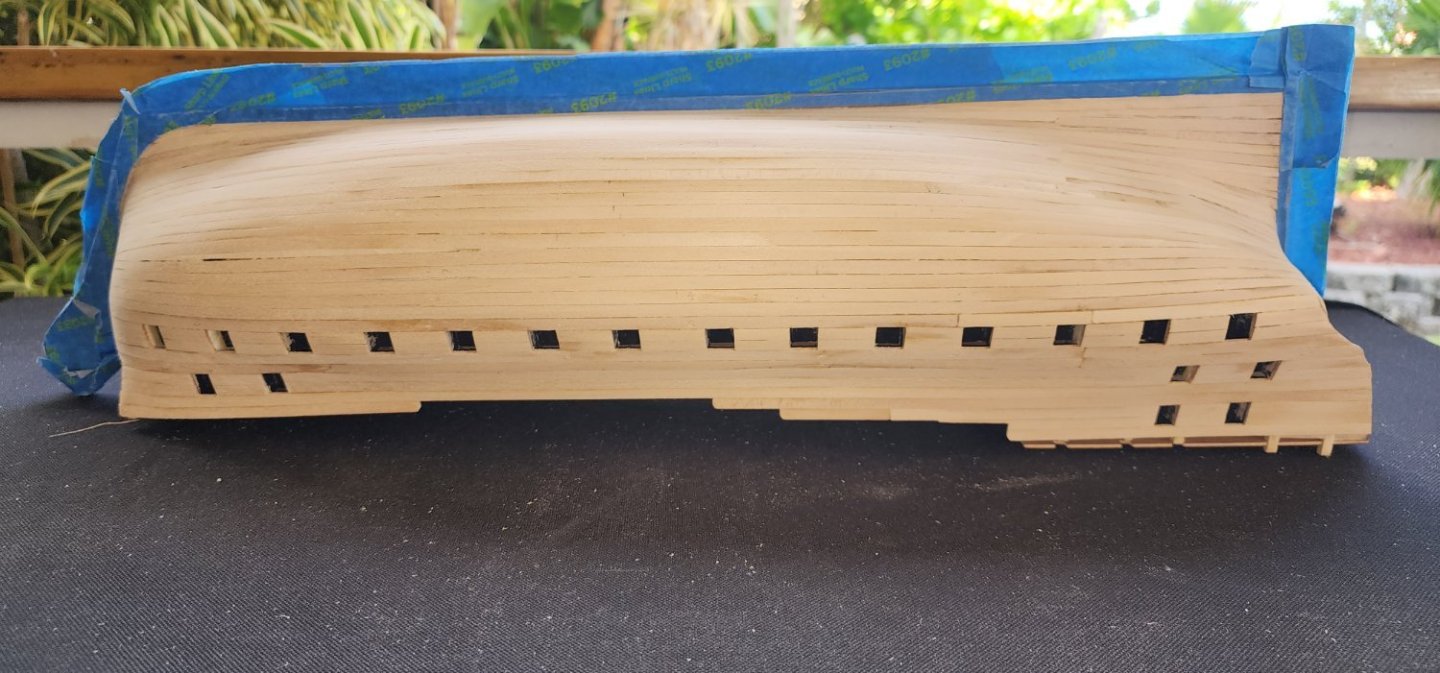
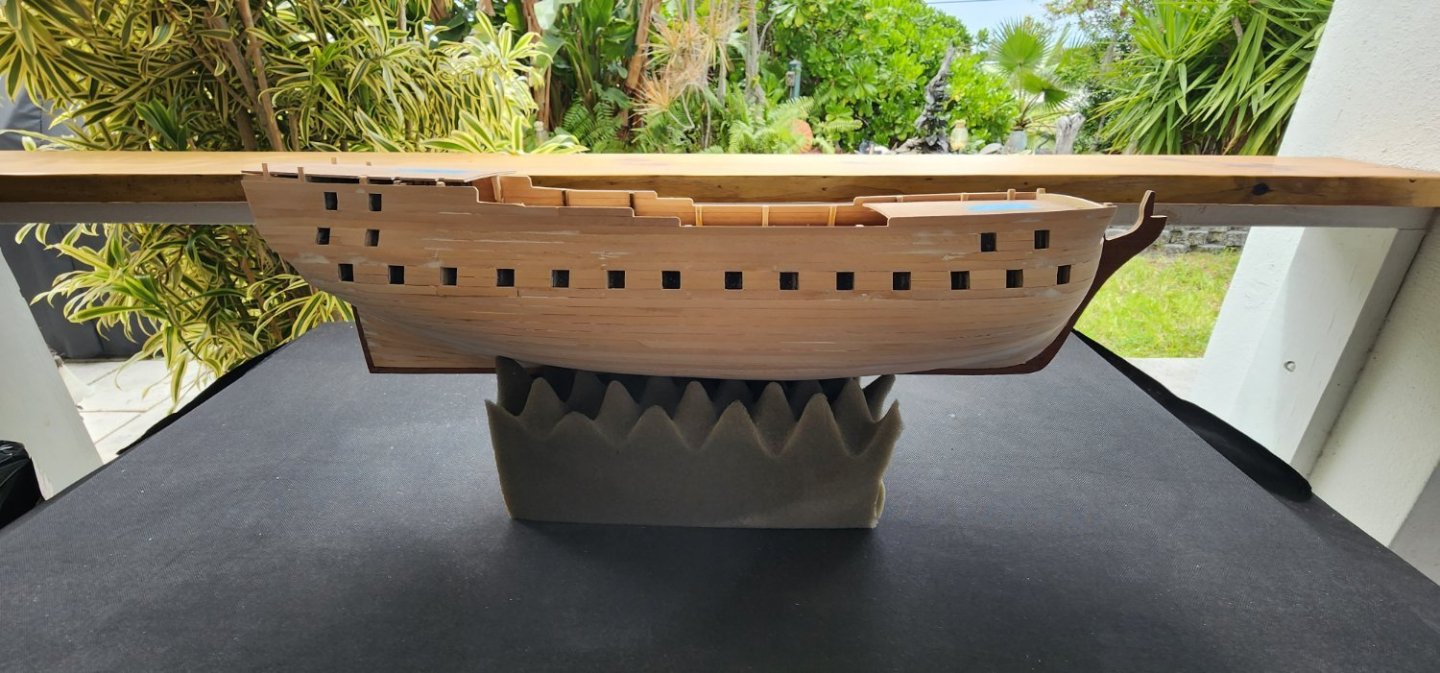
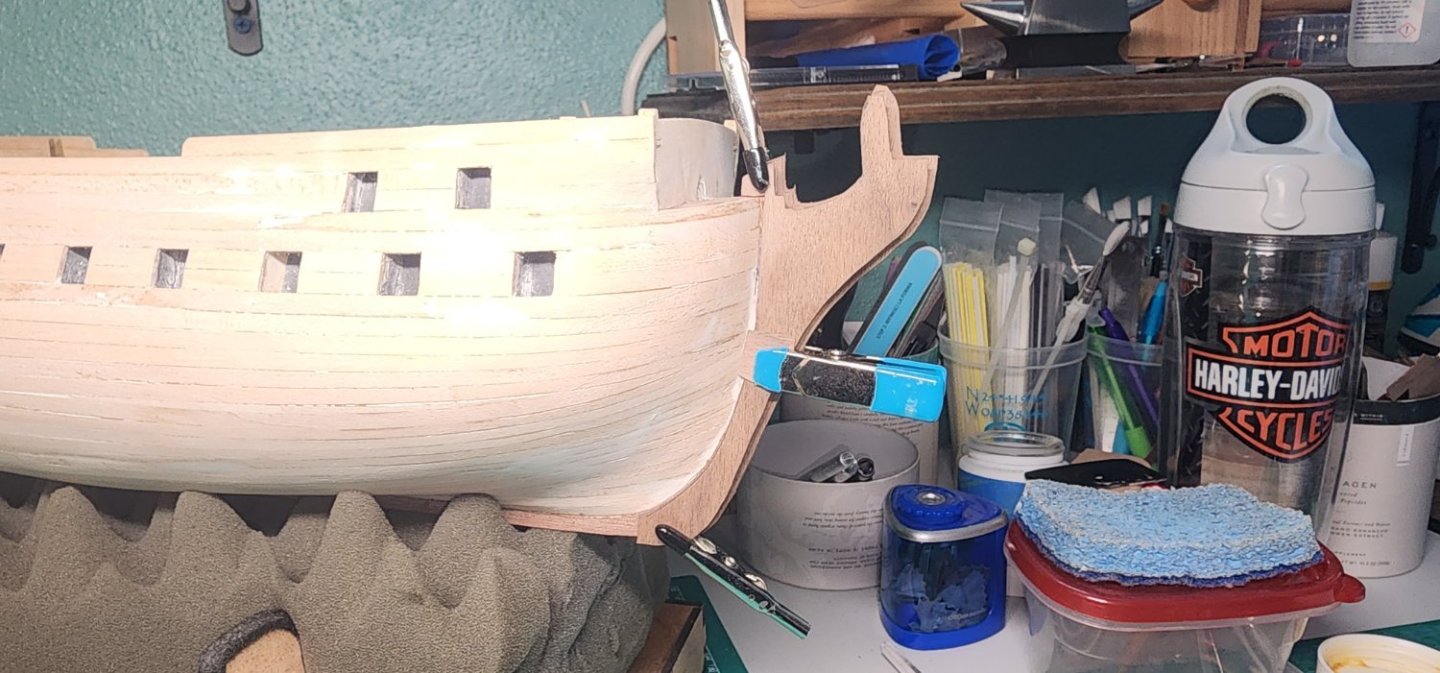
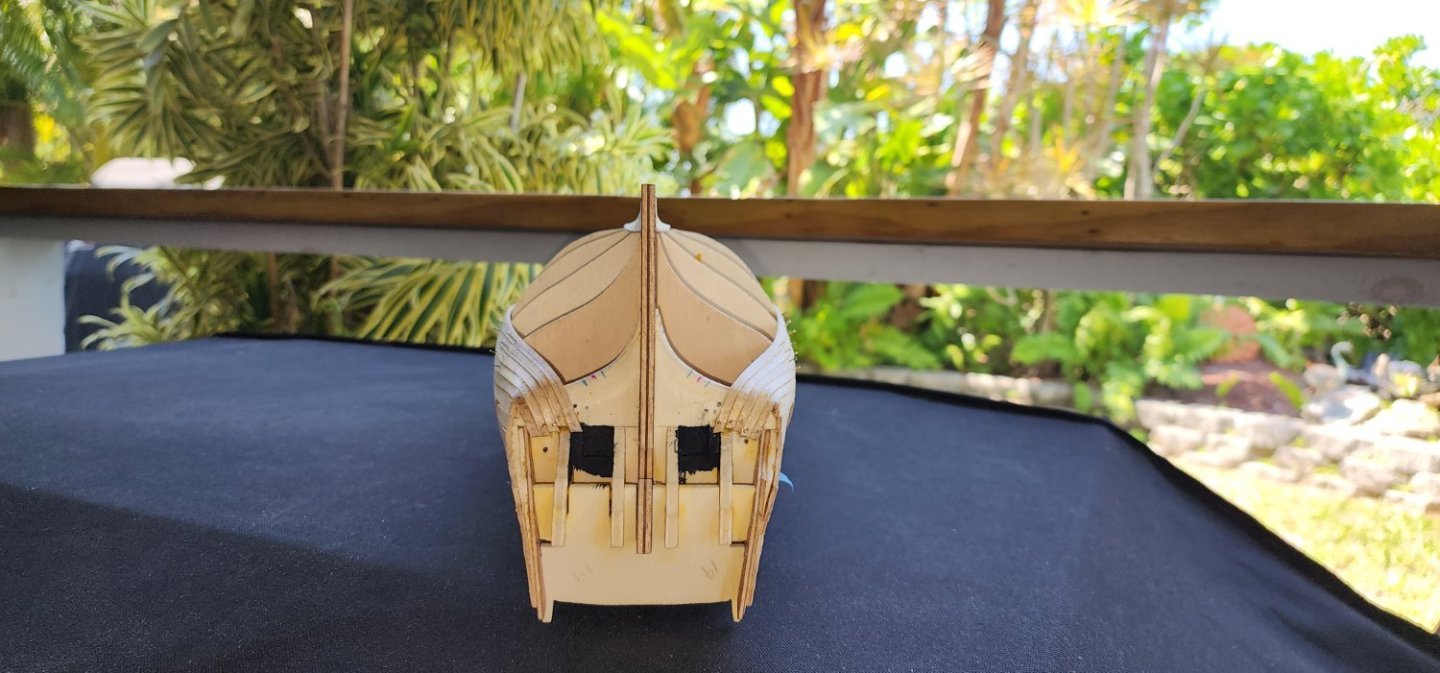
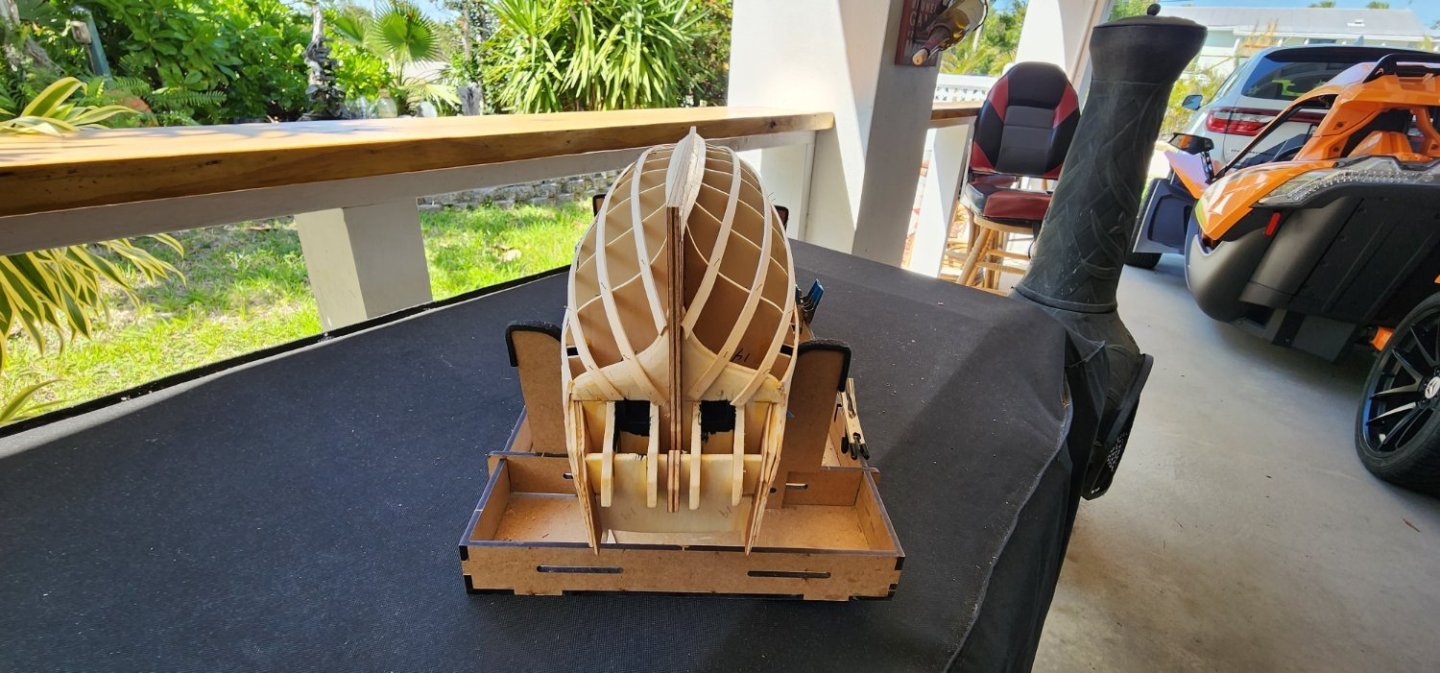
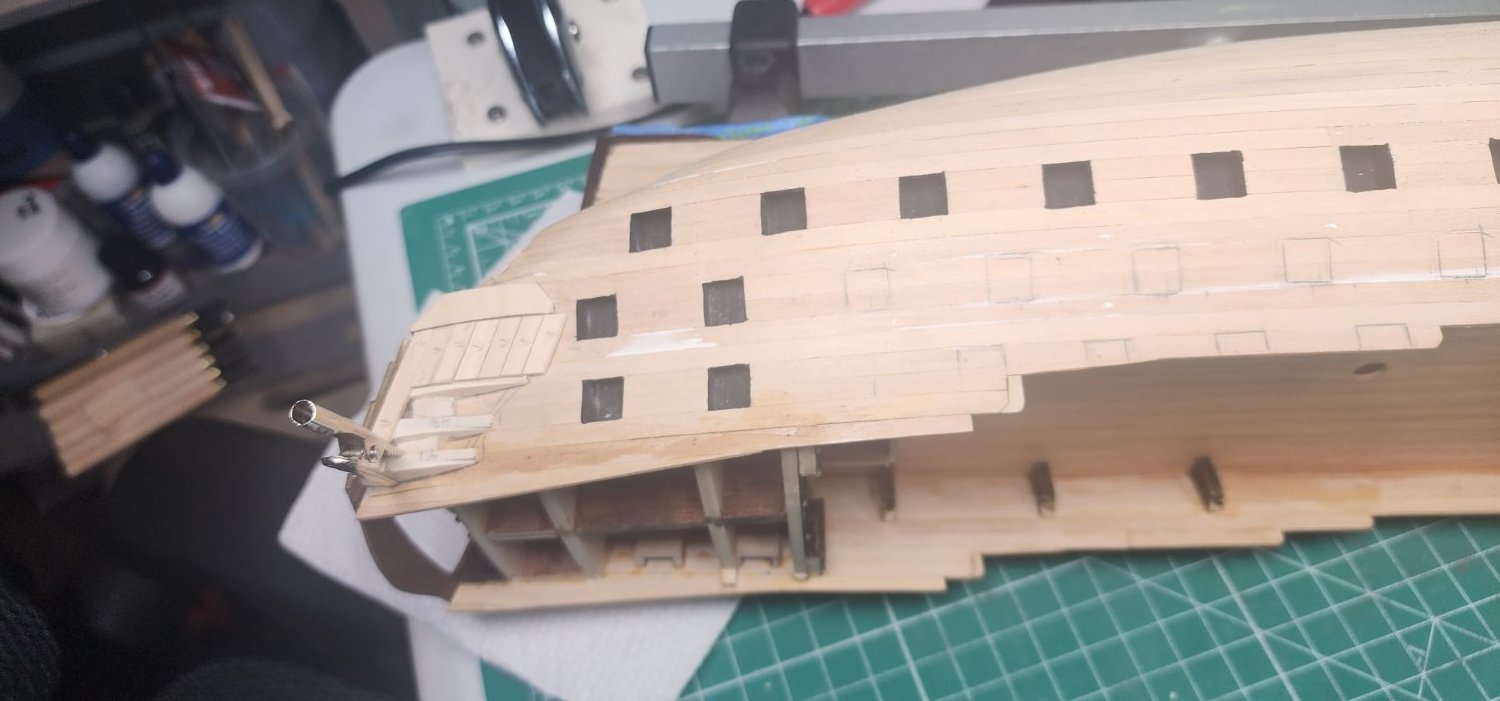
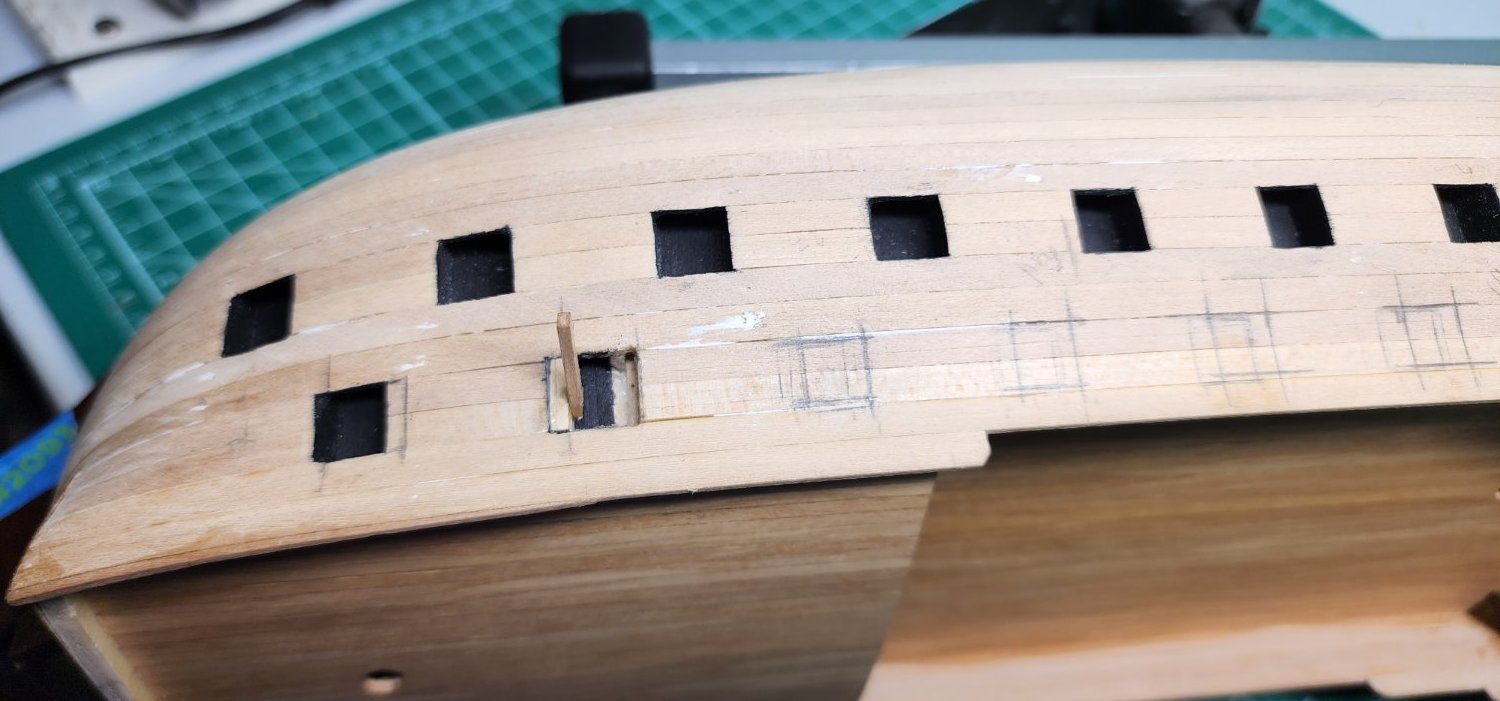
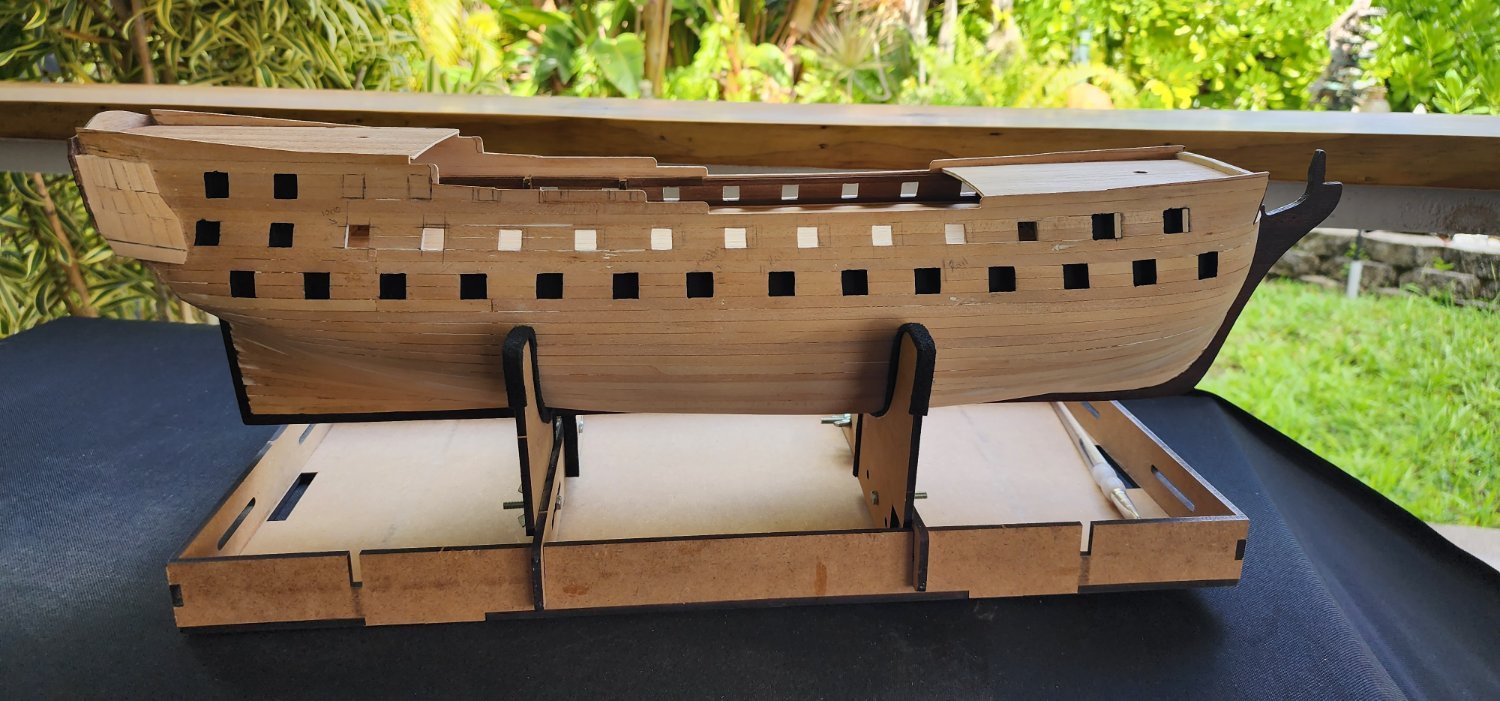
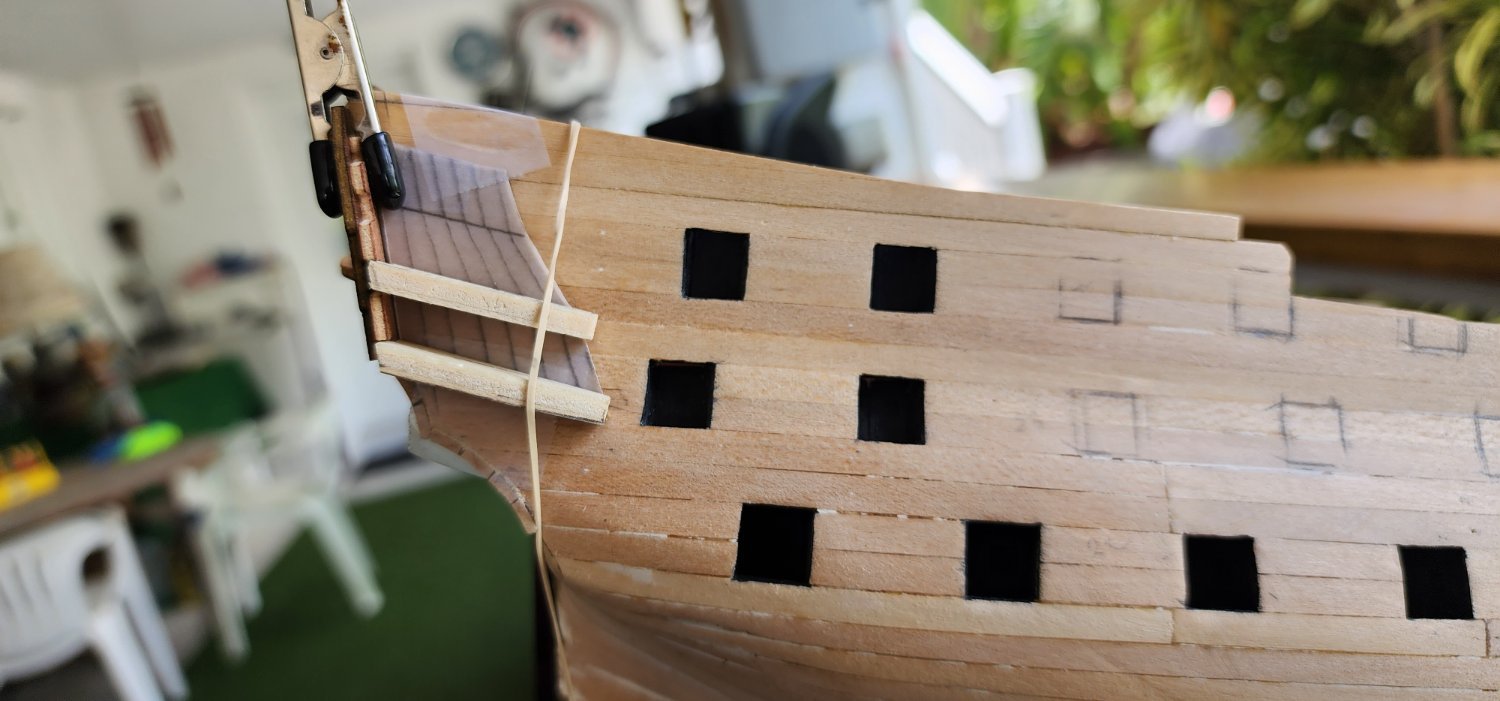
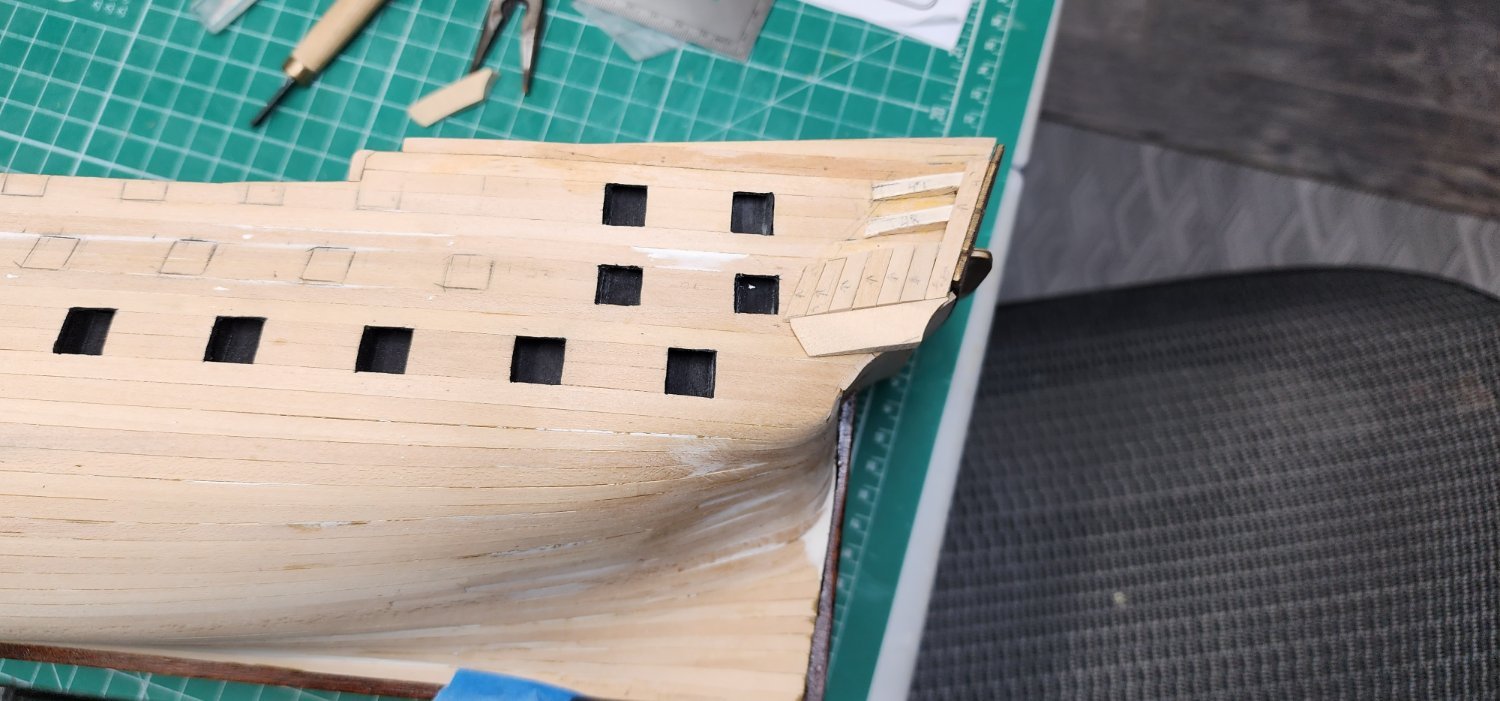
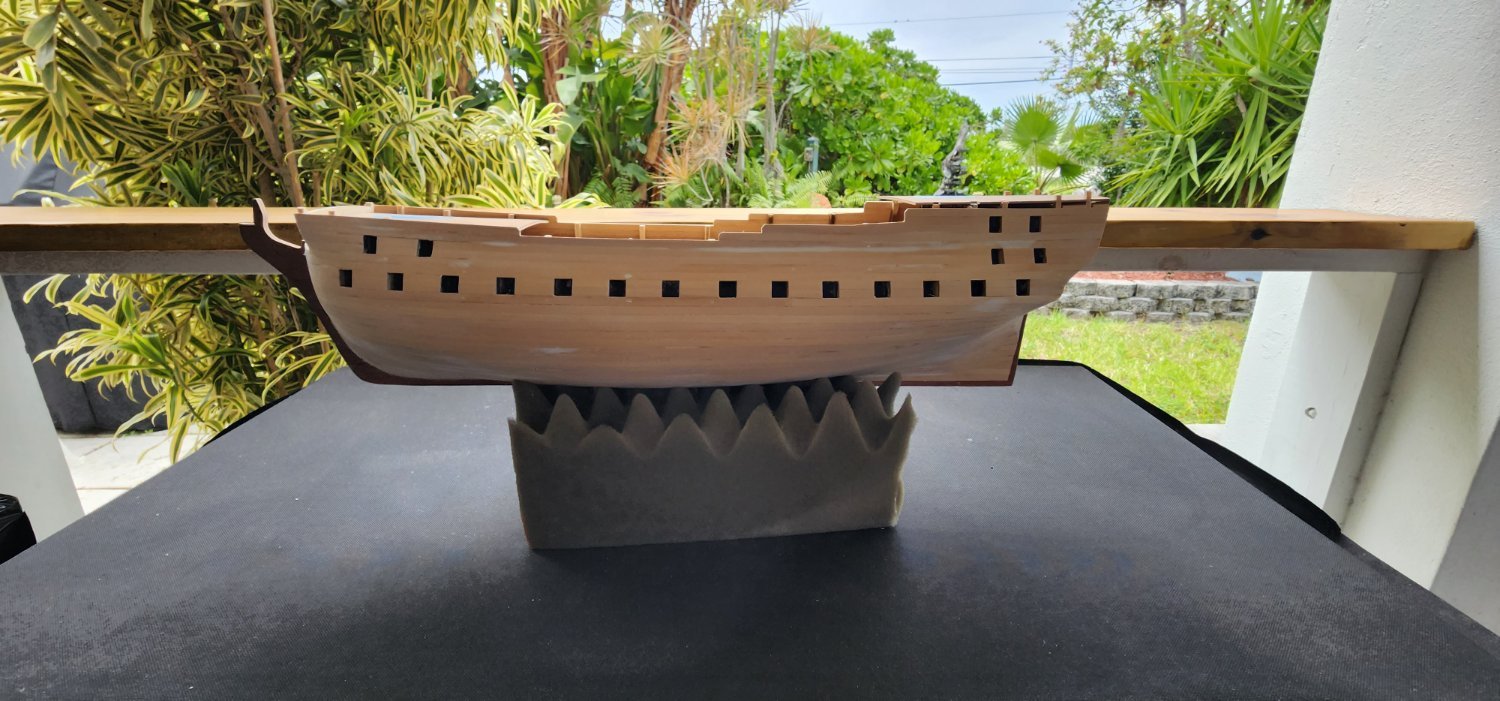
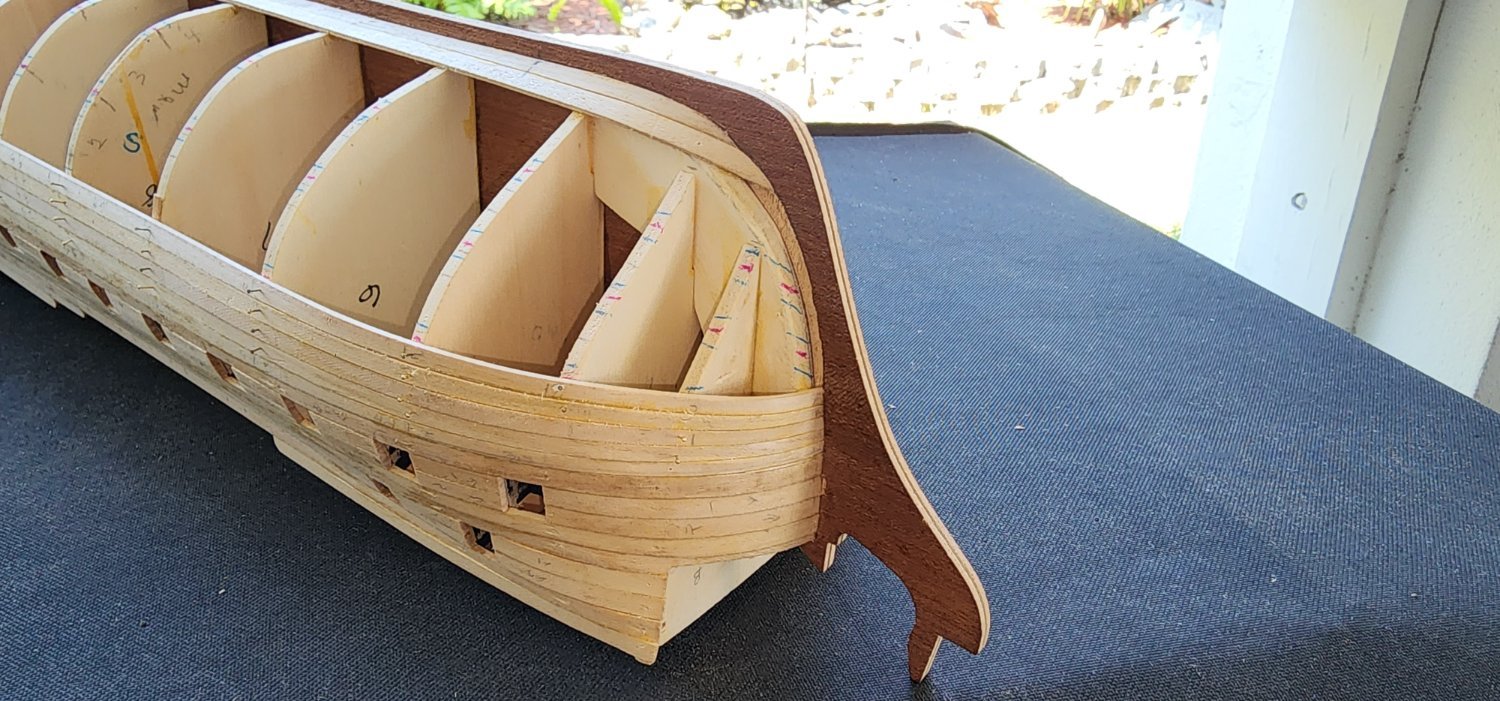
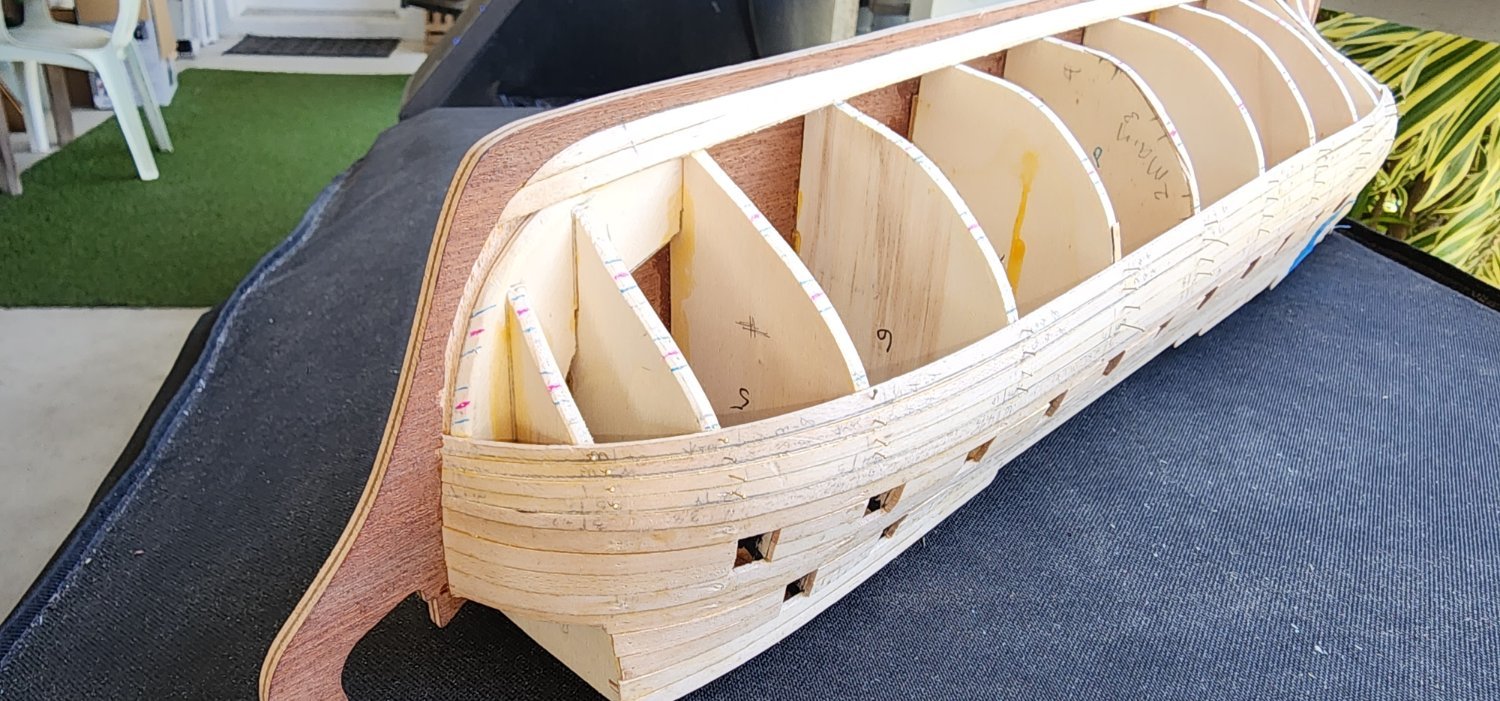
Well, the dog days of summer are here and have pushed me into the shipyard as it has just been to hot outside. No complaints here though. Here is an update on what I have accomplished thus far. I had a very challenging time installing the quarter galleries. I must have removed them from the hull 6 times before I felt that I had them right. There is only one drawing to scale that shows the placement of them, and it was not very clear in my opinion. I spent a lot of time on them and am pleased with the outcome so far. I have a little bit of fine tuning to do and will complete this before I start the second layer of planking. I started to layout the gun ports and found that the 2 forward starboard false gun ports were off by 2.5mm. I knew this early on but had not come up with a solution to make the adjustment. Pretty significant error on my part. What I had to do was to cut out a section that was 2.5mm to the aft and install a new bulkhead. I used a small nail to handle the small piece and glued it in place. I then filled in the void that was left on the forward section of the false gun ports. It came out ok, you won't see the repair after the second planking is in place. I installed the inner bulwark planking and cut out the port and starboard gun ports. Well that brings me up to date on the Bellona. I will have another update as I continue to make progress. Thanks for reading and as always, your comments and guidance are welcome.
Cheers
Nearshore


- hamilton, yvesvidal, Bill Morrison and 1 other
-
 4
4
-
2 hours ago, allanyed said:
Lots of progress, she is looking good!
Have you looked at the posts on the reducing of the thickness of knee of the head? It is a long string with many comments, but worth the read, especially the post by Chuck Passaro https://modelshipworld.com/topic/34577-taper-of-the-keel-stem-knee-of-the-head-and-stern-post/
When you go to add the wales, note that the drawing in post #36 is not as seen on contemporary models or plans as the wales should be diminished in thickness at the bow in order to seat properly in the rabbet. There is a good discussion on this at https://modelshipworld.com/topic/34868-wales-diminishing-thickness-at-the-bow/
Allan
Hi Allen,
Thank you for sharing the link on the wales thickness. I have several questions about the wales on the Bellona that i will ask on that forum.
Nearshore
-
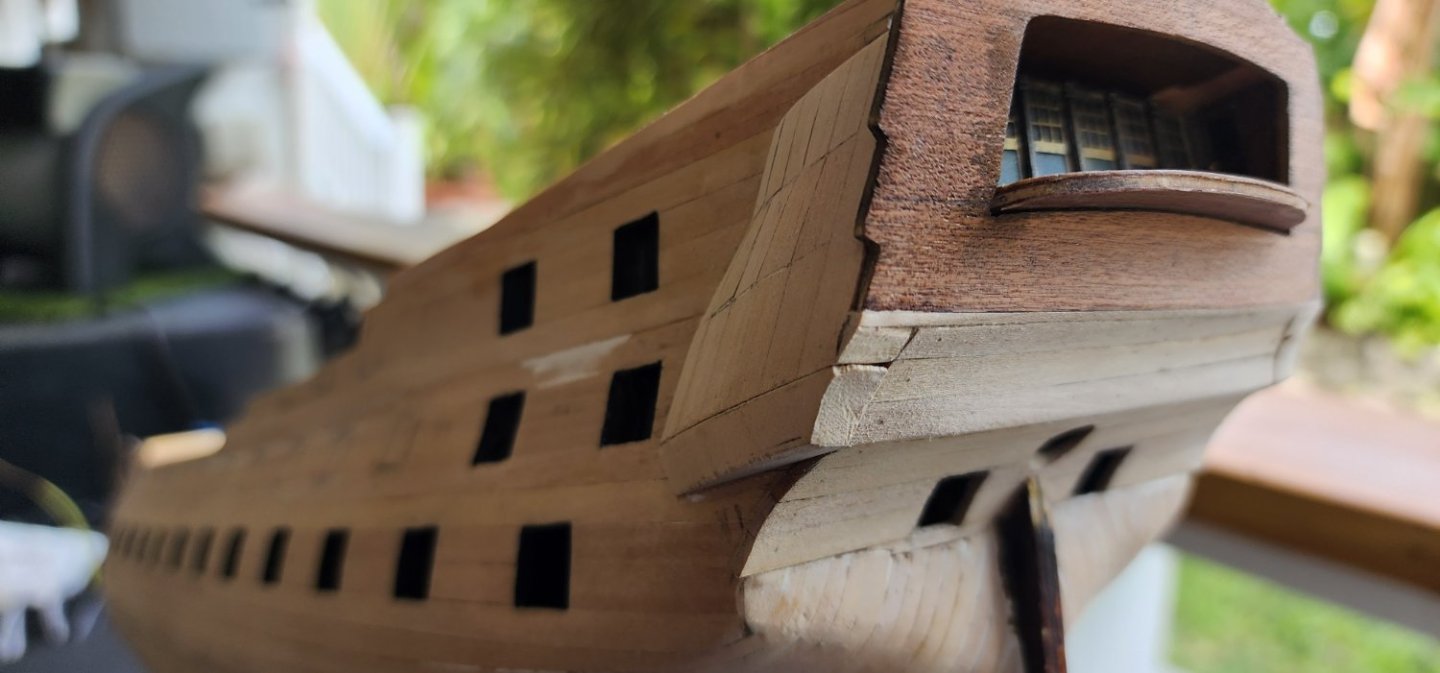
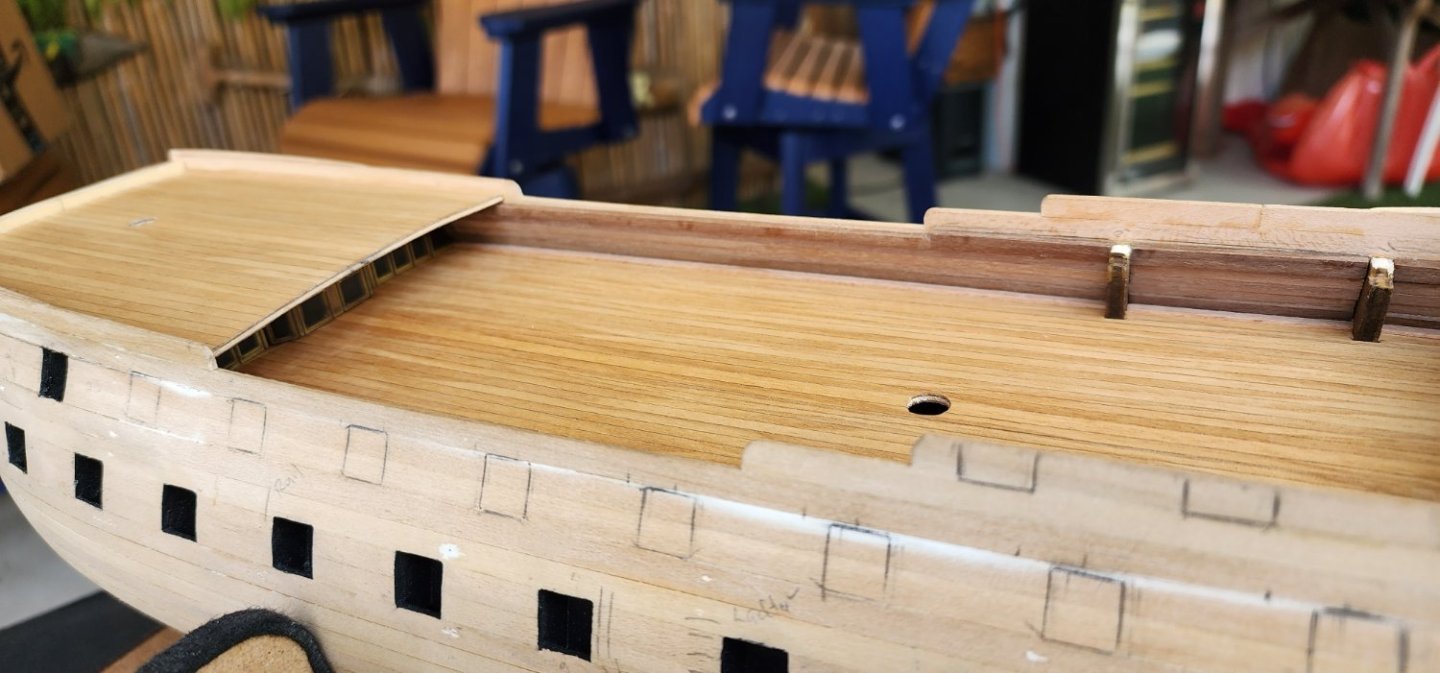
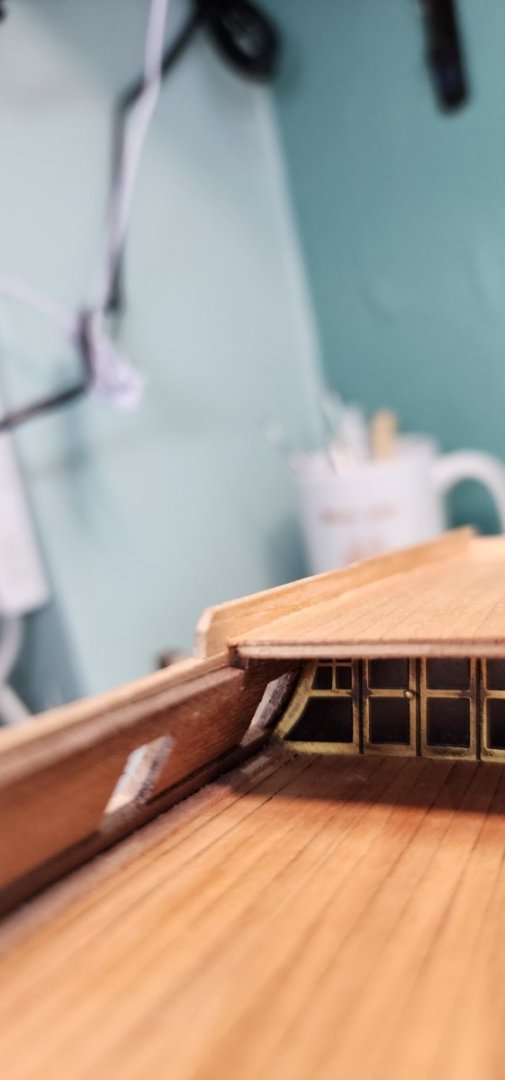
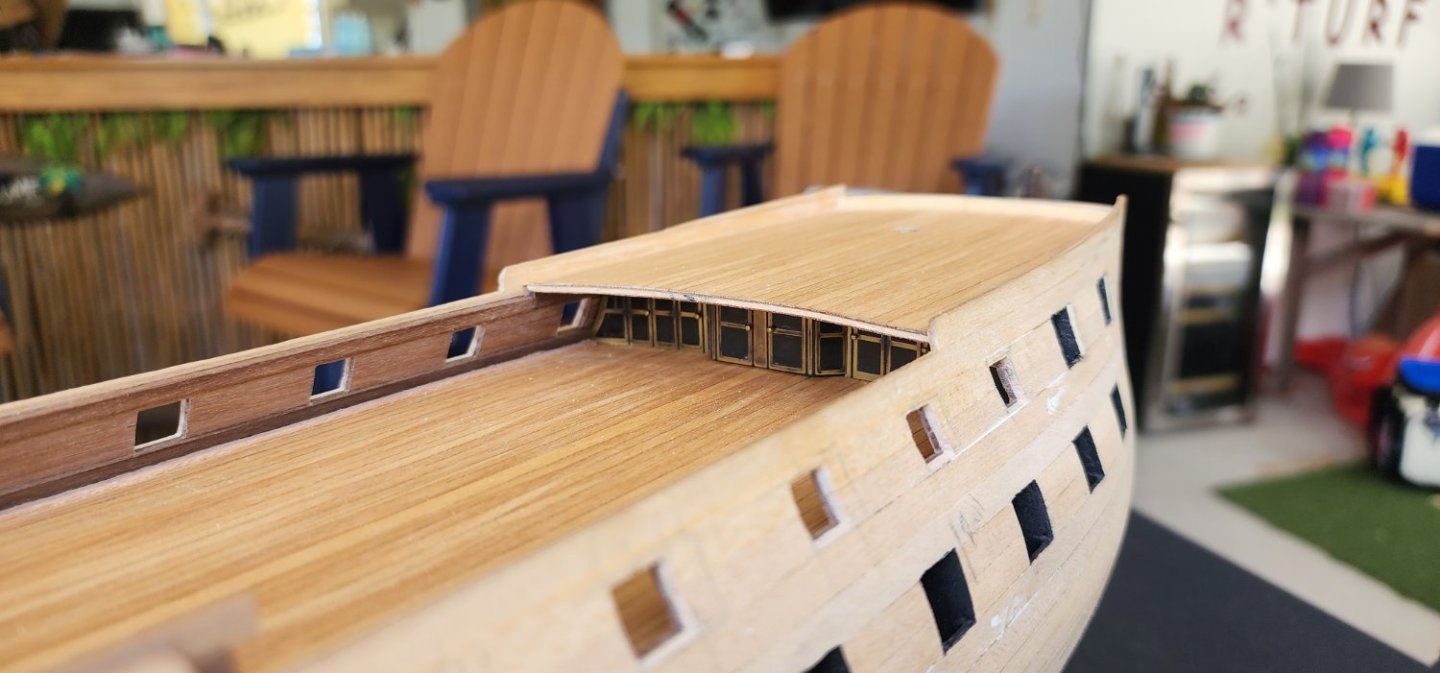
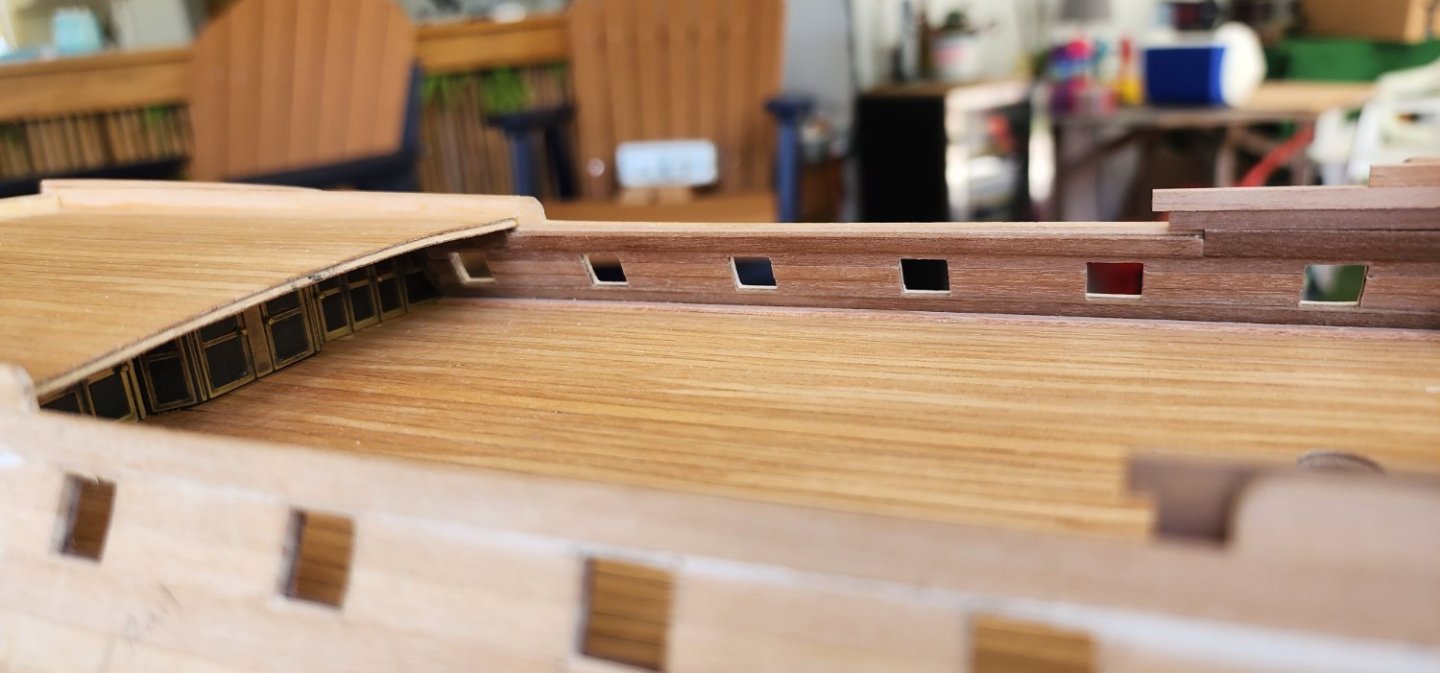
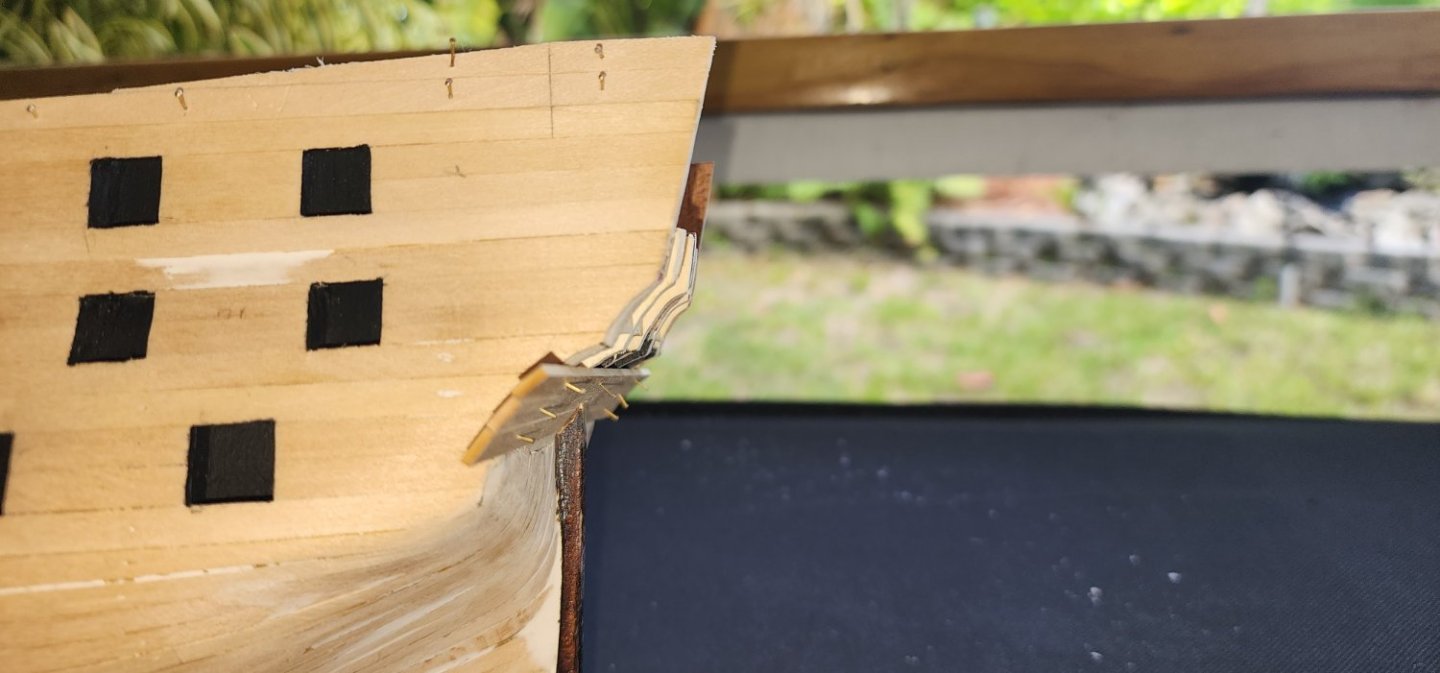
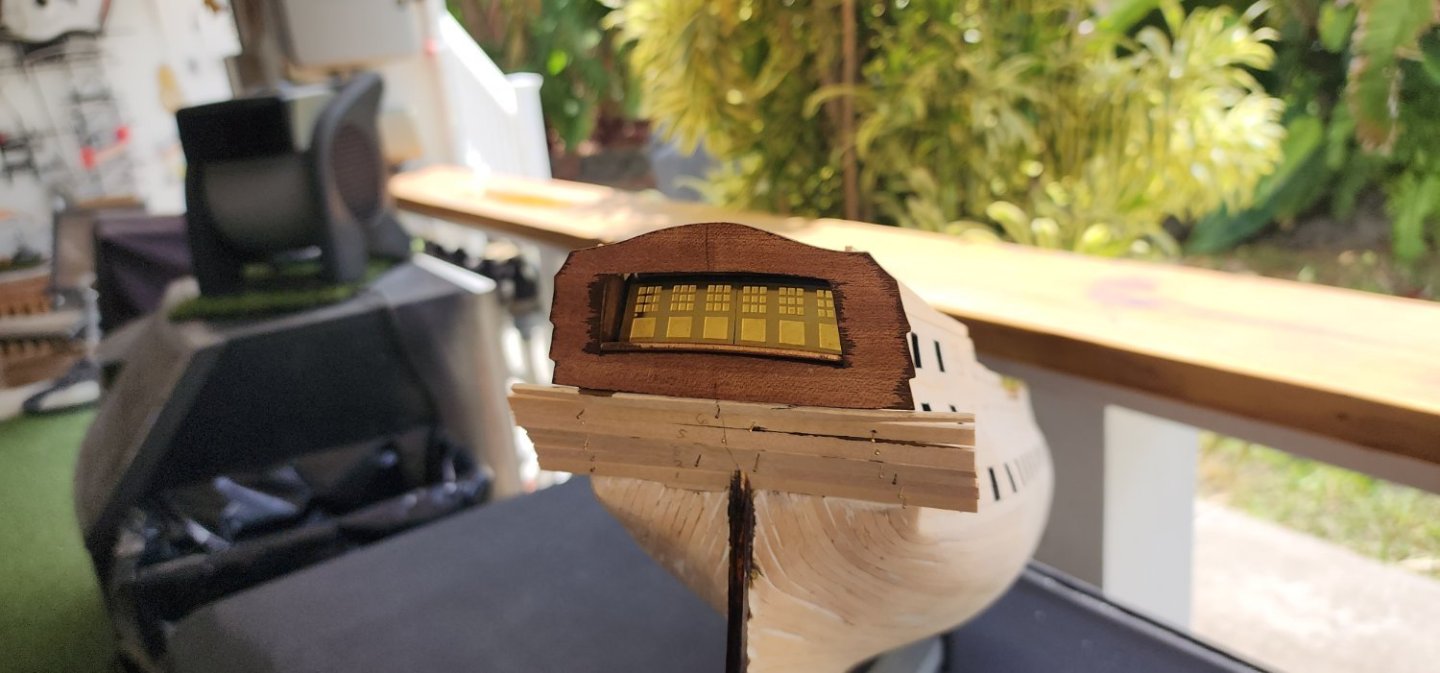
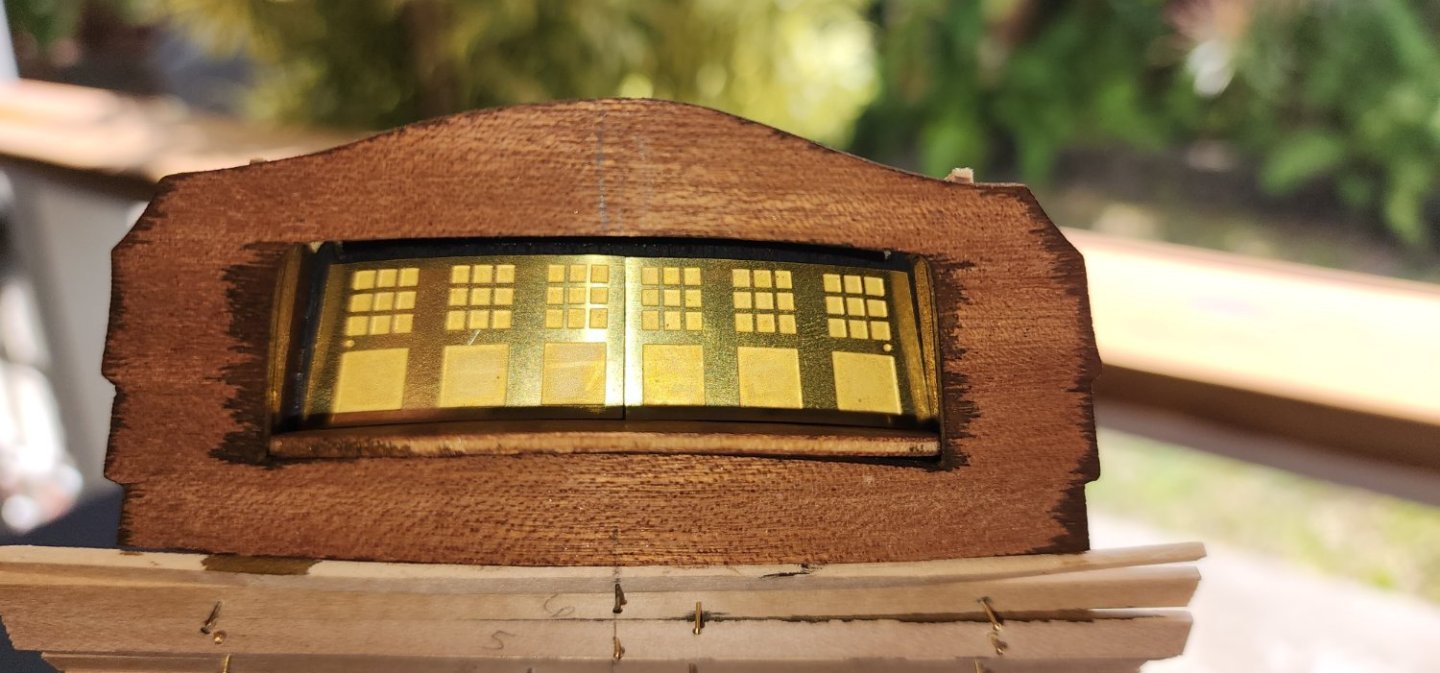
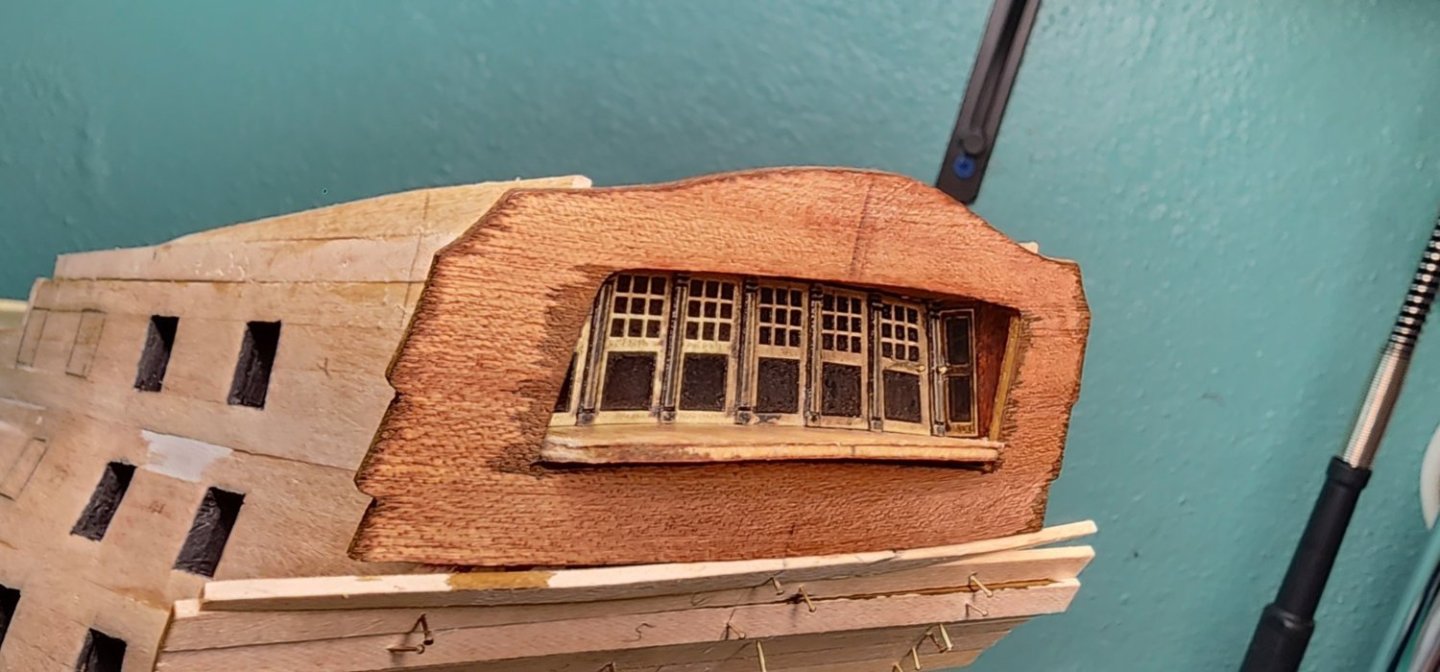
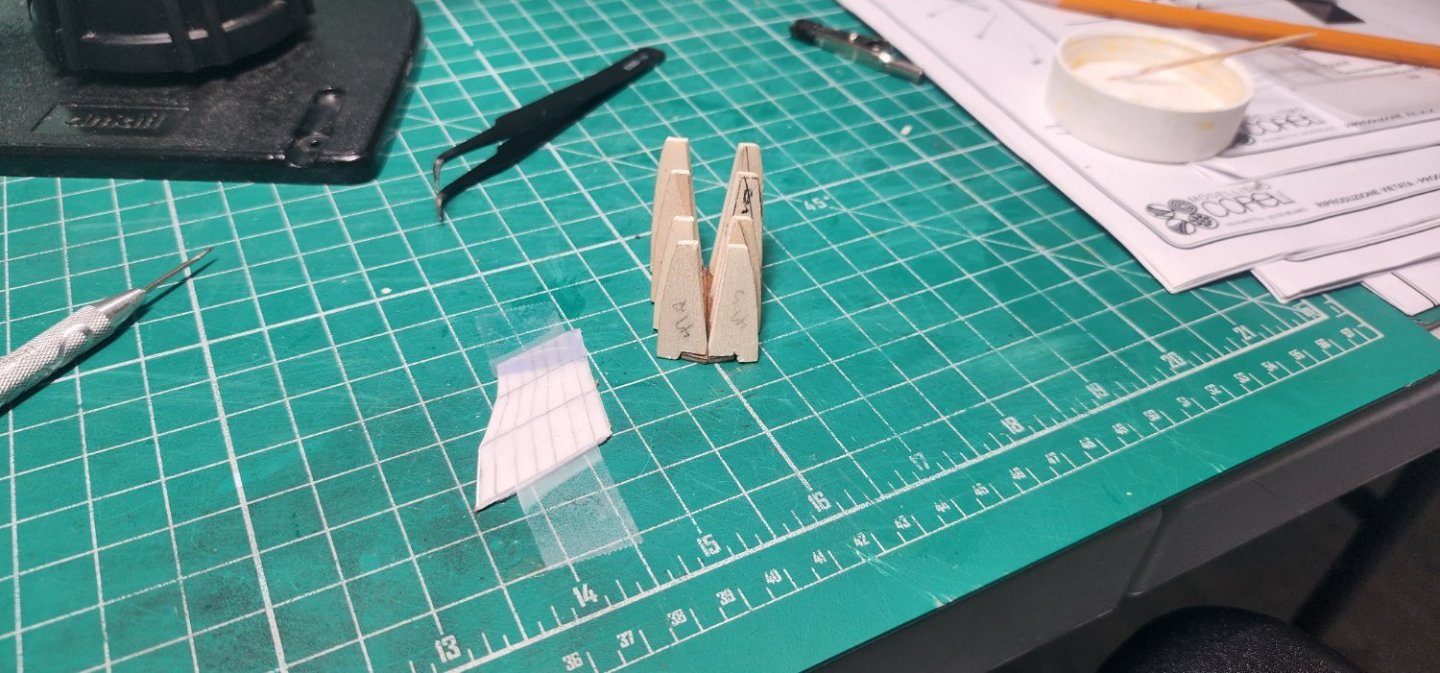
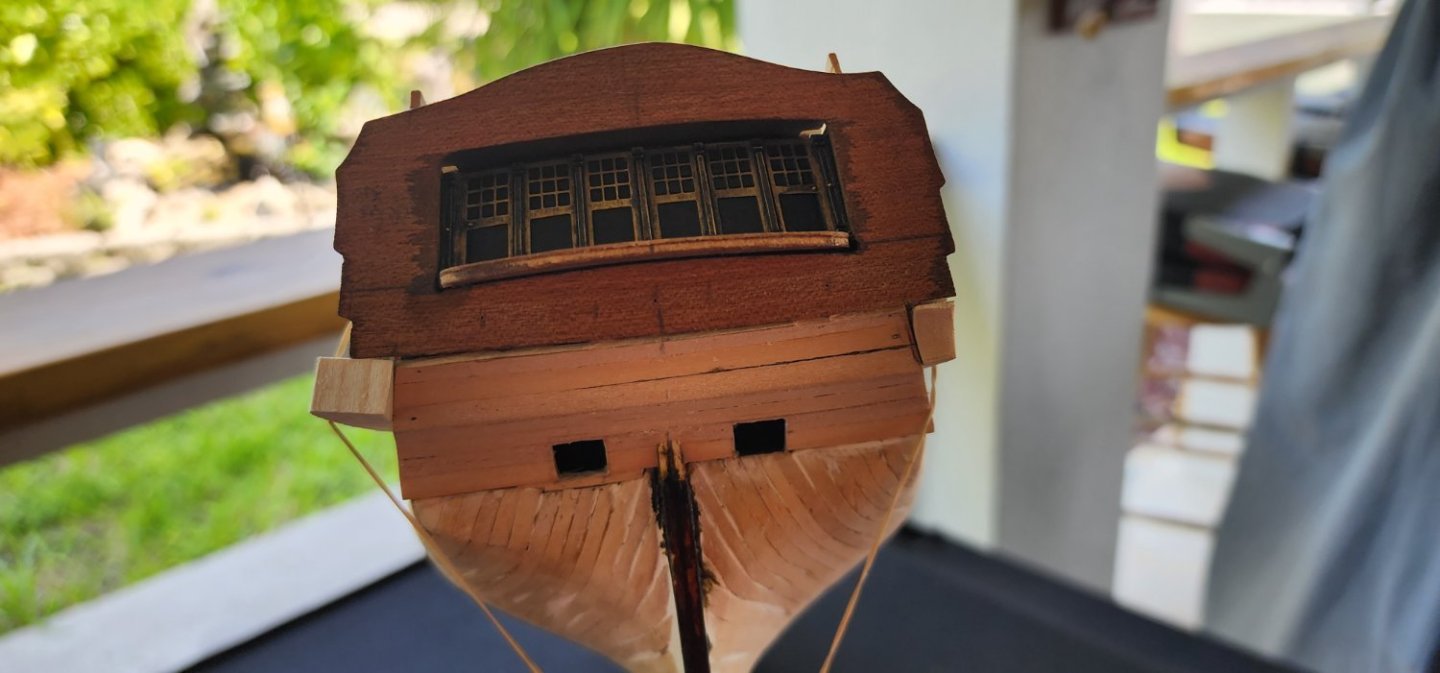
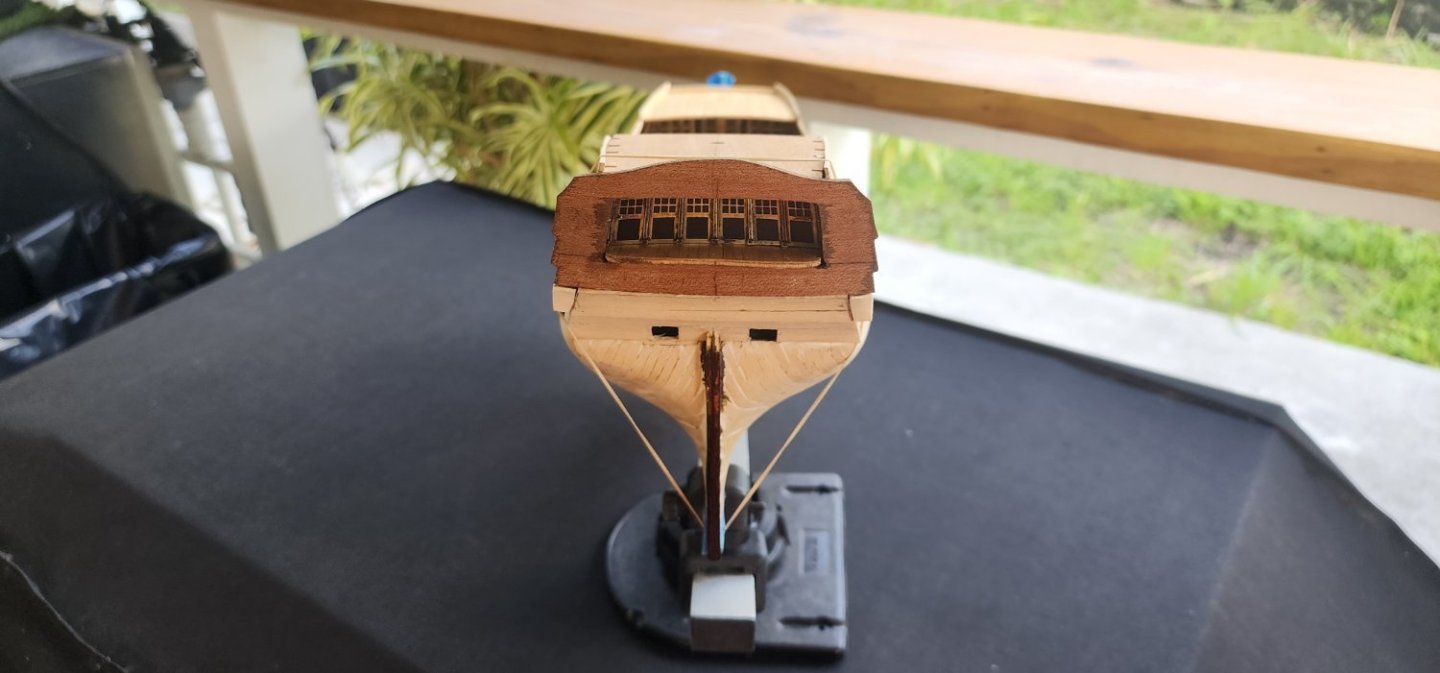
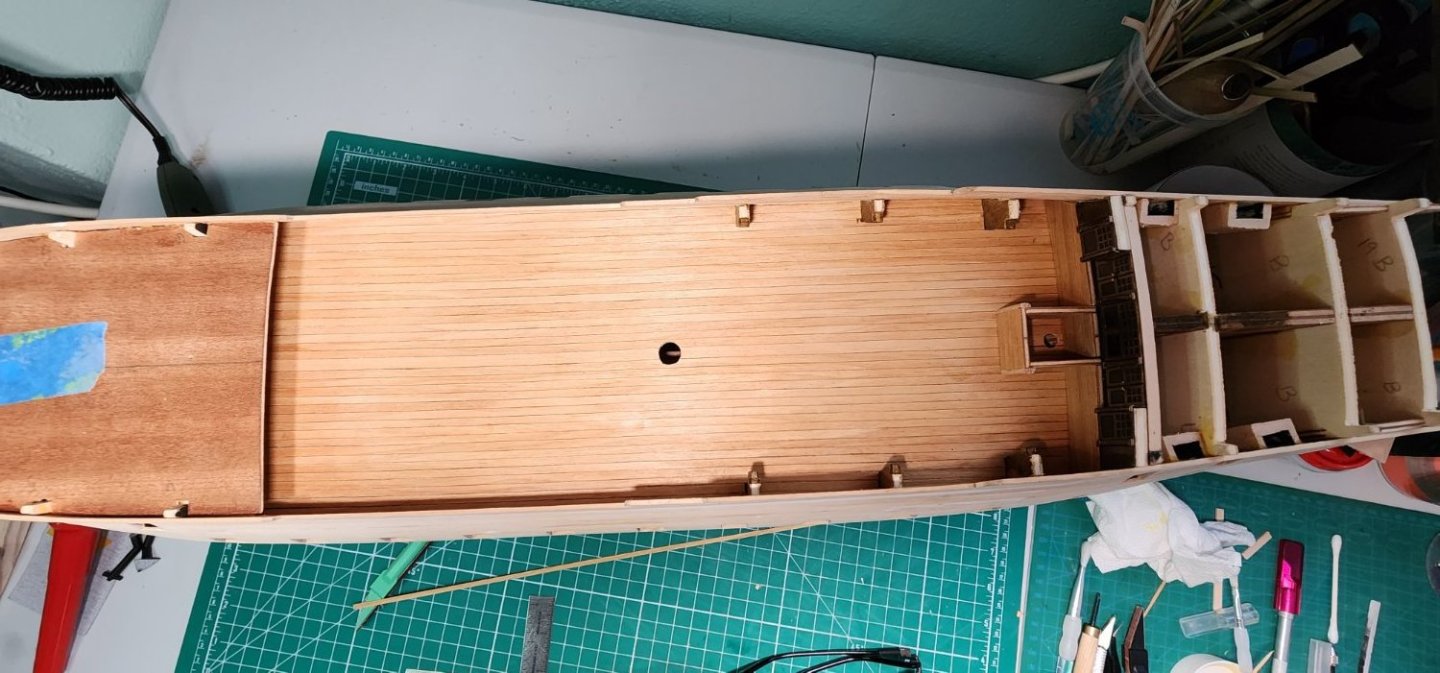
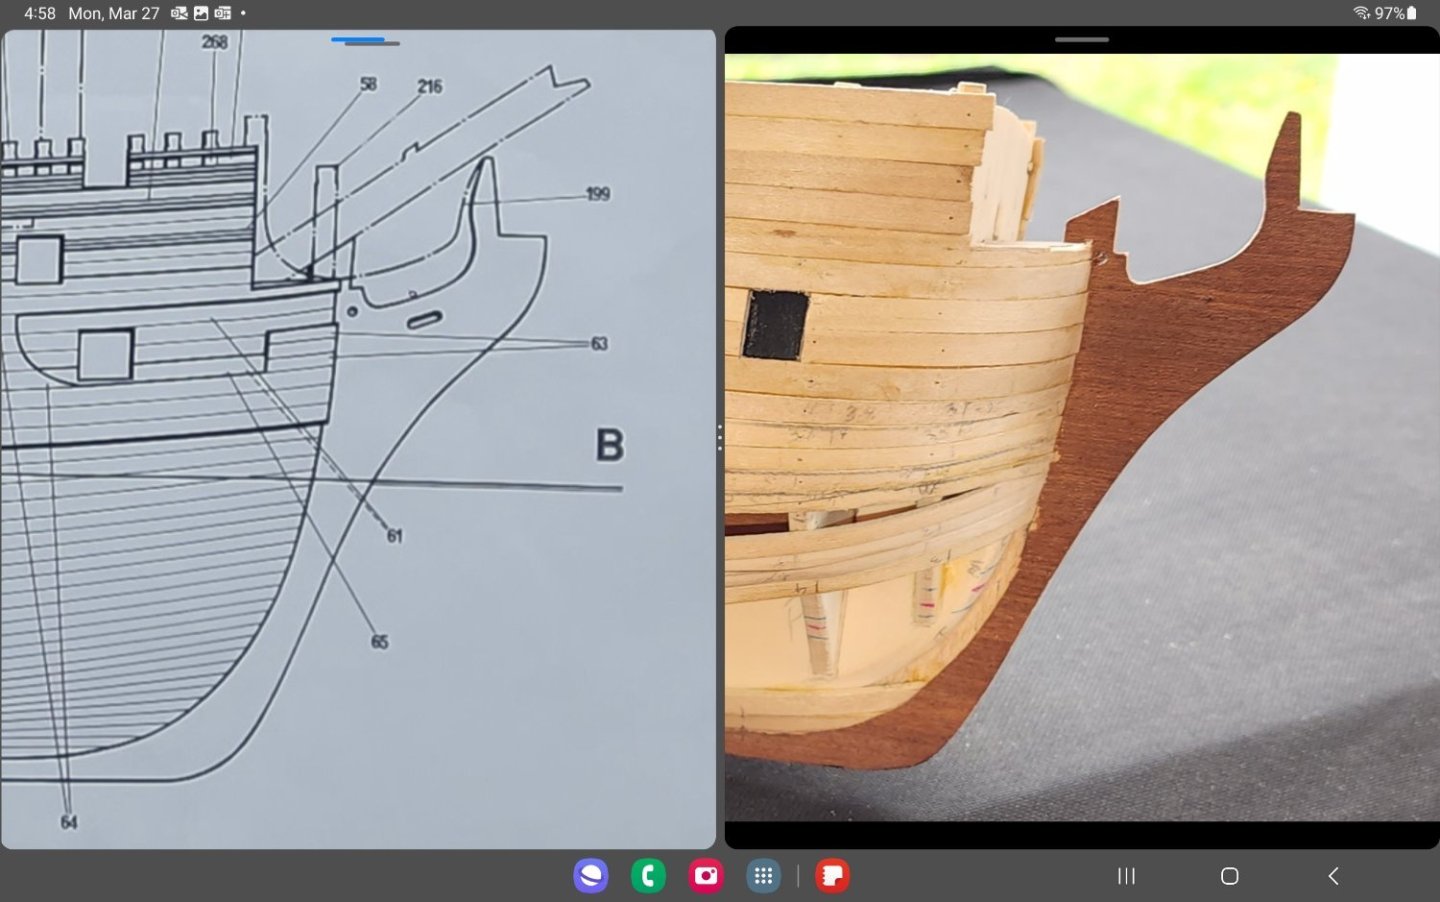
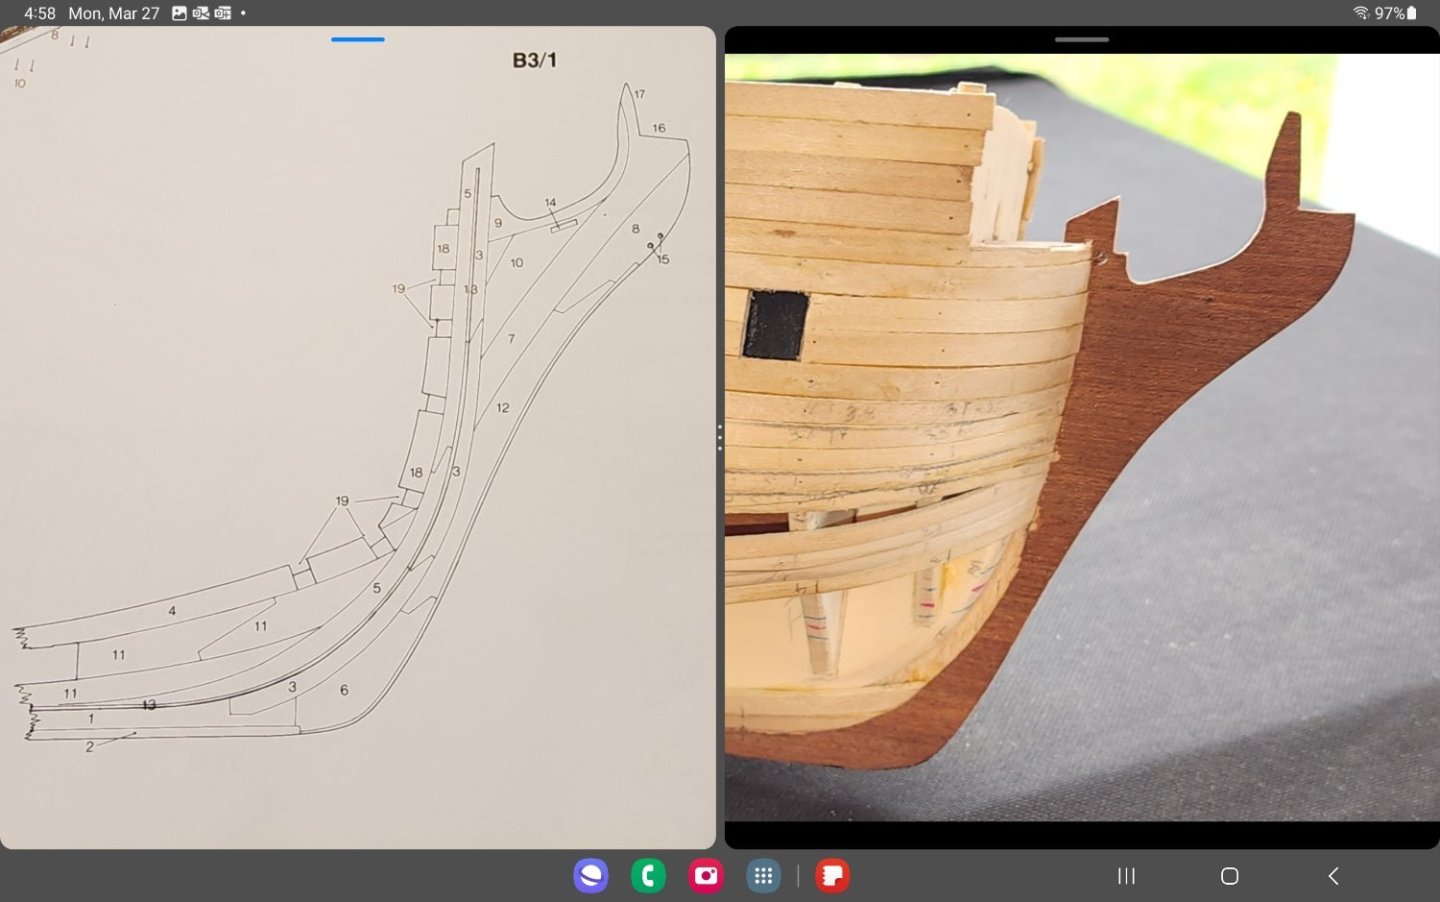
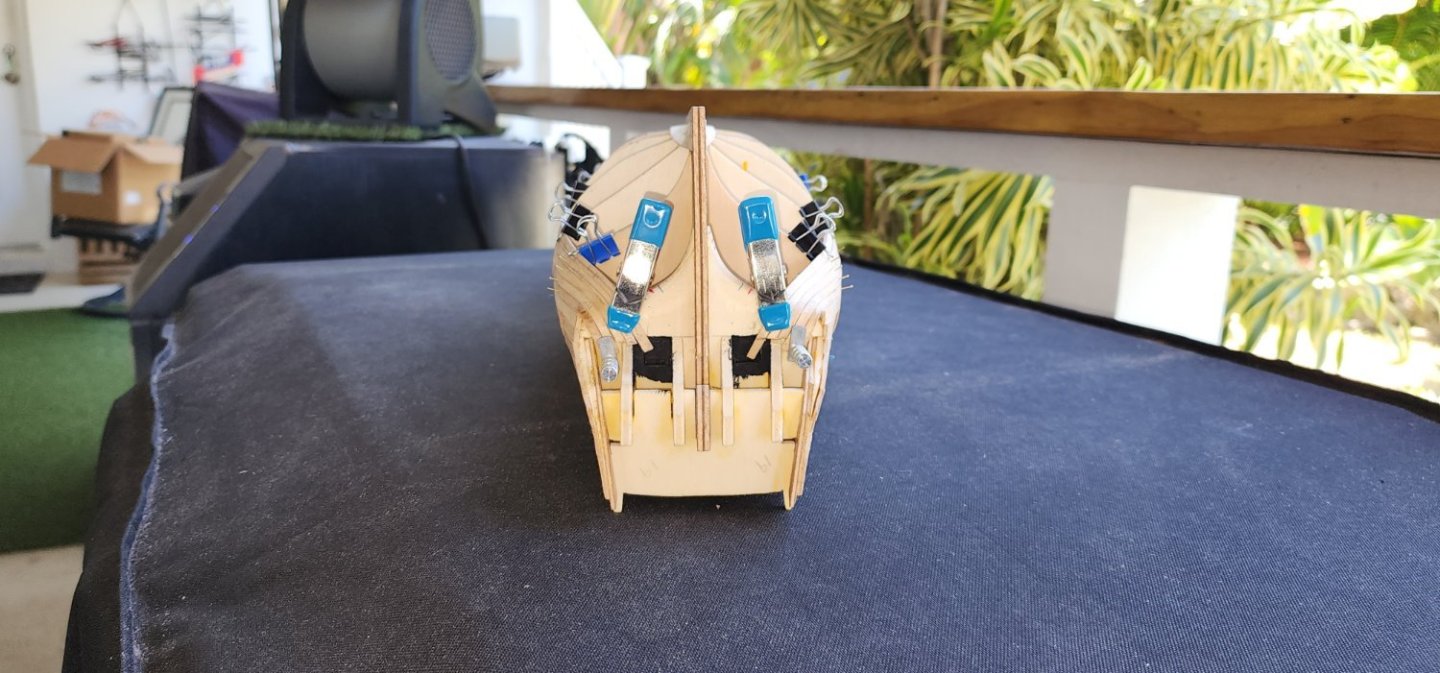
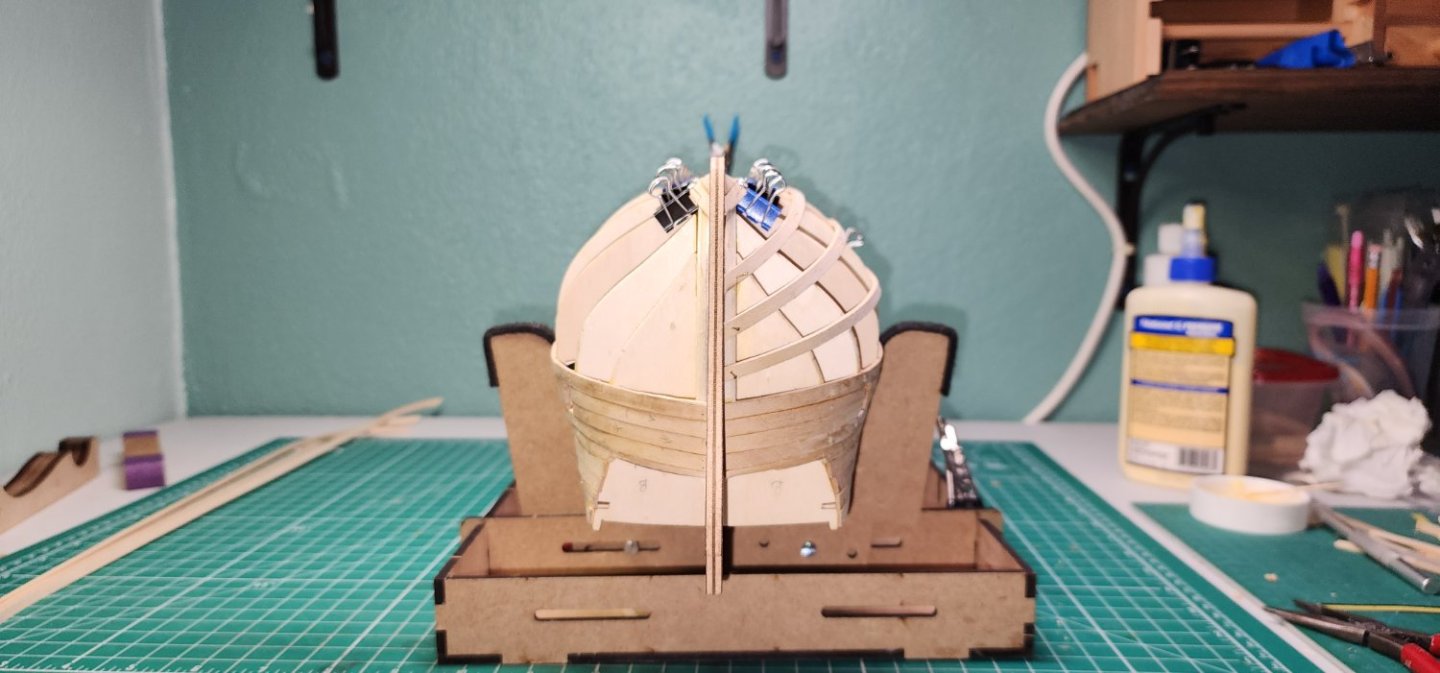
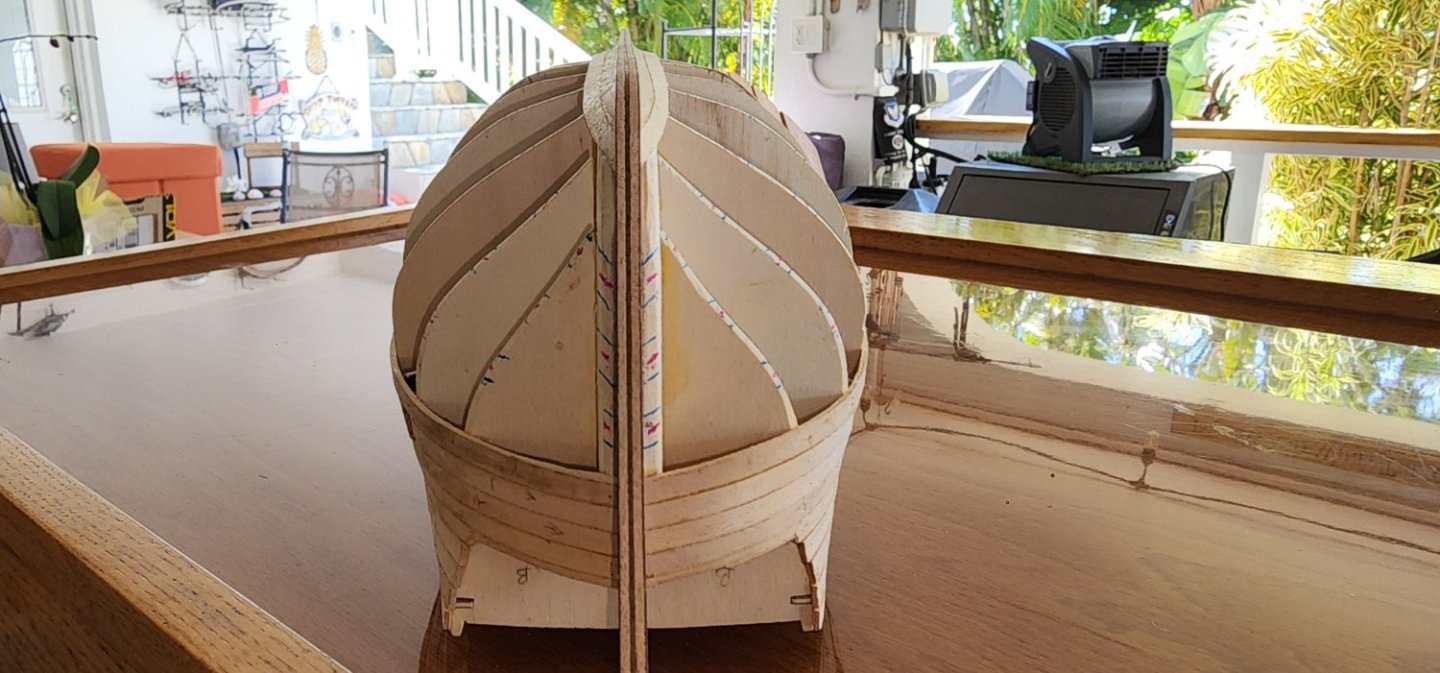
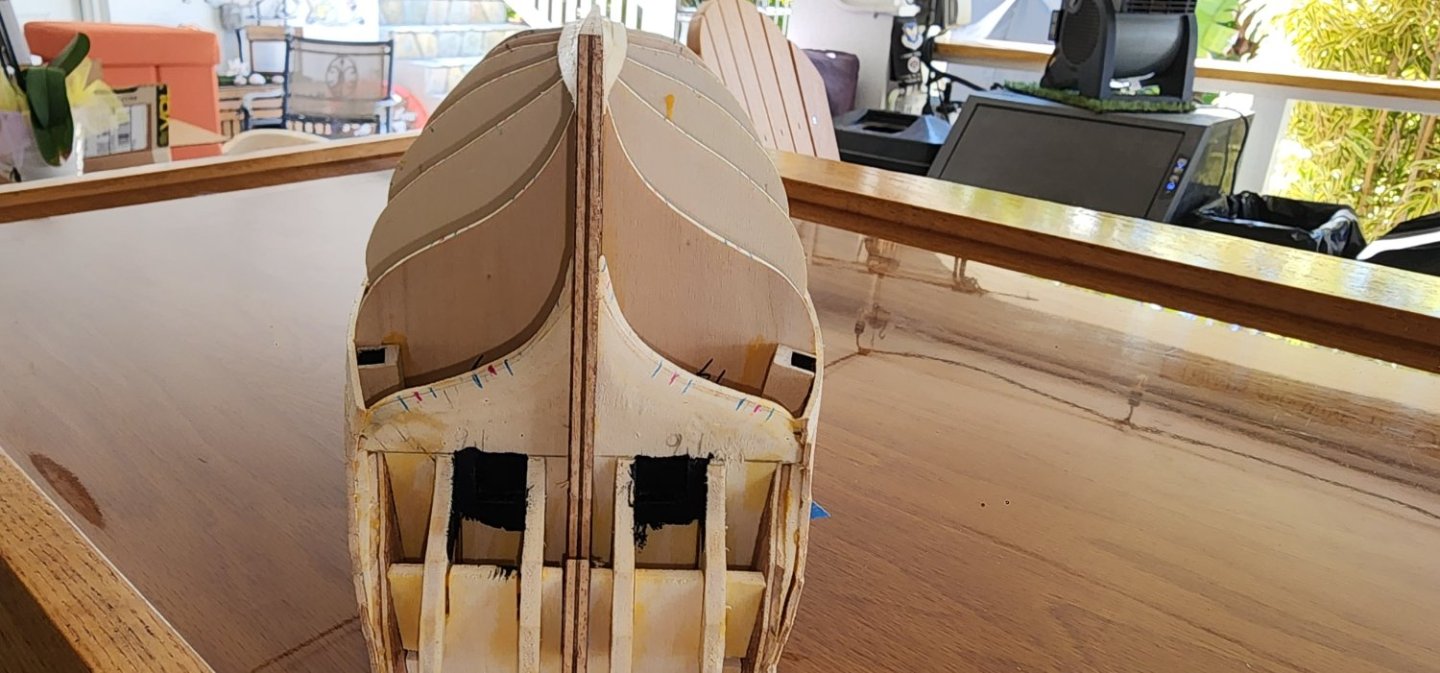
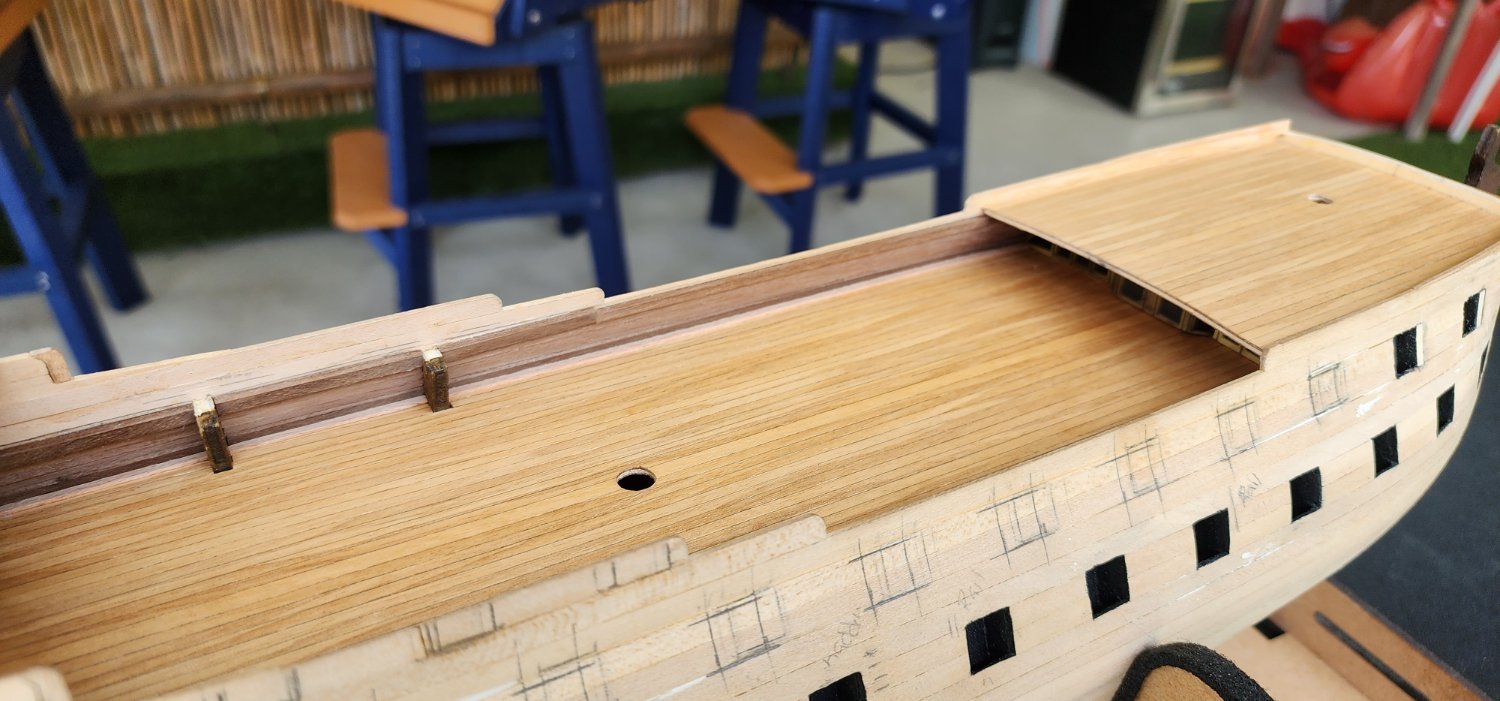
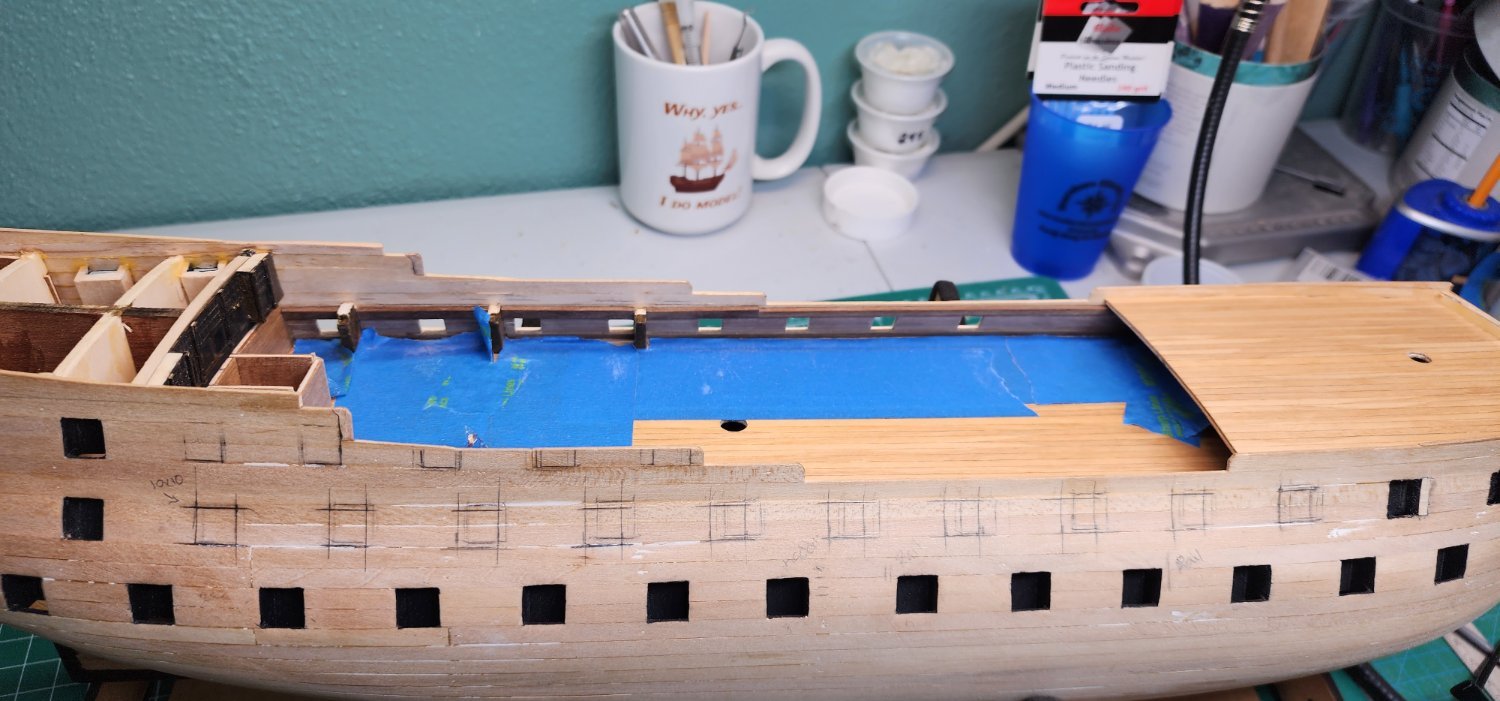
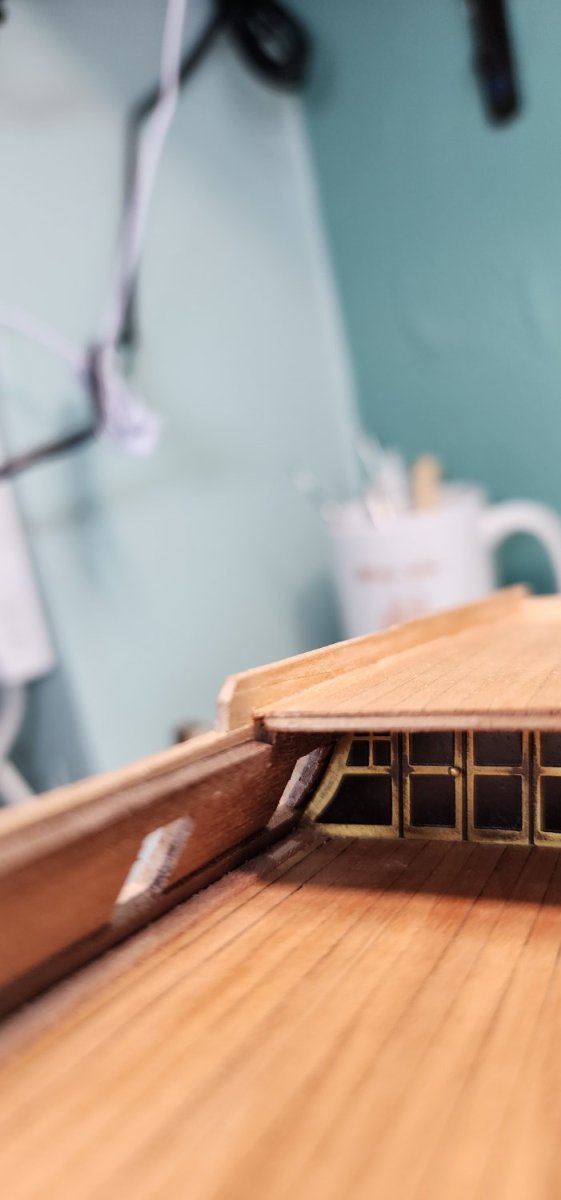
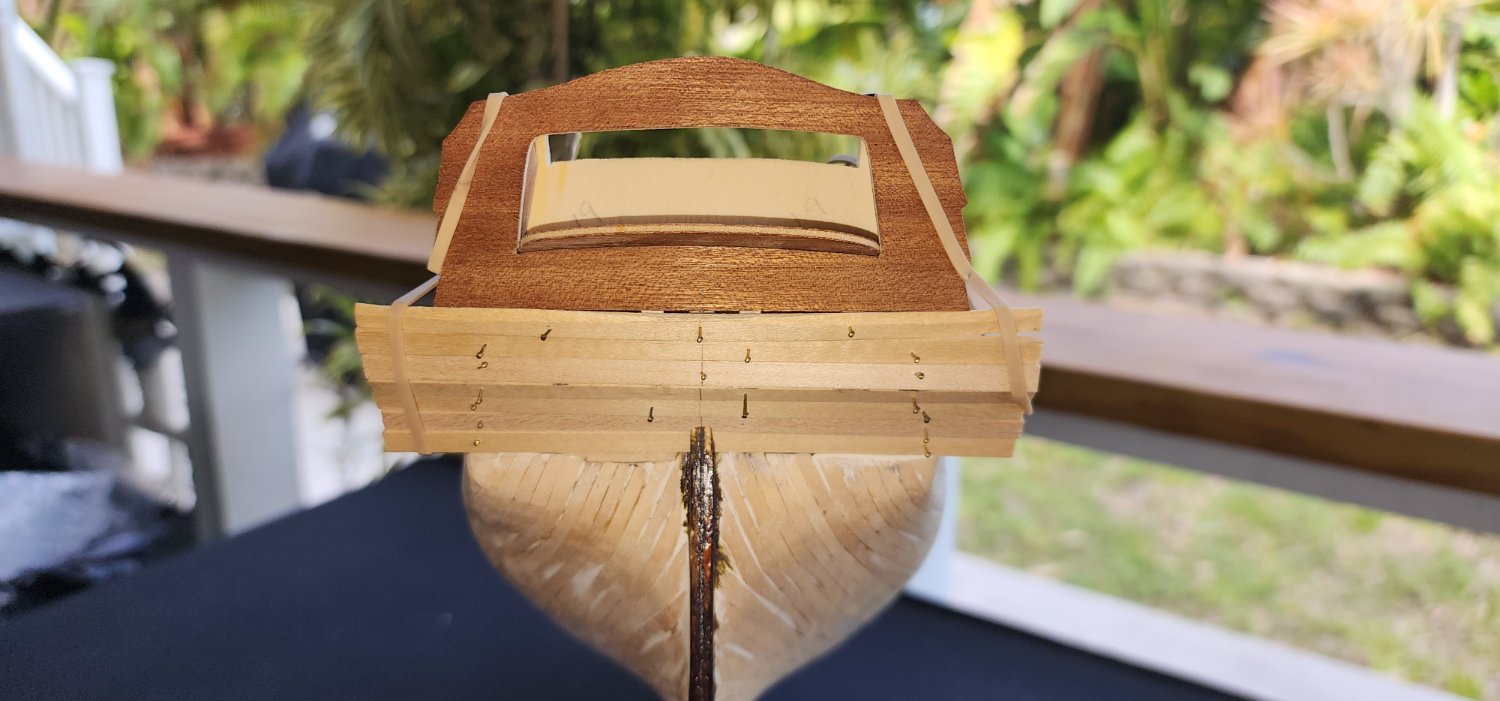
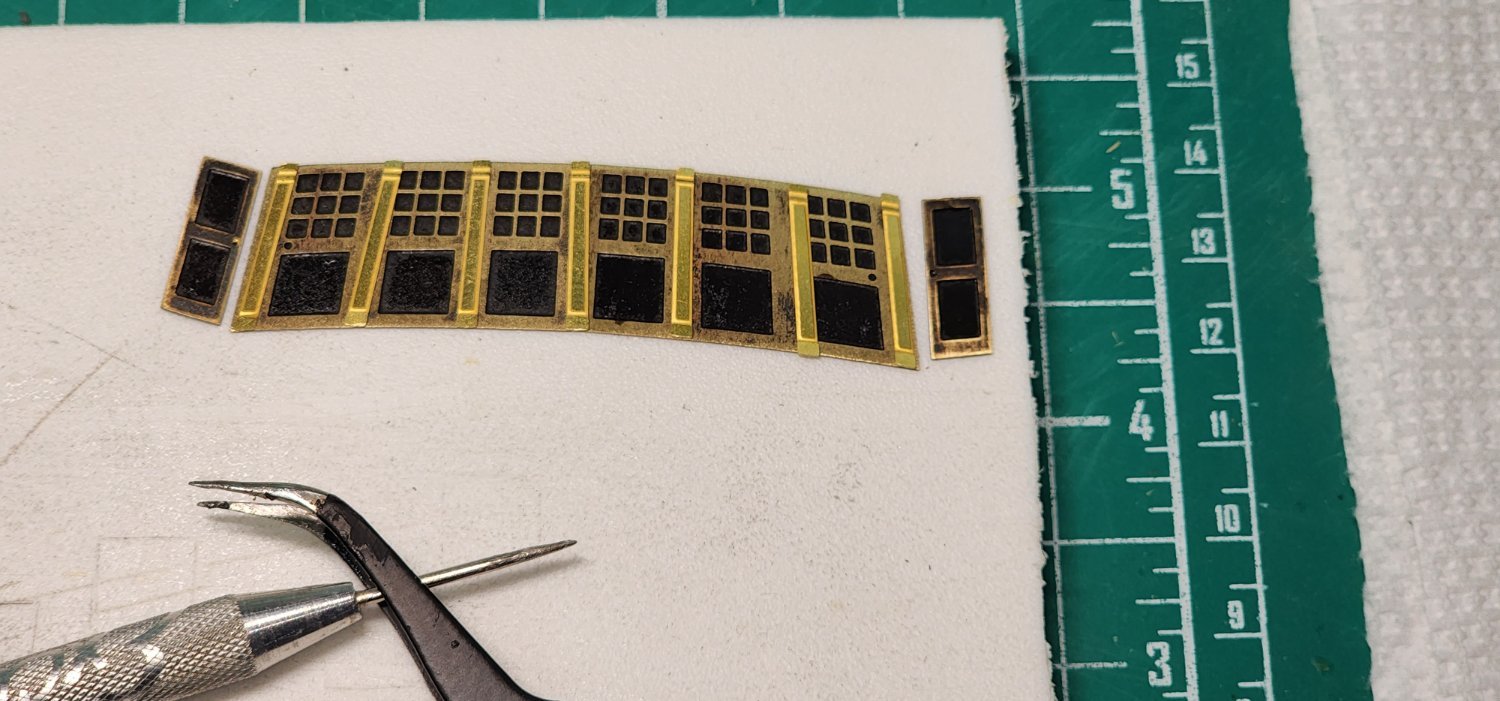
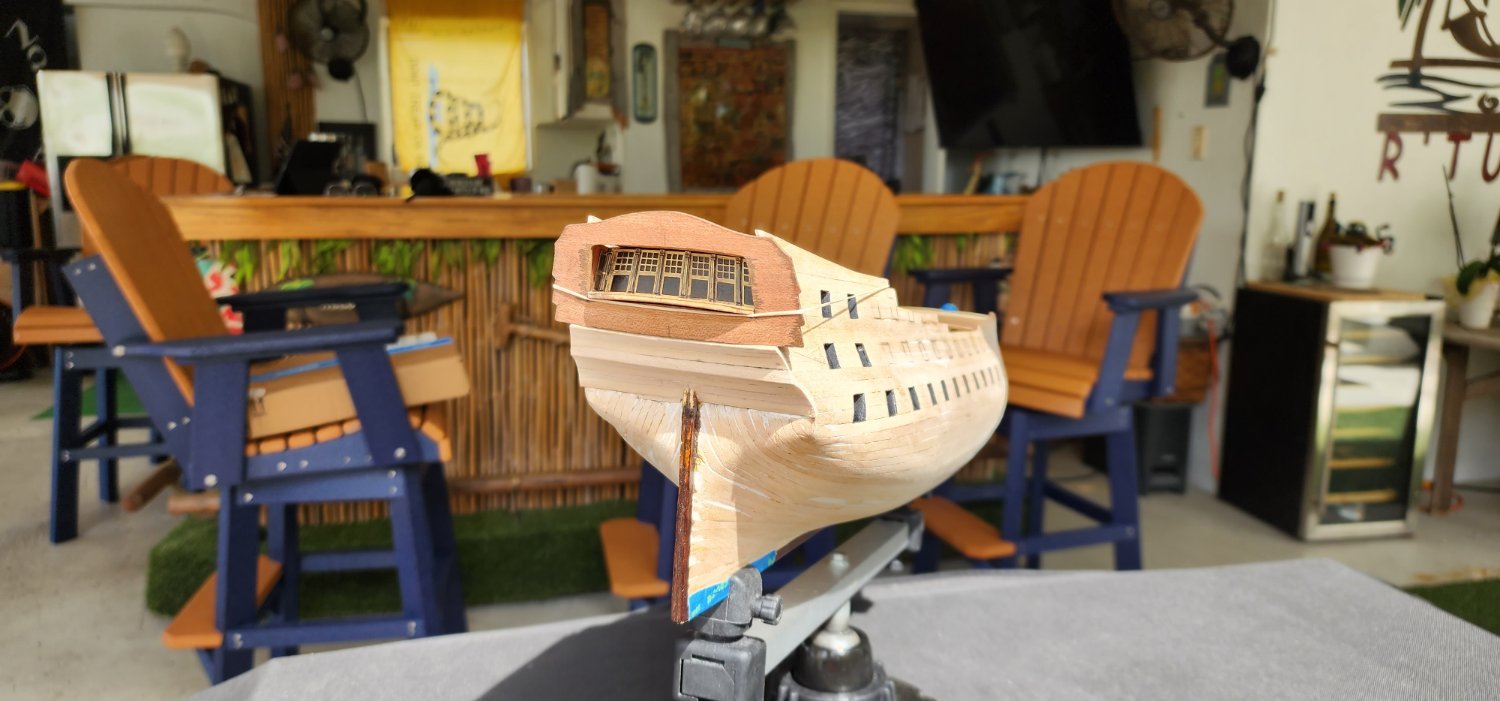
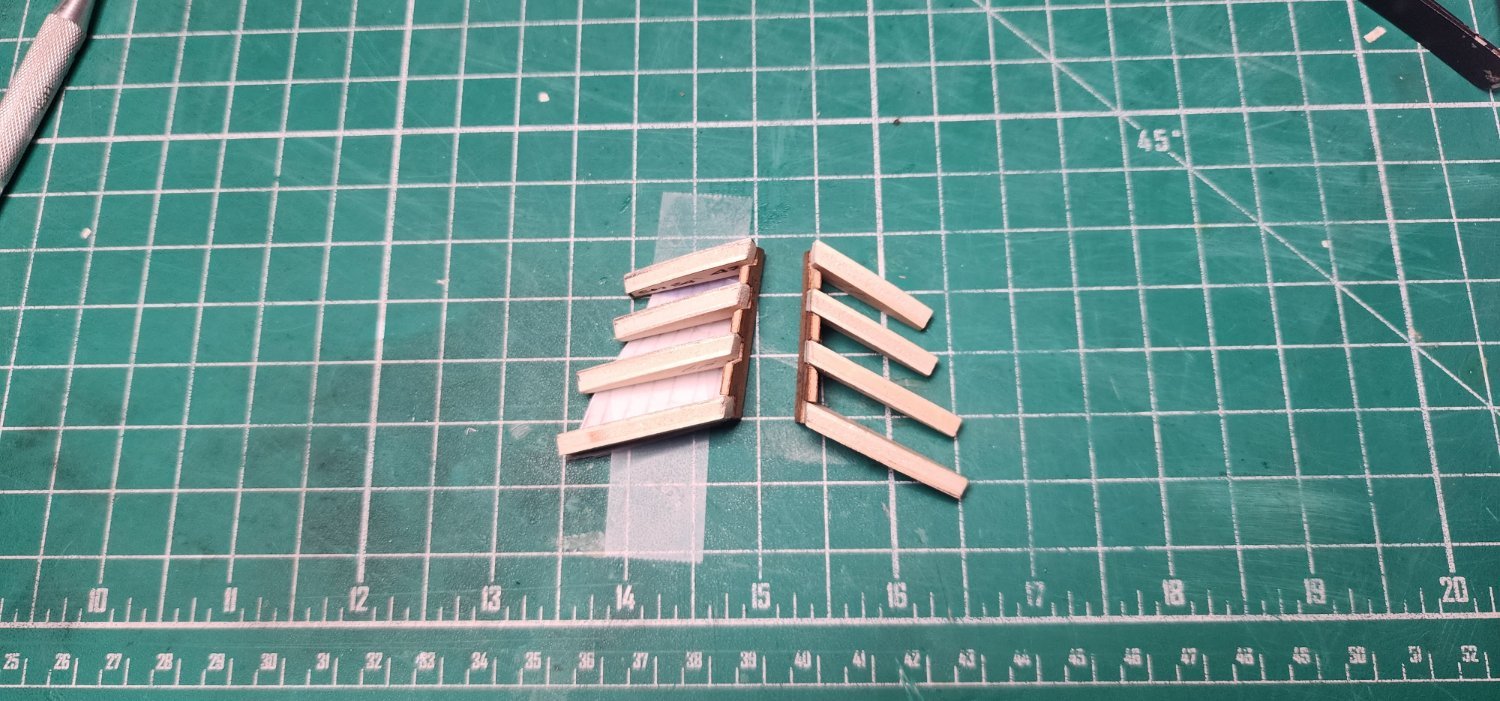
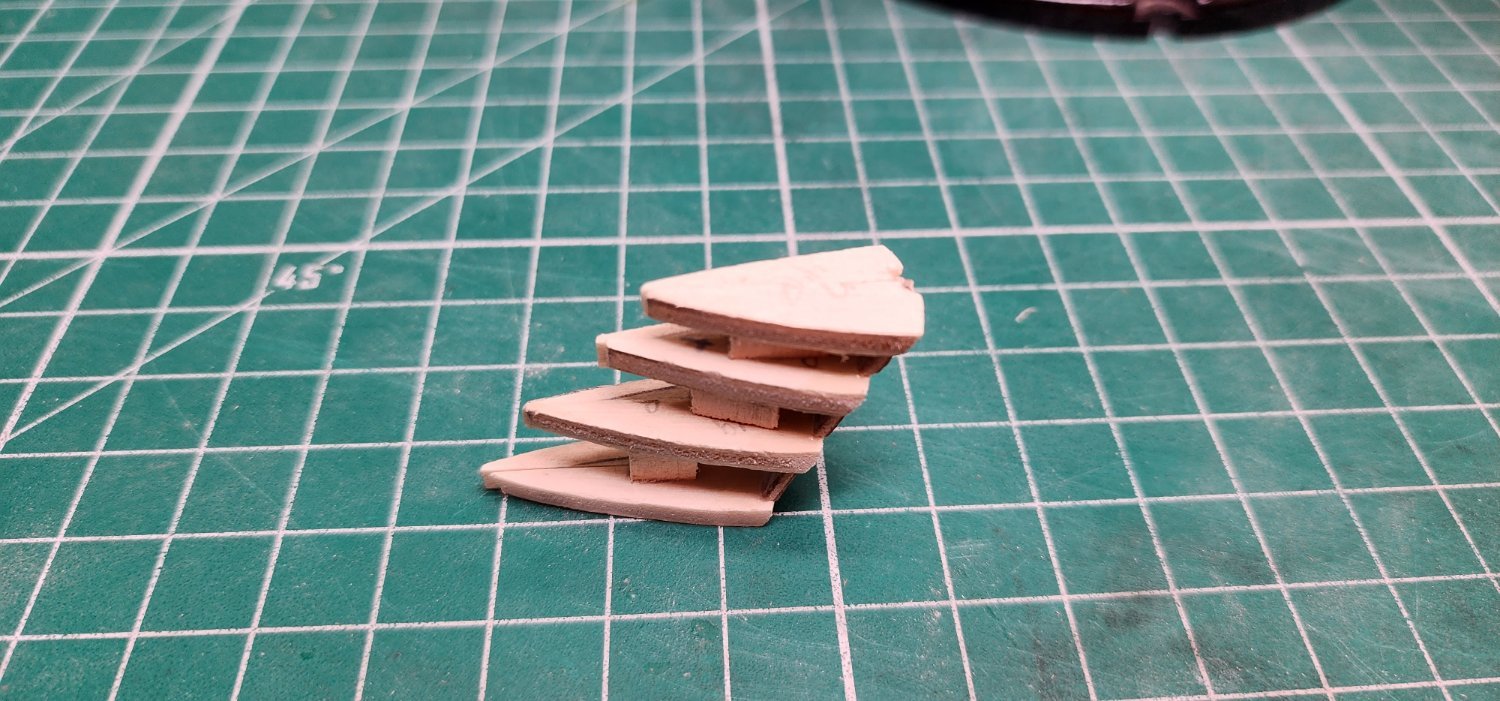
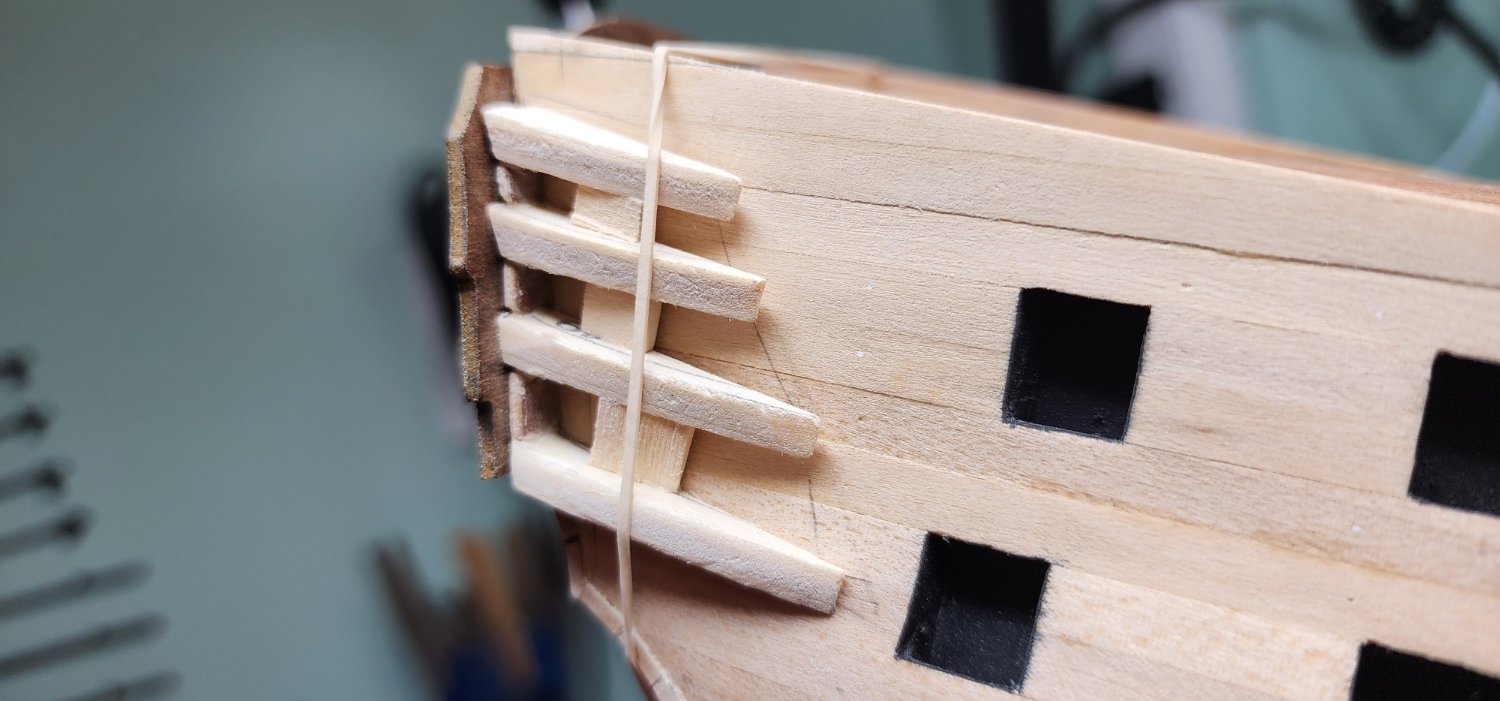
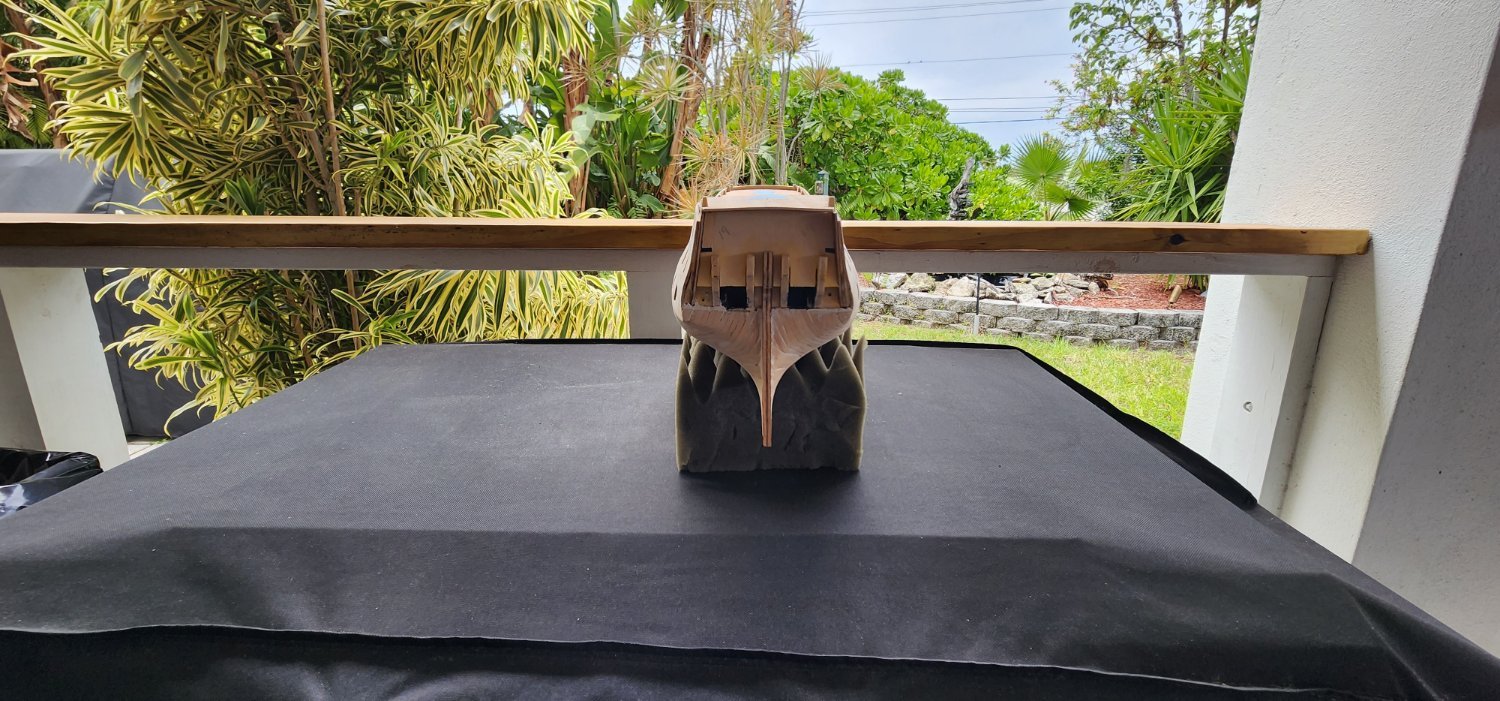
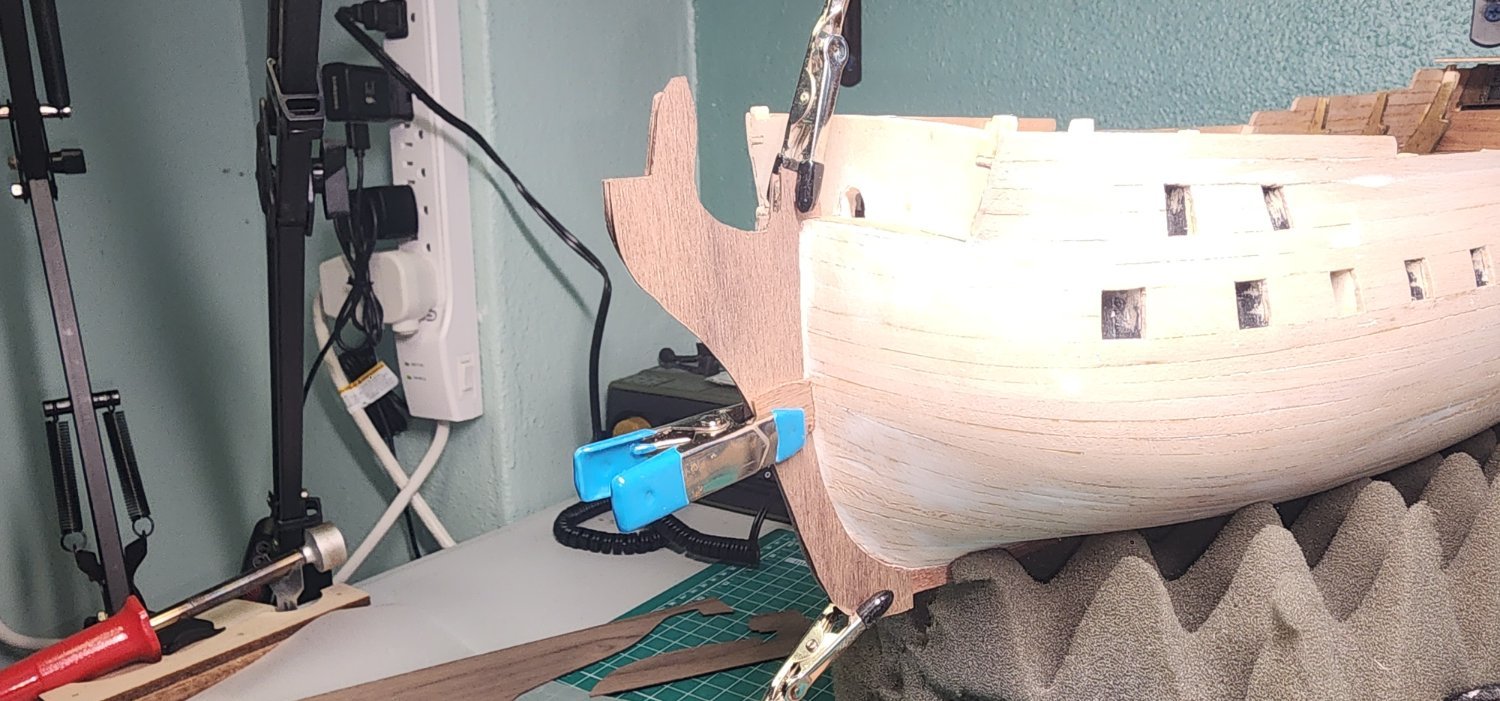
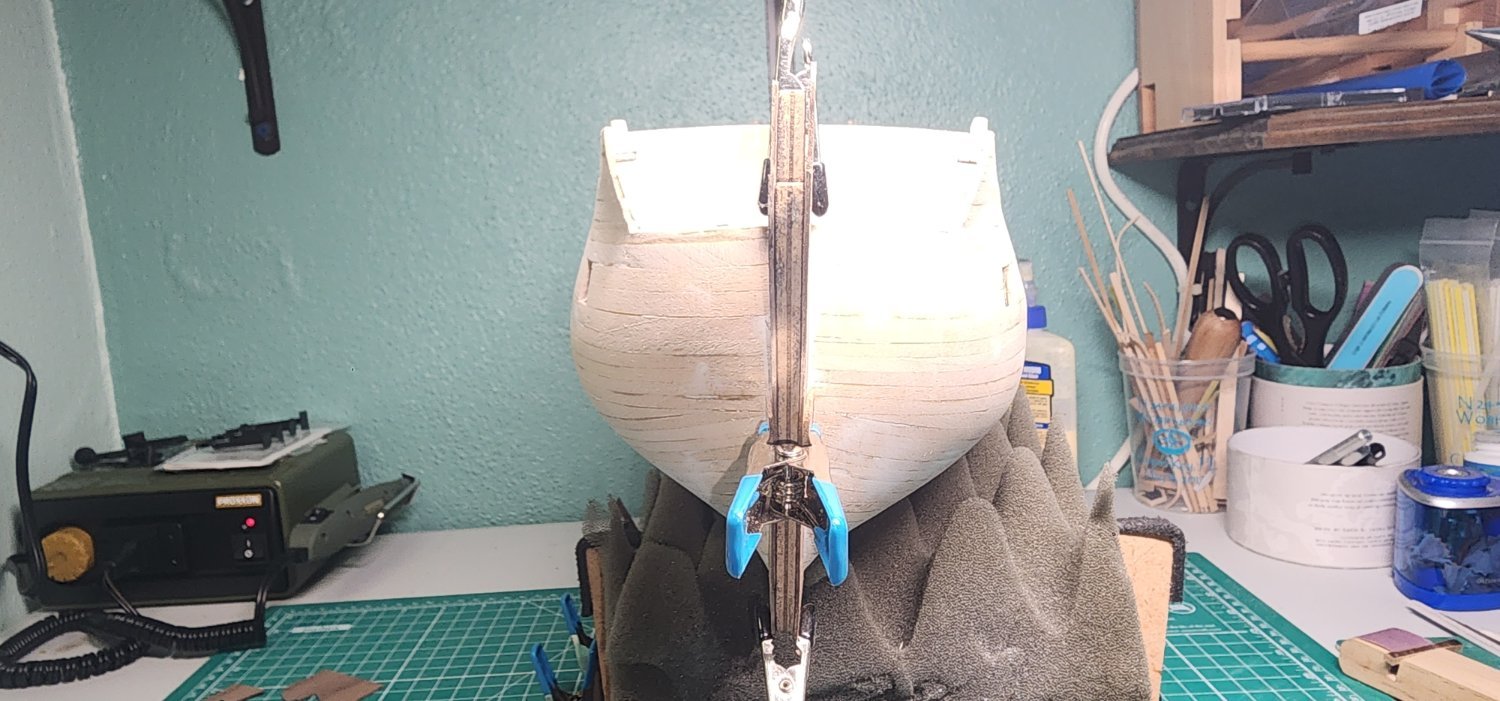
I haven't updated my log in sometime. I have not had too much time lately but have managed to make some progress. I installed the bow deck planking and forecastle planking. I sanded and applied tung oil for the finish. I also sanded and applied tung oil to the main deck planking as well. I completed the hull planking up to the poop deck and installed the transom planking and transom. I traced out the gun ports in preparation of cutting them out. I blackened and polished the stern gallery photo etched parts and installed them. I made a template using tracing paper and cardboard to try and lay out the quarter galleries. I assembled the framing pieces and tapered them down to what I hope are the correct dimensions. I have been having a very difficult time trying to get them to line up properly and have removed them several times to make adjustments. I installed temporary bracing to help stabilize the small parts during the sanding process which I found to be very helpful. I sanded the parts from the hull side out so I could keep the outside contour of the shape and keep the port and starboard framing contours equal. It made it a bit easier. The instructions stated to install them to the hull first and then shape them to the proper contour. I have started shaping the taper on the gallery planking and dry fitting them. I have measured what I think the length of each section of the quarter gallery should be based on the dimensions of the photo etched parts that are to be installed on each section. There in only one scaled drawing of this detail showing this stage and so far, this part has been very challenging for me. It is taking me a lot of time and I still don't feel too confident that I have it right yet. I am trying to be patent and get this part right, it will affect how the final look of the quarter galleries will look in the end. So, this brings me up to date as to where I am on the Bellona. I think it will be sometime before I can get to the point of starting the second layer of planking. There is still quite a bit of work to be done before I can start to attempt that process. I will update the log as my progress moves forward. Thanks for reading and as always, your input and guidance is always welcome.
Nearshore


-
19 hours ago, allanyed said:
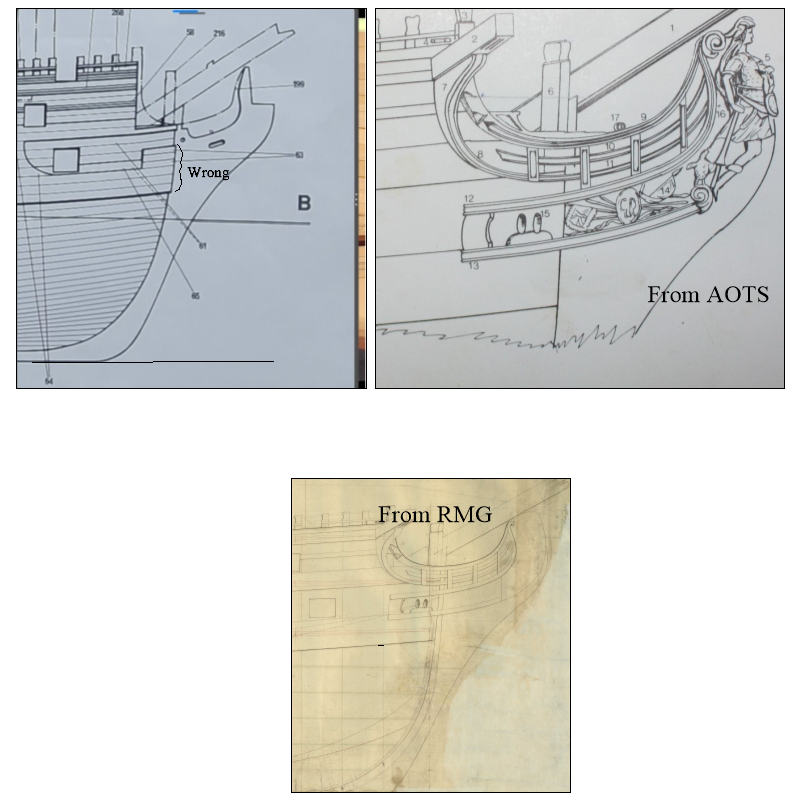
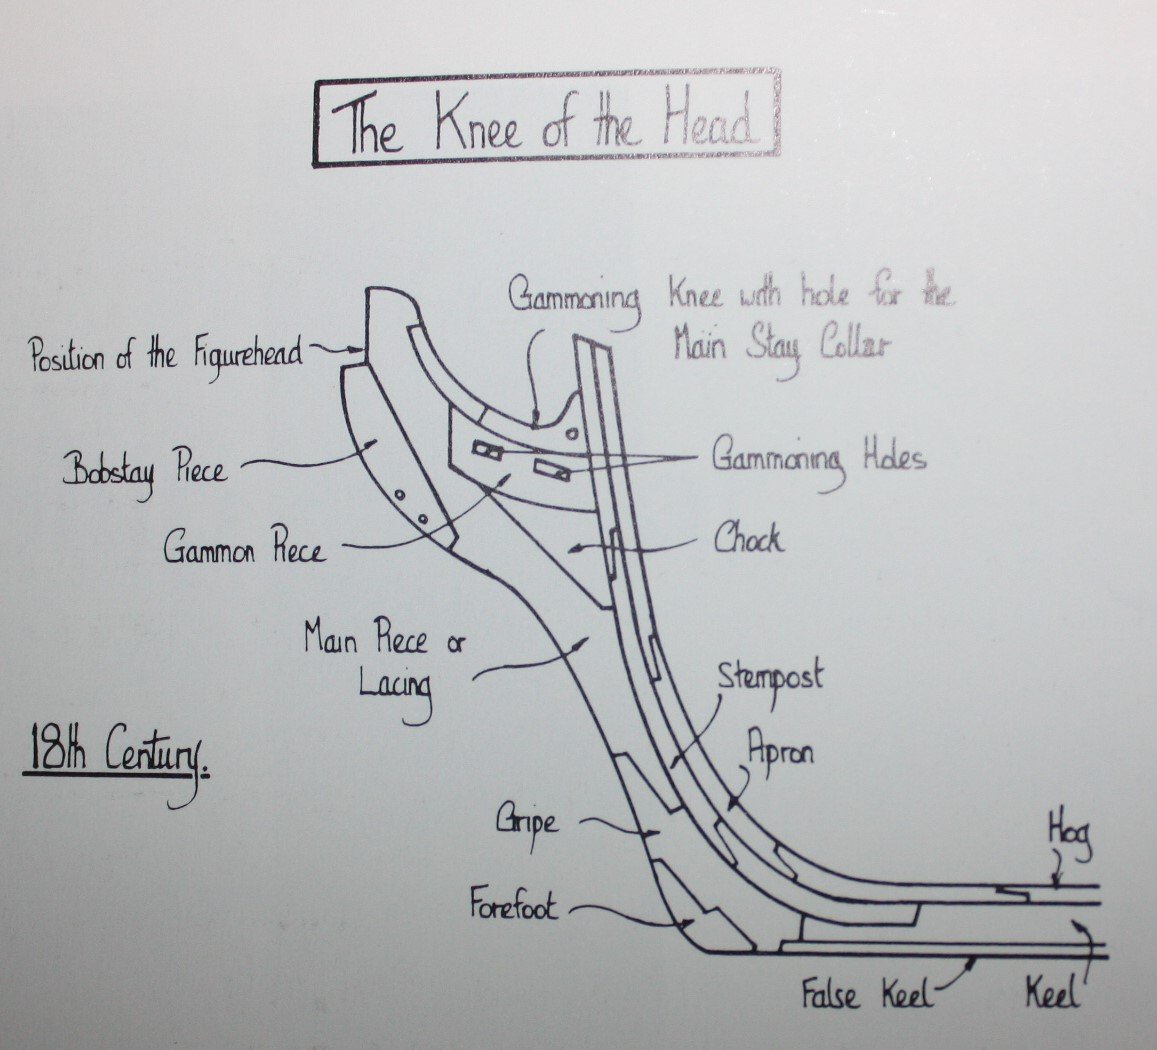
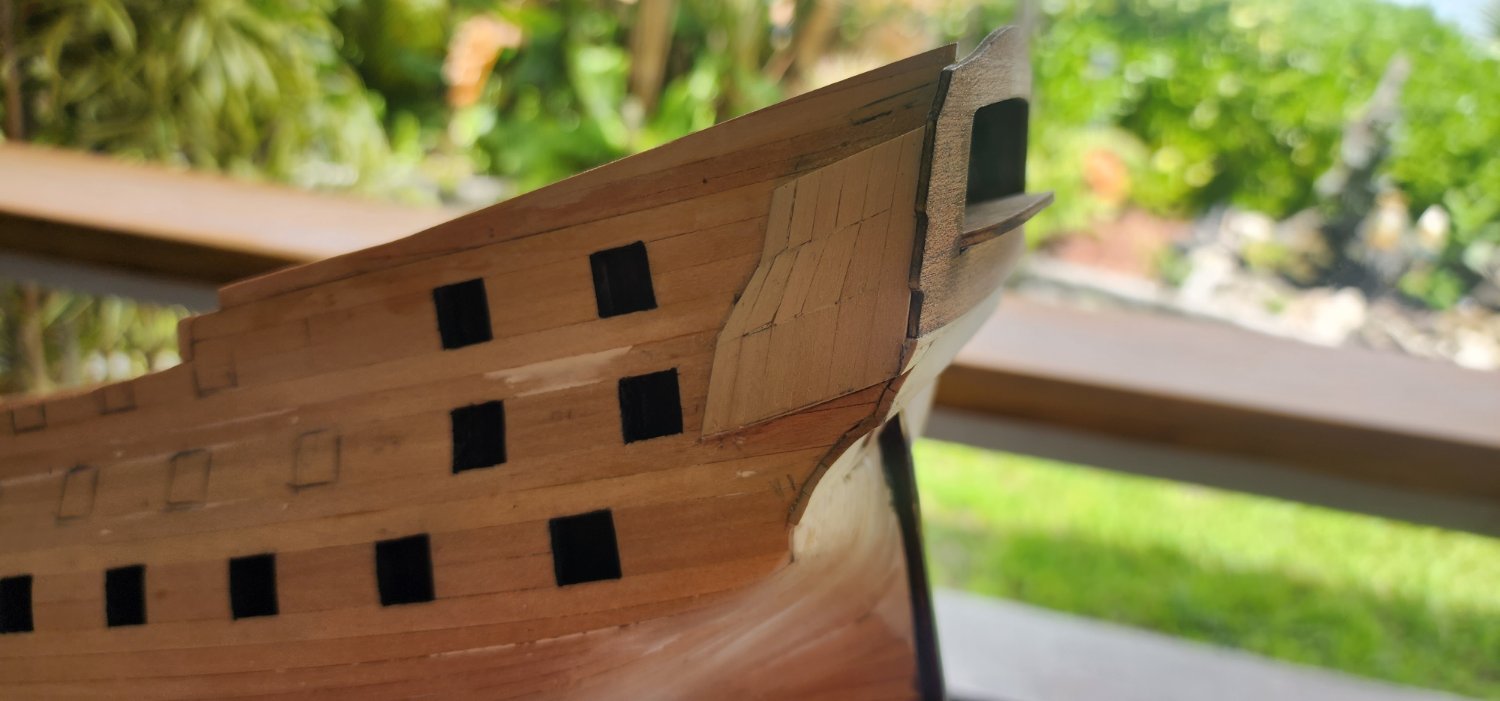
I realize this is a terminology thing and I really hope you don't mind but what you stained at the bow is not the keel. The keel (which it appears you also stained) ends at the point where it meets the stem and gripe. The larger section at the bow is the knee of the head which is made of numerous pieces as can be seen in the drawing below. Picture and a thousand words, etc. below from Peter Goodwin's The Construction and Fitting of the English Man of War, page 37.
Hi Allen,
I must admit that my terminology is not correct, I am new to the model ship building and there is a lot to learn when it comes to using the proper terminology. I apologize for my ignorance, and I appreciate you correcting me to help me improve my build log and use the right terminology to make proper sense. It's hard enough building these models and knowing the proper terms to use will only improve my knowledge. Again, thank you for your input and all the resources that you provide.
Nearshore
- Mr Whippy, Bill Morrison and No Idea
-
3
-
Hello all,
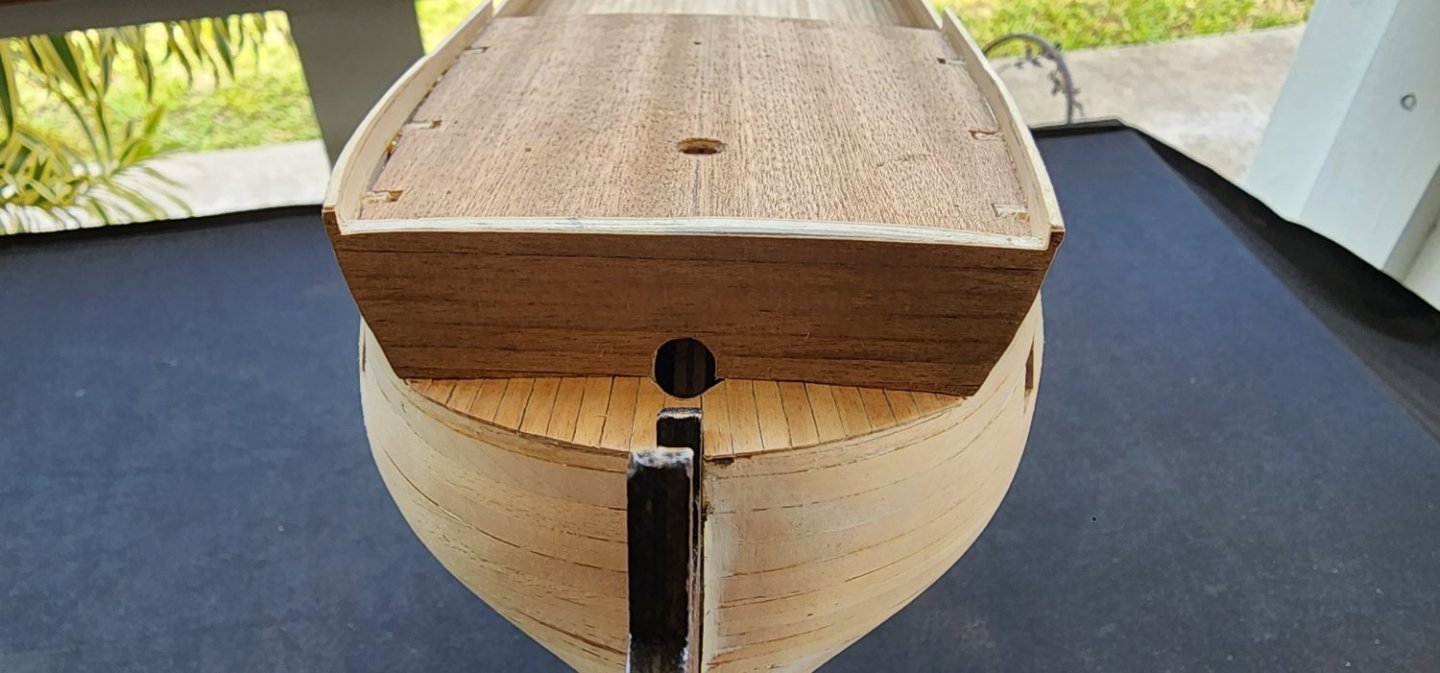
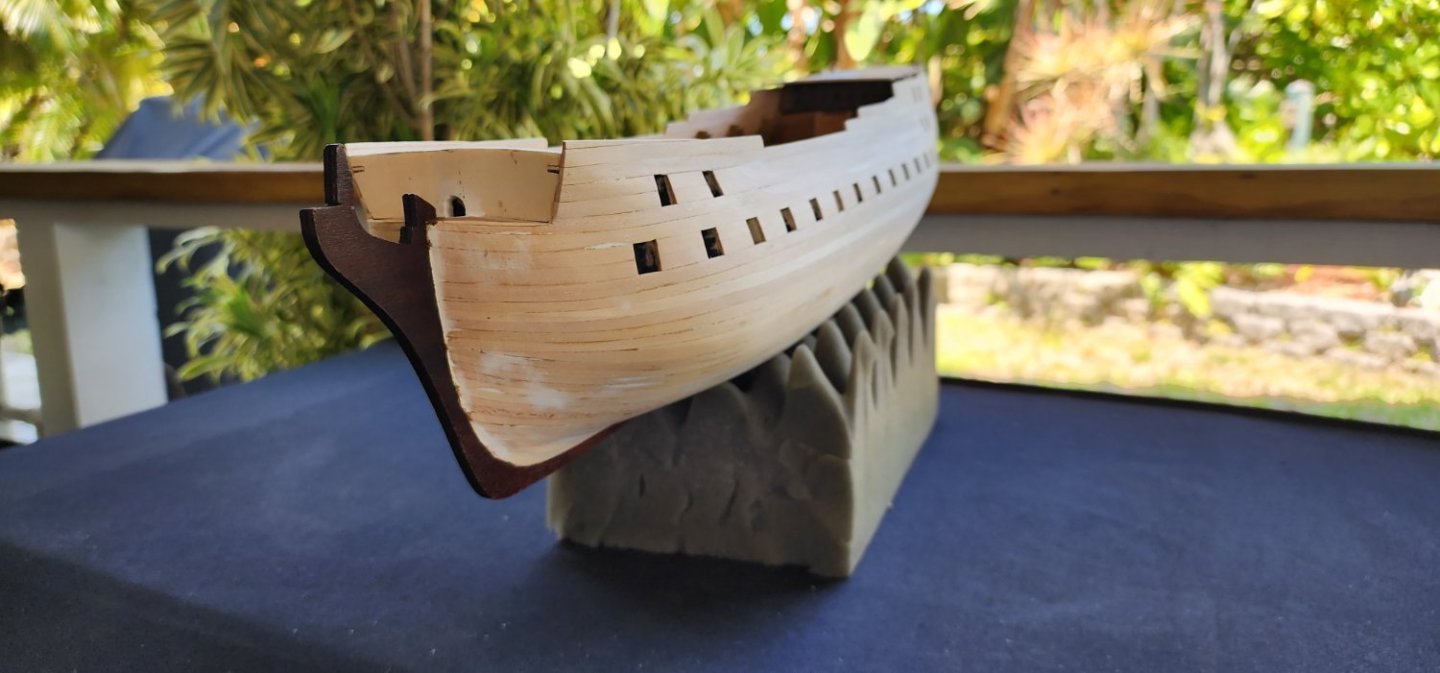
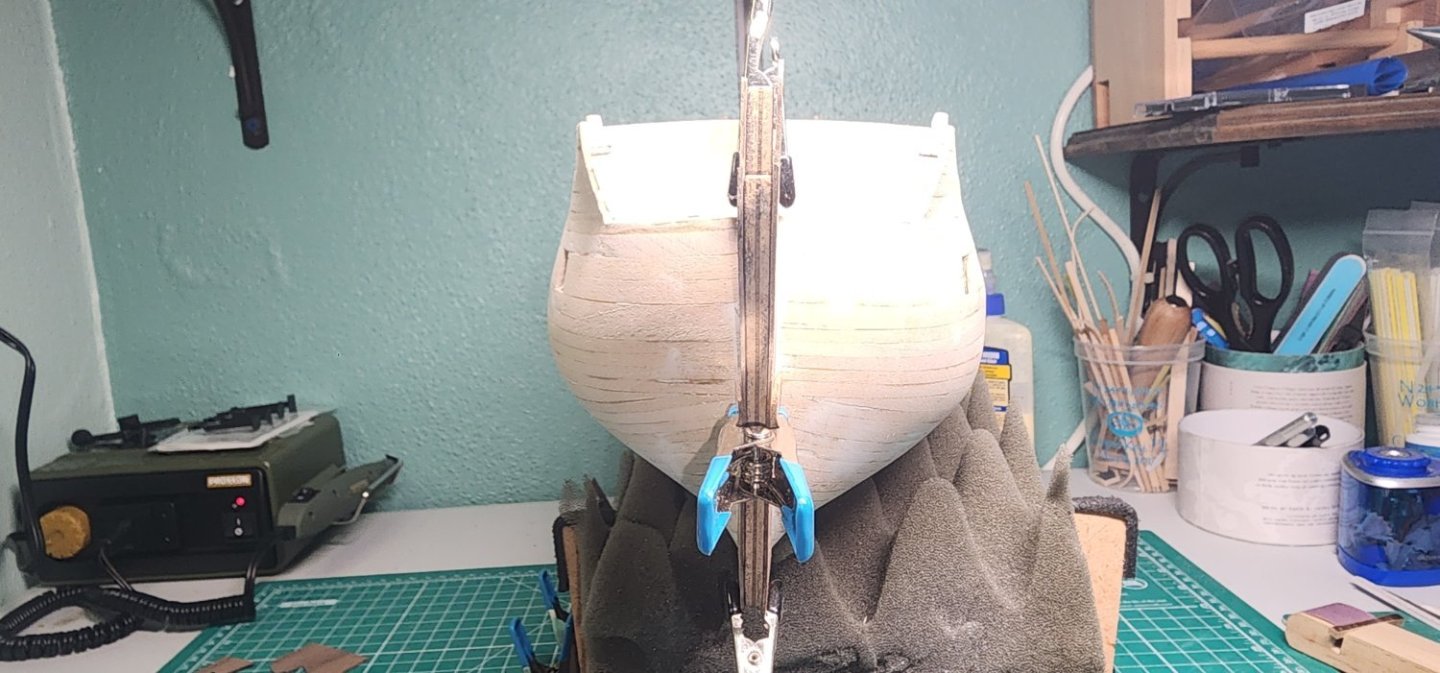
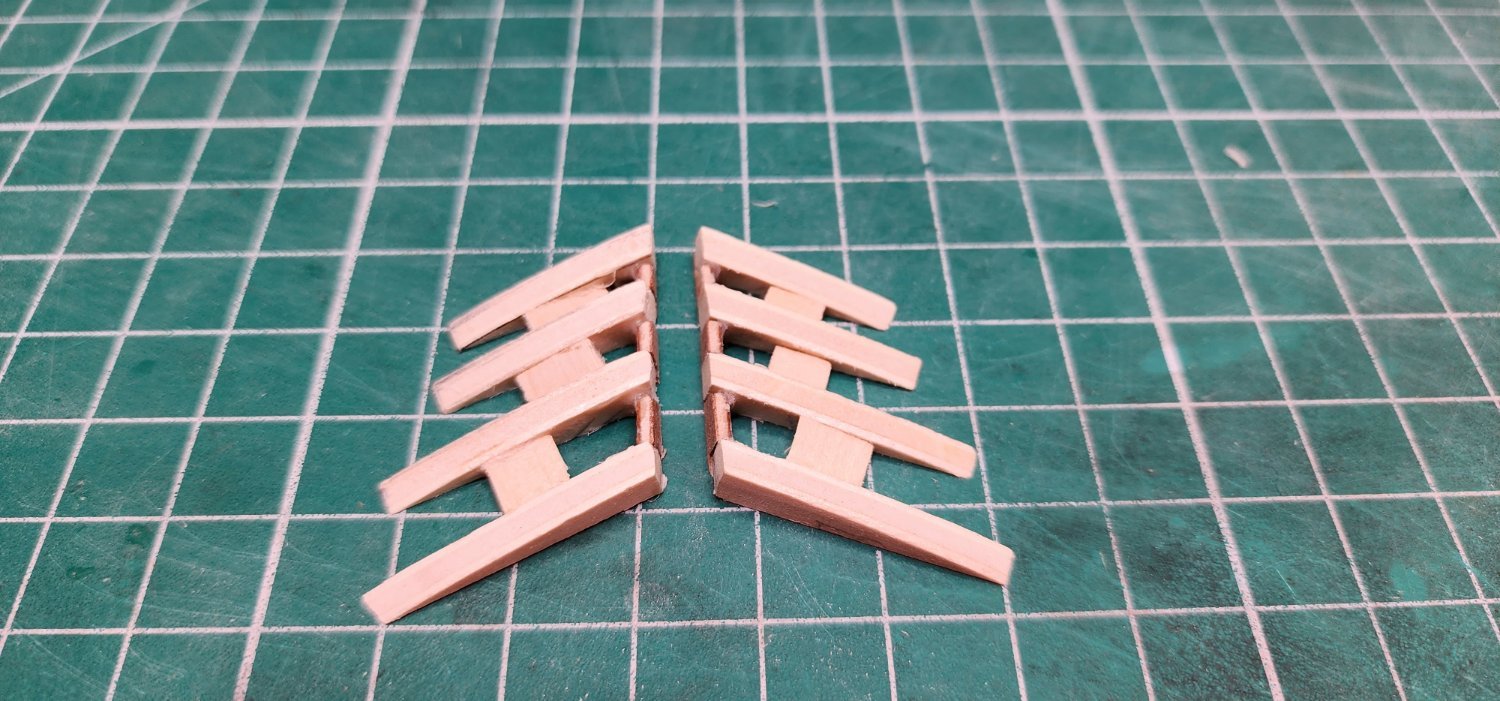
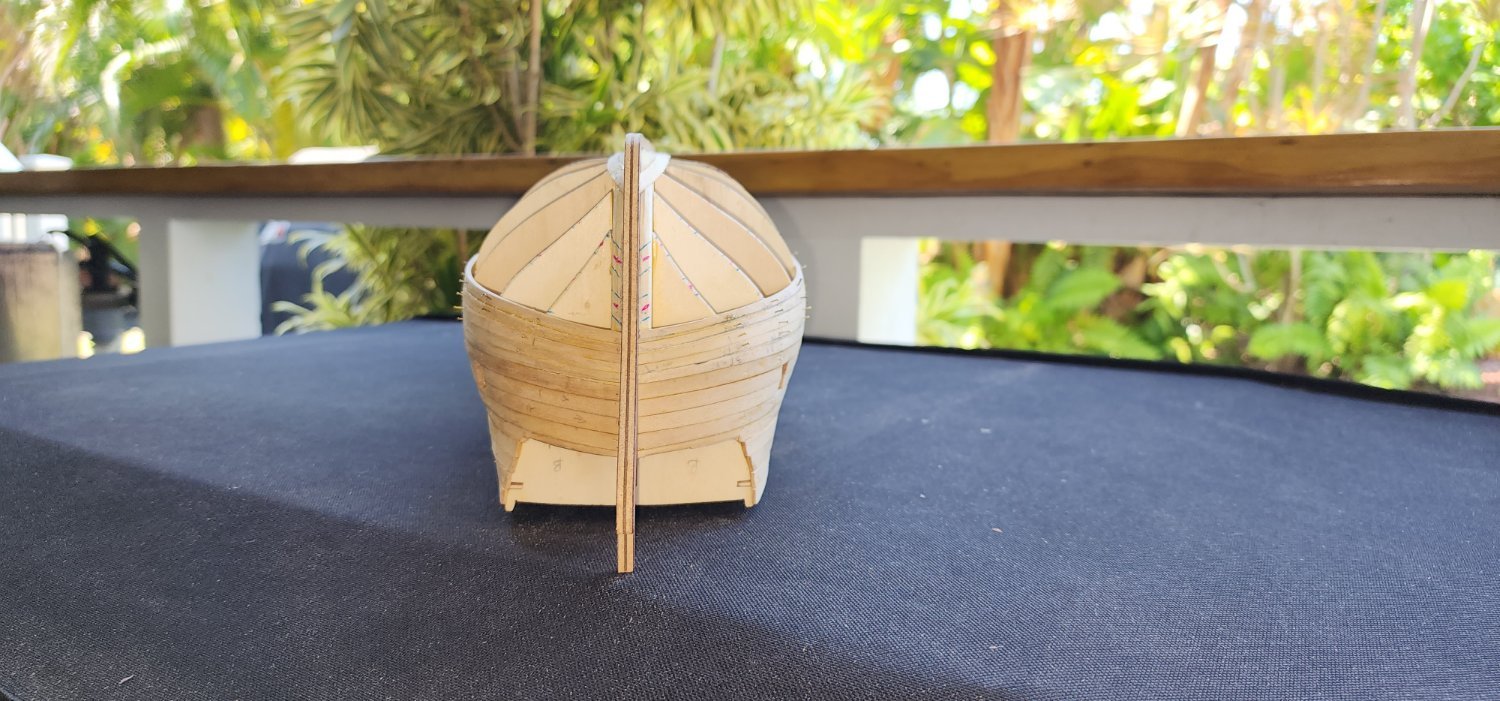
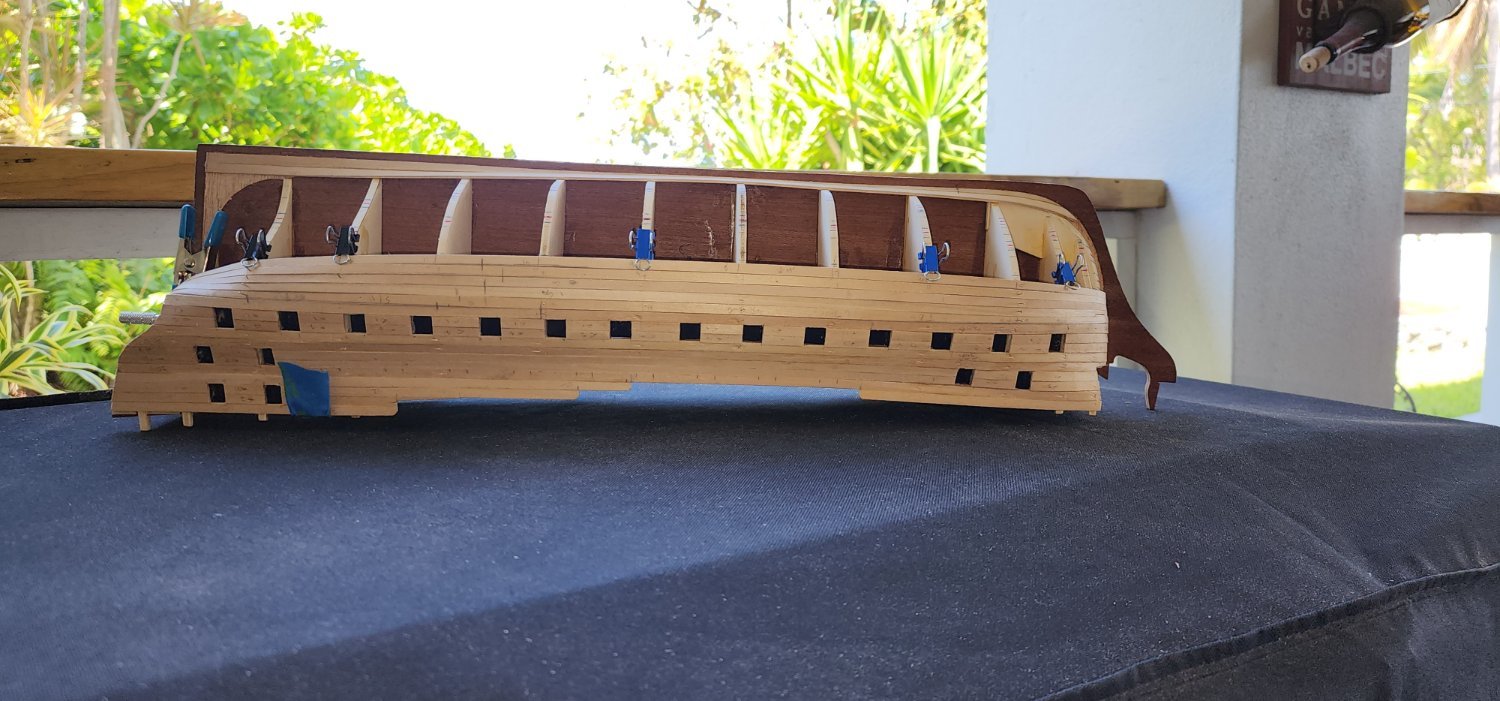
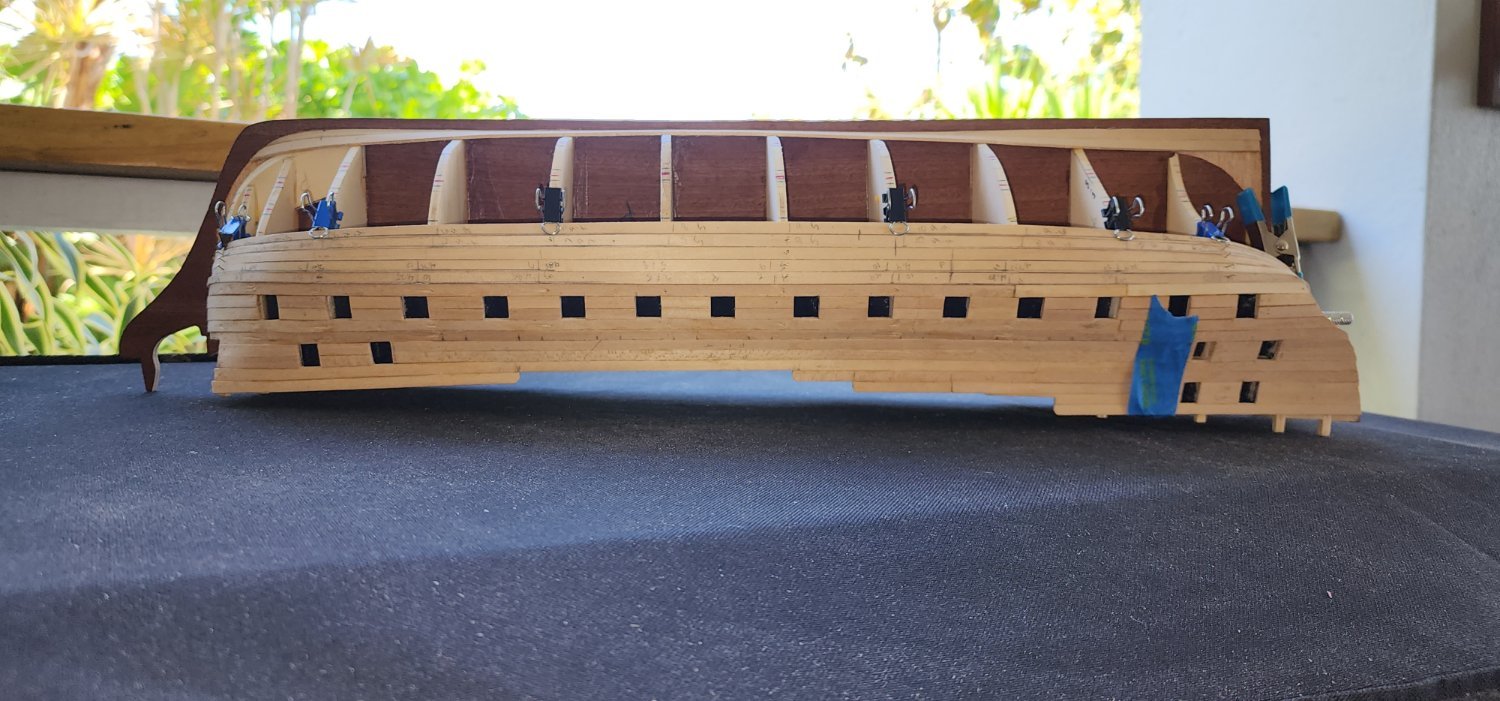
Just a small update on the Bellona. My brilliant idea of installing a laminate on the false keel is a bust. I managed to thin the walnut stock I had down to less then .5mm so that the overall keel thickness would only be 1mm thicker. Well the keel is 5.5mm thick and the figurehead fits quite snug as it stands. I would have to file down the figure head to fit and the accessories that accompany it would also have to be modified. At less then .5mm, the laminate was quite brittle and just kept breaking at the grain. So, I just decided to stain the keel to try and cover up the plywood layers. It came out ok, not what I was really looking for, but it is what it is. Like my mom used to say, " You can't make a silk sow out of a pig's ear". I moved on and finished the main gun deck planking. Not a whole lot of progress to report, spent a lot of time trying to make the laminate work. LOL
Nearshore
- Mr Whippy, chris watton, yvesvidal and 2 others
-
5
-
11 hours ago, allanyed said:
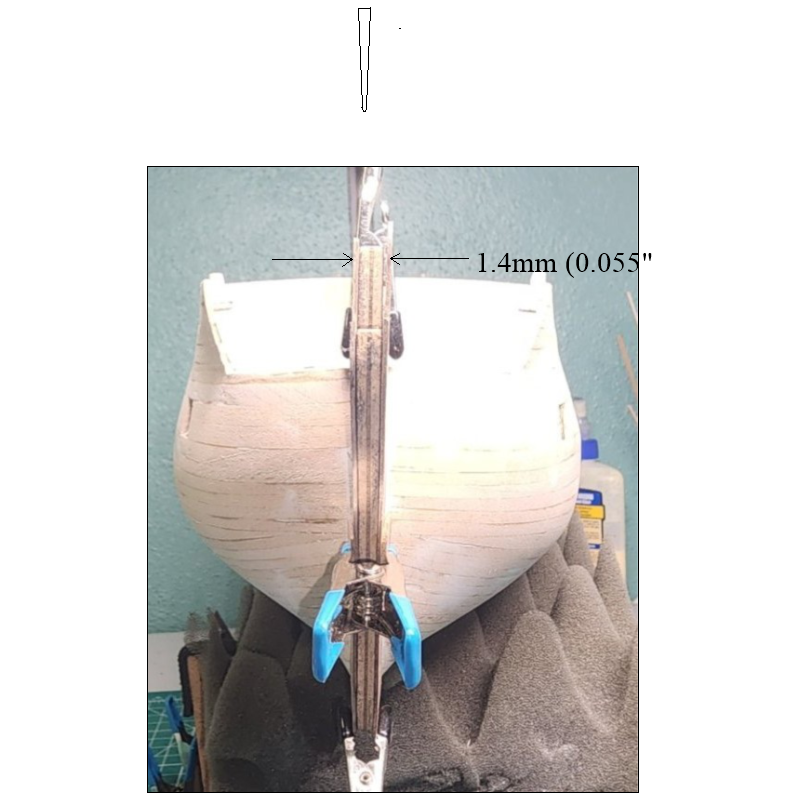
Very neat work, congratulations. One thing you may want to consider fixing, and I realize this is a common kit situation, is to taper the knee of the head. According to David Steel's Elements and Practice of Naval Architecture and the Shipbuilder's Repository, the knee tapered to less than 6" at the fore end on a 74 gun ship.
Sketch below gives a better picture than words, including a top view and dimensions at the fore end for your 1:100 scale (1.4mm) With the width you have the figure head of the Roman goddess of war, Bellona, will be extremely bowlegged.😌
Allan
Hi Allen,
I did look at the taper in the Anatomy book. The keel is 5.5mm thick along its entire length. The laminate idea that I was going to do is not going to work. At the 1:100 scale and adding another 1mm to the keel will make it difficult if not impossible to fit the figurehead on and its accessories. Tapering the keel at this point is probably not a good idea. As always, I welcome your input and guidance, you certainly are one of the experts when it comes to historical accuracy.
Nearshore
- Mr Whippy and Bill Morrison
-
2
-
20 hours ago, Kevin said:
your Bellona looks very nice indeed well done
Thank you for the compliment.
Nearshore
- Bill Morrison and Mr Whippy
-
2
-
-
24 minutes ago, yvesvidal said:
Beautiful hull and gorgeous scenery from your deck.
Yves
Hi Yves,
Thanks for the compliment. Yes we do have a nice view here.
Nearshore
- Mr Whippy and Bill Morrison
-
2
-
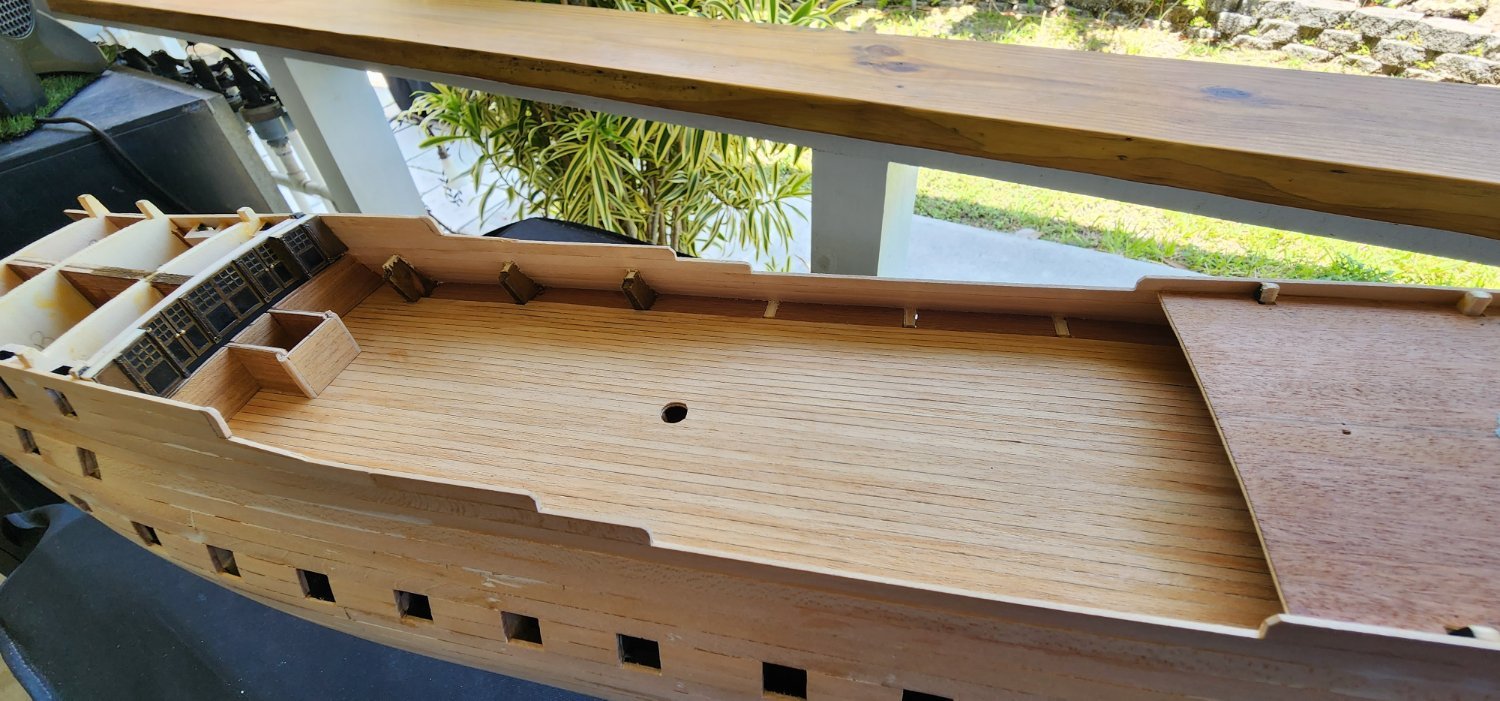
Hello all,
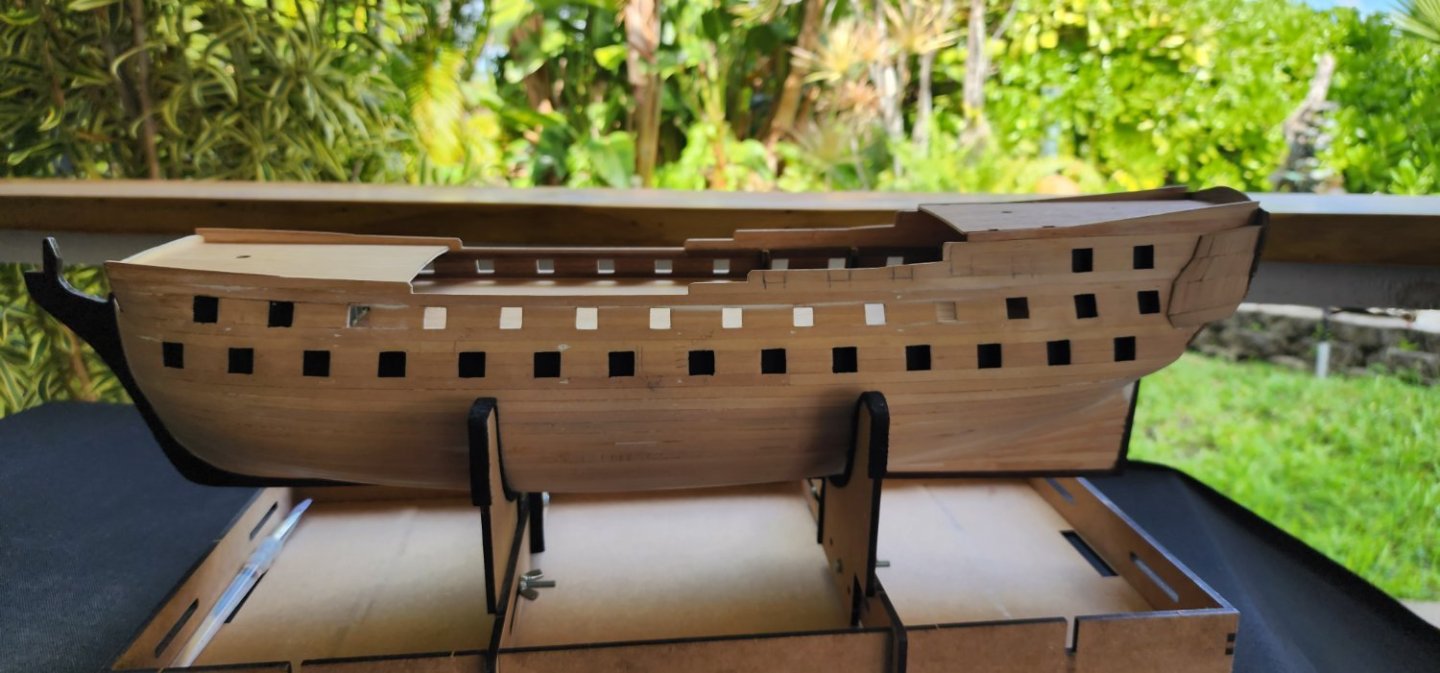
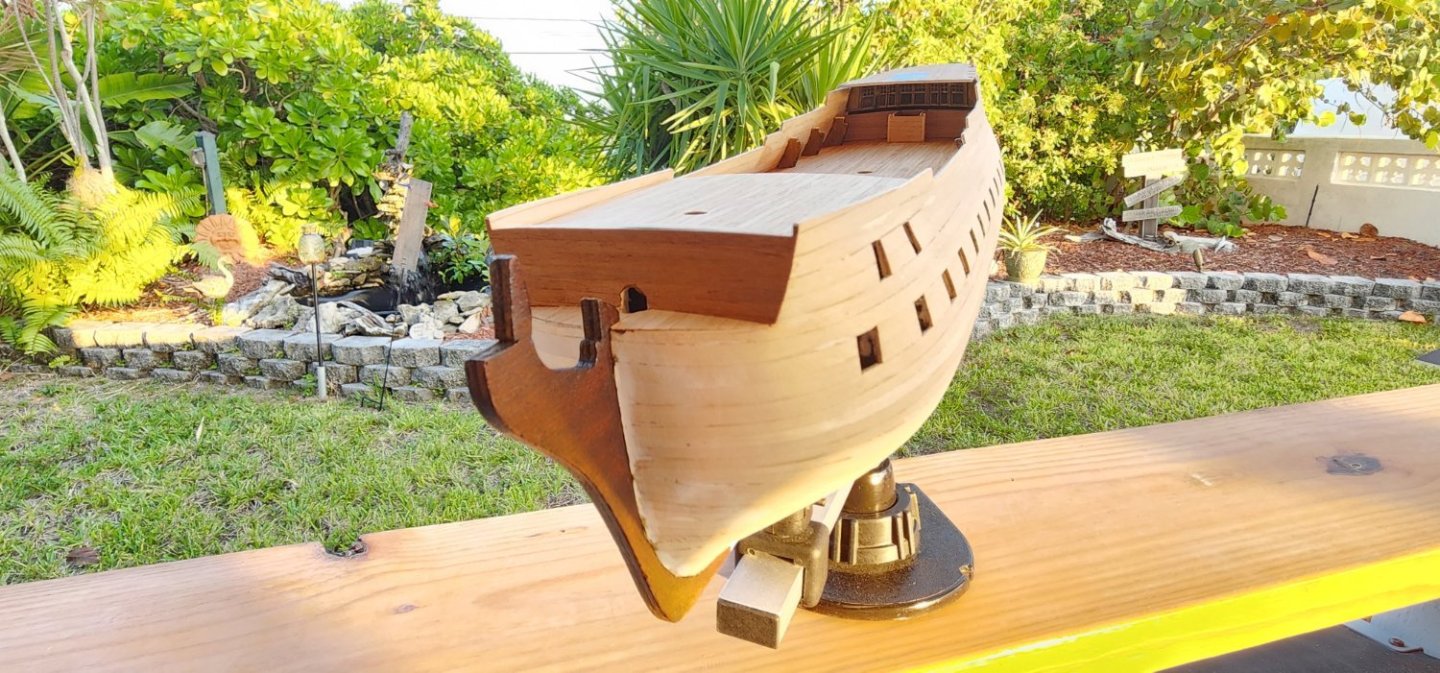
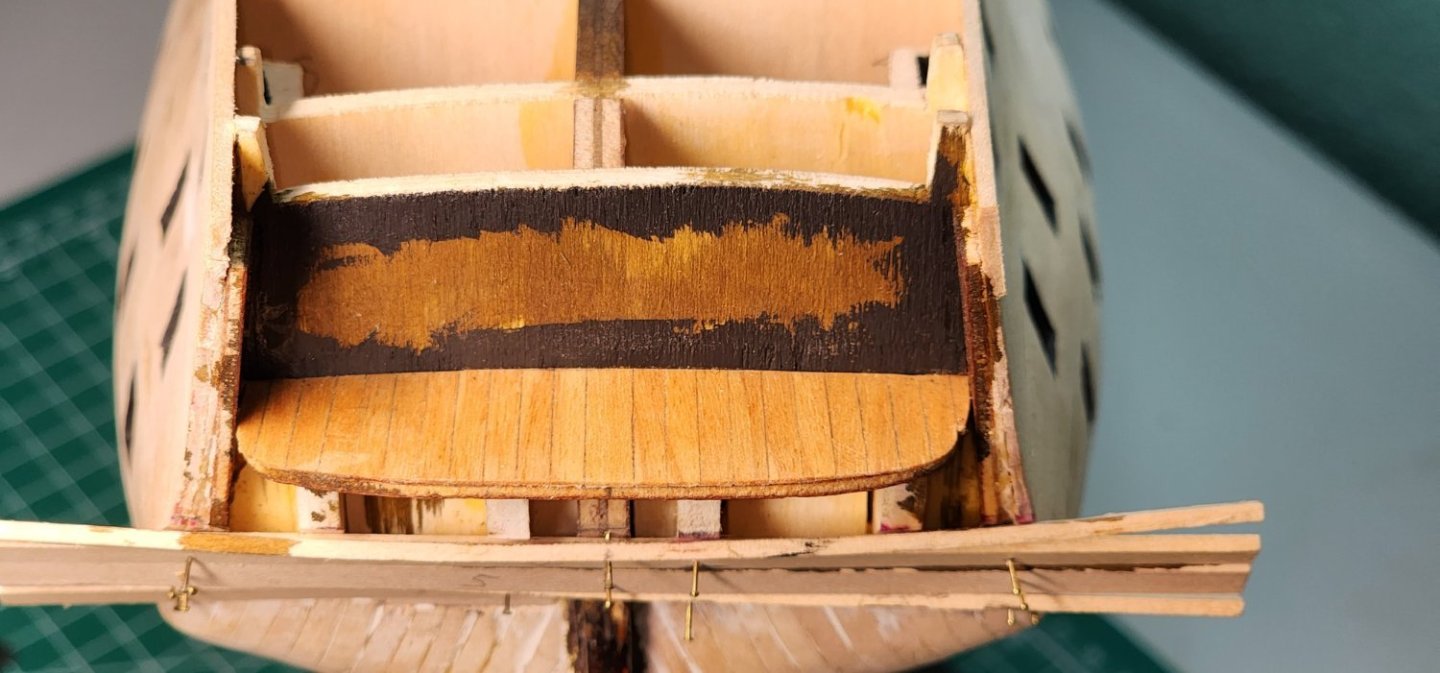
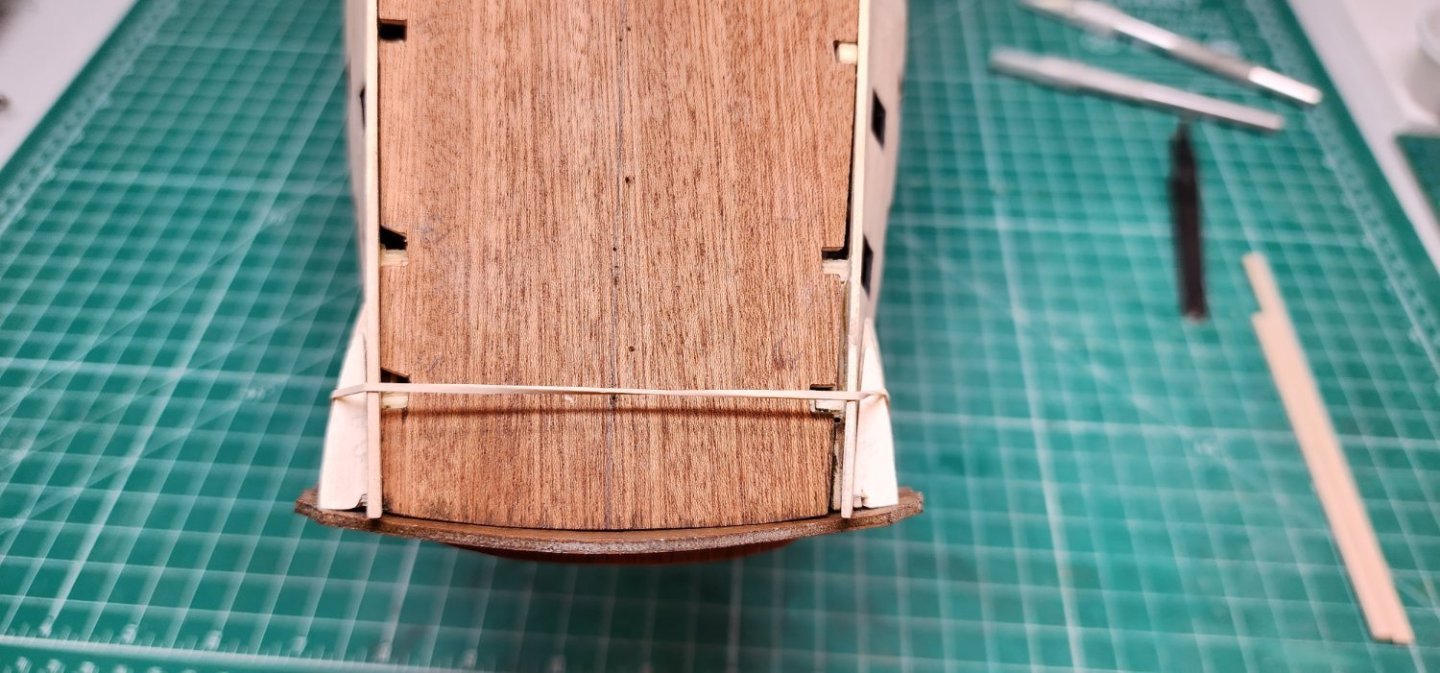
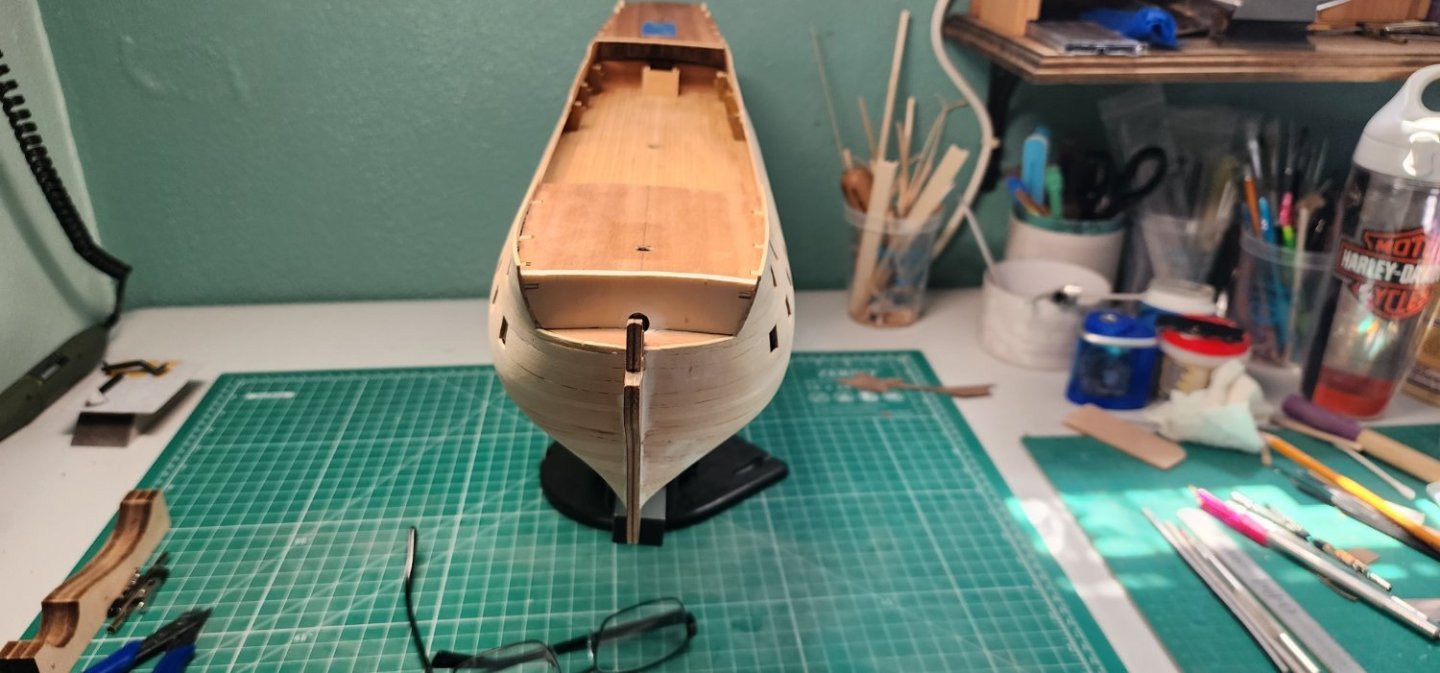
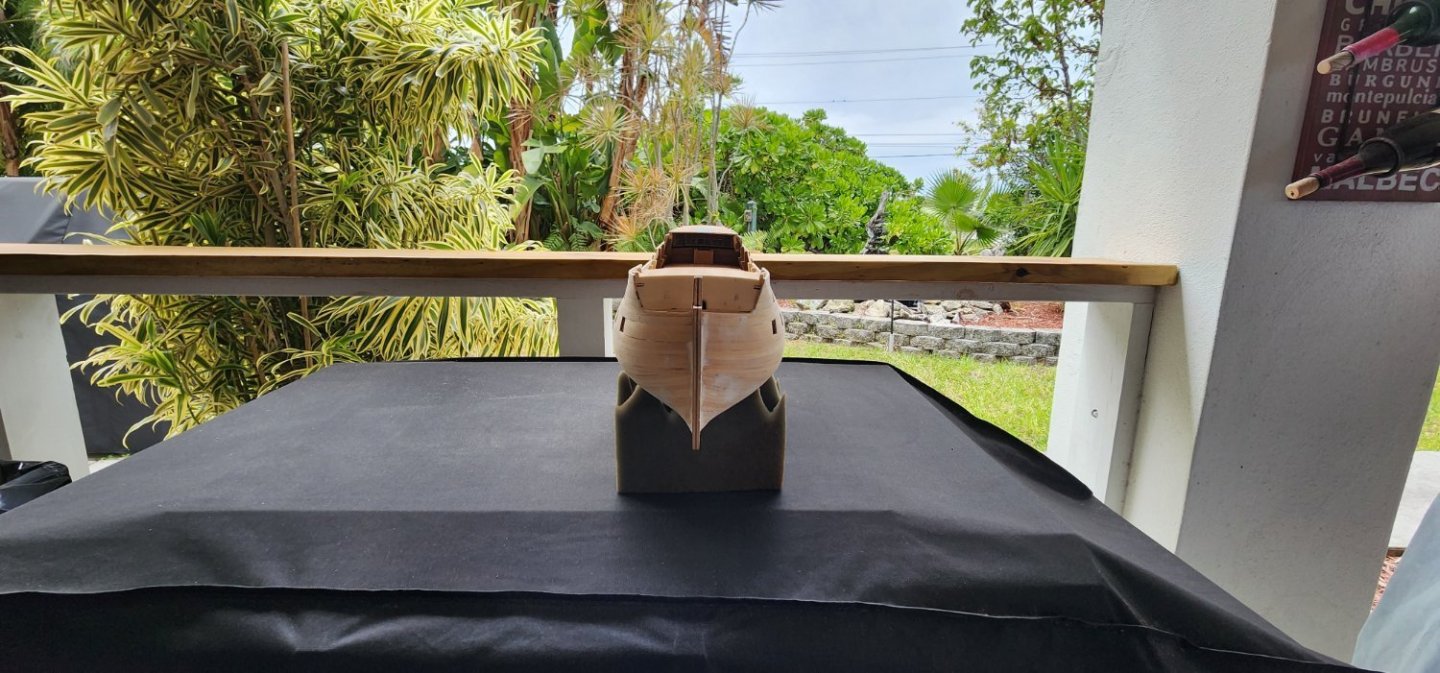
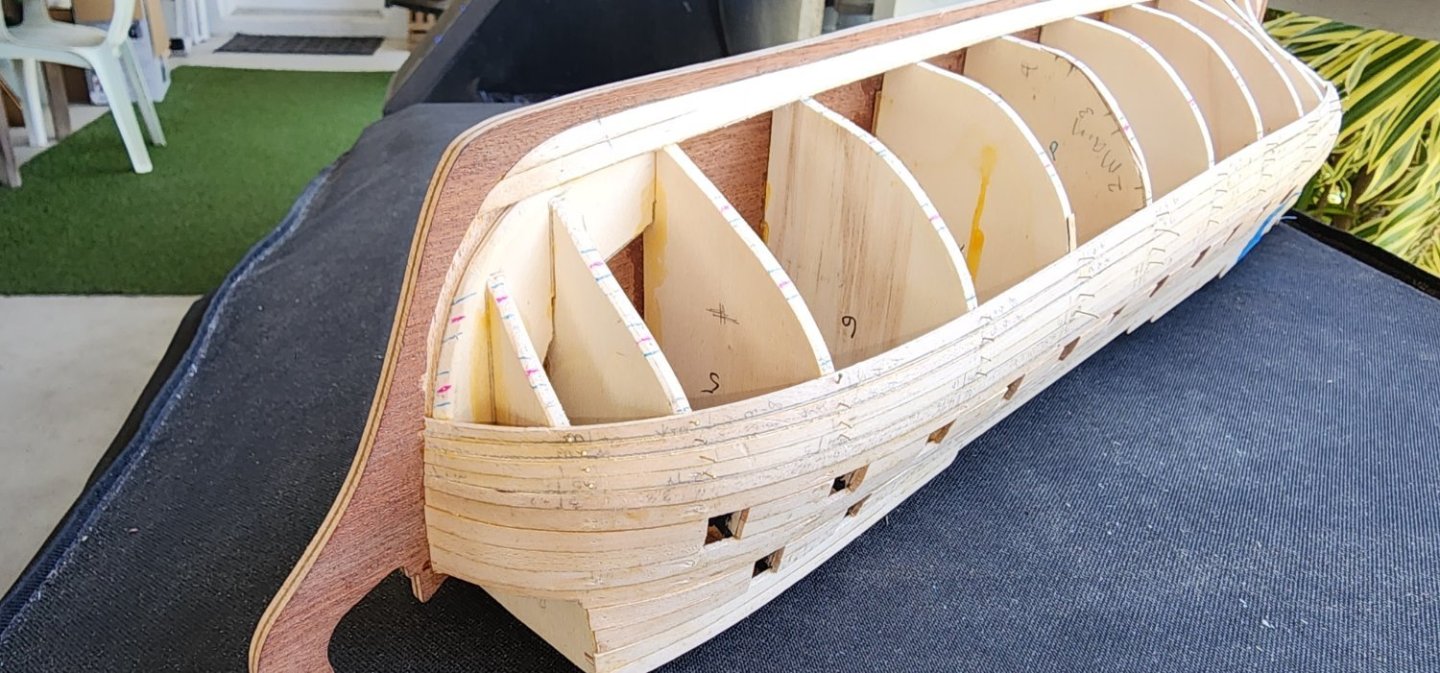
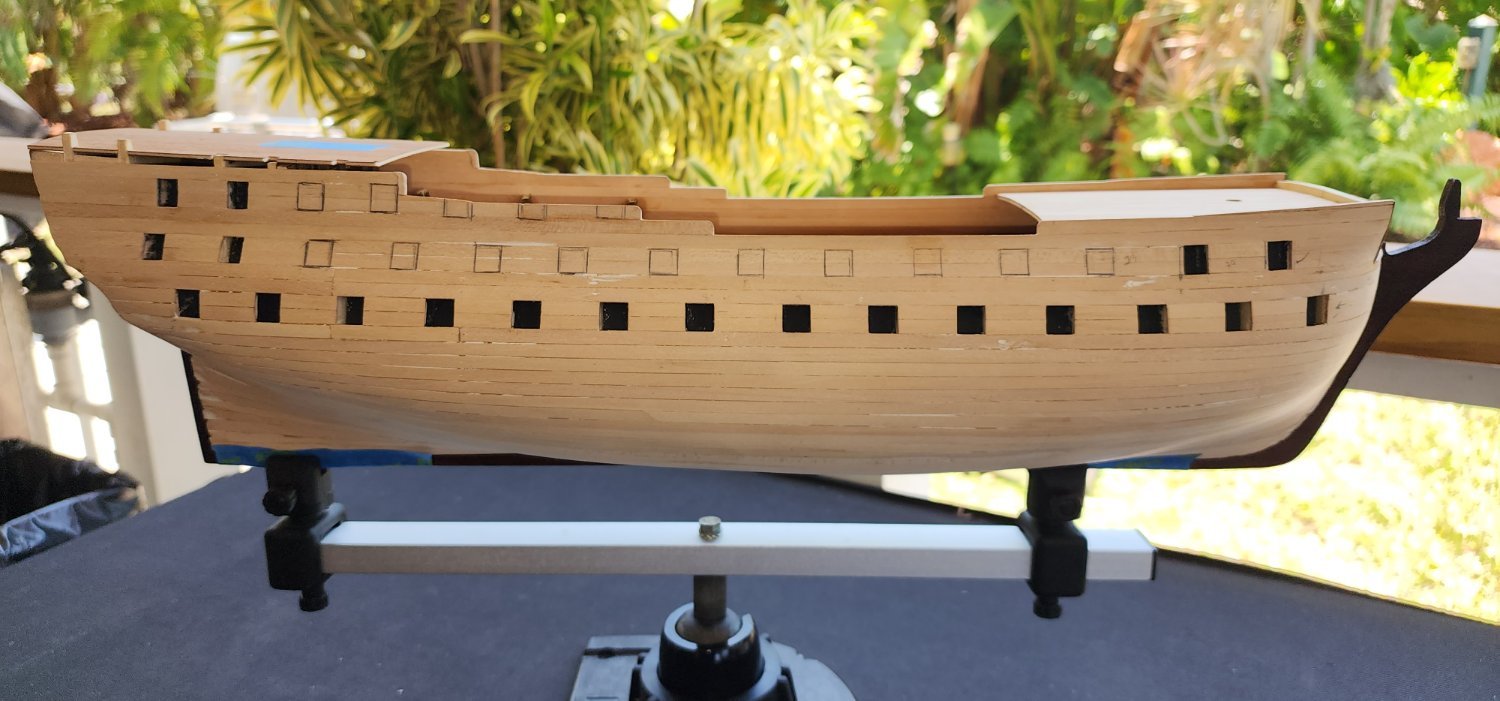
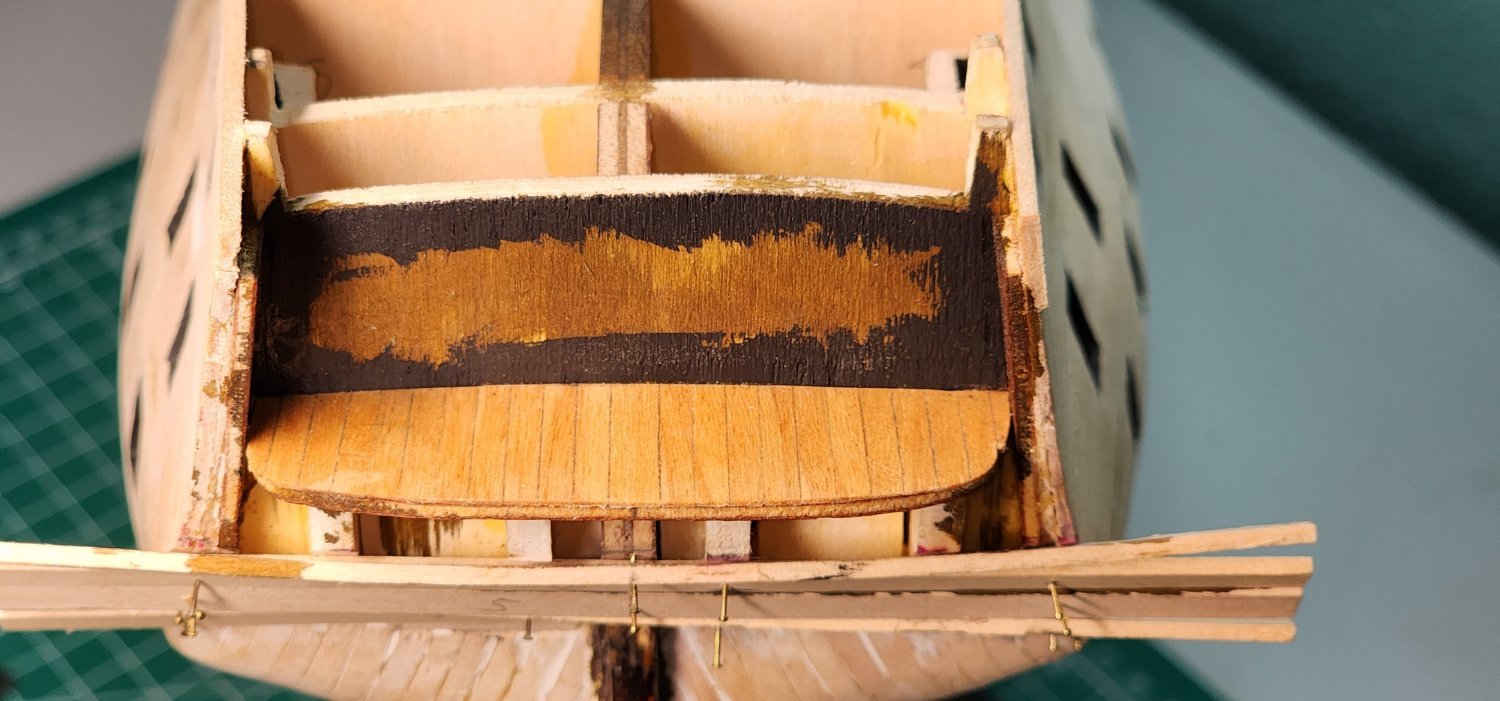
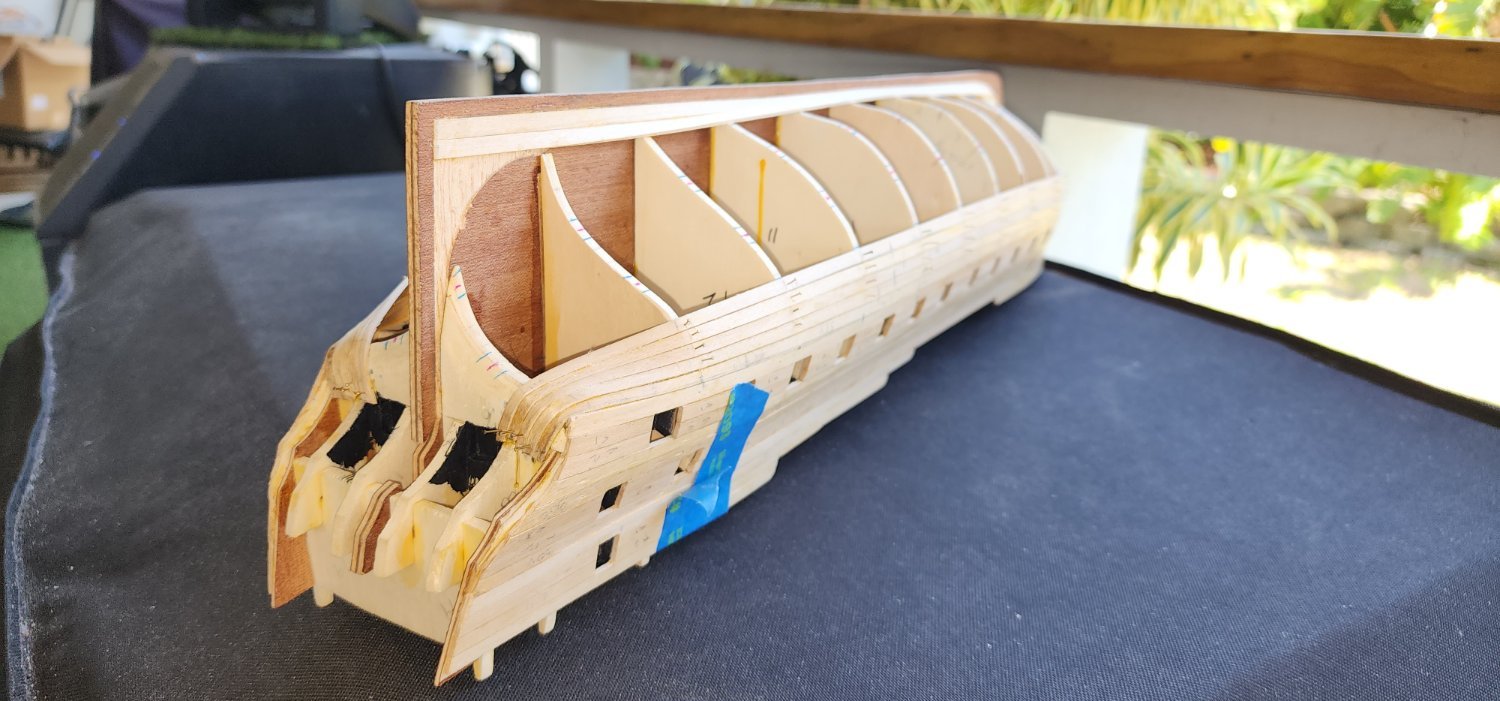
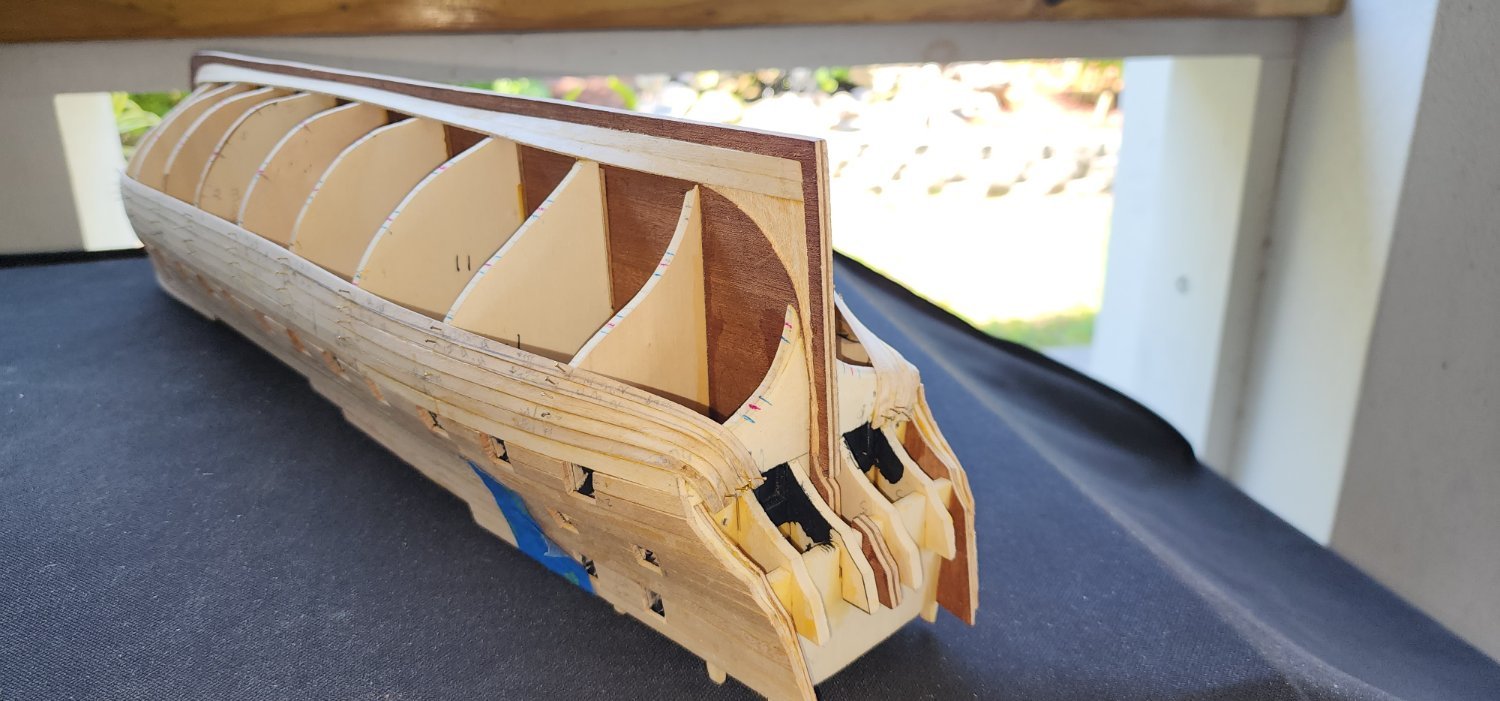
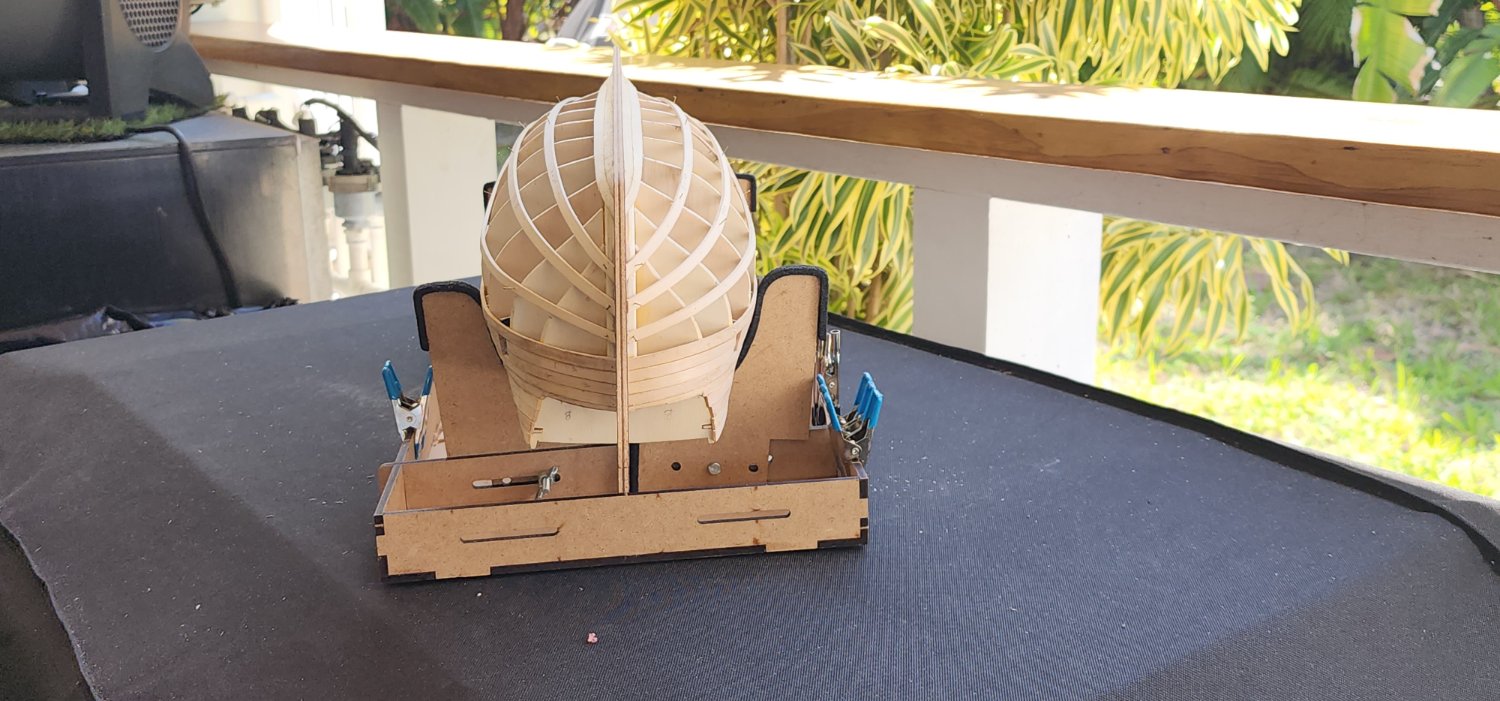
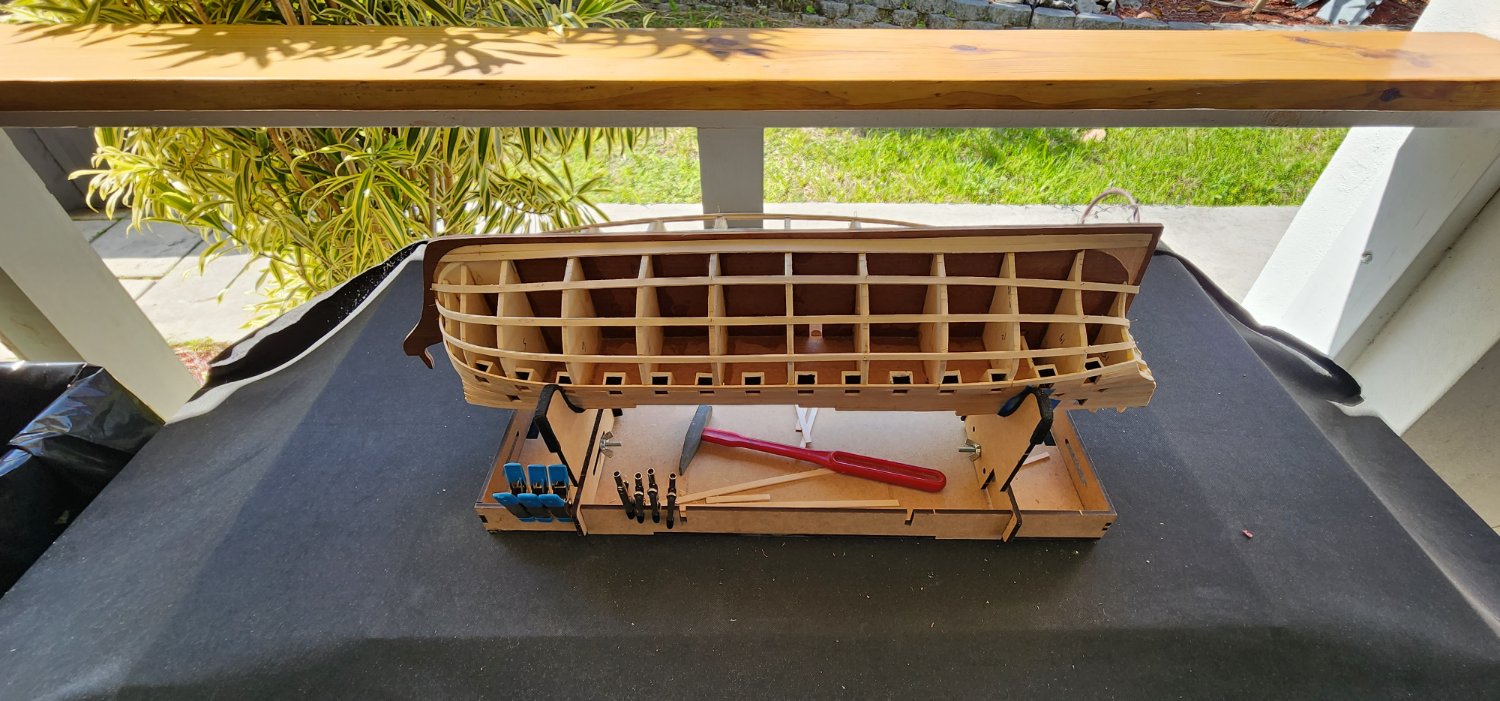
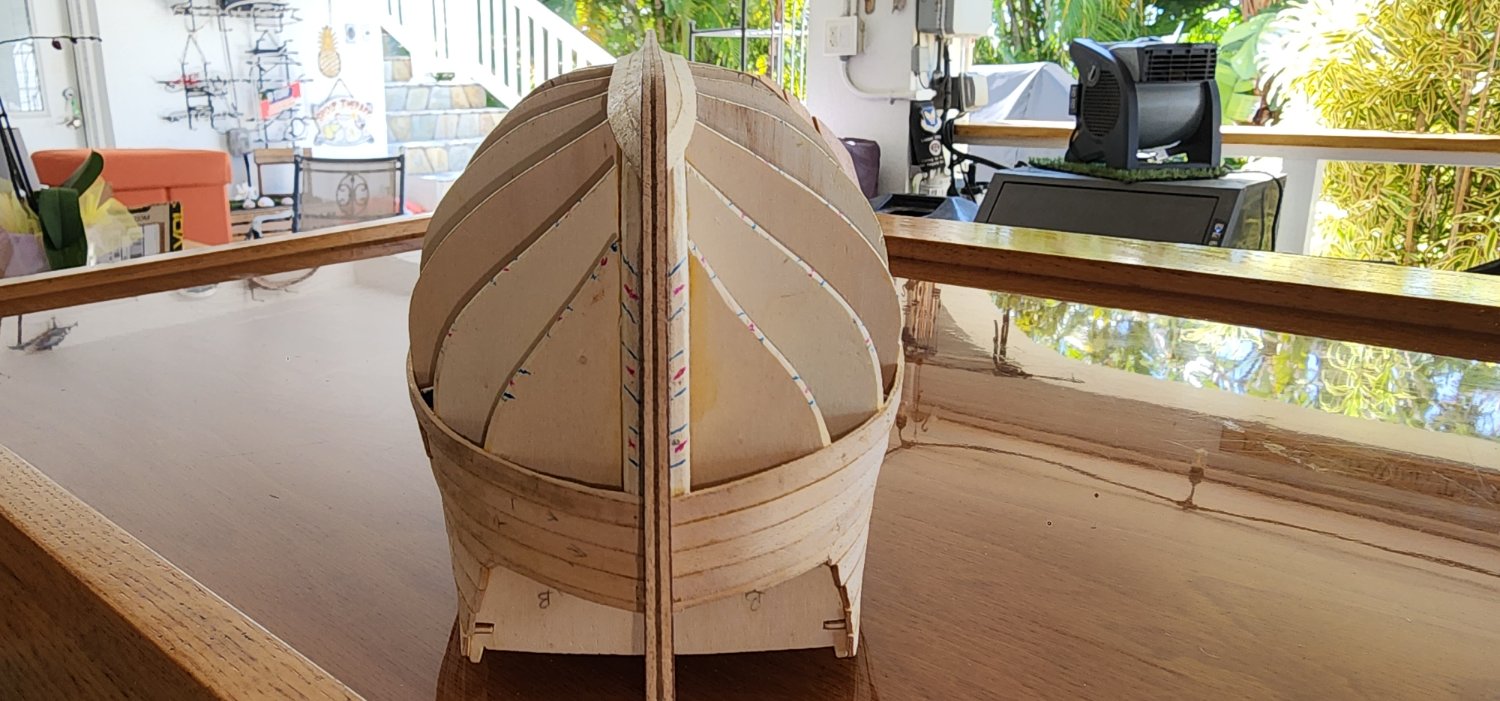
Well, a bit of an update on the Bellona. I feel that I have reached a milestone in the build. I have completed the first layer of planking and have sanded and faired the hull down to a pretty smooth surface and managed to not break the stem piece off. The first layer planking did not turn out as nice as I would have wanted, but it is still a good base to work from. I learned quite a bit in the process and hope to not repeat the same mistakes on the final planking that I did on the first. Since the beginning of this build, I have not liked the quality of the plywood that came with the kit. The false keel does not have any finishing schedule on the plans and reviewing other builds, the plywood that makes up the false keel just doesn't seem to look right in my opinion. I thought of possibly just staining the keel, but it still just doesn't seem right. I decided that I am going to laminate the false keel with a walnut laminate that I had left over from another project. I have reviewed the details of the keel that was included in the Anatomy of the Bellona, and the kit definitely did not include the detail of the original ship. I am not going to try and piece all the parts as shown in the book drawing, but to just apply a better finish. I started the dry fit of the stem pieces to see if it truly would be worth the effort and decided that it will and is a far better finish then what came with the kit. It will add about 1mm to the thickness of the keel, which will allow me to taper the stem as shown in the keel details in the book. It will also service as the bearding line by offsetting it away from the hull. I will apply a walnut strip on the face of the keel to hide the layers of the plywood. Well that's all I got for right now, I will update the results of the keel modifications once I've installed the laminate.
Cheers
Nearshore


-
Looks great!!
Nearshore
- Glenn-UK, hollowneck and mtaylor
-
2
-
 1
1
-
-
I received my copy of Anatomy Of The Ship Bellona by Brian Lavery from the postal service yesteday. I have been studying the contents and I must say, I am very humbled and honored to be building such a historical ship. The book contains a lot of information from her history, the captains and crews who sailed her to the construction and handling of the ship. I now understand why it is so important to research the information about the models we choose to build. I am becoming more attached to this build now that I have learned more about her history and construction. She was an amazing ship of her time and I can only hope to give her the attention to detail that she deserves. I appolgize if this update doesn't fit the content of my build log, I thought it would be relevant though.
Nearshore

-
17 hours ago, allanyed said:
Hi Nearshire,
Out of curiosity, what is the width of the planks in your kit? The reason I ask is that the first layer of strakes (which really does not matter) looks wide in the photos. Hopefully that is not the case on the second layer. From Goodwin's The Construction and Fitting of English Men of War, page 50, the bottom planking was from 10" to 12" wide at the dead flat. This would be 0.10" - 0.12" (2.54mm to 3mm) at your scale. This will make it easier to prebend the tapered planks with heat (ala the method in the Passaro videos) compared with if they are too wide.
Allan
Hi Allen,
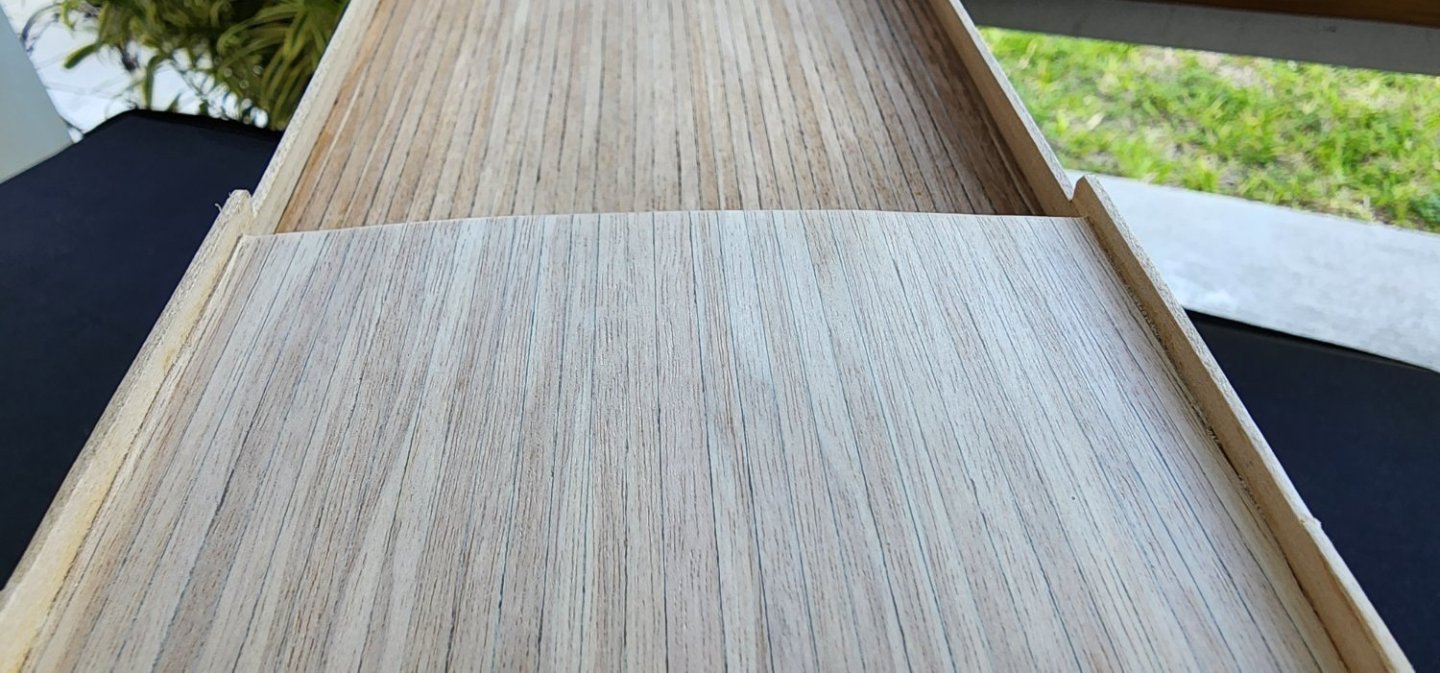
The planks for the first layer are 5mm x 1.5mm. Your correct in observing that the strakes are to wide. I did not follow my own measurements when tappering the stem planks. I was to taper the stem planks to 2.5mm but the taper was 3mm and me not following my own measurements threw the second band off. I guess i figured that being off .5mm was no big deal and could make it up if needed. I learned a valuable lesson that a model of this scale, presision is a must. I am trying to adjust the second band so that the 3rd and 4th band line up as they should. The second band is going to look pretty ugly, but I have a new respect for the scale of this kit. Numbers don't lie, and I will certainly trust them on the 2nd layer. As always, I appreciate your input and guidance.
Nearshore
-
2 hours ago, allanyed said:
There are hundreds of contemporary ship models on the RMG Collections site, many of which have photos in several views that might be of a little help. One example is below of the Hercules (74) 1760. All views of her can be found at https://www.rmg.co.uk/collections/objects/rmgc-object-66271
Allan
Hi Allen,
Thank you for the picture and link. I have already messed up my plan of plankning the first layer to match what the final planking lines will be. I am working on a fix to try and get the planks back in line where they should be. My mistake was not tappering the bow planks enough in the first band which is causing clinkers on the planks on my second band. Im going to have to put a couple drop planks in to straighten her out. I will post some pictures when I get a bit further on.
Nearshore
-
You are doing a nice job. The first layer of planks are looking good. You will be able to adjust on the second round. I'm on the first layer of planking myself.
Cheers
Nearshore
- Knocklouder and etubino
-
2
-
19 hours ago, yvesvidal said:
I remember bending these planks on the stern of my Bellona model. It is not easy and the angle is very sharp.
You are doing a great job on that kit.
Yves
Hi Yves,
Thank you for the compliment. I still have a very long way to go.
Nearshore
- yvesvidal and Bill Morrison
-
2
-
22 hours ago, hamilton said:
She's really coming along - planking looks nice so far!
hamilton
Thank you Hamilton. Haven't seen any updates from you in sometime. Look forward to seeing your progress.
Nearshore
-
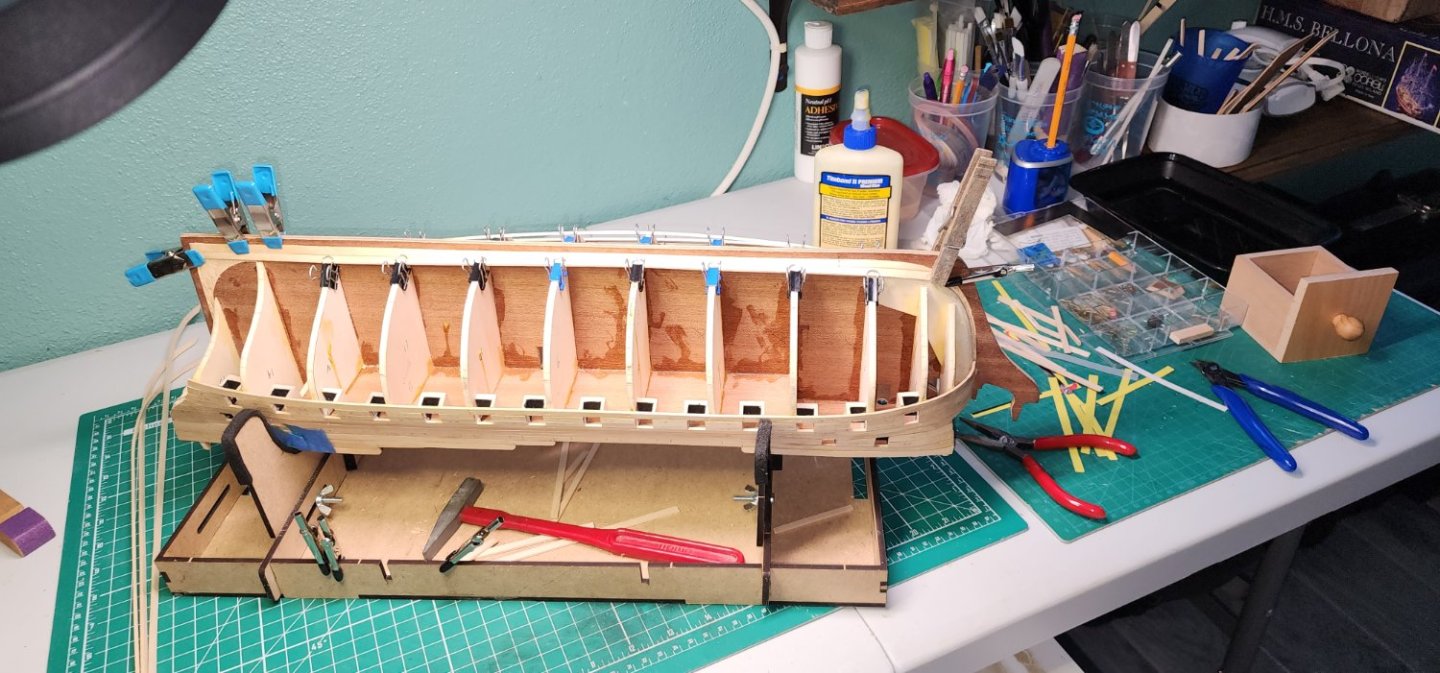
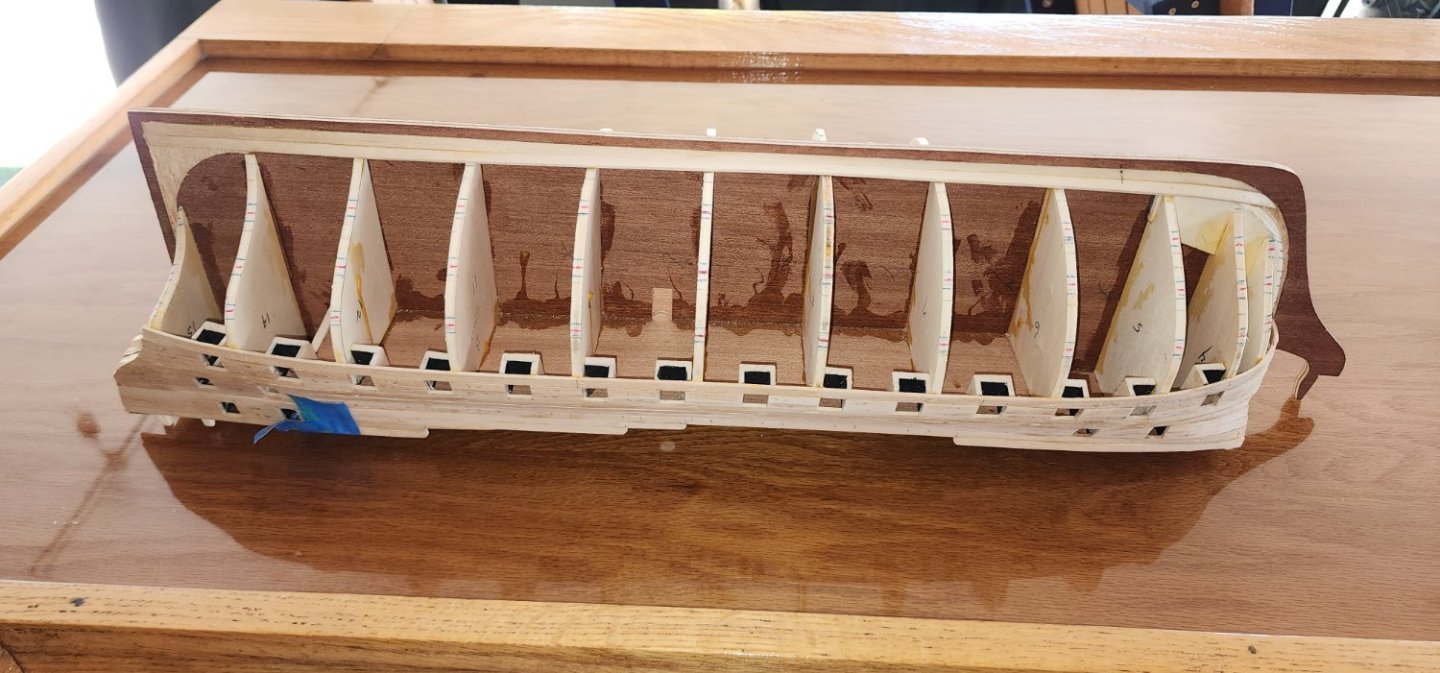
Here is another update on the Bellona. I have installed the first band of planks and tapered them according to the measurements that I took and plotted. I used a piece of tracing paper taped together and laid it on the bulkheads and marked their locations on it. I then transferred those marks to the planks that I would be tapering. I also wrote the amount of tapering that is needed at each bulkhead location on the plank. I used my belt sander to get a course taper and then finished each plank by hand to the specified measurement. I have been struggling with how the planking is supposed to lay on the stern. I have looked at all the build logs and searched other forums for suggestions on how they are supposed to lay. I did find a few pics but nothing that really focused on this part of the build. I have decided that I would put a few pics up on what I think is the proper placement and taper of these planks. Not sure if its right or not, but it's what I am going with on the first layer of planks. If it's wrong, I at least will get another chance to make it right. I am trying to install the first layer as close to what the final planking will be. Its good practice and if it turns out right, the second layer should go fairly smoothly. As you can see from where is am so far, there is going to be a lot of sanding and wood filler in my future. The first band has lined up somewhat close to the band marks on the bulkheads. The Bow and Stern are off a bit, but I hope to try and make the corrections on the next 2 bands of planks. I have started the second band of planks, and when I get a little closer to installing them, I will post another update. Hopefully my plan will work out, but if not, at least I will know where I went wrong and try not to repeat the same mistakes on the final planking. Well, that's it for now.
Cheers
Nearshore


- chris watton, KARAVOKIRIS, Rudolf and 3 others
-
6
-
Very nice work. She is looking good.
-
-
On 3/6/2023 at 12:13 PM, allanyed said:
For the future, try to use battens that are about the same width as they are thick. The edge bending will be minimal and overall easier to use.
It will also be easier to taper the planks to their proper width, especially from the dead flat to the bow, if you mark the line of each plank on at least every other bulkhead. With accurate tapering they will all land at the rabbet as they should, rather than coming up short as seen on many of the build logs.
Allan
Hi Allen,
Thank you for the tip. I will certainly try that in the future. I used the 5mm planks that were the same size as the planks that will be used on the first layer. I used them to try and get a feel of how the planks would form to the bulk heads as naturally as possible. I've started tapering the first band planks, hope it turns out ok. If not, I will have a second chance to get it right. I welcome all the advice I can get, I'm learning as I go.
Nearshore
-
Look forward to watching the progress of this build.
Nearshore
- Kevin, mtaylor, hollowneck and 1 other
-
4
-
Hello all,
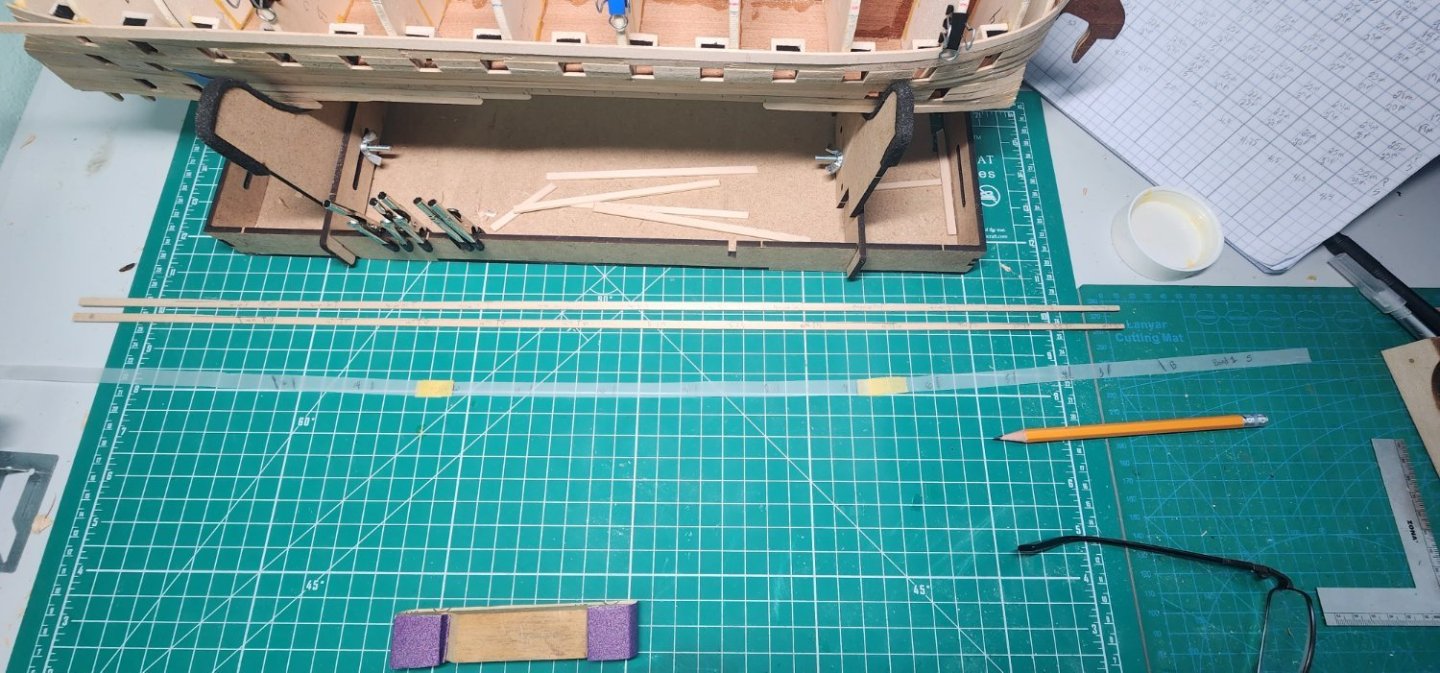
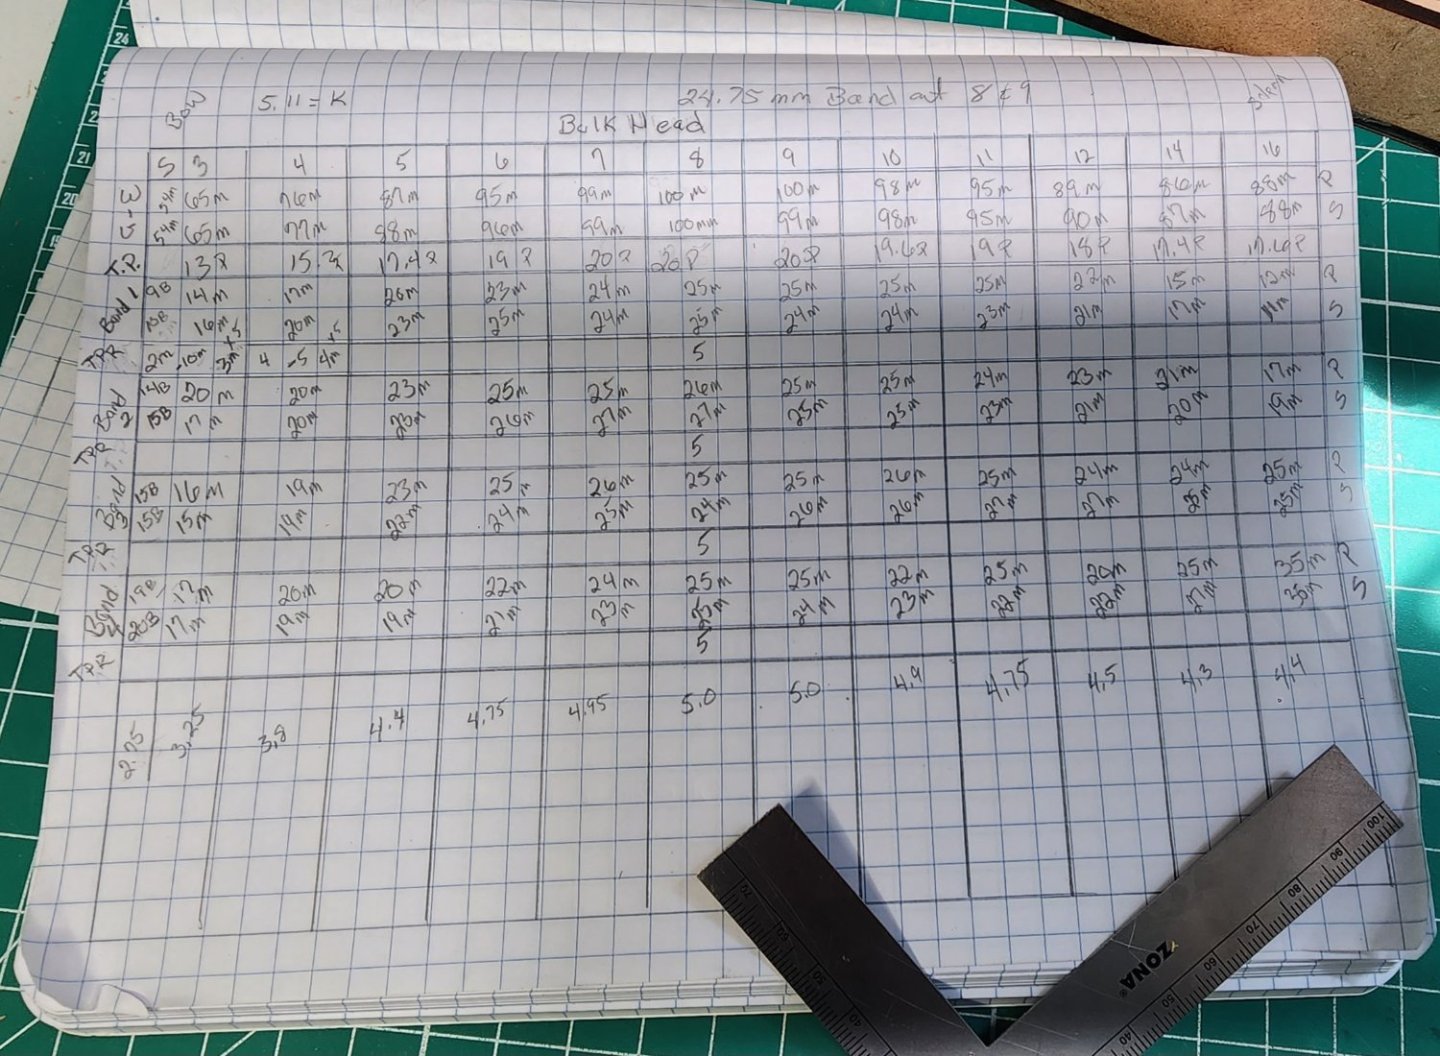
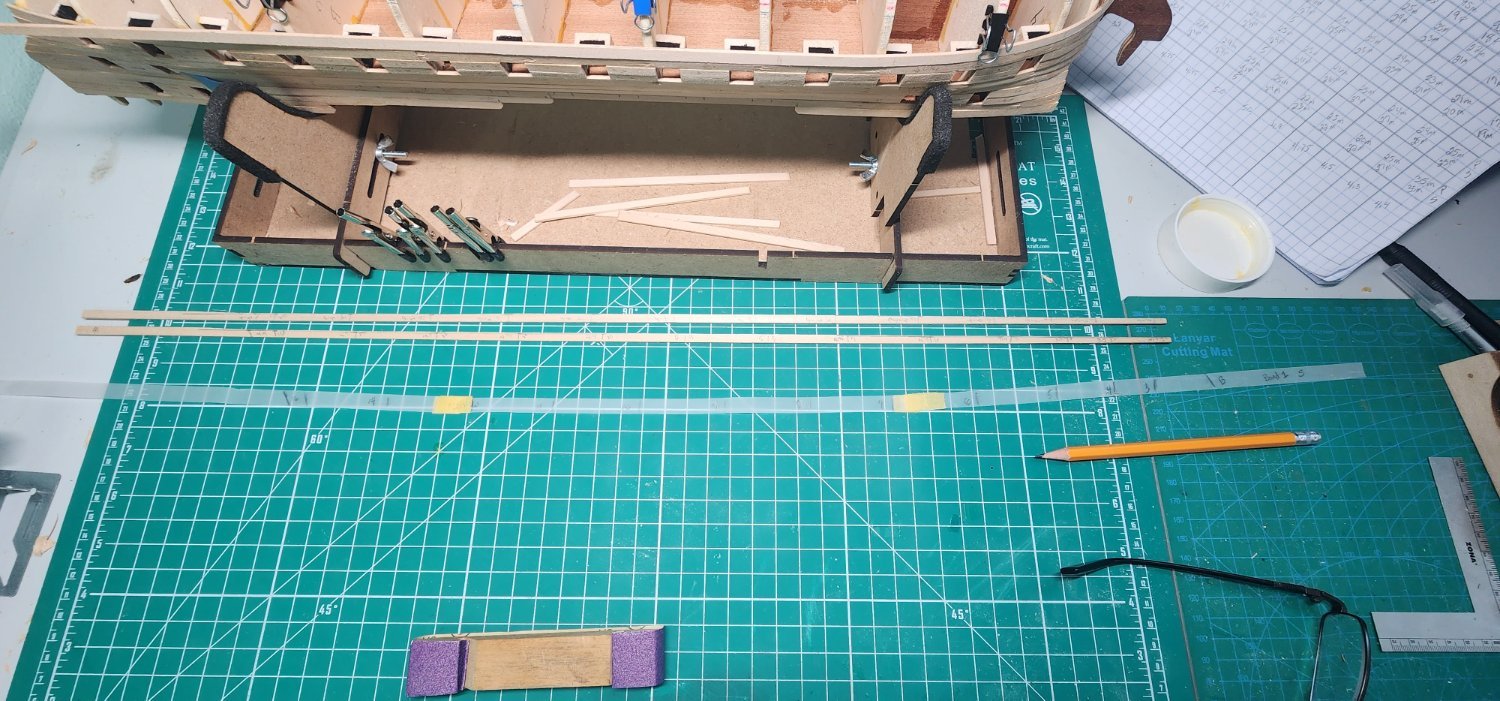
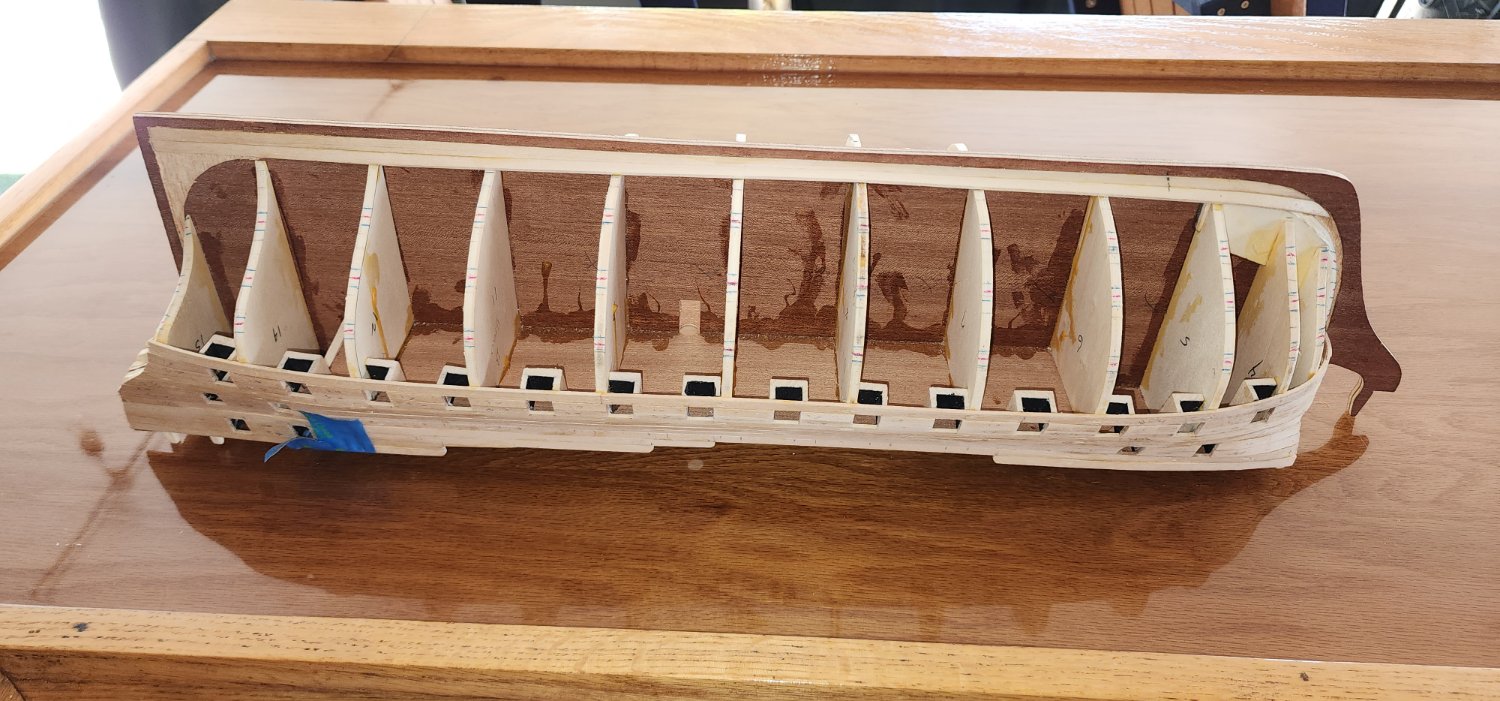
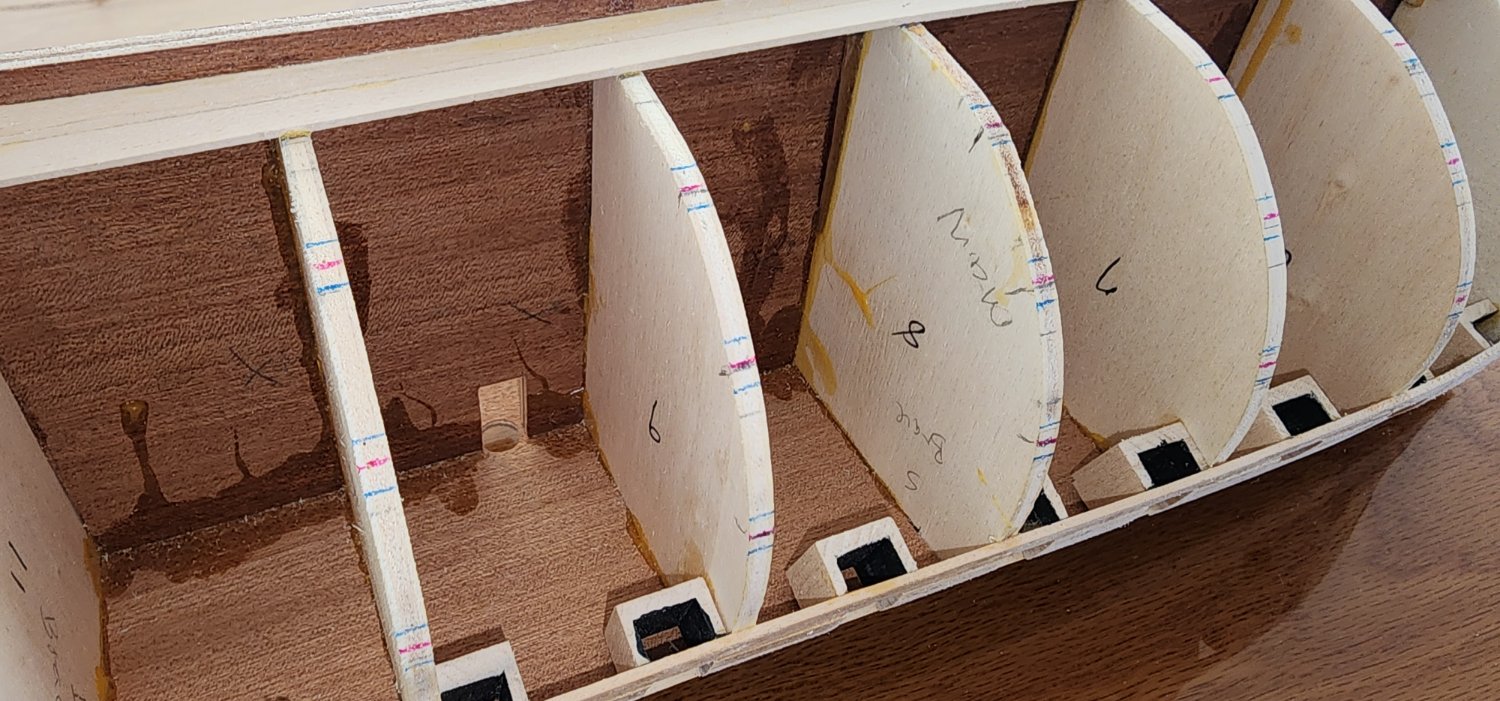
Small update on the Bellona. I glued the garboard planks in place and pinned the temporary battens in their positions. I have marked up the bulk heads so many times, that I decided to use a colored pen to mark the final-final locations of the battens. Before removing them, I marked each side of the planks in blue ink to differentiate from all the other markings on the bulk heads. After removing them, I marked the center line of each plank in red. After everything was marked, I began the daunting task of measuring the overall length of each bulkhead and the measurements between bands. The overall measurements were taken from the wales to the garboard. I plotted the measurements for both starboard and port side. The overall lengths are pretty even, but the measurements between bands and the band widths were off a bit. I believe that this is because the battens were not perfectly aligned and the measurements on port and starboard were off just a tad. I don't see this as a problem, I should be able to adjust when I start the planking. I used the overall measurements of bulkhead 8 and 9 to establish how many planks that would be needed. The first layer of planks are 5mm. I will need 20 planks on bulkheads 8 & 9. I used this measurement to establish the taper of the remaining planks. The taper is the bottom number on the spreadsheet. It was very interesting to line off the hull in this way and the numbers gave me a good indicator of the error on the placement of the temporary battens. The numbers on the column "S" were taken at the stem. It is telling me that the taper between bulkhead 3 and the stem will need to go from 3.25mm at 3 to 2.75mm at the stem. I have laid out a couple planks and tapered them to the measurements on the graph. I will post an update on the progress as I go.
Cheers
Nearshore


Bluenose by hamilton - 1:64 - POB - from Model Shipways plans
in - Build logs for subjects built 1901 - Present Day
Posted
Hi Hamilton,
The Bluenose looks fantastic. You have done a very fine job. Keep up the good work.
Nearshore