SJSoane
-
Posts
1,655 -
Joined
-
Last visited
Content Type
Profiles
Forums
Gallery
Events
Everything posted by SJSoane
-
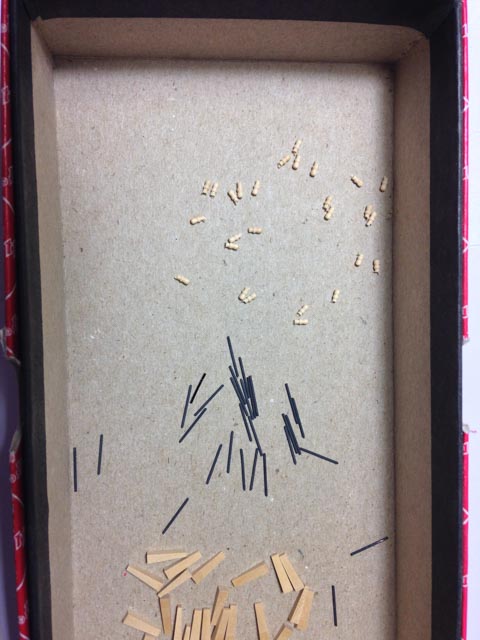
 Thank you iMack, for your comments. I started the cannon in December, and I probably get to work on the project about 10 hours a week. So I am maybe 160 hours into the 28 cannon, and I still have a great deal of work to do. I had no idea at all when I started that this would be so time consuming. They look so simple! One of these days, I will put together an account of how many separate fabricating, machining and assembly steps there are for all of the pieces in one cannon. I should note that the cannon involved learning brand new skills for me, with all of the delays and mistakes that entails. I had never cast metal, or silver soldered, or formed rings and eyebolts. Nor had I used the duplicator. It has been fun to learn new skills, but then tedious at times applying those to 28 cannon. For example, 28 cannon equals 112 wheels, 56 axles with 112 separately turned ends, 56 sides, 28 transoms; 196 eybolts, 112 tie rod washers, 56 rings, 28 tie rods, 112 wheel pins, 168 bolt heads, 56 stool parts, 28 quoins and 28 turned handles. And I haven't even thought yet about the hardware fastening the cannon to the carriages. And then I have an additional 28 cannon to think about when I get to the upper deck, and 18 more for the quarterdeck and forecastle. By then, I should be really fast at this.... Mark
 -
Ed, These are very complex forms bending in three dimensions, and you make it all flow so smoothy. Beautiful work. Mark
- 3,618 replies
-
- 2
-

-
- young america
- clipper
- (and 1 more)
-
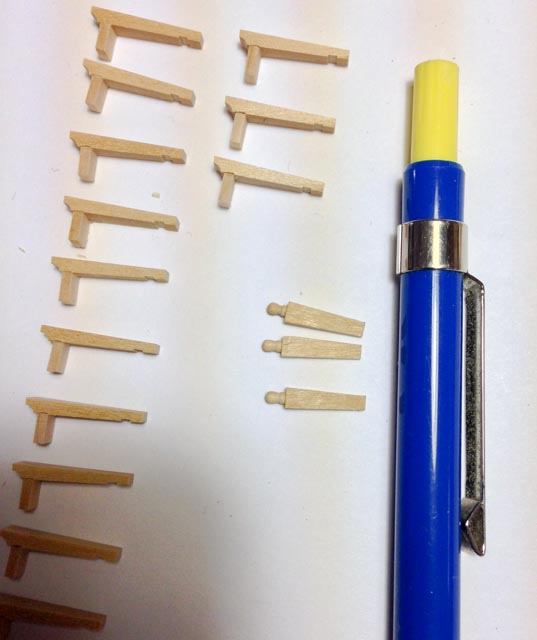
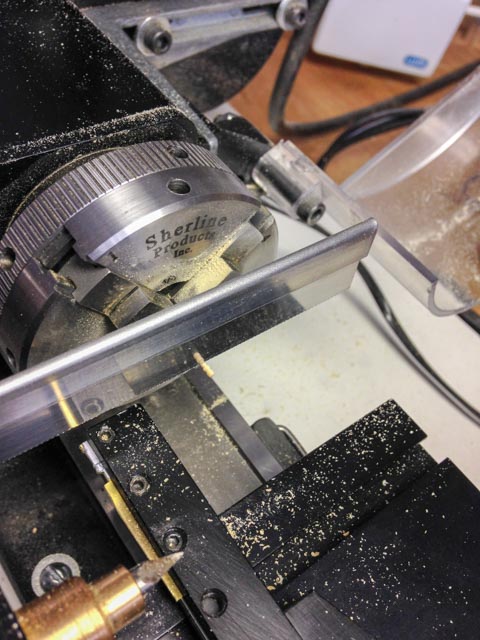
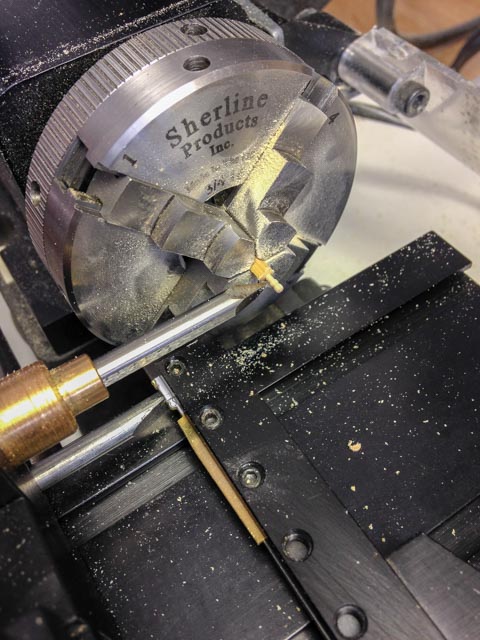
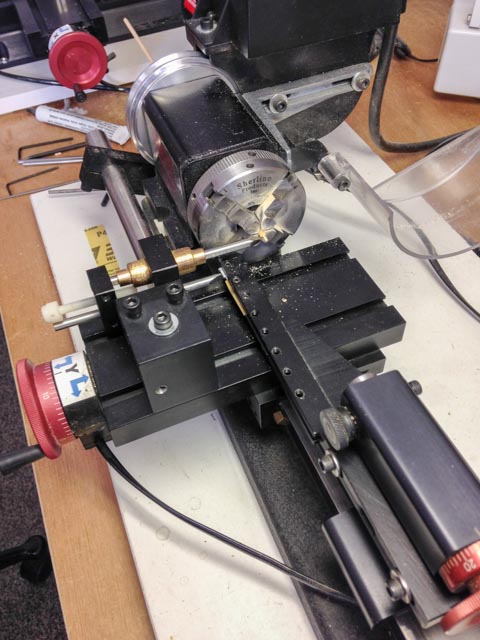
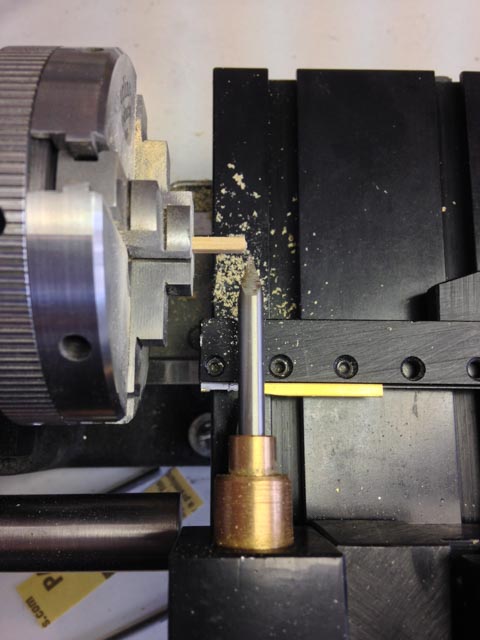
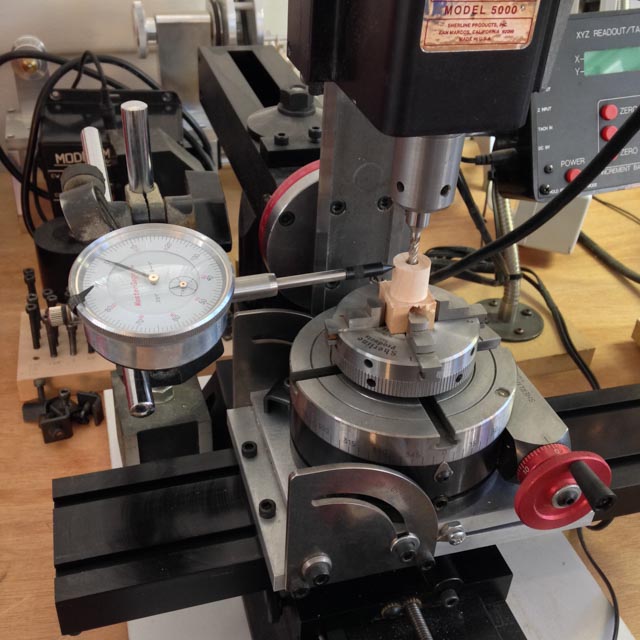
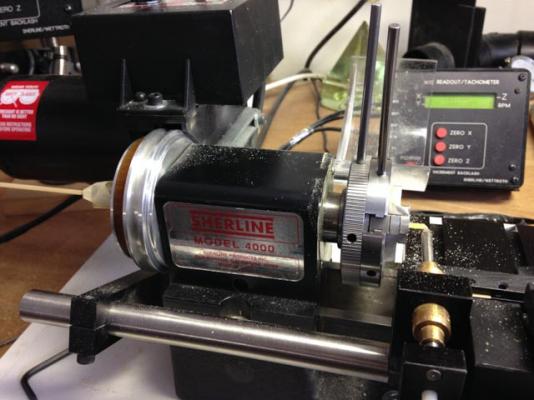
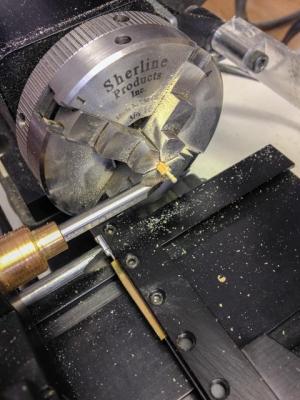
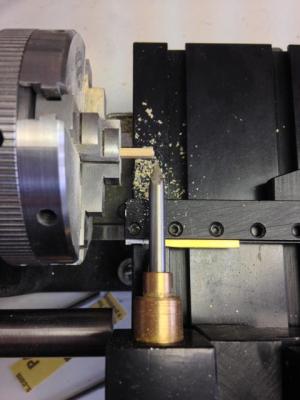
Hi everyone, Here are some images of cutting the quoin handle with the Vanda-Lay duplicator. As you can see in the last photo, a template holder clamps onto the tailstock, and the cutting head and follower is bolted onto the Sherline Y table. You have to unbolt the brass nut on the X axis lead screw, so the bed can move freely without using the handwheel. The idea is to slide the table in the X direction with your right hand, and push in the follower with your left hand, trying to trace the template as smoothly as possible. After a few tries, I got very reliable duplicates every time. Now, I did learn that I had to loosen the gib on the X axis, so the table would move very smoothly. I also used silicon grease on the ways, and graphite powder for the follower and cutter. Things really do need to move smoothly without any binding. Also, the cutter does need to be aligned precisely at or just below the centerline of the lathe. It took a little fiddling to get the cutter at the right height and at the right distance in. I fed a long strip of wood through the lathe, and simply moved it forward each time once I had cut off the previous handle. The masking tape at the end keeps the wood from bouncing around when the lathe is turned on. I have had this duplicator for years, but I had never used it until now; I believe there is an updated version from Vanda Lay. I can confirm that it works very well, once everything is tuned. The other photos show using a razor saw to cut off the handles when the lathe is turned off; these would fly for sure if using a cut-off tool. And one more photo shows the jig for drilling the handle hole in the ends of the quoins. Mark


-
Gaetan, this is a very fine slab of wood in the last photo. Is that the same wood that you are using for the ship? Mark
-
druxey, knever a knegative thought....
-
Thanks, druxey, jim, michael, grant, and all who liked. Grant, I will try to take some photos this weekend on the duplicator. I don't have it working quite as well as I would like, and will tweak a little to see if I can improve it. Mark, i am trying very hard to make everything myself--purely for the vanity of telling people who visit, "...yes, I made that...". We'll see how long I can keep that up. I have purchased a range of sizes of the outstanding Syren rope, and I am still pondering whether I will use this or end up making my own. I am a number of months away from making that decision. At the very least, it shows me the very high standard to which I will have to aspire! Mark
-
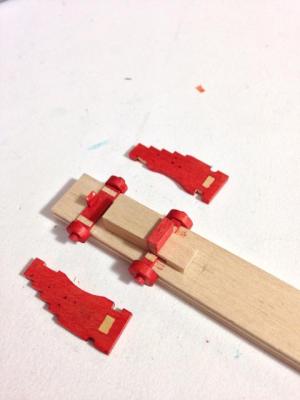
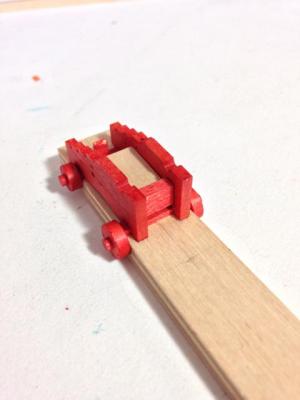
Hi everyone, Progress is very slow on these cannon. Yesterday and today, I made the stools, and then the first quoin with a small handle. I am showing using the Vanda-Lay duplicator on my Sherline lathe. You can barely see the template for the handle directly below the chucked wood blank. Only 27 more handles to go... Mark

-
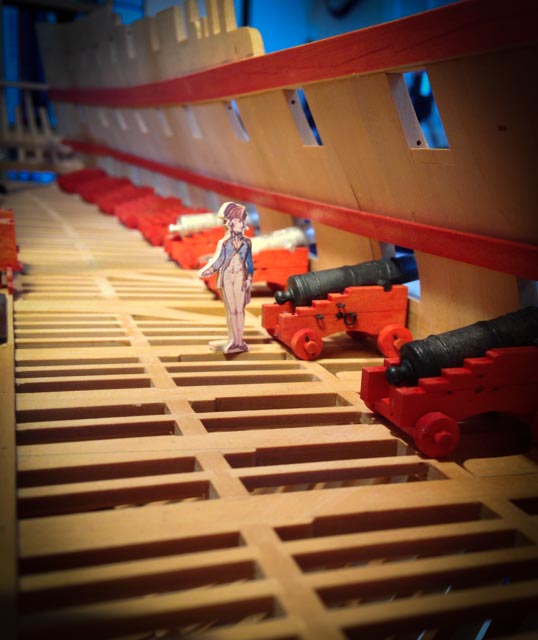
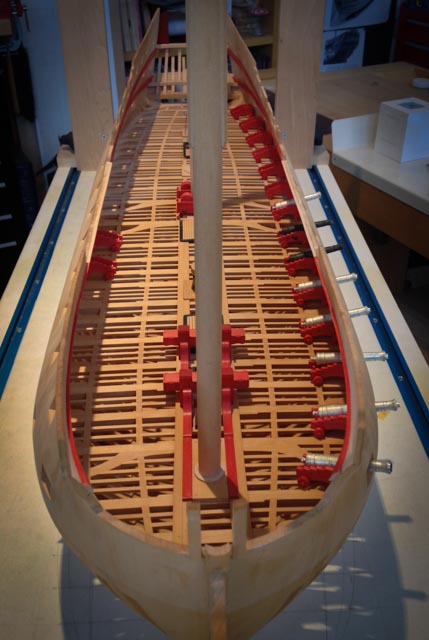
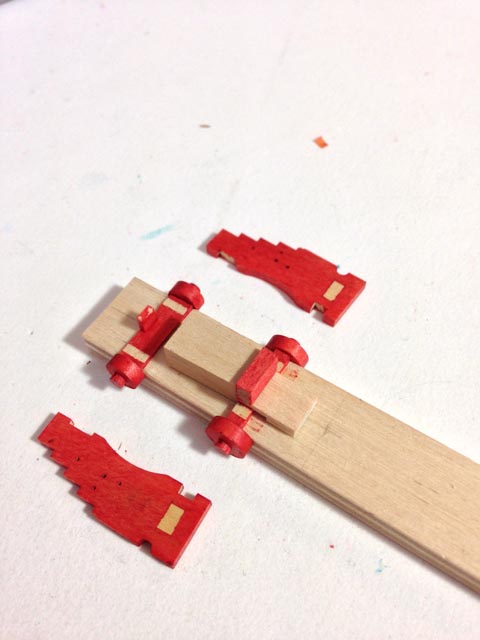
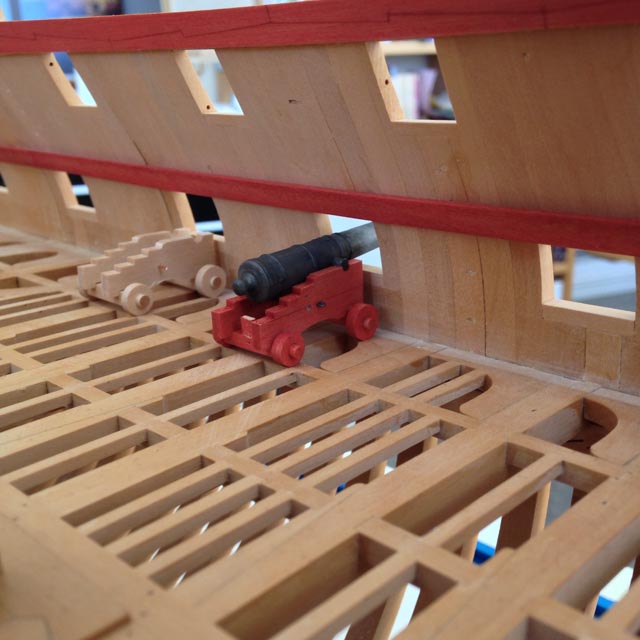
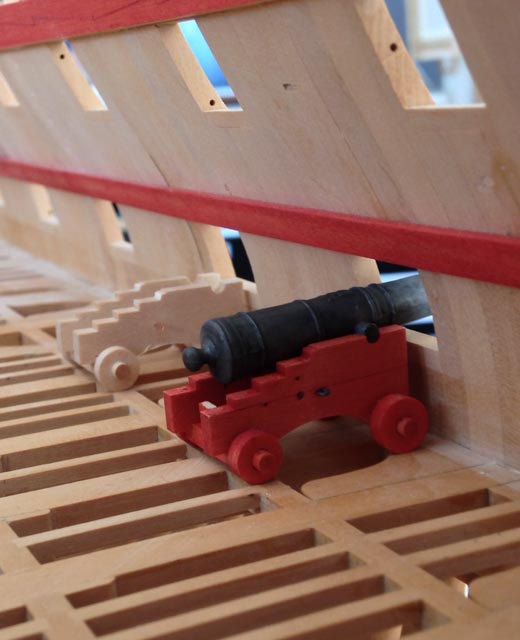
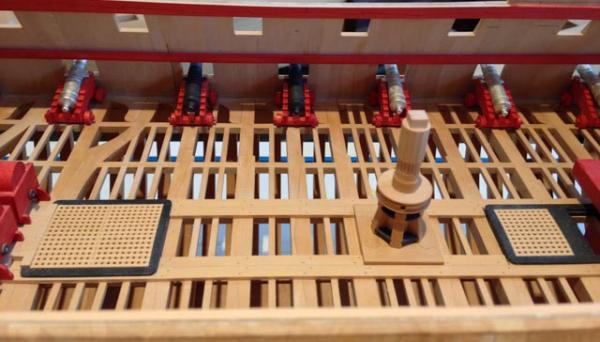
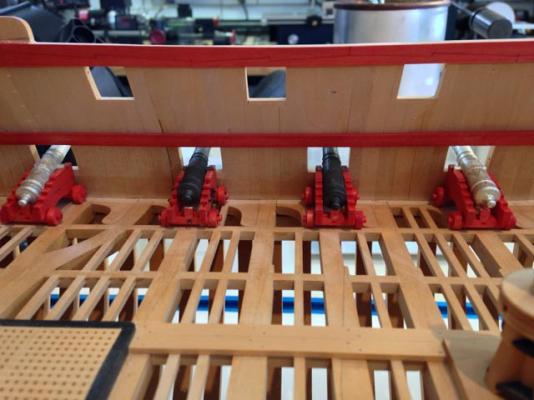
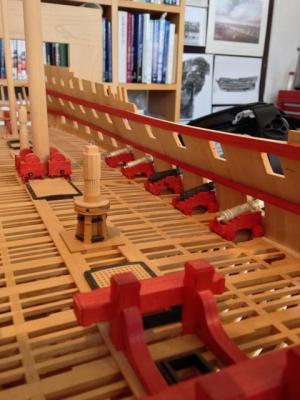
Hi everyone, I managed to stain and assemble the carriages for the entire port battery. Starting to look like a busy gundeck. Much iron work and casting still to do... Mark


-
Beautiful work, Siggi. Those wine glasses are amazing. How did you turn them? Mark
-
Michael, the further you go, the more confused I am about the mechanics of the engine, and the more impressed I am by your machining skills! Mark
-
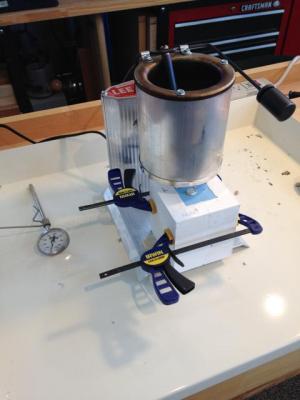
Thanks, Siggi and druxey. This has been a steep learning curve, working with metal casting. Part of the challenge is that I have been unable to use an open flame propane torch in my shop to heat the metal. So I had to dig into the bullet casting hobby sites to learn about electric melters. The Lee melter is not terribly expensive, and appears to work well. Mark
-
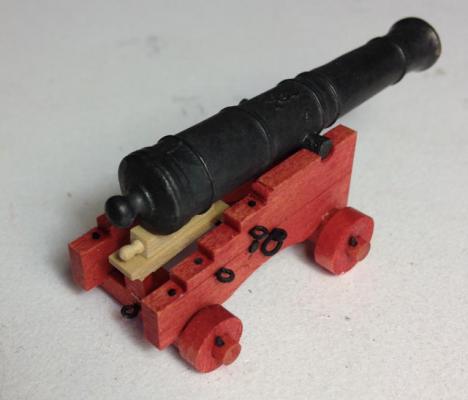
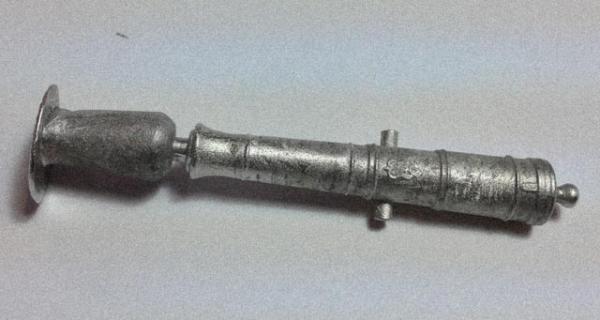
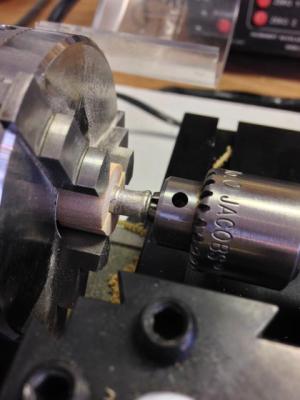
Hi everyone, A long time away from the shop; pesky real work gets in the way... I am zeroing in on these cannon. I think my sludge problem was from using an electric melting pot with a cast iron ladle; somehow the cast iron polluted the pewter. So I switched to a Lee bottom pour melting pot, and it works very well. No sludge, no dross to skim off the top. I have also learned to leave the pour in the mould for maybe 5 minutes. Pulling it earlier leaves small pockets in the cast where the metal pulls away from the mould before it is fully solidified. the photo of the cast cannon also shows that I changed my gunhead to look something more like the 18th century engravings showing gun casting. I don't know if it makes any difference, but it saves the amount of pewter I pour. I built a little collar to clamp the cannon in the lathe for cleaning up the muzzle and drilling the bore. I am showing how I clamp the extension of the bore from the cast into a small Jacobs chuck, to ensure the muzzle is centered in the lathe. And a few shots of the red carriages starting to line up. The jig shows the tedious masking on the carriage parts to ensure a clean glue surface. Mark
-
Hi Michael, I just had a chance to look in after a prolonged bout of work. Looks great! Mark
-
Siggi, I can't help with the cannon location, but I can say that those cannon look great! I now have great respect for the amount of work that goes into an accurately detailed cannon and carriage. They look great against the light deck and the red bulwarks. Mark
-
Astonishing, Michael. I would never have believed this to be possible. Your comment about the 1/4" drilling a tiny bit oversize raises a question for me. I have noted that many of my little drills are a smidgen under their stated nominal size. Is this to account for runout, wander, etc., so the final hole size is as expected? Mark
-
Alan, Looking good! It is very satisfying indeed to see the backbone emerge from parts. Mark
-
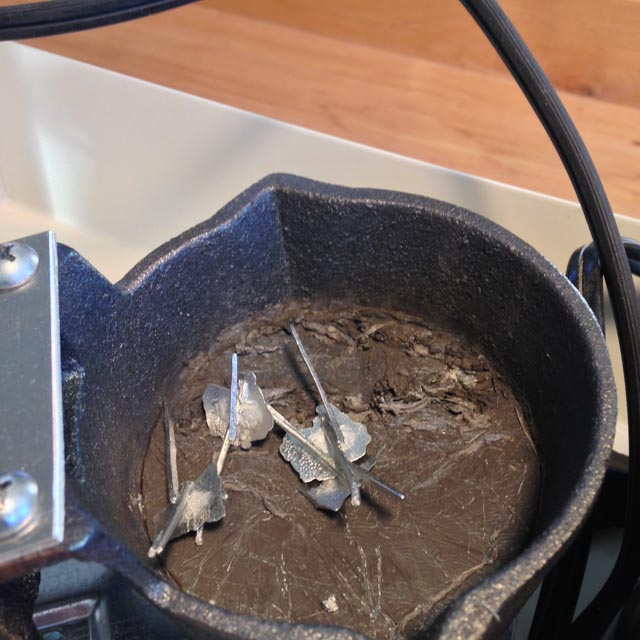
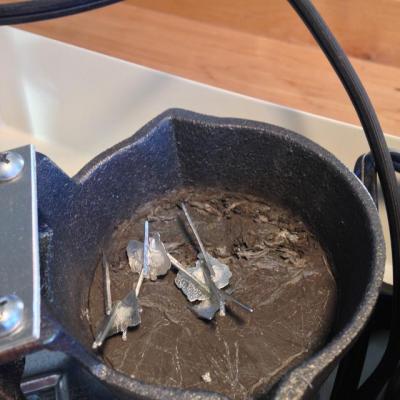
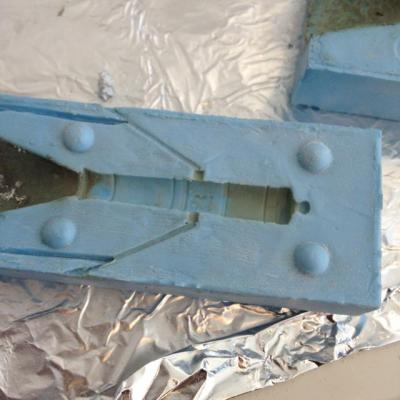
Now that I am having to remake my mould, I have a few thoughts about making it better: The first thing I notice is that the rubber flexes enough when putting plaster around it to allow the end of the barrel to come out a little oblong. Ed Tosti, you advised me, and I regret I didn't follow your advice, to use the 10:1 rubber RTV from MicroMark. Would it perhaps be less squishy than the 1:1 Rapid that I used, and therefore hold its shape a little better? And/or, perhaps I should leave the master inside the RTV mould when pouring the plaster around it. That would keep it from squishing. I also wonder about the pewter I bought locally. It has a downright nasty scum on the surface when it cools (see photo). Does anyone have a suggestion for an online supplier for reliable metal? Mark
-
Hi druxey, I skimmed the dross each time, showing the shiny metal. But in the time it took me to put down a skimming tool and pick up the ladle and pour, oxidation was already forming again. The sludge is surprisingly sticky, like it was beginning to break down the surface of the rubber. Mark
-
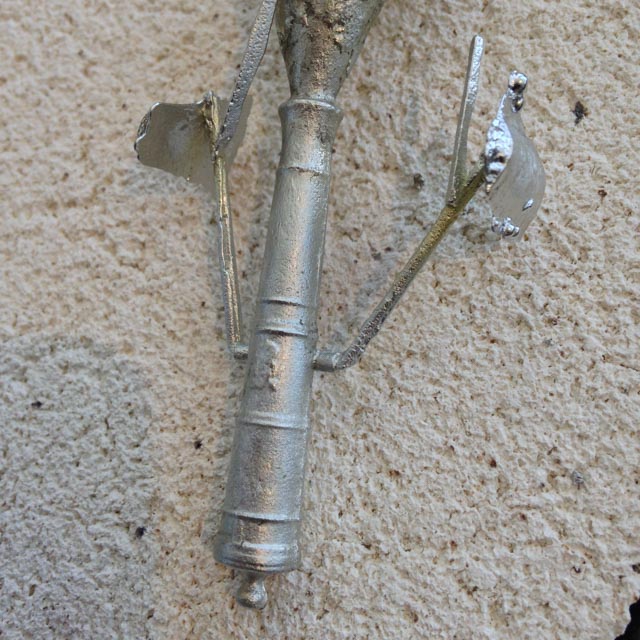
Hi everyone, Ah, a short-lived victory. I started casting more cannon today, and the further along I went, the worse the castings. They were starting to lose detail (see first photo). I looked more carefully, and a sticky brown sludge was building up on my mould (see the third picture, where I scraped some of it off). And then when I was trying to clean the mould, part of it ripped away at the muzzle face. So, time to make a new mould... I really wonder if the pewter metal I obtained at a local jewelry supply store was too hot for the rubber mould material. So, I either need to switch to stronger mould material, or find softer metal, perhaps at MicroMark. Or, switch to resin. The learning curve continues..... Before all of this emerged, I started the day building a successful jig (shown being set up in photo 2), to make a wooden collar with an inside diameter tapered to match the taper of the barrels, so I could chuck the cannon in the lathe for cleaning up the front face and drilling the bore. I cut the inside taper by putting the rotating table on the angle table, and then rotating the blank past a mill cutter inside the hole. It worked really well on a trial; I just have no cannon at this point to use it with! Mark
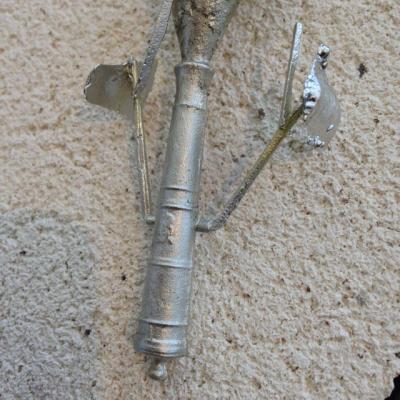

-
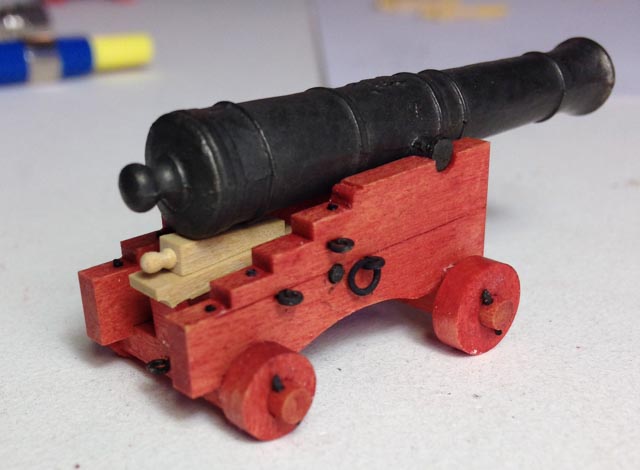
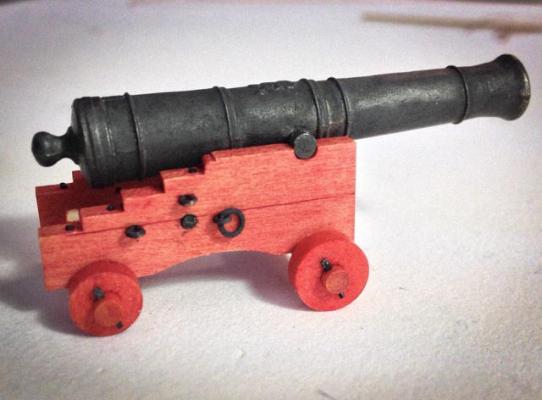
Hi everyone, Well, I finally cast some pewter cannon. Or one, to be exact. It is finished with Jax Pewter Black which appears to work very well. I mechanically cleaned the barrel after casting, with a 3M spider abrader, and then a dip in jeweler's pickle, a rinse in water, and then Jax brushed on. I will live with it for a while; I think it might want some final finish to give it a tiny bit more sheen. It is dead flat black right now. A mean looking cast iron monster.... And thanks, David and Michael, for ideas about how to mount these with spacers. That will be my next challenge. Mark


-
You can see my reconstruction of this partner at this site: http://modelshipworld.com/index.php/topic/196-hms-bellona-by-sjsoane-scale-164-1760-english-74-gun-as-designed/page-2 This is based on the drawing of the partners on my Admiralty prints of the gundeck for the Bellona. I believe the capstan would have been lifted up from above, the parts of the partners taken away, and then the capstan dropped down one deck. Presumably the partners from one deck above would then be fitted in this opening to make the two capstan operational on two decks. Mark
-
Gaetan, the calibration of monitor to printer as you show it here is impressive. I have always had difficulties with this. Mark
-
Perhaps early days for thinking about this, but I am beginning to wonder how I am going to attach the carriages to the deck, and the cannon to the carriages at a set angle. Since I am not planking the deck, I will need to put spacers under the wheels 4" thick to lift them to the correct height relative to the gunports. And how do I pin them down, rather than relying on glue alone? I can see, with the weight of the pewter cannon, how these might break free over time. Pins all the way through the wheels seems challenging. And how do I fasten the cannon down onto the quoins parallel to the deck? I could glue the cannon to the quoins with epoxy, but will this come loose over time without a pin? More construction details to ponder! Any thoughts? Mark
-
Hi Mark, It is a few drops of TransTint Bright Red dye, mixed into General Finishes Gel Topcoat wipe on urethane. I got both at Rocklers Woodworking. Ed Tosti has warned that this may be transient and fade over time, but I decided that faded red would be better than way too intense red paint. I had to throw away my first riding bitts when I painted them and hated the look. Mark