
Check out our new MSW Sponsor Innocraftsman
×


SJSoane
-
Posts
1,646 -
Joined
-
Last visited
Content Type
Profiles
Forums
Gallery
Events
Everything posted by SJSoane
-
 Ed, I have a lot of reading to do, catching up on when I was last able to follow your build. But what pleasurable and instructive reading it will be! Mark
- 3,618 replies
-
- 2
-

-
- young america
- clipper
- (and 1 more)
-
Hi druxey, Mark and Michael, It is nice to be getting closer to starting up again. Finishing up my career, retiring and moving really left the Bellona on hold for well over a year. During the down time, I was given a copy of the book "Virtuoso: The Tool Cabinet and Workbench of Henry O. Studley" (link below has some good images of his tool cabinet): https://lostartpress.com/products/virtuoso This inspired me to rethink my own tool storage, but my efforts are pretty crude next to Studley's tool cabinet. His defies description. Organizing the tools was also a great way of procrastinating, before tackling my gun casting challenges again. Best wishes, Mark
-
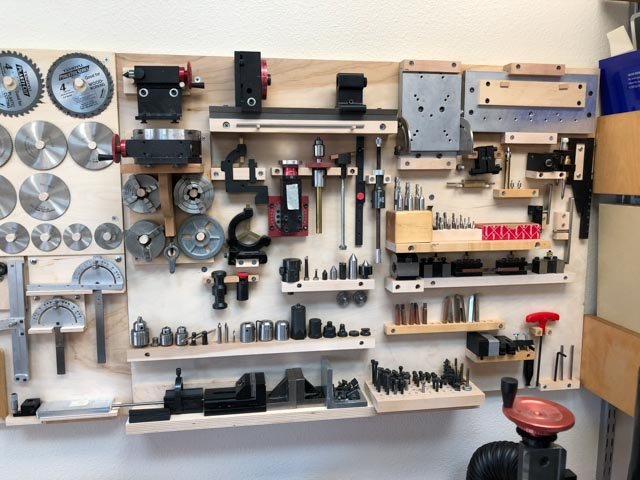
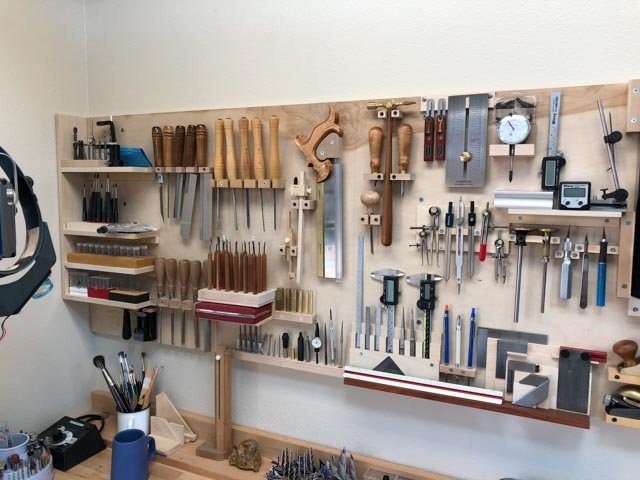
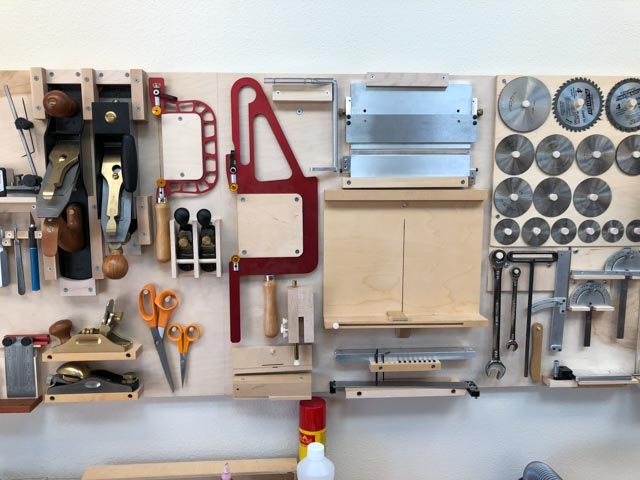
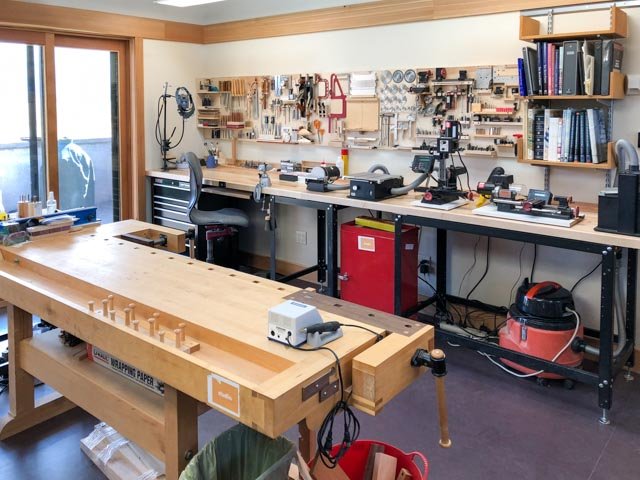
Hi Ed, I think this level of order was only going to happen one time, when I retired and moved. We will see how long it stays this orderly... Here are a couple of closeups of the wall hanging system, and also the dust collectors. Noel, each has a gate, and all the tools are plugged into a surge protector which is plugged into the Fein dust collector seen under the bench. So any tool turned on and off automatically turns on and off the Fein. Best wishes, Mark

-
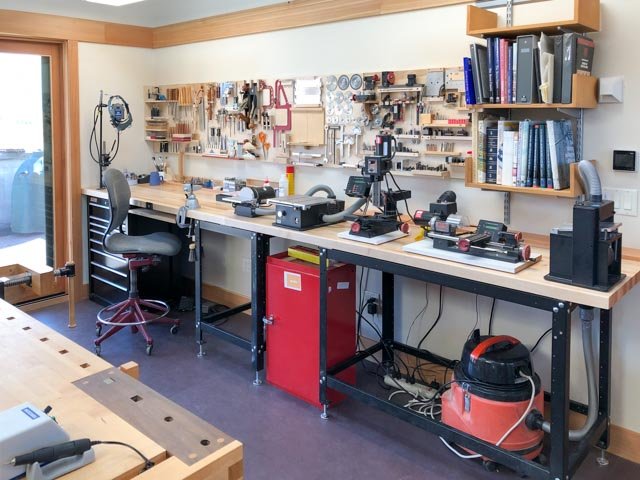
Hi everyone, Moving and retiring at the same time took longer, and was more stressful, than I expected. The retiring is great, the moving not so much fun. My new shop is smaller than the previous one, so I had to organize tools as efficiently as possible. Most of the major ones are now on the wall, and I have knee space at last at the power tools. Here are a couple of images. I hope to get back to the Bellona soon! Best wishes, Mark
-
Hi Mark, I just heard from a retired friend knowing that he doesn't have to do anything, and by the end of the day it is only half done.😀 Alan, the final 1 ½ years go by way more quickly than I would ever have imagined. You are practically there! Aviaamator, thanks for the comments. I hope it will not be many more months before I have a shop and continuing where I left off on the Bellona. I have been re-reading my earlier postings, to get me in the right mood for starting up again. Best wishes, Mark
-
Thanks, Mark, for the encouragement.Last day of work before retirement is June 27. I can only imagine what it is like to get up in the morning and look forward to going into the shop every day. But lots to do between now and then! Mark
-
My immediate challenge is how to transport the hull a thousand miles in a car without damage. First project is to build a crate...
-
Hi everyone, I am finally retiring in 5 weeks, and moving to Montana a thousand miles from an ocean, but a few hundred feet from a lake. Hope to have a shop set up in the next few months, and starting again on the Bellona. All my tools have been packed away for moving, and dust has definitely collected on the hull... Mark
-
Hi Vitaly, Many apologies for not seeing your questions. Work and personal circumstances have taken me entirely away from the shop and website for some time. Thank you druxey, for answering these questions in my absence! I will be retiring in one year, at which time I plan to take up the Bellona again with a lot more time available! Best wishes, Mark
-
Hi Siggi, I have been away from the website and the shop for some time, due to family and work issues. I just had a chance to read the rest of your build log, and I am delighted to see that you have completed the Dragon! It is an exceptional project, congratulations. I look forward to learning from your build as I reach similar stages of my Bellona build. Best wishes, Mark
-
Siggi, It is fascinating to see how you fit guns and furniture into the space, discovering how certain arrangements work and others do not. It is a level of detail I had never considered. Good job! Mark
-
Alexandru, Spectacular! Mark
-
Hi Siggi, Your cannon look great. And thanks for asking about my progress on the Bellona, which has been little since spring except for a little more CAD drawing. Work and family related issues have closed down the shipyard for some time. Maybe when the nights get longer in the winter..... I will continue to follow your progress as a road map for me, when I can return to the shipyard. Best wishes, Mark
-
Gaetan, You set the standard to which we all aspire. Beautiful! Mark
- 728 replies
-
- 4
-
-
- le fleuron
- 64 gun
- (and 1 more)
-
Alexandru, It is looking spectacular! Mark
-
All great comments. All details should be considered in light of the overall artistic effect of the model as a whole. Having said that, I know that I have made some very fine and time consuming details that no one will see in the end, but I did them anyway. I think for 2 reasons: first, to push my limits and see if I could do it; and two, because I was curious about how the detail was built. building the details helped me understand how these ships were made, and how the parts functioned. Good thing my overall deadline is to complete the ship just before I pass away.... Mark
-
Siggi, A very harmonious arrangement in the stern. The colors work well together, and the green paneling is not only historically based, but also gives a good sense of the privileges enjoyed by the captain. I had always been thinking that I would not fully plank the upper deck of the Bellona, but your checkerboard and green paneling are causing me to re-think this. Mark
-
Deck clamp notches
SJSoane replied to Dziadeczek's topic in Building, Framing, Planking and plating a ships hull and deck
My own experience with the Bellona is that the clamps are so fiddly to install, they would not easily have been removed to notch and then reinstall. They change their lengths slightly as they are conformed to the hull sides (particularly the upper deck clamps on a British 74), and any notching when they are not fully bedded down would result in inaccuracies fore and aft. So I opted for installing the clamps first, focusing on keeping their tops at the precise line marked on the bulwarks (deck height at bottom of planking minus thickness of beam, plus 1" as Druxey notes). Fully glued and pinned in, they form a solid foundation for everything else to follow. I then located each beam very accurately in its fore and aft location, temporarily clamping it in place with a small C-clamp. I then marked each side of the beam on the top of the deck clamp with a very sharp knife, and scribed down from this line 1" in scale from the top to mark the sides of the mortise. I used a small jig to scribe a line 1" down and parallel to the top of the clamp, to locate the bottom of the mortise. With the mortise accurately marked out on top, side and bottom, I then used a variety of small chisels and hobby knifes/scalpels to cut each mortise. One inch down at 3/16" scale is easily done by this method. Following full size practice, firmly press down vertically with a knife on each scribed line on the top, then take a slice from the top center of the mortise to each side you just cut, forming an inverted V. Cut from the middle so you are always cutting down on the grain into the stopping cut, thereby avoiding unexpected splits. Cutting this way also means that a knife can be brought to bear from the side, rather than the top where the tumblehome can get in the way. Do the vertical cut and then V cut on each side several times until you cut down to the 1" line. Then pare off the remaining inverted V with shallow horizontal cuts until the V is gone and the mortise is 1" deep. Easier to do than to explain. One key is to take a number of very shallow cuts, so the wood is easily pared, rather than forcing deeper cuts. The other key is to scribe the lines marking the mortises, from the beams themselves and from a jig for the bottom. The scribed lines give a very accurate register for the chisels/knives that you can feel in cramped quarters even when you cannot see the line. Even if you cut the mortises first, you will likely still have to make some adjustments to them once installed, to ensure that the beams are all exactly at the height of the deck minus the decking. I used long templates to sit on beams at the middle and at both ends of the deck, so all intermediate beams could be brought level to the template. So if you are going to adjust the mortises slightly in place anyway, why not cut them in place to start? Once cut this way, the mortises provide very precise beds for the beams fore and aft, and vertically. I drilled through the tops of the beams into the clamp where possible, more often into the bulwarks, for pins. I cannot begin to count the number of times I had to locate and remove the beams for further work, like marking and cutting the mortises in the beams themselves for the carlings. The precisely located mortises were my friend. For those who are anxious about hand cutting mortises, I took inspiration myself from Gaetan Bordeleau, who pointed out to me that the more you cut by hand, the more comfortable you become with cutting by hand. It was like training on the job. And if you follow the advice of shallow paring cuts into stop cuts, you can't go drastically wrong in any given slip of the knife. Mark -
Beautiful work!