


wefalck
-
Posts
6,651 -
Joined
-
Last visited
Content Type
Profiles
Forums
Gallery
Events
Everything posted by wefalck
-
 Allen is right, as the stringers also serve as 'shelves' for the thwarts normally. I have seen, however, clinker-boats, where the bent-in frames do not touch the planks along their whole width.
 -
Copper was quite expensive in the old North, but they had plenty of bog iron inter alia. To my knowledge these ships were always iron-fast. In fact, for some of the famous boat finds, the nail pattern is the only thing that was found, the wood has long be decomposed.
-
A DIY thickness sander
wefalck replied to Kris Avonts's topic in Modeling tools and Workshop Equipment
And, so ? -
Thatching in Europe and Japan is a serious business and the workmen take great pride in its execution to ensure that it is watertight and its longevity. I think thatching with straw is rarely practiced anymore, but in some areas of Europe (for instance, the Cotswolds in England, northern Germany, Denmark, ...) it is still practiced with reeds. It's expensive and fire-insurance premiums are high, but people like to preserve the traditional appearance of their houses. I happen to have a little booklet about thatching practice in England and watched it in execution on the building of a museum near Hamburg, where an uncle of mine was a volunteer. Model railway guys predominantly reproduce reed-roofs, which have a geometrically quite well-described shape and a uniform surface. I gather, the 'gaming' modellers, who work on medieval subjects, may have techniques for roofs thatched with straw. However, they tend to work in a somewhat exaggerated 'cartoon', rather than naturalistic style. I could imagine various routes to reproduce such thatched roofs. Next time you are down Mexico-way, you could try to find some dry grass, hammer it to break the fibers and comb it with a bristle-brush to remove small and loose bits. Alternatively, you could try to find some plumber's hemp and also brush it to straighten out the fibres. I would then put two strips of self-adhesive tape in the distance of the scale-length of the stalks, lay out the fibres in not too thick layers and spray them with some matt varnish to lightly glue them together. Once dry, you can cut swaths of this 'thatch' and glue them in rows onto the lattice work, beginning from the bottom. Normally the thatch is 'sewn' to the lattice work and you could reproduce that.
-
After-thought-job well done! It's those details that really make the difference. It's not easy to have all the necessary foresight, but I make myself a mental plan for working 'inside-out' in order to minimise interference. It does not always work though 😬
-
Pulled the Trigger == Lathe coming
wefalck replied to kgstakes's topic in Modeling tools and Workshop Equipment
I have been subscribed to both channesl for years ... 'clickspring' is a genius with handtools, particularly the file. The Taig is sold in the UK/Europe under the name Peatool, btw., but https://www.cartertools.com is indeed a useful site and I got lots of ideas from it over the years though I don't have a Taig. Although I was lucky to get some basic lathe instruction from an old mechanic, who ran the hobby-workshop (equipped with outdated toolroom machinery that the Swiss precision industry donated) at my university, it was not until many years later that I could afford my own lathe. I got myself various apprentice text books from the 1940s/50s (before CNC creeped in) to learn the basics, De Carlè's book (The Watchmaker's and Model Engineer's Lathe), as well as various historical mechanic's handbooks. The latter are good, because they contain useful ideas for manual lathe work and work-arounds that by today's mechanics (and H&S officers ...) may be snuffed upon or are considered inefficient (such as grinding your own HSS lathe-tools). -
They would be also easy to make yourself ... there are few examples on MSW.
-
Tiny Spar on 17th Century English Yacht
wefalck replied to catopower's topic in Masting, rigging and sails
My knowledge of 16th/17th century rigging is rather limited, but I think such 'pockets' in sails did not come into use until the second half of the 19th century on sports boats. The idea is normally to transmitt the stress from halliards, sheets etc. to the sail over a larger area through the bolt-rope. While toggle-like devices were used since antiquity, I tend to think that the ends of the mini-spar would have passed through two eyes form by the bolt-rope and the two pendants of the block would have then been put over these. I have no idea, why the method was chosen, but it seems to have been common on Dutch vessels for the foresail. Perhaps a PM to Ab Hoving, our resident specialist for Dutch vessels of the 16th and 17th century, could bring some enlightenment? -
I know next to nothing about the Allies' movement after the actual landing. However you could take GoogleMaps and sort of map out the trajectories indicated on the road signs. Taking for instance the third from left in the lower row that reads Paris-Rouen-Cabourg-Deauville, this must be located at a branch road somewhat south of the coast, somewhere between Cabourg and Deauville. If it where west of Cabourg, you should have Deauville above Cabourg. So from where the sign is, you would get to the main road between Cabourg and Deauville (probably the modern D531) and then turn either left to Cabourg or right to Deauville. From Deauville you would go South and pass Rouen (on the other side of the river) in the distance and continue on the N13 (today A13, Autoroute de Normandy). You could use similar reasoning to locate approoximately the other signs.
-
What do you do with your unusable rigging line?
wefalck replied to capnharv2's topic in Masting, rigging and sails
Shouldn't we rather promote the 'good' stuff or the making of it ? -
The model railway guys have the same problem and different manufacturers offer rub-on lettering and decals. Some of the above manufacturers also offer custom decals or rub-on lettering. In the model railway sector you can also find 3D-lettering in polystyrene, which can be pre-painted, assembled on some sticky tape and the cemented to the name-board using clear varnish. Once set the sticky tape can be removed and the white paint on the letters touched up if needed. Freehand-painting would be a challenge (at least for me) but can done. Draw the lettering with pencil, perhaps using one of those old-fashioned lettering-templates and then begin to construct the letters inside-out. One can always touch up with black paint and then pull everything together with varnish. There are also old-fashioned lettering pens for working with the mentioned templates that could be used with white pigmented ink or very dilute acrylic paint. If you are not so sure-handed with the brush, e.g. Faber Castell (Pitt Artist Pen Brush) makes pigmented markers with a fine brush-like tip in many colours, including white. However, the coverage of white is not so dense and may require repeated applications with the risk of messing it up.
-
Sanding and drilling pens
wefalck replied to bluenose2's topic in Modeling tools and Workshop Equipment
I think this is internally the same as that Chinese-sourced that was given to me by my wife a couple of years ago. I found its RPMs rather aggressive for many applications. It also somewhat irritating that on switching on you have the highest RPM and then one steps down. The high speed seems to be due to the fact that it is mainly inted for glass-engraving with diamond bits. I suppose this tool also does not use collets, but is bored for the ubiquitous 2.34 mm-shaft tools. You can get burrs, drills, grinding stones, polishers, sanding arbors etc. from many different sources, though the quality may vary ... -
What do you do with your unusable rigging line?
wefalck replied to capnharv2's topic in Masting, rigging and sails
The most radical solution would be to stop buying kits 😉 Otherwise, it might be possible to turn the 'threads' supplied by kit manufacturers into 'rope' using a (home-made) ropewalk ... -
My understanding is that this paper summarises the 2020 knowledge on the subject: Vale, B. (2020): Pitch, Paint, Varnish and the Changing Colour Schemes of Royal Navy Warship, 1775-1815: A Summary of Existing Knowlege.- The Mariner’s Mirror, 106(1): 30-42. Analysis of VICTORY's multiple layers of paint shows that during a certain period she must have been pinkish, which is probably due to the fact that ships had to use up their pigment allocations before receiving more pigments and that there was an overstock of red-ochre at some time. As at that time only natural red or yellow ochre was used (no synthetic ochre yet available), there may have been a variation in the hue due to the natural variability of the raw material and were it was mined. In addition, it would have been 'stretched' with chalk, which was cheap in comparison. I don't know where the RN sourced its ochre at the time. Traditionally, the main source was the Roussillon region in Southern France, but I would venture the guess that during the hostilities with France, this was not so easily accessible by the RN. Perhaps it came from Sweden.
-
Tiny Spar on 17th Century English Yacht
wefalck replied to catopower's topic in Masting, rigging and sails
On more modern Dutch boats, this developed into a single large block with a straight lower edge and two hooks on each side. The hooks hooked into two eyelets at each corner of the short square head of the fore-sail. Have to look into my literature, whether there were any specific names for this. This answer at least your question, how it was attached to the sail. -
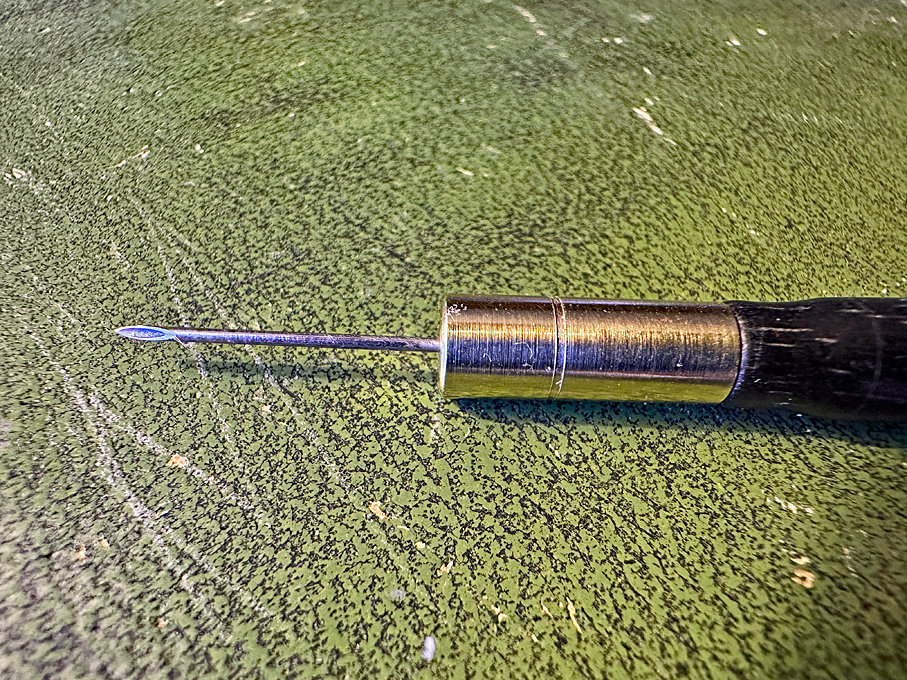
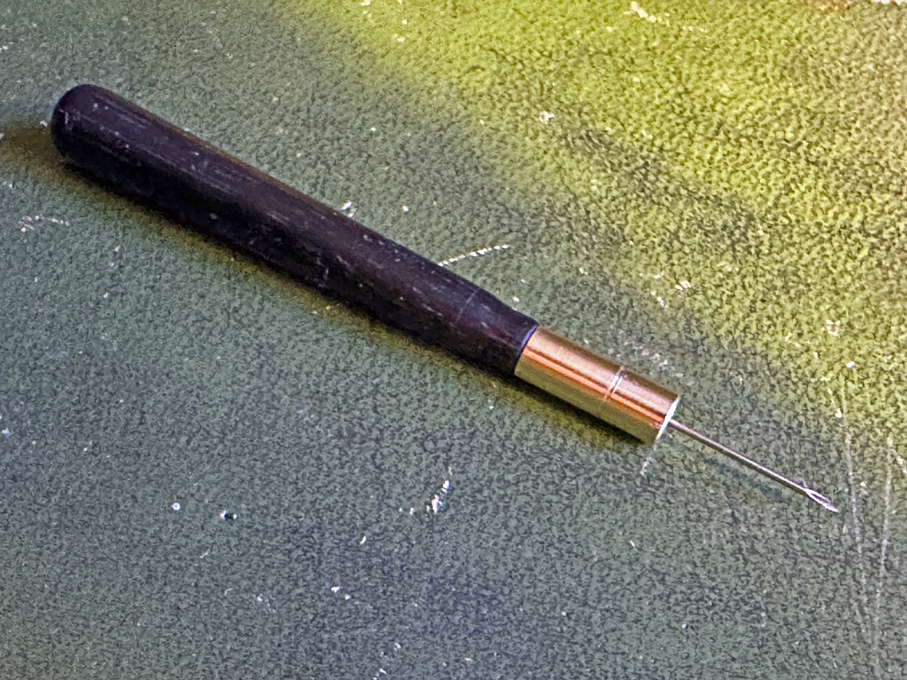
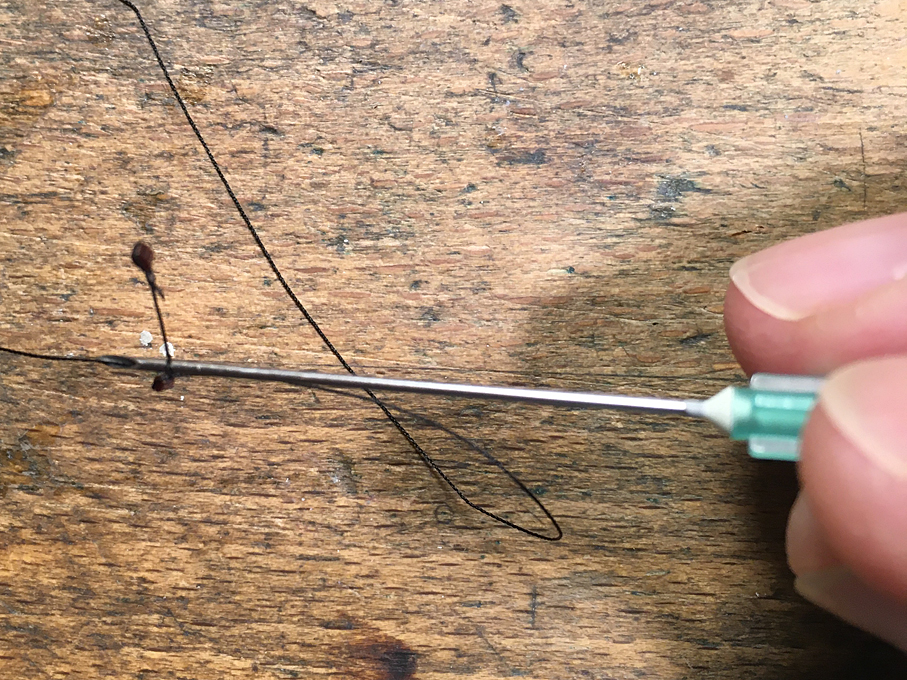
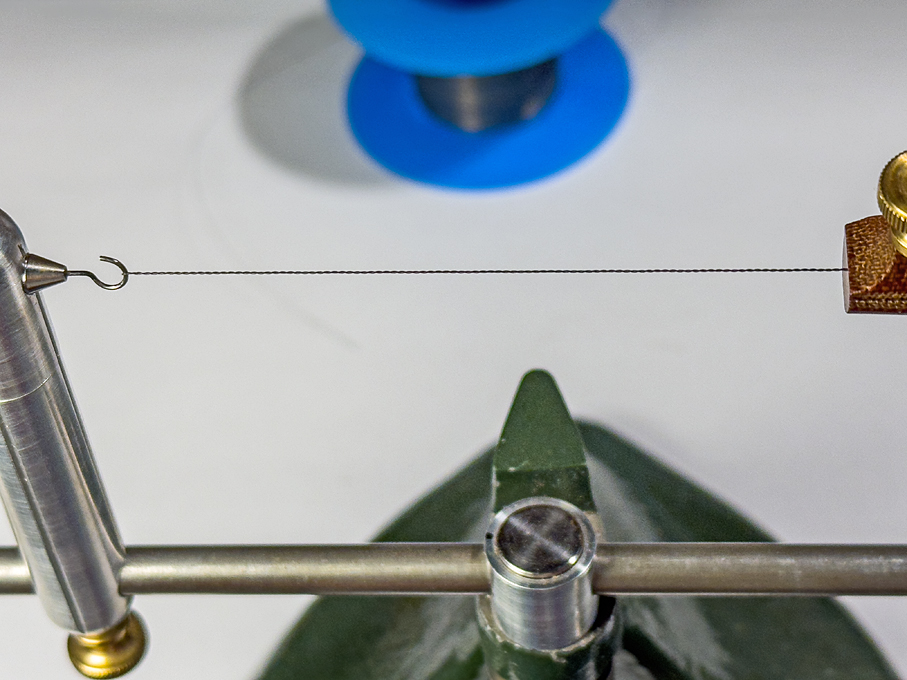
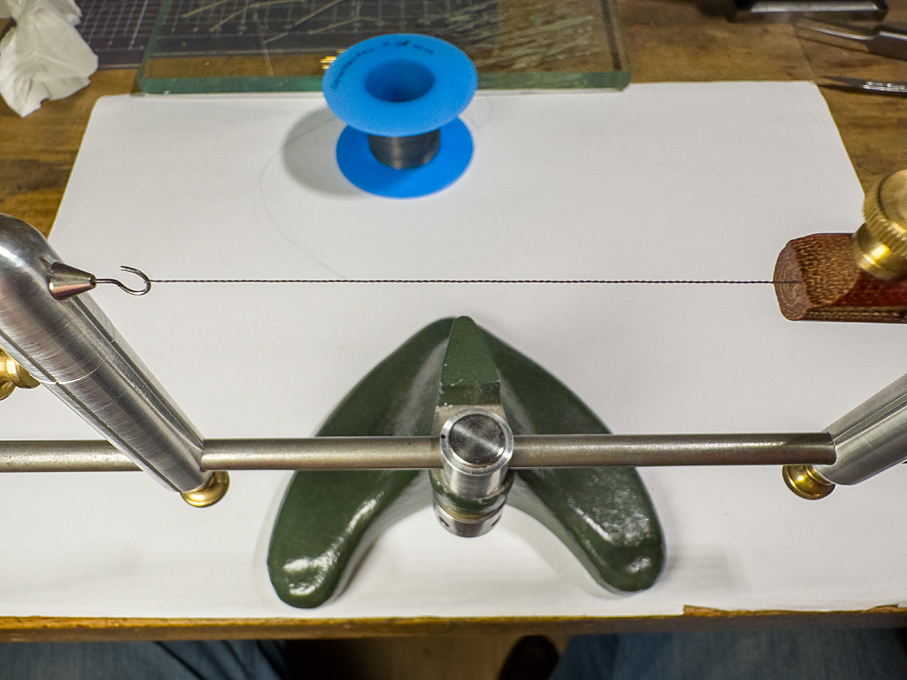
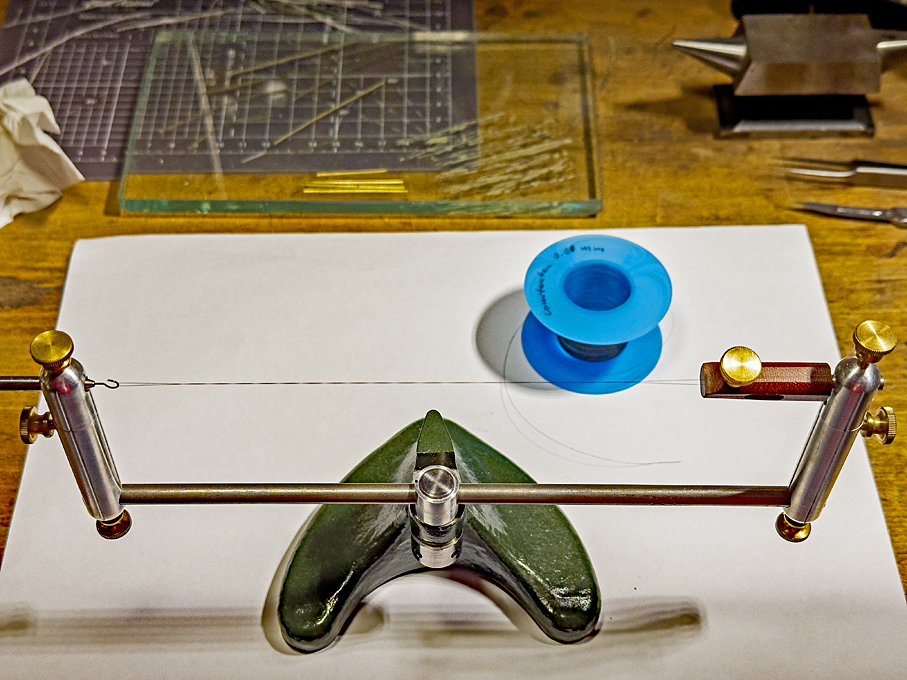
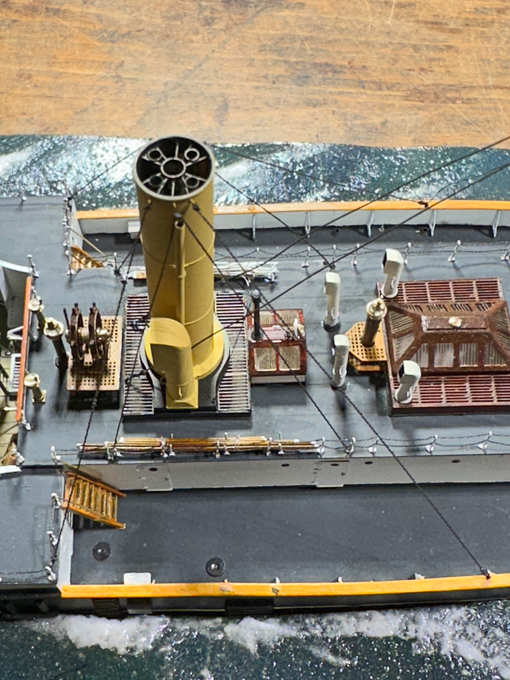
Well, again, real life with travels around Europe, mostly private have got in the way, plus of course, holiday preparations. Some small visible progress only, though preparations for installing the ship’s boats are under way. Completion of the staying of the funnel According to the principle of working ‘inside-out’, installation of the outer pairs of funnel stays had been left to a moment, when other work would not interfere with them anymore. The remaining funnel stays installed The stays are chain and they were simulated in the same way as the chains for the rails etc. Luckily the lithograph represents these chain-stays by dotted lines, so that the points where they have to be made fast are known. Miniature eyebolts were fashioned from wire and glued into holes drilled for the purpose. They also received laser-cut washers of 0.5 mm diameter. The stays are set taught with lanyards made from thread as used in the old days for mending ladies’ ‘nylons’. Not sure, whether I showed pictures before of how I am making fake chains using twisted wire. The material is oxidised Konstantan (a Cu/Ni alloy), sofar the best material I found for the purpose due to its tensile strength. Twisting two 0.06 mm wires together so that the length of each ‘twist’ is the desired length of the chain link. Laying in half of the twisted wire and twisting it together in the opposite direction. The finished ‘chain’. Depending on the envisaged use, one could also pull the ‘chain’ through the fingers with some graphite to make the links more visible. Micro-marlin-spike In between I also spent some time on the lathe and made marlin-spike for the upcoming ropework. So far, I just used a hypodermic needle, but found holding it between the fingers not very satisfactory. I knew that hollow marlinspikes are being used for work with wire-rigging, but somehow it had not occurred to me to use it in the model-realm. Thanks to ‘archjofo’ who described his marlin-spike made from a sharpened piece of brass tube. Hypodermic needle as marlin-spike As I have quite a collection of hypodermic needles in my scrap-box, I selected a suitable size. The nice (real) ebony handle also has been in the scrap-box for a long time, waiting for a suitable use. I gather it came from my father’s estate, who had trained as a medical doctor during the war. At that time a lot of better-quality (biological, medical, dissecting) instruments that did not need to be sterile were made with ebony or ivory handles – looking rather elegant today. The handle was almost ready to use and needed just a bit of turning down, where the ferrule will be fitted. The ferrule was turned from 6 mm brass rod and drilled out for the handle. A deep hole for the 0.8 mm hypodermic needle was drilled. The ferrule is a tight fit on the handle, but was secured with a drop of PVA glue, while the needle was just driven into the slightly undersized bore. Micro-marlin-spike Hypodermic needles, of course, are meant to cut through the skin and in consequence have very sharp edges – not so good, when working with fine threads. The cutting edges, hence, were dulled with an Arkansa-stone. Micro-marlin-spike Using such marlin-spike, it is possible to make fake eyesplices with ropes as thin as 0.18 mm … The next post will concern the installation of the ship’s boats, perhaps the most dreaded operations of all due to the exceeding flimsiness of some parts. To be continued ....
- 935 replies
-
- 16
-

-

-
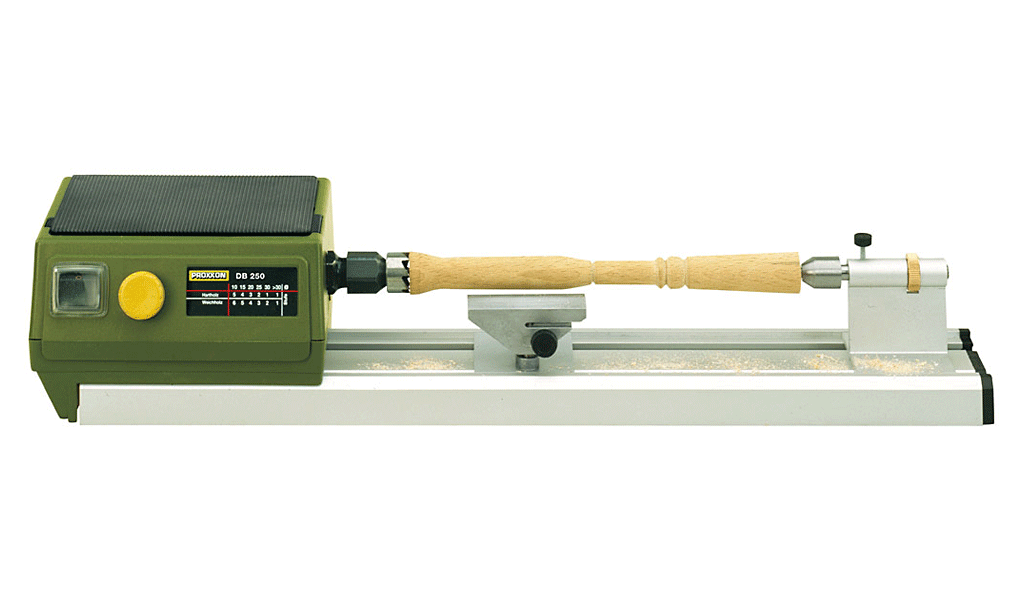
kgstakes, it just occurred to me that the small PROXXON wood-lathe may be just the thing for your miniature furniture making and some ship-model work too: https://www.proxxon.com/en/micromot/27020.php I think on demand they can supply extra beds for very long work-pieces. I think I also saw once a dulicator, but I don't remember, whether this was a third-party product. As you can see from Twokidsnosleep's post, once you have a metal lathe, you can make all sorts of tools and fixtures to make more tools to ... one can easily diverted, once one has got the hang of it (see e.g.: https://www.maritima-et-mechanika.org/tools/toolsmain.html).
-
I only had a quick look at their Web-site, but wondered how the machine handles fumes? They say that once can cut acrylic glass several millimetres thick, which would generate quite a bit of not-so-healthy fumes. The same would apply for cutting polystyrene.
-
If the interior of the ship cannot be seen, you could have used 'fake' butts by putting a small piece of wood behind the strake, where there is no frame to land on.
-
Two comments on the video linked above: - never ever manipulate parts that are held in a 3-jaw-chuck when the lathe is spinning; your fingers are too valuable! When the mandrel is held in a collet, you may do this (though this still is not ideal), but never with a 3-jaw-chuck, this is unsafe work-practice. - when using abrasives, such as sandpaper always cover the bed of the lathe, any spindles and move the cross-slide out of the way; detached abrasives are poison for the lathe. If you are a very beginner in machining, there are various hobbyist's textbook on that matter on the market. Another good source of learning are machinists' schoolbooks from the pre-1960s era, when manual lathe and mill skills were taught. You can find them on fleabay etc. or even on Google. Pre-WWI books can be even better, because they teach practices that are perfect for modellers, but were obsolete or even discouraged after WW2. Again, you can find such books on Google etc.
-
Nice work and interesting strategy. It's a bit counterintuitive, but may be a good idea. On the other hand, fairleads and such things for pieces of running rigging would need to be tied to the shrounds, which can be only done once the shrouds are set. Looking forward to see how you are getting on !
-
One of the best metallic paints I have come across so far was the range by AGAMA from Czechia: https://obchod.agama-model.cz/43-me-bronze-1/. They are available in Germany, but I bought a set from a hobby shop in Prague quite a few years ago. They are meant to be rubbed on, but also can be painted with sufficient solvent (alcohol). Otherwise, I think nothing looks quite like metal but ... real metal 😁
-
Yep, I had to do this on the wooden stairs in the house after school once a week …
-
PS. as our posts overlapped: - drill-chucks are made for drilling and do not like to take side-loads as occur in turning; they would be imprecise at least and can outright dangerous, when the loads are too high. Do not entertain this idea. - in hobby-turning one would not use any cutting-oil; brass and aluminium are always turned dry and for steel nether the turning speeds nor the cutting depths would lead to so much heat generation, that cooling of the tool-tip is needed - which is the purpose of cutting fluids here, not lubrification. Cutting fluids are for production lathes. On milling machines the situation is somewhat different, here you will need lubrification for steel, but not for brass normally. As to chucks: I believe there are hollow (China-made) MT2 to ERxx adapters available on ebay et al. This arrangement would be perfectly ok for working with bar-stock that passes through the whole length of the collet. If the material is shorter than say half the collet length, then there is a risk that it is being pushed out and the collet is damaged due to overtightening. If my memory serves my right, such adapters go at around 20US$ and collets, depending on size at 2 to 3 US$ a piece - I have bought such collets for use in lieu of a drill-chuck on my watchmakers lathe and as cheapo as they are, they are perfectly adequate for our needs. 4-jaw-chucks are very precise for centring material that has been already machined, but a pain to set up. You will also need a dial-indicator and stand for this. I wouldn't bother with a 4-jaw-chuck and unmachined round stock. Remember also that unless you need to re-chuck a piece (say to work on both ends), when working from bar stock, the quality of the chuck/collet is pretty unimportant. All machined surfaces will be concentric to each other.
-
There are two elements to engage the backgear: - there is a pin or other type of lock that engages the small gear on the spindle, which has the pulleys permanently coupled to it, with the large gear on the spindle; in this situation the lathe spindle is driven directly. - if the rear gear/pulley is not locked to the large gear, it idles on the spindle; the ball-handle lever on the backgear spindle works on excentric bearings, which allow the backgears to swing into mesh with the gears on the lathe-spindle. If you lock the gears on the main spindle and swing the back backgear into mesh, the whole system is locked. When you then start the motor, either the belt will slip on the pulleys or it may sheer-off the locking pin. If you suspect the latter is the case, you have to dissamble the whole headstock and drill out the remains of the pin. I have taken anything with Babbitt-bearings apart, so I wouldn't know, how to deal with them. I am sure you can find some advice for this on the Web. Normally, there would be a nut on the back of the spindle and a corresponding lock-nut, most likely to be worked with a C-spanner. These serve to adjust the end-play. If you take out the nuts, you can pull out the spindle to the front. There would also be a grub screw to loosen that locks the large gear onto the spindle.
