


wefalck
-
Posts
6,642 -
Joined
-
Last visited
Content Type
Profiles
Forums
Gallery
Events
Everything posted by wefalck
-

Firing a replica 18th century naval cannon - damage
wefalck replied to Louie da fly's topic in Nautical/Naval History
From the middle of the 19th century on many navies carried out systematic experiments with mock-ups of wooden and iron 'walls' and different types of guns and projectiles. I have an original French naval artillery yearbook that shows images of the effects and discusses them. When in the mid 1850s rifling and ogival projectiles were introduced, this gave greater penetration power, but on the other hand, the projectiles went straight through wooden ships with causing less damage and less desired 'collateral' damage by splinters. Therefore, for a while ships carried both, old-style smoothbore muzzle-loaders and more modern rifled muzzle- and breech-loaders in order to have the right tools for the different jobs. The development of safe and reliable time-fuses in the 1860s for shells that could be fired from rifled guns solved that problem ... -
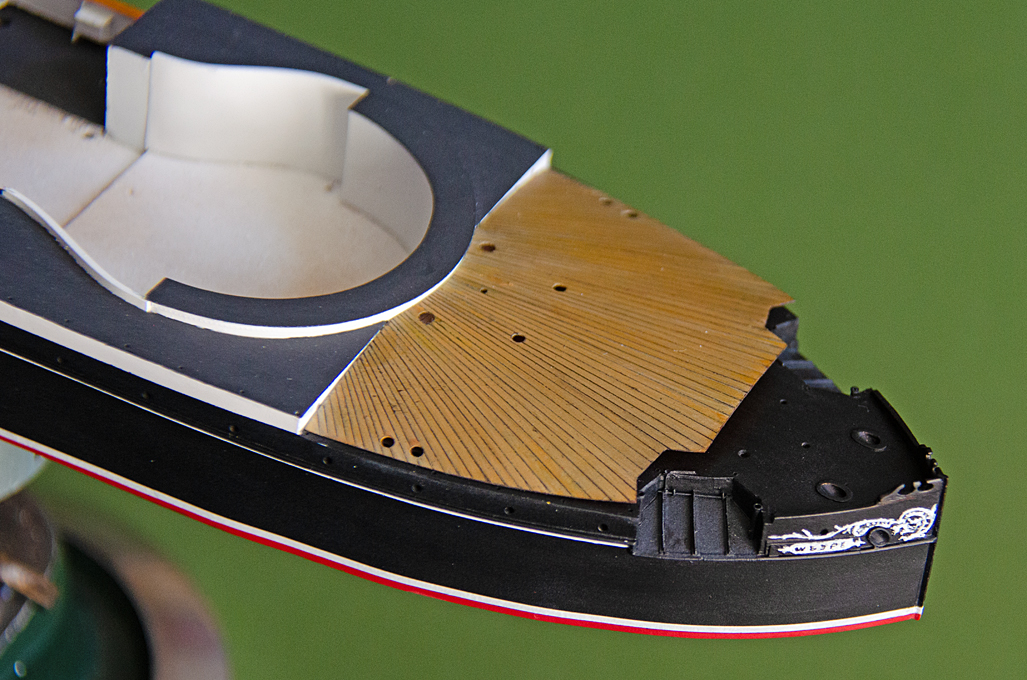
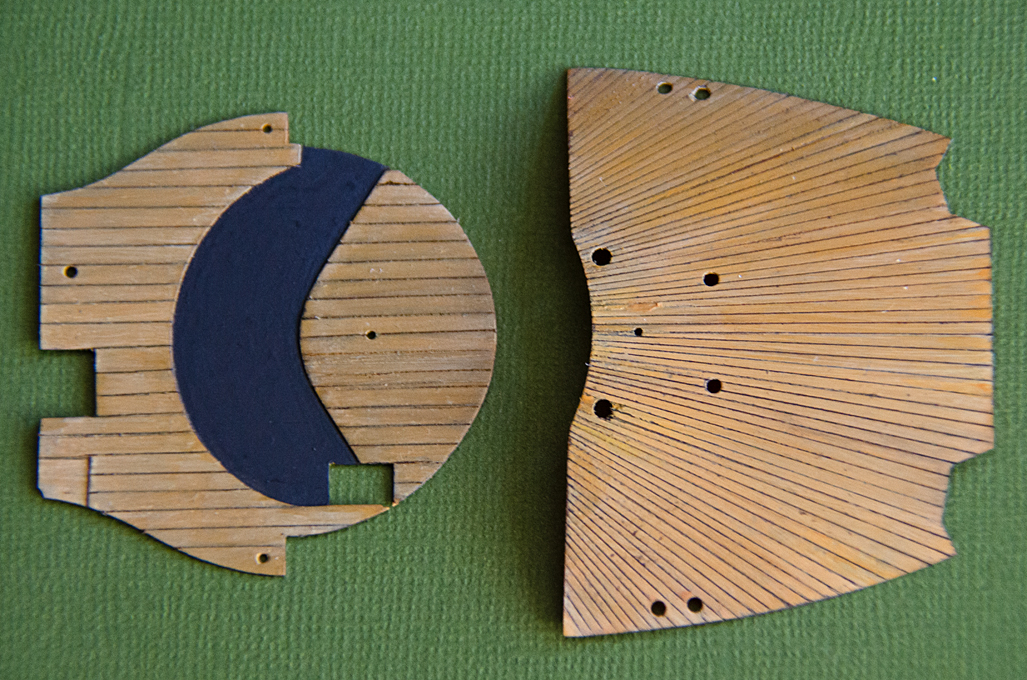
That's probably true, Bedford, but only that way we improve ****************************************************** More Paintwork According to the 1874 ordinance on paintwork, the ships were to have a white boot-topping stripe and a somewhat narrower white stripe just below the main rail. This scheme is clearly visible on the old photograph shown in the previous post. At that time also all the scroll-work was to be painted in a sober white, rather than the ochre/gold of later paint-schemes. It occurred to me that the easiest way to apply the white stripes on such a small model would be to cut narrow strips of white decal sheet and to place them appropriately. However, the latter part resulted in a lot of stress, fumbling and cursing. These long, narrow strips needed a lot of coercing and touching up with white acrylic in places. As I do not work with decals very often these days, I did not have any decal-softener to hand, which might have made this operation somewhat easier. In the end, the strips had to fixed additionally by infiltrating dilute satin varnish underneath them with a brush. In order to blend everything together, the hull then was given a coat of satin varnish. Perhaps the Prince August Air varnish was too viscous still for the air-brush, but when sprayed on it turned out rather matt and made the hull grey! Brushing on another thin layer got me over the shock moment. Perhaps it would have been easier to air-brush everything in white and then cut a narrow strip of Tamiya masking tape to mask the area of the white stripes and also to mask strategically for painting the hull in red and black … The scroll-work at the bow and stern then was picked out in white acrylics using a spotter brush and a (reasonably) steady hand. Wooden decking for the barbette and the forecastle. I also painted the only two pieces of wood decking on this ship, namely that on the forecastle with the distinct radial plank pattern (to minimise blast damage from the heavy gun) and within the barbette. The planks had been engraved a long time ago already with a hand-graver. The pieces were given a base coat of Prince August 77 (bois-wood) with the air-brush. This was followed by a light wash of 834 (bois transparent), which has a slightly lighter tone, applied with a flat hair-brush. Some planks were given another light wash of Vallejo 71.074 (beige) with a small brush. The planks then were followed with 0.05 mm black pigmented ‘fine-liner’. The excess was immediately wiped off with a clean finger-tip. In this way a narrow to scale seam remains. Forecastle put into place temporarily. To be continued ....
- 935 replies
-
- 20
-

-

-
Just a few additional thoughts: In principle alcohol (ethanol) is something dead cheap, but in many countries qualities fit for human consumption is heavily taxed. In Germany a litre of 96% was something like 50€, but the actual production costs are in the cent range. I seem to remember that in the US one could get it in a liquor store for a fraction of that price, but is information 30 years old. I am not sure what alcohol is used in them, but ready-made shellac solutions do not have an offensive smell (but I am actually quite tolerant towards the smell of organic solvents). Perhaps they use just plain ethanol, as the shellac solution would be unfit for human consumption, of course. So this could be solution to the problem, rather than mixing it up yourself. Sanding sealers used to be nitrocellulose lacquers in a mixture of organic solvents with pumice powder added. I gather these days they are acrylic emulsions in a mixture of water and alcohol(s). Water however, has less good wetting propoerties with respect to wood than organic solvents. Therefore, the modern sanding sealers do not penetrate wood as well, as did the old ones. The effect of such varnishes or lacquers, with or without pumice fillers, is that they fill the pores in the wood, obviously. Light then is not reflected from the surface of the wood, but sort of channelled into the pores from which it is not reflected anymore (or less). This makes the wood appear darker with 'depth' in the sheen. Beech-wood is very common over here in Europe and used for all sorts of purposes, where you need a harder wood than e.g. pine, but do not want (or cannot afford) to use tropical hardwood. However, as all woods growing in temperate climates, it has growth rings with different properties. When cut tangentially (which it normally is) the growth rings will take on dyes quite differently, so it may look patchy after dying. A tinted varnish (stain) over a clear sealer is probably a better option.
-
I gather it depends also on the direction with which the plank was cut from the tree, i.e. radial or tangential. I don't remember, whether I ever tried to stain beech, but for furniture-type applications I regularly apply solvent-based(!) sanding sealer, rub it down with 320 or 400 grit, apply another thin coat and then rub it down with steel-wool (or scrape it for flat surfaces), which results in a smooth satin finish with a light honey colour. Methylated spirit is only toxic, when you drink it !
-
A common way of doing that is indeed to drill a hole into one foot (in the heel, to give enough depth) and insert a short piece of wire. This wire then is inserted into a hole drilled into the deck, or wherever needed. The difficulty is to adjust the position so that it looks natural.
-
Painting on the sprue may sound attractive, but based on my plastic-kit experience from some 30 years ago, I would not do it, because it is difficult to remove flash satisfactorily, while the parts are still on the sprue. This applies particularly to round objects, such as cannon. The risk is that you flatten them. However, I appreciate that it may be difficult to hold 1/150 scale cannon for painting. Are the cannon attached at the muzzle ? Then I would perhaps cut off a small piece of sprue with the cannon still attached. This give you good access to the cannon for flash removal and a handle for painting. After painting you can slice the cannon off with a scalpel, clean up the fron of the muzzle, drill it open (if not representing tampions), and touch up the muzzle, if needed.
-
I think it is coming on nicely ! It enhances the 3D-impression and enlivens the surface.
-
Most probably you will not find something ready off the shelf. You will have to be looking for some 1:48 military or railroad figurines and do some plastic surgery and re-dressing on them. There are various cheap styrene ones for which conversion techniques are simple. It more difficult with white-metal ones. Looking around ebay for used ones could also be a good and cheap source. There are various books and guides on the Internet on how to work with such figurines and how to paint them. It is actually a whole hobby area. We already had a thread on the subject here with in the same topical area. You may want to look for prints by Garneray, who, being a mariner himself, drew various seamen in the mast, I believe.
-
Too bad ... over here in Europe they have started opening up again - in western Europe at least the majority of people have been vaccinated (which doesn't prevent the UK apparently from having 40k new cases every day ...).
-
For the rigging, there are various contemporary French and British textbooks on the subject, some of them also available as ebooks. They might be better then Underhill, who mainly deals with late 19th century merchant ships. Somwhere in another post here on the forum I listed most of the late 18th to early 20th century rigging books I am aware of.
-
Well, as we observed earlier, such ship were steered using the helm, rather than a steering wheel ... The gun would have been a 2-pounder or something like that and intended for signalling, rather firing in earnest at something/someone. The Baltic has been comparatively safe in the early 19th century, no pirates and such. With the barrel horizontal, it would fire under the rail. In order to effectively work the pump, the fulcrum should be about waist-high. You can work it out by making yourself a scale dummy, say cutting out a figure from thin cardboard. Such a dummy is always useful to get feeling for scale and proportions. Not absolute sure that the pump would be correct for this period. The black anchor, indeed, seems to be way too big. Anchor sizes are determined by weight, but it is not so easy to work out to what size this converts. The actual size would also depend on how the individual anchor is made. Perhaps someone else can help with table of anchor sizes per weight, I don't have one at my finger-tips. In any case, it would have a wooden stock. Just a modelling tip: you should probably sand your parts more thoroughly. They will look more delicate when painted and fit better together.
-
The 'depth' is exactly what you normally want avoid here ... the impression of depth is brought about by filling surface roughness that reflects more light, while using pastels just uses the surface roughness of the 'chalk' ... However, as noted above, you can also use the pigment of the pastels and their ease of application and then turn this into a sort of in situ paints. BTW, water colours or guaches can also be used for weathering, say for water streaks and the likes. The same effect can be achived with dilute acrylics, but you can wash it off, if you are not happy with it. Water colours would also need some 'fixatif' to prevent them from being rubbed off, when handling parts.
-
There are 'fixatives' for pastels, sold by art-supply houses. I am not sure what they consist of, but may the same thing as hairspray minus the perfume. For me the main point is the resulting sheen, that depends on what kind of varnish or 'fixatif' you use - some people want to have their models flat all over, while I personally prefer to more realistically respresent the the different sheen of different materials or surface treatments. The point is not to douse the pastels in varnish, but just to spray it lightly, so they are bound without the varnish necessarily forming a continuous layer. You will have to experiment.
-
Be aware that pastels probably will need to be 'fixed' with a very light coat of clear varnish. However, this can change the appearance of the pastels somewhat, they will look less 'dusty' but more solid - after all you just add a binder in situ to pigment that is now already there. The advantage of the pastels is that the effect can be build up gradually.
-
Yep, I was about to make the same comment on the tires and the inside of the flanges should also be bright, as the wheel touches there the rail all the time. Whether the rim would be painted or not, would depend on the livery of the company. Another thing I wondered about, when I saw you folding all those etched brass parts: you always fold them with the etched groove to the outside of the bend. Is this per instruction ? I would have thought it should be the other way round - the etched groove allows to make sharp corners. An interesting and unsual subject in any case. Some of the coaches of the Orient Express have been preserved and restored and are now operated by a company based in the Czech Republic. Some years ago I was invited to a 'dinner-cruise' out of Vienna in one of the dining cars. Some of cars are fitted out in Art Noveau (pre WW1) decoration, while others are furnished in Art Deco (post WW1) style.
-
It would be interesting to see, where the Osprey-author got his wisdom from. Was there any reference given ? From the mid 1850s own the French began to modernise old gun barrels from the 1820 to the 1850. They turned them cylindrical at the rear end and shrank steel tubes on to increase their tensile strength. They were also rifled to take projectiles that were given 'noses' to fit into the rifling. In the late 1859 they also began to experiment with breech-loading and some of the old barrels were converted into breech-loaders. This led to the Modèle 1858-60 artillery. The Modèle 1864 artillery saw newly constructed rifled breech-loaders. In 1867 they were again improved - but still no match for the Krupp breech-loaders There were a range of calibres, but they do not match excatly the numbers given above by Osprey - France had been metric since the beginning of the century. The smallest was 14 cm, then 16 cm, 19 cm, 21 cm and 23 cm (quoting from memory at the moment). As SOLFERINO was commissioned in 1861, this narrows the choice to the 1858-60 establishment. The carriages will be more complicated, as there have been many different types, depending on where they were going to be used. However, on http://www.dossiersmarine.fr/f_fco.htm it is stated that SOLFERINO only received the above armament in 1868. When first commissioned she carried apparently 36 smoothbore (?) 30-pounders and 16 50-pounders, presumably of the 1852 establishment. I have done research in the library of the Musée de la Marine and people there were generally helpsful. I have not tried 'distance' enquiries, other than telling them I would be coming around to look for this or that. This kind of research has become more complicated now, as their library and archives have been permanently moved out of Paris to a distant suburb (a not so nice area neither ...) - before, I could just hop on a bus and it dropped me right in front of the museum. My normal route is to talk to my acquaintances in the Association des Amis du Musèe de la Marine (AAMM, the association of the friends of the museum), who are very knowledgeable or can point me to someone else. However, this navy of Napoleon III is not so well researched.
-
BTW, I started looking into the naval guns, but found conflicting information on the armament of the SOLFERINO. Do you have more precise information, what she was supposed to carry at the beinning ? The data you posted earlier don't seem to be right, as far as the bores are concerned.
-
I gather it also depends on period and scale - for many periods and for not so common scales, you just can't find anything ready-made - or the stuff is just too crude ...
-
You really missed something then, David ! It's a real gem ...
-
Thanks to all for their kind comments and 'tumbs-up'. @KeithAug: well, if you look really close up, you would see that it is actually not so crisp. Painting on a threedimensional surface has advantages, but also a lot of traps. In fact, on the prototype there was an angle-iron running around the edge of the deck, to which the bulwark was rivetted. I simulated the upright leg of the angle-iron by impressing rivetts into some self-adhesive aluminium foil that I cut into strips and then ran around the inside of the bulwark. The edge of that was not as crisp as I had wished for, but really saw that only during the painting. I will not do this again. This upright leg was painted black/grey on the prototype, forming a sort of waterway/kicking strip. Due to the thickness of the material it is not so easy to decide where the separation between the colours should be and paint has the tendency to creep into corners. It required touching up in both ways, the grey as well as the white, until I had a reasonably clean line. My hand is also not so steady. But I have the model mounted on a foot on which I can incline it to near vertical, which makes access easier. I used a flat hair brush to approach the kicking-strip - and was holding my breath ...
-
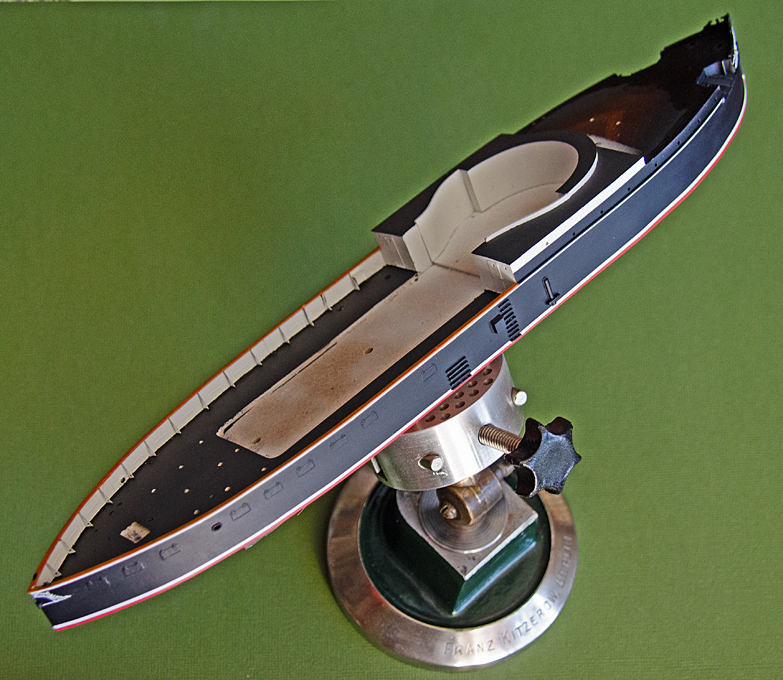
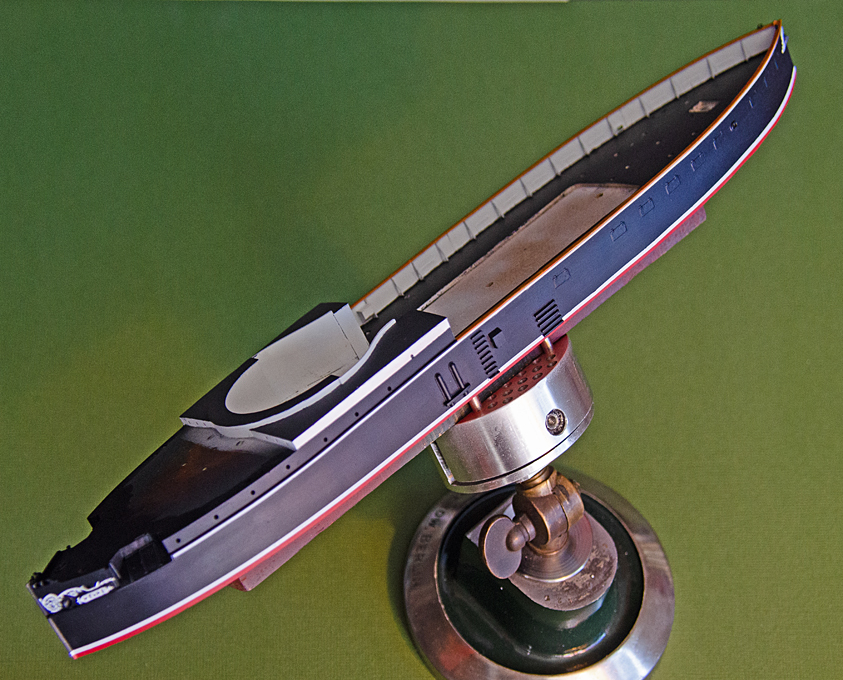
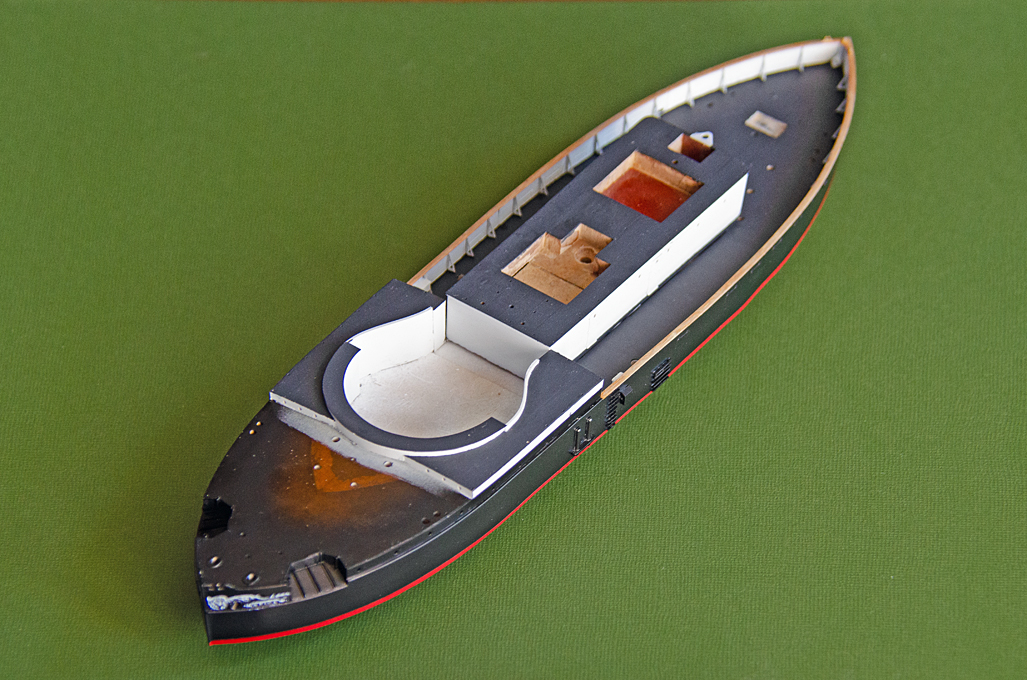
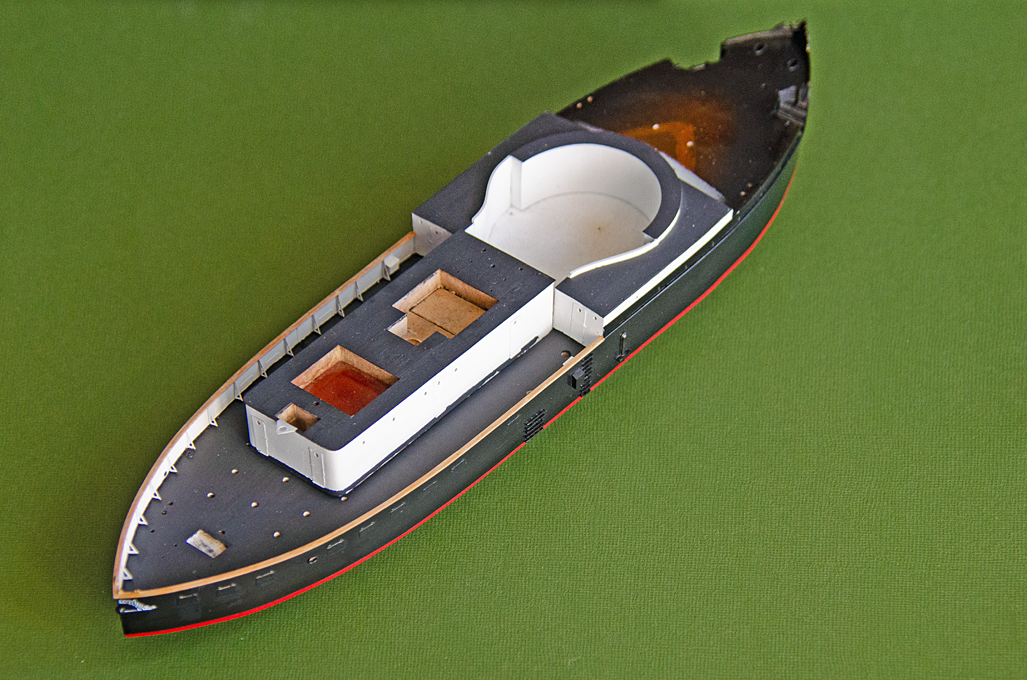
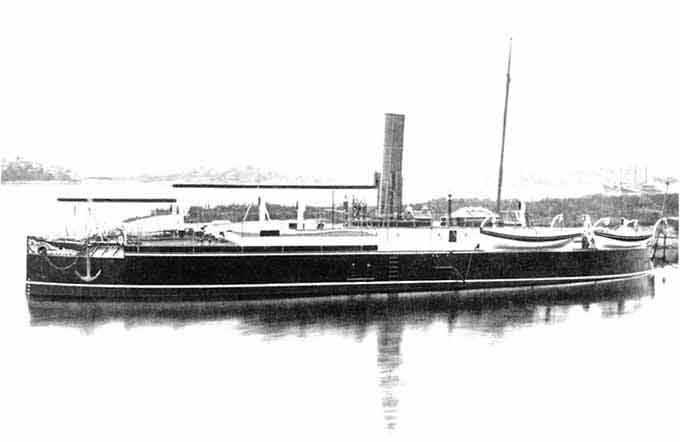
Thanks (belatedly) for the kind comments above and the thumbs-up ! ******************** Some post-summer progress It is quite amazing, how time passes – more than three months since the last up-date ! OK, I have been in sort of semi-vacation for six weeks in Spain, but then money-earning work seriously got into my way. Normally, I leave painting as much as possible to the very end, just before the assembly stage. This avoids damage to the paintwork by handling the model or the problem of removing dust from it. However, I felt that the project had progressed to a point, where I wanted to see how everything comes together. This also boosts the motivation, rather getting lost in fabricating endlessly little pieces. So, the model was given a good cleaning to remove dust, grease etc. The sequence of colours had to be carefully considered in order to work from the light ones to the dark ones. I also wanted to work inside out, because in this way masking was facilitated. Photograph of 1876 showing quite clearly the livery of SMS WESPE at the time. The whole paint-work is done with acrylics from Vallejo (marketed here in France under the brand ‘Prince August’) and Schmincke (a German manufacturer). Hence, I started with the white of the inside of the casemate, the bulwark and the walls of the deckhouse, which was spray-painted with the airbrush. Unfortunately, I had some trouble with the airbrush that had not been used for a while. Apparently, some paint had accumulated in the nozzle from insufficient cleaning over time. This particularly affected the white, which seems to have comparatively bigger pigment particles and is more difficult to spray anyway. Due to the various bits and pieces added to the bulwark etc., it is virtually impossible to rub down the paint and begin afresh … so the white paintwork is not as good as I had hoped for … The decks were not originally laid in wood (with the exception of the quarter deck and the floor of the casemate) or covered in linoleum at that time. They appear to have been painted with a mixture of tar and black oil-paint, with sand mixed into to provide a non-slip surface. I assumed that this mixture would attain a dark greyish colour with time due to weathering, similar to older tarmac. Prince August 996 (German ‘Panzergrau’ - tank-grey) seemed to be a suitable choice. All the deck areas were sprayed white together with the other parts to give a better key for hand-brushing. I began with painting the kicking-strips and water-ways between the bulwark stanchions and then progressed to several coats on the deck areas. All this painting was done by brush, as it would have been virtually impossible to mask-off the bulwark. The paint-schemes of the Prussian and then Imperial German Navy ships are reasonably well known for the years after 1867, as the ordinances were published in official gazettes that have survived. For the first couple of service years of SMS WESPE, the 1874 ordinance paint-scheme would have been applicable. This specifies that hulls below the waterline were to be red and above black, with a white boot-topping; another white strip was to be painted below the main rails; all ginger-bread work in white as well as all superstructures and deck-houses, ventilators, etc. Funnels and masts were to be painted yellow (buff). Photographic evidence indicates that there were some variations to this scheme for SMS WESPE, but I will discuss these, when I come to describe the painting of respective parts. First, the narrow visible part of the underwater hull was painted in Vallejo 71.269 (red RAL 3000). This area was then masked off with Tamiya masking tape. The inside of the hull was also masked and the hull sprayed black. The bulwark-rail appears to have been varnished wood. It was first given a coat of Prince August 77 (bois-wood), followed by a light wash of 834 (bois transparent), which has a slightly lighter tone, followed by another light wash of Vallejo 71.074 (beige). Finally, a very light wash of Vallejo (transparent orange) was applied, which gives the wood a deep, warm tint. The images above show the ‘raw’ paintwork. It still needs to be touched up and items such as the scrollwork needs to be refined. Eventually, there will be also a light weathering and ‘griming’ with pastels – the idea is to just show the effects of being in use, but with good maintenance. To be continued ....

- 935 replies
-
- 17
-
-
Well, the distance between steps on stairs and ladder is pretty much uniform all over the world and all times: go to your staircase and measure the distance in Millimeters and divide that number by 64. My textbook on ship's joinery tells me that steps are around 200 mm high and about 220 mm deep, which roughly translates in 3 mm height at 1/64 scale and 3.5 mm deep.
-
Many coastal fortresses were armed with mortars in order to fire plunging shots/shells at approaching ships. While originally the idea was that the shot would penetrate to the ship's bottom and create a leak that would virtually impossible to stop, when armoured ships appeared the idea to be able to penetrate the unarmoured or only lightly armoured decks with shells to cause damage within the ship became more important. To this end in peace-time the waters around the forts would be carefully surveyed and maps drawn. With the aid of two or three observation posts the position of the ship relative to the mortar implacement would be determined by cross-sighting and the gun layed appropriately. The necessary settings would have been determined experimentally in advance.
-
Looks like a forged iron poop-deck rail, rather than a 'rope'.

