HOLIDAY DONATION DRIVE - SUPPORT MSW - DO YOUR PART TO KEEP THIS GREAT FORUM GOING! (Only 66 donations so far out of 49,000 members - Can we at least get100? C'mon guys!)
×


bhermann
-
Posts
548 -
Joined
-
Last visited
Content Type
Profiles
Forums
Gallery
Events
Everything posted by bhermann
-
Jerry I'm not sure how I missed the first few months of your log, but I am in to see what turns up next. Your work is looking very good, and I will enjoy following along. My own Bluenose is languishing at the moment due to focus on a different hobby, but I will get back into the shipyard someday. I enjoyed looking through your log and discovering another Bluenose in the works. Bob
-
Nice finish to an excellent build, Julian, Congratulations on a job well done! Bob
-
The Minwax product I used on my dowels is called "Pre-stain Wood Conditioner" (I just read the can). I wiped that on with a rag, waited 15 minutes, then applied Minwax Wood Finish. It made for a very even stain - check the photos in my log to see the result. The color I used was "Special Walnut". I was going for a darker finish to make it look like the masts had been "slushed" to allow mast hoops to slide up and down. Bob
-
I'm not dead yet! I'm not making any progress on Bluenose at the moment, but she is still sitting next to me waiting for some attention. In part I am doing my over-analyzing thing about how to do the sails, and freezing in place while that goes on. I am also rekindling my life-long dream of doing astrophotography (if you think wooden ship modelling is a money sucker, try AP sometime) and am at a point there that requires a lot of energy to get better. I still stop in to MSW on an almost daily basis and am keeping an eye on you all. EdT's Young America continues to amaze, and I am enjoying watching Chuck build up Syren Ship Modelling, and many of the other activities here. When I get off the dime and decide to move forward with old Blue, I will start posting in the log again. Bob
-
Mechanical Solar System by jim_smits - Eaglemoss
bhermann replied to jim_smits's topic in Non-ship/categorised builds
Very nice, Jim. Love watching the inner planets and Moon whipping around while the outer planets plod through their orbits. Nice build of an interesting project! Bob -
Mechanical Solar System by jim_smits - Eaglemoss
bhermann replied to jim_smits's topic in Non-ship/categorised builds
There's a second model in the series? They are killing me! Looking forward to seeing the video. Bob -
Mechanical Solar System by jim_smits - Eaglemoss
bhermann replied to jim_smits's topic in Non-ship/categorised builds
Sweet - I can't wait to see the operating model. Very nice indeed. Bob -
Nice detail Julian. This looks nice and clean. Very well done indeed! One question - it looks to me like the green light is mounted on the port side, is that correct? In the States the red light is usually port, and green is mounted on the starboard side. I don't know if different countries use different rules. Bob
-
Barbara On sheet 5 of the MS plans, the details of the flying backstays show the lower end connects to an eyebolt in the transom. There are two eyebolts on each side, I'm not sure whether the inner or outer one is used, my best guess is the outer, with the inner one used for the boom tackle. The tackle that runs between the backstay blocks belays to pin 44 on the starboard side and pin 45 on the port side. Bob
-
That is some amazing work, Bruce. Very clean and crisp. Good to have you back, and happy you got the picture thing sorted out. Bob
-
Barbara I agree with Russ about the size to use - using the smallest size available to you will maintain scale integrity better than the larger sizes. Out of curiosity, which kit are you building? As an alternative the rope that Chuck sells at Syren Ship Modelling is far superior to what was provided in the Models Shipways kit. You may be able to get sizes that come closer to the plans and allow you to create a more accurate representation. The look and feel of Chucks product is fabulous and a good upgrade, in my opinion. Bob
-
While responding to a PM, I visited the Nova Scotia archive web page to check on a couple of things... and found that it had moved. It has been a great resource for me when working the little details, so I thought I'd put the new link in here: https://novascotia.ca/archives/bluenose/ I know it has been a long time since I've done anything on this build, but life (and other hobbies) have been taking up much of my time over the last few years. On the plus side, I am wrapping up three years as chair of the Board of Deacons at my church at the end of May, and am hoping that will give me some time to get this going again in earnest. Of course there is always the granddaughter to spoil, astrophotography to work on, etc., etc., etc. Thanks for your patience with me, and for sharing all your experiences in this hobby - MSW is s a great place to help keep the interest alive! Bob
-
Jan-Willem I think your versions of the deck structures look much more realistic than the ones provided by Billings, and are definitely worth the effort. If you ever want measurements from the Model Shipways plans, let me know and I'll be happy to take some for you. You'll have to convert them from 1:64 to 1:75 scale. About the long time between sessions, I guess that is the price we pay for having a life in addition to a hobby. It has been over a year since I have been able to do any work on my Bluenose build, so I understand your frustration. All I can say is work on it when you can, but don't fret about it when you can't. The project will be there when you have time to spend on it. Keep up the good work and please share your progress as time permits. Bob
- 127 replies
-
- 2
-

-
- Bluenose
- Billing Boats
- (and 1 more)
-
Choice of paint
bhermann replied to robbe33's topic in Painting, finishing and weathering products and techniques
Robbe33 I too use a brush to apply paint. I have had good results using Testors Model Master acrylics. They go on smoothly and I haven't had any issues with brush strokes showing at all. The key for me has been to do multiple thin coats. You can check my build log for photos of the finish I have gotten, and judge for yourself if it meets what you are looking for. Bob -
Mechanical Solar System by jim_smits - Eaglemoss
bhermann replied to jim_smits's topic in Non-ship/categorised builds
Wow - planets AND asteroids - I like it! Bob -
Buying an Expensive Kit and throwing most of it away
bhermann replied to pirozzi's topic in Wood ship model kits
My thought when I started on Bluenose was to use everything that came with the kit and replace nothing. I paid for it and I was going to use it all! The kit has a lot of stripwood and a fair amount of scratch building of components is required, so even though it is a kit, it is not just a collection of parts to be assembled. I have repurposed some stuff along the way, for example the walnut veneer that was supplied for the second planking became planks that I laminated and used for the main cabin roof and for hatch covers. After rigging around the bowsprit with the kit-supplied "rope", I have since purchased Chucks rope as replacement and I will finish the rigging with that. The sailcloth that comes with the kit is useless for the purpose and will also be pitched. I pestered some of my quilting friends to come up with something more suitable, and I may use their stuff instead. At the moment I consider myself a kit builder, and will probably stay that way for the foreseeable future. My serious hobby money goes to my astrophotography addiction, and not for modeling tools. Having someone else provide a POB framework for the bones of the hull is attractive to me, and I can generally work with whatever else is in the box. I did pitch the dowels that came with the kit, but only because they were warped beyond salvation. Rather than get ME to replace them I thought it better to go to the LHS and buy some stuff I could see in person. Who knows, in the future I may laminate some square stock and shape the masts myself. I feel that this hybrid approach gets me the best of both worlds - if what's in the box is OK, I will use it. If not, I won't. I get the joy of scratch building deck fixtures, with out the tedium (for me) of having to prepare a framework for the project from scratch. Bob -
Greg I got mine from Micromark a few years ago. It came in handy for building squared-up deck fixtures, hatches, etc. http://www.micromark.com/magnetic-gluing-jig-10-1and4-inch-square,7038.html Thanks, Bob
-
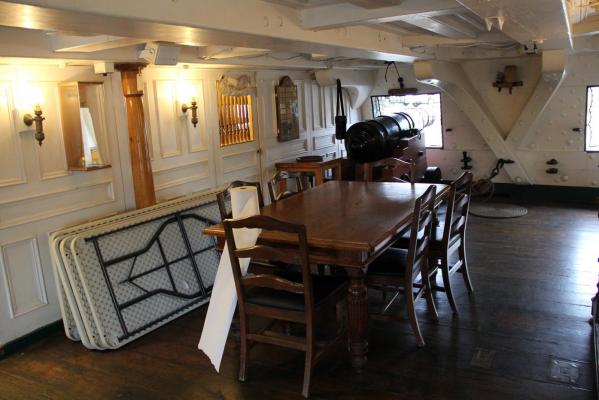
Ken - here is a shot I took during our tour with Henry (Popeye2sea) in August 2014. Hope it helps. Pardon the folding tables Bob
-
Stern Details
bhermann replied to t5956ws's topic in Discussion for a Ship's Deck Furniture, Guns, boats and other Fittings
Bill Grant Dale (expertly directed by Danny Vadas) did a rework of Victory's stern a few years ago. Unfortunately most of the details were lost with the great MSW crash of 2013, but he did post a short photo summary of the job on the first page of his resurrected log. That log can he found here: http://modelshipworld.com/index.php/topic/163-hms-victory-by-grant-dale-mamoli-scale-190/?hl=victory The photos may give some inspiration for process, or maybe someone saved the details of the re-build and will post them as a result of seeing this. Bob -
Thanks for the clear and detailed explanations of your process Ken - and the good size photos. I will be following along with this build - and I'm going go back and read through the Niagra log. I probably won't add too many comments here (how many ways can you say "great Job"?) but will be checking in regularly. Bob
-
Nick - thanks for sharing this, and for the clear explanation and photos on how it works. I think it looks pretty nice, too!! Bob
-
Thanks, Danny. Not quite the same class as what you are into these days, but a fun little project. We will watch out for the paper cuts for sure And thanks to all for the "likes"! Bob
-
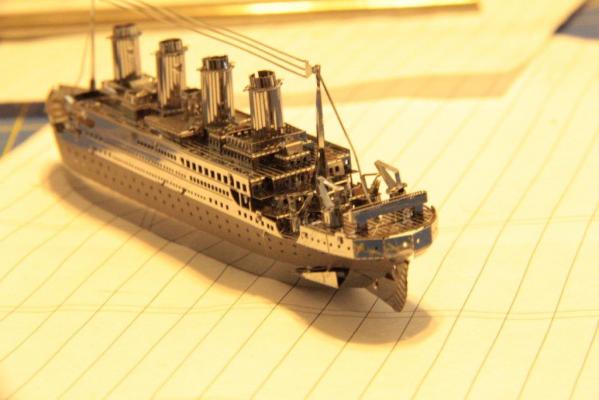
Thanks, Dimitris. It was a fun little build. I like the level of detail they managed to pack into such a small replica. Bob
-
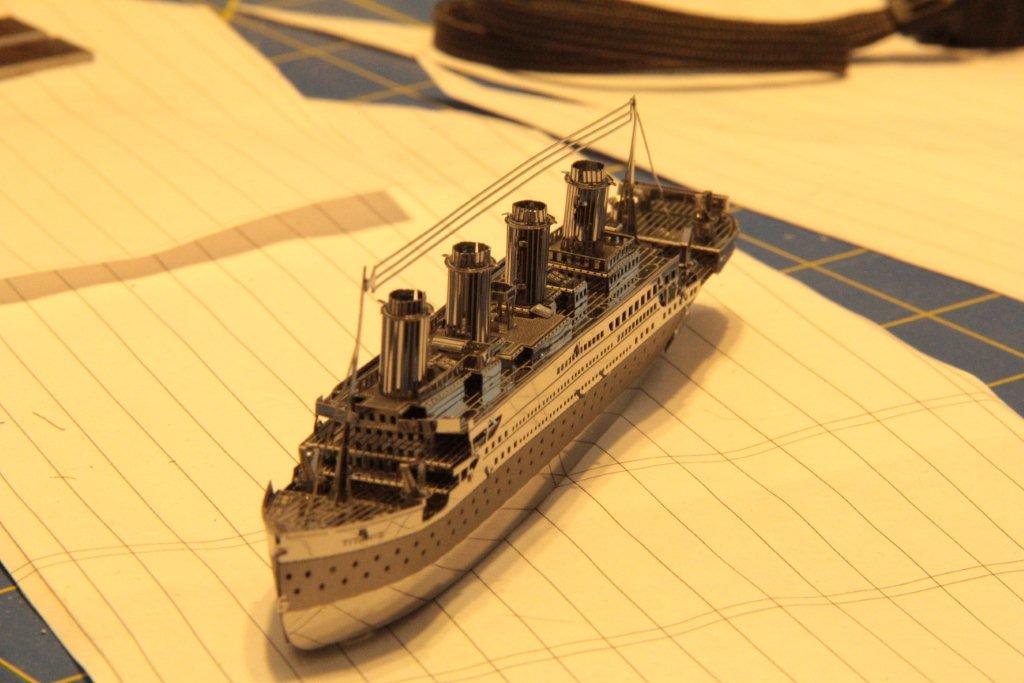
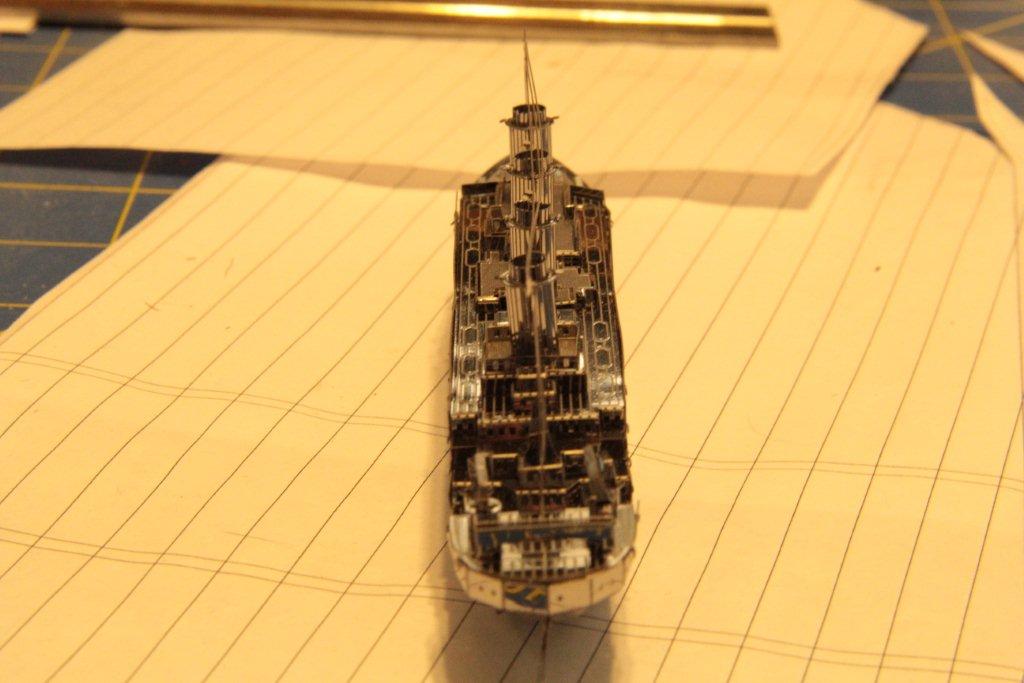
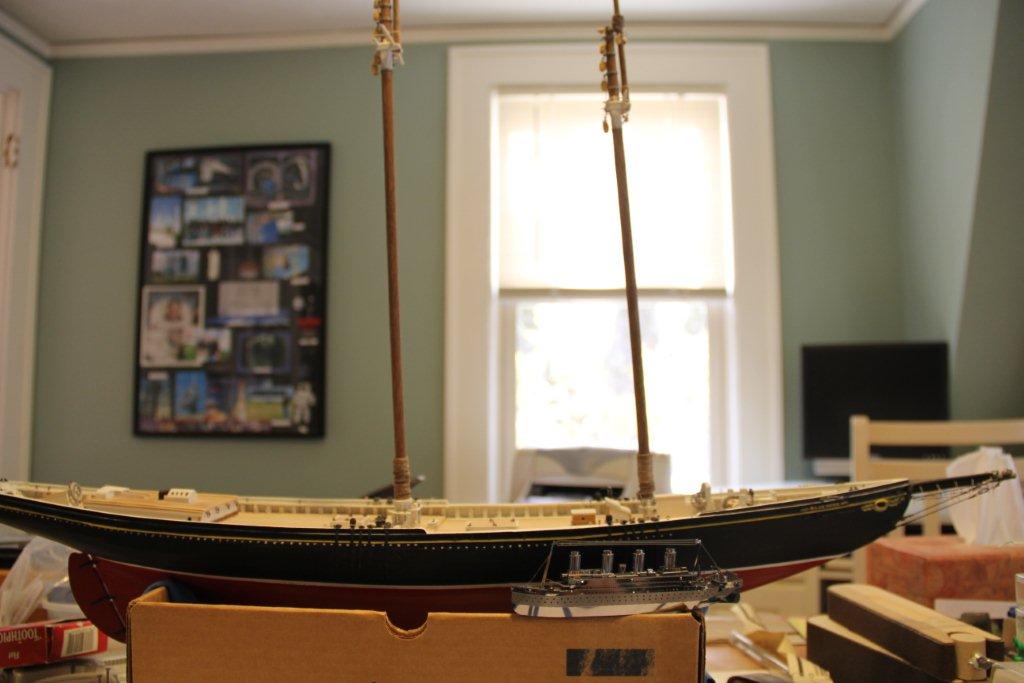
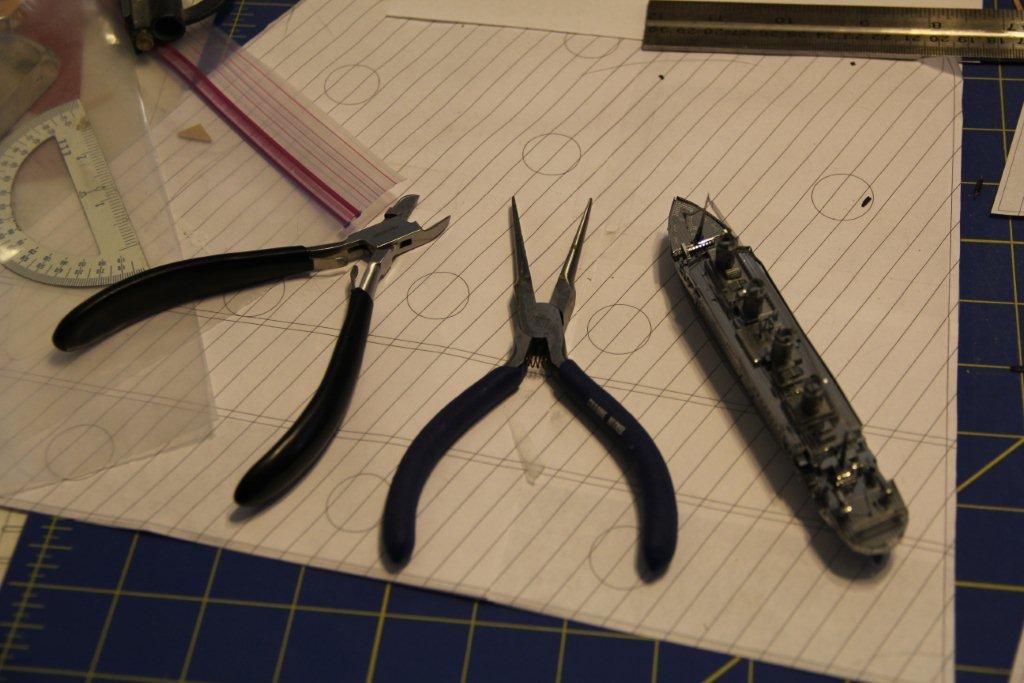
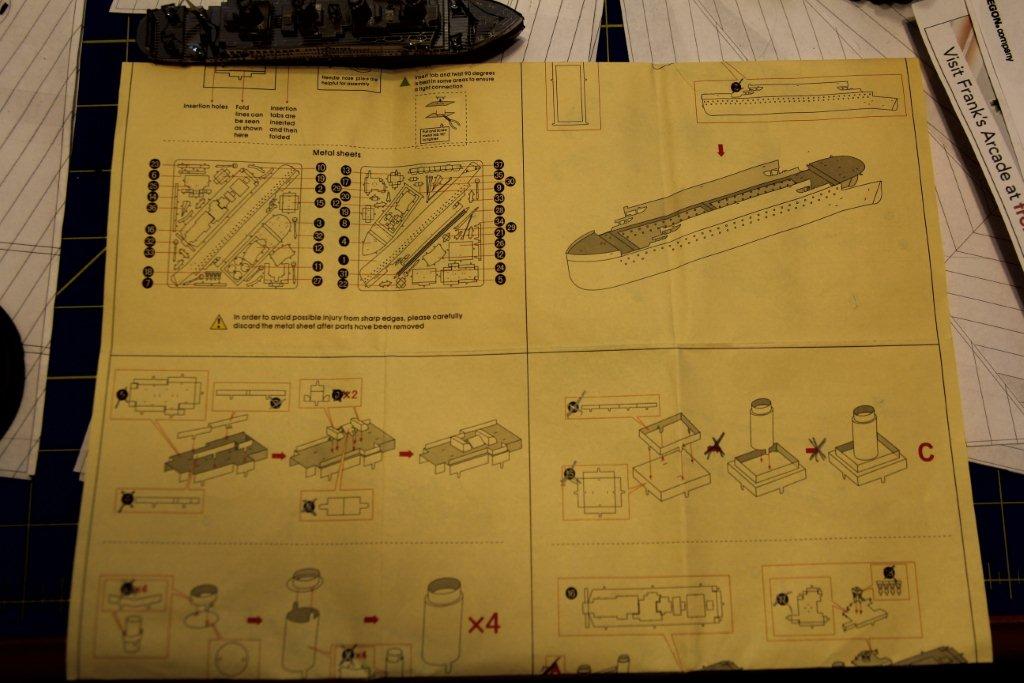
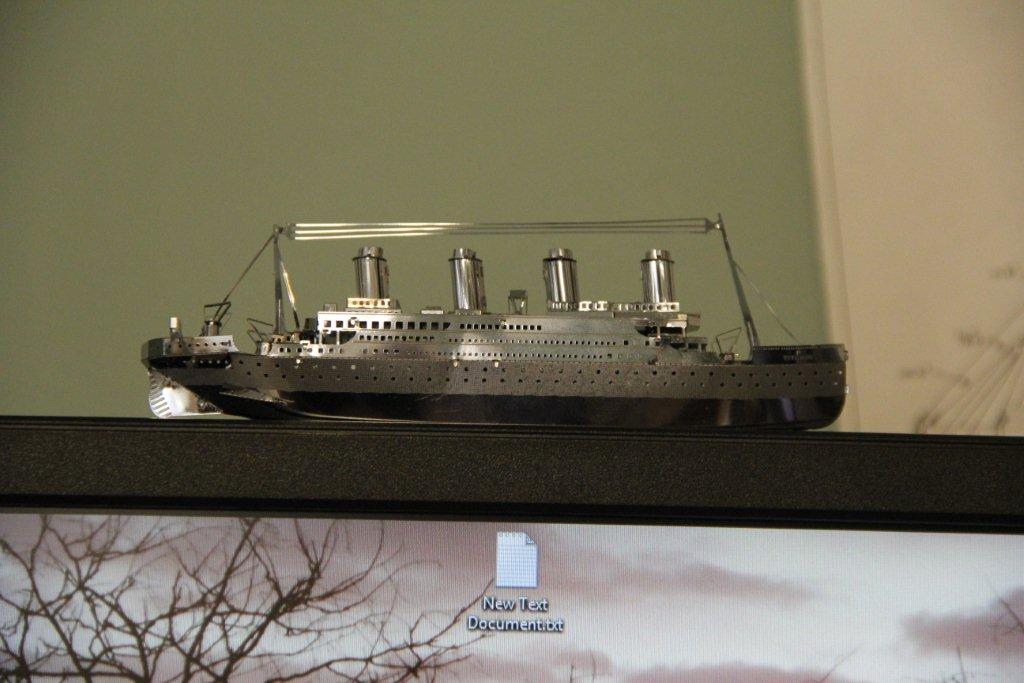
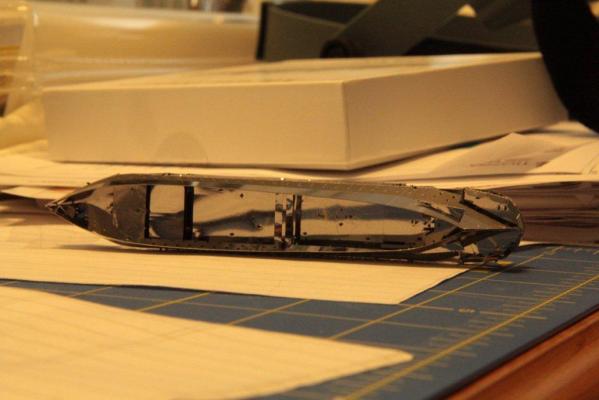
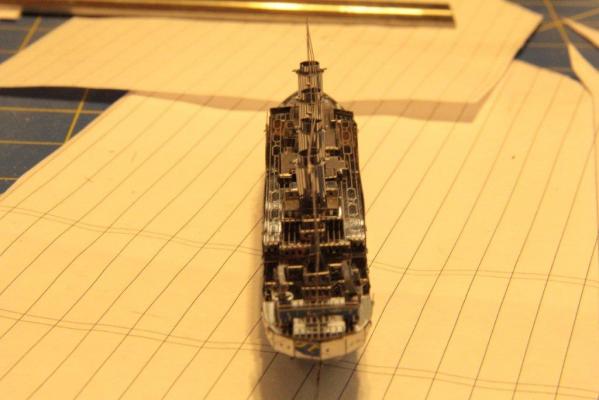
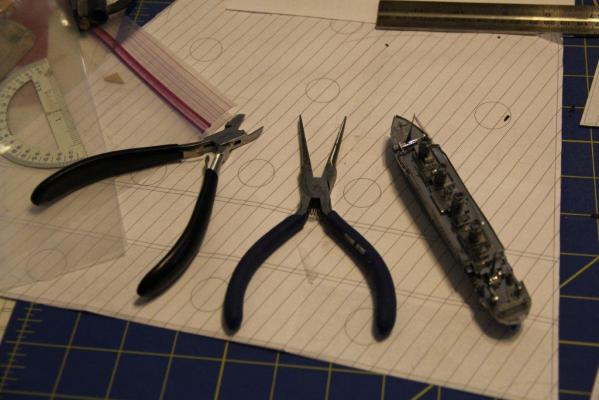
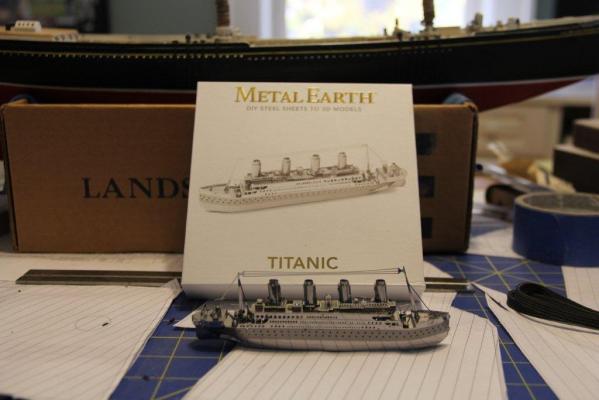
I received this as a Christmas gift last year and recently decided to give it a shot. The model comes packaged in a 6"x6" box and works up into a 5 1/2" model stem to stern. The materials consist of two steel sheets with all parts attached via sprues. Construction is of the "insert tab a in slot b" type. The tabs can be folded over or twisted 90 degrees to lock the parts together. Steps are laid out in a series of diagrams - no text here. Tools used for construction - a wire cutter to cut parts loose (some have three attachment points and I cut one before twisting the parts loose) and a needlenose plier to fold or twist the tabs to lock in place. The order of steps is logical and I was able to follow with no deviation. Here is a shot of the underside that shows several of the tabs twisted and locked in place. A few shots of the finished model follow. The pieces were not dangerously sharp, but I wouldn't recommend this for younger kids. I was thinking about getting one to build with my 7 year old granddaughter, but I think I'll hold off on that. I have a paper pirate ship I picked up a few years ago - we may start there. A size comparison with my Bluenose in progress and the model in it's display location atop my monitor. We'll see if the cat allows that to continue. Overall the model went together well. The pieces were strong enough to take some flexing, the assembly plan was logical (although a third hand would be useful at some points), and the completed model holds together well. In short it was just the thing to help me keep my hand in model building, while I continue in my Bluenose doldrums. It's a fun little project that takes a short amount of time and provides completion satisfaction quickly. Now I can say I have a completed build! Bob


-
Jan- Willem Thanks for the info on when wire standing rigging came into play for North American fishing schooners. I agree it comes down to what looks and feels right to the builder. I suspect our expectations of what looks right may be colored by seeing all those 18th and 19th warships with their heavy shrouds here on MSW and on replicas. I should pull up the photos I took of L A Dunton at Mystic and compare her shrouds to what the Charles Morgan is carrying on the other side of the yard In the end, Julian should do whatever makes him most comfortable - he is the Captain for this voyage. Bob