


bhermann
-
Posts
549 -
Joined
-
Last visited
Content Type
Profiles
Forums
Gallery
Events
Everything posted by bhermann
-
Jan- Willem Thanks for the info on when wire standing rigging came into play for North American fishing schooners. I agree it comes down to what looks and feels right to the builder. I suspect our expectations of what looks right may be colored by seeing all those 18th and 19th warships with their heavy shrouds here on MSW and on replicas. I should pull up the photos I took of L A Dunton at Mystic and compare her shrouds to what the Charles Morgan is carrying on the other side of the yard In the end, Julian should do whatever makes him most comfortable - he is the Captain for this voyage. Bob
-
Julian I finally got the chance to check the plans on the Model Shipways 1:64 model. They call for the lower shrouds to be .018 inches, which converts to about .45mm, which I believe is where you started, and thought small. One thing I am not clear on - were the shrouds originally rope or wire? If they were wire, would a thinner wire provide the same support as a thicker rope? Just some food for thought. I am blissfully ignorant enough to go with what the plans call out. BTW the MS plans call for .005" ratlines, .127 mm equivalent. Thanks, Bob
-
Mechanical Solar System by jim_smits - Eaglemoss
bhermann replied to jim_smits's topic in Non-ship/categorised builds
I think I'll avoid the Pluto flap, although I do have an opinion I love the finish of Mercury! I didn't realize this sort of thing was available - I may need to look into one of these too! Thanks for sharing, Jim. I will be following along with great interest. Bob -
Jan-Willem Nice job on the ring bolts. I suspect your issue with the top left sample is the lack of variation in the thickness of the eye-bolt and the ring wire. I like the diameter of the ring in that sample, but you might like it better if you were able to use a thinner wire for the eye-bolt. The relative size of the eye and ring somehow 'feels' right to me in that sample. The hinges look very nice as well. Keep up the fine work! Bob
- 127 replies
-
- 1
-

-
- Bluenose
- Billing Boats
- (and 1 more)
-
When I was planking Bluenose, she spent a lot of time upside-down in my lap. No sharp objects were in use - all cutting was done on the work desk. If you need to see a shrink, I do too... I wonder if we can get a group rate? Bob
-
Tom - If you plan on going soon, you may want to wait until after August, but before October. Salem tends to wind up a lot for the summer and around Halloween. I haven't been to the PEM in years, but it is certainly worth the trip. BTW, what you are doing here is making me think I may have to actually build a warship at some point in the future - I love the attention to detail you are putting into her! Bob
- 1,354 replies
-
- 3
-
-
- constitution
- model shipways
- (and 1 more)
-
I was thinking about "borrowing" the Admirals cutter for sail material - as long as I use things for the same purpose she does, she is usually very understanding. If I were to try that with wood veneer, however - watch out! Bob
-
Congratulations, Jay. I have enjoyed watching your work progress over time. You must be so happy with the result. Thanks for sharing your journey with us and Well Done! Bob
- 732 replies
-
- 3
-
-
- constitution
- model shipways
- (and 1 more)
-
Looks like some very nice work, John. Congratulations on getting through her - not bad for a practice model Bob
-
First time rigging - being organized
bhermann replied to RichardG's topic in Masting, rigging and sails
Richard - I like the idea. I stared a spreadsheet for Bluenose when I was working on the head rigging. It was more of a historical documentation item at that point than a planning tool, but as I ponder moving forward someday, it would be nice to have everything laid out in a manner that would allow for manipulation of the order, and to mark each line complete as you go through the process. Bob -
Silver soldering - Copper vs Brass
bhermann replied to rtropp's topic in Metal Work, Soldering and Metal Fittings
Richard I looked all over the torch and I don't see a model number anywhere. I recall that I picked it up at Home Depot and the price was in the $40-60 range (I think). Sorry i don't have any better detail than that. I bought this one after trying a couple of pencil torches. They worked OK, but I had a lot of trouble trying to refill them. Bob -
Silver soldering - Copper vs Brass
bhermann replied to rtropp's topic in Metal Work, Soldering and Metal Fittings
Richard - the supplier (SRA) reports the melting point at 1205 degrees Fahrenheit. The product is described as "Solder Paste with Flux Silver Easy" There is a medium version that melts at 1325 and a hard that melts at 1435. Bob -
Silver soldering - Copper vs Brass
bhermann replied to rtropp's topic in Metal Work, Soldering and Metal Fittings
Richard - I use this Berzomatic torch for silver soldering. It runs on butane and is hot enough for the silver soldering I have done to date. I use the silver soldering paste with flux premixed. The torch has an adjustable flame. I picked this up at Home Depot a couple or three years ago and it has been fine for me. If I am not careful, it is capable of melting and evaporating the brass pieces I am working on. Bob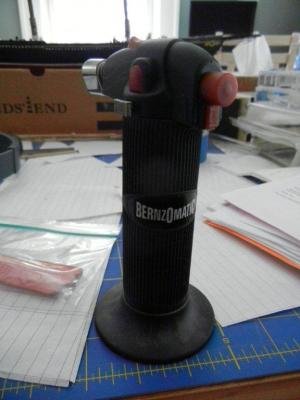
-
Your best sail cloth and technique
bhermann replied to steven sturgis's topic in Masting, rigging and sails
Tadeusz Thanks for outlining the step by step process you use. In my opinion, the thermal transfer is brilliant. I have been hesitating to start my sails for quite a while because I don't want to sew the seam lines (I think they would look too bulky) and I don't trust myself to be able to draw them evenly using pencil. You have certainly given me something to think about! I imagine transfer will be more durable than pencil - another plus for the technique. Thanks, Bob -
Hi Steven, and welcome to MSW. I will be following along with your build. Flying Fish is next on my list. The box is sitting underneath the Bluenose box, daring me to open it up and get things started. One thought on the deck caulking. I used a number two pencil along one side of each plank to do that on Bluenose. I think it came out OK, and I didn't have any problems with smudging when I sanded and sealed the deck. If you use the wrong kind of marker to do it, I'd be nervous about the ink bleeding onto the top of the plank. A full set of sails including the stunsls should make for a lovely presentation. I look forward to watching your progress! Bob
-
Bluenose is my first build - I enjoy working on her when I have the time. She is relatively straightforward to plank. The MS plan sheets show a lot of detail that you can add or not, depending on your interest. Overall I'd say she seems like a good next kit for you, if you have an interest in fishing schooners! Bob
-
Actually the name appeared in both configurations over the life of the ship. Around the rail and on the transom are both used, so it is builders choice as to which one to use. Bob
-
That looks like a decent approximation from what I can tell. Interesting process you came up with here. Bob
-
Arghhh... you hit on one of my greatest fears - getting something completed and installed, then realizing there is just 'one more thing' that needed to be done. I admire your tenacity in making a replacement instead of accepting the error. I probably would have tried to cut the slot out and install real sheaves - nah, I would have hoped no one would notice and gone with the part as is . Your idea for the drilling jig is a good one and sounds like a good way to ensure alignment between multiple holes or multiple sessions with the same dowel. I'll tuck that one into the back of my head for future use. It'd bee good for drilling holes, attaching jaws and making bands. I've pretty much done everything by hand and by eye to this point. Bob
-
Grand Banks Dory color
bhermann replied to jbelwood's topic in Painting, finishing and weathering products and techniques
John - sorry I missed this. I don't have a lot (or any) painting expertise, so I seldom look into this topic. I built this guy a few years back after a couple of false starts on models that were much too complicated to take on with no experience. I have a recollection of gluing my fingers together rather severely while putting the barrel together. I'm afraid I can't help with your paint color question. I did the hull white, and the interior a dark green color. Like I said, not much experience with paint here. It looks like your build has turned out very nicely. I like the natural wood interior, even if that isn't the way they normally did them. The paddlewheeler came out very nicely too. Bob -
Ed - Thanks for posting more fabulous work. I was picturing the full size ship being pitched over as in the first photo for planking the lower regions - it brought a smile to my face. At least you don't have to work for hours holding your arms above your shoulders - that is always the most painful position I can think of to work in The info on the two volumes to come is very interesting to me. A Naiad-like volume (or volumes) on clippers is of great interest to me and I will most likely pull the trigger on that one. The POB version being covered there is just a plus for me. As always great work - it is a pleasure watching and learning from your process and posts. Thanks, bob
- 3,618 replies
-
- 1
-
-
- young america
- clipper
- (and 1 more)
-
Julian - that object is part of the fore boom sheet. In the MS version there is a slot in the top of of the piece where Billings has the five dots and a cast metal piece that goes underneath the top between the side pieces. There is a ring on top of of the cast piece that extends through the slot. A shackle and a block are connected to the ring and they are rigged to a block on the boom. If you look at posts 29 and 44 in my log, you can see the piece installed just ahead of the mainmast. Unfortunately I didn't add the shackle and the block before installing it If you would like a closer photo let me know amd I will try and get one. Heck, I may try to add the shackle and block, if so I will update my log with it. Bob
-
Thanks, Dimitris. I do hope to get back to work on her in the new year! Bob
-
Bob - She looks sweet - you must be very proud! Nice to see the sails don't hide all the details of your deck work - gotta love those fore and aft rigs!. Thanks for sharing your work with us. Looking forward to your next build. Bob
-
Looking very nice, Simon. Don't forget to put the mast hoops on before you permanently close up both ends of the masts (that was one of my biggest fears when doing the masts.) Bob
