bhermann
-
Posts
549 -
Joined
-
Last visited
Content Type
Profiles
Forums
Gallery
Events
Everything posted by bhermann
-
Kimberly Given the number of bumps molded into the hull, I'd say you did a very good job. As Harvey said, we are often our own worst critics and we can drive ourselves crazy trying to get everything "perfect". The good news - when you get to the larger scale Conny down the road, those bumps (which are part of the chain plates) will be separate pieces that get attached after the stripe is painted, which will make the taping off much easier. Sometimes the small scale plastic models try to put so much pre-formed detail into the mold that it makes it very difficult to work with. If you had started your taping-off experiment with the copper plating, you would have gotten a better feel for how well the process can work. There is much less in the way at that section of the hull and it is possible to get a much cleaner tape and paint line down. I agree with Harvey, take a step away for a day or two, work on something else, and then come back to this. You may find that it looks better than you think it does right now. It's always that "patience" thing . I have heard it said that patience is the most important tool in the toolbox, and the more I do this, the more I believe it. Bob
- 47 replies
-
- 2
-

-
- constitution
- revell
- (and 1 more)
-
Kimberly - I think I see what you mean about it being difficult to get a smooth line for the tape. I took a closer look at the photos and I see the molded bumps on the hull that fall in the middle of where the tape would run. This is one of those places where you need to go slow to get a good result. As you lay the tape down, use something to push the edge so that it forms a nice tight seal against the protrusions. There is no substitute for taking it slow. The suggestions that Harvey and Andy made about sealing the tape line before applying any white paint are good ones too. Finally - another "take your time" opportunity - it may take more than one coat of the white paint to get good coverage. Resist the notion that you need to put down one thick coat of white to get the job done. You will get a better result and less paint bleed if you do multiple thin coats, letting the paint dry between coats. It will be interesting to see how you make out with the paint pen. A steady hand might solve all your problems! Bob
- 47 replies
-
- 1
-
-
- constitution
- revell
- (and 1 more)
-
Kimberly - When painting the white stripe did you use masking tape to on the hull to prevent the white from going where you don't want it? If you run a strip below the gunports and another strip above it might make that job a bit easier. If you think of it as a white stripe running from front to back of the ship, rather than thinking of it as separate white sections between the cannon windows, it might make it easier to visualize. When you painted the copper plates did you use anything to mask off the upper section of the hull or did you do that by hand? If by hand, that is a really nice clean job! or maybe the lower part of the hull was already a copper color? Bob
-
Floyd, you sly devil! Starting a second build right under the Admirals eye. I am looking at the "Flying Fish" box right now with great longing. I will be following along with this one, she has such wonderful lines. BTW, there is a 4th option - that is to do nothing at all for months at a time and call it "pondering the next steps". Bob
- 80 replies
-
- 1
-
-
- Americas Cup
- Endeavour
- (and 1 more)
-
Bob The Bluenose plans that I have show a hook in the staple with a "dory tackle" rigged to it. I think what S.os and Anthony provided fills out the the detail nicely. You are probably fine to just install the staple and let it go at that. Bob
-
Kimberly This looks like it will be a good study preparing for the larger scale build. I understand that having visual references works better than trying to read text. If you haven't yet, make sure to check out Jays (Modeler12) Constitution build. He has done a very good and detailed job of documenting the rigging on his build. Being able to see that might be a big help to you. I will be following along here with interest. Enjoy, and take the time to learn. This one will be better than the last, aand the next will be better than this one. Bob
- 47 replies
-
- 1
-
-
- constitution
- revell
- (and 1 more)
-
Kim Nice job on finishing up another build. Masts and rigging seem to be the main issue for many builders here, but with experience you will improve. If I could make one suggestion, it would be that you stop more often to post progress pictures and ask detailed questions about things that are driving you crazy. There really are a lot of people here who have been through what you are going through and who are more than willing to share their expertise. Model ship building is not a race and the result is rarely improved by rushing through steps or attempting things blindly on your own. Posting on your log more often will do two things. It will slow you down a bit, and give you the chance to get things clear in your mind before getting to a point where you are not completely happy with the result. I look forward to seeing your Conny get underway - stay warm - Winter is almost over! Bob
-
No problem - the whole log is backed up, as I have been at this for almost seven years. I simply soldered some brass eyes (or maybe galvanized steel) out of wire, drilled holes into the spreader, glued them in and painted the whole mess white. BTW, I just looked at what you did with the toothpicks and am impressed! It is an elegant solution. In any case, feel free to ask about anything at any point. It may help someone else, and it certainly doesn't hurt me to go back over details from the past. Bob
-
Hi Danny - welcome to MSW! You are certainly off to a good start, thanks for bringing us up to date on your progress. About edge gluing the planks for future builds, I highly recommend it. It adds a lot of strength and rigidity to the hull and makes for a more stable form. Doing it for all the planks, not just where the gunports are cut out, is a good idea. Looking forward to seeing your progress as you move forward. Bob
-
Thanks Russ. The reason I am thinking about drawing in the hems is for scale purposes, not to avoid the sewing. At 1/64, I think anything I can do on a sewing machine will just look too big to my eye. I have read in log after log that it is best to err on the small side when adding detail. We'll see how it turns out. In any case, after I have drawn in the lines, if it looks like stitching is needed, I will at least have some guides to follow Please feel free to look at any and all parts of the log. That's one of the main reasons I have it out here. Any questions come up, please feel free to ask. If you see something I haven't explained (and there is a lot missing since the crash of MSW1), let me know that too. i tried to get the main stuff in when I re-started the log, but there is a lot that isn't here anymore. If I can still remember what I did, I'll be happy to share. Alfons - I am enjoying watching your build - we work on them when we get the time, no? Bob
-
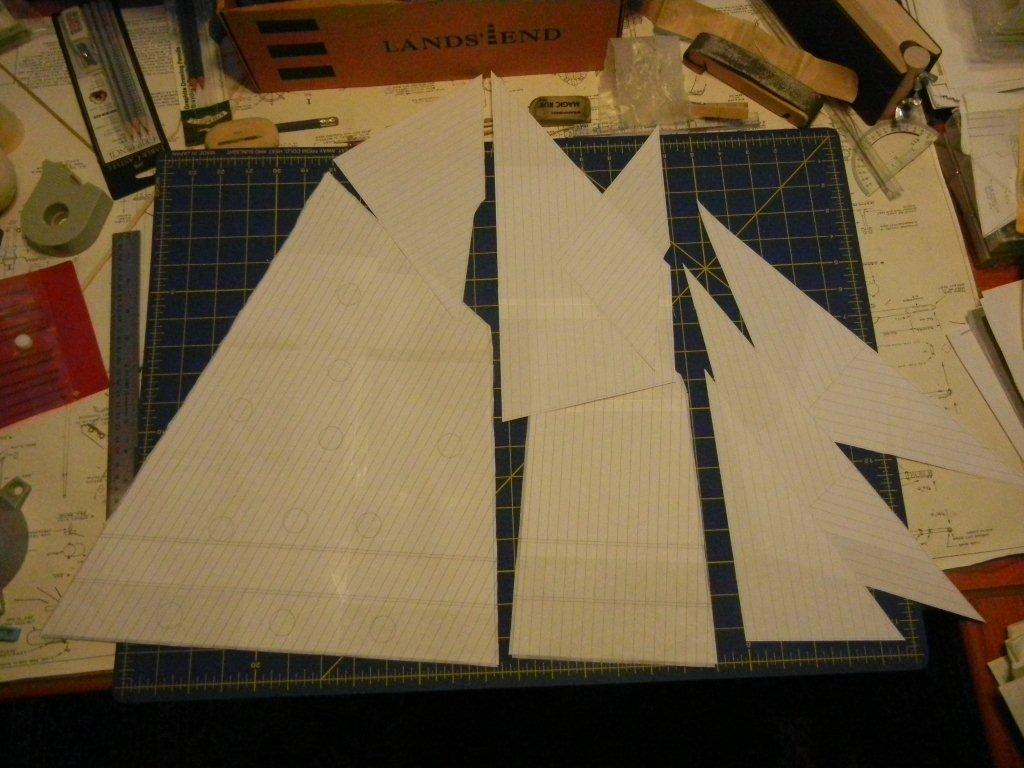
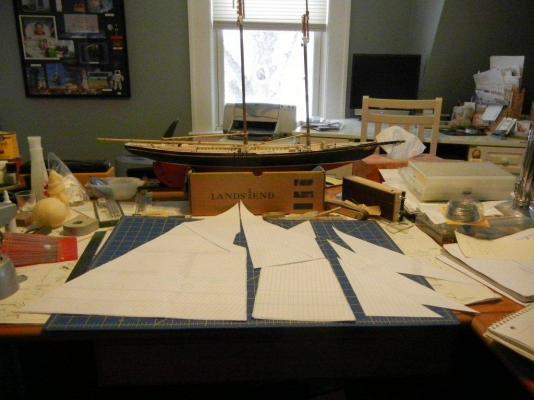
LOL - if you do order the tap and die set make sure to get both RH and LH threads - so you can make those working turnbuckles! I am not at a complete standstill - in fact my mind is going 200 mph, even though the build itself is crawling. I did manage to finish making and cutting out the templates for the sail set. Don't know if I'll use the fisherman sail, but I have it if needed. I may add a third reef band to the mainsail - it seems too large not to have the option. The sails laid out: and where they are going to: A closer look at the destination. I see the mast hoops are too thick, but I have to remember I have a few extras on the mast in case of breakage. Still working out the details of sail construction in my mind. I am pretty clear on drawing the hem lines, not stitching them. I am debating on whether to fold the hems over and glue them, or to get an iron-on edge and trim that to the actual sail size. Anyway, here are a couple of shots of where I am at the moment. Bob


-
Gil Tough call to make to address the color issue - you have done it with your usual thoroughness and the end result shows it. Well done! Bob
-
Well done, sir! I like the touch of storing the log along with the display. Your work is nice and clean - nice to see another one of these bad boys finished up. I am concerned about one thing - am I going to have to find a Canadian friend the vett my completed model when I get there? Maybe I'll send Sawdust a plane ticket when the time arrives Bob
-
Ed What beautiful lines she has... and you have brought them out masterfully! Thanks for sharing the details and congrats on reaching this milestone. Looking forward to the next steps. Bob
-
PopJack - Steal away! That's why I post the stuff I have "borrowed" from many others during my build, Gil Middleton's fake splices in his Victory log is one of my favorite finds. For the shackles I soldered the loops on the ends of the "U" then super-glued a brass wire "pin" into the loops. I trimmed after gluing so I'd have something to hang onto while gluing. I have gotten better at getting the loops small enough to create a little friction when inserting the wire pin. Some of my early efforts were pretty loose, but the pins have stayed in place even in those. I have tried soldering the pin in place, but haven't had much success with that. Using the glue allows the turnbuckles to rotate on the pin, when I tried solder it froze everything in place. Bob
-
Reading this makes me think that Danny has come up with an excellent list. The thought that popped into my mind is that all these basics need to be applied in a small space and that order will be important when actually rigging the model. I am going to add this post to my list of "Favorites"! Bob
-
Nice touch with the torch, Jay. You are becoming a real master. I still occasionally evaporate the fitting I am trying to solder - must remember light passes are all that is needed. I never thought of taping things to the stone - I have an old ceramic tile in the basement I may need to drag out for futures - still have all those sail hanks to make for the jib sails. Loving the build! Bob
-
Like you I soldered the eyes. Now I don't have to worry about them opening up while rigging, just about them ripping out! I agree about toning down the white. In some places (like the rings on the hatch covers) I changed them to black after seeing them in place. You are doing some fine work here, in my opinion. Bob
-
Is that a small torch? It's the only size I own, and I have used it for all silver soldering on Bluenose. Bob
-
Robert - thanks for the kind words. I am pretty happy with the MS kit. I think it is a bit larger scale than the Amati kit (1:64 vs 1:100?) which makes it possible to add more detail Dave - no problem. I'm glad you can recall something useful from that part of the build. I haven't spent a lot of time on Bluenose lately. I have finished up the rest of the sail templates and printed them, haven't cut them out yet. I've been spending a lot of free time on other projects, one of which is an origami canoe - not something I'll be repeating soon. Ralph - I did take a look back at the old photos but I only have pictures of the completed assembly. That would not be much help, I know. If Daves response isn't what you are looking for, I recommend posting a question either in your own log (hint, hint ) or in a separate topic. Bob
-
Good to see you coming back to her after a break, Bob. She is a fine build in progress and it'll be fun to watch where you take her from here. Bob
-
Hi Robert, and welcome to MSW. It looks like you are well into this - and things are coming along nicely. Thanks for sharing your progress so far. I'll be following along too. Bob
-
Hi Ralph, and welcome to MSW. I see this is your first post. I am sorry to hear you are having issues with the fittings on your kit. I would suggest one of two things to get help on this. First, you could start a build log of your Bluenose build. A build log is a great way to get advice and share your work with the community. For me it isn't about showing a perfect product, it's about sharing the process and learning as you go. There will be other things that you come across throughout the build, and if you have a log started it's a simple matter of posting your question. A second possibility is to open a new topic in the "Discussion for a Ship's Deck Furniture, Guns, boats and other Fittings" forum. That would be a natural place for the question you are asking. Whichever path you chose, I'd recommend posting some photos of the issue - that will make it easier to visualize what you are describing. I will look back in my old photos and see if I have anything useful for this problem. It was about 5 years ago when I did that part of the build, so my memory is more than a little fuzzy. I look forward to seeing more of your work as you continue your Bluenose build. Bob
-
Hey, Thor - it's good to have you back. I recall your Bluenose as being an excellent build. There are several people working on her now who are going to appreciate what you have to offer.. I will be following along again as well! Maybe you could post one shot of the finished build as a teaser . Bob
-
Kip - I have thought of you often over the past year and wondered what had become of you. The occasional post would show up, but no building activity. I am happy to hear you were able to find something that works for you (and of course i am looking to the resurrection of Old Blue ). Bob