egkb
-
Posts
1,632 -
Joined
-
Last visited
Content Type
Profiles
Forums
Gallery
Events
Everything posted by egkb
-
 She is Brilliant Mate.. Great job on the rigging and your decision to add those extra bits will only make her better! I totally agree with Ken's comment above.. get yourself some decent lights.. I picked up 2 of those LED with Magnifier jobs (the led's go all around the magnifier) in Lidl a few weeks ago for about €35 each (usual price for same produce elsewhere €65.. they are the business) Stay Well Bud Eamonn
- 215 replies
-
- 2
-

-
- convulsion
- caldercraft
- (and 1 more)
-
Hey there Mark.. the hinges look a treat, you make it look so easy ! I just finished doing the exact same thing over on Ballahoo.. All The Best Eamonn
- 128 replies
-
- 1
-
-
- artesania latina
- Finished
- (and 2 more)
-
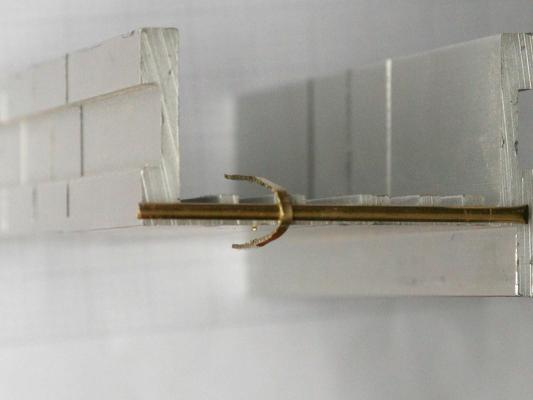
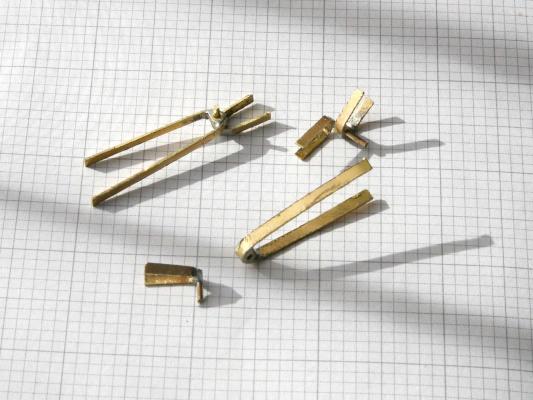
Latest Hot From The Press...... The Brass Strips I have been waiting for arrived this morning and I got straight down to making up the Gudgeons & Pintles.. The new Strips are approx 0.4mm in thickness and as a result are Sooooo much easier to work with (my full scale Blacksmiths Forge and Accessories inc. Anvil (needed to work with the 1mm stuff) are currently for sale on Ebay.. going cheap ) Right then To Business: Ballahoo needs 3 sets of G&P's, and I bashed them up without any issues.. There are 2 parts needed to make each Gudgeon (2mm strip of Brass & short length of Brass Tubing) and 2 parts to each Pintle (2mm strip of Brass & 1mm thick length of Brass wire this came with Kit) .. so I cut 6 X approx 2mm wide strips off the Brass (in 2 different lengths, ie 3 long and 3 short) The long ones will be used for the Gudgeons and will eventually attach to the Boat herself. I bent the strips into a curve whose width was the same as the Stern Post, to make this easier I located some metal (an old metal Mitre Box) that was the same thickness as Stern Post and bent the Strips snuggly around it and using a spare piece of brass tube to keep a space 'open' at the top, a gentle tap with a small pin hammer gives a nice shape around the tube too. see photos I then soldered a short length of brass tube to the inside of the curved brass strip and trimmed off the excess tube, this produced the Hole for the Pintle, I filed away any rough surfaces or excess solder and that was it for the Gudgeons. The Pintles are made using the short brass strips and in a similar fashion to above except I soldered the 1mm wire to the outside of the curve.. these will end up attached to the Rudder.. incidentally my Rudder is slightly thinner than the Stern Post so I had wrap them around a different metal piece (as it happens a different part of the same Mitre Box.. handy thing that mitre box eh? ) a gentle tap with a hammer gives a nice shape to the bends too. See Last Photo for the result of all this.. they are still a little rough in places and will need to be finished properly then either chemically blackened or simply painted. Hope this may be of some help to anyone wanting to try this for themselves (though there are many many better descriptions/examples out there in MSW land.. ) All The Best Folks Eamonn Photos..

- 1,039 replies
-
- 14
-
-
- ballahoo
- caldercraft
- (and 2 more)
-
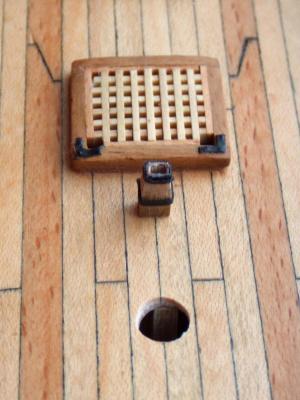
Hey There Jason.. Great to hear from you again. The Brackets are cut from thin (very thin) brass 0.25mm approx and 3 round head nails are simulated on each by a dot of Super Glue (CA) and the whole thing painted black prior to setting in place.. Their function is to reinforce the timber where the Anchor Rope goes below deck.. were I to make them now I'd use the 'Making Nails' method from a few posts back and drill little holes, instead of the dots of CA which were nerve wracking to do (got them done without a glitch admittedly but WOW.. ) Incidentally this version of running the Anchor Rope below deck isn't the one as per the kit (where they simply disappear below through 2 holes cut directly into the deck) I thought this looked better. Thanks for looking in All The Best Eamonn Sorry for not posting more often on your builds but you have advanced so far beyond me as to make my input negligible
-
The Squaring of the inside took me a good 20 mins of patient filing . E
- 1,039 replies
-
- 1
-
-
- ballahoo
- caldercraft
- (and 2 more)
-
Righty Then.. heres my version of Kesters Chimney.. still needs to be painted (I left it 'natural' so as to see it better) and a final light sanding too. It isn't fitted in place but this is essentially where it will go.. I wrapped thin strips of black card around it to act as iron 'binders'.. Tip of the Day.. The Black Card I bought proved too brittle (once glue was applied to it) to do the jobs asked of it so I coated a 2'' square of it in Dilute PVA and let it dry.. the result was a much more usable Black Card ! this 2'' square has done numerous jobs over the last few months and is a more manageable size than coating the entire sheet of A4.. Thanks for the Big Assist Kester. Stay Well Folks and Thanks for looking in.. Eamonn Photo Time Again..

- 1,039 replies
-
- 10
-
-
- ballahoo
- caldercraft
- (and 2 more)
-
Cheers Kester.. you're a Star ! .. E
-
Hmmm 'So Long By So Wide by So High'.. just as I suspected.. I'll go get my So So Ruler. Thanks Kester, and sorry for putting you to trouble ! Eamonn
- 1,039 replies
-
- 3
-
-
- ballahoo
- caldercraft
- (and 2 more)
-
Quick Question Kester.. Approx how big is your Chimney? Myself and David are going to copy/nick your design for our Ballahoo's .. Cheers Eamonn
- 1,039 replies
-
- 1
-
-
- ballahoo
- caldercraft
- (and 2 more)
-
I'll go along with Ken on this Bud.. go for it ! Eamonn
- 215 replies
-
- 2
-
-
- convulsion
- caldercraft
- (and 1 more)
-
Are you 'bedazzling' your jeans with a Convulsion accessory.. Hmmm I feel it may clash with the Pink Purse though.. personally I'd go with one or the other not both, but then again I'm more of an Autumn.. She looks Terrific Mate (amazing height in those Mortor Vessels) Re the Ships Boat, cut out a little paper template to the right size (of the Caldercraft boat) and see where it would best fit on Convulsions deck (either side of the Main Mast Aft looks good though you may want to shift the angle of the Pump Handles) what do you think? All The Best Eamonn
- 215 replies
-
- 1
-
-
- convulsion
- caldercraft
- (and 1 more)
-
Good to see you back at the Sandbagger Altalena. Eamonn
-
Brilliant stuff Kester, thanks for posting the photo! I shall have to have a go at this soon. Eamonn
- 1,039 replies
-
- 1
-
-
- ballahoo
- caldercraft
- (and 2 more)
-
Yup, spot on Kester as I guess with a name like Ballahoo there would have to be a certain Gaelicness about her.. Just Kiddin' the class were (I think) all named for Fish.. I was thinking a similar thing re the Chimney (that smaller boats built out in the sticks.. so to speak.. Ballahoo was built in the Bahamas.. may not have been as 'modern' in their fittings as those built at home) Did you carve your chimney Kester or build it up from spare timber? All The Very Best Eamonn
-
Crackin' good planking going on there Brian.. I suspect you are right to put the Margin down now to help with a neater finish. All The Best Eamonn
- 831 replies
-
- 1
-
-
- Armed Virginia Sloop
- Model Shipways
- (and 1 more)
-
Roll on the Photos Mate.. Oh and Ramble away.. no complaints here.. Eamonn
- 215 replies
-
- 2
-
-
- convulsion
- caldercraft
- (and 1 more)
-
Thanks Kester, though the kit supplied version 'does the job' I just felt I could perhaps do it differently! There have also been a few other minor changes recently (for instance I changed the kit supplied 'rings' where the Masts enter the deck and did them in a pale wood) but not enough 'action' to warrant an update to the build log I plan on putting a wee Galley Chimney in place too, so will be asking for advice on how best to achieve this shortly 'cos I kinda like your 'squared' version! All The Best Kester Eamonn
-
Thanks for looking in Mike, I did it both ways (pre treated and after they were in place) there is no discernable discolouration to the painted wood and the work was done almost 6 hours ago.. be warned though there is a pungent rotten egg smell from the LoS.. so don't do it in the kitchen Regarding applying the LoS after instaling the 'nails' into bare wood.. Hmmm I couldn't say for certain, though I think you may find the answer over on EdT's Young America Log.. he seems to apply the LoS to the pre installed nails but check whether he has treated the timber first (coat of Polywax etc) I had a quick look and found this.. scroll about 1/3rd down and you will see him apply the LoS and discuss pre treatments. http://modelshipworld.com/index.php/topic/3453-young-america-by-edt-extreme-clipper-1853/page-42#entry192759 All The Best Mike Eamonn
- 1,039 replies
-
- 1
-
-
- ballahoo
- caldercraft
- (and 2 more)
-
Blackening brass problem
egkb replied to Maury S's topic in Metal Work, Soldering and Metal Fittings
I've had mixed results due to the brass used being of different (poor ?) quality compared with previously successfully blackened brass. Eamonn -
I look forward to seeing your Serving Machine endeavours David, as I mentioned to you earlier the nail making is sooo simple to do, the end results were lightly glued into pre drilled holes then given a wee brush with diluted Liver of Sulphur which blackened the copper nails nicely without damaging the red paint... that said I'll probably wake tomorrow to find the 'whole shebang' has turned green or something Thanks for stopping by, and to the Like Button folks too. All The Very Best Eamonn
- 1,039 replies
-
- 1
-
-
- ballahoo
- caldercraft
- (and 2 more)
-
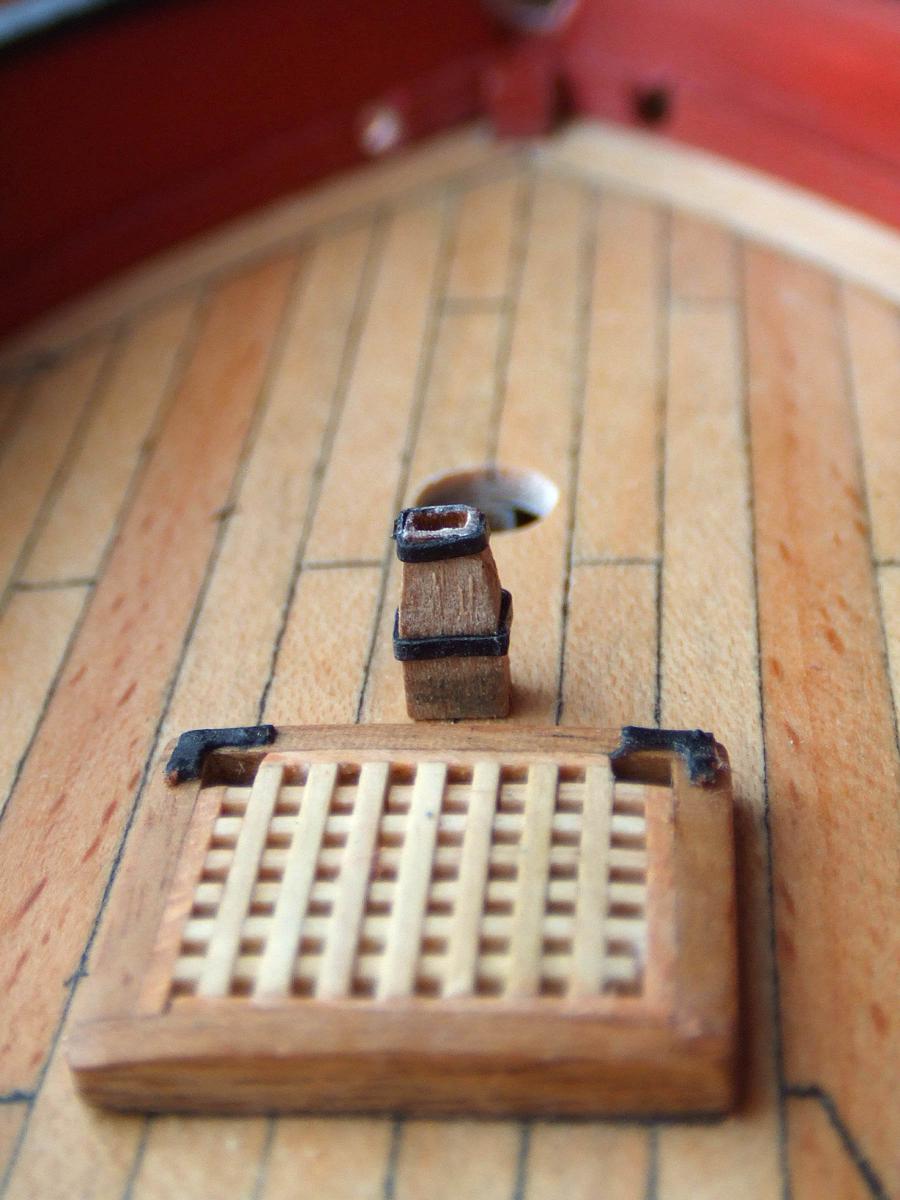
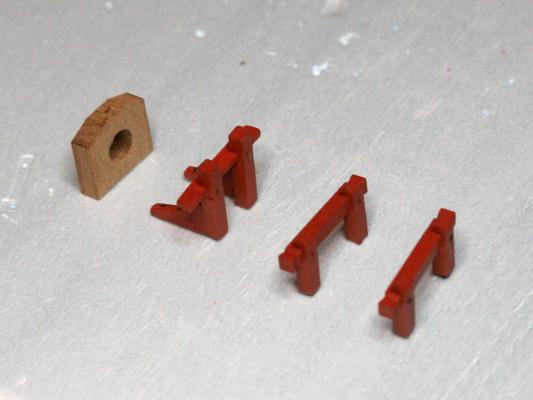
Ok Folks it's about time for a.. wait for it.. wait for it.. A Photo Update.. Woo Hoo ! Though I haven't posted here in over 1 month (I know I know) I haven't been exactly sitting back, there has been much planning and scheming going on over here. The main part of my Planning & Scheming has been to replace the 'Seating' arrangement of the Bowsprit, the kit supplied solution is an Arch Shaped block of wood with a circular hole cut into it that takes the bowsprit.. well it always looked ungainly to me so I drew up a different model borrowing heavily from Sherbourne & Pickle (the original kit supplied version can be seen beside my 'solution' ) Originally I had planned on incorporating the Riding Bitts into it but as the gap between the 'uprights' is only the width of the Bowsprit (6mm) this didn't prove ideal (the spacing between the Hawse Pipes is slightly more than this, not much but enough to feel wrong, sorta pinched in.. if you follow) I also squared the inner end of the Bowsprit to fit the new arrangement, I simply used a hollow piece of dowel that was lying around (an old Turned Wood Pen) that had a 6mm inner hole, glued it in place then sanded it square and faired the edges.. I am in two minds regarding the outcome as the hollow dowel I used is a different coloured wood to the Dowel used in the Bowsprit itself resulting in a dark & light wood effect.. I don't hate it but am not in love with it either my fall back would be to follow Bobs (Rafine) example in his Essex Build and sand the B'Sprit right down then glue on 4 strips of timber to bring it back level and sand fair.. but as I said I don't hate the current state of affairs (it looks kinda unusual) and I could always Blacken the end 2 cm's anyhoo. I have also been practicing my Brazing for the Gudgeons & Pintles, and thankfully it is going fairly well.. I bought 1mm thick Brass Strips which I figured would be easy to manipulate to the correct shape, but when it arrived Holy Moley it has all the flexibility of an Anvil.. so I ordered something thinner 0.5mm and less!! (it's in the post) the 1mm stuff felt too thick when offered up to the hull anyhoo (you know the old model building saying.. 'If it looks too big then it probably is'.. well if you didn't then you know the old saying now anyhoo !!) Oh and I cut some round head nails too (using the method demonstrated below by someone waaaaaay more skilled than me!) and fitted them into the riding bitts etc (you may just be able to make them out in the (ahem cough cough) super quality photo that I'm spoiling you with.. sorry in advance ) I blackened the copper with Liver of Sulphur too (Yup I've been well busy over here eh?) Link to Nail Making Here (I hope) All Righty Then it's Photo Time.. All The Very Best Eamonn
- 1,039 replies
-
- 11
-
-
- ballahoo
- caldercraft
- (and 2 more)
-
Great to hear from you again Mate.. Am looking forward to the next Convulsion instalment cos these 'Mid Season Breaks' are a right pain.. All The Best Eamonn
- 215 replies
-
- 1
-
-
- convulsion
- caldercraft
- (and 1 more)
-
Hey There Gregor.. Am looking forward to following your new build along.. Thanks for putting the Link into your Sherbourne Log. All The Best With It. Eamonn
-
Jeeez Danny.. that is seriously jaw droppingly good ! Eamonn My build is now going in the bin ..
-
Looks amazing D. The colours are deadly by the way ! Eamonn Loving the P's & G's.. I'm still practicing before doing mine !