


popeye the sailor
-
Posts
15,981 -
Joined
-
Last visited
Content Type
Profiles
Forums
Gallery
Events
Posts posted by popeye the sailor
-
-
not to mention, it's really an unknown at the moment when this kit was produced........I've yet to find any dates. there is a train yard, but it's not Keystone. I think I'm tracking down a place, rather than a model company

- thibaultron, Canute, mtaylor and 3 others
-
 6
6
-
thanks OC
") ....bit bit closer towards the big step. I went to put the gear doors on the main landing gears and found that I should have done this before the wing was assembled. a short part of the doors fit inside, and now there is no room to do this. there are two locator pins on the gear and two holes on the door.......seeing that the top pin is just inside the opening, I cut off part of the door and slid it in. I did the same with the other wing gear.
....bit bit closer towards the big step. I went to put the gear doors on the main landing gears and found that I should have done this before the wing was assembled. a short part of the doors fit inside, and now there is no room to do this. there are two locator pins on the gear and two holes on the door.......seeing that the top pin is just inside the opening, I cut off part of the door and slid it in. I did the same with the other wing gear.
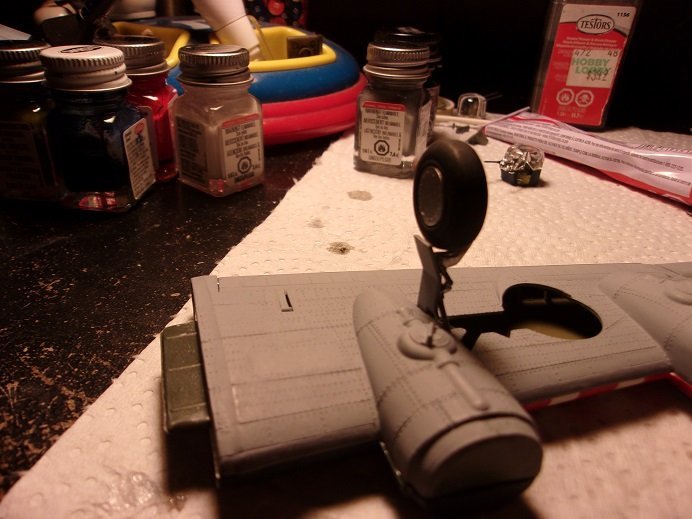
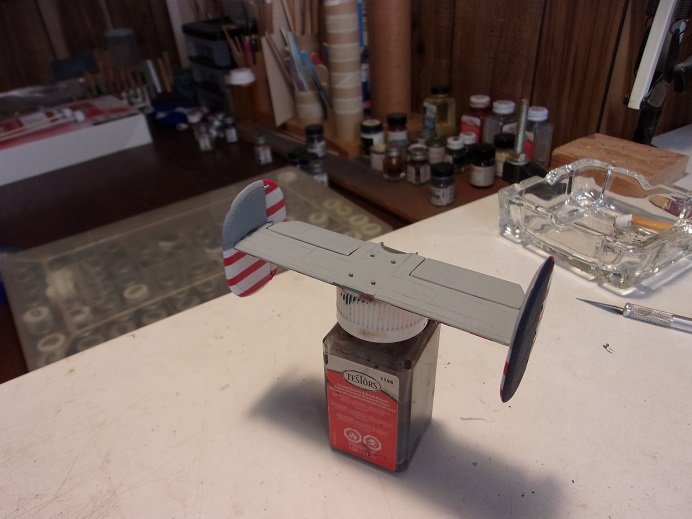
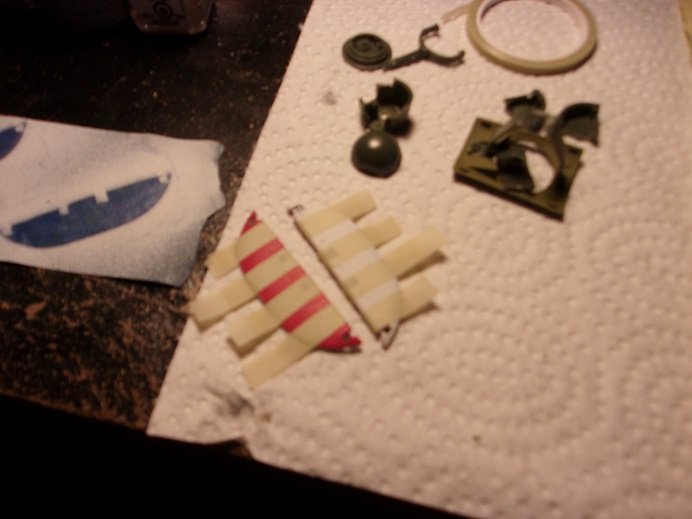
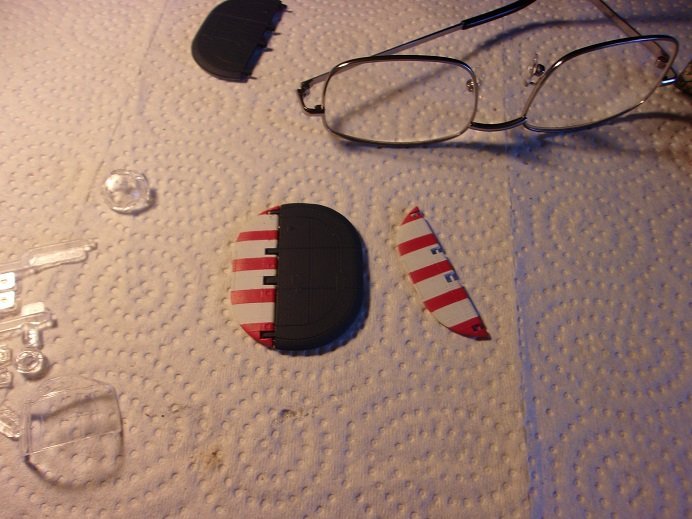
I also painted the fourth nacelle cowl........the outboard cowls are done in red and white. this was done by cutting a strip of tape in half lengthwise, and then cut triangular pieces out of it. wondering what to use for a backing for the tape....I though about what might not stick badly, so I used parchment paper. this proved to be too poor of a sticking surface, but I used it anyway, clamping the tape down firmly so I could cut it. in the end it worked, but the combination of paints were another issue. the red and white came out good......but my decision to paint the inboard cowls blue, came out less than perfect. even with the final cowl, I will need to do some touching up. the outboard cowls are added to the wings.
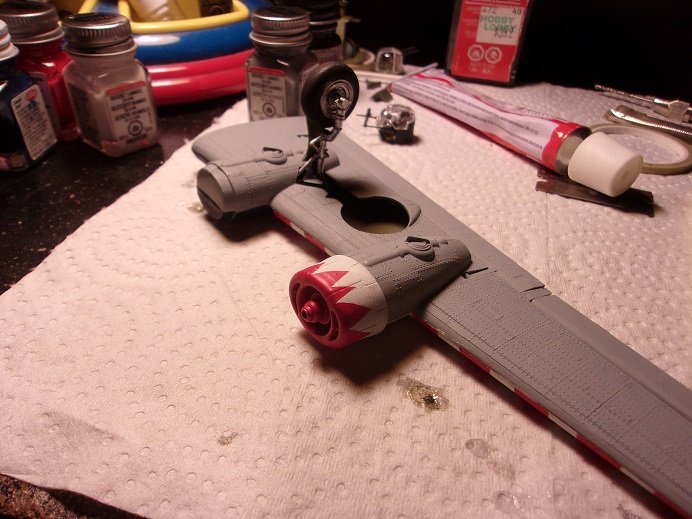
I've made more progress since this was done........I'm waiting for the last cowl to dry, before touching it up. more soon
-
OK....back from shopping
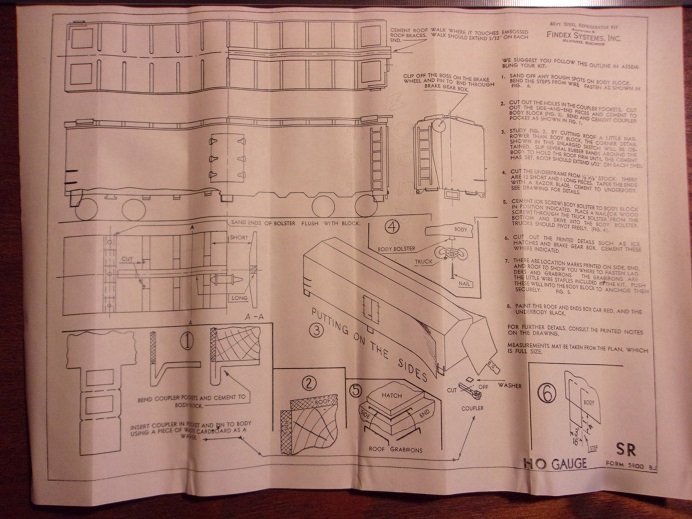
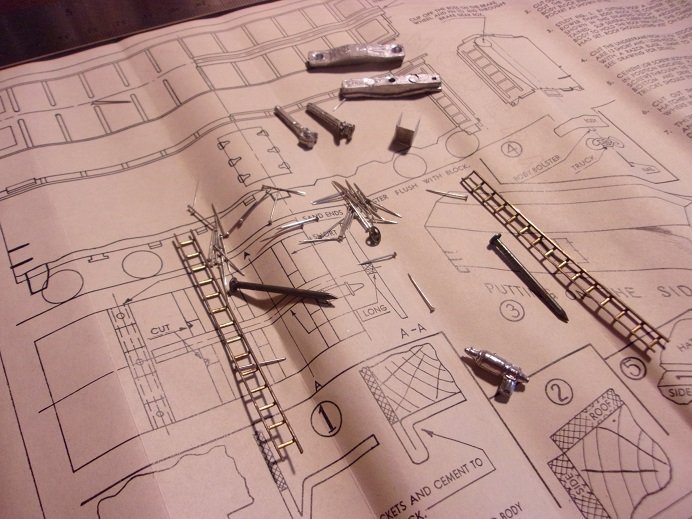
these are the instructions that came with the Keystone kit. they show the basic assembly, but leave out a lot of the detail. the first page is a mix of history and information, should one want to add more to their model.

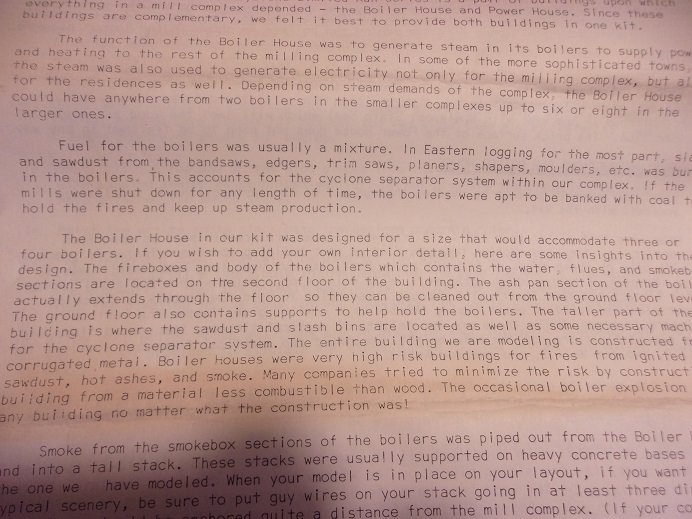
they give an outline with regard to how the facility was set up.
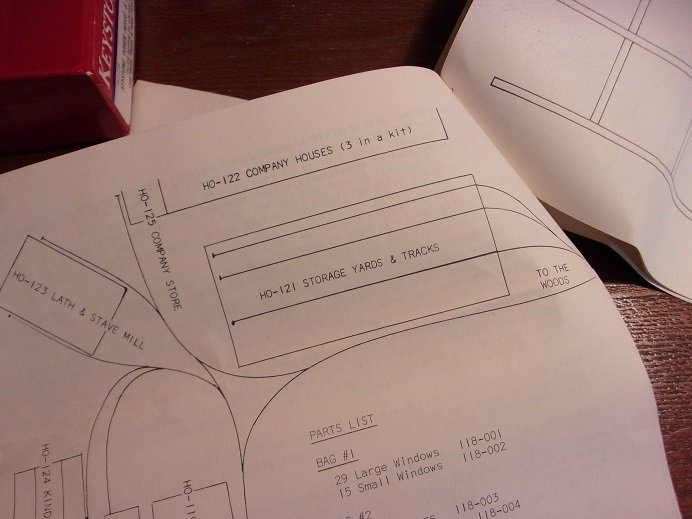

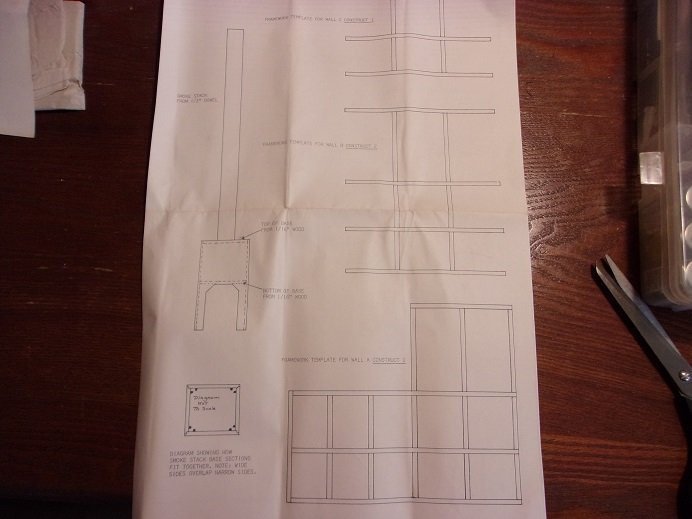
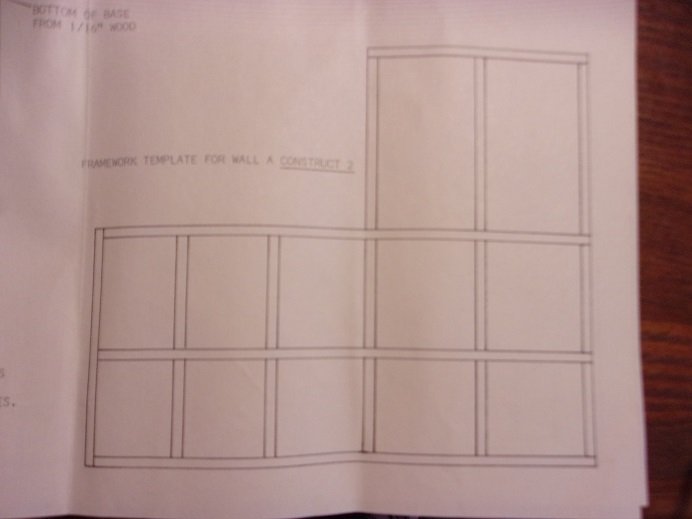
frame layouts.......
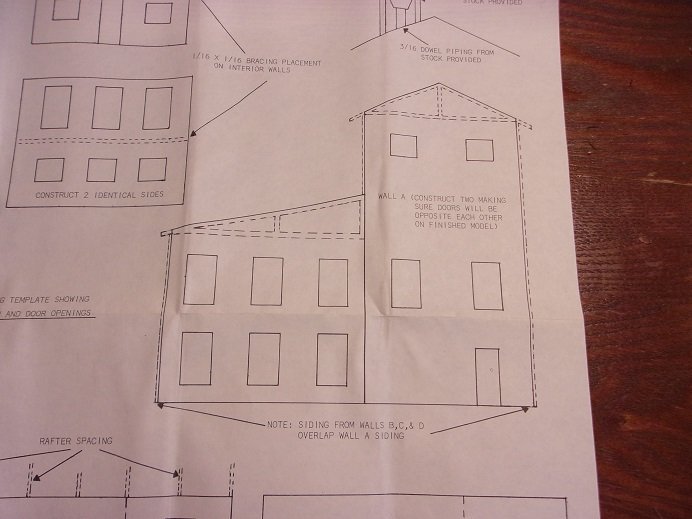

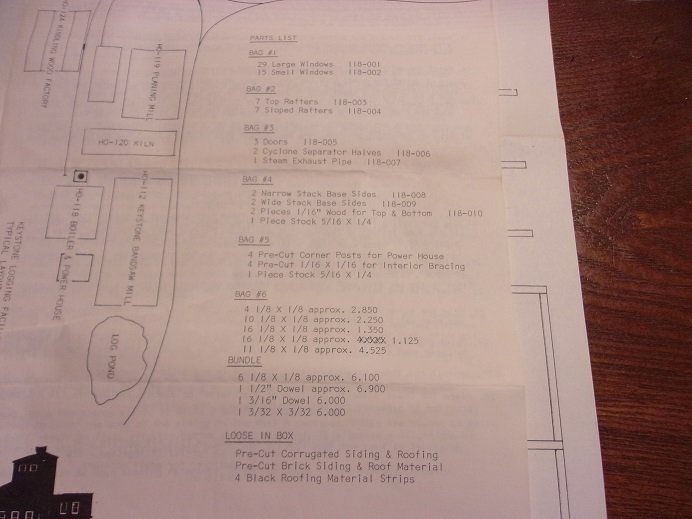
it ends out with the parts list. the text instructions may direct cutting out windows and doors.......I haven't fully read through them yet.
- Egilman, Canute, GrandpaPhil and 4 others
-
7
-
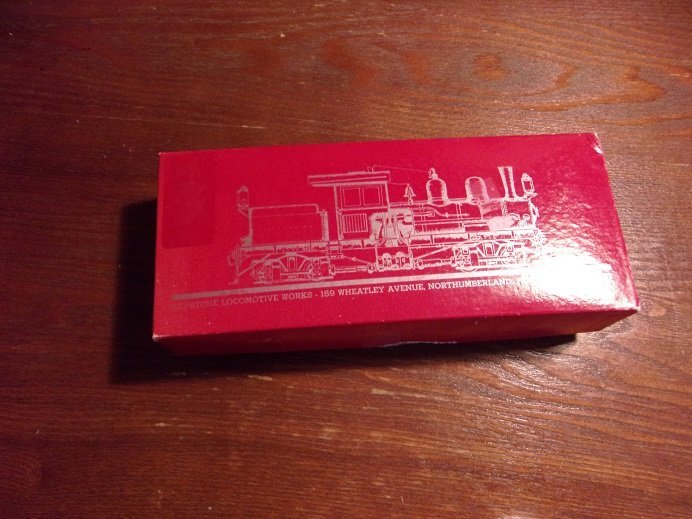
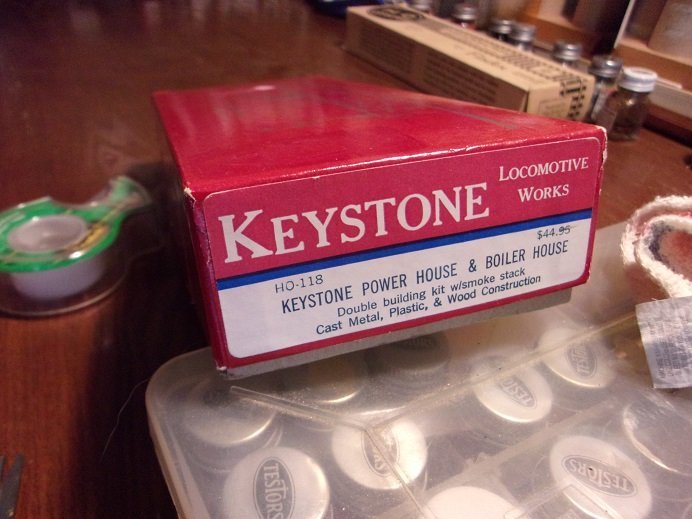
so the other kit my son gave me is of a building........part of a set that spans several kits. it's called the Keystone Locomotive works......what I have is the power house and boiler house. research that I've done using google map, shows a single building in Pulteney. New York. they indicated that they moved from what must be their old location {on the box}, Northumberland, Pennsylvania. the strange thing here, is that where they are located in Pulteney, there are no rail tracks. for a chuckle, I looked up Northumberland, Pa......and there looks to be a rail yard there. Wheatley Avenue {street name}, is not near the yard, but what could be four or so blocks away, more toward the interior of the city. I've got it up on my computer right now......I'll look into this more later.
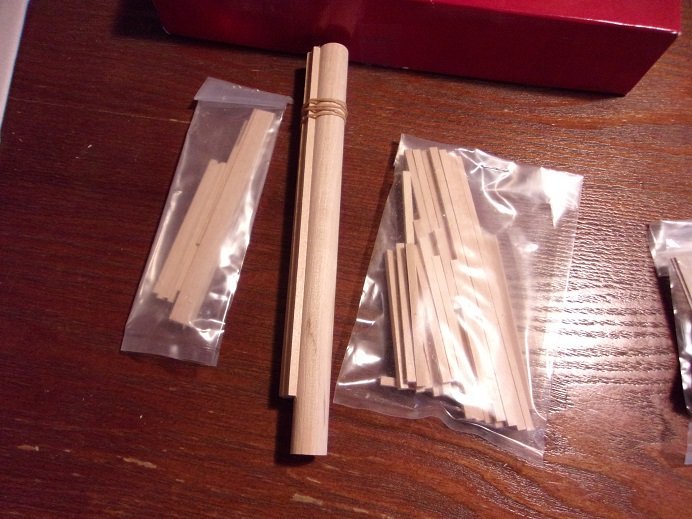
this is a multi media kit....and there is quite a bit to it. for a small box, it is crammed packed with parts.......it has some weight to it. this is kit #6 according to the information in the beginning of the instructions. the frame pieces all appear to be precut.
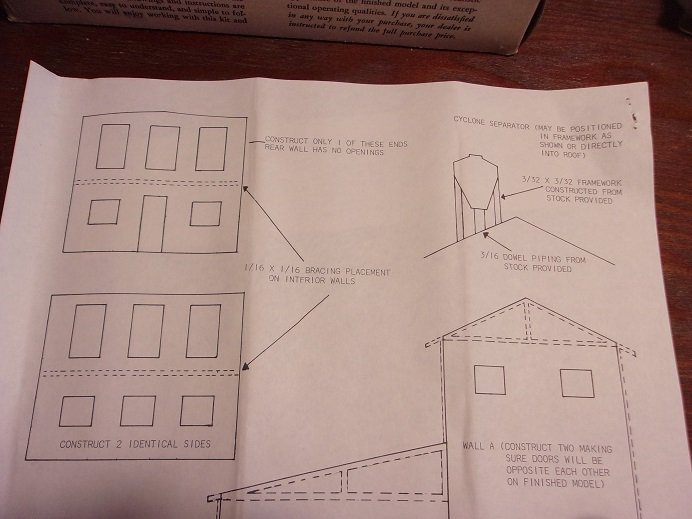
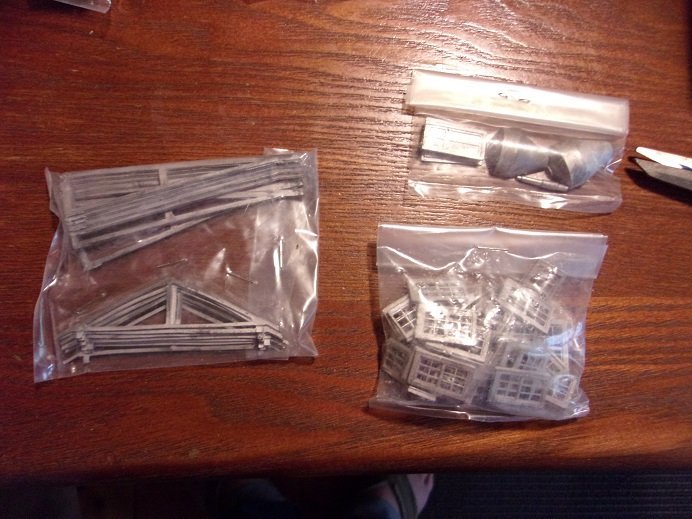
the boiler is comprised with plastic parts. generically, only one boiler is supplied, but in the descriptive story that come with the instructions, there were three boilers in the building. they were located on the second floor, with ash chutes that dump down to the first floor, for ease of removal and cleaning. the instructions gives you the option to scratch build them and detail the interior.
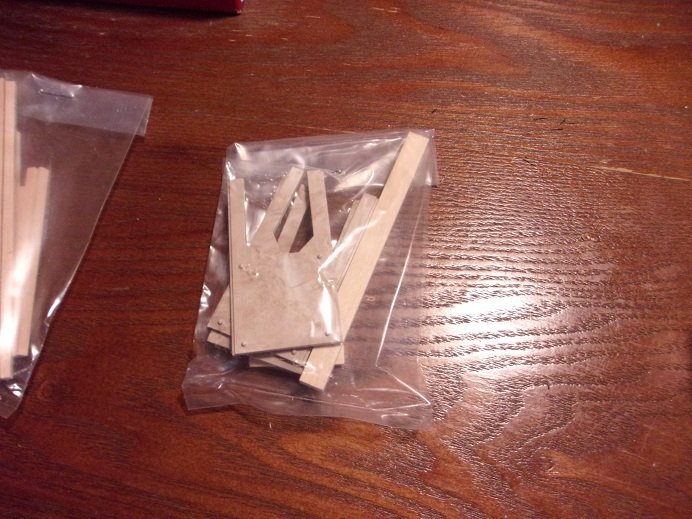
the trusses and eaves that base the roof, are made of metal. the windows and doors are also made of metal. I've been meaning to order some plastic HO scale windows from Micro Mark for a future project....I may raise the scope of my order, and do away with these metal parts. we'll see about this when the need arises.
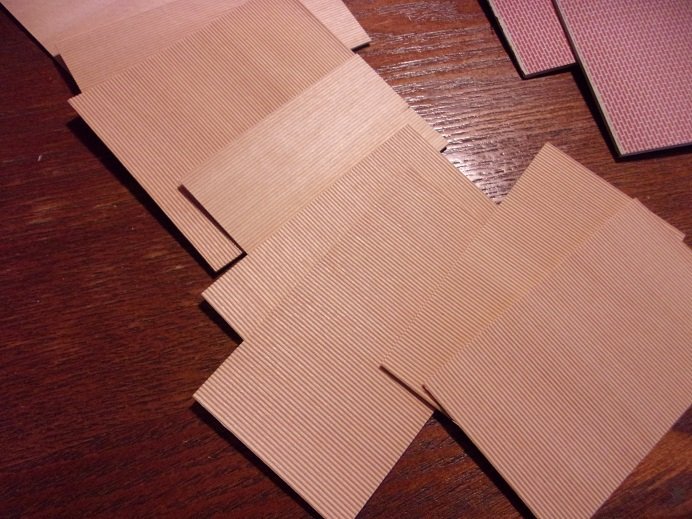
there are four sheets of wood with brick detail.......a supplemental added to the instructions, indicates a problem with them, and a solution to remedy the problem.

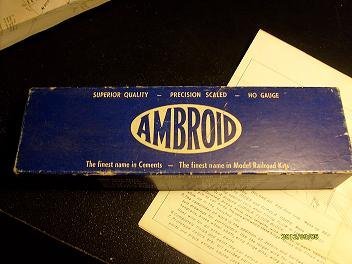
there are many smaller parts.......different sizes, of scribed wood panels. as I recall, scribed wood like this still can be purchased from the old Ambroid company.
architectural model trim ho scale
Laser-cut kits for model railroading and dollhouse miniatures - Website of nesm1!
Valley Model Trains -HO- Precision Lasercraft
Products - Decals & Graphics - Woodland Scenics - Model Layouts, Scenery, Buildings and Figures
I may have a few others..........my book mark list is very long
") here are the parts.....
here are the parts.....

the instructions are somewhat extensive...but a bit vague at the same time. I'll get into this in the next post.
-
hi all.......glad to see that there is some interest. as a side note here.........I saw a plastic kit that I'd like to get. it's hopeful that I might be able to get it, but it depends on the budget director. I last checked and it's still available.......and for some reason, since checking, the budget director has been bringing it up. an omen from the model god?........we shall see
let's all join hands and recite the Mantra........"build it and they will come..........build it and they will come........STOP!!!!!! holy crap!,......I got a baseball team here!  OK...OK...new Mantra.........."please?"
but anyway.......it is good. I checked to see if I had enough of that stuff.......what I'm referring to, is corrugated aluminum siding.......I had a couple sheets of it. I found it in the clearance aisle at Hobby Lobby...had some minor damage, but good enough to use for other things. after finding that I either misplaced it or don't have enough, it will be fairly easy to get more. my only thought stumper at the moment is the apron around the base of the body itself......looking at the instructions, you can see what I mean. another was figuring out the placement of the cross members for the trucks, but if the drawing is 1:1 with the model, I can measure it and solve that small dilemma. I'll continue to work on some sort of game plan in the meantime.
I'm glad you liked the article Richard.......some articles I've read in the past were total B.S. nor does it exclude the rail modeler's medium. I can also relate to it, even though I was one of those folks that built my models, clueless to what was going on in the modeler's world around me. yea.....I used to go to my favorite hobby shop and chat shop with them, but I never really got the sense of how the medium was evolving. I joined those old modeler's clubs and stuff......but never really liked them. the sad part was that they were only aimed at those who were still in their little rabbit holes, only aiming to make money off you. then you had the individual clubs....they would be useful, but I didn't know anybody or any groups, living in the country, as I did.
it wasn't till the internet scene, that I really started to see thing in a different light........and not to blow the horn {on second thought....I will}, till I found sites like this one, that brought modeling for me to a new light and level. around this time though, I had just resumed modeling, taking time away for life and family. life got even more interesting, when I was introduced into the wood medium.........
....but I digress yet again......
so.......if anyone has a special project going on, or a link to a really cool place.........by all means...post it here. oh.......and BTW.......the god smiled!
- Egilman, thibaultron, mtaylor and 3 others
-
6
-
I had a train set when I was young........don't remember the manufacturer, don't recall the cars that came with it.......all I can recall is that it was a steam locomotive and the layout. the layout was a 4 X 4 foot square.......plywood covered by a huge vacuform scene, with a road through the middle and a tunnel. given the size of the layout, the track was simply a huge circle, and the train went 'round 'n 'round. it was awkward to set up every time we wanted to use it, and one day it got even more awkward. my brother in some fit or another, decided to turn up the voltage high enough, that the train crashed into the tunnel, breaking a chunk of it off. Dad was pretty angry.......he put it in the pump room part of the cellar, and we weren't to play with it anymore.
time past, and the desire to play with it grew.......I figured I could set it up and get it back in the box before Dad came home from work. all went well, wrestling it out of the box in that cramped room....it was annexed off from the rest of the cellar. it was the only part of the cellar that had a cement floor, aside from where Mom did the laundry. I played with it for a while, losing track of time........my sister came down stairs. she knew....and told me I had better get it back in the box.....pronto! in the rush, I accidentally hit the regulator for the pump and broke it. yup!........warm fanny......you bet!

I never had another one after that.........had a slot car track, but it just wasn't the same. ....probably why I got into models.......it was a lot safer
in my early days, I didn't know much about the model train medium.......saw pictures, but never put two and two together. I'd guess it has been the last 20 or so years, that I began to see a lot more of the medium........it's a lot bigger than some realize. I know I've posted it before, but this article was very interesting to me.....
A Brief History of Scale Modelling (As I Recall It) by John Loughman
I thought to myself....as much as I sometimes loathe the internet, it has opened our eyes to thing we may never see. it gives us insight to the models that we are building, and the tools to build a better model. I would always build out of the box, and not outside the box........ now, I can see much more, than the field outside my window. but I digress........
in 2011, I received an Ambroid train kit from a past co worker at the shop...I was working at the Walmart DC. his ex-wife's grandfather past away, and while going through his effects, she stumbled onto the kit. she showed it to him, and he in turn gave it to me, rather than let her toss it out. it is the Ambroid B&M Snow Plow, partially started.

some of the pictures are not that good........but yup......I had that purple / pink mechanical pencil even back then!
a good portion of it is done.....the metal stuff and plow needs to be done. I'd have to sort through the pictures to see what is good enough to post. I even proposed to do it as a diorama...a small layout of a place where they might keep such a car. it's been in the closet since then.
my older son is into real estate........uses a drone to take pictures of the properties he looks at, and then posts them on line as sort of a short video, complete with music of some form of commentary. recently, he did a property.....the previous owner was still in the process of packing up. he told me how it went down, but the gent literally gave him a trunk load of train stuff.......locos, cars, tracks and all that goes with it, and a number of kits for buildings and train cars. he showed them to me.....shocked me how old some of the kits looked. he drives a Mini Cooper.......and the trunk space was totally full.......even a bit more in the back seat! my first suggestion was to have the stuff appraised to see if any of it was worth selling. he did find a place that sells stuff on consignment. he did save a couple kits for dear 'ole dad....what a good son
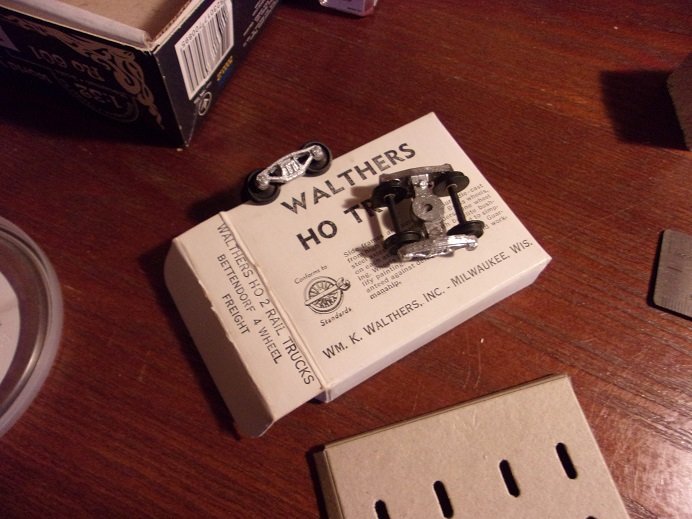
the first kit is a 40 foot refrigerator car kit, produced by Findex Systems LTD. Milwaukee. I tried to look up the company, but so far, I haven't been able to find anything on it. I did see another refrigerator car kit on E Bay. the price extension on the kit box is $1.00. working on this car will be a game changer, after my experience with the Ambroid kit........it starts out as a wooden plug.
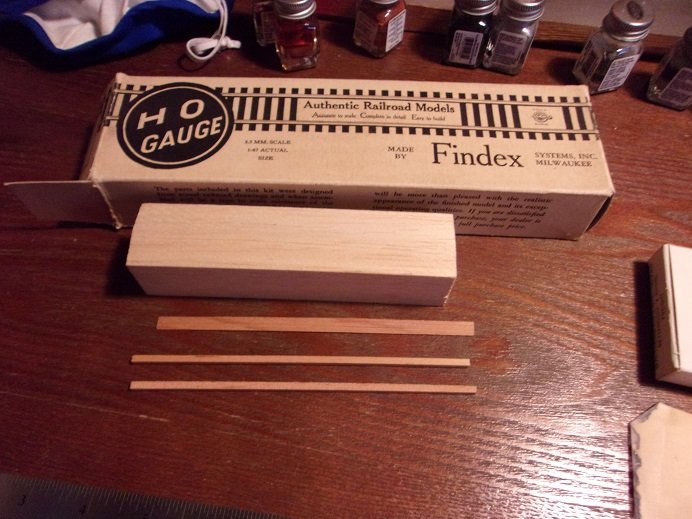
that's all there is for wood parts. according to the instructions, there is a covering that goes on the wooden plug. it was not in the kit.
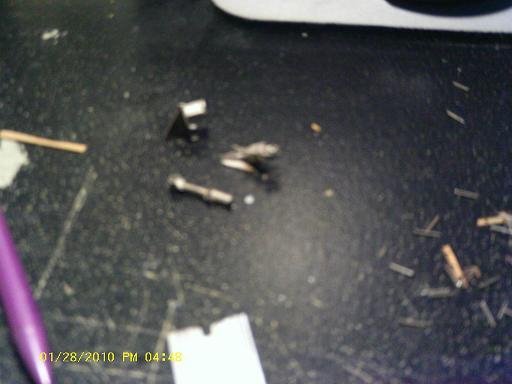
you see the fold out on the end....the yoke for the coupler. they are included in the bag with the ladders, staples for grab irons, nails, and the two cross bars for the trucks.
this is it........ there are options......Hobby Lobby and Hobby Town sells stuff for HO train and layouts. here is a list of the places I have book marked.
Model Train Scale and Gauge - Railroad Model Craftsman
Model Train Stuff - HO Scale Microscale Decals
architectural model trim ho scale
I may have a couple more somewhere. heck......I use some of the sheeting stuff for model ships. I may even have enough to cover it. another option is this model can also be done as a box car, with very little modification. we'll see when I start it
-
add another vehicle to my list to work on........just got back from looking at a 2007 Ford Explorer. gonna need some work
 but not a bad rig once it's caught up to date.
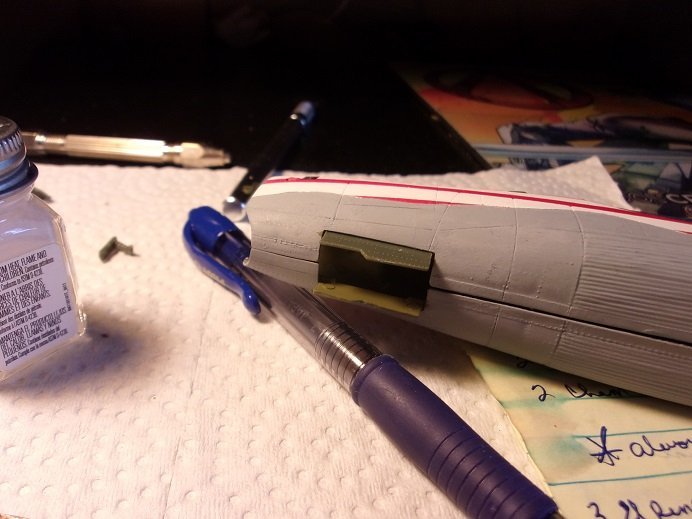
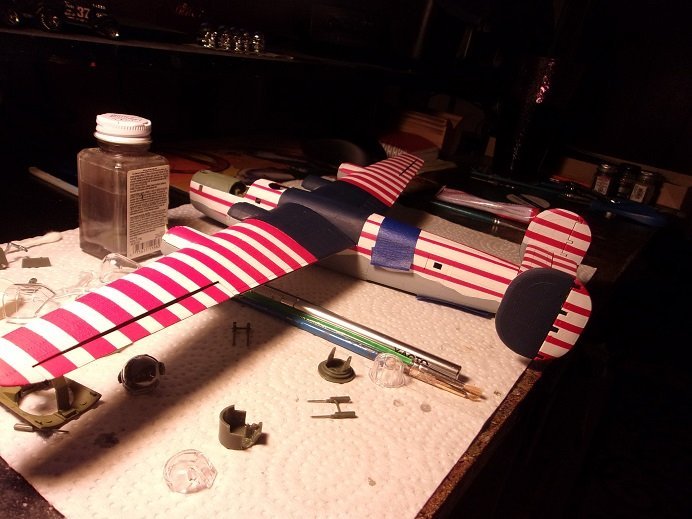
the belly turret is assembled and painted. it won't have guns, so I might leave it in the retracted position. I'm not too keen on the gap that's all around it
the nose gear doors have also been added. once they are dry I can paint them.
the dorsal turret glass has been masked and painted. for this one, I decided to paint the frame flat white........the tail will be blue, since the turret body base has been painted blue. I felt that white would have ben a nightmare to paint.

here's where it got funny........when I took off the tape, I saw a few bleeds, so I lightly scraped them off. this did mar the clear surface a little, so to fix it, I painted a little window maker over the scrapes. it dries clear and it will blend right in.....and it does
I painted a few more parts, in prep for assembly.

the dorsal turret was assembled after it dried.........really can't tell the difference!
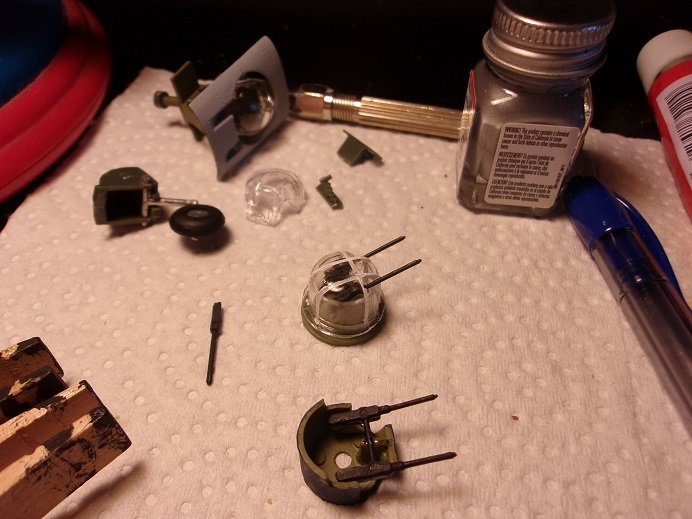
still need to paint the rest of the glass........I will paint the frames in the color that rules. I still have 1 more nacelle to paint......one needs some touchups and will look pretty good, given the scheme. the nose landing gear was assembled........tire on and such, and cemented in place on one half of the fuselage. it was joined together for alignment purposes.
I should have waited.......I've done a couple other things while writing this. it will make it for the next update....perhaps the fuselage will be finally joined together permanently
-
yea....I saw those color palettes.....but I didn't want to cloud the issue too much. taking into account that quite a few of the pictures were of models and R/C aircraft.......a lot of them were the modeler's choice. but that's what I do......I look at images and something will eventually catch my eye. shades of gray and bare aluminum are the more dominant choices. Egilman is correct in that assumption.......as far back as the early biplanes, they rolled them out of the factory with a given paint scheme. when they hit the field, whoever didn't like what they got, decided to personalize it at their discretion. there was a lot of field paint, and they used whatever they had available. the same went for any modifications they wanted to make...from thicker armor in places.....to even a cup holder
we're only the 'devil's advocates' here........whatever you come up with will be super!
- Egilman, Canute, Edwardkenway and 4 others
-
7
-
I did a contents shoot of both kits Ken.......I'll have the log up soon. who knows.......it might even get me to continue with the Snow plow
on the assembly plane front.........it's been a lot of paint. the tires and associated parts, and the turrets for the most part..........and I've been touching up the fuselage halves and adding the needed parts to them to close her up. I even found another use for the window maker. there are pictures, but I'm still in the process, so I'll have them up later. more soon
- Old Collingwood, Egilman, Canute and 2 others
-
5
-
getting rid of the mold lines would be my gripe.........some of the parts I've dealt with in the past on other projects
very nice paint work on the earlier assembly Grant........looks very real-like very nice job!
- Canute, Old Collingwood, Egilman and 3 others
-
6
-
I have seen a few wearing camo....

most of what I've seen are silver with color around the nose and tail, be it red of blue. North Korea flies these birds as well. do as I did.......do a search for Mig 15 and look at the images...they might give you ideas. you will also see that some are at the builder's discretion...their own artistic license.
- Edwardkenway, FriedClams, Jack12477 and 4 others
-
7
-
I've see old kits on oldmodelkits.com that look interesting.........and they are relatively cheap. I've also seen some of the work Andy does, and I'm blown away
I book marked the HOseeker site......also browsed through some of the fridge instructions.......Ambroid has a real nice one. the refrigerator car comes with a set of Bettendorf trucks.......to me, they look a bit clunky.........I'll start the log very soon thanks again Ken
-
I'll look into that site Ken......thanks for the head's up. so they are defunct.........I would imagine, so is Findex. I couldn't find anything on them, just that E Bay has the Refrigerator car listed too. both of the kits has the instructions......the refrigerator car seems to be missing the outer shell.......it is laid over a wood plug. unlike the B& M snow plow, the kit has the trucks and couplers. in my building what I've done on the snow plow, I bought parts for the couplers.........been a while since I was in the box I have it all in. it ended up in a closet and it's been there ever since. I'll start a log and show you what I've got so far
as for the Keystone Loco works....there are several kits that make up this facility. what I have is the power house and boiler house. the instructions even give suggestions, if one plans to detail the interior. I'll show that kit as well in the log.
the Skiff appears to be complete.......the contents don't look as if they were ever touched.
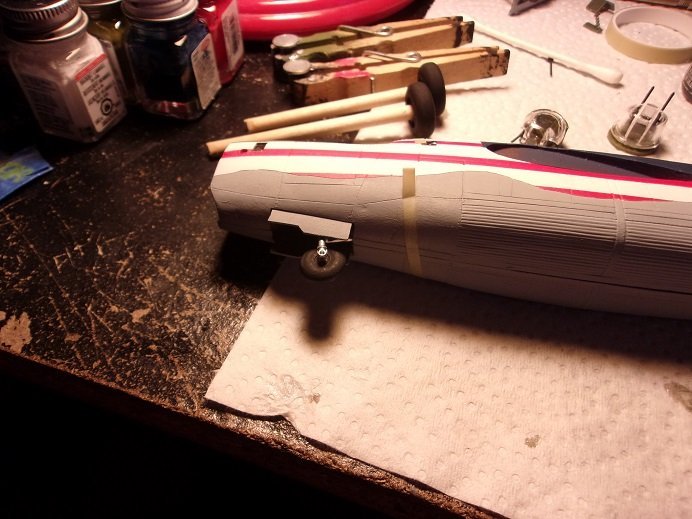
painting the plane wasn't a big issue.......it's touching it up that is chaotic....this is why I mentioned the pigment. I couldn't touch it up right away..... the paint was becoming active and blending was occurring {I was getting the pink}. with a near empty bottle of white {red isn't the problem}, I'm allowing it to separate, so I can utilize the 'full strength' pigments, without the suspension additives. I'm hoping to be able to touch up most of the 'bleeds'. at the moment, I'm cementing in the windows and working on the turrets. the goal for this step is to get the fuselage together. thanks for the likes and kind comments!
- Canute, lmagna, EricWilliamMarshall and 2 others
-
5
-
she's look'in real nice........very nice detail work
glad to see your back working on her!
- Edwardkenway, Egilman, Canute and 3 others
-
6
-
I am such a weakling...........I couldn't stave off such an impulse. id didn't help much that my two older grand sons quizzed me about what I have been working on. I had been lax in sending them pictures of the recent planes........I made up for it that early evening when we got home from their house.
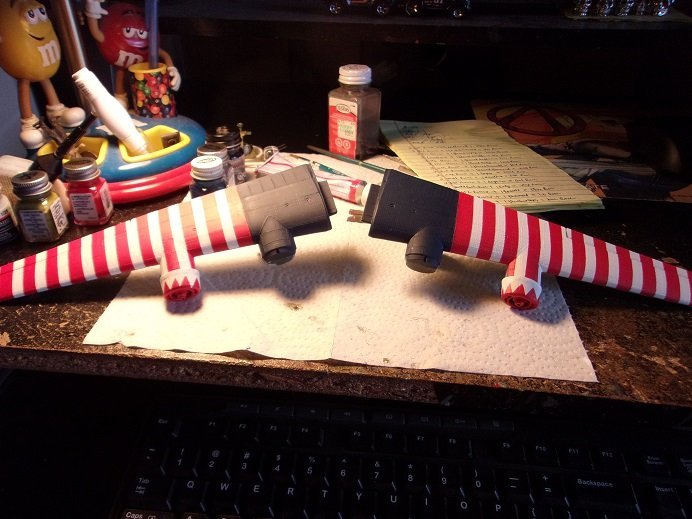
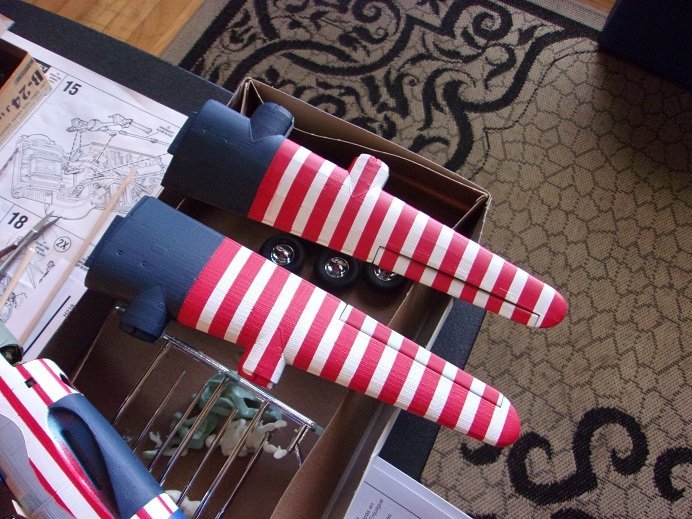
I told them about the assembly plane.......I also told Chase {the oldest} about the KG 200 book. he doesn't know, but I'm going to get him a copy, since there is a lot of history involved with it. so I cobbled together these two pictures {minus the blue tape}.....
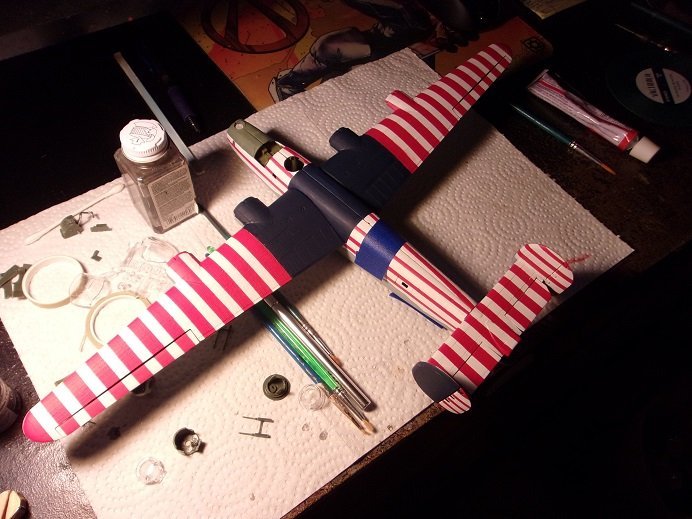
the wing span is about 18 1/2 ".........makes for a fair size model. my son gave me three more kits.......a MidWest kit of a Skiff, an HO kit of a 40 foot refrigerator car, and an HO building, which is part of the Keystone Locomotive works facility. the works is located in Pulteney, New York......it's an actual place........I looked on google map. strange though that there are no train tracks anywhere in the area {just what I need, another rabbit hole}.
the Refrigerator car is produced by Findex Systems INC. , Milwaukee......kit looks old. might be missing a few parts......I will research it and see what I can find out about it.......cool.
- Canute, Egilman, Old Collingwood and 6 others
-
9
-
-
thanks OC........working on the nacelles at the moment...... mixed reviews

- mtaylor, Old Collingwood, lmagna and 2 others
-
5
-
thanks Jack
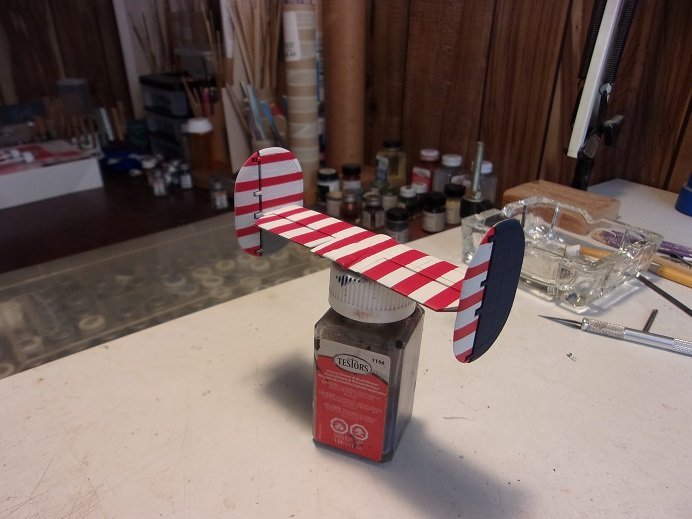
........almost ready to be put together. I'm itch'in to see it all together.... I swear..........I haven't even done a dry fit! that's going some for me.......... while I was presenting the latest update, I assembled the tail assembly. most of my brushes I have out have become misshapen, so I got a couple of fresh ones and touched up a few of the more noticeable bleeds. I like it
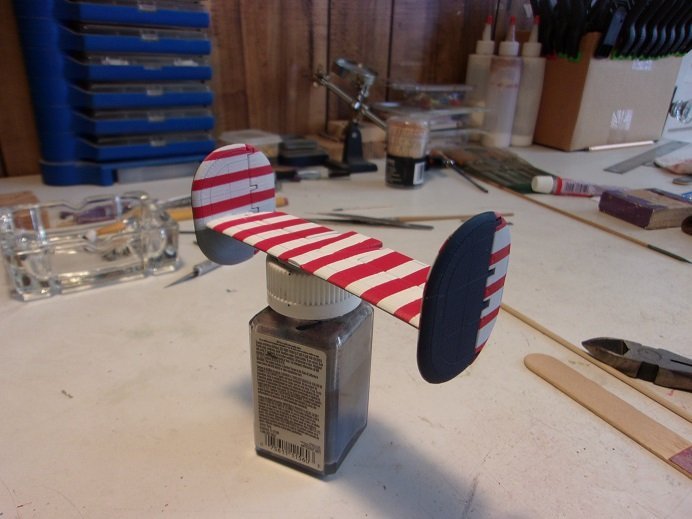
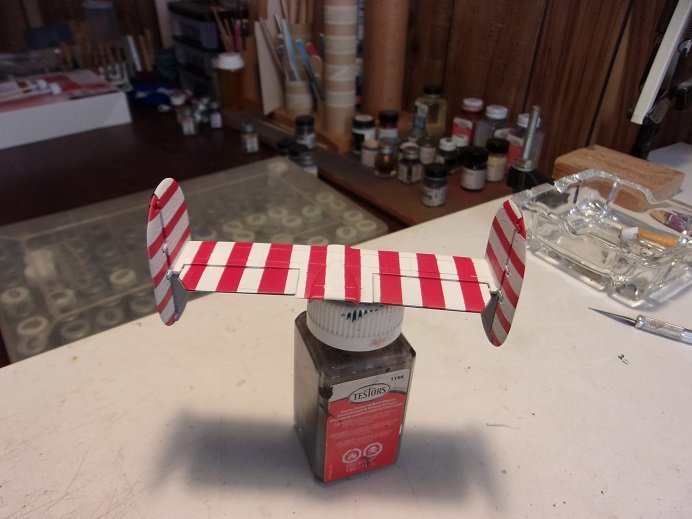
I previously did a few touch ups on the wings........they are fully dry now. I painted the tires and the outer hub caps as well.
- Landlubber Mike, mtaylor, Canute and 5 others
-
8
-
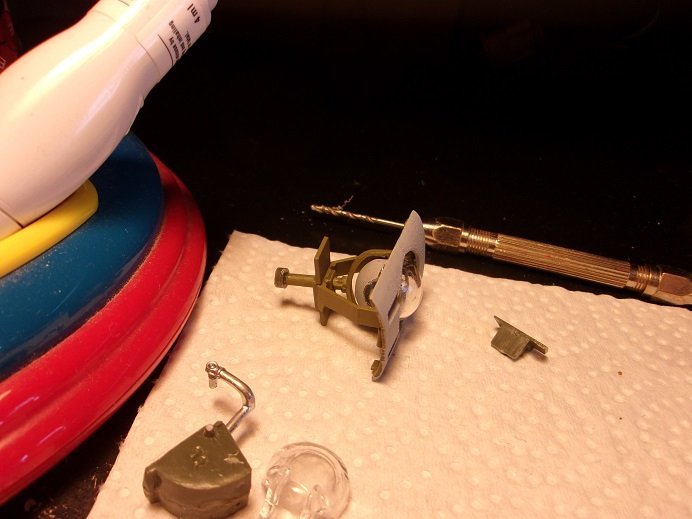
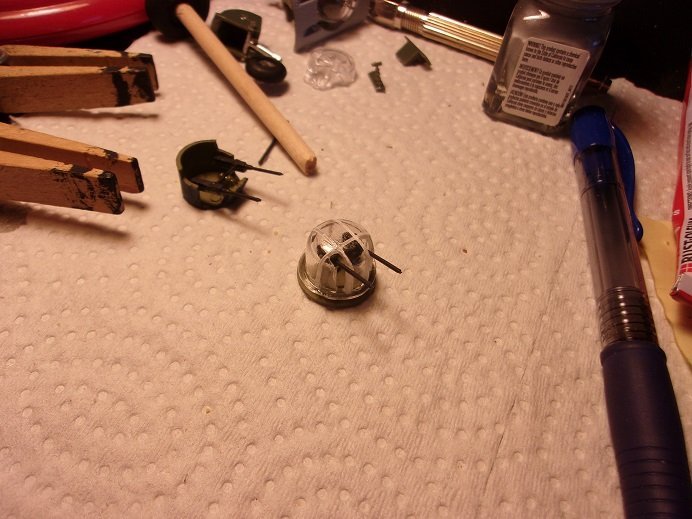
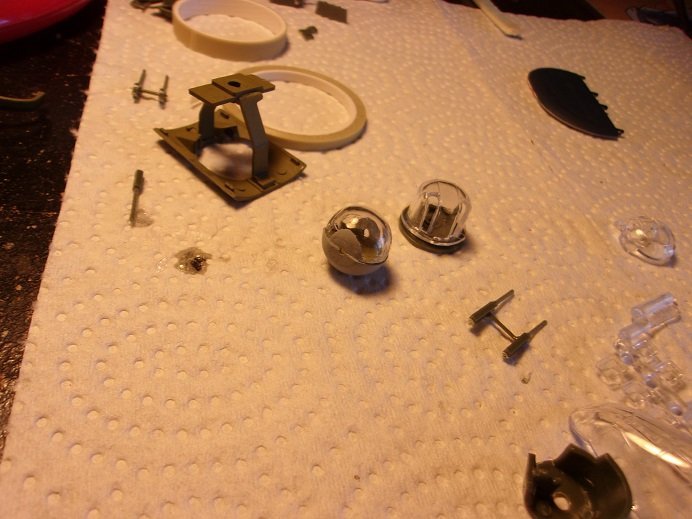
got an update for yuns........got more time on her last night. I was going to do the other side of the rudder ailerons, but never got to them.......trying to figure out the belly turret. it's the large opening under the fuselage........the assembly is built on the filler, and then cemented in place. the big thing is.....will it touch the two tabs that are inside the opening?! I've been hoo-doo'd by assemblies of this nature before.......put it all together, only to find that id won't fit.........too tall and won't seat correctly. the filler plate and the frame for the turret assembly has ben assembled...the part that is now on the top is my concern. the rudders are ready for the paint booth.
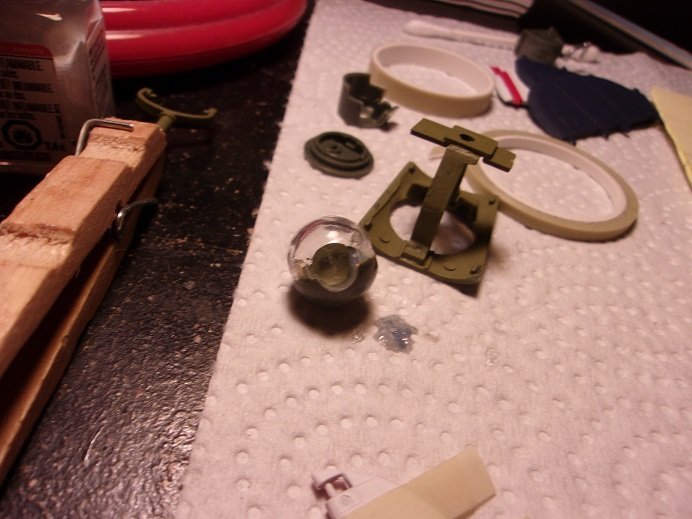
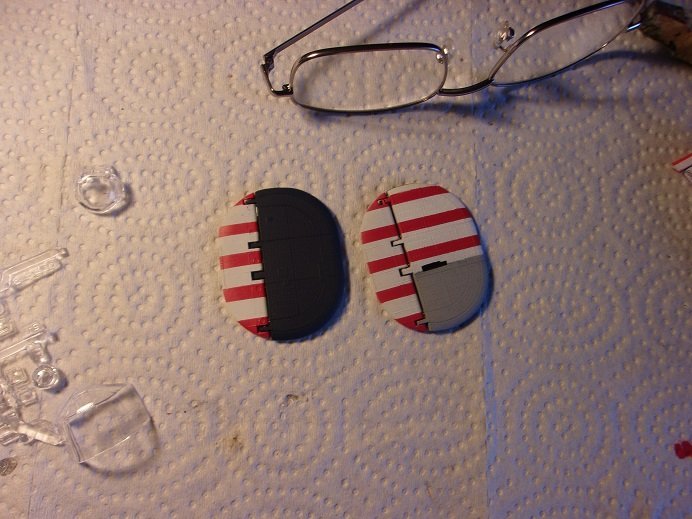
the ball was painted on the inside and the glass has been added to it. I use window maker to fill in the gun slots...there will be no guns in it. there will be guns at the tail, the dorsal....not decided on the nose. there will be no waist gunners......as mentioned, some 'teeth' but that's it. I did some more fiddling before sack time..........this morning, the rudder ailerons were painted. one has been assembled, so you can see what the outer side will look like. I'm still wrack 'in my head about the nacelles.
the outside of the ball has been painted.......the areas where the yoke connects to the ball, has also been painted.
........and now both of the rudders are assembled.......I let the striping go all the way down, instead of breaking it off with the gray.
-
-
AWESOME! they are here! first...from Gofer racing decals, I saw this sheet and figured that at least a couple of them might work. they are for 1:24 / 1:25 scale models, but I'm glad I bought them.......
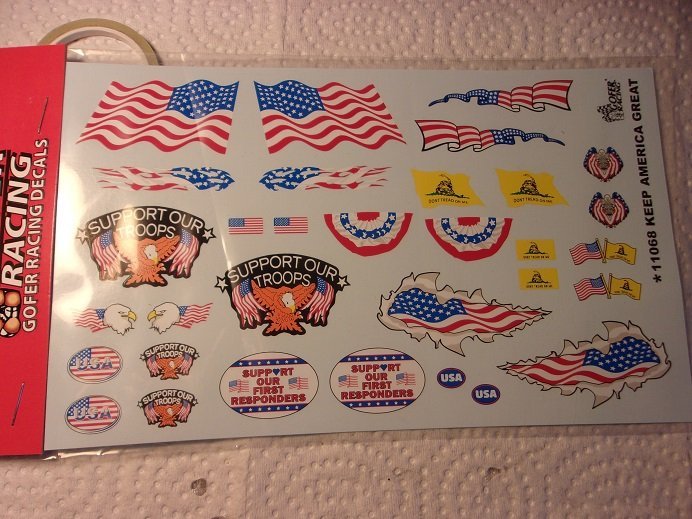
the other sheet is from Archer.......these are a bit different than the normal waterslide. they are what they call NCF decals {no clear film}. they are national insignias for jeep and 1/2 ton truck models.......just the stars. they come in what looks like several different sizes. I was hoping to find a sheet that were all the same size, so I could arrange them in a flag formation. but I wasn't opposed to laying them in odd sequences either. looks like the latter wins out.
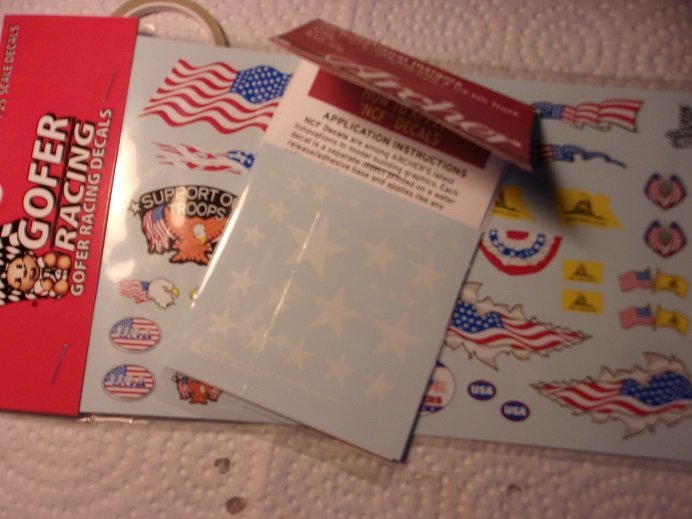
now to go digging through the archives.
-
extra sharp Vermont for me...........with beer
- Canute, Egilman, Edwardkenway and 5 others
-
8
-
c'on......I'm just a back seat driver
really nice progress you've done so far.......yea, you really need to build the car around the figures, that 's the main reason why I don't like to do them either. do the figures come with insignia decals? if not, they can be bought at Mega Hobby...looks to be a huge sheet of 'em. neat array of different kits too........the 'Walking Dead' dio look really cool
I watched Hogan's Heroes regularly.......never knew the background to the show either. it's a wonder they got any of them to do it
- Edwardkenway, thibaultron, Egilman and 7 others
-
10
-
Battle of Waterloo Attack on La Haye Sainte Farm by Old Collingwood - 1/56 (28mm)
in Non-ship/categorised builds
Posted
you dio is coming along nicely.......looks even better now that you starting to fill it out") also glad to hear your enjoying the airbrush......your gonna love how much further you can stretch the paint supply
also glad to hear your enjoying the airbrush......your gonna love how much further you can stretch the paint supply ") not to mention the uniform coat your able to put down. I grew up on a small farm as well.....we had a window to throw it out of. but.......someone had to knock the pile down when it got up to the window. hell bud........I did it bare foot! where do you think I got my big feet!
not to mention the uniform coat your able to put down. I grew up on a small farm as well.....we had a window to throw it out of. but.......someone had to knock the pile down when it got up to the window. hell bud........I did it bare foot! where do you think I got my big feet! ") keep up the good work.......really looking good!
keep up the good work.......really looking good!