
HOLIDAY DONATION DRIVE - SUPPORT MSW - DO YOUR PART TO KEEP THIS GREAT FORUM GOING! (Only 36 donations so far out of 49,000 members - C'mon guys!)
×


popeye the sailor
-
Posts
16,007 -
Joined
-
Last visited
Content Type
Profiles
Forums
Gallery
Events
Everything posted by popeye the sailor
-
 what I usually go by, is that most military aircraft aren't very shiny........with the exception of bare aluminum aircraft. a satin would be the best bet...........in sunlight, there is at least some sheen. Olive Drab was the go to paint for our military because no matter how you looked at it........it was flat it was the same with the Navy......gray was the chosen color....but I'm sure your aware of that. glad you did the stripes.......that would probably be something that I'd do.......why I mentioned it. you did a great job.
 -
so I guess the Chitty is out.........that's what I get for being late to the party I've never seen a Boat tail model before, so this will be interesting.
-
I think Micro Mark carries it....I'll have to check
-
thanks for the explanation........you are the grounds keeper
-
yea OC........I saw you recent dilemma.. glad you found the way to make it work for you that Murphy is a pretty sneaky fellow....constantly watching and waiting for the moment you let your guard down..........................then BAMMMMM! Lt. Friedrich Kempf........but I should have done the drab over the light green......I would have gotten a better outcome. I've yet to remedy the scheme issue......doing a couple other things first. I should wait till I have an update, but what the heck....you all could probably do for a good laugh. I painted the stabilizer and rudder the other day ......the bottom of the stabilizer in flat black. I noticed some bleed through, so I painted the top of the stabilizer with primer......sounds good ........right?!?! well I brushed on some flat white over the top, and it looked terrible........so I waited a while and gave them a second coat. ....just as bad. OK......I'll put them in a tub of thinner and remove the color....bad move. it not only did well in taking off the paint, but it started to dissolve the parts! I got the rudder out of there and wiped it down......some sanding later on saved it.......but as for the stabilizer.........it was too pitted to be of any use. sanding removed most of the detail anyway. I have the other stabilizer.........I sanded the leading edges flat, taking the rounded curve off of it. the bottom is already painted flat black...........there is some bleed through, but I'll give the stabilizer a coat of light gray and then the white........un&#@%*believable! thanks to those who looked in........you are some brave folks!
-
I'm of the same mind........never used anything but enamels
-
sorry I missed all the action............sad to see that happen OC. I've had decals do that.......that's why I hardly ever coat them afterwards. something about the decal film........perhaps not enough adhesive properties. when the decals are movable on the paper, I like to move them around a bit, to insure they have sufficient adhesion. the use of micro sol and micro set can take some away, if too much is used. one might never know the cause, but it's a learning curve nonetheless. hard to say if the use of paint pens might have helped you, but I've done that in the past with reasonable results. you did the right course of action. glad to see you can move on from here.....and get this bird finished........hopefully Murphy free
-
Wow! your making fast progress with this project!.............looks great! the color looks super too...........the only tanks I've ever built had the rubber tracks.
-
I've never seen them before.........really cool! gone to the circus in my younger days, but never got to see anything like that.......lucky guy Ken! I've seen older wagon kits though, but haven't bought any. I did purchase the Budweiser Clydesdale wagon recently.......gotta be around forty years or so when the kit was released.
-
that's where scratch building comes in.........lots of time, the supplied parts aren't quite up to snuff, especially ship fittings. the use of paint is more of a requirement with plastic than wood.........with wood you see more lacquers and stains. Seafire is com'in along nicely OC
-
look'in good so far OC
-
......yea, like some of the decals @ 1:72 scale.........they can be a pain too she's look'in good Andy........the exterior is really sweet!
-
bikes are looking great Yves
-
look'in really sweet........did you do the landing gear doors in the stripes? love the way you did that
-
kinda like playing Jenga..........from what I'm seeing, all the trouble came from one block..not to say that other blocks added to it. I'm sure there is a way to gauge the height...the width of the block can be addressed after the wall is assembled. you set yourself up well using the MDF.......perhaps a sort of jig can help you out further..........something along the lines of a short, easy to manipulate straightedge. they do sell really short levels.....a laser level perhaps? just throwing ideas out there........your doing a really good job
-
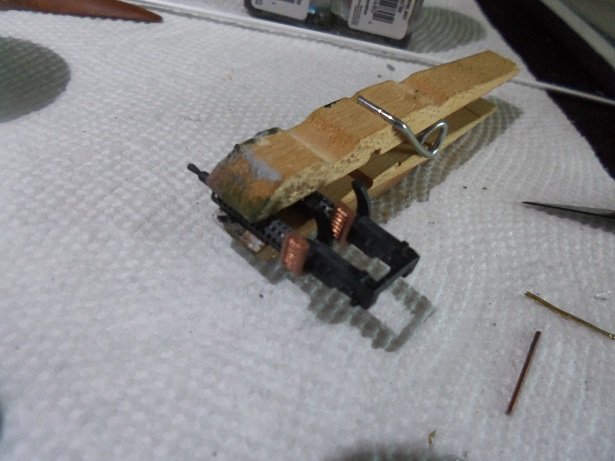
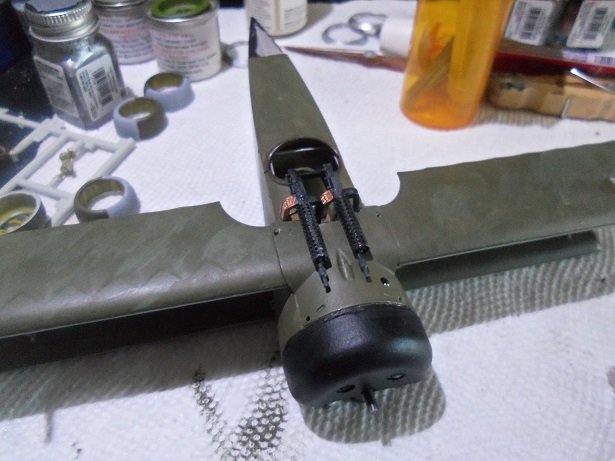
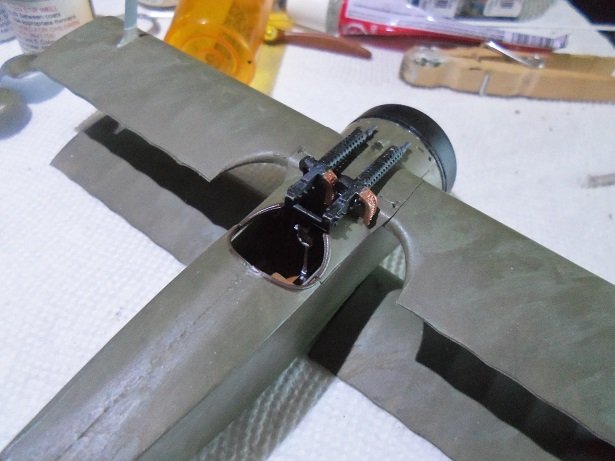
thanks Carl thanks to all who hit the like button as well! I went further on the machine guns.......more poor fit problems. the feed belts and shell dump chutes were added to the guns.......the left side has the exposed dump chute and the right gun has the exposed ammo belt. the way the top part of the cockpit / fuselage is shaped gives a good idea as to how the assembly is located. the dump side fits OK.........but the belt falls short of the contour where it would fall into place...the belt is way off of course, the only sort of adjustment that can be made, would be to cut out more of the contour, but it would create a very large opening there. it is also very close to the edge of the fuselage side. rather than chop the plane to ribbons, I chose to cut the ammo belt at an angle and leave it the way it is, since the shell dump chute orients the assembly in the proper place. I'm not even going to add the locator pins on the machine guns........concerns that they might knock then out of alignment, putting me back to square one. the ammo belt hides the defunct opening fairly well..........I'm not going to complain. .....but it is prompting me to fill out that card I got in the kit jeeze.........I can't wait for the next surprise on another note.......I got my delivery today...........very quick!
- 157 replies
-
- 11
-

-
very nice look'in car room enough just for the driver to fit into it........no need for belts anyway
-
it's likely........god awful fit.....I can tell ya that came out look'in good, but no locator pins or tabs at all.
-
yep.........kind of what I did with the Wulfe hound. I later streaked it with Bomber tan to give it more fading. .....it came out just as you wanted it too..........didn't it?!?!?!
-
you latest section is a work of art........I love the integration of wood and metal! gaps in the boards.........peep holes in the ramparts.....adds so much to your hamlet I do have a question about the main gate.......are you allowing enough of an opening for carriages or carts to pass through? or...is there a separate storehouse outside the perimeter that supplies the hamlet?
-
I'm not a big bike enthusiast, but I like the color you chose......that is a very nice color blue. the kick back from the red base color {plastic} makes it pop!
-
we have you now.............now you'll never get away! joking....but I will warn you....they can be addicting. between these two mediums, paint is a bit more critical here, since wood absorbs the excess paint, and plastic doesn't. it's better to do a couple of thin coats, rather than 1 thick coat.......but I'm sure you know that. one thing to keep in mind, if your going to use those air cans for airbrushing, is to put the can in a bowl of warm water. prolonged spraying will cause icing. I love tanks.........but I fear the admiral will think I've gone too far off the plank, and pull back on the reins.......I've been pretty lucky with the planes pleased to follow along
-
1/32 Hawker Sea Fury racer
popeye the sailor replied to ErnieL's topic in Non-ship/categorised builds
Have to say.........I think you've got the biggest stash I've ever seen. I showed it to the admiral........."see honey....thre are folks worse than me!" I also agree.....you can't build and then not show -
looks really cool KP.........love the Mad Max movies
-
yepper.......very nice look'in plane I've never tried to do one before.........seen plenty of kita around though........seen De Havland D 10 and Hadley Page bombers too. they look very daunting