
HOLIDAY DONATION DRIVE - SUPPORT MSW - DO YOUR PART TO KEEP THIS GREAT FORUM GOING! (89 donations so far out of 49,000 members - C'mon guys!)
×


popeye the sailor
-
Posts
16,007 -
Joined
-
Last visited
Content Type
Profiles
Forums
Gallery
Events
Everything posted by popeye the sailor
-
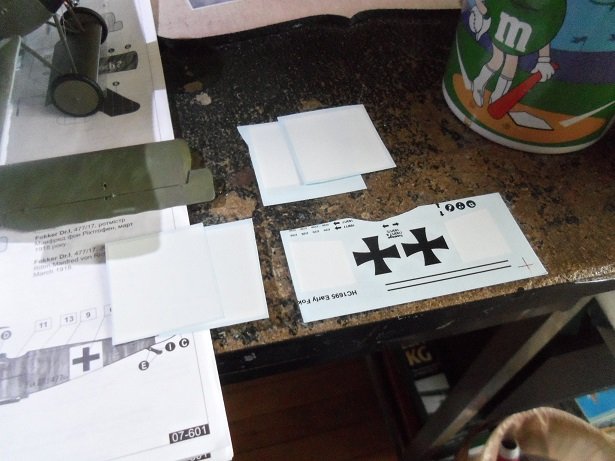
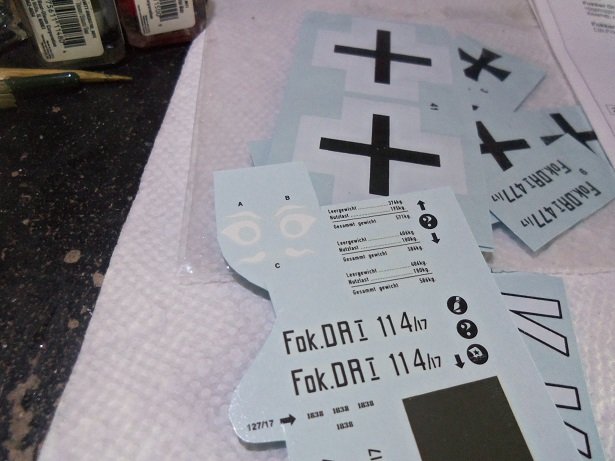
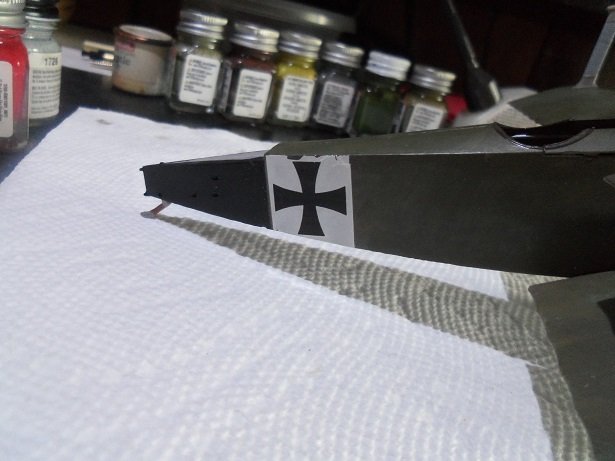
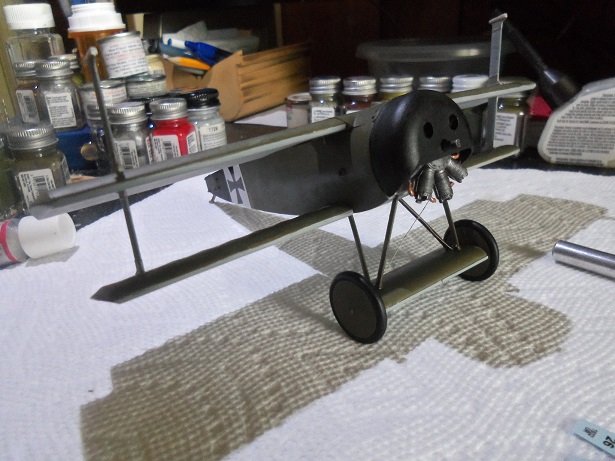
 OK..........in keeping our wits {and digits}............the flying x-actor finger of fate fell on this model this morning { actually yesterday}. first thing I wanted to do, was put the decals on the interplane struts before cementing them in place. the model was front and center...... choosing and cutting the decals needed for this model, I noticed in the scheme, that there were white fields behind the insignias. I actually should have painted these fields on before assembly....I came up with a quick solution. I still have the decals for the HobbyCraft Dr 1...that model had a decal sheet that covered several planes! among these decals were the white fields, as well as olive green and red fuselage fields. I was surprised to also find a face!.........I have one in yellow too the wing fields are larger than the wings........I began to wonder if they didn't belong to the 1:24 scale D VII I built {Revell kit}. no matter.......I can trim them down now........I'm sure you can look back when you were young, building the older models. the decals were kinda thick, with flashing around them........sometimes this needed to be trimmed off. I remember that it was nothing to take a razor blade and skirt along the edge, a good blade produced the best job. just hold the blade at a slant, moving downward as the blade was slid along the edge. most decals we work with today are much thinner, with next to no flashing around them. this can be bad, especially if the decals have some age on them. tearing and chipping often occurs....and of course, Murphy is sitting on your left shoulder that is what happened here....there is some chipping that will need to be touched up.......I usually use paint {sparingly}. so I did the fuselage fields first, adding the insignias afterwards. the decals were added to the interplane struts........and then they were cemented in place on the bottom wing only. I will wait till later to cement the middle wing. now........we'll get on with today's progress
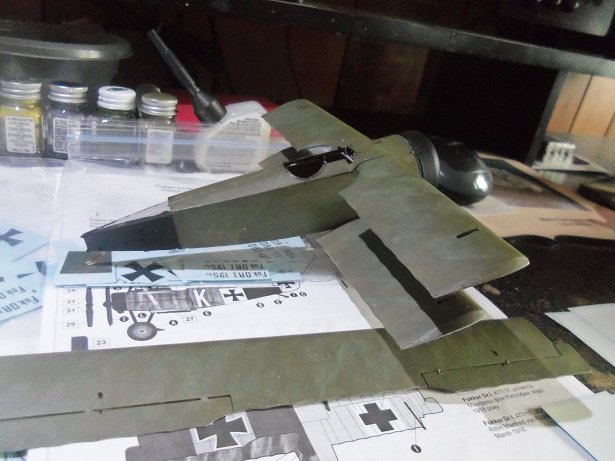
-
thanks Jav.........and all who are following along. I'm gonna try and do something I haven't done in a long time. I've done some painting..........kinda bland, but the plane is totally green {going by the suggested paint scheme}. I'm sure everyone love to put in the small windows ....personally, I hate 'em. before I started to use window maker, they always ended up cloudy looking.......a result from using cement. the window maker doesn't do that......but I read that it could be used to fill in the small windows as well. since this is a menage of small windows, I thought it would be a good practice to try. these weren't too bad.......I have a little touching up to do. I did the other side and had a terrible time.....I had to remove a couple. it could be a slow process. I looked for a video on this, but I wasn't satisfied with the method shown. I should have more on this soon. thanks for the kind comments and for looking in
- 63 replies
-
- 11
-

-
oh...oh! the human race has gone and done it now!!!
-
...and you only had one change to get it right great outcome!
-
I've heard of blue tack, but never tried it. normally, I use masking tape cut into shapes, or strips cut in curves and such. rattle can will do as well as an airbrush, but knowing the temperment of whatever you use will determine what outcome you'll have. with the tape method, light coats are a must........rattle can must be done in quick passes. it's sometimes good to let 'em sit.....you'll come up with a plan of attack. don't change it just yet
-
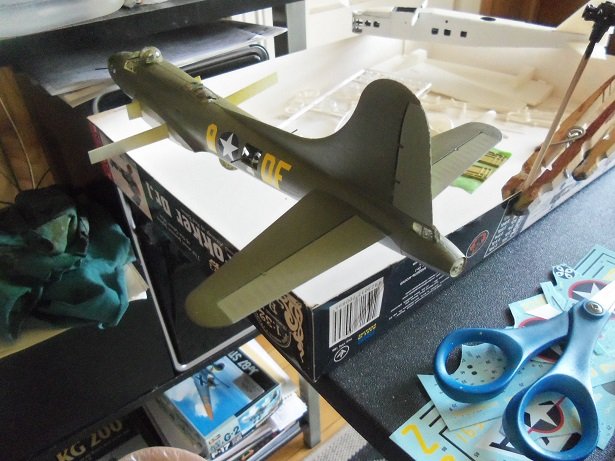
thanks all for the kind comments and the likes I haven't done much other than add a few more decals. I hope to have more soon!
-
looking really good KP...the scratch building is amazing
-
I'm just trying to get to my first one......got two and a half years still. I like toying with the idea.......gives me something to look forward to there's really not a lot of parts to the model.......bet this would make a neat paper model. thanks for the suggestions...I'll check it out. and thanks for the kind comments and likes. gotta hit the rack.......work tomorrow
-
MRAP ATV by CDW - FINISHED - Rye Field - 1:35 Scale
popeye the sailor replied to CDW's topic in Non-ship/categorised builds
agreed on the awesome color choices........the detail is amazing! -
thanks Ken....welcome to the log. the fit is so-so........I've had to shape some of the parts. no real secret Jack........I wake up in the morning.......grab a cup of coffee........then it depends on what part I pick up first. of course, I've got this dream of lining the spare room with one continuous table....all around the room I'd be all set then ohhhhhh.....and retirement would be a nice touch too welcome Ed........there not a whole lot of parts to this model.........that and it seems smaller for a 1:72 scale model. paint will be relatively easy........two, perhaps three basic colors. welcome Harley....that's the basic information I have here. I tend to think the plane is a bit unstable.......it's service life was a little over ten years, but in those ten years it went through about 185 different modifications! I agree that it was likely a power issue that limited her ability to stay in the air when crippled. there is one option for this model.......it can be built with or without wheel fenders. I'm going to try and build it with the fenders. after drilling out the tires because the existing hole was too small a diameter for the axles, the inner fender halves were cemented on the struts. any protrusion of the axle / spindle was trimmed to accept the wheel, being a tight fit for the wheel inside. I did a dry fit to find this out. as for the fuselage, I managed to fit the nose turret platform in place. other than paint a few parts, I've done nothing else. errands and keeping Gibbs at bat for the refrigerator repairman took up most of my time. it's been a strange three days off. I had my physical on thursday..........I'm as healthy as a horse in spite of my eating habits. he still wants to do that inspection of my 'lower' G.I. {I keep refusing referring to it as 'holy grounds'. the only thing I had there was a boot........and that was from my father many.....many years ago he also wants to do a cancer screen.......sure....I'll let him win this one by now he must know my love for doctors, 'cuz he kept asking me if he was going to see me again
-
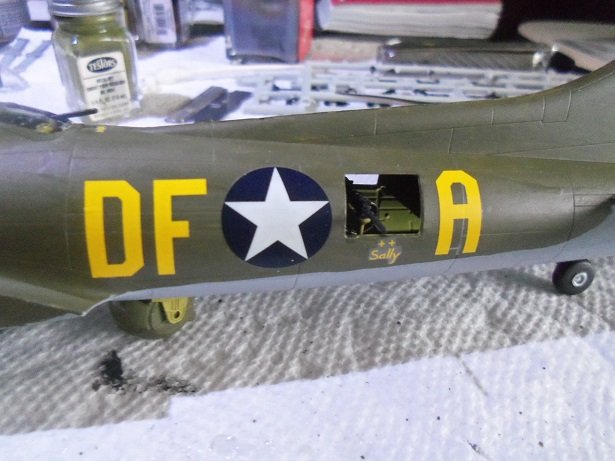
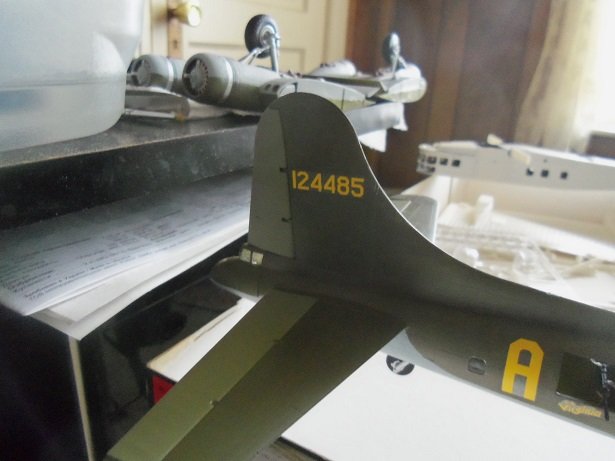
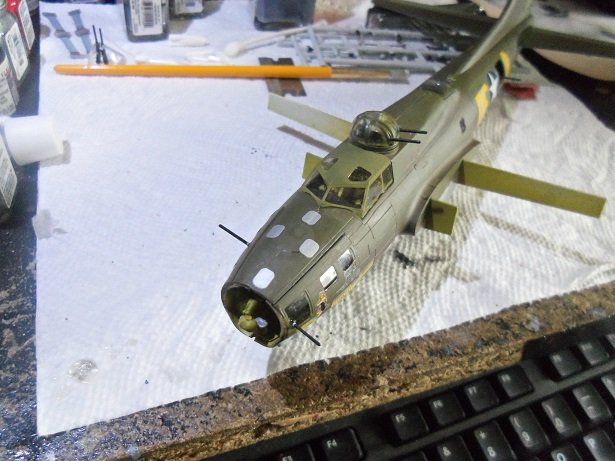
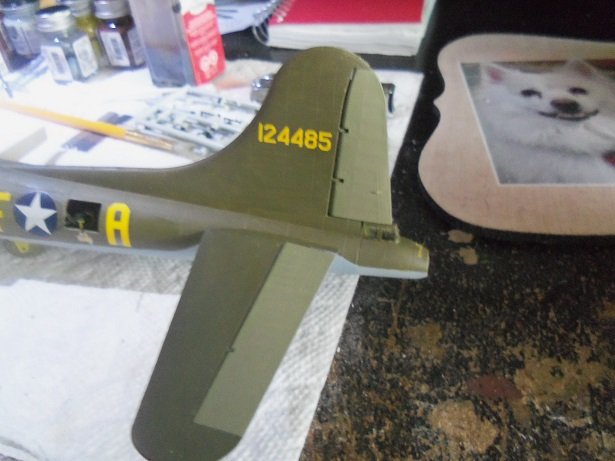
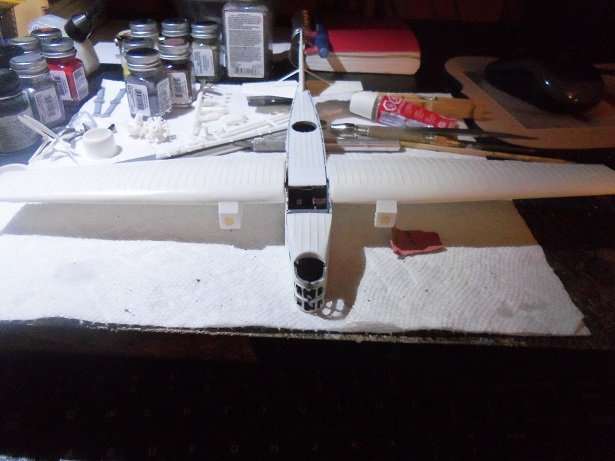
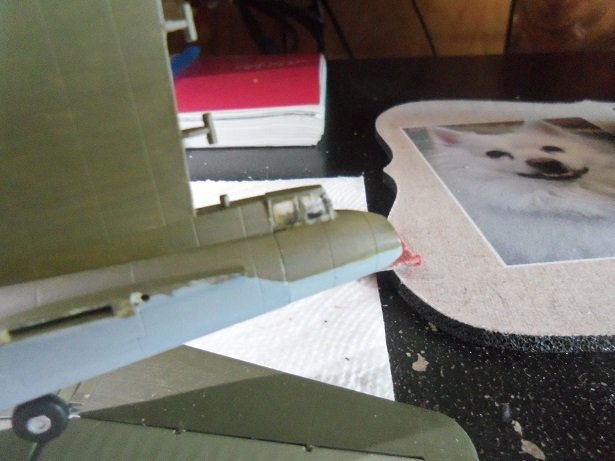
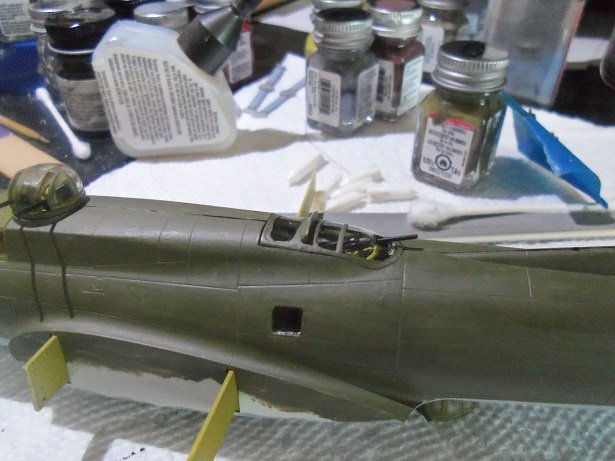
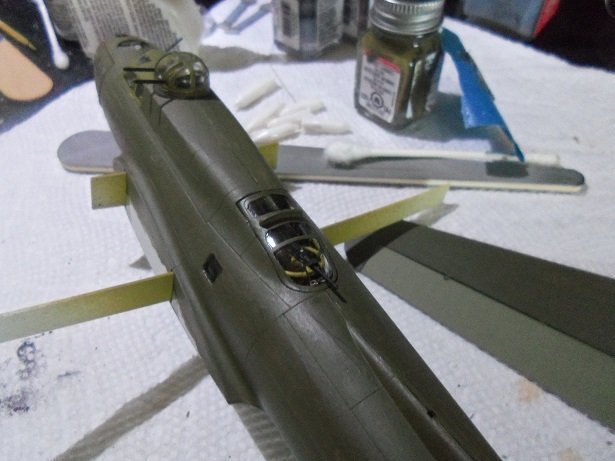
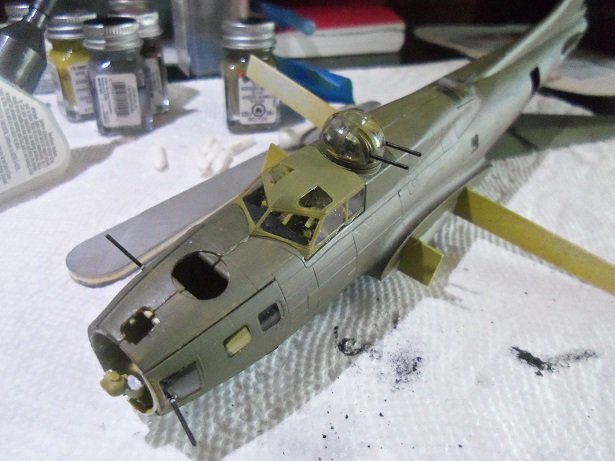
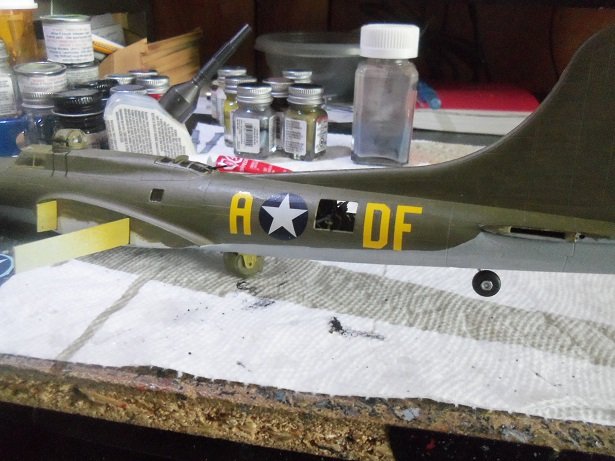
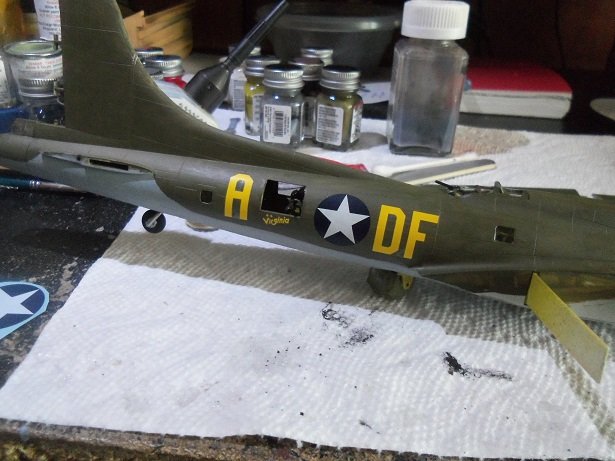
thanks all......it's been some good progress moving forward. at the moment, I'm trying to get more decals on her. I'm finding the areas in question easier to handle. looking in further on the vertical stabilizer, I've yet to find another picture showing that painted over blotch. I got a copy of the documentary {or the air force release} along with the Memphis Belle movie......I've yet to pull it back out to review it again. I'm certain though that it was the 'A' code letter though.......there were a few planes to sport it along with the Bomber Group triangle. the correction on the port letters...... I was able to remove the decals and reposition them. the glass parts were added to the top of her nose......there were other versions in the kit. it looked terrible.....took a bit of work to get it straightened out. I'm still not completely happy with those side panels........terrible fit. the insignias were added to the wings you might see other small decals her and there........there are quite a few to go yet. her number was added to the vertical stabilizer. I added some decals at the nose.........I may remove the panels and try to repair them. I've compounded the issue though.... a little more was done on top of the nose....after touch up paint, I added the silver rectangular decals.......not sure what they are for.........fake windows perhaps. more soon......thanks for look'in in and the likes!

- 247 replies
-
- 10
-
-
seriously nice work on the Jeep ensemble........looks ready to run out to the field very nice detail!
-
good to hear you finally got your parts
-
hi Egilman......welcome as well! rushed.....repair man is coming!
-
just do'in my part OC welcome! hello Jack.....welcome to the log as well
-
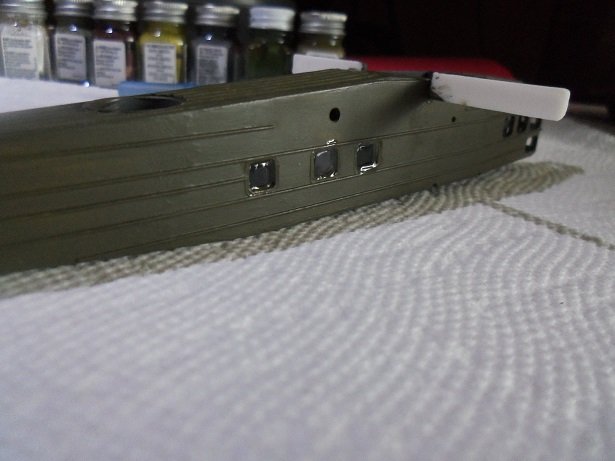
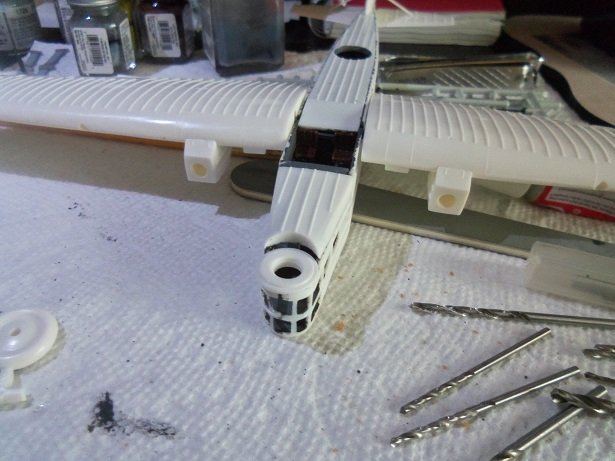
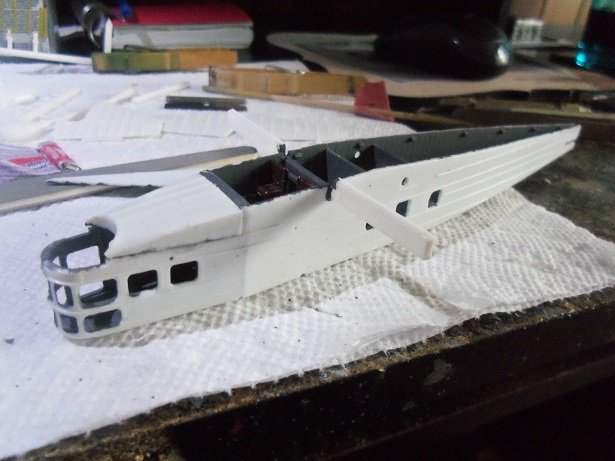
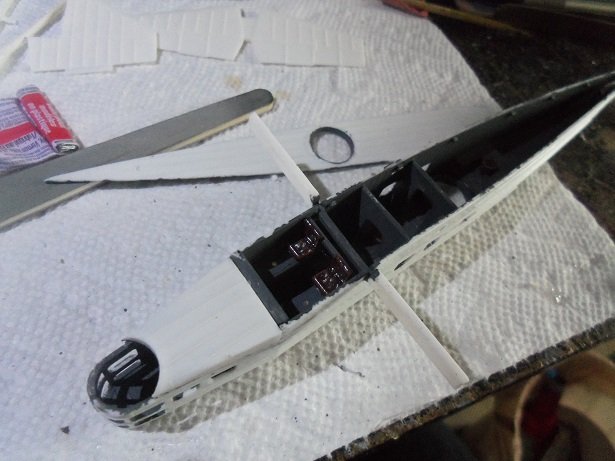
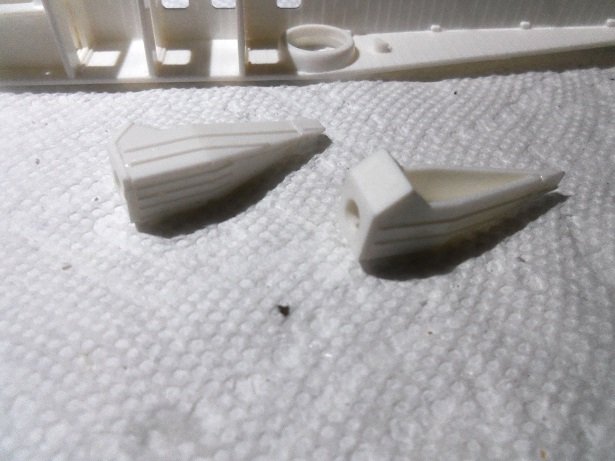
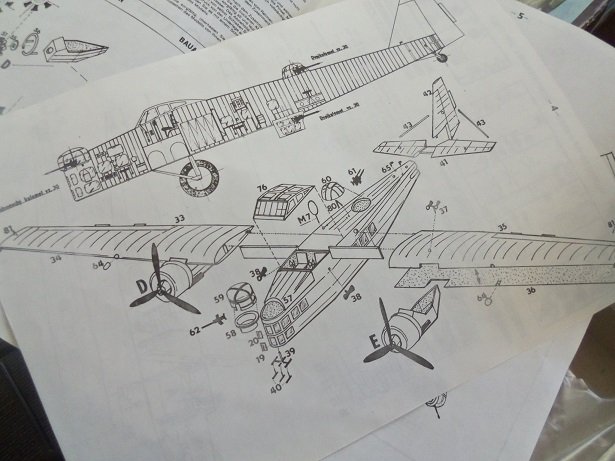
the engines consisted of four parts....later the two cowls and props will be added. I did goof by cementing the wrong narcele on the wrong wing...noticed by the notch for the main landing gear strut. I got out of it by cutting the same notch in the proper place on the inside facing the wing root. the notch on the outside was filled in with cement to make it less noticeable. the interior of the fuselage was painted gray........the port side fuselage half was then added, later to be painted as well. the wing root tabs were added after that. then the seats........two for the cockpit, three for other places in the fuselage. the fuselage top at the nose was added. the top aft section of the fuselage was added.... every step involved fitting parts....the windows at the nose had to be 'tooled' as well. this was also the case for the stabilizers.........the butt end of the fuselage, and drilling out the hole for the pin on the vertical stabilizer {rudder}. there was a little stabilizer root protrusion that needed to be trimmed flush for the proper placement of the rudder. two struts brace the rudder. the wings were dry fitted in place. the mating surfaces need to be sanded flat for a better fit more as I go.........

- 63 replies
-
- 16
-
-
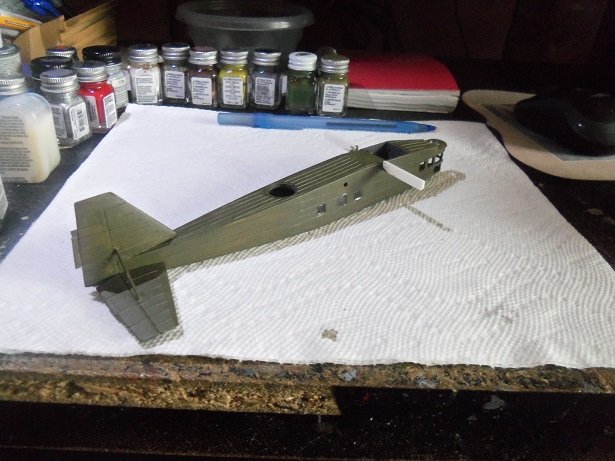
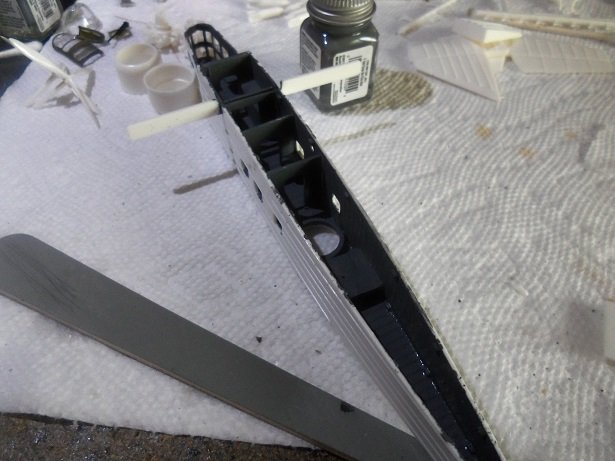
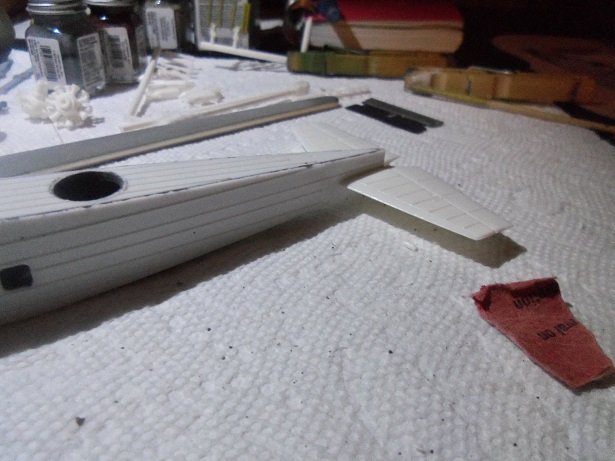
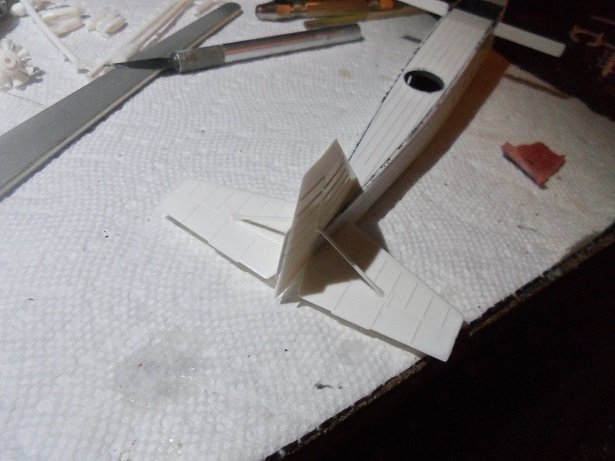
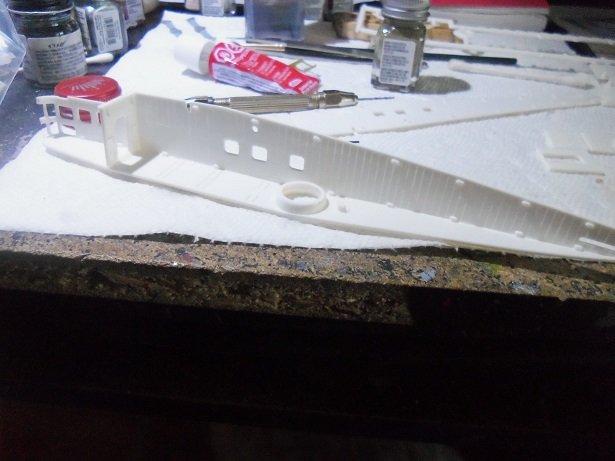
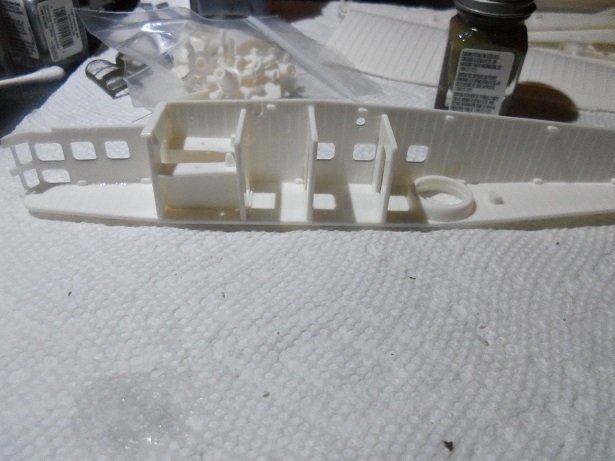
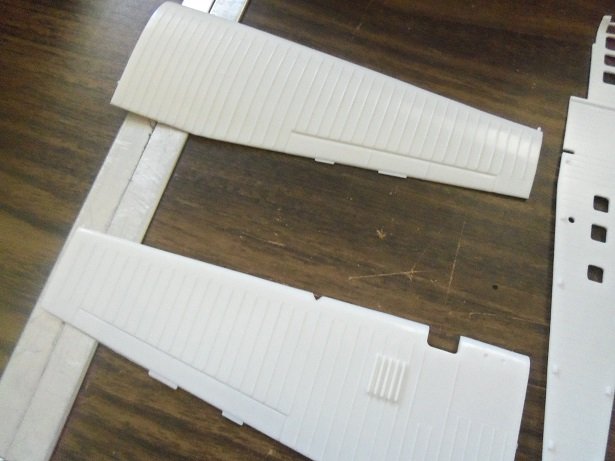
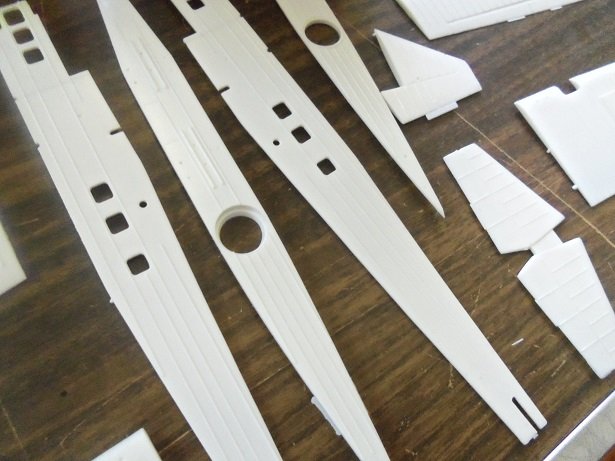
I started to assemble the fuselage. there isn't a whole lot of detail....or parts for that matter, the edges needed to be squared for a clean assembly. the bulkheads were added.........then the cockpit decks. the engine narceles were assembled at this time.........again, sanding and squaring edges, so the fit would be good. the wings were assembled next. when they were dry enough, the narceles were fitted in place. the mating surfaces on the narceles were sanded for a good fit.
- 63 replies
-
- 12
-
-
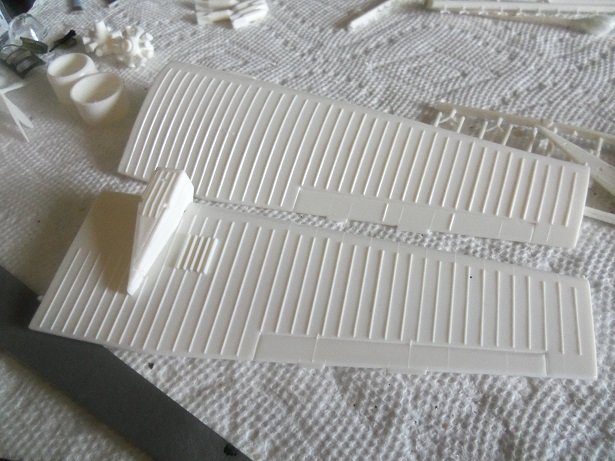
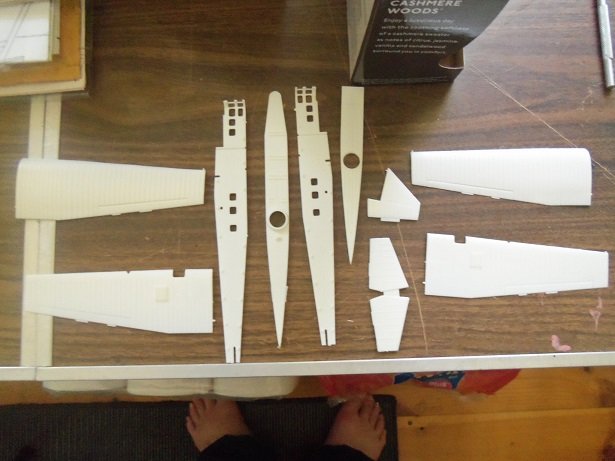
getting more into the kit, I did a breakdown to give a better sense of the parts involved. the parts do have a certain amount of flash. 😄 I don't recall a model where I had to assemble the fuselage like this........should be fun. there is some fairly good molded detail, in spite of the flash. there are some spots that are indented for the fuselage......these are points that need to be bent or shaped to form the fuselage. I do like the boxy style of plane.......also an indication of the period it was in service. the starting point is to assemble a few of the sub assemblies.
- 63 replies
-
- 11
-
-
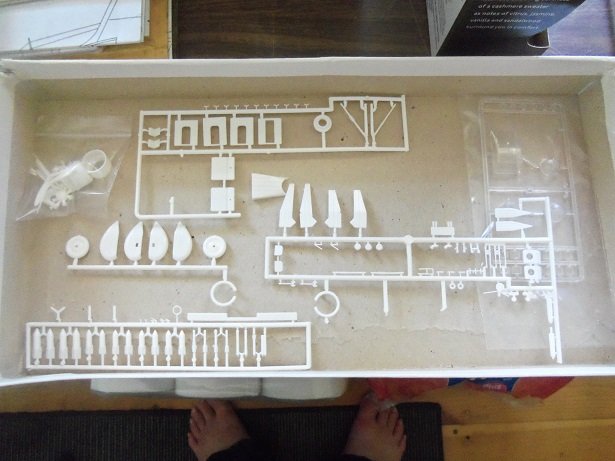
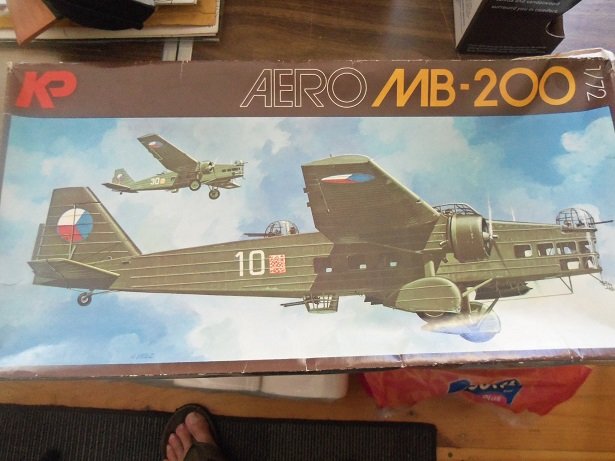
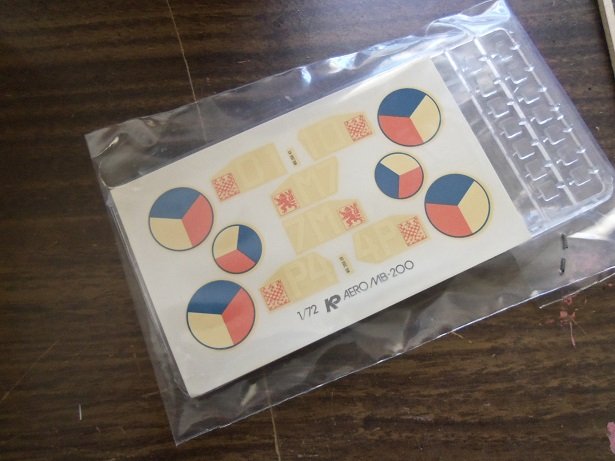
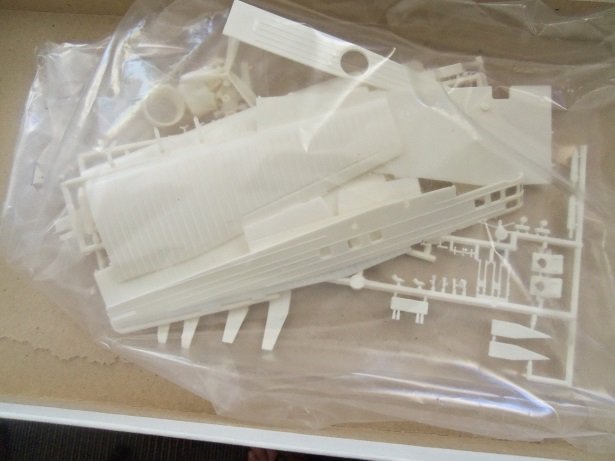
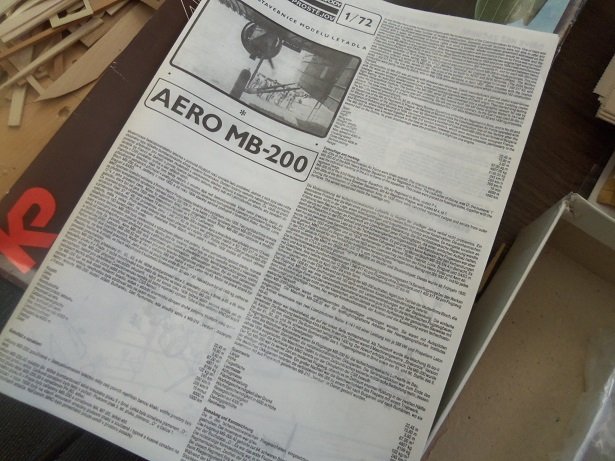
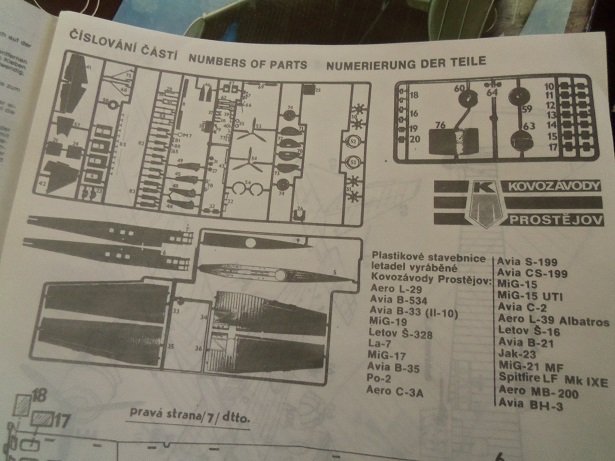
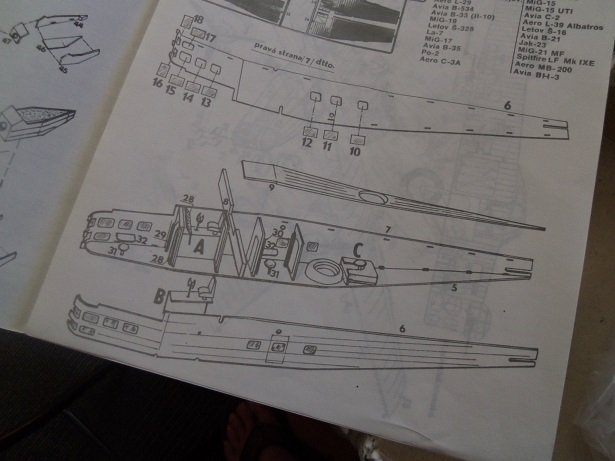
during the mid thirties, the Czechoslovakian air force was having a hard time modernizing. they wanted a heavy bomber, but really didn't have the knowledge for the construction of such an aircraft. this made it hard for the domestic aircraft factories to come up with a suitable airframe. they turned to the French Government for aide, but at that time, even the French were dealing with the same issues. faced with limited choices and ideas, they finally arrived with the construction of a high wing heavy bomber. it would come to be called the Marcel Bloch Aero MB200 En-4. the contract to build them was given to Henry Potez and the Aero factory in Prague. the initial order was for 75 planes {one was set aside for testing}.........as they progressed, they did experience problems, and changes were made along the way. the Twin engine bomber was powered with 588 Kw Walter K-14-I radial engines with Letov Hd-43 airscrews. the port engine revolved clockwise, while the starboard engine revolved counter clockwise. this made it almost impossible for the plane to fly on one engine, if one was damaged or had a problem. armament consisted of five 7.92 MG's Strakonice VZ 30 machine gins and could carry 1,400 bomb weight. they were released pneumatically......the crew consisted of 4 - 6 airmen. at the time of the Munich crisis, the Czech air force shared around 54 bombers, between the several squadrons, which made up the two main air force regiments. during the German occupation, the air force was stripped and the MB's were sent to Bulgaria and Roumania, serving alongside the Verdun MB - 210 bombers, which had been moved from the French air force. by the end of the Thirties, they became obsolete. the construction was all metal with stretched skin, quite an accomplishment from their earlier form of construction......metal fuselage with wooden wings. the cost for each bomber was 300 thousand Fr........if the plane was equipped with long range fuel tanks, of course the cost was a bit higher. this model was produced by KP models in Czechoslovakia in 1984 what interested me was the domestic airliner / military feel the plane has. during this time period, this was somewhat of a common practice.......the germans even modified plane for reconnicence or military service. I took these pictures when I first got the kit. the decals are a bit yellowed.......I put 'em in the sun for a while. the model a bit jumbled......some manipulation is apparent. the instructions are thin.......like newspaper. this is the only way to select the parts needed for each step.......they are numbered, although some shown in the diagrams are not. the diagrams appear to be hand drawn........very little text is available. should be fun
-
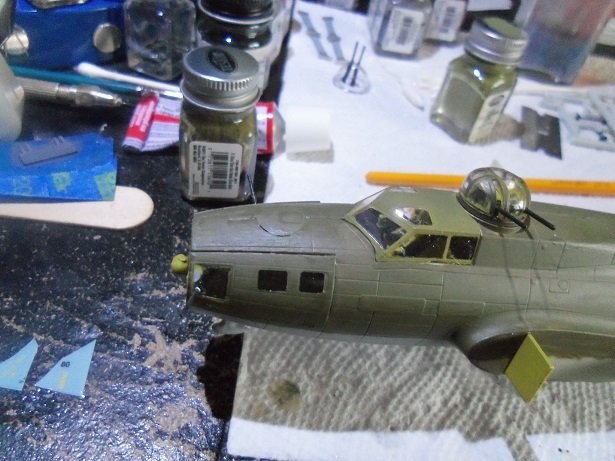
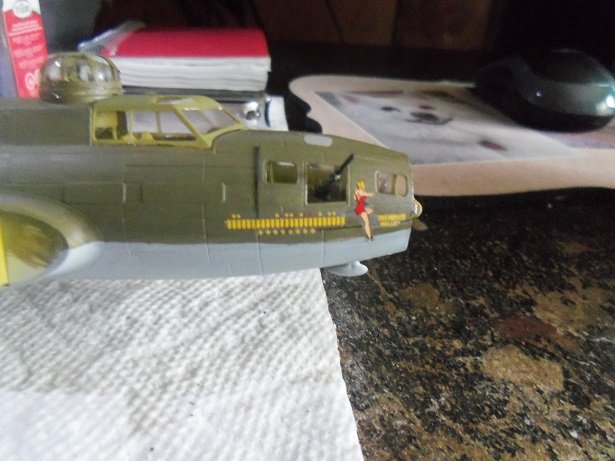
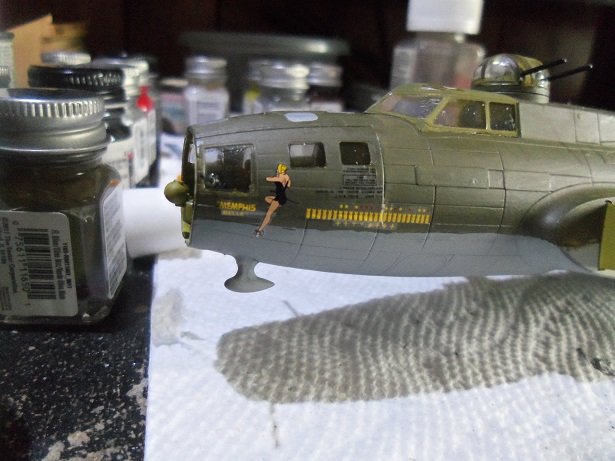
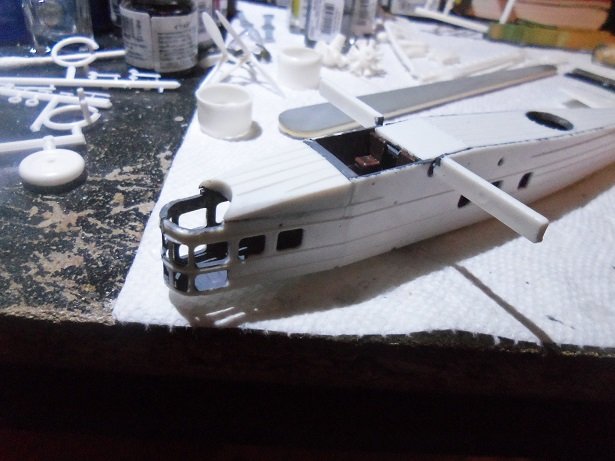
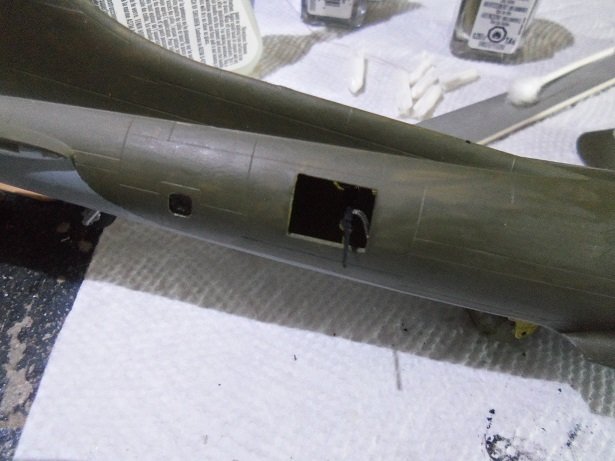
the update has grown, so I better post it before it gets too large now that the fuselage is assembled, I can start to add what has already been done. the tail glass has been fixed, but needed to be fitted still. it is now in place. it still rises up into the rudder area.......I'm hoping that it isn't going to hinder the addition of it. the navigator glass was added next, along with the gun that sticks out. the pivot that the gun sits on can be seen. the glass had to be painted by hand....surprised with how well it came out. the nose is going to need some work.........I found that these two openings are not seen on the Memphis Belle.......baffled to see that there are four silver rectangles there instead. the cockpit glass has been cemented in place. here a shot of the waist gun I promised you. It will be easier to decal her while at this stage.....and so I started........ bad thing here........the port side is backwards. personally, I think that the starboard side is too, but this is how the instructions show it. I've checked pictures and seen that the starboard side is correct. I will change the port side.......not a big deal, because if they get damaged, I have that sheet of letters. Egilman pointed out that blotched out field on the horizontal stabilizer { rudder fin}........that was an 'A'.......not in the traditional triangular field shown on other squadron planes. I haven't been able to find out why it was removed.......I'll keep looking because it's an interesting feature that could be added, as I did on the Wulfe Hound. later it was found to be a useless attempt, since the swastika appears out of scale and covers it.......oh well. the stabilizers and rudder were added next. oops! **spoiler alert** ahhh-hmmmmmmmm.....moving on...... as you saw, the starboard waist was called Virginia.........the port side was named Sally I'll have the port decals fixed by the next update.

- 247 replies
-
- 10
-
-
MRAP ATV by CDW - FINISHED - Rye Field - 1:35 Scale
popeye the sailor replied to CDW's topic in Non-ship/categorised builds
late to the party............suspension looks awesome in the older car kits, they used to supply real springs........selected ones though. that's a cool paint kit you got there.........when Lou mentioned detailing the undercarriage, I though about stay'in within the same color.......different hues would make a big difference and still accomplish what one want to achieve. very nice start -
very nice job on the bridge.........the funnels look really good too. highly detailed.......... your usual standard of superb workmanship
-
👀 lots of good content here! I will never get to build one......too rich for my blood.......... your progress looks super Grant.......good choice to keep things as they are. move the engine.........move the drivetrain. nice looking car Rick!
-
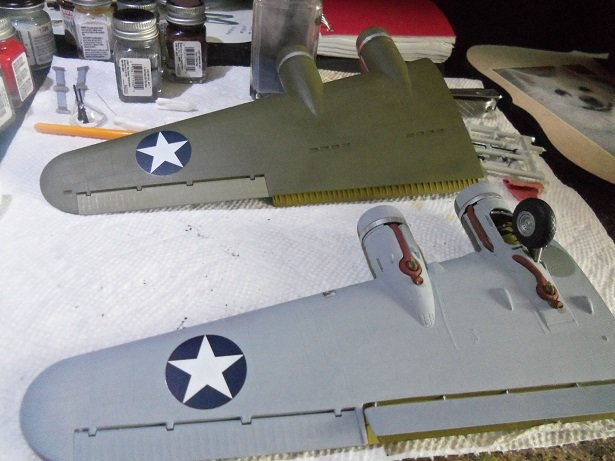
thanks Robert......I didn't do anything to her yesterday.......I was playing with something else { damn my MDD........Model Distraction Disorder}. the wing surfaces were all done with airbrush........I got impatient waiting to get thinner, so I painted the fuselage {upper and lower surfaces} with a brush. at one point in time, I had given up the airbrush, thinking that they were too much of a bother for the tasks that were small. but, since I got into building wooden boats, I have great need for it. large surfaces are a killer with a brush. now a days, I juggle both. I'm getting there........I've already seen her with the wings {dry fit}..........I'm happy.