


popeye the sailor
-
Posts
15,993 -
Joined
-
Last visited
Content Type
Profiles
Forums
Gallery
Events
Posts posted by popeye the sailor
-
-
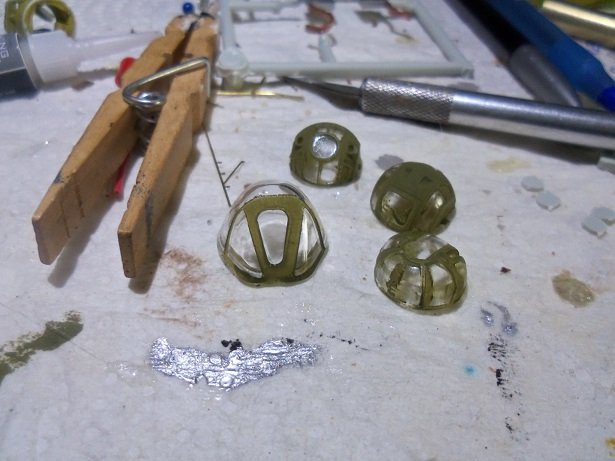
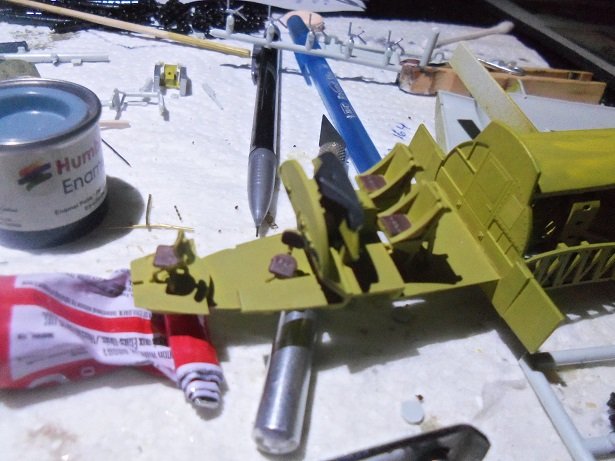
I've been making progress on the M.B. I've run into a bit of a glitch though. I sprayed all the clear parts after putting on the masking set. some I did the Chromate green first, and the rest I didn't........at this scale, it won't be noticeable anyways. I read the instructions for the mask set......and right away I smelt trouble brewing. it says not to use thinners or mineral spirits.........so I'm guessing that enamels are a no no? I took the masking off a few of the clear parts to find that the adhesive had stayed on the parts......not only that, there was a lot of bleed!
 so I need to clean up the parts......I do have some duplicates of these parts {almost a second set}, but they might not look like what the M.B. was outfitted with. I'm still working on that problem. in between all this, I did some small stints of paint.
I had earlier fleshed out the narcelles....the inboards housed the landing gears. I painted the internals and added the final parts before the painting of the outer surface.
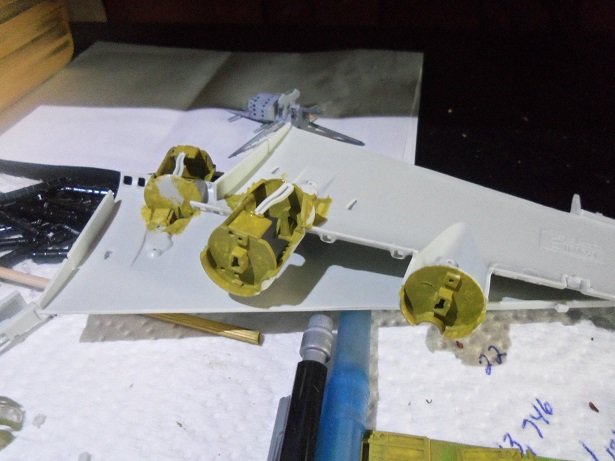
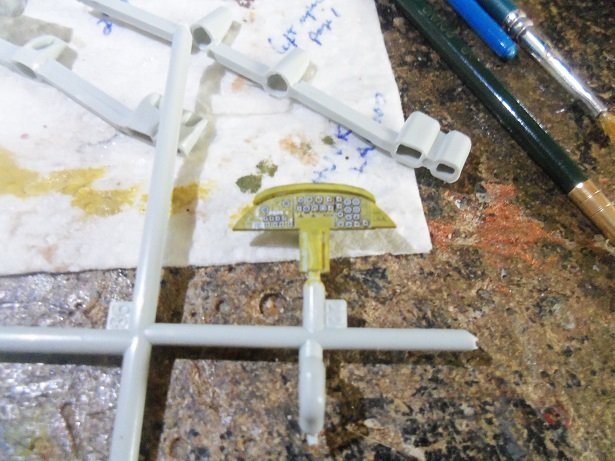
the instrument panel is fitted with a decal. the entire interior is assembled......putting the panel in place was very tight.
here is a picture of some of the glass........I need to get after the rest of it
the flaps have inserts that are fitted on the underside of the upper wing half. they were fitted and painted
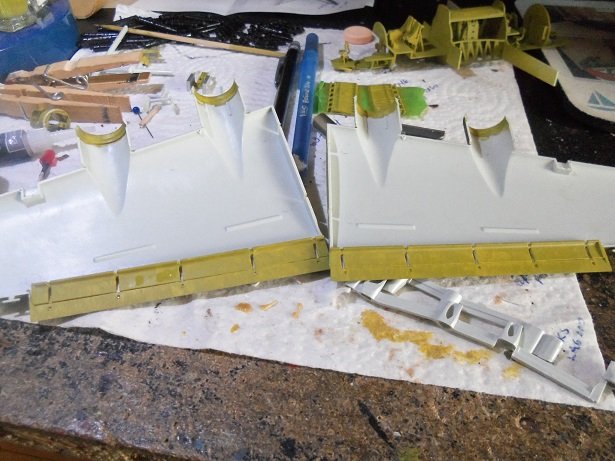
a lot more painting was done on other parts.....prepping to start putt'in her together. I started to do some detail paint to the interior.
I did a lot more, but these are all the pictures I took.......should have more tomorrow. I've been going back and fourth planking a hull frame along with this project, so I've been satisfying my wood 'jones' as well
")
- Fright, GrandpaPhil, Edwardkenway and 5 others
-
 8
8
-
awesome job Jack.........looks like a shot out of a movie!
the rocks look great too..........first class!
-
love the Fokkers........I have two that both fit in the palm of my hand
watching and waiting 👀
- Edwardkenway, lmagna, Canute and 3 others
-
6
-
hello Julien, I looked in the Billing USA site...they have downloadable instructions on quite a few of their models. unfortunately, the Half Moon is not one of them. I looked in the Billings Danmark site and found that it has been discontinued. I will dig them out and see what can be done.
hello Jerry!
good of you to pop in! glad to hear you and Charlene are doing well through all this.......we are also well. so many have died........a very sad thing to happen in our world anyway, it's also good to know you still look in from time to time......very nice of you to think of me.....I appreciate it.
-
really like what you did with this project Tom........it was a very good read
I can sympathize with you on the Mahogany .......brittle at times and real touchy to work with. figures I'd find it when your just about done, more fun to follow along she's a beauty!
-
I hear ya there........the Nordkap I built and the one I'm currently building, both are not laser cut. it's a good thing I'm scratch building the progress with the second kit {wait....that amounts to the same thing
 }. I've always wanted to try a Dumas kit........I saw the PT boat at a local HobbyTown.....I wonder if it's still there?. should be a fun project to watch.........first to unravel the pile of parts
 ") good price!
good price!
-
petrified...........it might have been powder!
 I'll bet all the plywood would have already delaminated. you did a superb job though.........this is not the easiest kit to work with I can attest to that two fold! I haven't started the second log yet........without getting into specifics.....I've run into the second snag with planking....not as big as the first snag {part of that broke off }. I'm waiting to see if I have a hull to work with first, before I start it. chances are, I will..........but if not, I'll keep the pyre stoked just in case
- Edwardkenway and jct
-
2
-
so many words to describe....I can't decide which one is best
 so detailed and the best rendition of sub anatomy that I have seen! so good to see her all together with the starboard skin on........she looks absolutely stunning! you've done an amazing job!
-
-
wish I had a cannon like that in my car
then I could get rid of that 'back off' sticker on my bumper look'in good
-
she came out great....very nice finish! I guess it's good she came out of the box now.....who knows what you would have found opening the box later
you bested my fastest build, which was the M&M Fun Ship, which took me 4 1/2 months to build. very well done....right down to the rigging! congratz to you, my friend.........I guess it leaves me to play catch up . if anything, it will give you something to look at while your pack'in up the RV .
-
as I'm going through this log........I'm thinking to myself that this looks to be a good size model. I did the double take to find that this is a 1/8 scale model......wow! gee......I don't know EG.......I think this looks of junkyards I still visit!
superb job KP........love the looks!
-
-
they look awesome Jack.....where's Ma? when I lived in Fla. I had a chance to try some 'o that stuff.............I was told to sip it. hell no.........I knocked it back!
never had to swallow so much in my life!
- lmagna, Edwardkenway, Jack12477 and 4 others
-
7
-
-
good to see your continuing with it.......I'm sure your admiral is watching. bet she even has a place for it
look'in SWEET!
- Canute, lmagna, Old Collingwood and 2 others
-
5
-
looks good and does the job
- Edwardkenway, Egilman, mtaylor and 3 others
-
6
-
good start Ed.....will be look'in in
-
-
really nice progress on the engine. I've never tried one of these kits before, but they look really neat! love the engine detail.
- Edwardkenway, mtaylor, Canute and 5 others
-
8
-
look'in good Lou! color looks fine to me as well........I can agree with "looking down the line".........neither of my B 17's have the same green
you could also dry brush on some Bomber tan over the top part and show the degree of fading. here's an idea.......if you have a kit or two that you don't mind wasting, do some practicing on them....even start a log. it will get you more comfortable with the art and brush up on techniques. it will build up your confidence level too you got the potential...flaunt it!
- Egilman, Jack12477, Edwardkenway and 3 others
-
6
-
you continue to amaze........the houses look great! the jail is shaping up nicely.........superbly done
- lmagna, Edwardkenway, mtaylor and 4 others
-
7
-
one thing I can tell you.......if your using enamels, I'd be careful. I'm still figuring out what to do. after I sprayed the glass, I read the back of the mask set and it suggests not using thinners or mineral spirits due to the adhesive on the maskings. it not only bleed through the maskings, but there is adhesive all over the parts. I haven't unmasked the main canopy yet....I can just imagine what it looks like. Vallejo is an acrylic so you should be alright
- Old Collingwood, mtaylor, Canute and 1 other
-
4
-
two..........by now you should know, I am my own antagonist!
I'm sure he'll be pleased with her
thanks Richard
- Edwardkenway, Egilman, EJ_L and 1 other
-
4
FINISHED - Scammell Pioneer SV2S Heavy Breakdown Tractor - IBG Models - 1:35 Scale
in Non-ship/categorised builds
Posted
don't forget your bunny slippers
if this isn't one rugged truck........nutt'in is") gotta be a huge decal sheet! if OC falls asleep, fire it up right off the manifolds.......that ought to wake 'em!
gotta be a huge decal sheet! if OC falls asleep, fire it up right off the manifolds.......that ought to wake 'em! ")