
Supplies of the Ship Modeler's Handbook are running out. Get your copy NOW before they are gone! Click on photo to order.
×


glbarlow
-
Posts
4,035 -
Joined
-
Last visited
Content Type
Profiles
Forums
Gallery
Events
Everything posted by glbarlow
-
 I’m a Nikon shooter as well and appreciate the setup description. Photography Is my other ‘hobby,’ I’m primarily a nature and wildlife guy. http://glennbarlow.com. I only pull out the portrait stuff for important things like my grandkids. I’ve shot photos of them on large curved white paper. I’ll have to get it out next time I shoot a completed model. Your photos are well lit, not as easy to do as some might think. The mesh in front of the lights is a nice touch, your own soft box. 👍🏻
- 109 replies
-
- 5
-

-
- Vanguard Models
- Flirt
- (and 1 more)
-
Nice! I like the black and red paint scheme. The stem looks like it has a smiley face, or is that just me... You’re going to make us all feel bad about our planking and photography skills, are you shooting that in a white product box?
- 109 replies
-
- 1
-
-
- Vanguard Models
- Flirt
- (and 1 more)
-
I agree, it’s why the first thing I asked them back over a month ago for the tracking number, onLy to find out there wasn’t one. I recently ordered the plans for Cheerful from the NMM in the U.K., they also sent it postal airmail, but provided me with a tracking number and I received two weeks later (about three weeks ago). I’m pretty sure my order is lost but without a tracking number, who knows...
- 778 replies
-
- 2
-
-
- cheerful
- Syren Ship Model Company
- (and 1 more)
-
I asked, they don’t ship with tracking numbers was their answer. As I said I placed a second order a few days after this one. I received it in 2 weeks. Whatever the current situation 9 weeks is a long time. It is not helping that they don’t use tracking numbers. Why do you ask?
- 778 replies
-
- 2
-
-
- cheerful
- Syren Ship Model Company
- (and 1 more)
-
I have that as well, my second favorite tool. I've talked to both Jim and his wife a couple of times on the phone. The very definition of small business owners with great customer service and great products. My latest addition is the sliding table for the saw. I wasn't sure I needed it, now I don't know how I got along without it. I used it to cut 24 perfect lap joints for the three cargo hatches on my Nelson project, great way to make consistent, repeatable cuts on very small wood pieces. Cornwall is placing blame on the US Postal Service since they sent it 'Air Mail.' The funny thing is I did receive a second order I'd placed a week after the one I don't have yet....I think it fell off the conveyor belt somewhere along the line.
- 778 replies
-
- 4
-
-
- cheerful
- Syren Ship Model Company
- (and 1 more)
-
Thanks for the comment. I like doing the writing, sometimes I think I get carried away. I got it and all my Admiralty Paints from Cornwall Boats in the U.K. I used to received orders in 7-10 days. However I have an order I’ve been waiting 9 weeks, all they say is be patient. I haven’t found a US source for Admiralty paints.
- 778 replies
-
- 2
-
-
- cheerful
- Syren Ship Model Company
- (and 1 more)
-
I have the Byrnes Saw with a Thurston I-292 .030 kerf slitter blade. I’m a big fan of the Byrnes saw.
- 778 replies
-
- 4
-
-
- cheerful
- Syren Ship Model Company
- (and 1 more)
-
I have a maple etched deck from Chris for HM Speedy replacing the pear that came with the kit. While I haven’t installed it yet so I don’t how it will look sanded I can tell you without hesitation it is anything but hokey or taking the easy way out. A laser etched deck is definitely an item that could run the gambit in quality. My maple deck from Vanguard Models instantly changed my mine about planking it myself. I've planked the decks of nine models, always kit bashing using my own cut holly. I have some nice looking decks, except for the fact that once it’s masted, rigged, and furniture in place you barely notice. While I’ll cut and plank the deck for Cheerful, I’ll use the laser etched maple deck on the shipwright version of HM Flirt and be proud of it.
-
I think you felled a tree to plank Winnie, but it looks great.
- 642 replies
-
- 3
-
-
- winchelsea
- Syren Ship Model Company
- (and 1 more)
-
Any creative ideas about how to maintain a 1/64th inch gap above, below, and alongside the ports? I did cut my first run of 3/64" thick planks from 3/16, 1/16 and 5/32 lumber, I'm a bit proud of that having never done that before in volume. Again I will say the Yellow Cedar flew through the saw, and I'm typing with ten fingers.
- 778 replies
-
- 6
-
-
- cheerful
- Syren Ship Model Company
- (and 1 more)
-
Beautiful work! Can you plank mine for me😂
- 642 replies
-
- 3
-
-

-
- winchelsea
- Syren Ship Model Company
- (and 1 more)
-
Nice work on this detailed model, it looks great. I like your choice of ‘red.’ What did you use?
- 221 replies
-
- 1
-
-
- queen anne barge
- Syren Ship Model Company
- (and 1 more)
-
Sometimes I just have to stop and reorganize, I have stuff everywhere. I do like those files, thanks again for the recommendation.
- 778 replies
-
- 2
-
-
- cheerful
- Syren Ship Model Company
- (and 1 more)
-
Good observation. All the sides of the gun ports run perpendicular to the water. Per the plans gun port sills on 4-6 do slant upward following the run of the deck so you’re right about the slant but it’s correct per the design. Chuck included reference lines on the bulkhead. I just had to match the top of the sills to each mark. 4 does seem to stand out more in the photo, but it’s the same as 5 & 6. I think the spacer bars, which are more or less straight, accent the slant and not in a good way. They’re ugly but I hope helpful later in the build. If you look at the previous post of the port side the slant is there but looks more ‘elegant’ without the spacer bars. Thanks for the comment. Everything about this build is new to me, I’ll take all the help I can get.
- 778 replies
-
- 4
-
-
- cheerful
- Syren Ship Model Company
- (and 1 more)
-
First I’ve heard that working. I’ll quit offering advice then.
-
You'll want to close that gap at the bottom before adding a plank. I cut the shape of the bow from a scrap piece of wood using the plans as a template. I can put the soaked wood on it and clamp the heck out of it so its a tight fit. If you keep going from here make sure to get clamps down at the bottom to get it tight on the frame. The first rule of modeling is when you think you have enough clamps, go buy more clamps. You're having fun now....
-
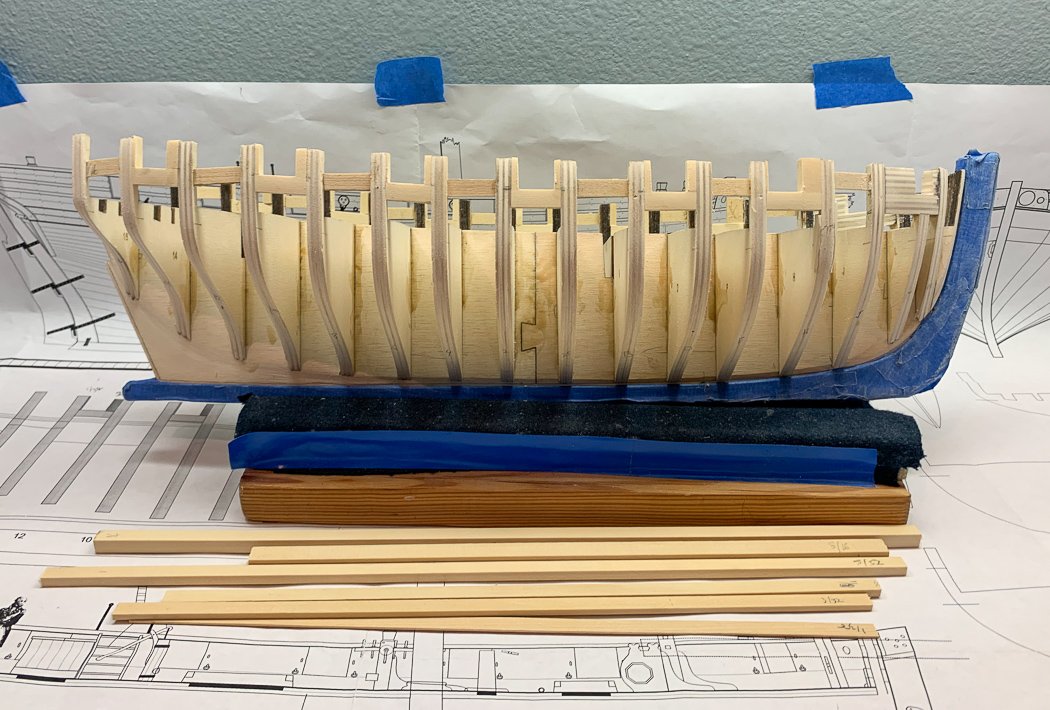
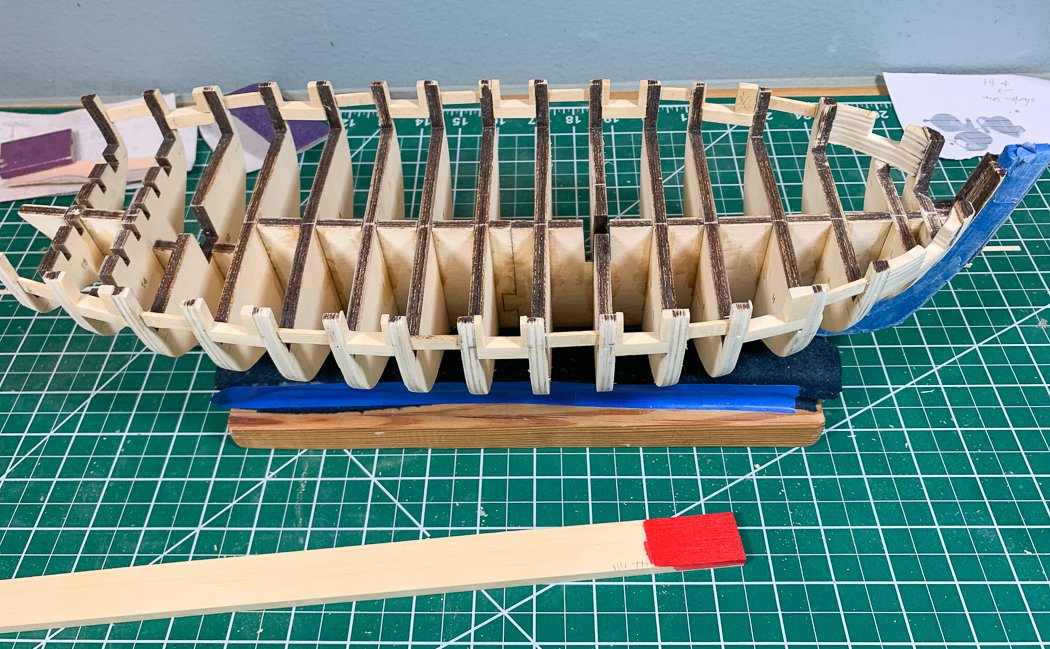
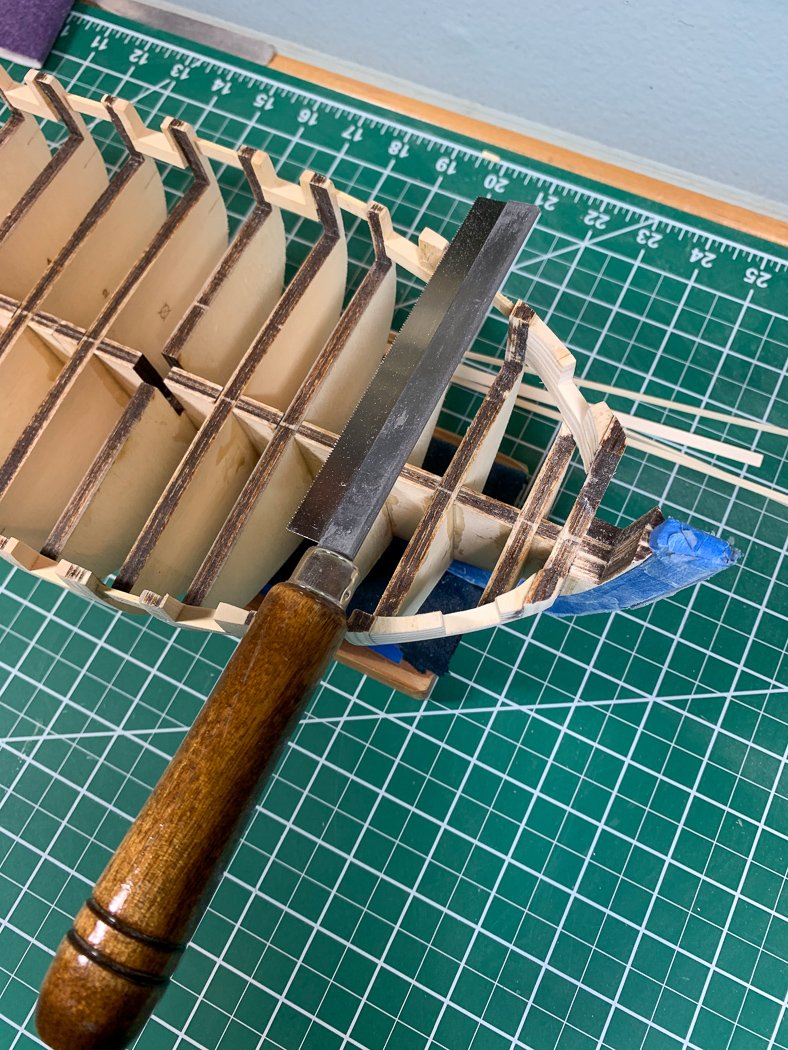
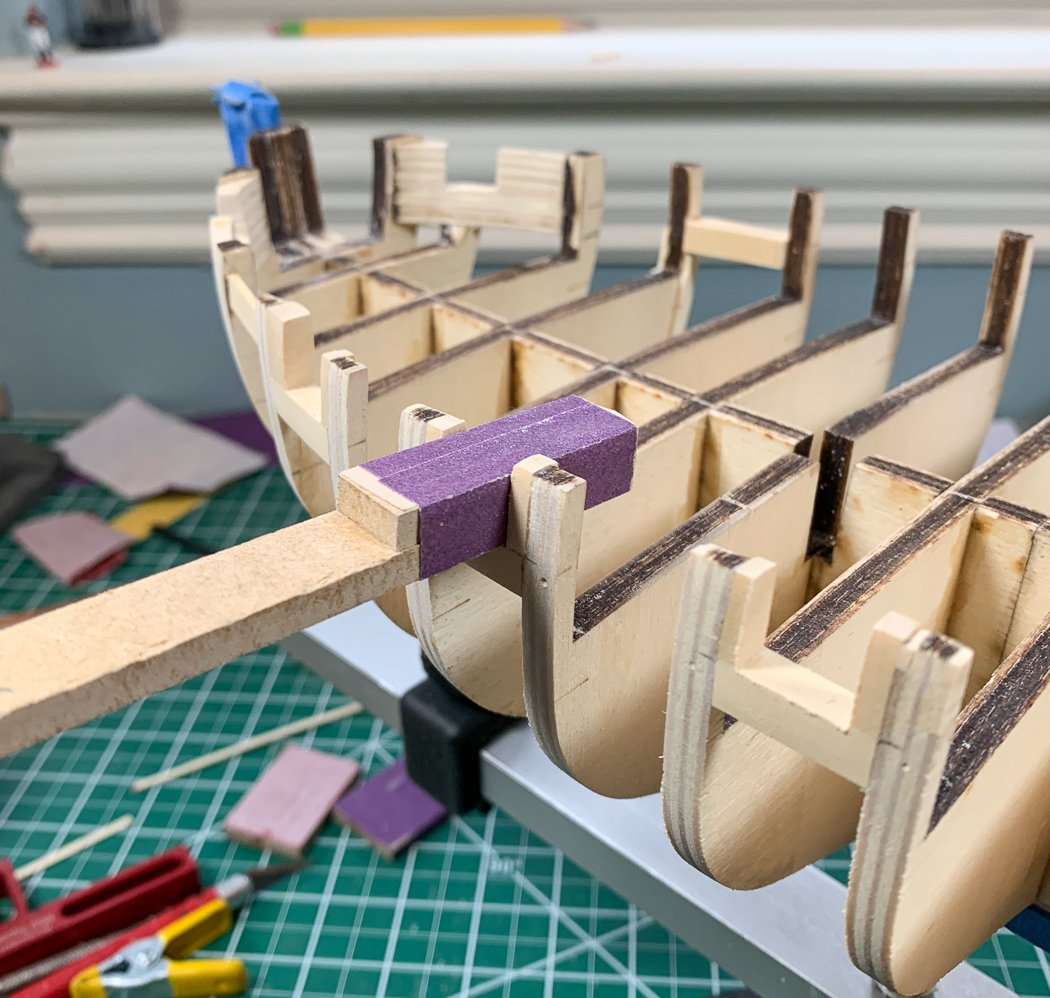
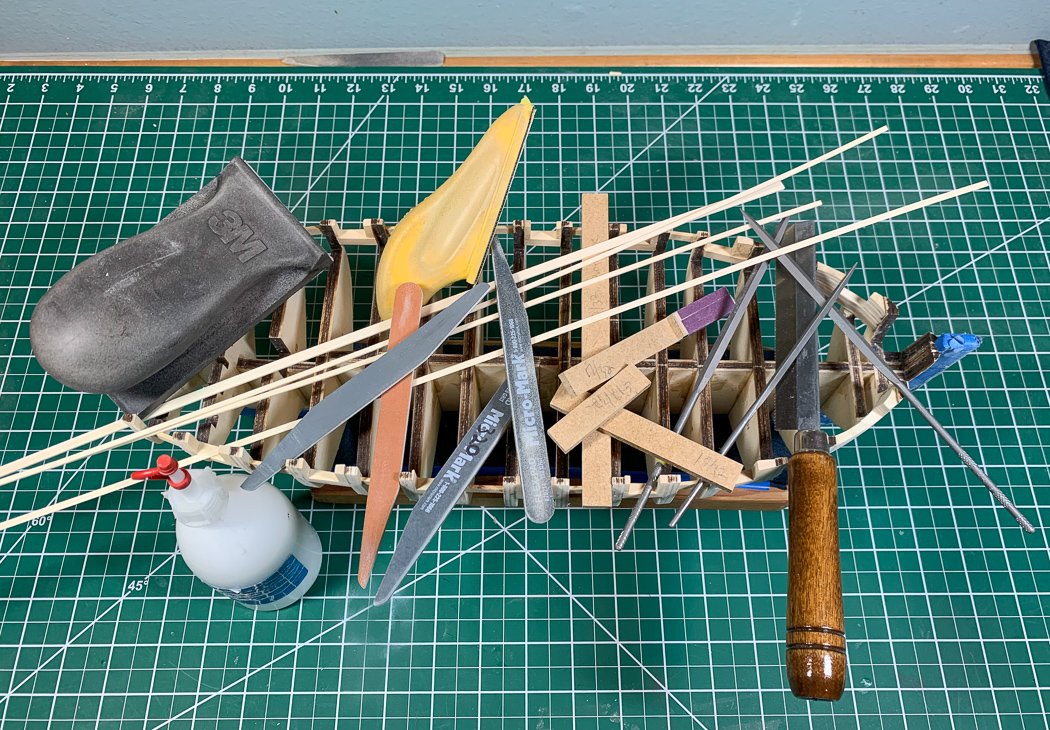
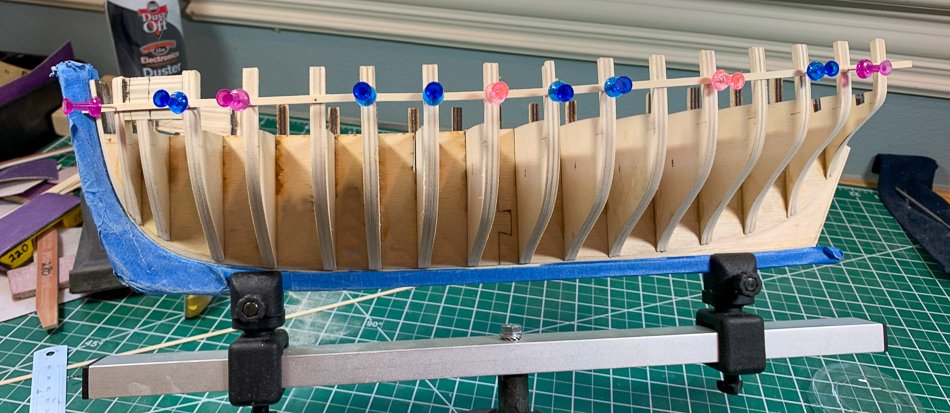
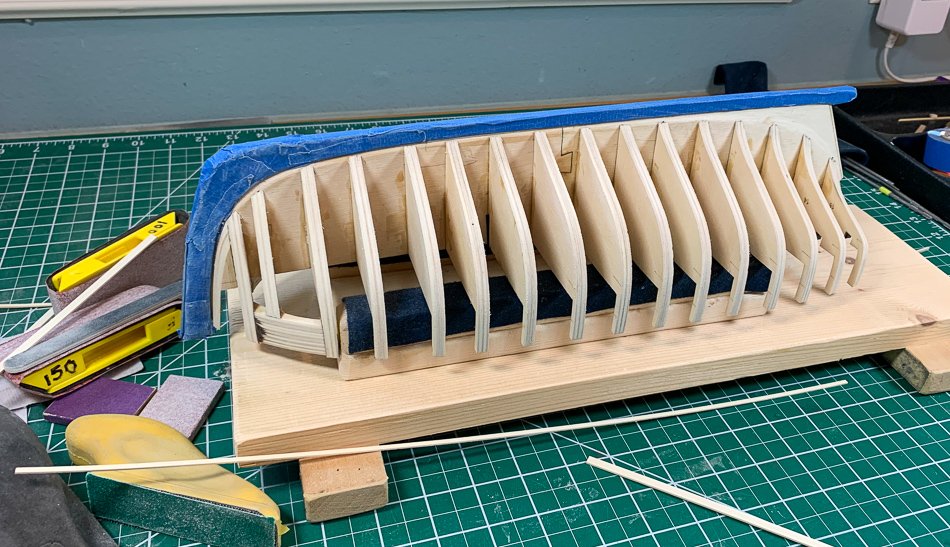
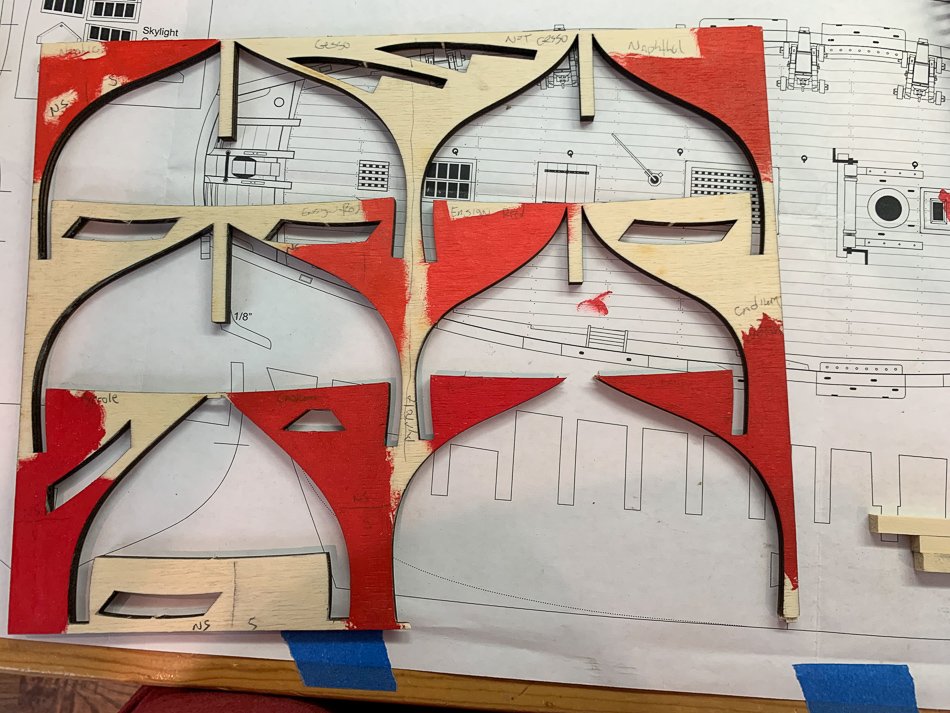
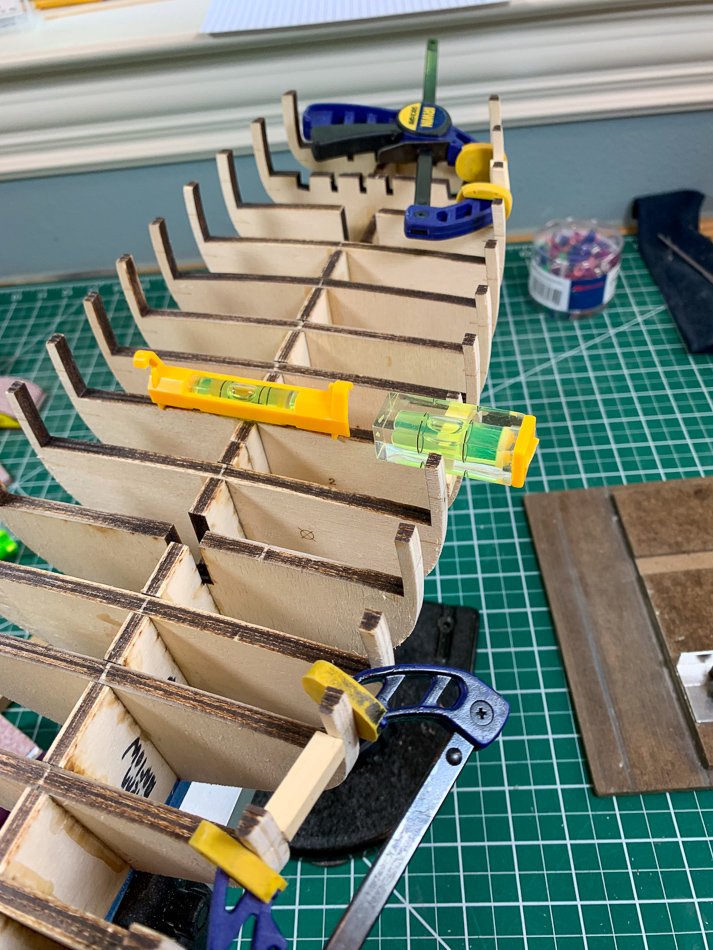
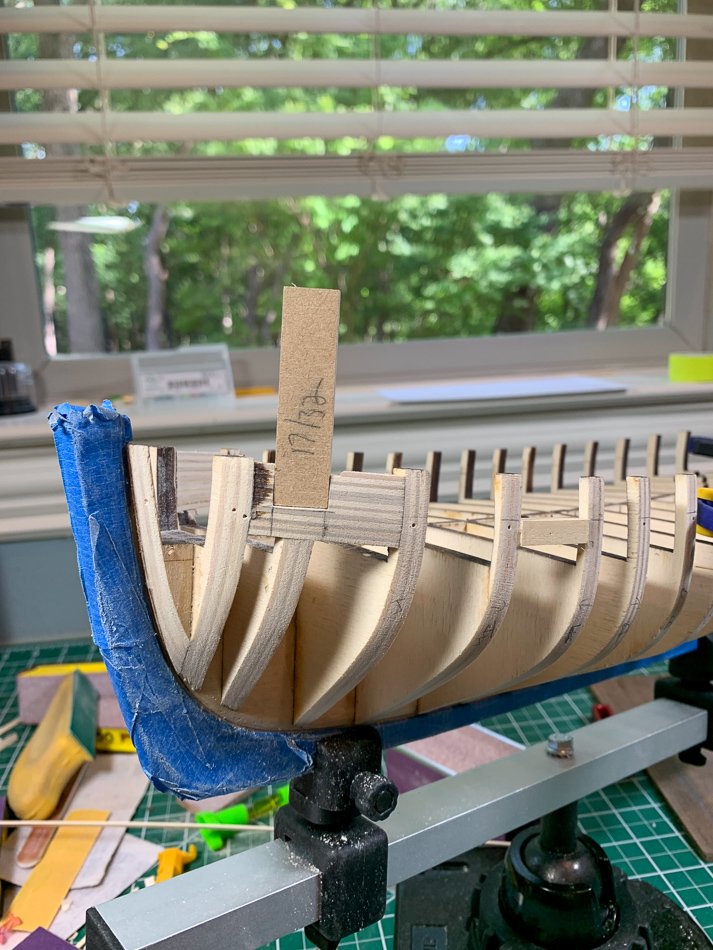
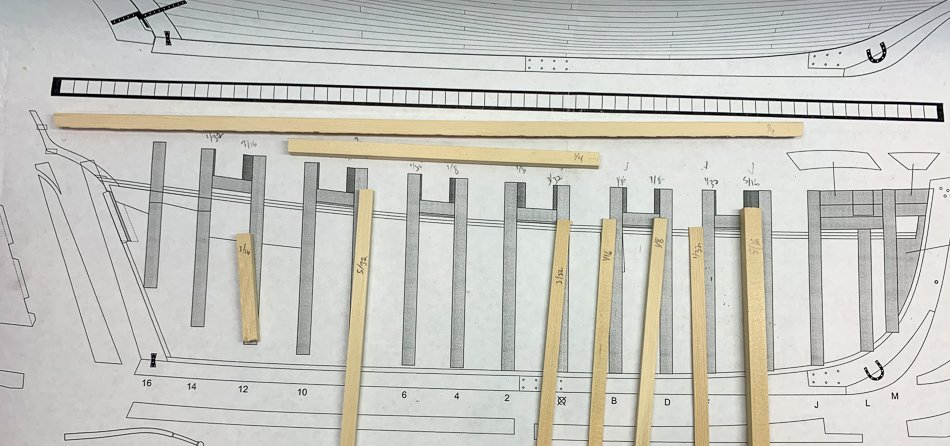
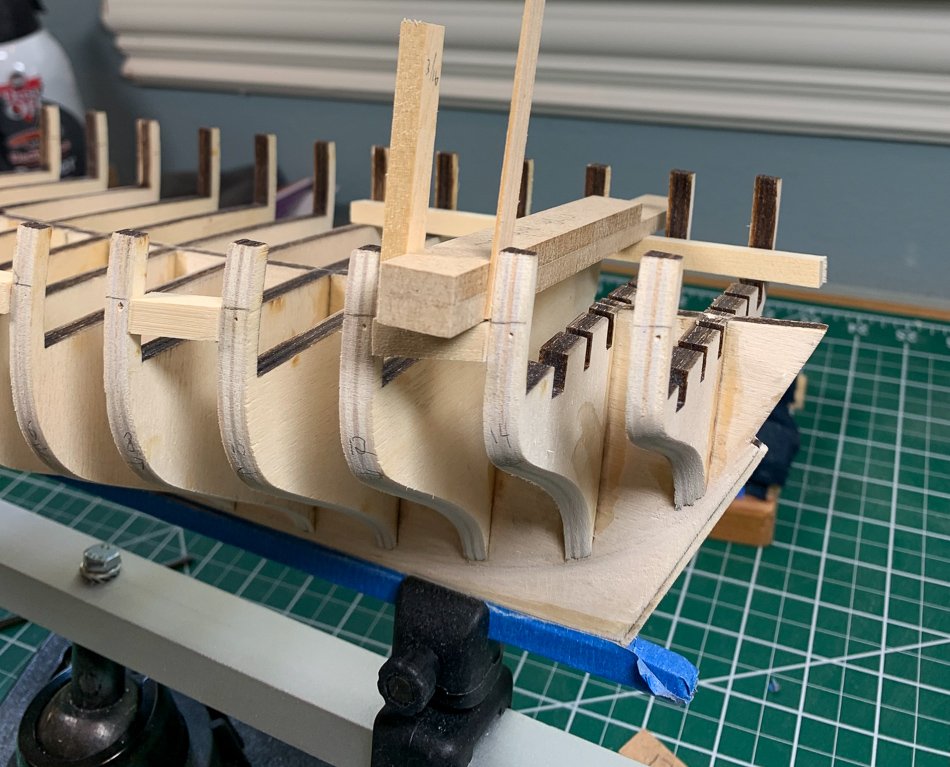
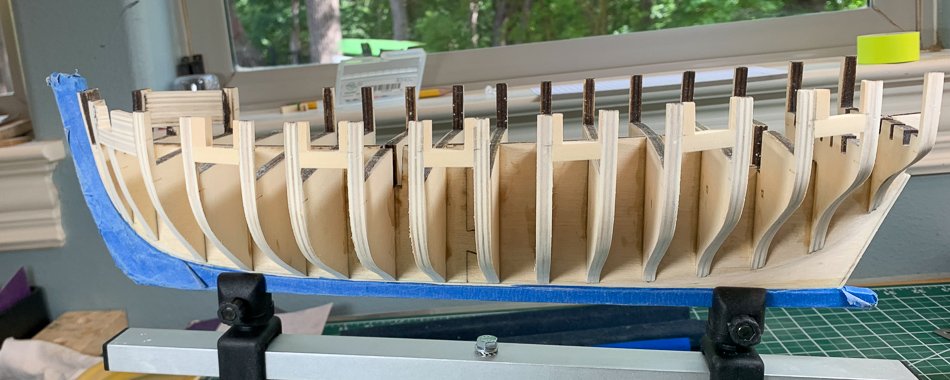
While I still have fine tuning to do, I’ve completed the ports and fairing on both sides. The second side went in easier since I had a little experience, I’d also cut some of the pieces by duplicating the fit on the port side before I installed them, making finding the size and angles easier on the stern ports. In the foreground are the various sized wood I ripped to make the ports - I’m sure the remainder will come in handy later. You can see I’ve added some ugly, casually placed reinforcement between bulkheads without ports. I took this from Rusty’s log sort of, his were much neater. I used 1/16 and put them close to the outside after doing the fairing. I’m anticipating some challenging sanding on the inward side later, these are more preparation for that. Of course they’ll be covered by planking and if the get in the way they’ll be easy to remove. So I sacrificed form for function, there went my pretty faired ship. A lot of doing the second side is keeping it equal in all ways to the first side, my little port leveler made sure I had the ports aligned and the sills on opposing sides level with each other. I even measured the width of the remaining bulkheads at the stern and bow so I don’t end up with a lopsided ship. I may still end up that way, but this helps reduce my chances. Everything measured up fine, once again a testament to the design. I am taking it very slow and careful with this frame - hopefully that pays off later. My other consistency jig was my “port sizer” I had the wood gauges to use as I was building - my last step was take a square jig - reduced in size just enough so it was 17/32 including the 320 grit sandpaper wrap. While I was close for the most part, using this little tool to run through and through settled all my ports to be consistent in size, including the chase ports up front where it really came in handy. My tool of choice for cutting the chase ports was my Razor Saw. As Chuck advised, I cut inside the line and short of the bottom, used my #11 blade to clear and my port sizer to size after first using some sanding sticks to get it close. I measured the port side to the plans, I was more focused on matching the starboard to the port - remarkably they came out the same. How’d that happen - oh I measured a lot. I will confess I was working in millimeters. I’m trying to be a good imperial boy, but I fall back to the MM ruler every time I need to measure something close. I’m still trying to get my head around numerator/denominator measuring. I wasn't listening during the fractions portion of my elementary education. I know some have opted to line the chase port with wood. I have elected not to do so, though I thought about it. The wood to me is so smooth and the cut so square I’m ok painting it as it is. Speaking of which, here is my earlier mentioned choice of Golden Cadium. It’s not quite as bright as this photo, but it is very red and I’m ok with that. Finally, here is my collection of various tools and sanders I used for this stage of the build. I instantly regretted piling it on my ship. The flexible 3M holder was used for the heavy lifting. It has velcro face and matching sandpaper, I used 80, 120, and 220 with it. The yellow handle has the same velcro connector, I used it for tighter quarters and fine tuning. The sanding sticks, 120, 220, and 320 grit for even more fine tuning and opening the ports. I will finish the ports with a fine stick before painting. I discovered these Vallorbe Barrette files on Derek’s Speedy build log, they are really great. They file only on one side, I have them in coarse and medium. I’ve always had an issue with a standard flat file since it files on the side edge as well. These eliminate that issue, important when you’re trying to square something up, like a port. I also prefer the triangular file for corners as opposed to the square one for the same reason, I can file the side I want without impacting the other and the point of the triangle cuts a nice corner. I have so many versions of needle files, they are now tossed in a drawer. I now have a full set these Swiss Vallorbe files, they are sharp and cut evenly. I also highly recommend them. There is my file lesson for the day. So I feel a stern is coming, see what I did there. Uh Oh, more new ground for me. Here I can ponder such questions as why is a square tuck a triangle. I won’t get ahead of myself. First I have to attach and fair some stern brackets without breaking anything.

- 778 replies
-
- 17
-
-
- cheerful
- Syren Ship Model Company
- (and 1 more)
-
It works.
-
Thanks Chuck, I appreciate your keeping an eye on it as I proceed. While the ports are new to me I know I have bigger challenges ahead. Fun stuff. Derek, I was never a fan of planes, or they weren’t a fan of me, but this little jewel is making me a believer. That photo was after I finished my last model and before starting this one. It was a momentary moment of being organized 🙂 We have our grandkids 3 days a week, so I’ve become a teacher following the online program her school put together. I had respect for teachers before now I an even greater appreciation. Yes, jelly is the same here and I know exactly what they mean.
- 778 replies
-
- 4
-
-
- cheerful
- Syren Ship Model Company
- (and 1 more)
-
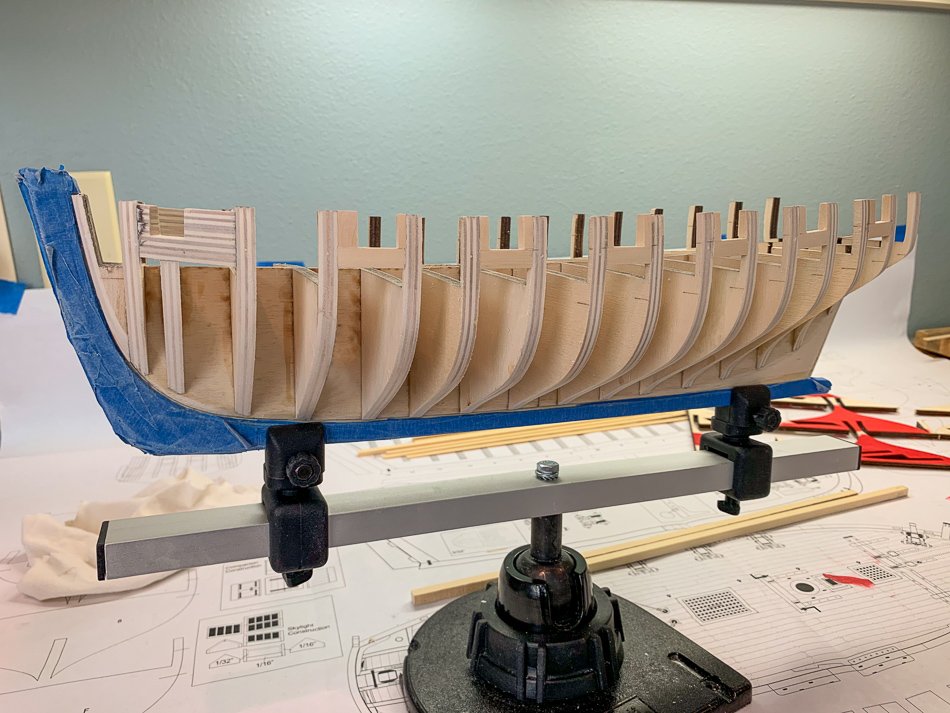
Now interesting stuff starts to happen, or interesting for me anyway. Failing to find an outsourcer, (I didn’t really look, I instead did my isometric exercises Sand On, Sand Off) I spent a couple of days sanding to get to this point. I concluded it was time to stop and get the ports in before I sanded away the bulkhead extensions. Lining up the ports is so much more easy thanks to the reference lines Chuck provides on the starter kit bulkheads. I’m not sure I’d started this project if I had to cut them out myself, where’s the fun. I was prepared to make micro adjustments by measuring and doing the look test but frankly it was near spot on just with tacking the batton to the reference lines, though I still measured and looked to be sure. I later met with near disaster when I started the starboard side. The hard part of this task is getting the pushpins to stay in the bulkhead extension, I pushed a little hard and snap.:-/ I pinned it back with an inserted brass rod and splinted it up. It’s not so pretty now, but it will be covered up soon enough. I should know how to avoid this mistake, stupid pushpin, and I was even pre-drilling the holes…Oh well, I’ll be sure to check the fairing closely, though I tried to account for that as I repaired it. Modelers don’t panic, we adapt, overcome, and improvise - Clint Eastwood in Heartbreak Ridge would approve. I started doing testing what color red I am going to use. I’ve always used Admiralty Paints but their only red - Ensign Red - just wasn’t red enough and Cheerful has to be red, right. To be clear, I really like red with this ship. I settled on Golden Cadium. Go Red or Go Home. I’ve since tested it on a piece of Yellow Cedar thinned down and multiple coats (7 so far), I like the look of it. As I installed the lower port sill I made sure they were level with the hull, my many variations of little levels make this easy. I was working from outside in so I could have room for the clamps. There is a little fun beveling to get the outer ones to fit the shape of the hull, just a little bit. I went ahead and thinned down the bow port filler to about 1/8 with my Dremel after reading ahead in Chuck’s practicum, then cut the port. One of my many uses of left over MDF from past kits is in this case making port sizers. So yay, the chase port is a square smooth 17/32 like it’s suppose to be. I’m still having trouble adapting to imperial measurements, this is my first time not using metric. I’ll say it again, metric just makes so much more sense to me. Why is the US still stuck…he said rhetorically. Here is where I as a kit builder knew I wasn’t in Kansas anymore. The sides of the gun ports call for multiple, seven to be precise, different sizes to match up to the plan location and size for the ports between the bulkheads. This I where kits wouldn’t go, they’d be limited to a few sizes of stock wood, and of course gun port patterns. It took me a second to wrap my head around the fact I was no longer limited by what stock wood is included in a typical kit. I purchased the wood package from Chuck, this lovely bundle of Alaskan Yellow Cedar billets comes in multiple sizes, six of the seven needed were in the package. I used my Byrnes saw to rip ¼ inch widths of 1/32, 1/16. 3/32, 5/16, 1/8, 5/16 (all in the package). For the last one I just took one a piece of the 5/16 square piece I’d already ripped for the port sill and cut it to the called for 3/16. See how I did all that imperial thing there… I will say once again the best tool I ever bought for model building is my Byrnes saw. Now, with a little help from Chuck, Rusty, and Jim Byrnes, that I know how to properly rip a plank with the proper blade, I’m cutting and ripping whatever I need with joy in my heart and fingers still attached to my hands. If you don’t own a Byrnes saw, buy one. You’ll never regret it. (Though I learned he’s on Covid hold until the end of June for new orders waiting for his supplier to deliver 120v engines, he still has 220v). I made a longer gunport checker for the gun ports, which I will also use to make sure they are lined up with the other side. I also use it to double check the two side pieces will create the called for 7/32 opening. That whole measure twice cut once thing. I also determined I didn’t need the pieces quite this tall… So here she is with the port side ported and faired. The batten lays smoothly top to bottom. Now that I’ve splinted my broken bulkhead extension work can begin on the starboard side. Comments and feedback welcome. It will be a day or two before I can get back at it again, I still have to process my granddaughter’s 7th birthday portraits as part of my other photography hobby. On a side note, if you ever want to make a 7 year old's day, prevented from having a normal birthday party by Covid and 2020 catch phrases like lock down and social distancing, hold a car parade. Her parents arranged to have her friends and family do a slow drive-by their house honking horns, holding signs, and making noise. She got to see friends she hasn't seen since schools were closed in early March, her teacher participated as well. I have an English friend who shared the Facebook video with the very true statement "if this doesn't cheer you up, nothing will." She was sooo happy. And as a result, so was I.
- 778 replies
-
- 17
-
-
- cheerful
- Syren Ship Model Company
- (and 1 more)
-
Do both at the same time, maybe you’ll invent something new😂🤣
-
You aren’t familiar with the method. You don’t do both at the same time and when you have bent the plank right it does in fact fully fit. I did your way for a long time, this way works soooo much better for me. But then I’m very comfortable and have always used CA on planks. I don’t have time or patience to watch glue dry a plank at a time. But like you said waste wood trying new things and learning what works best for to get to a finished planking. It is true it’s not for gunport patterns, and there are different ways to do that too. I described my method in another Speedy log, though with Speedy it’s an easier bend than some. Lots of ways to do things, no one should inflict theirs on someone else, I’m just passing in what I think is a great technique for me.
-
Before you start boiling wood check out Chuck Passaro’s method of plank bending. I used it on my last model and it changed everything in how the planks fit to the hull. It’s worth the time to learn and much easier in the long run
-
Have you turned this battle ship into a freight hauler...?