


glbarlow
-
Posts
4,130 -
Joined
-
Last visited
Content Type
Profiles
Forums
Gallery
Events
Everything posted by glbarlow
-
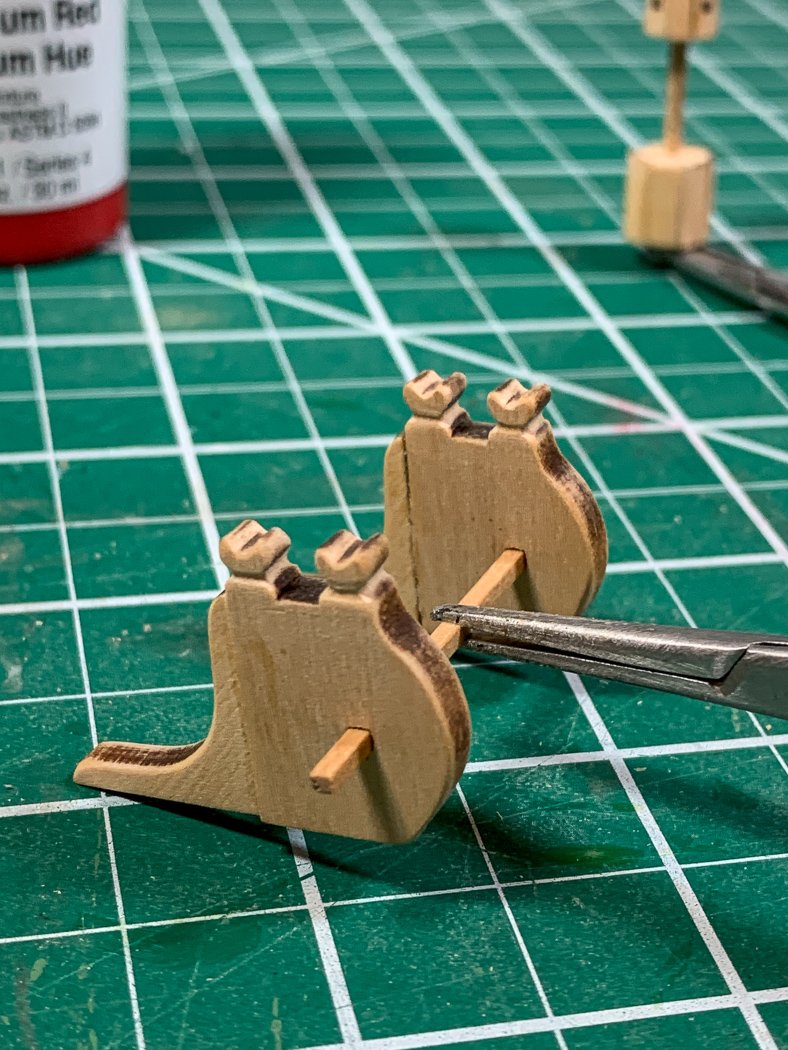
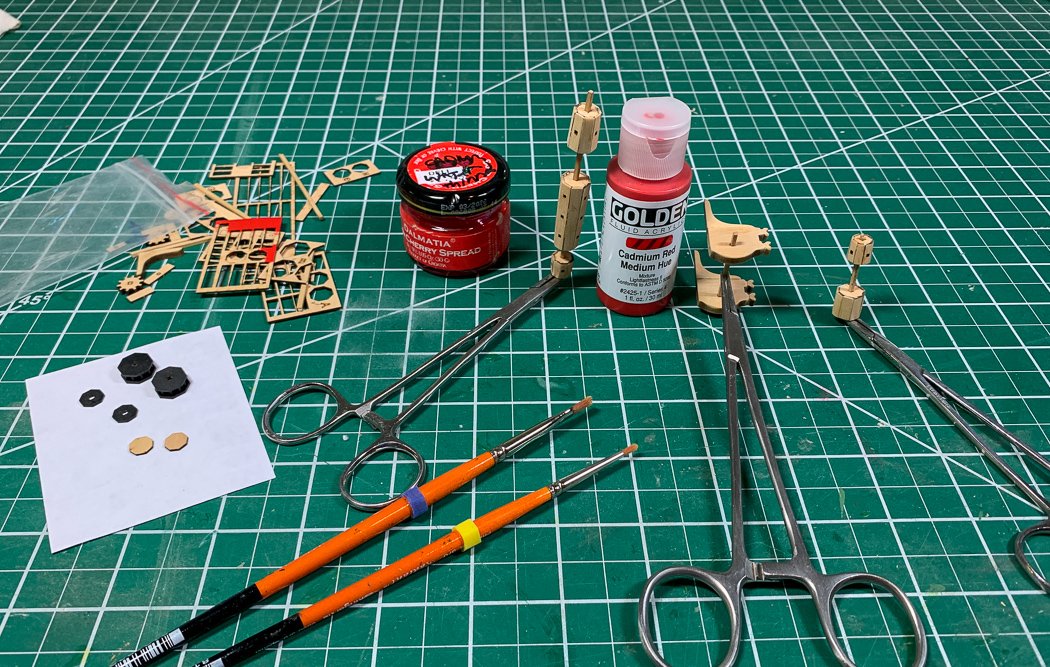
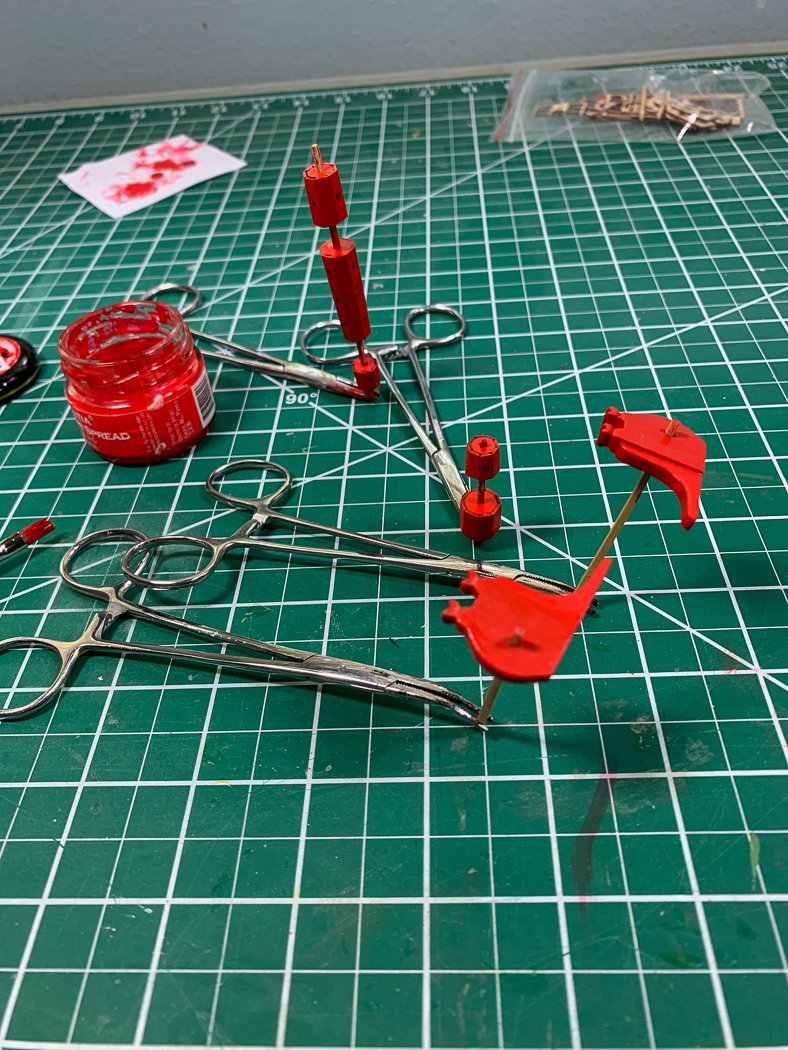
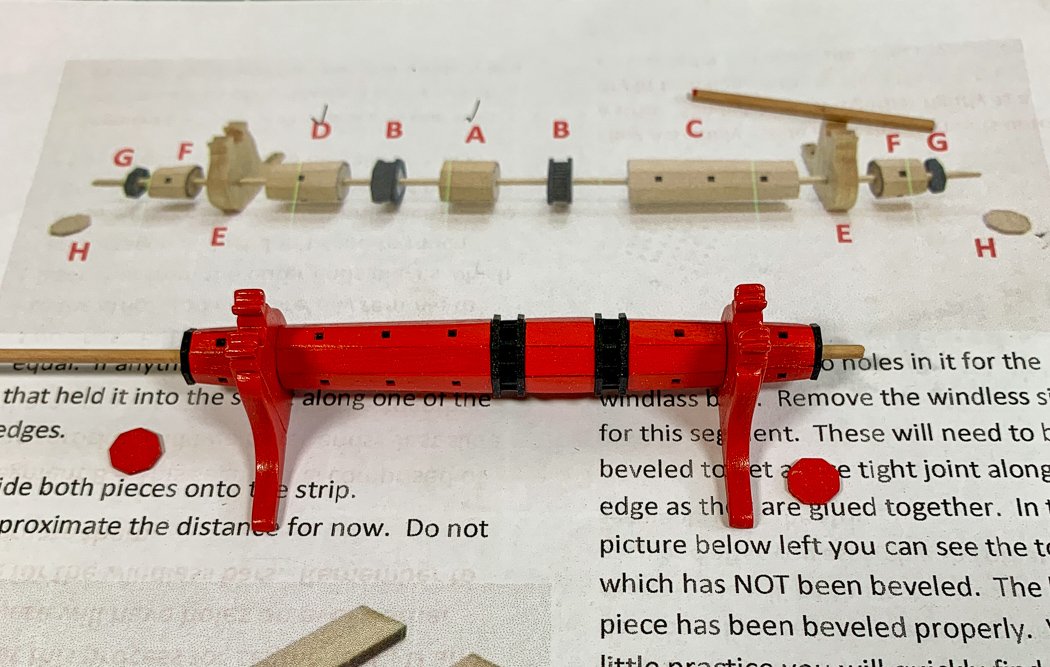
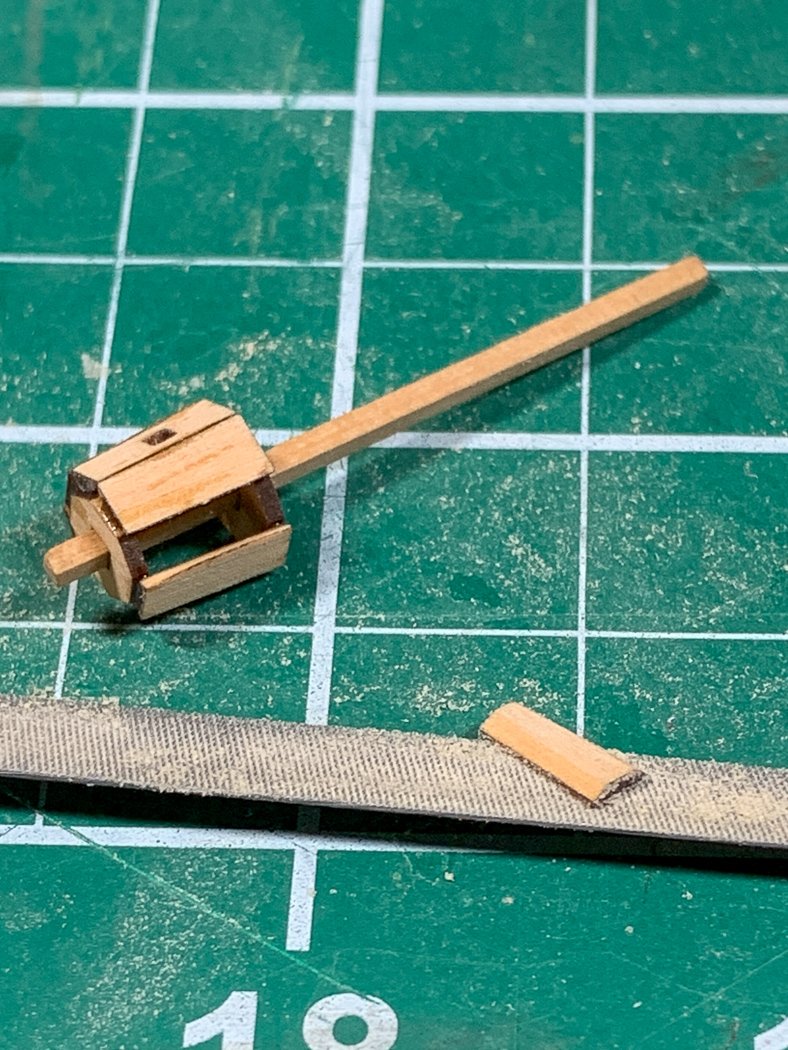
 I did a little side project, putting together the winch sub-assembly from Chuck’s https://www.syrenshipmodelcompany.com site. This is one of several I have as part of my Cheerful semi-scratch build. This model with the plans, starter kit, monograph, and these sub-assemblies, make entry into scratch building so much easier an experience. The winch comes in a little baggy of finely lasered parts, mine is in boxwood. I printed the simple to follow instructions from the website and commenced to sand and file away. The instructions say to bevel the many panels (5 barrels and obviously 8 to each barrel) so that only a brown edge is showing. Not surprisingly my last one was better than the first. The big key is when the instructions say only a little edge is showing, it means a very little tiny barely visible bit of brown edge. This one still needed more filing. With everything assembled, it’s time to paint using the Golden Cadium Red I’ve selected for the model. This is in a bottle not a tube, but I still mixed it at about 3 parts paint to one part water. This gives it an almost ‘red water’ consistency. I found three coats were enough to make me happy. I painted a scrap piece and after three it started looking a little too thick. I use Admiralty Paint Ironwood Black for the components that are, well, wood meant to look like iron, (so that’s how they got the name…) on a real winch. This is great paint, it took only one coat, any more and it will look more like paint and less like metal. As a side note, more of this paint is one of the items in my lost order from the UK. I’m a big fan of 400 grit sandpaper, I use it to soften everything to make it feel “warmer” and “worn.” With 400 grit as opposed to even 320 there is no danger of losing shape or too much material. I also did a little shaping at the top, not too much, its a winch… Because I’m using very thin paint I did have to remove all the laser char otherwise it would show through. That was a bit challenging with the end pieces. So here I'm clearly not done. My hemostats come in handy to hold things while I’m painting, easy here since I could use a 1/16th stick to hold them. The final dry-fit. It’s really not this shiny, just the bright light and my iPhone thinking too much. The final step is glue it all together, snip off the rod running through it and add the red caps to the ends. I’m not going to do that until I’m ready to mount it on the ship - a long long time from now - just in case any adjustments are needed on the fit to the deck. So off it all goes to join the rudder and sternpost on a cabinet shelf I keep free of everything but a soft cloth bottom and future parts of my current model. I’m sure a few cannon will find their way to that shelf before they’re ready to mount. I like little projects like this to break up the build process. So now back to the hull.
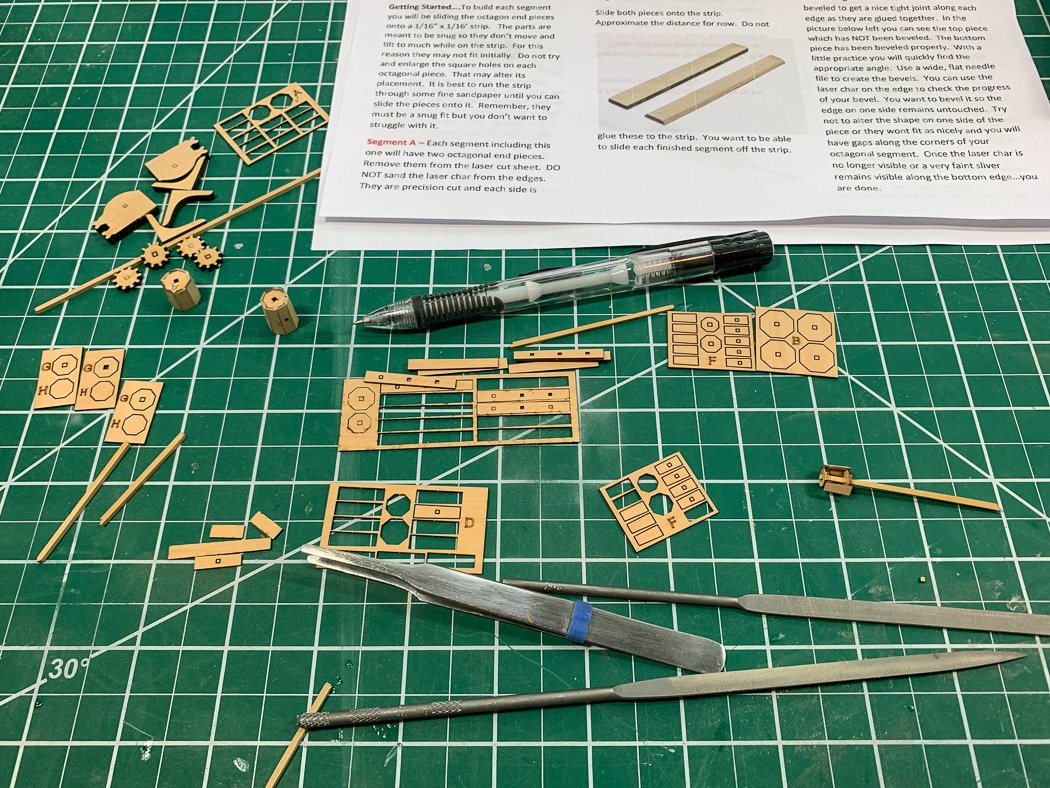
- 778 replies
-
- 21
-

-
- cheerful
- Syren Ship Model Company
- (and 1 more)
-
The masts are looking nice!
-
Fine work on the deck. Very impressive skills on the consistency of your joggling cuts! Did you make all the scarp and joggling cuts with chisels?
- 725 replies
-
- 2
-
-
- vanguard models
- speedy
- (and 1 more)
-
I'm not sure I'm all that proud of mine, I had a good deal of fun planking it. Frankly I think it might be easier with 2mm planks.
-
I just finished the one I have for Speedy, not as easy as one would think. I built 4 for Vanguard, not really all that fun.
- 109 replies
-
- 1
-
-
- Vanguard Models
- Flirt
- (and 1 more)
-
Looks perfect to me. More elevation more range. 🤣😂
- 725 replies
-
- 1
-
-
- vanguard models
- speedy
- (and 1 more)
-
Very ambitious and well done with the joggling, I learned a new word. I’m sure you’ve thought to check your cannons fitting in the gun ports with the additional .6mm deck height. The dentist tool remains one of my most often used tool, glad it’s helping you as well.
- 725 replies
-
- 2
-
-
- vanguard models
- speedy
- (and 1 more)
-
There is a lot to learn from following along that I will apply to Cheerful. I'm also looking to see where you go next and at least for me I'm glad you're thinking smaller. The Winnie is beautiful and amazing but just way bigger than I'm interested in doing, or for that matter have a place to display. Nonetheless the craftsmanship and design is incredible as is the work and other logs that are following along. I like the figurine. Not a period sailor but, I'm assuming, a likeness of you just strolling around looking at the work as it progresses. That's just too funny. (and if I have that all wrong, it would still be a fun thought).
- 1,784 replies
-
- 6
-
-
- winchelsea
- Syren Ship Model Company
- (and 1 more)
-
Great progress. I never ceased to be amazed at the transformation in wood created by wipe-on poly. Your paint lines are very crisp, nice work.
- 436 replies
-
- 4
-
-
- vanguard models
- alert
- (and 1 more)
-
I understand the desire to plank it, I have a maple deck for Speedy/Flirt I got from Chris. It just looks so good I will use it. I have enough holly planked decks, this one time I’m going to forgo that experience. I do like planking the lower deck, I’m sure this model will look great with the hatch open. Maybe throw some fish blood in their to liven it up 🤣😂 As Soyglass says, we all knew you’d bash it 😊
- 195 replies
-
- 4
-
-
- lady eleanor
- vanguard models
- (and 1 more)
-
I’m not much a fan of fishing vessels, but this is a great looking model I may need to add to my collection once I negotiate for more display space.
- 195 replies
-
- 3
-
-
- lady eleanor
- vanguard models
- (and 1 more)
-
Thanks everyone for following along. I’m pausing the build for a few days but will be back at it soon. Please watch for updates.
- 778 replies
-
- 5
-
-
- cheerful
- Syren Ship Model Company
- (and 1 more)
-
Nice work on a very tricky part of the model. They look great.
-
I’m a Nikon shooter as well and appreciate the setup description. Photography Is my other ‘hobby,’ I’m primarily a nature and wildlife guy. http://glennbarlow.com. I only pull out the portrait stuff for important things like my grandkids. I’ve shot photos of them on large curved white paper. I’ll have to get it out next time I shoot a completed model. Your photos are well lit, not as easy to do as some might think. The mesh in front of the lights is a nice touch, your own soft box. 👍🏻
- 109 replies
-
- 5
-
-
- Vanguard Models
- Flirt
- (and 1 more)
-
Nice! I like the black and red paint scheme. The stem looks like it has a smiley face, or is that just me... You’re going to make us all feel bad about our planking and photography skills, are you shooting that in a white product box?
- 109 replies
-
- 1
-
-
- Vanguard Models
- Flirt
- (and 1 more)
-
I agree, it’s why the first thing I asked them back over a month ago for the tracking number, onLy to find out there wasn’t one. I recently ordered the plans for Cheerful from the NMM in the U.K., they also sent it postal airmail, but provided me with a tracking number and I received two weeks later (about three weeks ago). I’m pretty sure my order is lost but without a tracking number, who knows...
- 778 replies
-
- 2
-
-
- cheerful
- Syren Ship Model Company
- (and 1 more)
-
I asked, they don’t ship with tracking numbers was their answer. As I said I placed a second order a few days after this one. I received it in 2 weeks. Whatever the current situation 9 weeks is a long time. It is not helping that they don’t use tracking numbers. Why do you ask?
- 778 replies
-
- 2
-
-
- cheerful
- Syren Ship Model Company
- (and 1 more)
-
I have that as well, my second favorite tool. I've talked to both Jim and his wife a couple of times on the phone. The very definition of small business owners with great customer service and great products. My latest addition is the sliding table for the saw. I wasn't sure I needed it, now I don't know how I got along without it. I used it to cut 24 perfect lap joints for the three cargo hatches on my Nelson project, great way to make consistent, repeatable cuts on very small wood pieces. Cornwall is placing blame on the US Postal Service since they sent it 'Air Mail.' The funny thing is I did receive a second order I'd placed a week after the one I don't have yet....I think it fell off the conveyor belt somewhere along the line.
- 778 replies
-
- 4
-
-
- cheerful
- Syren Ship Model Company
- (and 1 more)
-
Thanks for the comment. I like doing the writing, sometimes I think I get carried away. I got it and all my Admiralty Paints from Cornwall Boats in the U.K. I used to received orders in 7-10 days. However I have an order I’ve been waiting 9 weeks, all they say is be patient. I haven’t found a US source for Admiralty paints.
- 778 replies
-
- 2
-
-
- cheerful
- Syren Ship Model Company
- (and 1 more)
-
I have the Byrnes Saw with a Thurston I-292 .030 kerf slitter blade. I’m a big fan of the Byrnes saw.
- 778 replies
-
- 4
-
-
- cheerful
- Syren Ship Model Company
- (and 1 more)
-
I have a maple etched deck from Chris for HM Speedy replacing the pear that came with the kit. While I haven’t installed it yet so I don’t how it will look sanded I can tell you without hesitation it is anything but hokey or taking the easy way out. A laser etched deck is definitely an item that could run the gambit in quality. My maple deck from Vanguard Models instantly changed my mine about planking it myself. I've planked the decks of nine models, always kit bashing using my own cut holly. I have some nice looking decks, except for the fact that once it’s masted, rigged, and furniture in place you barely notice. While I’ll cut and plank the deck for Cheerful, I’ll use the laser etched maple deck on the shipwright version of HM Flirt and be proud of it.
-
I think you felled a tree to plank Winnie, but it looks great.
- 642 replies
-
- 3
-
-
- winchelsea
- Syren Ship Model Company
- (and 1 more)
-
Any creative ideas about how to maintain a 1/64th inch gap above, below, and alongside the ports? I did cut my first run of 3/64" thick planks from 3/16, 1/16 and 5/32 lumber, I'm a bit proud of that having never done that before in volume. Again I will say the Yellow Cedar flew through the saw, and I'm typing with ten fingers.
- 778 replies
-
- 6
-
-
- cheerful
- Syren Ship Model Company
- (and 1 more)
-
Beautiful work! Can you plank mine for me😂
- 642 replies
-
- 3
-
-

-
- winchelsea
- Syren Ship Model Company
- (and 1 more)