glbarlow
-
Posts
4,127 -
Joined
-
Last visited
Content Type
Profiles
Forums
Gallery
Events
Everything posted by glbarlow
-

Seats of Ease
glbarlow replied to stuglo's topic in Discussion for a Ship's Deck Furniture, Guns, boats and other Fittings
The attachment above is an interesting read, it answers a lot of questions and dispels a lot of conjecture. -
Fun to watch your build of the Syren stove, you always add such clever mods. Mine for Winchelsea is still far in the future.
- 27 replies
-
- 3
-

-
- galley stove
- Syren Ship Model Company
- (and 1 more)
-
Best wishes on a successful surgery and good health!
-
Correct Glue
glbarlow replied to Blacklab's topic in Painting, finishing and weathering products and techniques
I never use what the glue comes in, too unwieldy. Bob Smith Industries also has these Applicators I’m sure they are available from other sources. “There are significant differences in adhesive performance among the various cyanoacrylate products.“ From simple web search. Both Smith Industries and Gorilla manufacturer their CA products. Bob Smith Industries has 8-9 different variations including an odorless version. As mentioned other companies, generally hobby stores, put their name, with permission, on BSI’s products. So many glue threads, so many opinions….🤣 I know what works for me. -
Opportunity to crush the keel if leave raised to high or a crushed model if too loose. One of my vices is buying too many vises 😂
- 227 replies
-
- 13
-

-
-
Maybe for a kit at this level engraved decks aren’t necessary. I’d plank the deck myself and would rather see quality wood strips rather than an engraved deck I wouldn’t use.
-
Welcome to the club, I’ve been enjoying my build for almost a year now. I look forward to following yours. It is correct the false keel is a piece (actually three identical pieces given the length needed) you need to mill. Just simple pieces the size instructed in the monograph.
-
The color just pops, it looks great. Lovely and neat work as always Rusty. Very nice!
- 642 replies
-
- 3
-
-
- winchelsea
- Syren Ship Model Company
- (and 1 more)
-
Correct Glue
glbarlow replied to Blacklab's topic in Painting, finishing and weathering products and techniques
Amazon sells Smith Industries CA -
Correct Glue
glbarlow replied to Blacklab's topic in Painting, finishing and weathering products and techniques
Good note, thanks. They also have an odorless version. -
Correct Glue
glbarlow replied to Blacklab's topic in Painting, finishing and weathering products and techniques
I have built a lot of models using CA, some are 20 years old, there’s nothing wrong with it used correctly. Take a look at the planking on my current build, HMS Winchelsea, it was all done with CA. However, not all CA products are created equal, I only use Smith Industries CA. Local hardware store superglue isn’t the best choice. If you’re at the point of needing acetone you used way too much. I use multiple glues depending on the stage of the build and task involve. Titebond is great for the frame, not the best for smaller, tighter work. I use a lot of white PVA glue, but I get a quality wood working product, I wouldn’t trust Elmers on my models. I would never use a wood stain on a model, I prefer the natural look of the wood with a few coats of Wipe On Poly. There are many many ‘glue’ threads on this forum, everyone has an opinion. CA seems to create strong opinions in some, always amuses me to read the ‘never CA’ crowd comments. Do a search on it if you want more opinions. I use what works best for me. -
I made four. the hard way for my Vanguard. It’s doable without the resin hull cheat, just not all that fun. I think yours look fine as is. You’ve captured the wood color nicely.

- 102 replies
-
- 4
-
-
- Flirt
- Vanguard Models
- (and 1 more)
-
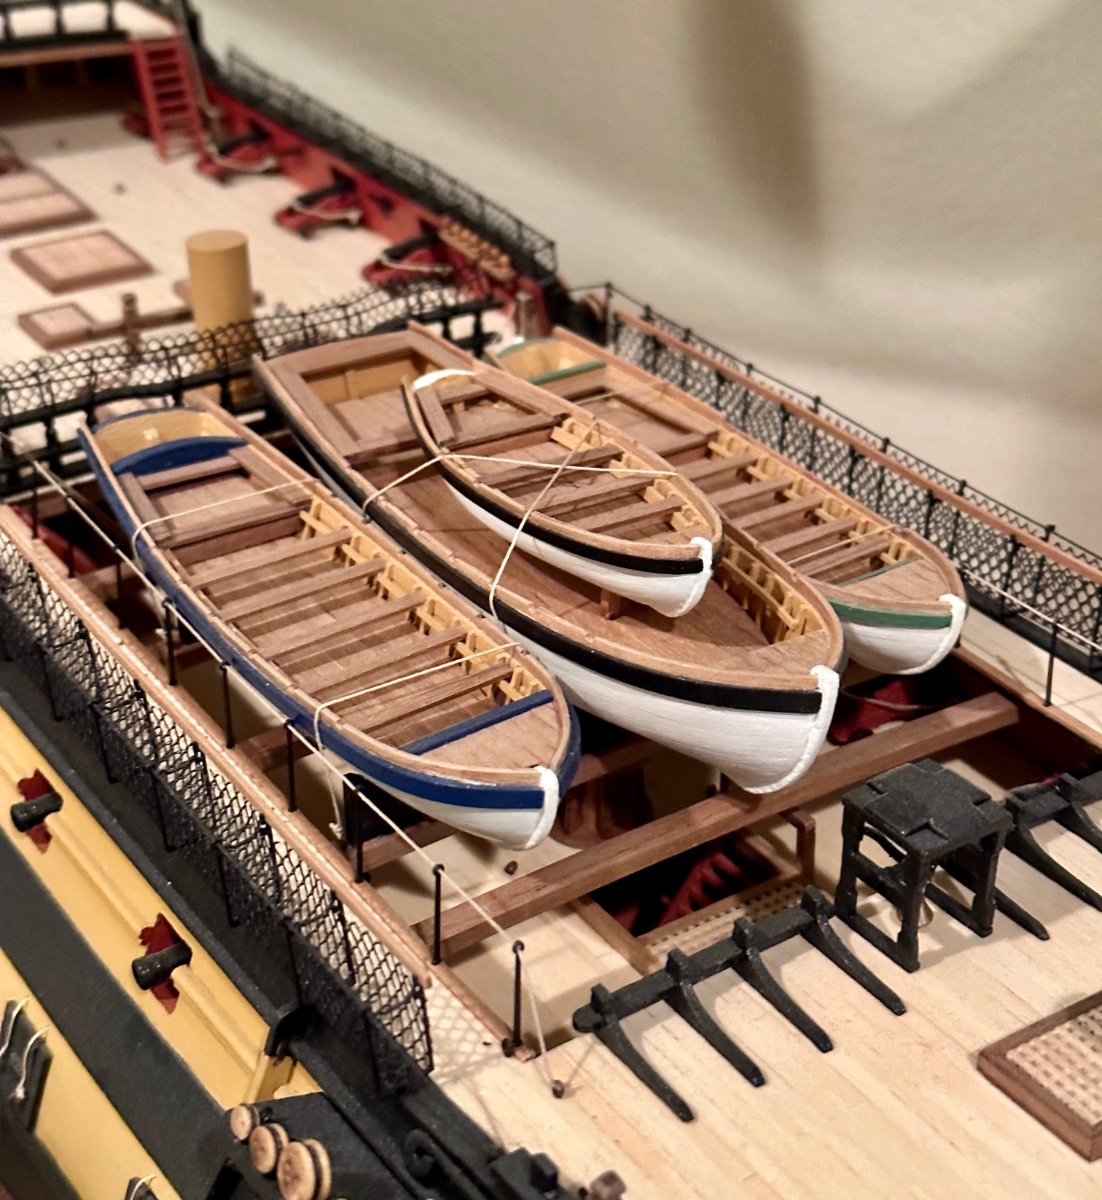
The boats are more difficult to construct than the ship, for me anyway. Yours looks just fine. I made the decision early not to include it on Flirt and Winchelsea.
- 102 replies
-
- 1
-
-
- Flirt
- Vanguard Models
- (and 1 more)
-
This is really quite amazing. As both a photographer and a modeler I really appreciate both aspects of your work in bringing this to life. I also enjoyed the narrative describing the different boats. Having published a few photo books I understand the significant cost involved and so appreciate your making it available to a wide audience via .pdf. Aside from stunning models and graphic work the best part of it all for me is the collaborative work of father and son. Well done!
-
How’s your planking coming along?
-
Well done! Every time I see a well constructed stove like yours I want to pause my build and build out mine.
-
I understand, Planking becomes a way of life with Winchelsea for a wile My two cents: The stern planks might be difficult to sand out as is. Like the bow they they need to be bent. Unlike the bow they also need be twisted so they turn outward to meet the sternpost. I think there are good examples in various build logs, I tried to do so in mine. It doesn’t take much CA, a little on each bulkhead goes a long way. The garboard looks right, maybe a little forward. The key, and I’m no expert, is that it is straight on top, no upward bend. I good check is dry fitting the next two bow planks up and see hoe they fit. I recall reading Chuck’s instructions and looking at multiple logs. It was never exactly the same from one to another, they were all in the vicinity of yours, including mine. The key of course is to have fun. 😊
-
Both the direct link and via Syren are working for me using Safari
-
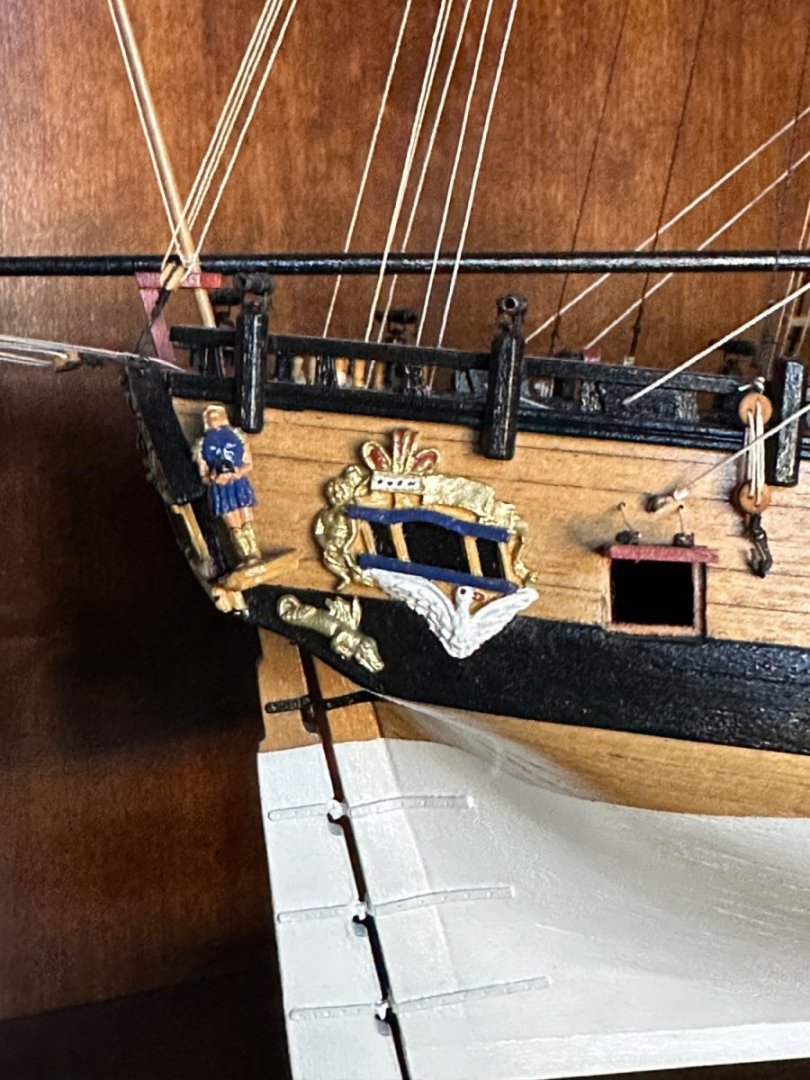
Removing wood would be a really bad idea, very hard to get that right. Just file the metal slowly with constant test fits until you’ll have it right. I did this before painting it. I dry-fitted the soldier dude behind the quarter badge but held off gluing him to near the end. The q-badge really isn’t in the way once on.
-
I followed the sequence in the instructions, I don’t recall them being any particular issue or challenge. You file off what’s required on the bottom for a flush fit. Here’s a (not very good) photo of mine for reference.
-
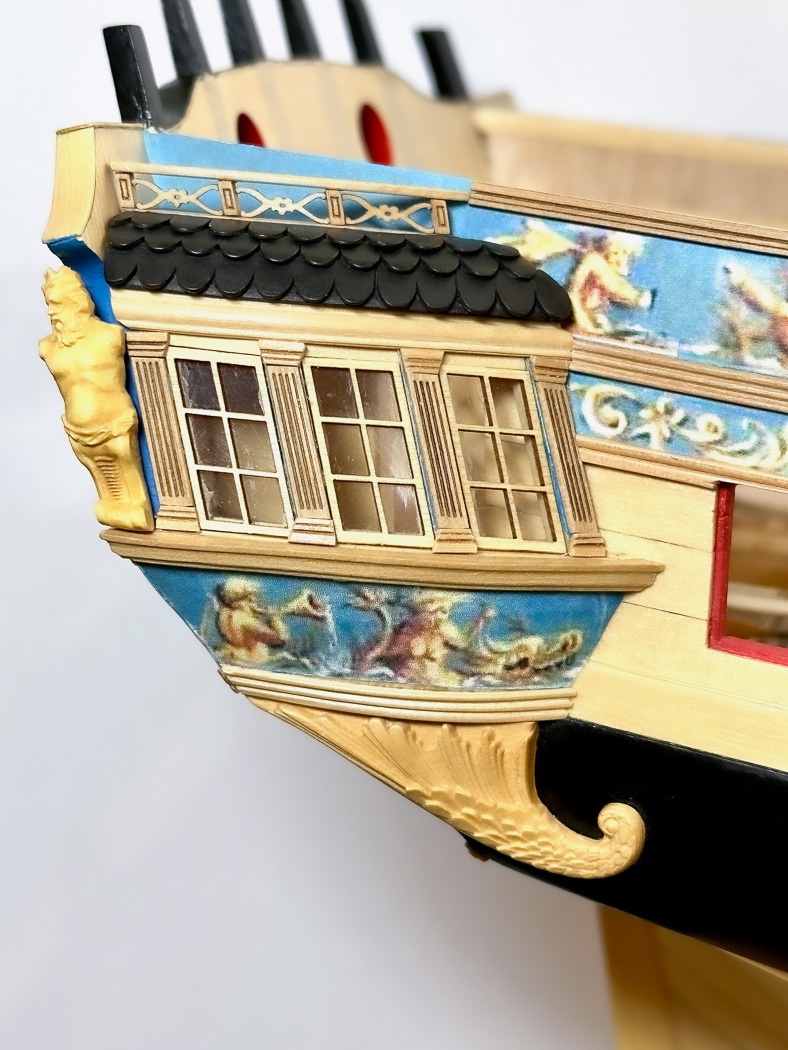
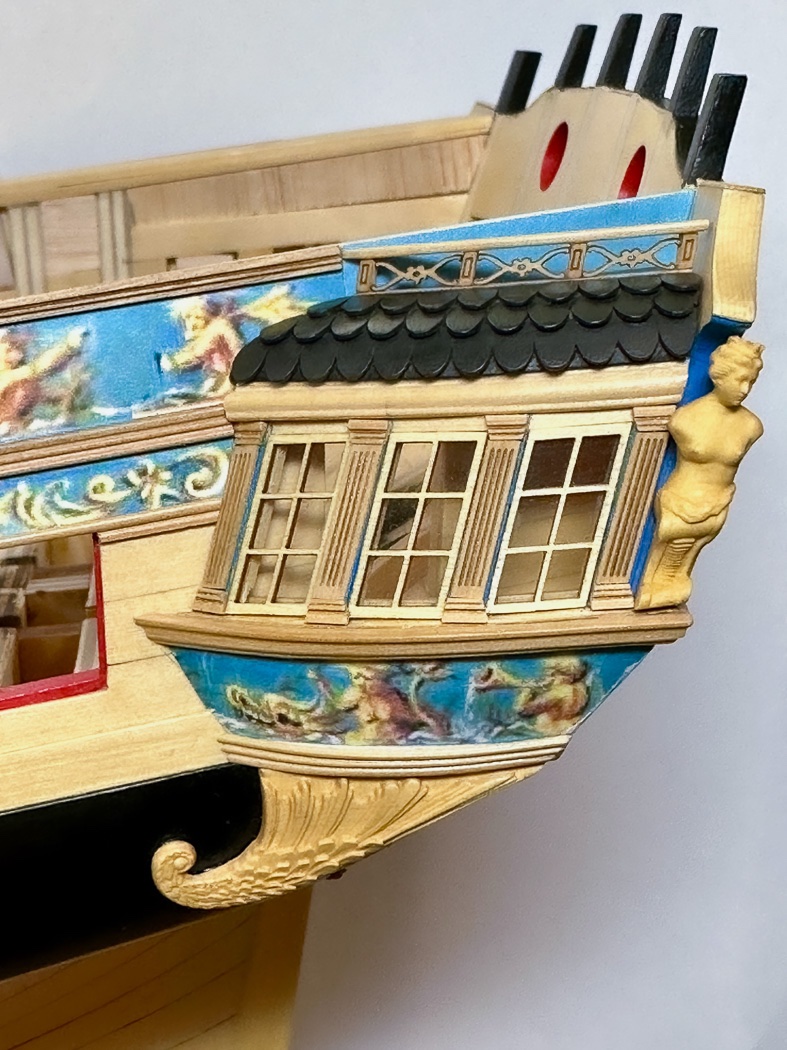
Outer Hull Complete (for now) After installing, ripping off, and replacing the hull moulding and friezes for a while I’ve now completed the Chapter 3 outer hull work. So Yay! I turned my attention to completing the quarter galleries with the addition of the nice rail on the top. I say nice because it looks good finished. Nice wasn’t necessarily a word I was using as I cleaned, lined up, and installed the little tiny pieces that make it up. So here’s a few fun facts, the rail consists of 9 parts, it is part of the roof which including everything to sand and glue together consists of 43 separate parts. One quarter gallery, including the roof and rail, is a total of 91 separate parts, large and small, sanded, scraped, glued, fitted, and installed to make it up. So 182 separate pieces in the two photos above. In my humble opinion the assembly of all those pieces of wood and paper make for an outstanding signature component of Winchelsea. While there are a lot of parts, every aspect of the design not only amazing it is logical, Chuck’s instructions make total sense and are easy to follow. It isn’t all done at once, I started the first step in July, it follows the course of the build. While I’m quite happy with my quarter galleries, I know the reason they look good (at least to me) is in very large part due to @Chuck design and the laser cut components he provides with Chapter 3. Finally..., on to the stern. Thank you for your likes and comments - they are always inspiration.
- 840 replies
-
- 22
-
-

-
- winchelsea
- Syren Ship Model Company
- (and 1 more)