glbarlow
-
Posts
4,130 -
Joined
-
Last visited
Content Type
Profiles
Forums
Gallery
Events
Everything posted by glbarlow
-
 I followed the sequence in the instructions, I don’t recall them being any particular issue or challenge. You file off what’s required on the bottom for a flush fit. Here’s a (not very good) photo of mine for reference.
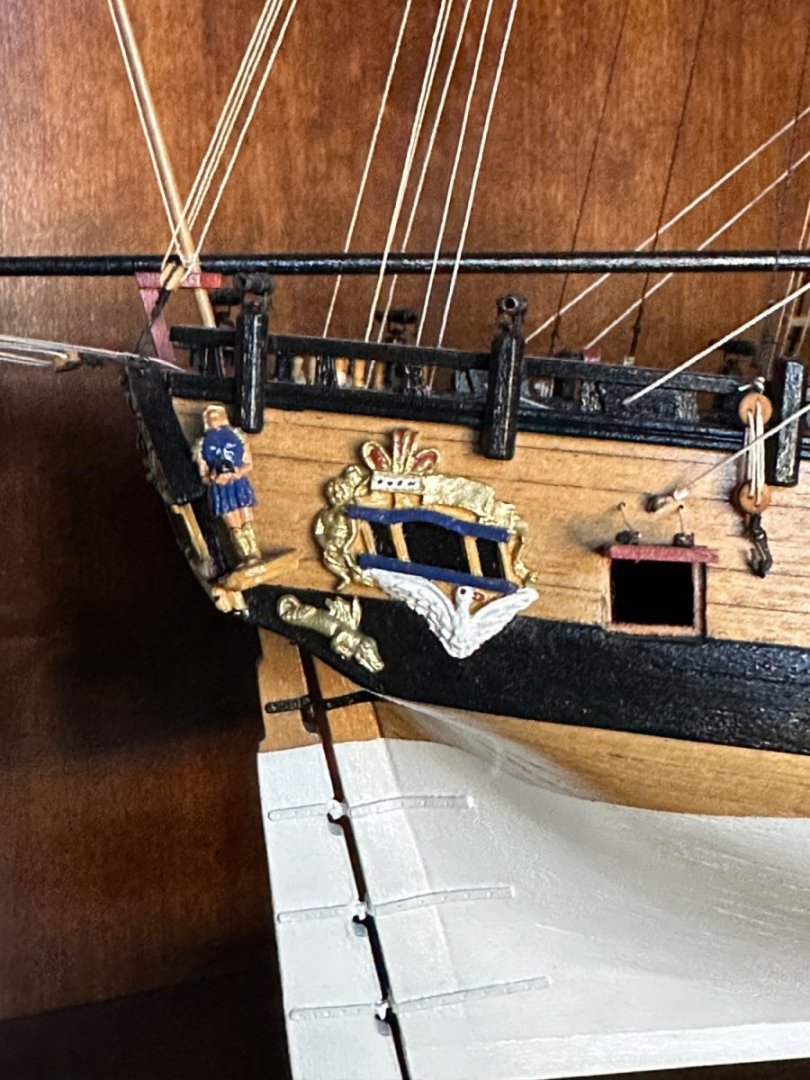
-
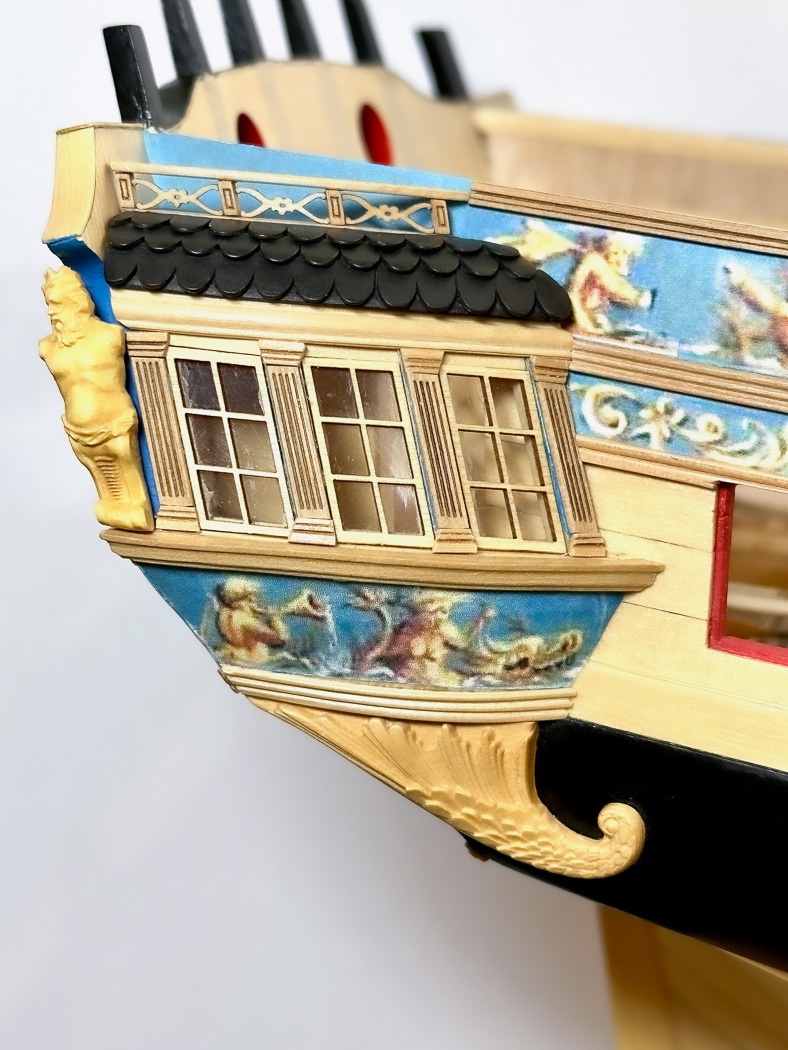
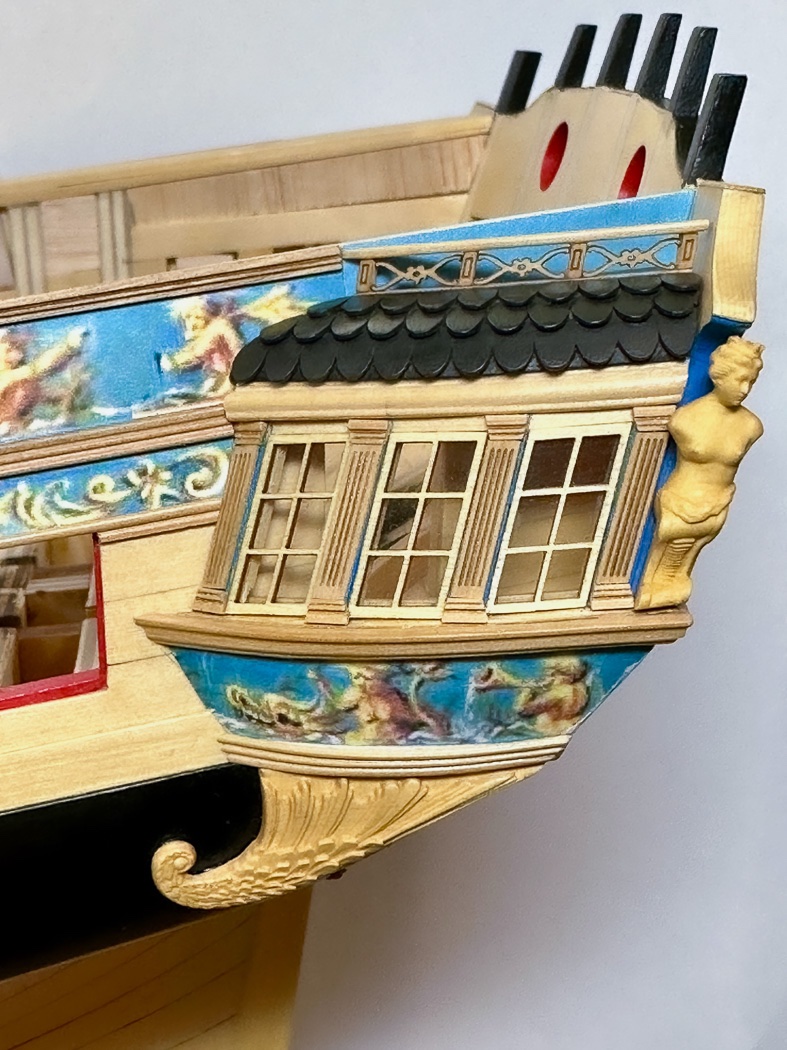
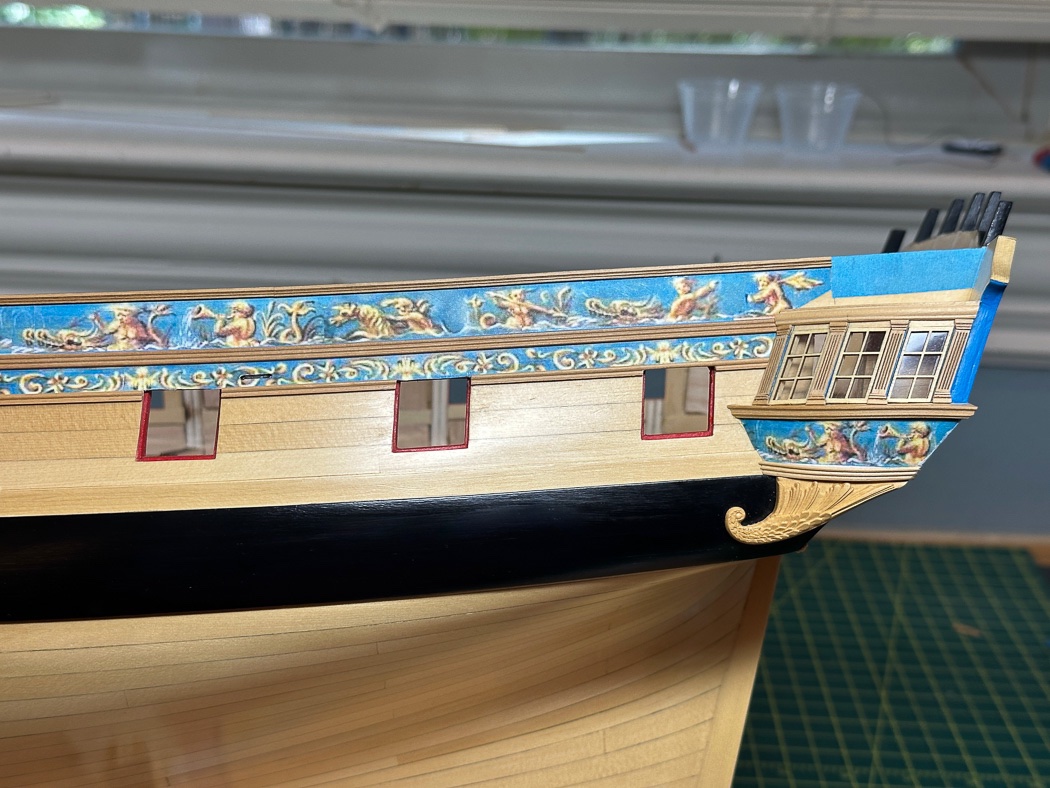
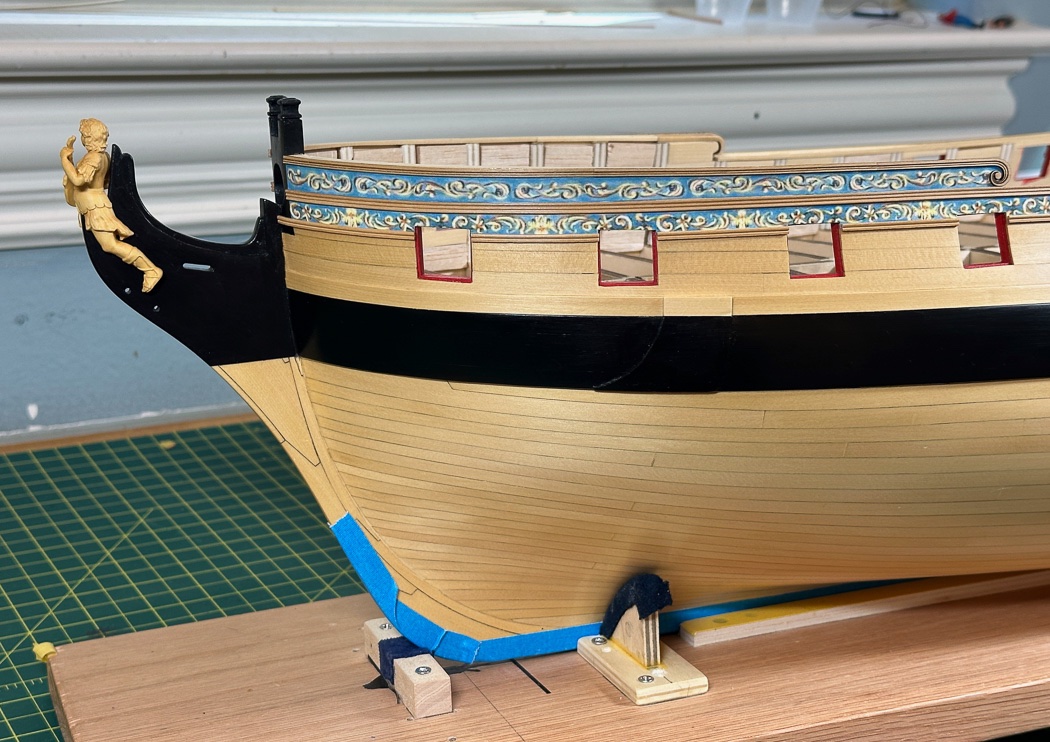
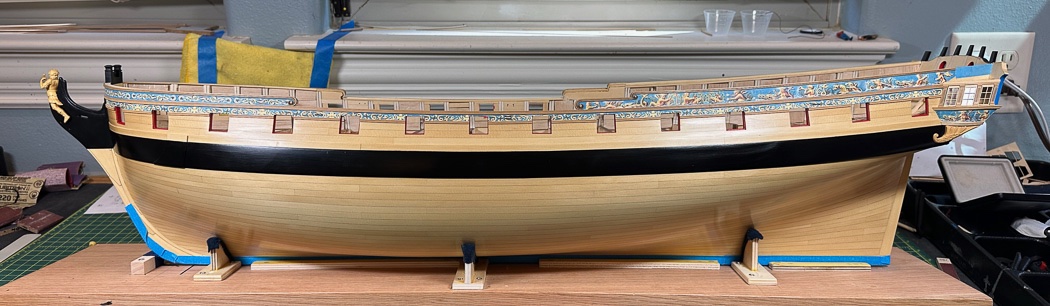
Outer Hull Complete (for now) After installing, ripping off, and replacing the hull moulding and friezes for a while I’ve now completed the Chapter 3 outer hull work. So Yay! I turned my attention to completing the quarter galleries with the addition of the nice rail on the top. I say nice because it looks good finished. Nice wasn’t necessarily a word I was using as I cleaned, lined up, and installed the little tiny pieces that make it up. So here’s a few fun facts, the rail consists of 9 parts, it is part of the roof which including everything to sand and glue together consists of 43 separate parts. One quarter gallery, including the roof and rail, is a total of 91 separate parts, large and small, sanded, scraped, glued, fitted, and installed to make it up. So 182 separate pieces in the two photos above. In my humble opinion the assembly of all those pieces of wood and paper make for an outstanding signature component of Winchelsea. While there are a lot of parts, every aspect of the design not only amazing it is logical, Chuck’s instructions make total sense and are easy to follow. It isn’t all done at once, I started the first step in July, it follows the course of the build. While I’m quite happy with my quarter galleries, I know the reason they look good (at least to me) is in very large part due to @Chuck design and the laser cut components he provides with Chapter 3. Finally..., on to the stern. Thank you for your likes and comments - they are always inspiration.
- 840 replies
-
- 22
-

-

-
- winchelsea
- Syren Ship Model Company
- (and 1 more)
-
Reducing the price to $700
-
So, for the audience as comparison how do you rate come of your current models and where will Indy come in?
-
Outstanding model BE. Your work has been an inspiration for me going all the way back to Pegasus, which I built about the same time (my log lost in the great crash, I keep backups now). Not only is the work exceptional, your maritime knowledge gently applied in well informed modifications are always creative and interesting. The time, care, detailed, and easy to follow logs you share with us are a tutorials for us all, and always a fun read. Excellent photography too. Chris has provided a great model with his innovative designs, you have brought it to life in a model worthy of a museum. Congratulations & Well Done!
- 857 replies
-
- 3
-
-

-
- Sphinx
- Vanguard Models
- (and 1 more)
-
A fine looking model BE. Having decided to include the cranes running rope through and terminating it somehow seems the only practical course. Working on Winchelsea I still admire how you touched up the friezes with your brushwork. It adds such a nice pop.
- 857 replies
-
- 4
-
-
- Sphinx
- Vanguard Models
- (and 1 more)
-
Wow, what a journey and what a beautiful result. It serves as ongoing inspiration for those following in your wake. Not that I can achieve a result such as yours, but it will be fun to try to come close. I understand about the wood and price involved for the base, and I’ll appreciate the plans, especially for the three pieces holding her up. One nice final offering I hope you’ll consider is the carved crest/name plate we can all use with what ever base we end up with. I recall first looking in wonder at your build log several years ago, now it’s a amazing finished result that I’m also trying to build. I’m sure there is a museum shelf waiting for your Winchelsea. Like others all I can say is Well Done!
- 1,784 replies
-
- 9
-
-
- winchelsea
- Syren Ship Model Company
- (and 1 more)
-
That looks really nice Rusty. It brings the ship to life. Perfectly built, looks it is a single sculpted piece. The Cherry has such a nice look.
- 642 replies
-
- 2
-
-
- winchelsea
- Syren Ship Model Company
- (and 1 more)
-
Thanks Rusty, as I do yours. I’m ready to move on from these friezes and do something new.
- 840 replies
-
- 3
-
-
- winchelsea
- Syren Ship Model Company
- (and 1 more)
-
It was just the lower moulding, I’m just my own worst critic. It’s been removed so nothing to see that would help😊
- 840 replies
-
- 2
-
-
- winchelsea
- Syren Ship Model Company
- (and 1 more)
-
Port side Finished the port side friezes and moulding. Excuse the messy work bench (the ugly yellow rag is part of my bow bumper cheap rig for turning the ship to work on the stern). That led me to decide I didn’t like the starboard side as much so I’m taking it off and doing it again. I think it’s important to do all three sides of a ship model, or so it seems in my case. Check out December in the 2023 NRG calendar Thanks NRG, and of course thanks Chuck for such a great model in HM Cheerful! Off I go to make more moulding, hoping one day I get to the stern. Thanks for looking in.

- 840 replies
-
- 13
-
-
- winchelsea
- Syren Ship Model Company
- (and 1 more)
-
Look closely, the top of the port is no more than the cap rail, lids have nothing to hinge to. As I recall there was discussion in Chucks original Cheerful log on this topic. Some speculated there may have been separate stoppers stored below deck that could be secured by rope in the port in heavy weather. Nothing supported that beyond guessing. Or maybe it is simply a design feature to fortify the port. Again at any rate none are shown on the plans or Chuck would have included them.
- 113 replies
-
- 3
-
-
- Cheerful
- Syren Ship Model Company
- (and 1 more)
-
I'm selling my Vanguard HMS Sphinx kit. By the time I'm done with my present model I'll be ready for the next Syren or Vanguard model, I just won't have time to build this wonderful Chris Watten kit. The kit is brand new and untouched. Selling it for 10% less than the current exchange rate price or $715 plus shipping cost (standard UPS rate depending on destination). I'd prefer to sell it to a US based modeler, I'm not sure how to go about shipping it overseas. Please reply if interested.
-
I know that problem. Sometimes it’s best to stand back 3 feet and see if you can still see it. Not that it changes anything, we still all know where our flaws are 😄
-
I like the open companionway, wish I’d done that. Excellent job on the windlass, the mini-kits are all so much fun. I came up with a way to do the hook planks, hopefully that might give you a few ideas on doing yours. You have a great looking Cheerful.
- 113 replies
-
- 3
-
-
- Cheerful
- Syren Ship Model Company
- (and 1 more)
-
One of the most thorough logs I’ve seen with your exceptional level of detail. Congratulations on completing your project, I’m sure you are justly proud. Well done.
- 476 replies
-
- 2
-
-
-
- sphinx
- vanguard models
- (and 1 more)
-
Looking forward to seeing your continued work on Winchelsea. Then it seems we’ll have Chuck’s Speedwell to look forward to. It seems that will be another next level jump.
- 201 replies
-
- 1
-
-
- Duchess of Kingston
- Vanguard Models
- (and 1 more)
-
Here’s my best advice. Don’t get caught up in trying to follow multiple different methods and techniques for planking. At least three have been listed in this string. Pick one and go with it and ignore the others.
-
Thanks Frank, but I feel like I'm crawling along. I'm in no rush, I just have time available to work on her.
- 840 replies
-
- 3
-
-
- winchelsea
- Syren Ship Model Company
- (and 1 more)
-
Well done Frank.
-
For starters you have to taper those planks at the bow. I described that a little at the beginning of this thread, it won’t fit as you have them. If this is the Lady Nelson you might check my build log linked in my signature for a different look.
-
Not sure what model you’re building and not much to see to understand where you’re going wrong. The plank seems unusually large and your fairing seems way off. Also not sure if you’re laying the bent plank the right way (plank should be bent upward to lay flat and bend down). But again it’s hard to tell from what you’ve provided. I’d suggest you view Chuck’s planking videos a couple of times.