glbarlow
-
Posts
4,127 -
Joined
-
Last visited
Content Type
Profiles
Forums
Gallery
Events
Everything posted by glbarlow
-
 Merry Christmas Derek. You didn't forget to do those lines off the ship, you just wanted to show us how good you are at tying them aboard the ship:-D
- 345 replies
-
- 1
-

-
- Duchess Of Kingston
- Vanguard Models
- (and 1 more)
-
Well done Frank. The long road of planking lies before you. The good news is it feels great when you finally get to that last plank.
-
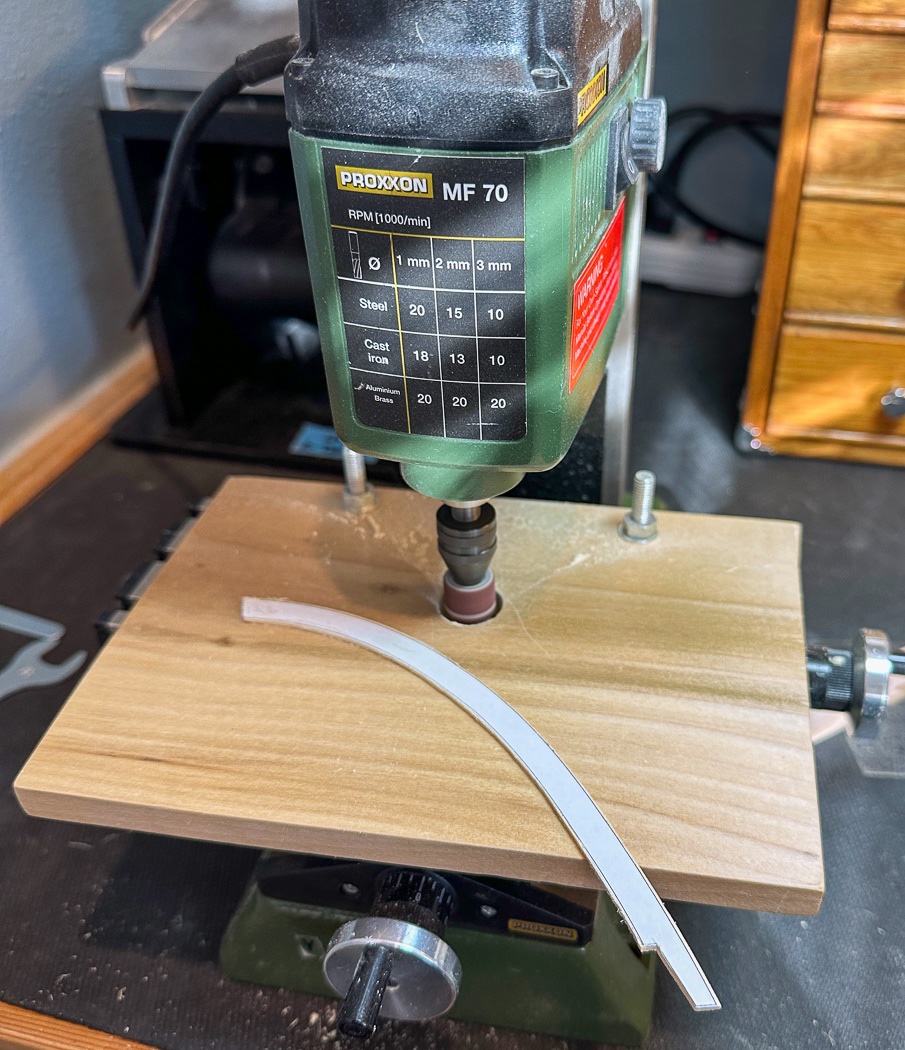
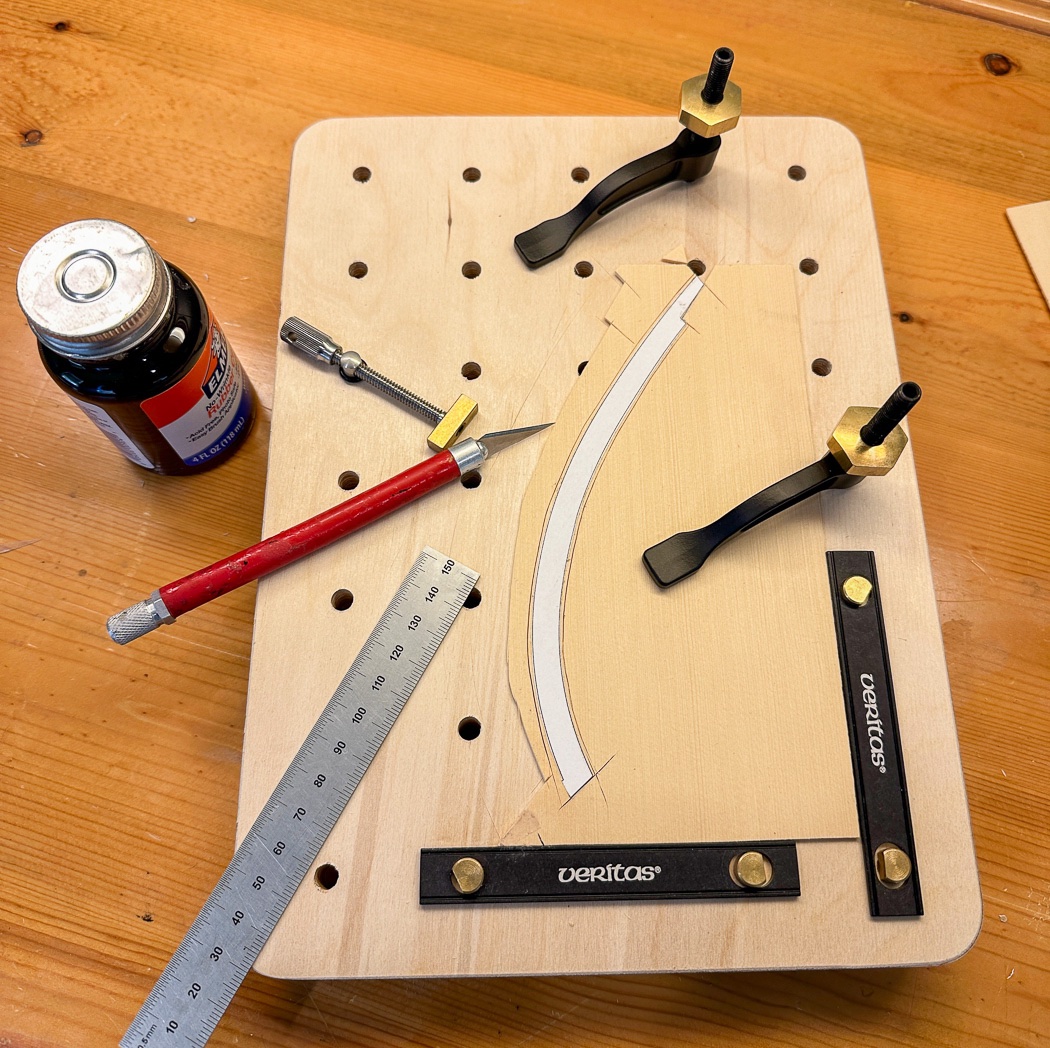
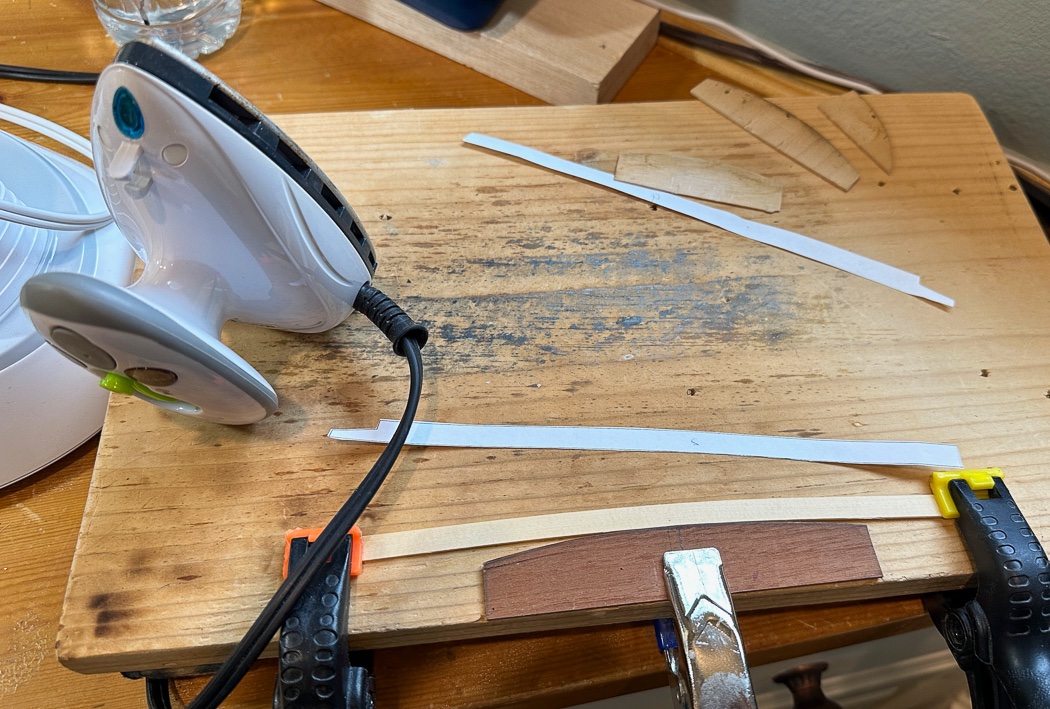
Margin Planks A short update this Christmas Eve. Gained an early Christmas present with this Veritas mini-worktable. This setup make it much easier to hold down and cut the forward margin planks. I was fortunate that the paper templates were a close fit requiring little modification. So I attached them to a 3/64 thick sheet wood with rubber cement and rough cut them with a simple #11 blade. Leaving the template attached as a guide I turned my mill and Dremel accessory into a basic spindle sander. I finished them off with fine grit sandpaper to make for a tight fit to the bulwarks. The waist and stern sections were managed with 5/16 strip and my ever-handy bending station. I used the templates as an initial guide then laid them into place marking where adjustments were needed. The heat-only bending process makes this easy and quick with the yellow cedar. Hard to get exciting photos of margin planks. I ran the planks through the Thickness Sander along with the eventual deck planking. I followed the template to cut one side of the scarf joint, traced that onto its matching partner, then cut and sanded each to match up. They turned out well enough the four joints are barely visible on the photos, hopefully the WOP I apply later will bring them out. I sanded one edge of 1/32 square strip and added the waterways. Both the margin planks and waterway were attached with PVA. With that my deck is ready to plank starting with the cabin area. That will all wait until after Christmas. Merry Christmas everyone!
- 840 replies
-
- 20
-
-

-
- winchelsea
- Syren Ship Model Company
- (and 1 more)
-
Your'e doing fine, keep doing fine and you'll be fine.
-
Excellent work. Measure twice and once you’re absolutely sure it’s right measure again is a good philosophy at this critical stage which you clearly are doing.
-
As you should, we shouldn’t look to you to fulfill random, specialized, or limited interests. Nor should your page be the place to challenge the business model you’ve set and have so clearly and frequently restated. You’ve come a long way since your first release, I am confident you will continue to make the right choices. I will order HMS Surprise the day you announce it.
-
It’s huge, can’t imagine 1/64th then.
-
And Surprise. I’ll buy the first one.
-
HMS Vanguard is out there.
-
My Veritas mini-chisels are now likely my most used tools, for a lot more than just being a chisel. You’re doing a great job with your AVS, all that learning will serve you well on future models. First rule of clamps, when you think you have enough, buy more clamps.
-
Glad you’re staying true to your product line, and that Surprise is next up or near it.
-
Planking or deck. I wanted it somewhat level with the deck waterline and the deck. It’s worth taking the time to get it right, probably mostly an eyeball check. Here’s mine: I looked at a lot of build logs in addition to studying Chuck’s. Hard to tell but yours maybe tilted down a little. Ultimately it’s what you think looks good.

- 389 replies
-
- 3
-
-
- winchelsea
- Syren Ship Model Company
- (and 1 more)
-
Excellent work, all that fine detail really stands out. Always a joy to see your progress as my inspiration.
- 642 replies
-
- 2
-
-
- winchelsea
- Syren Ship Model Company
- (and 1 more)
-
Thanks Rusty, it is kind of nice when the work on the core infrastructure of the ship pays off later, and obvious with close tolerances when it doesn't. Glad to make it to this stage.
- 840 replies
-
- 3
-
-
- winchelsea
- Syren Ship Model Company
- (and 1 more)
-
An excellent process for a challenging step, thanks for sharing. I’m happy you are feeling better and on a better path for your health.
-
Thanks Derek, I always appreciate your comments and observations. She is definitively big, over three feet, the 1:48 scale is fun to work with though.
- 840 replies
-
- 2
-
-
- winchelsea
- Syren Ship Model Company
- (and 1 more)
-
Best Spindle Sander for Ship Modelling
glbarlow replied to whaynes's topic in Modeling tools and Workshop Equipment
No table to hold the wood being sanded? My Proxxon mill does a nice job impersonating a spindle sander. The variable speed is necessary from my perspective.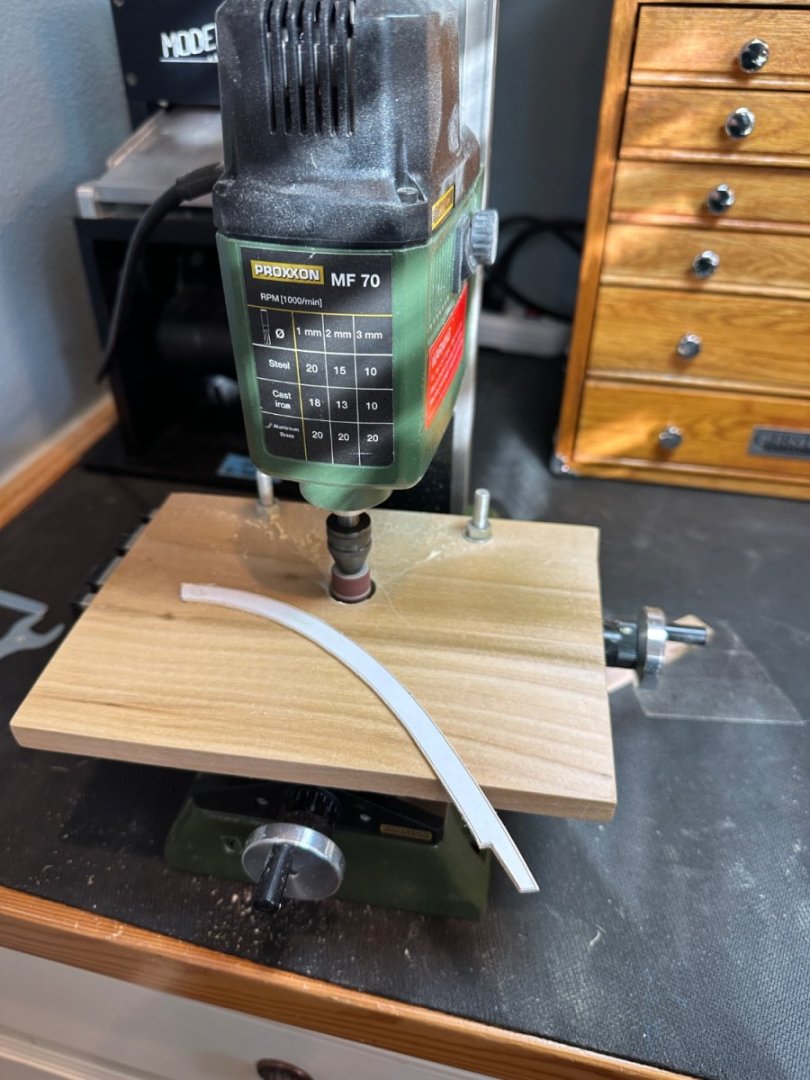
-
Thanks Chuck. It definitely looks like an actual ship now. Very rewarding from those long days of planking the hull.
- 840 replies
-
- 2
-
-
- winchelsea
- Syren Ship Model Company
- (and 1 more)
-
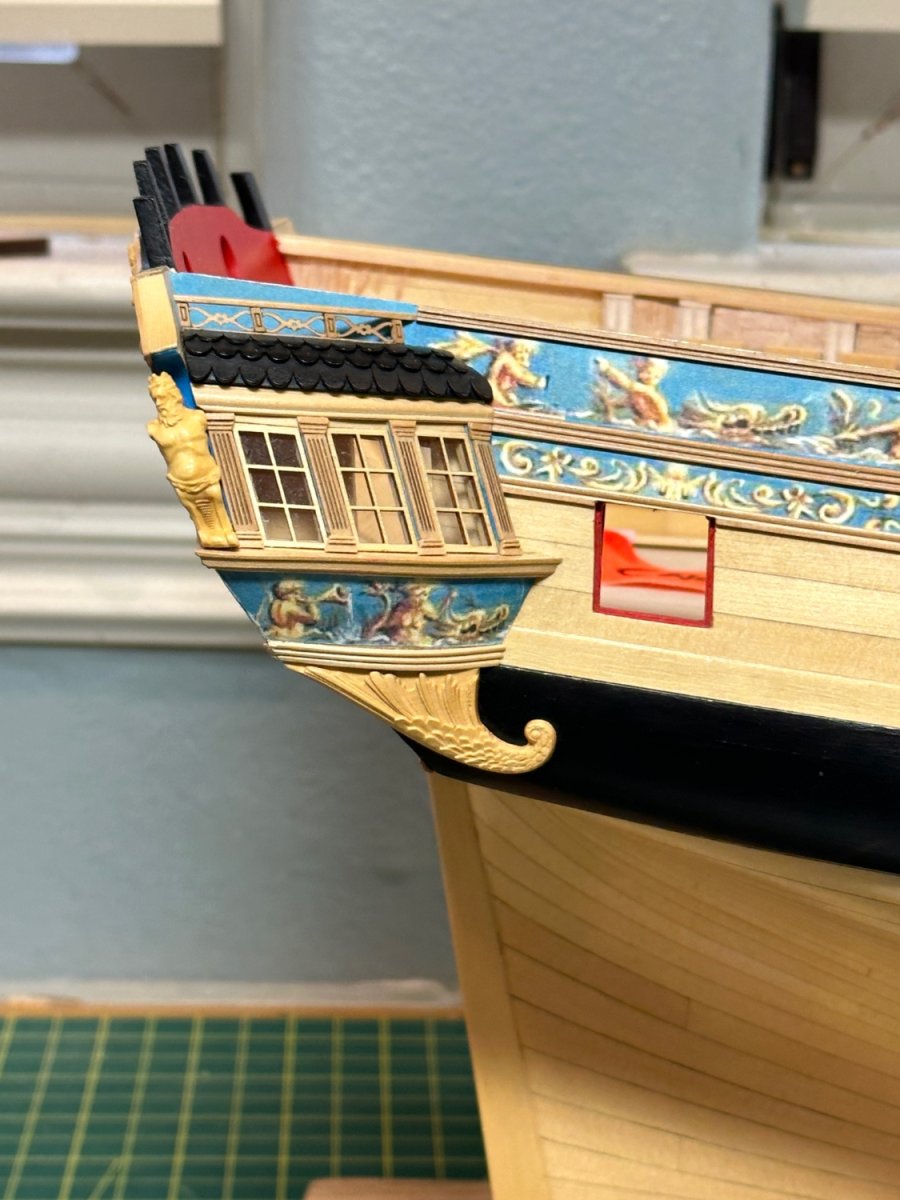
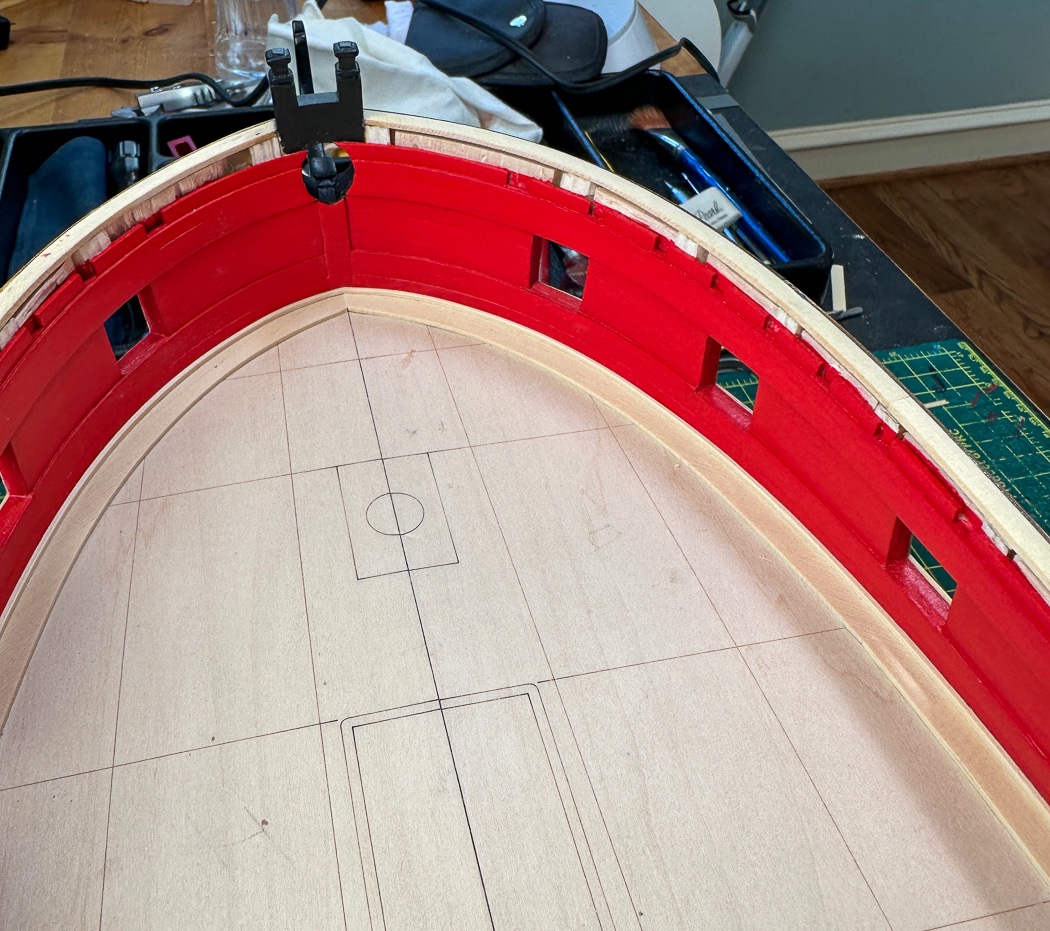
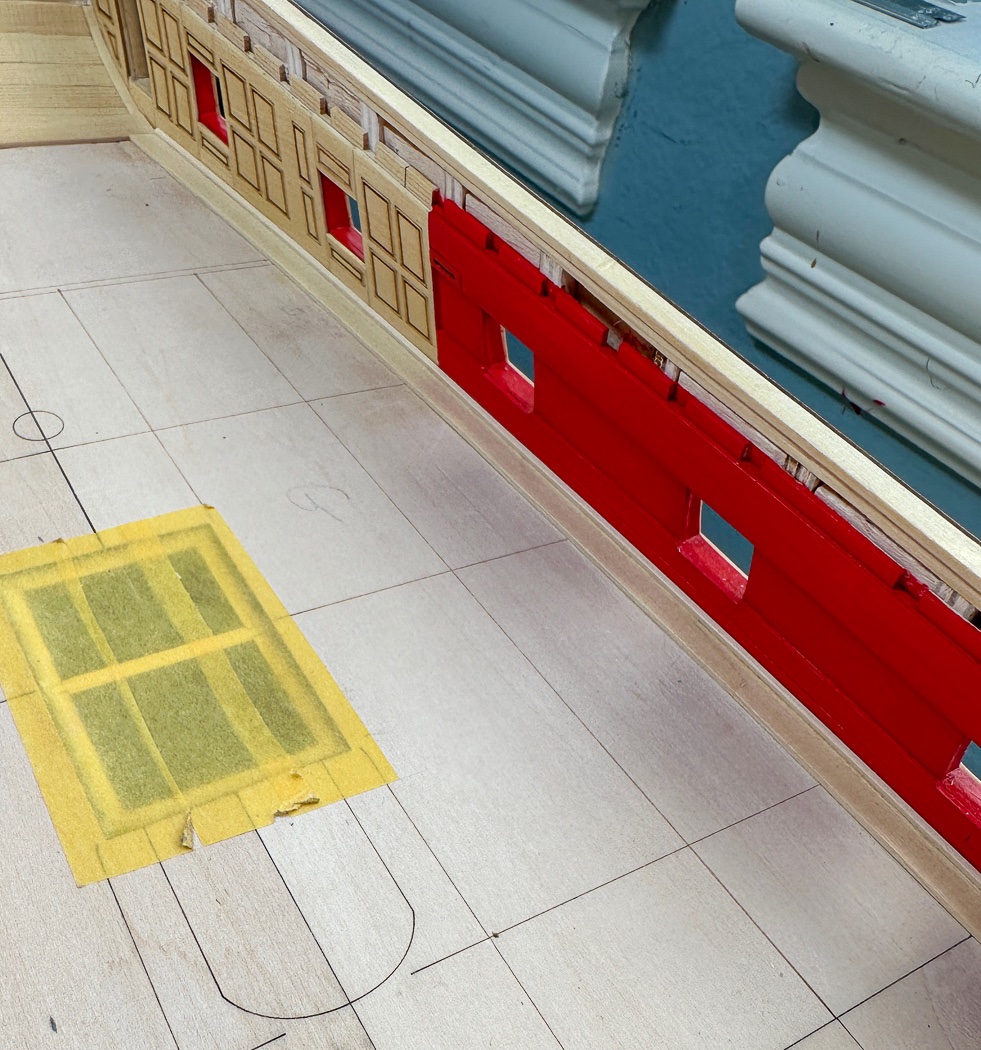
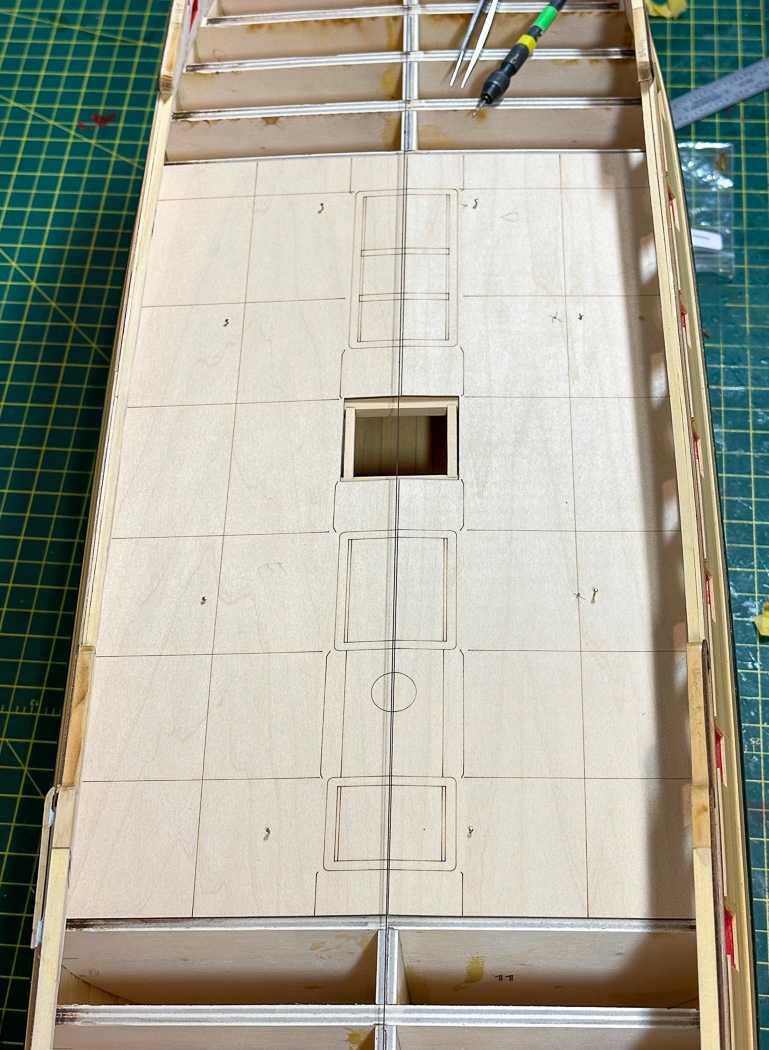
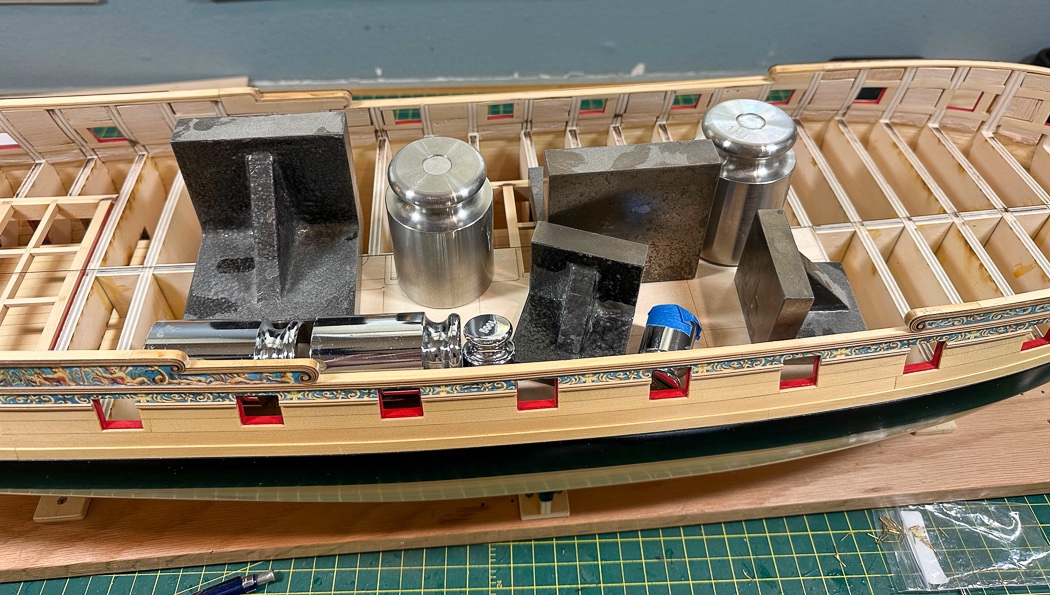
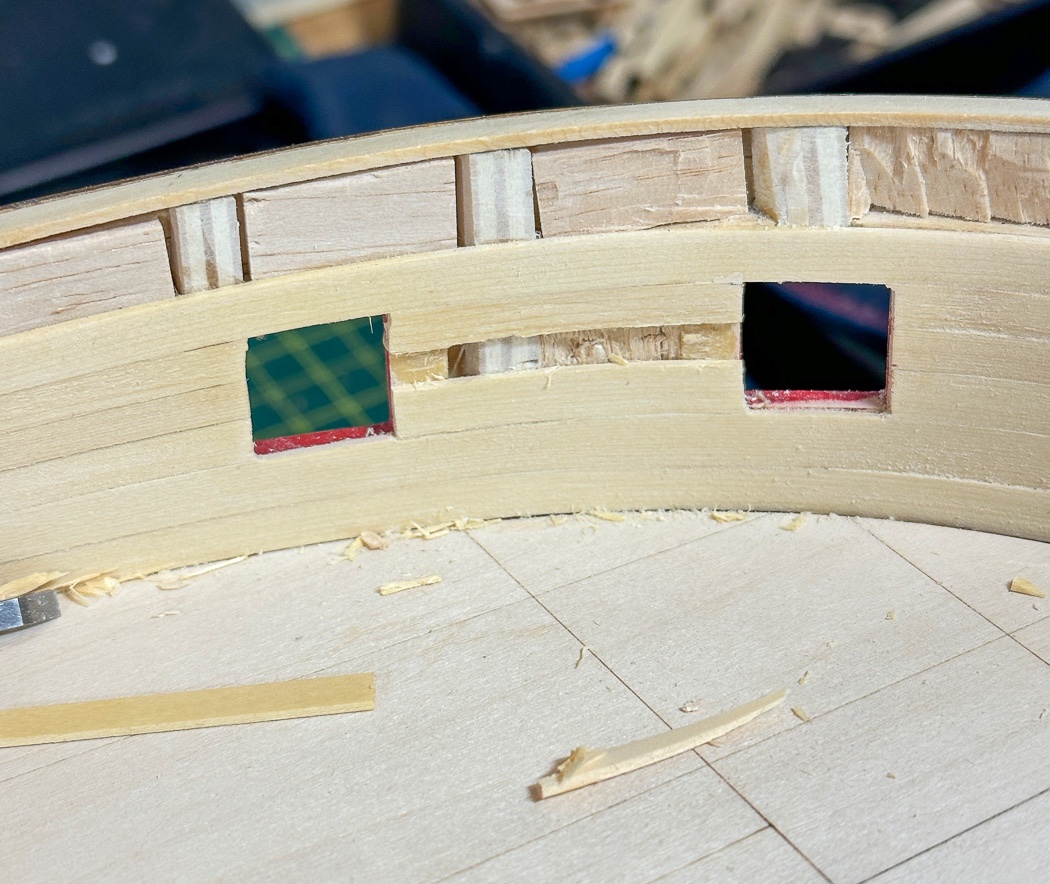
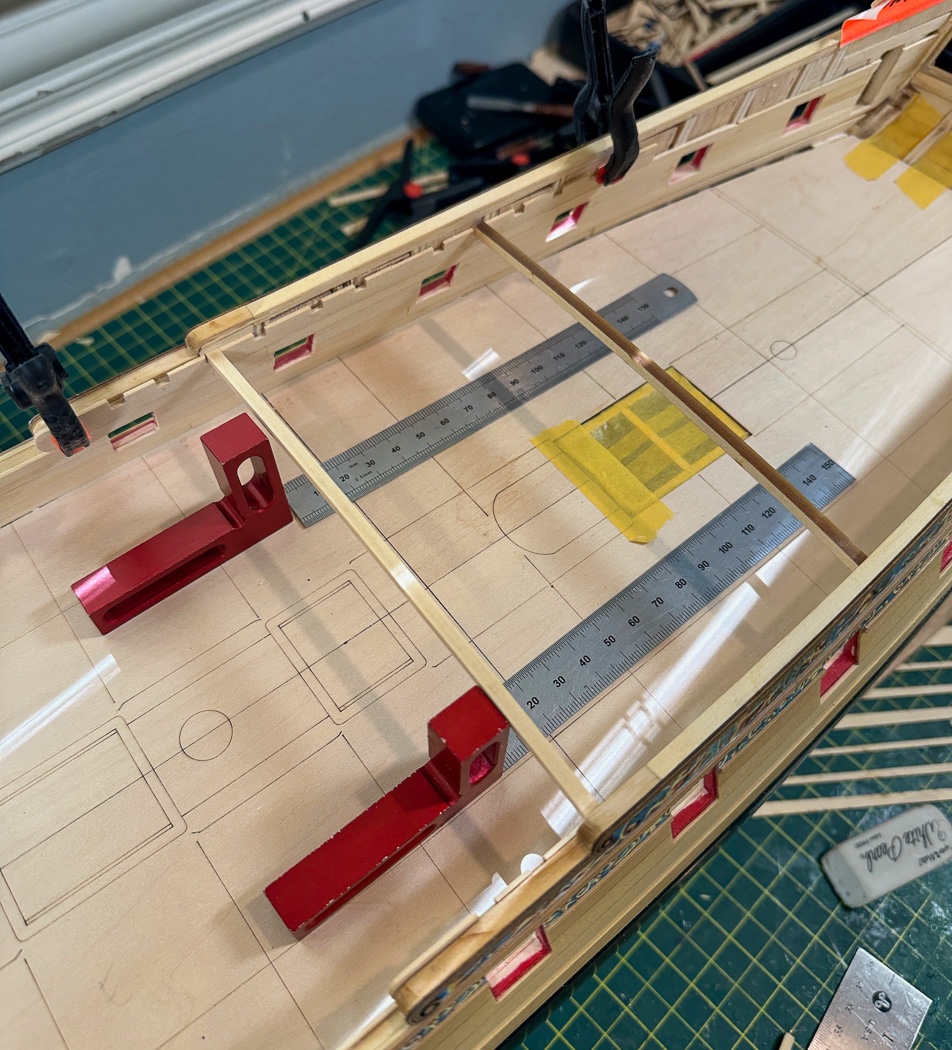
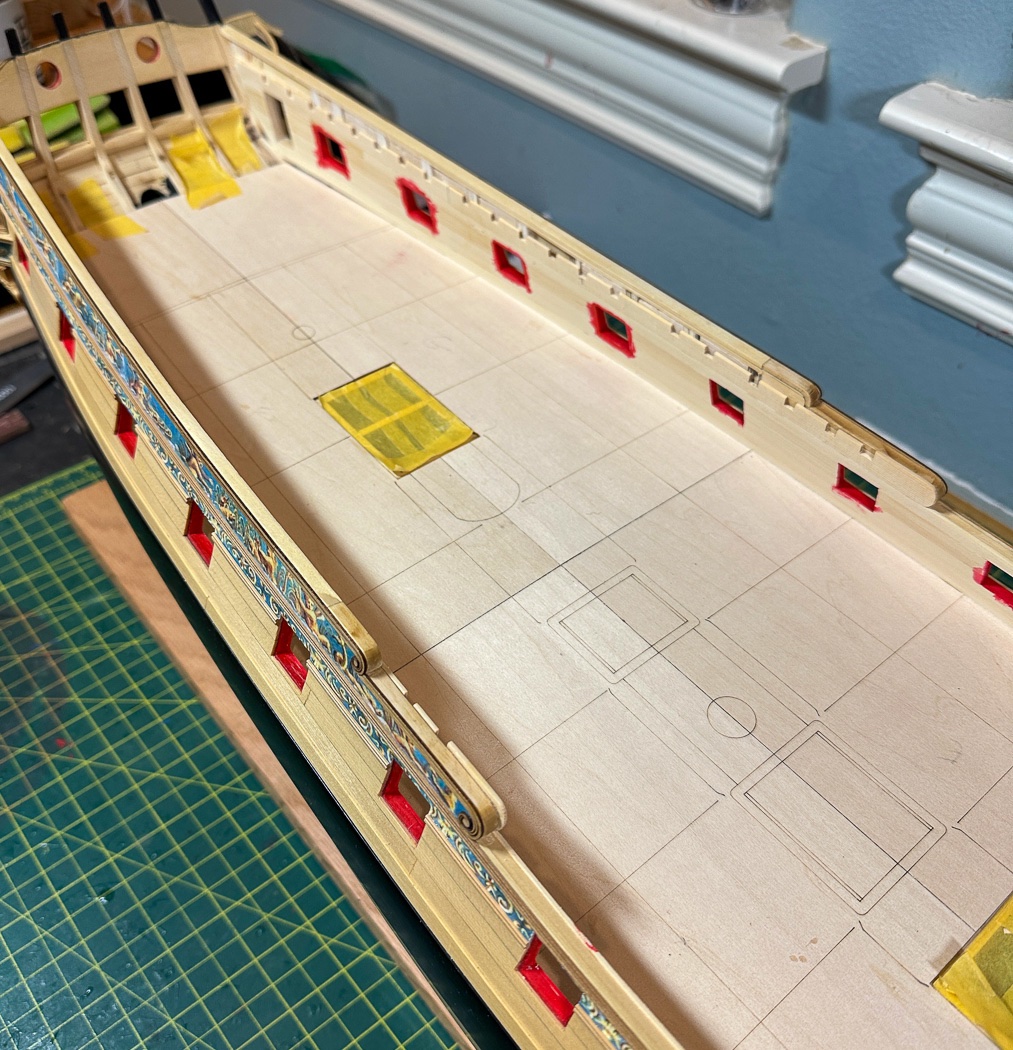
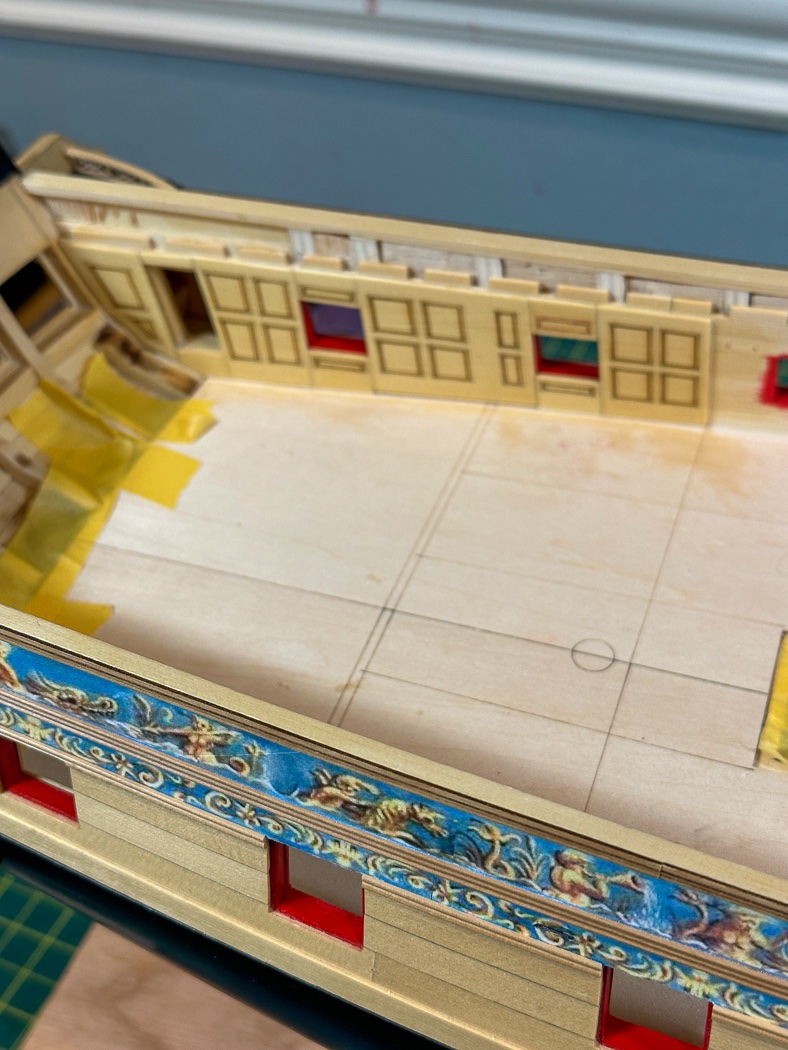
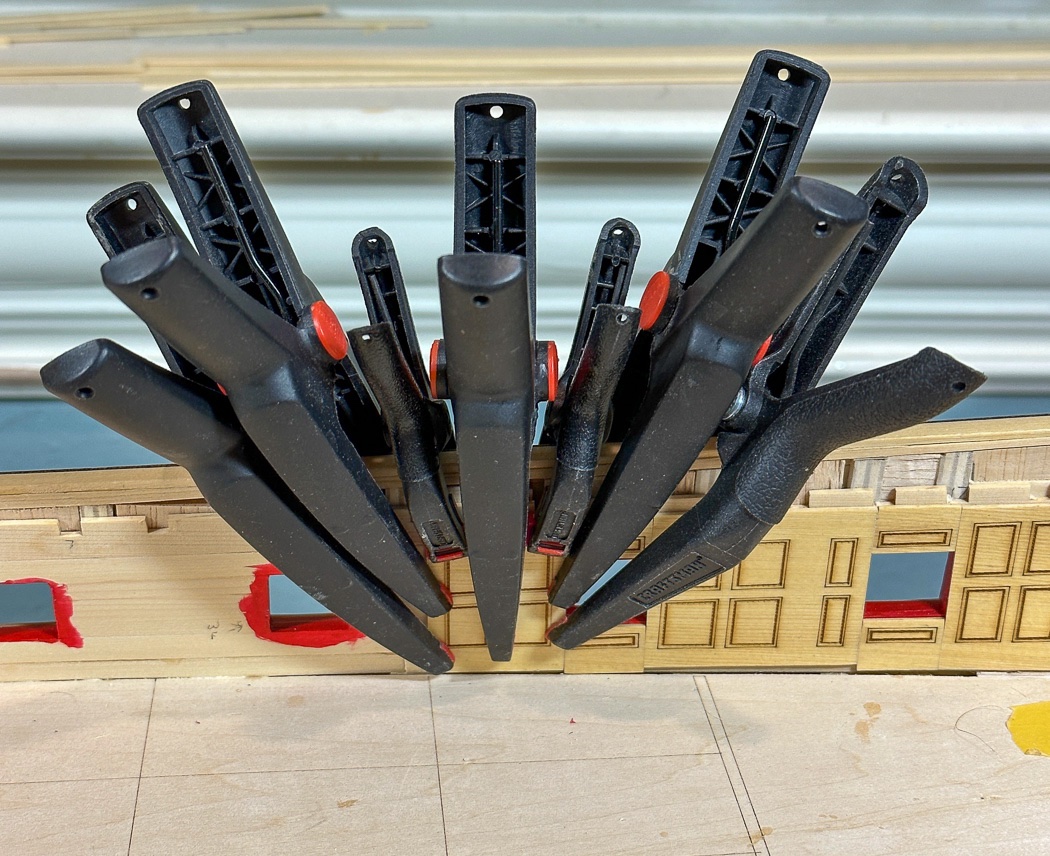
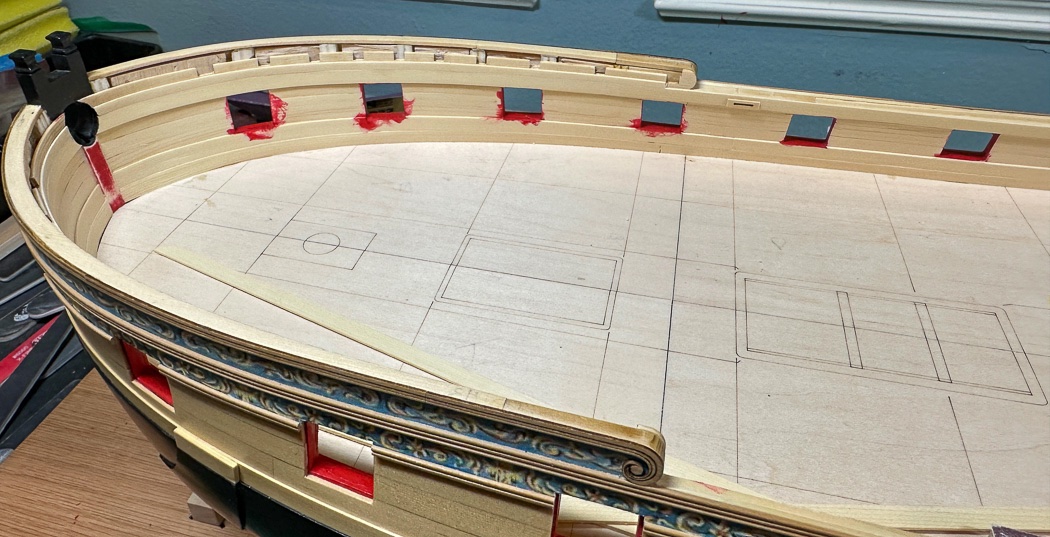
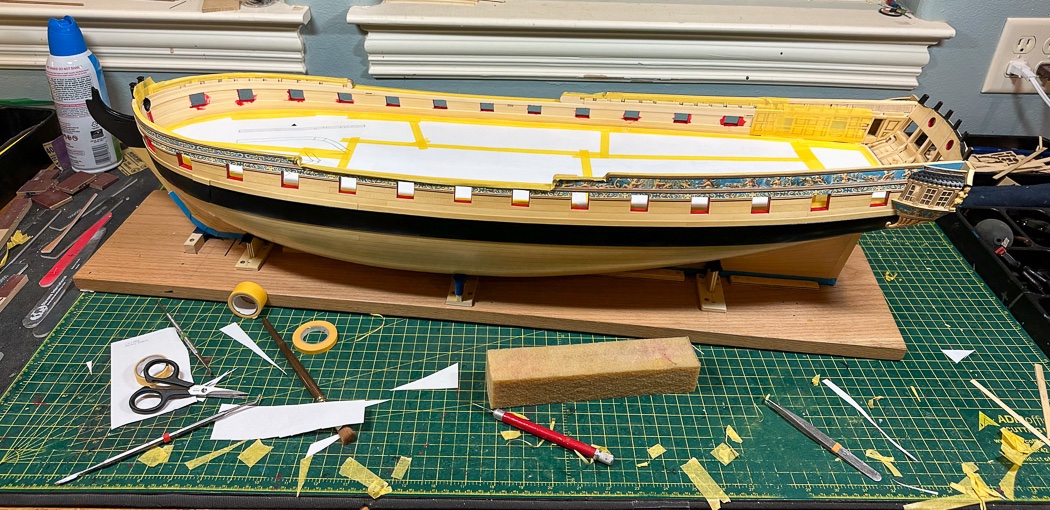
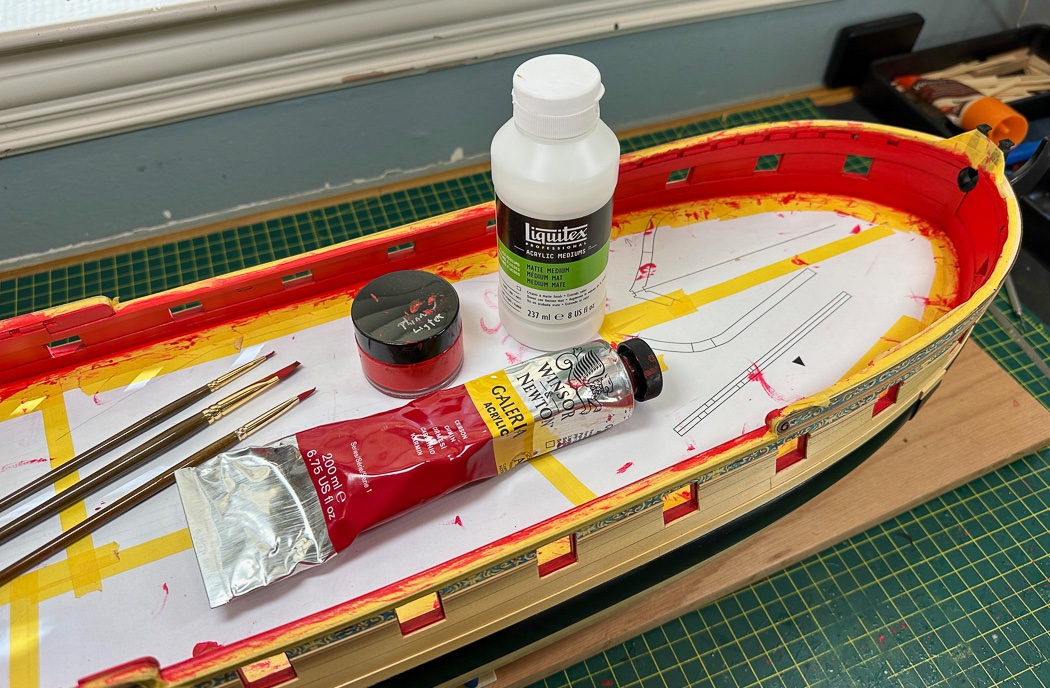
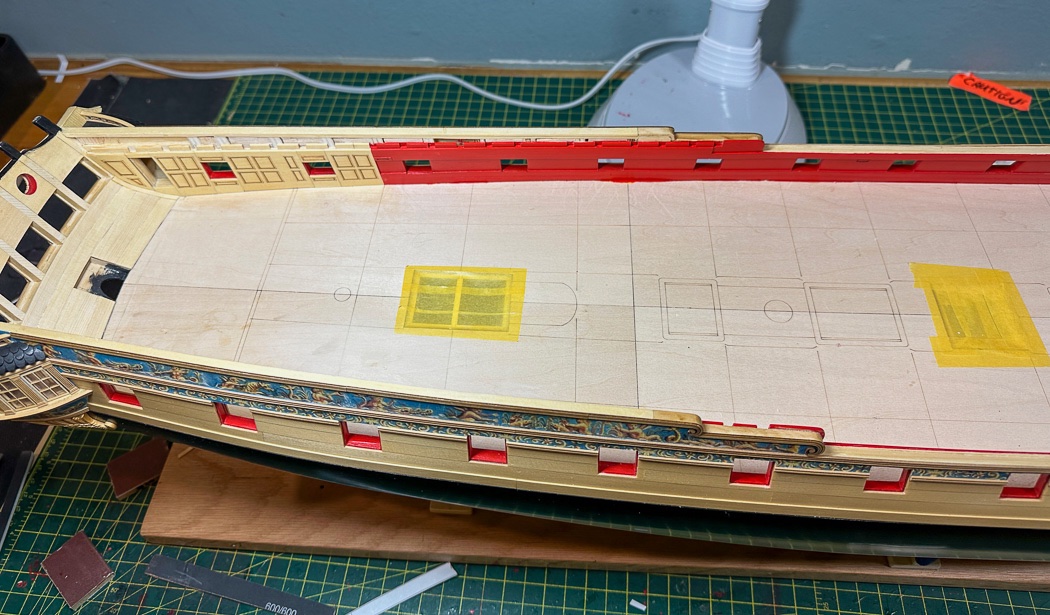
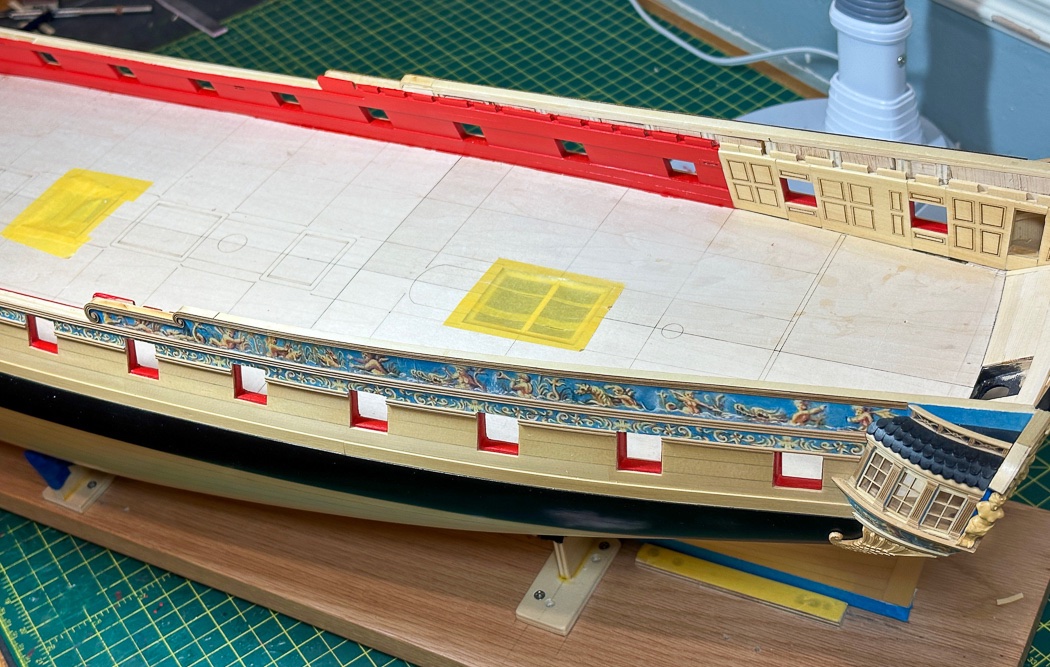
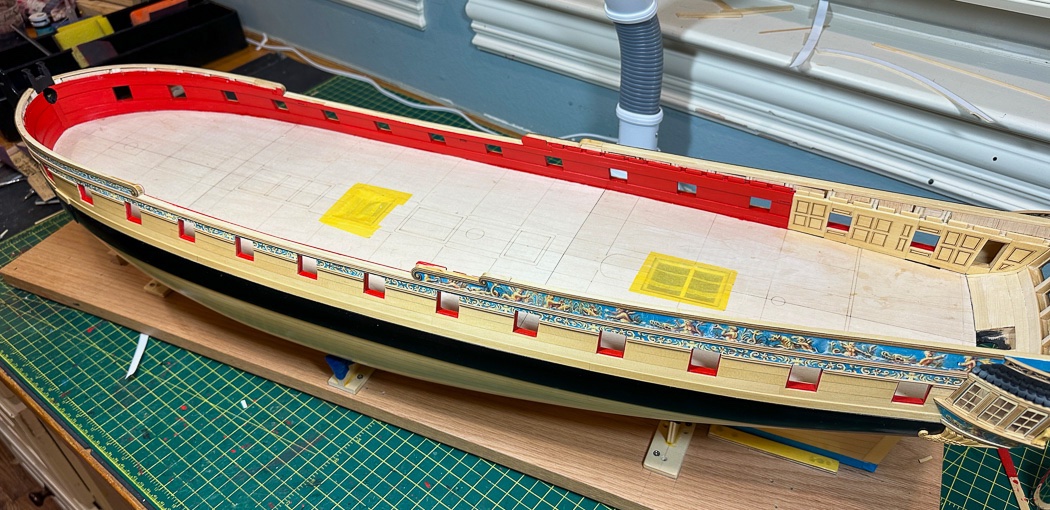
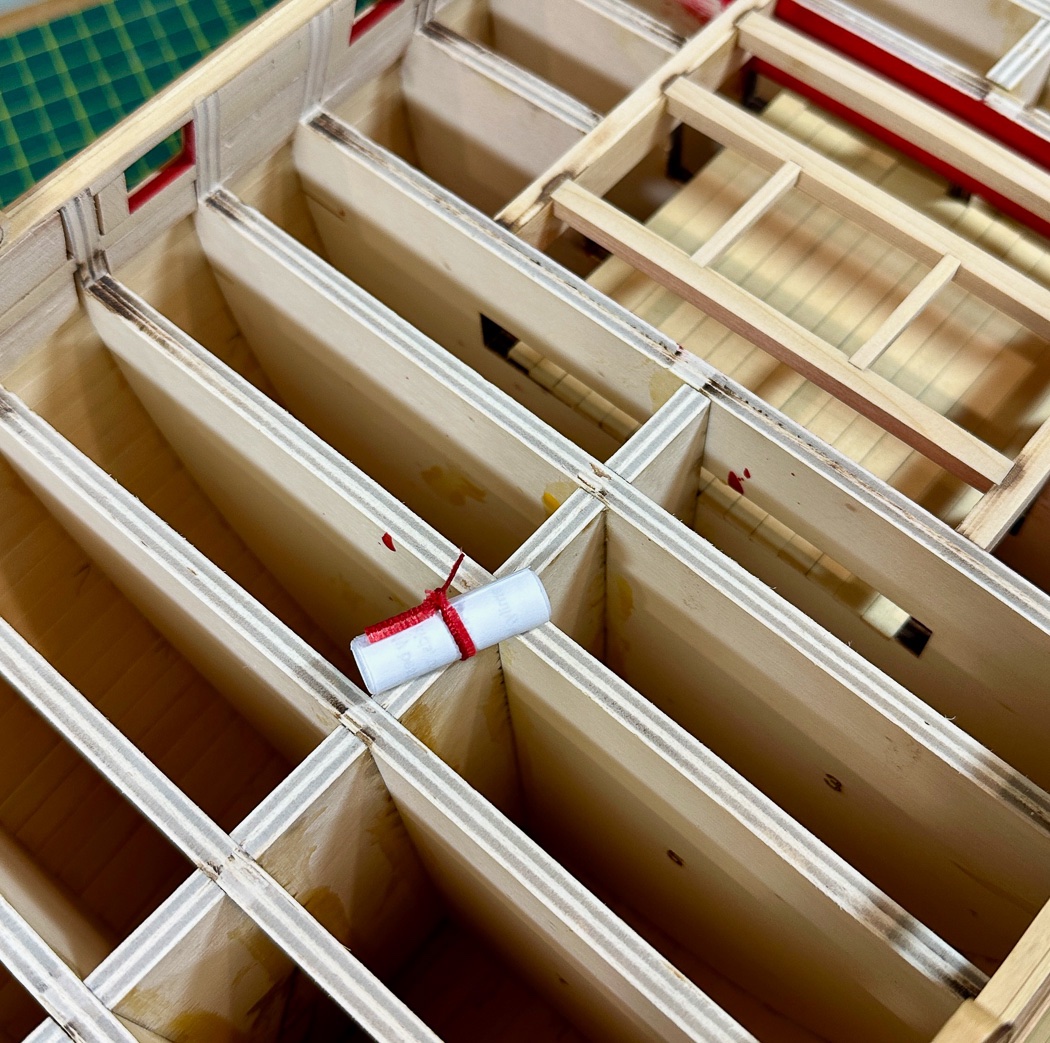
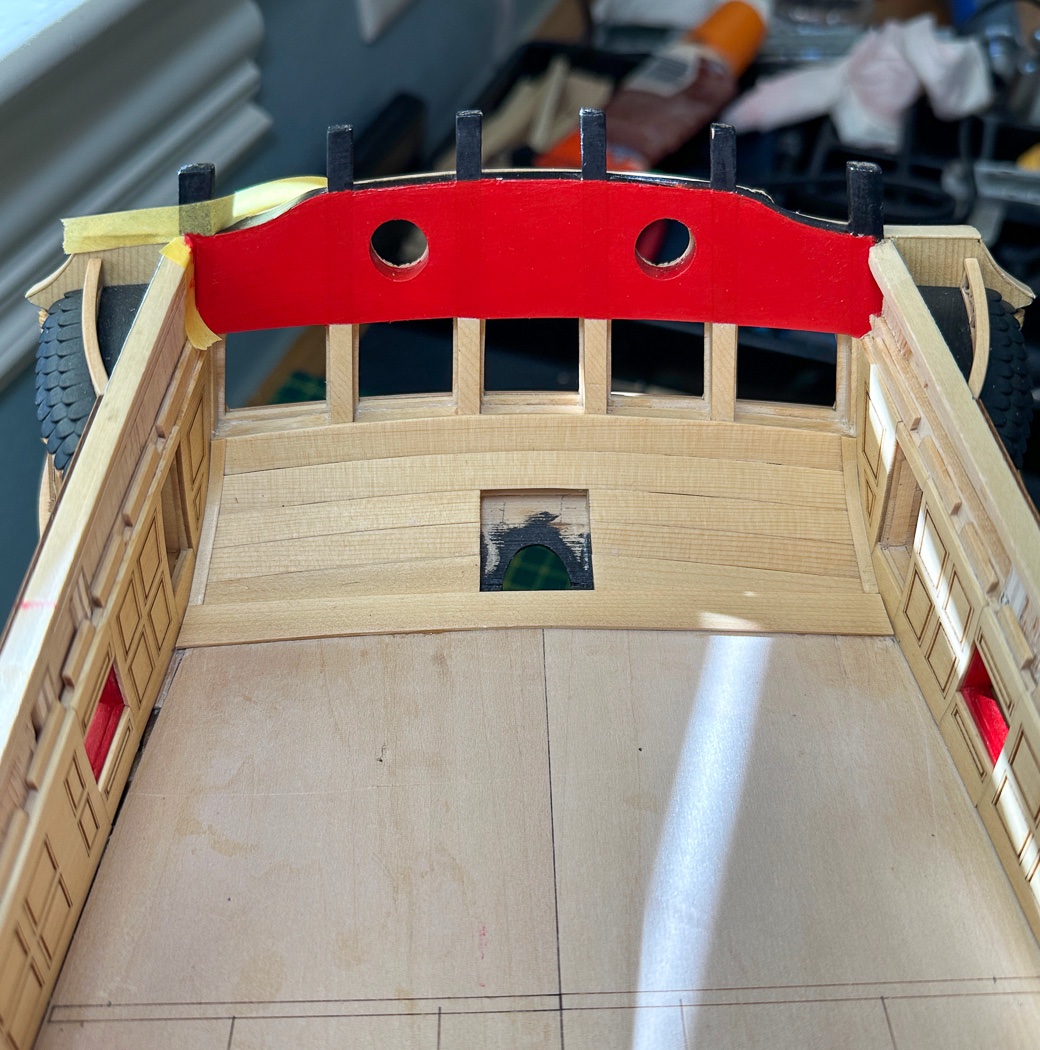
The Bulwarks and Cabin It’s been a minute. While the bulwarks seem like an easy and quick task, for me it wasn’t. A lot of adjustments and time to get what I wanted to get. Plus the holidays and family time reduce time in the workshop. Other than this one with the scroll I failed to get any photos of the lower deck planking and beam installation seen in the outer edge of the photo. There are two of these openings for eventual hatch covers, and make for a nice touch. There will only be a glimpse below once the deck is built out, I still added a little red paint down there for the hope of a little color showing. Even if it doesn’t these were fun to construct. Next up is adding the false deck. It’s in six pieces and important to get lined up along the centerline Having the lines lasered for deck furniture placement and the grid lines are a big plus. The deck openings helped line up 6 pieces along with temporary pins, I took the time it took, including a plumb string, to get the centerline correct, starting with the center pieces, then aft, then the bow. I probably didn’t need this much weight to hold it down while the glue dried but I do now know its firmly in place. I used white PVA to allow me time to make any last minute adjustments for fit. Getting the first half of the center was a bit of a challenge, the rest fell into place as they should. I got caught up in the building and didn’t get many photos. There are multiple widths of wood, ¼, 3/16, and 7/32 making up the first layer to get the proper fit deck to rail. Once it was complete I went back and touched up the paint on the ports. A few things to note: This was a good time to check the run of planking at the waist. I pulled out a strip of the 5/16th wood used for the eventual cap rail and made a few minor adjustments for a good fit with the moulding on the hull exterior. Much easier to do this now before painting and without apprehension of damaging anything else, ok, less apprehension. I’m sure the build order as described by the monograph is done with good purpose. However, if I were doing it again I’d install the false deck and bulwarks before doing the exterior work of chapter 3. I did a lot of clamping as I installed bulwark planks and was constantly concerned about damaging the fine detailed work on the exterior the of the hull with the clamps. It would have been easier, I think, without the frieze work and moulding to clamp the outside. Again, that’s just me. One absolute mistake I made was gluing on the quarter panel roofs at the end of chapter 3. I absolutely should have set these up in my cabinet and added them much later. I try to be careful, but I’ve knocked off and had to replace the ornate fence on its top twice now. Just me being rushed with hand movements as I painted but still why have them there as a target for reckless movement. Naturally, me being me, I wasn’t always satisfied and pulled a plank or two I didn’t like. The Byrnes Thickness Sander once again proved its worth, I ran all the planking through it before adding them to the ship and minimized the planks I wanted replaced. The deck clamps are important to get right. I was glad to have chapter 7 parts on hand to test fit a couple of beams, I took the time for careful measurements to ensure they’d be squared up. With the port clamp fixed I adjusted the starboard side for an accurate fit, the beams are now square and the clamps in alignment with the etched laser grid marks on the false deck. The laser etched cabin panels are another nice touch. I did have to make a number of adjustments to fit my model, but fortunately they were minor. I guess my placement of those port sills way back at the framing stage were pretty much where they were supposed to be. The tape at the stern came in handy in preventing small pieces from disappearing forever into the dark hold. When installing these panels it’s important to find out just how many clamps you can get in there to hold it while the PVA dries. I think I did pretty well in achieving max, and likely not entirely necessary, clampage. Once again affirming the rule, when you think you have enough clamps, buy more clamps. The second layer of planks, just 1/32 thick (actually a bit less), add a really nice look to the bulwarks, it takes time for alignment and installation but fun to see the result it brings. Here’s really weird iPhone pano of the starboard side. It’s obviously warped but still a fun look at the completed bulwarks. Ready, set, paint. I pride myself on being extremely neat and organized as I mask the deck and ship for bulwark painting, or maybe not. I’m am a firm advocate for Tamiya tape. It is perfect for this task, flexible and once applied no paint is going to leak beneath it. In this regard for my model work it leaves the usual blue painters tape in the dust. On a side note, @kurtvd19 recommended the large “eraser” block also shown in the photo for cleaning sandpaper of embedded sawdust. It does this quite well. It has the added benefit of being the perfect size to lift and tilt the build board for better working angles. Unlike wood blocks, being rubber, it doesn’t slip. It's worth the purchase for this alone (available on Amazon). Back at the beginning I chose Winsor & Newton Galleria Crimson Acrylic for my bulwarks, ports, and other deck work. I thinned it with Liquitex Matte Medium. I’m sure there are better explanations for this verses water, for me it imparts more translucence to the paint as well as more of a matte (hence the name) finish than water thinned acrylic. I’m sure this is debatable, everyone has their own choice and thoughts for paint work. Seven coats of paint and many days later the bulwarks and cabin are complete. It’s difficult to get a photo of showing this in any interesting way. The paint is matte, but the work lights impose a bit of a glare, it’s either that or photos in shadow. I hope you can tell how nice the 2nd layer adds to the affect. I’m really happy with the color. It may not be historically accurate (though some shade of red was), it does make for a nice model. I like a similar shade of red on my Cheerful. Like then I decided if I’m going red, I should really go RED. While I was painting, and under the premise of paint early often, I also painted the deck side of the transom. The paint is still drying and there is touch up underway including the black of the transom top. I’m glad to get this done now, much easier access at this point. Finally the stern cabin ‘wall” is complete to include the stern margin plank. A rudder housing and benches come later. On I go to margin planks and deck planking. I’ve already milled a batch of planks and run them through the thickness planer. I also get to build some coamings and the first of the deck work in the process. I guess the big sanding and paint work is done for me and a year of two of detailed (and fun) work is ahead. Thanks for stopping by, for the likes and especially the comments, they are appreciated.


- 840 replies
-
- 14
-
-
-
- winchelsea
- Syren Ship Model Company
- (and 1 more)
-
In the third book (I'm re-reading them) Aubrey replaces the mast with mast for meant for a 36 gun frigate. He is please with the added speed he gets with this and other adjustments of his own design. So if you're building it as Aubrey sailed it in the books, the larger mast is correct.
-
Yay, the surprise is Surprise!
-
The Surprise is an excellent choice. I am rereading the series now and finding myself wishing I had a better idea of its layout. Caldercraft/Jotika had for the longest time, years, HMS Surprise as a soon to be released model. I kept waiting on it, but it never came. Frigates are far more interesting subjects, I personally have no interest in another ship of the line. I also have no more room for another large model.
-
This is a common challenge, you can get some ideas from other logs that have resolved it. As Chuck noted you only need a small width.
- 389 replies
-
- 1
-
-
- winchelsea
- Syren Ship Model Company
- (and 1 more)
-
My bad, I thought you were on chapter 12.
- 642 replies
-
- 2
-
-
- winchelsea
- Syren Ship Model Company
- (and 1 more)