


Charter33
-
Posts
422 -
Joined
-
Last visited
Reputation Activity
-

 Charter33 got a reaction from CraigVT in HMS Triton by Charter33 - Complete model - POF - 1:48 Scale
Hi,
The first step is often the hardest ….
I hope to undertake this challenge of building my first POF ship in order to develop my practical skills and learn new techniques - as well as ending up with a (hopefully) impressive final model. I’ve been preparing for a month or so – downloading the plans for the keel, getting them printed and sourcing the wood.
My choice of timber is cherry for the keel and frames, maple for the false keel and other components further down the line and I also have some black walnut in store.
The timber as purchased:
A strip of each cut off, split and planed down to 8 mm.
Ready to start ….
The first component I decided to make was the aft deadwood.
Patterns cut out and glued onto the cherry with ‘Spray Mount’. I’ve found that this holds the paper in place well enough without leaving any residue on the surface once removed. A couple of times the paper lifted while a piece was being worked but this was spotted and dealt with before errors occurred.
After initial cutting out with a band saw edges were refined with a combination of a band facer and drum sander.
I have read about, and liked, the technique of enhancing wood joints with permanent marker pens and decided to experiment with black and brown pens on some off-cuts. To say the difference is subtle would be a wild exaggeration! Blowed if I could tell the difference….
The pieces were glued together, cleaned up and the ‘steps’ marked prior to the waste wood being removed with chisels.
My first attempt. I’m leaving the final shaping to the sides until much more of the keel has been completed in order to try and get my head around how much wood needs to be removed.
I have also been working on making a building board.
Before I work on progressing further could someone confirm whether or not this project has been opened to new members again, please? I’m a bit confused by the message saying that it is on the ‘Forum’ front page and the one at the top of the ‘Cross section’ thread saying it’s temporarily closed.
In no way is the fact that this project has no big glossy box to smuggle through the back door while the Admiral isn’t looking, thus avoiding the inevitable questions of ‘how much?’ or ‘and where is it going to go when it’s finished’ has absolutely no bearing on my decision to get actively involved ….. honest…
Cheers,
Graham.
-
 Charter33 reacted to matiz in French 74-gun ship by matiz - scale 1:56 - Tiziano Mainardi
Good day, indoor hull finishing and first adjustment of the outside and first cut in height of the excess part
-
 Charter33 got a reaction from AnobiumPunctatum in HMS Triton by Charter33 - Complete model - POF - 1:48 Scale
Hi,
The Furniture scratch repair pens arrived .... three different browns euphemistically labeled mahogany, oak and cherry.
The first was as dark as the marker pen I used previously on the aft deadwood, the other two, shown above, were very similar to each other but do not match the woods they are named after, to be honest. The cherry, on the left, was the best of the bunch and it was this that I used on the second attempt at the deadwood and various scarf joints.
It would be wrong of me to criticize these pens without actually trying them for their advertised purpose, but with a working knowledge of furniture restoration and various finishing technique including French polishing there are other processes I'd use to repair scratches first. The effect of this pen was generally okay although it does have a tendency to bleed, especially on end grain.
Then I came across Dan Vad's advice to Jeff (Zarcon) on his HMS Victory build log about using Pigma Brush pens and archival ink. More than twice the price of the set of three, but so much better - and worth every penny! I'll be using this for the rest of the build.
I have now completed cutting out all the components for the keel etc.
My next task is to add the rebates and additional tapering to the fore and aft deadwoods, referring to the first plan sheet and the other build logs in this forum - I love a challenge! Once this has been done, and the parts have been assembled, I hope to be in a position to access the full set of sheets.
Cheers,
Graham.
-
 Charter33 got a reaction from mtaylor in HMS Triton by Charter33 - Complete model - POF - 1:48 Scale
Thanks Chuck - your swift response is appreciated!
Graham
-
 Charter33 got a reaction from G.L. in HMS Triton by Charter33 - Complete model - POF - 1:48 Scale
Hi,
The Furniture scratch repair pens arrived .... three different browns euphemistically labeled mahogany, oak and cherry.
The first was as dark as the marker pen I used previously on the aft deadwood, the other two, shown above, were very similar to each other but do not match the woods they are named after, to be honest. The cherry, on the left, was the best of the bunch and it was this that I used on the second attempt at the deadwood and various scarf joints.
It would be wrong of me to criticize these pens without actually trying them for their advertised purpose, but with a working knowledge of furniture restoration and various finishing technique including French polishing there are other processes I'd use to repair scratches first. The effect of this pen was generally okay although it does have a tendency to bleed, especially on end grain.
Then I came across Dan Vad's advice to Jeff (Zarcon) on his HMS Victory build log about using Pigma Brush pens and archival ink. More than twice the price of the set of three, but so much better - and worth every penny! I'll be using this for the rest of the build.
I have now completed cutting out all the components for the keel etc.
My next task is to add the rebates and additional tapering to the fore and aft deadwoods, referring to the first plan sheet and the other build logs in this forum - I love a challenge! Once this has been done, and the parts have been assembled, I hope to be in a position to access the full set of sheets.
Cheers,
Graham.
-
Charter33 reacted to knightyo in HMS Triton by Alan – POB 1/64
I thought I should show the steps I'm taking in order to mark out deck clamps, etc... Especially if I'm doing anything wrong.. I've cut the templates to fit the insides of the hull, resting on top of each bulkhead. I've also sanded the insides of the hull in order to match the contours of the templates. I'm now transferring the template markings onto the insides of the bulkheads accordingly. I plan on running a plank along the deck clamp line from stem to stern to serve as a support for the deck beams. I'll also be planking the inside of the hull up to the deck clamps to add strength. The hull is extremely fragile right now. I believe I'll also need to lay down planking on top of the bulkheads in a few areas, which will be visible from a hatch or two.
-
Charter33 reacted to AnobiumPunctatum in HM Sloop Fly by AnobiumPunctatum - 1:32 - POF
The last part of the backbone is the Stern, consisting of the Inner Post and the Stern Post. I build a small jig to adapt the Stem to the Deadwood:
For fixing the Stern on the Deadwood I use small brass pins. At the keel I used a simplified tenon joint:
Next I milled the scores for the transoms and the rudder hinges:
The last picture shows the nearly finished port side of the arrangement. I lost a little the sharp edge of the rabbet, but don't think that I can do it better. So I will live with it. After finishing the starbordside and glueing the complete arrangement together, I will final sand the everything.
The two parts of the stern are real tricky and so I am very happy if I can fnish this part. Greg has spllitted his stern post in two part. If I have to do this part another time, I think I will follow this way. The rabbet at the transoms is than a littlebit simplified, but I think his way makes life much simpler.
-
Charter33 reacted to jablackwell in Sopwith F.1 Camel Build Log
Serious headway made on the fuselage these past couple of days. The port and starboard sides were done first, and triple checked for alignment. They were then joined at the nose with what will become the engine mount later on in the build. Horizontal formers were then placed on the top and bottom along the length of the fuselage. This will end tomorrow with the joining of the two fuselage sides at the tail. Note the little metal tensioner eyes in the corners. Wires and turnbuckles will go in there. Along the top will be run a series of stringers from the tail to the back side of the cockpit. Such fun keeping this all aligned! I had better finish this soon so I can catch up with the other Syren builds! ;-)
~john
-
Charter33 reacted to knightyo in HMS Triton by Alan – POB 1/64
I used to have a Triton log, but it went down with the crash years ago. My priority is to finish my Syren, but thought I'd post my old photos with a few comments. I don't see a lot of POB logs on here, and suspect people considering the POB version might be hesitant due to the lack of logs, and mentions of a bulkhead which might be out of scale.
I've rescaled the plans to 1:64 which is my preferred scale. The keel pieces are pear. The photo shows a number of test pieces.
-
 Charter33 got a reaction from GuntherMT in HMS Triton by Charter33 - Complete model - POF - 1:48 Scale
Hi,
The Furniture scratch repair pens arrived .... three different browns euphemistically labeled mahogany, oak and cherry.
The first was as dark as the marker pen I used previously on the aft deadwood, the other two, shown above, were very similar to each other but do not match the woods they are named after, to be honest. The cherry, on the left, was the best of the bunch and it was this that I used on the second attempt at the deadwood and various scarf joints.
It would be wrong of me to criticize these pens without actually trying them for their advertised purpose, but with a working knowledge of furniture restoration and various finishing technique including French polishing there are other processes I'd use to repair scratches first. The effect of this pen was generally okay although it does have a tendency to bleed, especially on end grain.
Then I came across Dan Vad's advice to Jeff (Zarcon) on his HMS Victory build log about using Pigma Brush pens and archival ink. More than twice the price of the set of three, but so much better - and worth every penny! I'll be using this for the rest of the build.
I have now completed cutting out all the components for the keel etc.
My next task is to add the rebates and additional tapering to the fore and aft deadwoods, referring to the first plan sheet and the other build logs in this forum - I love a challenge! Once this has been done, and the parts have been assembled, I hope to be in a position to access the full set of sheets.
Cheers,
Graham.
-
Charter33 got a reaction from CraigVT in HMS Triton by Charter33 - Complete model - POF - 1:48 Scale
Thanks for the ‘likes’, comments and input. Always welcome and appreciated.
Michael (MEDDO) – the equipment is not exactly mine, but having access to it is the next best thing. The planner / thicknesser and I go back 40 years – and I believe it was almost 20 years old when I first used it! I must have fed the equivalent of a small forest through it over that time …..
Christian – I agree that the black and the brown pens that I used on the aft deadwood are too dark. I have found a set of ‘Furniture Touch up scratch repair’ marker pens that contain lighter browns and plan to experiment with these when they arrive next week.
In the mean-time the components for the bow structure are ready to be cut out.
I’ve been working on the false keel and keel parts this week. All the scarf joints have been marked out and cut.
I have also made a temporary filler piece for the space between the fore and aft deadwoods, where the frames will go later, to help with shaping the bottom edges of the keelson components and to aid with the alinement of the various sub-assemblies when they are glued together.
I’ll be adding the tapers to the ends later. They are ready for gluing now and once dry I plan to add the treenails to the joints. Showing my inexperience here, but should these be wooden pegs or copper wire? – I’ve seen both methods used …..
Cheers for now,
Graham.
-
 Charter33 got a reaction from Jorge Diaz O in HMS Triton by Charter33 - Complete model - POF - 1:48 Scale
Hi,
The first step is often the hardest ….
I hope to undertake this challenge of building my first POF ship in order to develop my practical skills and learn new techniques - as well as ending up with a (hopefully) impressive final model. I’ve been preparing for a month or so – downloading the plans for the keel, getting them printed and sourcing the wood.
My choice of timber is cherry for the keel and frames, maple for the false keel and other components further down the line and I also have some black walnut in store.
The timber as purchased:
A strip of each cut off, split and planed down to 8 mm.
Ready to start ….
The first component I decided to make was the aft deadwood.
Patterns cut out and glued onto the cherry with ‘Spray Mount’. I’ve found that this holds the paper in place well enough without leaving any residue on the surface once removed. A couple of times the paper lifted while a piece was being worked but this was spotted and dealt with before errors occurred.
After initial cutting out with a band saw edges were refined with a combination of a band facer and drum sander.
I have read about, and liked, the technique of enhancing wood joints with permanent marker pens and decided to experiment with black and brown pens on some off-cuts. To say the difference is subtle would be a wild exaggeration! Blowed if I could tell the difference….
The pieces were glued together, cleaned up and the ‘steps’ marked prior to the waste wood being removed with chisels.
My first attempt. I’m leaving the final shaping to the sides until much more of the keel has been completed in order to try and get my head around how much wood needs to be removed.
I have also been working on making a building board.
Before I work on progressing further could someone confirm whether or not this project has been opened to new members again, please? I’m a bit confused by the message saying that it is on the ‘Forum’ front page and the one at the top of the ‘Cross section’ thread saying it’s temporarily closed.
In no way is the fact that this project has no big glossy box to smuggle through the back door while the Admiral isn’t looking, thus avoiding the inevitable questions of ‘how much?’ or ‘and where is it going to go when it’s finished’ has absolutely no bearing on my decision to get actively involved ….. honest…
Cheers,
Graham.
-
Charter33 reacted to Steve 12345 in HMS Bounty by Steve 12345 - FINISHED - Billing Boats - 1:50
Hello all and welcome back to my penultimate post on HMS Bounty
another milestone reached is completion of the running rigging I thank you guys for the suggestions on the stay line distortion issue I had
I stiffened the line with the white glue and water mix and played about and redone the lines several times Im know going to conclude I believe some distortion is normal maybe not so much on the real ship but it is just rope and any pulling on it at all will of course distort it so I think I can live with that .
We still ofcourse haven't reached completion there still remains my achilles heal on this ship, the ships boat and rope coils
with completion of the running rigging I am now going to let myself begin the rc aeroplane build
but your can be dam sure ill be back with a ships boat and rope coils to claim my sought after FINISHED badge in the title
so with some sadness the shipyard is deconstructed and now converted to a hangar
until then thanks guys for viewing liking and commenting
steve
-
Charter33 reacted to md1400cs in Wasa by md1400cs - FINISHED - Corel - 1:75
Hi Mates,
Minor update. Working with some sections of the sails has proven to be – well not so much fun (for me)– venting here Hmmm---
I got through the boltropes – pleasant enough. Then came the need to add various cringles. Now those are really hard for me. So far the least enjoyable part of this build.
I am also not satisfied with the results. And knowing that a reinforcement canvas wrap should also be included around each cringle has annoyed me.
Tried several glues on sailcloth bits and could not find a glue that “disappeared”. Also these cloth rectangles are to be sewed as well – just not happening.
I re-did the martnets after buying some triangular deadeyes from WoodenModelShipKit (one of the vendors that advertises here). After fiddling around several times finally discovered how to lace without lines crossing over each other. Happy with the results.
So this area (sail details) is slowing me some.
Several of the other sails will not need so much extra work – and it will all be fun again (;-)
-
Charter33 reacted to kurtvd19 in Learn how to gain access to the HMS Triton Plans
HMS TRITON PLANS AVAILABLE AGAIN
Some time ago we shut down access to new downloads of the Triton plans due to piracy by the Chinese while we worked to determine a way to keep the plans from being pirated by others. We investigated many options and have devised a method to eliminate, as much as possible, access by those wishing to pirate our plans.
The NRG Board came up with a workable method and access to the plans has now been reopened. There is now a $5.00 (US) charge for access to the plans. There are costs incurred with providing the access that we must cover and we are sure anybody who is building either the cross section or the full model will agree that the plans are a bargain for the price.
To get access one must go to the NRG Store http://alturl.com/ntqf7 and supply your Model Ship World (MSW) user name and proceed to pay the $5.00 charge. Upon receipt of the payment the NRG Office will notify Chuck to grant access to you. Chuck will permit access and then send you a Private Message (PM) on MSW. Please allow a few days for the PM as Chuck is the only one able to provide access.
Once you have access you can access and download the plans at any time – your access is perpetual.
We are glad to be able to reopen access and hope to see some new build logs soon.
you will know when you have been given access. A previously hidden link in the Group Projects Menu at the top of the forum will suddenly appear and you will have access to them. It is called
"The HMS Triton Downloads "
I have already given access to three new Triton builders. Remember....you will not be given printed plans....
Five bucks gets you access to the downloads.....as I have already received a few questions on how fast the printed plans will be delivered. There are NO printed plans. You will need to print them on your own for your own personal use ONLY.
PLEASE NOTE: Orders will not be accepted to any persons with an address from China or Russia.
Kurt
-
 Charter33 got a reaction from prutser in HMS Triton by Charter33 - Complete model - POF - 1:48 Scale
Hi,
The Furniture scratch repair pens arrived .... three different browns euphemistically labeled mahogany, oak and cherry.
The first was as dark as the marker pen I used previously on the aft deadwood, the other two, shown above, were very similar to each other but do not match the woods they are named after, to be honest. The cherry, on the left, was the best of the bunch and it was this that I used on the second attempt at the deadwood and various scarf joints.
It would be wrong of me to criticize these pens without actually trying them for their advertised purpose, but with a working knowledge of furniture restoration and various finishing technique including French polishing there are other processes I'd use to repair scratches first. The effect of this pen was generally okay although it does have a tendency to bleed, especially on end grain.
Then I came across Dan Vad's advice to Jeff (Zarcon) on his HMS Victory build log about using Pigma Brush pens and archival ink. More than twice the price of the set of three, but so much better - and worth every penny! I'll be using this for the rest of the build.
I have now completed cutting out all the components for the keel etc.
My next task is to add the rebates and additional tapering to the fore and aft deadwoods, referring to the first plan sheet and the other build logs in this forum - I love a challenge! Once this has been done, and the parts have been assembled, I hope to be in a position to access the full set of sheets.
Cheers,
Graham.
-
Charter33 got a reaction from Jorge Diaz O in HMS Triton by Charter33 - Complete model - POF - 1:48 Scale
Thanks for the ‘likes’, comments and input. Always welcome and appreciated.
Michael (MEDDO) – the equipment is not exactly mine, but having access to it is the next best thing. The planner / thicknesser and I go back 40 years – and I believe it was almost 20 years old when I first used it! I must have fed the equivalent of a small forest through it over that time …..
Christian – I agree that the black and the brown pens that I used on the aft deadwood are too dark. I have found a set of ‘Furniture Touch up scratch repair’ marker pens that contain lighter browns and plan to experiment with these when they arrive next week.
In the mean-time the components for the bow structure are ready to be cut out.
I’ve been working on the false keel and keel parts this week. All the scarf joints have been marked out and cut.
I have also made a temporary filler piece for the space between the fore and aft deadwoods, where the frames will go later, to help with shaping the bottom edges of the keelson components and to aid with the alinement of the various sub-assemblies when they are glued together.
I’ll be adding the tapers to the ends later. They are ready for gluing now and once dry I plan to add the treenails to the joints. Showing my inexperience here, but should these be wooden pegs or copper wire? – I’ve seen both methods used …..
Cheers for now,
Graham.
-
 Charter33 got a reaction from harvey1847 in HMS Triton by Charter33 - Complete model - POF - 1:48 Scale
Hi,
The first step is often the hardest ….
I hope to undertake this challenge of building my first POF ship in order to develop my practical skills and learn new techniques - as well as ending up with a (hopefully) impressive final model. I’ve been preparing for a month or so – downloading the plans for the keel, getting them printed and sourcing the wood.
My choice of timber is cherry for the keel and frames, maple for the false keel and other components further down the line and I also have some black walnut in store.
The timber as purchased:
A strip of each cut off, split and planed down to 8 mm.
Ready to start ….
The first component I decided to make was the aft deadwood.
Patterns cut out and glued onto the cherry with ‘Spray Mount’. I’ve found that this holds the paper in place well enough without leaving any residue on the surface once removed. A couple of times the paper lifted while a piece was being worked but this was spotted and dealt with before errors occurred.
After initial cutting out with a band saw edges were refined with a combination of a band facer and drum sander.
I have read about, and liked, the technique of enhancing wood joints with permanent marker pens and decided to experiment with black and brown pens on some off-cuts. To say the difference is subtle would be a wild exaggeration! Blowed if I could tell the difference….
The pieces were glued together, cleaned up and the ‘steps’ marked prior to the waste wood being removed with chisels.
My first attempt. I’m leaving the final shaping to the sides until much more of the keel has been completed in order to try and get my head around how much wood needs to be removed.
I have also been working on making a building board.
Before I work on progressing further could someone confirm whether or not this project has been opened to new members again, please? I’m a bit confused by the message saying that it is on the ‘Forum’ front page and the one at the top of the ‘Cross section’ thread saying it’s temporarily closed.
In no way is the fact that this project has no big glossy box to smuggle through the back door while the Admiral isn’t looking, thus avoiding the inevitable questions of ‘how much?’ or ‘and where is it going to go when it’s finished’ has absolutely no bearing on my decision to get actively involved ….. honest…
Cheers,
Graham.
-
Charter33 reacted to Torbogdan in Fokker DR 1 by Torbogdan - FINISHED
Some pictures finally! They are not that good but ok. I took them fairly quick just to get some pictures up.
Some more vacation coming up so no time to build or update for a few weeks. But these are hopefully better than nothing.
So whats left? Well attaching the upper wing, attaching the landing gear (which is causing some trouble as the space between the wings and the body is too tight for the landing gear struts to fit. Will have to do some thinking there. I got a nice tight fit between the lower wing and body only to find out that it is too tight for the landing gear...)
Then there is some covers over the "engine compartment" and attaching the wires for the ailerons. Oh, must not forget the raison etre for a fighter, getting the Spandaus in place!
Then it should, more or less, be finished. So maybe some time in October
-
Charter33 reacted to Steve 12345 in HMS Bounty by Steve 12345 - FINISHED - Billing Boats - 1:50
Hello all thanks again for the views and comments
no apology needed popeye I thank you for your intervention and I am glad other billings bounty builders can see the reccomemded ten mm vrs the eight mm and decide for themselves how they would like to proceed credit to don also for suggesting eight mm
my goal for this evening was to fit the mainmast upper shrouds and make a start on the mainmast ratlines I smashed that and had a really progressive evening I hope to complete all the main mast ratlines by tomo evening then its onto the mizzen
oh and hi Derek good to see you back buddy hope all is going well on the bluenose
-
Charter33 reacted to jablackwell in Sopwith F.1 Camel Build Log
Top and bottom wing now have tensioners. The trailing wing edge has been added. Ailerons have been separated from the wings (using a small XActo saw... very nerve wracking). Now to hinge the ailerons and then move onto the fuselage.
~john
-
Charter33 reacted to jablackwell in Sopwith F.1 Camel Build Log
David: nice to have you on board!
Ron: thank you for the review. I am happy that the MA kit is wood: I am enjoying that a lot. The wing ribs are about as accurate as laser cutting can make them without them getting too fragile. Seeing real Sopwith's in the shop, all their components are more fragile... they were pretty light weight with thin components.
This week finished the wings' wooden components and am about to add their compression bars and tensioning wires. I am ...just... almost concerned about cutting free the ailerons. We'll see how that goes!
~john
-
Charter33 reacted to Robert29 in HMS Victory 1805 by Robert29 - FINISHED - Caldercraft - Scale 1:72
Gun deck inner bulwark gunport patterns in place. To align the height of the gun ports of the inner pattern with that of the outside pattern, I had to shave off quite a bit from the lower edge of the inner pattern. I found those small cheap spirit levels quite useful for the job. Linings for the gunports without lids are ready as well.
Robert
-
Charter33 reacted to Steve 12345 in HMS Victory by Charter33 - Caldercraft - Scale 1:72
Hi graham I resize my photos with a program called faststone it's completely free to download no adds no third party involed I've been using it from I joined msw with no problems there is even a tutorial on utube give it a try hope this helps
Steve
-
 Charter33 got a reaction from yvesvidal in HMS Victory by Charter33 - Caldercraft - Scale 1:72
Thanks WackoWolf and mort stoll for the 'likes'.
A bit of progress made this week …..
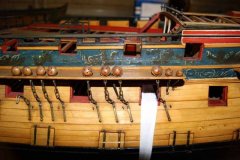
With the aid of a couple of card templates, plan sheet 2, google images and several build logs the location for the dummy gun ports was found and marked onto the hull.
One of the most helpful logs was JJacobi’s – thank you! I made a comment on his build log back at the beginning of March about how his build was a few pages further on in the instruction manual compared to mine only to discover that he was still in the process of uploading pictures. In truth it transpires that he is way, way ahead! If my Victory gets anywhere close to his in terms of quality I will be well satisfied.
The outlines of the ports were incised with a sharp chisel as was the division between the double doors on the middle deck.
The ports were then painted. I’ll add the hinges etc. later on.
To drill the holes for the spigots of the dummy cannons some simple guides were made. These were produced from some hardwood offcuts trimmed to size to fit the ports and then mounted in a four jaw chuck on a lathe for boring.
The manual suggests that the drill to use should be slightly larger than 2 mm. Checking the spigots showed that they were well under this size coming out at about dia. 1.77 mm. Trial holes drilled in a spare piece of ply from the kit resulted in my selection of a Number 49 drill bit (1.85 mm). Although they still need painting I couldn’t resist pushing them temporarily into place.
I’ll be spraying the cannons at the same time as the upper gun deck barrels but first I have plans to modify these. More details will follow once I’ve worked out how to achieve the results I am hoping for.
As for progress with my other project - I finally found a couple of UK based suppliers of T Track. Neither have them I stock at present but at least they have been ordered. I now have the base board ready and waiting for them, the parts for the gantry prepared and the set of 1:48 scales printed. About time to start shaping some wood, I think, and another build log to begin …..
With the Victory build the next challenge is the copper plating – lots and lots of copper plating ….!
Cheers for now,
Graham