-
Posts
1,038 -
Joined
-
Last visited
Content Type
Profiles
Forums
Gallery
Events
Everything posted by No Idea
-
Hi All Is Ancre responding to any messages on their website - I've sent them 2 messages via their website over the past few months and never received a reply. Has anyone else had this problem or just me? I want to order a new monograph but I would like some extra plates for the axial parts and frames for accuracy. Its seems as though they are not receiving the messages sent. Let me know as I have also checked my junk mail just in case Thanks Mark
-

L'Amarante by marsalv - 1:36 - POF
No Idea replied to marsalv's topic in - Build logs for subjects built 1501 - 1750
The way you solve both clamping and machining operations is inspirational - stunning -
Your attention to detail is simply mind blowing - wow
- 2,623 replies
-
- heller
- soleil royal
-
(and 9 more)
Tagged with:
-
Beautiful work - your joinery is spot on.
- 399 replies
-
- winchelsea
- Syren Ship Model Company
-
(and 1 more)
Tagged with:
-
The capacitor in our saws is a start and run. It doesn’t only help the initial kick it also runs the motor whilst using it
-

Planking Method Name
No Idea replied to Thukydides's topic in Building, Framing, Planking and plating a ships hull and deck
That looks like a hooked scarf joint to me -
I have found the switches to be a slightly weak point but are easily changed. The capacitors are start and go and are also easily changed too. If you do replace the switch you can go a bit top gun! I love my new switch on my sander - it adds nothing to the machine but makes me smile.
-

L'Amarante by marsalv - 1:36 - POF
No Idea replied to marsalv's topic in - Build logs for subjects built 1501 - 1750
That really is beautiful work - I found planking the ceiling particularly difficult and your result is amazing -
If it helps this is my Le Rochefort build - I too am very much learning on the job but I have received much help on this forum to get me to this point. Also Gerard Delacroix is a member of this forum and always answers my questions regarding this lovely ship when I get stuck. Drop him a message I'm sure he will be more than happy to help.
-

Help with tapering
No Idea replied to N1ckel's topic in Building, Framing, Planking and plating a ships hull and deck
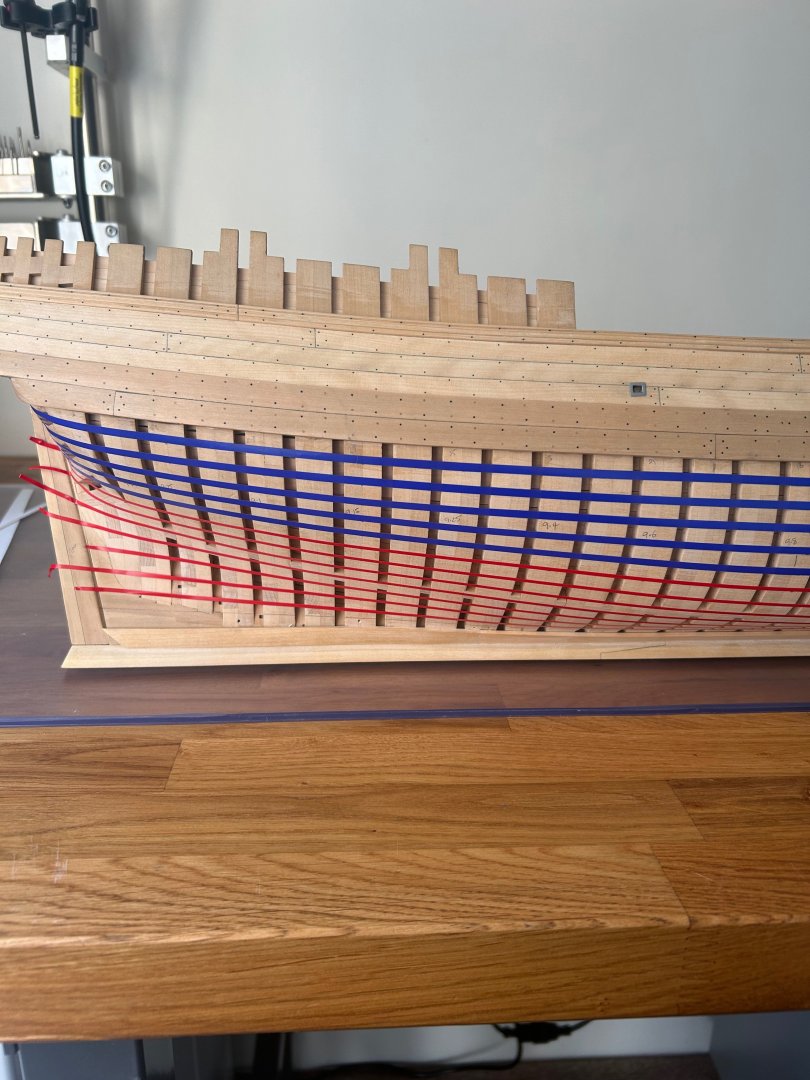
Hi Nick - Sorry I should have read this thread earlier. This is how I carry out the planking process which has always served me well. Firstly I firmly believe that if you can mark out and draw every single plank then you can make them too. I literally spend days marking out to get a good look with the correct spacings too. I use automotive tape so that I can see and adjust the runs of each strake and I like to do this after I have placed the garboard strake. Just for clarification a strake is simply a length of planks all joined up which run from stem to stern. Doing this work up front first makes seeing the individual planks easy when it comes to actually making them. There are very very few parallel planks on a ship and it's also very time consuming but so satisfying when you get it right. I also only bevel one edge of a plank which for me is always the top side of the plank. I leave the bottom of a plank square. That way the next strake meets a square edged plank and I cut the bevel to suit. I have put loads of words down so here's a picture that explains what I mean. If you don't plan it from the start you will be chasing each and every plank which is a nightmare. -
Stunning work Ben your attention to detail is fantastic
- 399 replies
-
- winchelsea
- Syren Ship Model Company
-
(and 1 more)
Tagged with:
-

Byrnes table saw - belt tensioning
No Idea replied to Mr Pleasant's topic in Modeling tools and Workshop Equipment
Hi I've also had this issue and changing the belt made no difference either. I contacted Jim who advised me to place a couple of washers behind the tensioning spring. It's a little fiddly to do but it works great and is a permanent repair. It just pushes the motor back that little further which is what is required. Mark -
Mike I'm so glad that you are going to reprint these books. As soon as they are available I will be ordering a set from you and if you can let me know when they are available I would appreciate it. I'm not so good with ebooks but I think what you are doing is a great idea - I'll wait for the reprint. As I understand it with the original series it was possible to buy an encapsulated frame plan view. If so will this be available too.
-

L'Amarante by marsalv - 1:36 - POF
No Idea replied to marsalv's topic in - Build logs for subjects built 1501 - 1750
Hi marsalv I'm just catching up and how I missed this I do not know. Its another fantastic build and I'll be following along - Mark -
Hi Marc I'm just catching up on your amazing build. I have used Birchwood and I also had issues with it rubbing off when it was handled. I did exactly as you using acetone to clean the parts before dipping them in the solution. I then (after) read the instructions and they advise cleaning the part in alcohol (IPA) and then washing this away with water before dipping. After doing it this way the results were excellent. Keep the updates coming as this is such a fantastic build.
- 2,623 replies
-
- heller
- soleil royal
-
(and 9 more)
Tagged with:
About us
Modelshipworld - Advancing Ship Modeling through Research
SSL Secured
Your security is important for us so this Website is SSL-Secured
NRG Mailing Address
Nautical Research Guild
237 South Lincoln Street
Westmont IL, 60559-1917
Model Ship World ® and the MSW logo are Registered Trademarks, and belong to the Nautical Research Guild (United States Patent and Trademark Office: No. 6,929,264 & No. 6,929,274, registered Dec. 20, 2022)
Helpful Links
About the NRG
If you enjoy building ship models that are historically accurate as well as beautiful, then The Nautical Research Guild (NRG) is just right for you.
The Guild is a non-profit educational organization whose mission is to “Advance Ship Modeling Through Research”. We provide support to our members in their efforts to raise the quality of their model ships.
The Nautical Research Guild has published our world-renowned quarterly magazine, The Nautical Research Journal, since 1955. The pages of the Journal are full of articles by accomplished ship modelers who show you how they create those exquisite details on their models, and by maritime historians who show you the correct details to build. The Journal is available in both print and digital editions. Go to the NRG web site (www.thenrg.org) to download a complimentary digital copy of the Journal. The NRG also publishes plan sets, books and compilations of back issues of the Journal and the former Ships in Scale and Model Ship Builder magazines.


.thumb.jpeg.8ba7c8a47bafd4dc679c2898cfbb64ae.jpeg)


