
HOLIDAY DONATION DRIVE - SUPPORT MSW - DO YOUR PART TO KEEP THIS GREAT FORUM GOING! (Only 13 donations so far - C'mon guys!)
×


CaptainSteve
-
Posts
1,858 -
Joined
-
Last visited
Content Type
Profiles
Forums
Gallery
Events
Everything posted by CaptainSteve
-
 It hath been way too long since CaptainSteve didst update-eth this log. Verily, some o’ Ye may even be a-thinkin’ that he didst chuck-eth in the towel and give-eth up on this build. “Nothing,” declared Our Hero, stirring from semi-retirement, “couldst be further from the Truth.” “Indeed-eth,” he were to go on, by way of explanation, “’Tis true that I may ha’ thrown a tantrum or two when me stern timber didst snap-peth. But that couldst easily ha’ been repaired.” However, ‘twas whilst Our Hero was examining the damage done, a-scratching his head and contemplating his options, that he were to notice something that didst cause-eth him great consternation. “Forsooth,” he were to begin. “I crap-peth thee not, but I were to discover-eth a most foul emission which I didst maketh.“ A most foul emission, you say, CaptainSteve ?? No surprises there !! “A most foul O-mission, I didst mean-eth”, Our Hero were to haughtily correct-eth himself. “For, verily, ‘twouldst seem-eth that I didst neglect to work-eth in the curvature across Connie’s sternal regions.” Indeed, the counter piece which had been made previously (and made-over, and over) were too short and the upright timbers didst result in a flat plane when taken horizontally across the stern. But, upon re-examining the plans and his vast collection of Connie cornucopia, it became clear that this were not to be the case … a slight outward curvature didst exist and was glaringly apparent. “Besides,“ CaptainSteve didst interdict, if further justification were necessary, “She looks better that way !!” And, so, yet another do-over were to be in order ... a major one, this time. “Verily, backward steps were taken …”, Our Hero didst declare-eth. Thusly, he were to take-eth up his knife and didst remove-eth the timbers a-ready inserted, and he didst return-eth unto the drawing board. Stay tuned, Dear Reader. An update be imminent …
 -
I'll be the lone, dissenting voice that says I wouldn't worry about a launch ... your ship is magnificent enough to stand alone as a display.
- 962 replies
-
- 5
-

-
- sovereign of the seas
- ship of the line
- (and 1 more)
-
She looks absolutely stunning, Dave. Bravo, Sir ... Bravo !!
- 962 replies
-
- 6
-
-
- sovereign of the seas
- ship of the line
- (and 1 more)
-
Nice work on the mast-hinge, Buck. Good to see that the mean ole Quality Control lady let it pass through.
- 515 replies
-
- 6
-
-
- artesania latina
- whaleboat
- (and 1 more)
-
Make that three votes for unblackened, DrPer.
- 335 replies
-
- 4
-
-
- 18th century longboat
- Finished
- (and 1 more)
-
For a very brief moment, I considered swapping books with you (an autographed Model Building with Brass for my AOTS). But, in truth, I'd really rather have BOTH books. I have also read some reviews of Marquardt's book that say it is not entirely accurate. For me, personally, I find it to be a fantastic and extremely detailed tome, although I have never claimed to be any kind of Naval Historian.
-
That's a fantastic picture, Ken !! It appears to show both Royal Studs and Topgallant Studs on the Mizzen, as well as a second Swinging Boom. I think I'm gunna need a bigger modelling room !! Just a thought, but with regards to the booms, would the fore ones fold back along the channels, and the main-mast ones fold forward ?? (I'll check again, but I'm sure AOTS only showed the one along each side, though clearly two would be required.)
-
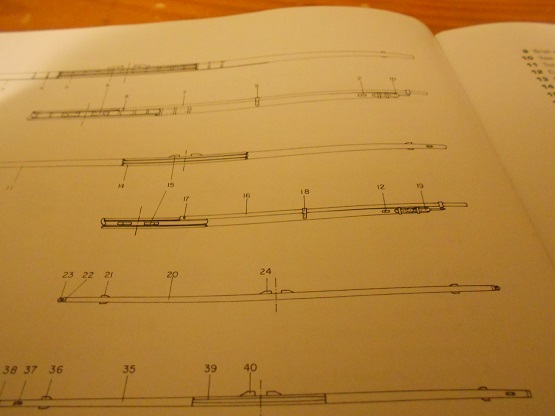
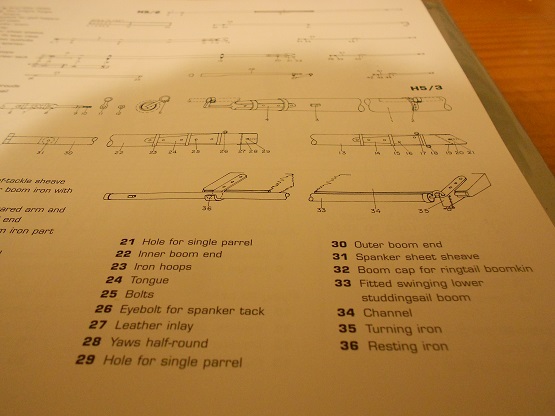
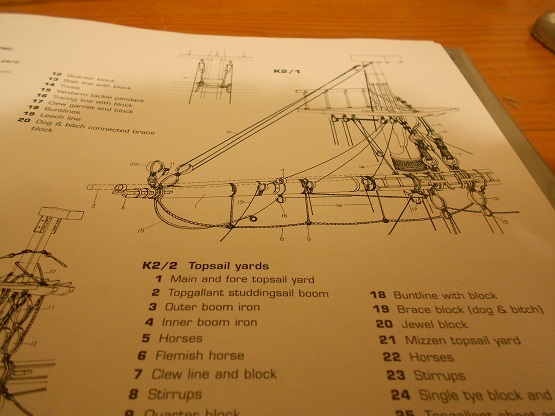
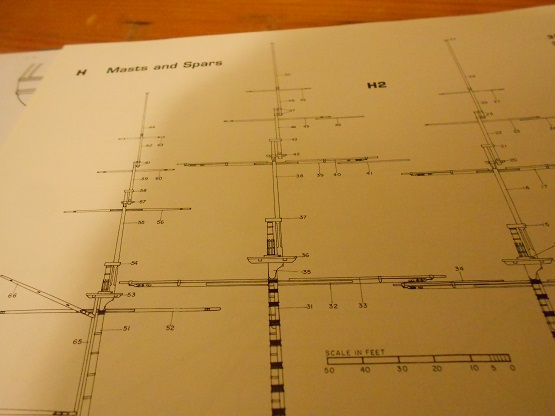
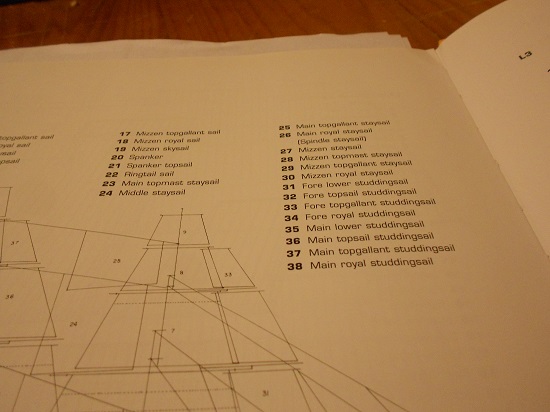
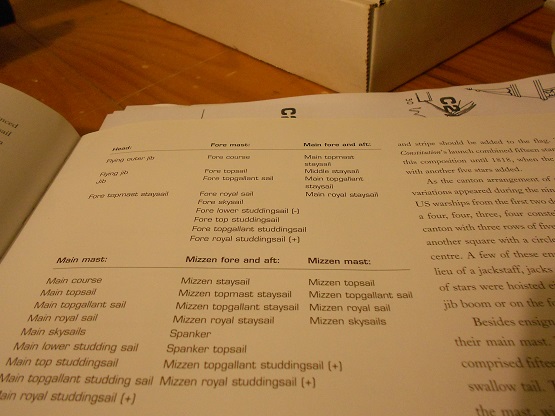
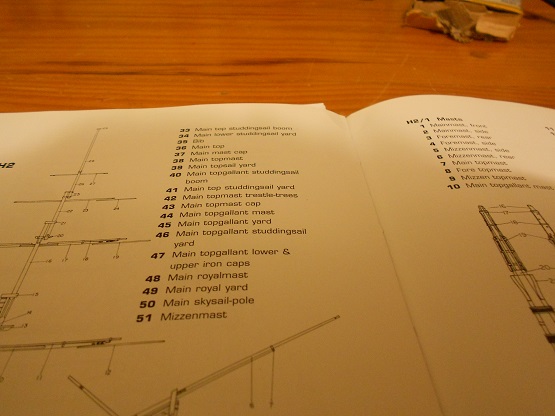
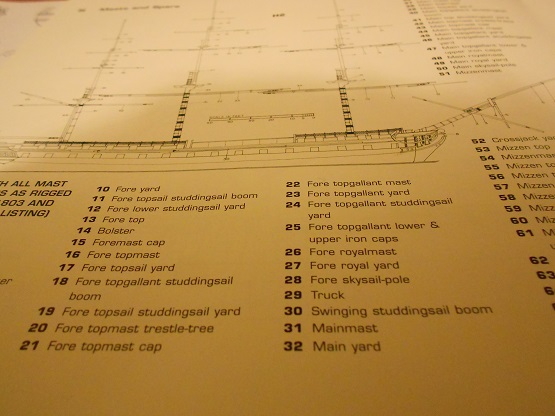
Ken, I've pulled out my copy of AOTS and had a scan thru the Masting and Rigging Sections. There really is a ton of useful information in that book (some of which I'm still discovering). At first, I must admit that CapnHarv's explanation made sense - that any mainmast stud-sails would deprive the foremast stud-sails of any wind. However, AOTS provides irrefutable evidence that Connie not only had Main- and Fore-mast studding sails ... ... but also had the option for Mizzen-mast studding sails ... It would seem that, with one exception, all of the studding booms are kept fitted to the corresponding spar ... The one exception would be the one boom that is stored alongside the main-mast channels. This is the one which you have already modelled (and which I shamelessly plan to copy from your build). This boom is more correctly known as the Swinging Studding-sail Boom. (In this pic, you are interested in Item #30. Rather difficult to spot, but it appears below the open bulwarks between the mainmast and the foremast.) Here is a pic of a studding-boom attached to its' corresponding spar (I can try to get a better photo if you need it) ... (You are interested in the fourth spar down from the top of the page.) Finally, a pic showing the fixtures for the Swinging Boom where it lies against the channel ... Hope these are of use to you. Let me know if you require any others.
-
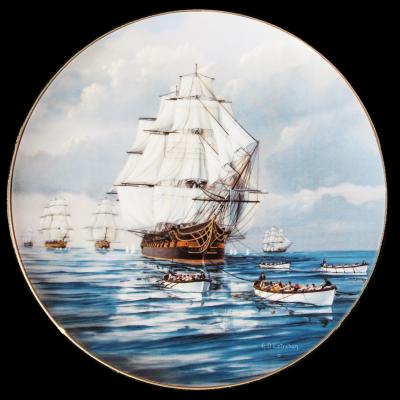
Great work on the netting, Ken !! I'd need to check thru my copy of Marquardt's AOTS to try to answer your question. Will look into that this evening (as I'm at work right now), and let you know what I can find. Meanwhile, I found this pic showing the Great Chase from a slightly different angle:
-
CH, I wasn't at all impressed with the ME line in the Bounty Launch kit, and replaced all of it with Chuck's Syren rope. I plan on doing the same with my MS Constitution build, and have already laid in one order with Chuck for both rope and blocks. I think you will notice a vast difference with the Syren stuff.
- 96 replies
-
- 6
-
-
- topsail schooner
- revenue cutter
- (and 3 more)
-
Just stunning detail on the hatch, Matt ... but then, we've come to expect nothing less from you.
-
Coming along nicely, Sunsanvil. I also lost a lot of the cherrywood when doing the frames. Indeed, there was barely enough of them to complete the Launch ... and I may have even needed to substitute some wood I'd saved from previous kits. In my case, I was painting the kit anyway, so this wasn't too much of an issue. With regards to bending the planks, as I recall, I just soaked them in cold water and then used the curling iron to apply heat while making the bends around the bow area.
- 66 replies
-
- 2
-
-
- bounty launch
- model shipways
- (and 1 more)
-
Cutty Sark by NenadM
CaptainSteve replied to NenadM's topic in - Build logs for subjects built 1851 - 1900
Actually, Jud, house-training a dog is a whole lot easier than most people realize. It just takes a bit of patience and the need to pay very close attention to your puppy for about three to four days. Training should start as soon as the dog is walking on her own. All that is needed is to follow the doggie around closely for those first few days. The trick is that the very moment you notice the dog start to squat down, you interrupt her toilet intentions by clapping your hands loudly near her (to break her train of thought), then (still clapping) lead her outside to her designated toilet spot (it's essential that she learns to walk there by herself). Now just wait. It won't take very long. As soon as the dog has done her business, reward her with heaps of praise and a treat. Repeat this process after all meal-times, and whenever you see the dog going into a squat, for the next few days. Naturally, an open door or fitted doggie-door is essential so that the dog can get outside by herself. Have a section of garden reserved just for the dog to use as a toilet. You will need to bury any doggie-droppings regularly. Do this in the same spot, as the dog will come to recognize the smell as being her toilet place. The Old Wives' tale of rubbing their nose in the mess is actually counter-intuitive as, most of the time, the dog is being punished for something that happened hours beforehand. They cannot associate the crime with the punishment. Sorry to hijack your build-log, Nenad.- 4,152 replies
-
- 5
-
-
- cutty sark
- tehnodidakta
- (and 1 more)
-
Beautiful work, Matt ... right down to the scuppers in the last pic.
-
Can't say that I know wood well enough to have spotted any visual clues. I'd agree with what you have read about gently plying the wood. If it doesn't yield, then turn it 90 degrees. That looks good. The plans, as I recall, mention spot-gluing the frame pieces just above the sheer-tabs.
- 66 replies
-
- 2
-
-
- bounty launch
- model shipways
- (and 1 more)
-
Just a quick heads-up you may want to keep in mind ... When bending the frames, I lost quite a few to breakage before realizing that I needed to pay closer attention to the run of the wood-grain (though it seems you had no problems with your first one).
- 66 replies
-
- 2
-
-
- bounty launch
- model shipways
- (and 1 more)
-
Microwaving the wood?
CaptainSteve replied to a topic in Building, Framing, Planking and plating a ships hull and deck
Pete. This is similar to the one that I have ... ... it has a thumb-operated clip to hold the hair/wood. You'll need to apply pressure to the clip once the piece of wood is placed inside, in order to form the bend. Hence, the tea towel to avoid burning your fingers.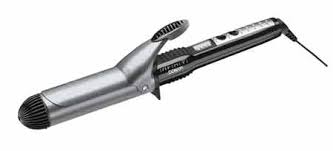
-
Microwaving the wood?
CaptainSteve replied to a topic in Building, Framing, Planking and plating a ships hull and deck
In the past, I have had great success with a hair-curling iron*. Just soak the strips in warm tap water. It may take a bit longer. Depending on the size and thickness of the wood, leave them for an hour or so. Then clamp the strips in the curling iron where you want the bend to form. You may require a tea-towel (or similar) to prevent burning your fingers. (*Note: The part where I didn't have a lot of success was walking into a store frequented mostly by female members of the population and asking to buy aforementioned hair-curling iron. Something about a short-haired male (with tattoos) requesting said item seemed to result in stares of incredulity and wonderment amongst the staff.) -
Cutty Sark by NenadM
CaptainSteve replied to NenadM's topic in - Build logs for subjects built 1851 - 1900
She's beautiful, Nenad !!- 4,152 replies
-
- 3
-
-
- cutty sark
- tehnodidakta
- (and 1 more)
-
Steve. Have you seen the cross section being built by Modeler12 ?? He is doing his from scratch and I know that he has done extensive work on the knees. (See his log from about page 7 and onwards)
- 108 replies
-
- 4
-
-
- mamoli
- constitution
- (and 2 more)
-
Cutty Sark by NenadM
CaptainSteve replied to NenadM's topic in - Build logs for subjects built 1851 - 1900
I don't know, Carl ... the detailing on them looks pretty good.- 4,152 replies
-
- 2
-
-
- cutty sark
- tehnodidakta
- (and 1 more)
-
Cutty Sark by NenadM
CaptainSteve replied to NenadM's topic in - Build logs for subjects built 1851 - 1900
Great work, Nenad !!! Are those cigarettes 5 foot long ?? I sure hope you are not smoking a whole pack of those every day.- 4,152 replies
-
- 5
-
-
- cutty sark
- tehnodidakta
- (and 1 more)
-
For someone who is flying blind, you are doing a fantastic job, Dave.
- 962 replies
-
- 5
-
-
- sovereign of the seas
- ship of the line
- (and 1 more)
-
Your close-ups are a thing of beauty, Thomas !!
-
Reckon I need to get me one of those 2nd editions, too ... before I get to my own Connie brass-work.