CaptainSteve
-
Posts
1,858 -
Joined
-
Last visited
Content Type
Profiles
Forums
Gallery
Events
Everything posted by CaptainSteve
-
 Ever thought about making a naval battle-ground diorama ?? I figure you're more than half-way there. (Personally, I think it is sad that someone could take all that hard-work, put it in the back of a shed and pile junk on top of it.)
- 30 replies
-
- 2
-

-
- artesania latina
- bounty
- (and 1 more)
-
Arrr ... Thanks Guys !!! But ya can't get rid o' me that easily ... with feasible activities reduced to an absolute minimum, I find I'm logging onto MSW five times a day just to check on updates and everyone else's builds. (I'd say more, but I just hate typing left-handed/one-fingered)
-
Cutty Sark by NenadM
CaptainSteve replied to NenadM's topic in - Build logs for subjects built 1851 - 1900
I'm changin' my mind ... (Gee !! That NEVER happens) #4 in definitely a winner !! -
Arggeth !!! 'Twouldst seemeth that Our Hero hath been struck down !! Or, at least, temporarily winged. But, 'twas not, as One might suspect, a cowardly revenge attack from the Frames. "Y'see, back in the real world, whilst unloading a vehicle at work the other day," CaptainSteve didst begineth to explain, "I didst doeth an injury unto me modellin' arm. It doth appear that a muscle hath been torn." He didst, as always, go on: "Verily, it shall taketh some six to eight weeks to cometh goodly again !!" Indeedeth, Our Hero cannot at the moment as much as picketh-up a razor-knife, much less cutteth anything. Erstwhile, CaptainSteve be reduced to typing left-handed. "It be a right PITA and doth taketh me much longer and, verily, much editting must occur !!"
- 625 replies
-
- 1
-
-
- bounty launch
- model shipways
- (and 1 more)
-
Cutty Sark by NenadM
CaptainSteve replied to NenadM's topic in - Build logs for subjects built 1851 - 1900
I agree with Popeye ... the second star looks better, although the blue colour on #3 is great !!- 4,152 replies
-
- 1
-
-
- cutty sark
- tehnodidakta
- (and 1 more)
-
Beautiful work, Tom !!!!
-
That's IMPRESSIVE !!!
-
I'll guess Option2. I am no drafts-person, but I have built many kits over many years. To put it bluntly, I was less than impressed with the written instructions provided with the MS Bounty Launch (I put it a little less bluntly in my Build Log). At least Constructo & Occre both provided an excellent step-by-step photo-book. As for making sense of the Launch plans, for me it came down to three things: (i) trial-and-error, (ii) experience gleaned from earlier ship builds, (iii) the living, breathing encyclopedia of maritime modelling know-how that is MSW !! To be honest, I would be terrified of attempting something as complex as Connie without this place.
-
Fletch, I should remind you that it is almost two years since I purchased my Connie kit ... and so far I have only done the boats !!! (And now you are telling me that I need to build another 3 boats ?!?!?)
-
Cutty Sark by NenadM
CaptainSteve replied to NenadM's topic in - Build logs for subjects built 1851 - 1900
Awwwwwwwww .............. I hope one of the strong reasons was "He's so cute !!!" -
Cutty Sark by NenadM
CaptainSteve replied to NenadM's topic in - Build logs for subjects built 1851 - 1900
Awwwww ...... :( -
Cutty Sark by NenadM
CaptainSteve replied to NenadM's topic in - Build logs for subjects built 1851 - 1900
You got a PUPPY !?!?!? Awwwww ........... -
Ahoy, Dg !! It turns out (hic) that it was all of the above.
- 625 replies
-
- 3
-
-
- bounty launch
- model shipways
- (and 1 more)
-
I'm a late-comer to your build, Paul. (I'll 'fess up and admit that my interest was piqued as this is the same kit I built as my introduction to wooden ship-modelling.) Allow me to say that you are doing a far superior job to what I did. Your work is just brilliant !!
-
Fletch, Your on-going research is very interesting to read. I'll be certain to revisit this section of your build-log regularly. Fantastic work !!
-
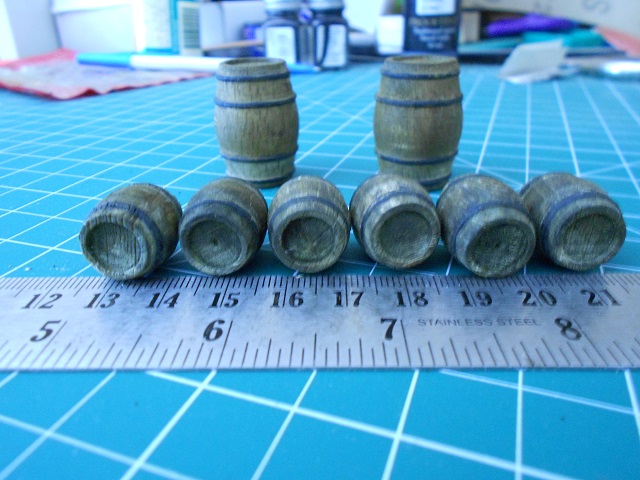
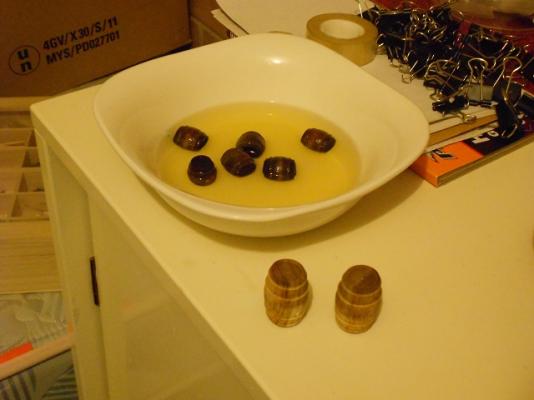
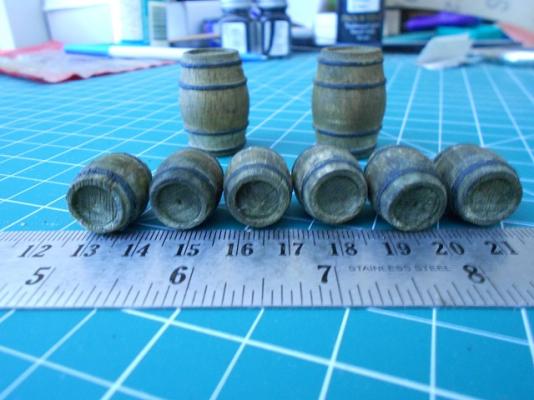
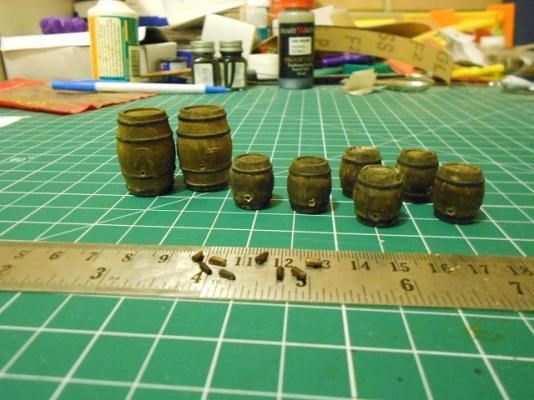
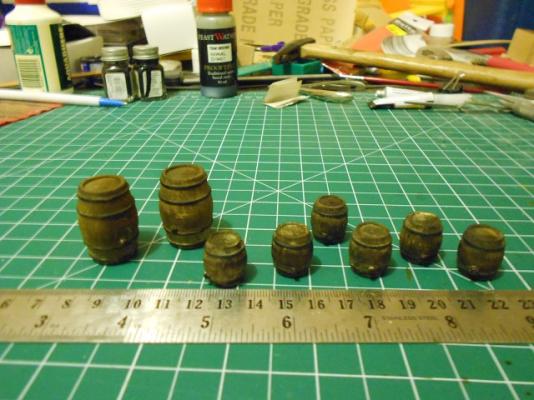
Well, CaptainSteve be back at work tomorrow ... But 'aforehand, he didst manage to ticketh one further item off o' his check-list: "'Tho' others have expressed much dissatisfaction wi' the kit-supplied barrels," he didst begin, "I have chosen to use them nonetheless." (O'course, this probably doth hast more to do with the fact that CaptainSteve doth possesseth not the skill-set - nor the lathe - to maketh his own.) To further the whole water-logged look that he be going with, Our Hero didst firstly soak the kit barrels in bleach for a couple of days ... ... and thence, didst he re-apply stain and re-paint the barrel hoops ... "'Afore moving on, I didst lightly sand back the colouration on the lower half o' the small barrels to show that they hadst spent the journey virtually floating around the bottom of the Launch." Next up, CaptainSteve didst taketh a good, hard, long look at himself ... and his barrels ... and he didst cometh to the terrible realization that there be no way to getteth out the water/wine/rum stored within. "Arrgggeth !!! There be no BUNGS !!" he didst exclaimeth. And, so, CaptainSteve didst add firstly bung-holes ... ... and, finally, the Bungs (which didst formerly existeth as the tips o' tooth-picks - now stained). "They be very hard to spotteth in this picture, but, rest assured, they be there !!"
- 625 replies
-
- 9
-
-
- bounty launch
- model shipways
- (and 1 more)
-
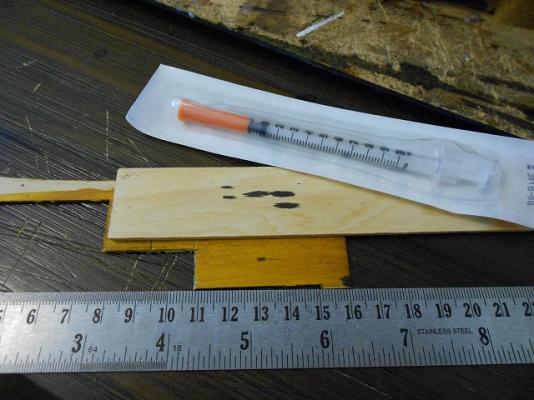
Incidentally, those with looooong memories may recall that once upon a time, Our Hero had mentioned he wouldst be adding tree-nails to the outer hull of his Launch. Well, that probably ain't gunna be happening. "Much as I didst liketh greatly Keith's external trennelling," CaptainSteve began, "'T'is most doubtful that I shalt be replicating these." He didst go on: "For I didst tryeth out the syringes I hadst purchased from the Apothecary. Indeed, I didst test them out on some left-over frame wood from the kit's planking. And 'tis wi' great regret that I must reporteth verily great bleeding of the stain across the wood !!" "Indeedeth, I didst toy with some other ideas," Our Hero tried to explain. "In particular, one contributor to the Kit-Basher's forum had suggested using the bristles from a toy broom. "But, time be against me and, insteadeth, I shalt be re-visiting the concept o' the scratched-up water-line," he didst addeth.
- 625 replies
-
- 1
-
-
- bounty launch
- model shipways
- (and 1 more)
-
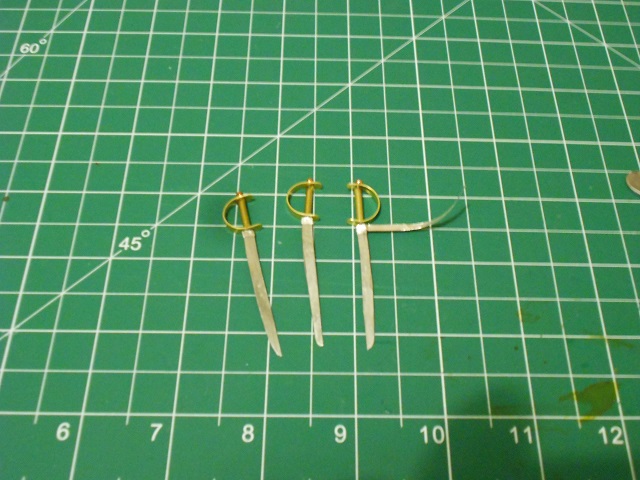
Thanks, Jesse ... and everyone for the "likes". I found myself side-tracked over the past week, as I must have viewed almost every single picture of a sword that could be found with Google. But, hey, it all proved to be very interesting reading. Also, because I have recently become addicted to dry-brushing, the Grips have since been lightly stained ... in a similar fashion to what I did wi' me oar lashings.
- 625 replies
-
- 1
-
-
- bounty launch
- model shipways
- (and 1 more)
-
Hmmm ... Interesting point you bring up, Pops. Without having given it too much thought at the time, I'm fairly sure that I would have followed Image A in the past ... And I have usually had difficulties getting the planking to sit right. Although, with the Launch, this had more to do with me flipping planks the wrong way around, rather than any problems with the frame fairing.
-
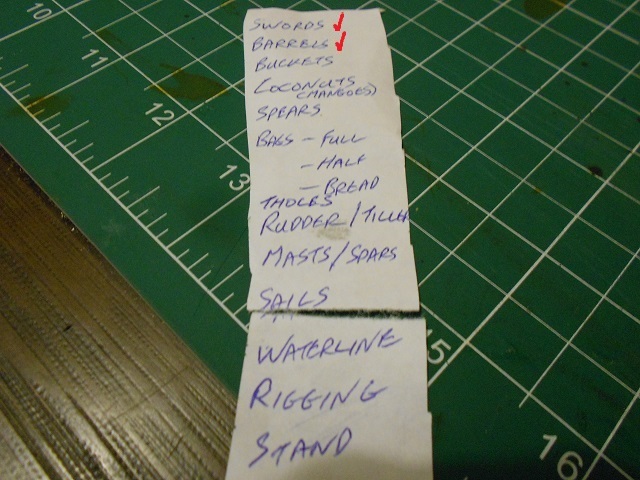
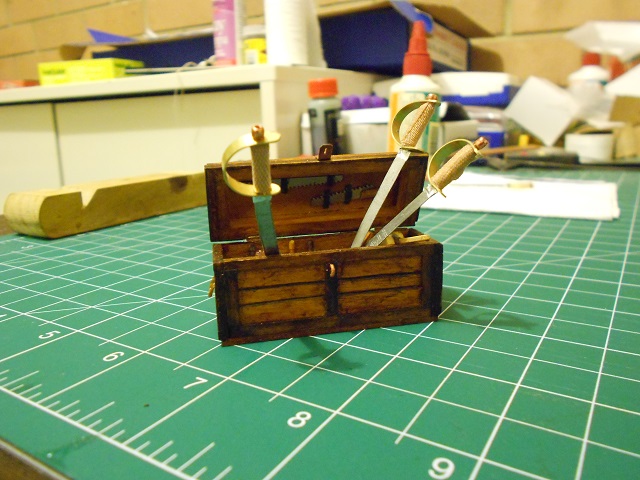
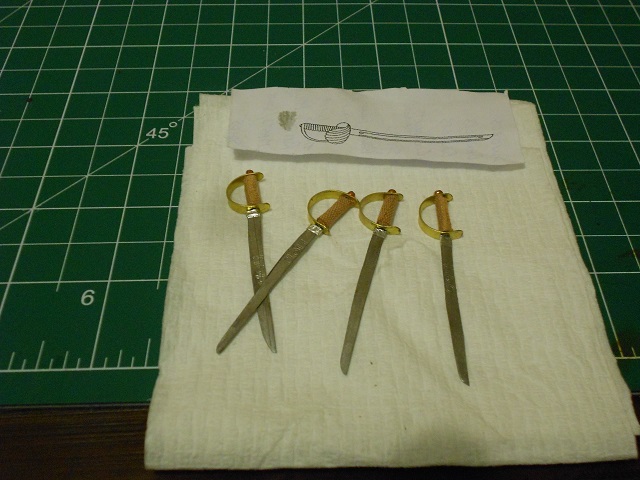
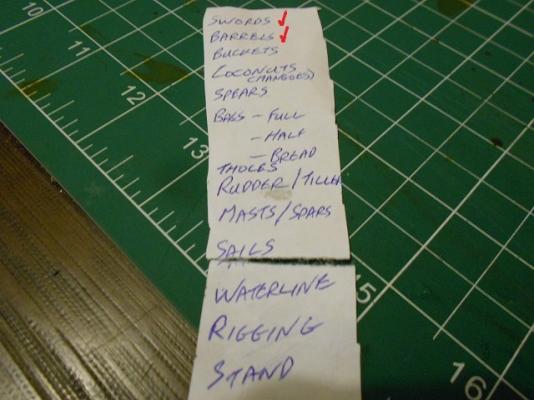
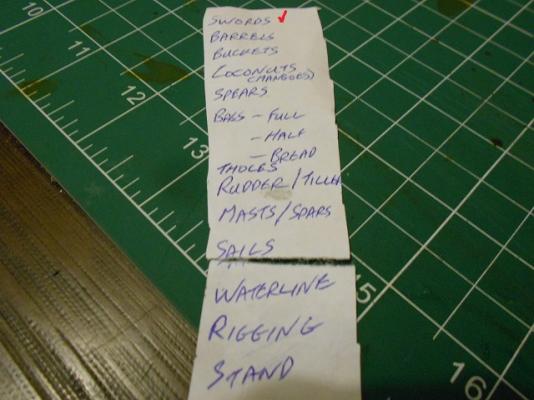
This past week, Our Hero hath continued to work on the various detail items to be included. And here, he hath madeth a list: Indeed, just this very day he didst PhotoShop a tick unto the top o' the list upon his return from the faraway land of Nippon where he didst journey to learn the ancient secrets of sword forging. “I shalt not repeateth myself here,” CaptainSteve was heard to mutter. “For I hath detailed in the Kit-Basher’s forum me method fer making these." So, please, clicketh here to check it out. Now, as we know, Mr Bligh was not the most personable of people. Indeed, ‘tis known that even amongst the loyalists in the Launch with him, only a handful of men could be relied upon. Thusly, Our Hero hast reasoned that Bligh would’ve been certain to keep all the weapons onboard within easy reach. “Hence I shalt most probably be placing the four cutlasses (and two native spears) that hath been documented up Bligh’s end of the Launch,” CaptainSteve didst explain. Re-visiting the tool-chest, for now, three of the cutlasses have been lazily placed inside. “Thee final one couldst well be chopped into the edge of one of the rear benches,” our Hero didst suggest. “Mayhaps next to where ol’ Bligh hisself be sitting.”

- 625 replies
-
- 13
-
-
- bounty launch
- model shipways
- (and 1 more)
-
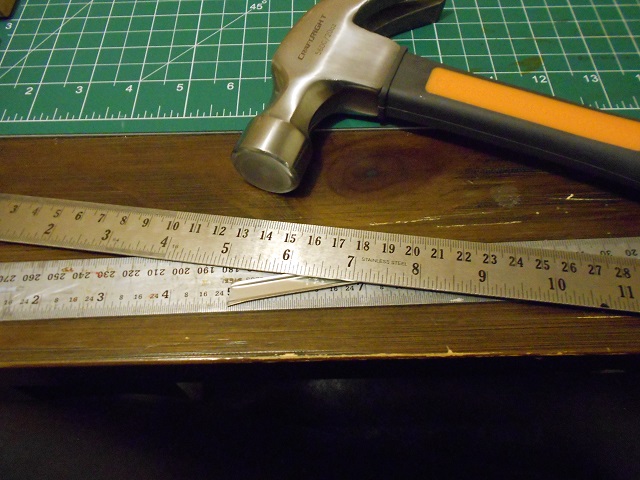
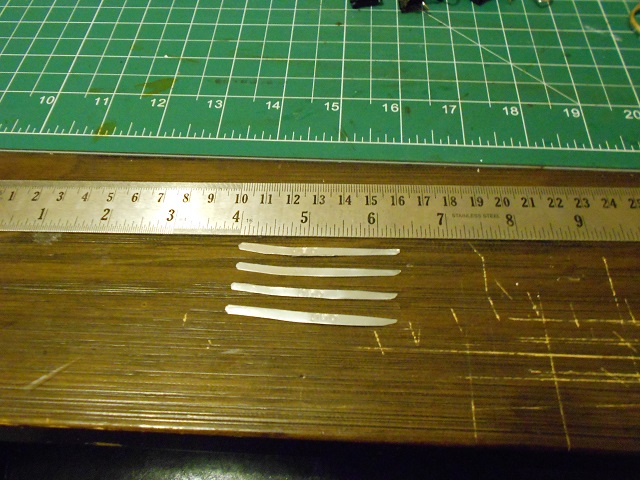
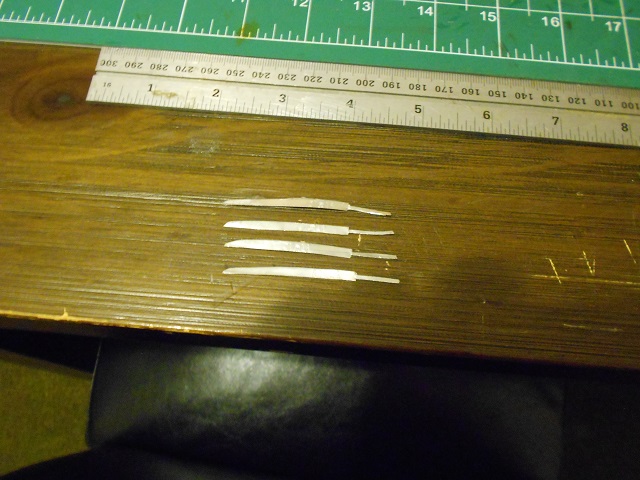
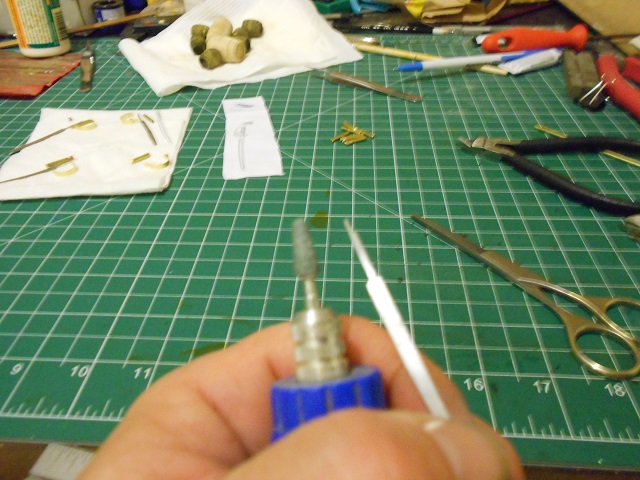
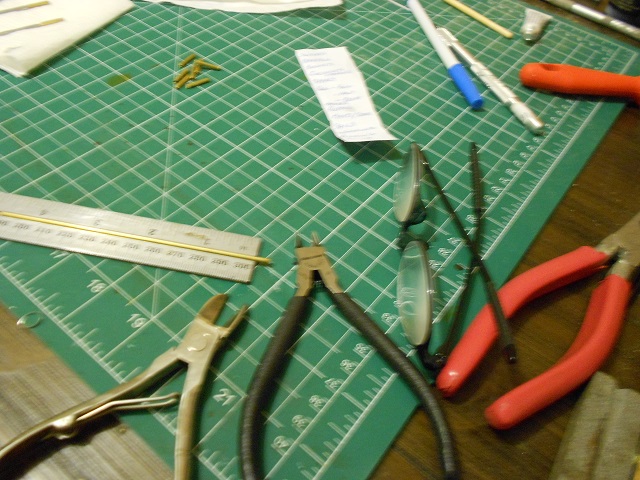
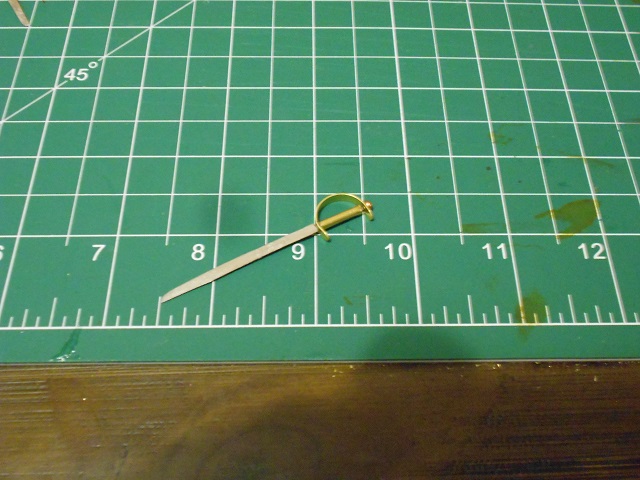
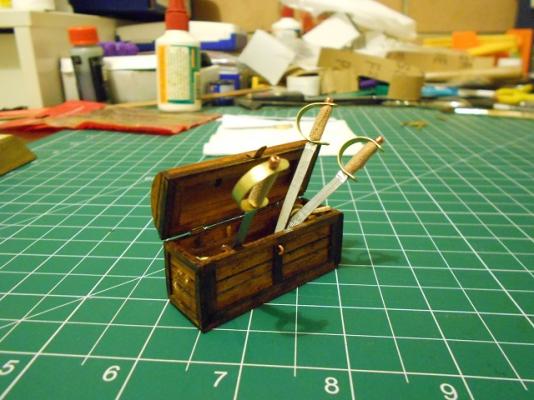
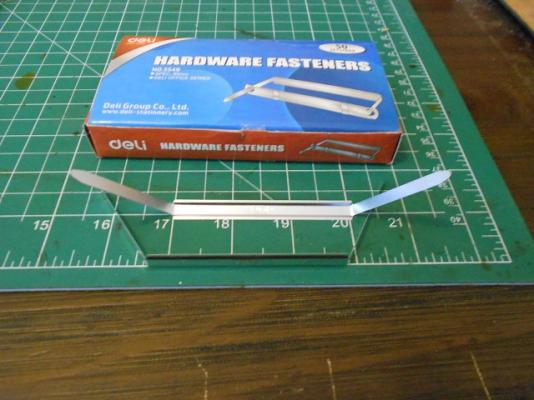
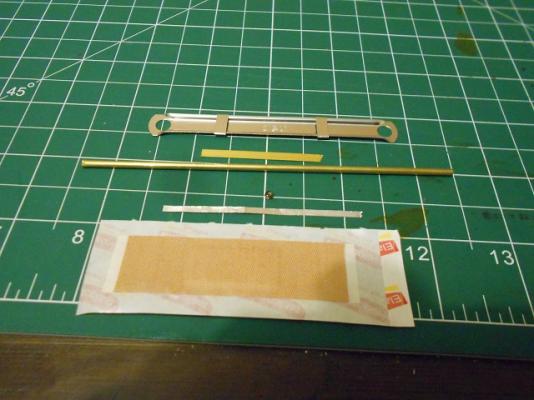
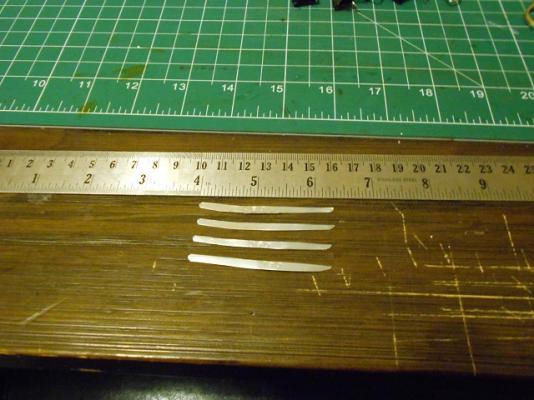
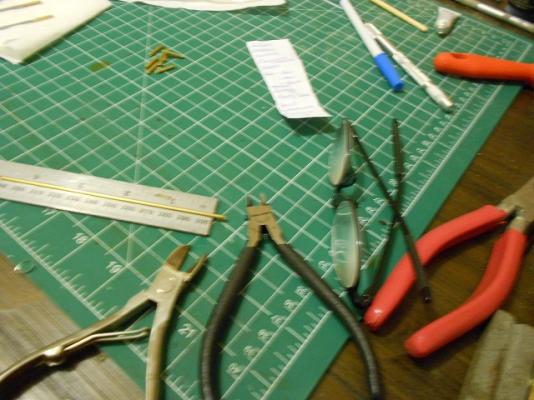
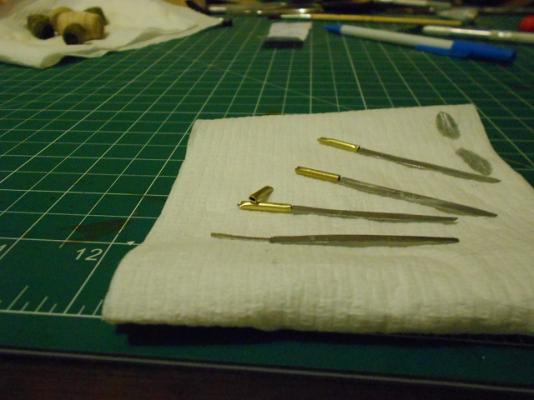
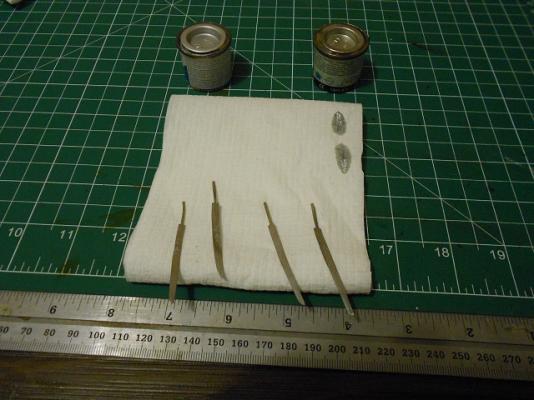
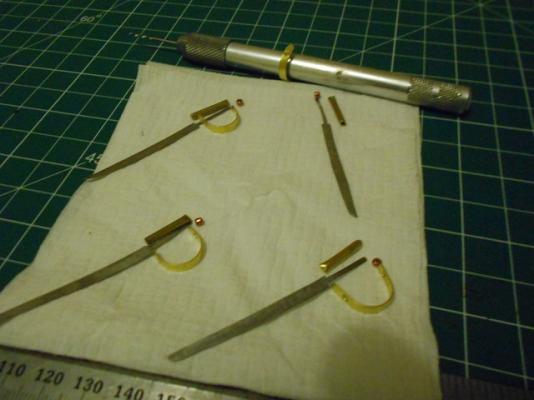
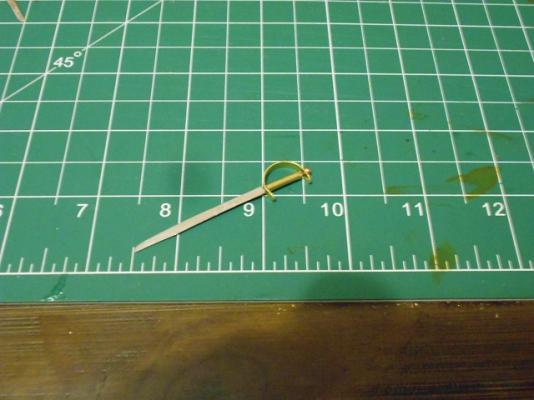
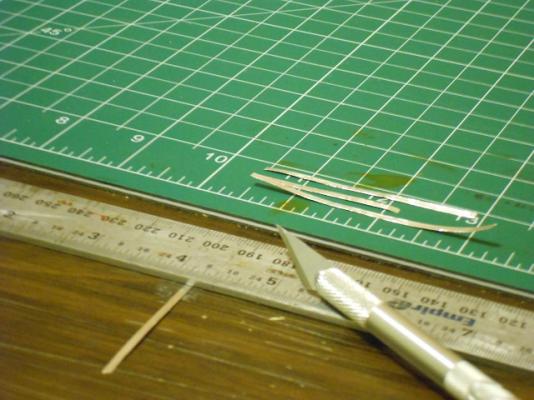
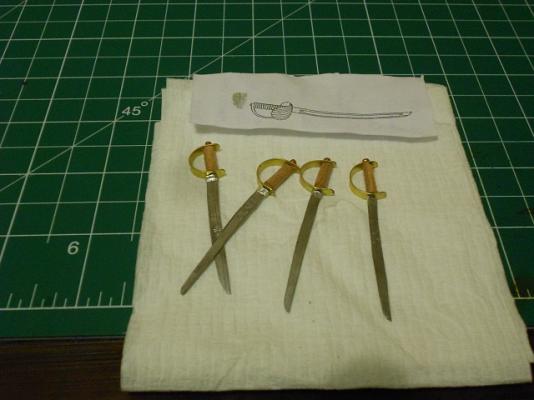
FILE FASTENERS (and BAND-AIDS) – To make 1/16 scale cutlasses as detail for my Bounty Launch, I used some file fasteners, plus a few other common items. You will need: File Fastener; Piece of brass strip; Piece of tubing (plastic/metal); A small, metal bead; Strip of aluminium foil; A band-aid (cloth variety). Flatten the file fastener. I put mine between two metal rulers and then hammered along the length. With the ones I used, there was a brand indentation which could not be completely hammered out. (At a casual glance, it almost looks like a Royal Crest !!). Cut out the rough shape of your sword. Bear in mind to leave enough for the “Tang”. This is the part extending back from the blade which will later form the interior of the handle. The Dremel tool makes the shaping process a little easier … Cut a short piece of tubing to become the Grip. This fits over the Tang. It needs to be approx. 3mm shorter, allowing the tip of the Tang to stick out … This part is entirely optional, but I chose to dry brush my blades with, first, a metallic chrome, and then a matt gloss. Cut short pieces of the brass strip to make the Hand Guard. This piece will need to be approx. twice the length of the Tang. Drill a hole at each end (approx 0.5cm in), and then round them off, using the Dremel. (A tip: clip the corners with nail-trimmers first.) Next up, bend the brass strips over a suitable tool (I used my hand-drill) to form the Guard. Here are all the pieces set out and almost ready to begin … But first, make some strips of aluminium foil. Fold them over onto themselves a few times, to give them extra strength. These strips will become the Rain Guards on your swords (but, more importantly, they will serve to make the join between hilt and blade look much tidier). WARNING: It can be a bit fiddly putting everything together. Test-fitting of pieces before applying glue is highly recommended to ensure that nothing breaks and needs to be re-made. Apply small amount of Epoxy glue to the Tang and top part of blade. Thread Tang through hole in one end of the Guard. Slide the Grip into place. Make sure the Tang protrudes from the other end, and then poke it through the top hole of the Guard. I used a pair of pliers to grip the two ends of the Guard together whilst the glue dries. You will want to apply just enough force to keep the Guard flush against the ends of the Grip piece. Quickly, before the glue can dry, place the small bead onto the end of the Tang, now protruding through the top of the Guard. This becomes the Pommel (or Peen Block), holding everything together. It should look something like this … Wrap an aluminium strip around your blade (two turns is enough), sliding it up against the bottom of the Guard to ensure it is flush ... Once the epoxy has set, take the cloth band-aid. Cut a short strip to the length of the Grip. Carefully wrap this around the tubing piece. (NOTE: Originally, I was going to wrap cotton around the Grip. But, I have been desperately trying to find an excuse to feature Band-Aids in Kit-Basher’s.) And here they are, together with the drawing which inspired them … EDIT: The rain guards are most probably NOT historically accurate for basic cutlasses.


- 396 replies
-
- 15
-
-
- Idea
- Bright Idea
- (and 1 more)
-
Firstly, Tom ... may I just say that I take offence that you refer to your planking as a "hack job" !!! Seriously ????? (Personally, I think it is immaculate ... indeed, I am planning on using your work as a step-by-step.) Secondly, regarding the rope diameters ... well, as I sit on the side-lines watching, all I can add is "your build, your choice". (I await your decision)
- 1,354 replies
-
- 1
-
-
- constitution
- model shipways
- (and 1 more)
-
Ed, A number of us have experienced the same thing. In short, there appears to be a conflict between Windows7 and IE11. A roll-back and/or different browser should solve the prob.
- 3,618 replies
-
- 1
-
-
- young america
- clipper
- (and 1 more)
-
Indeed, Nenad !! I would just LOVE to have an authentic 16th Century katana/tanto set in my modelling room !! But, alas, I am just a mere wage-slave and can only dream of such things ...
- 625 replies
-
- 1
-
-
- bounty launch
- model shipways
- (and 1 more)