Dziadeczek
-
Posts
656 -
Joined
-
Last visited
Content Type
Profiles
Forums
Gallery
Events
Everything posted by Dziadeczek
-
 Would you, Korablik, show and explain the process of the carving of your small wonders, rather than showing the end products? I have a hard time imagining how you do it! What is the scale of the last figurehead? Regards, Thomas
 -
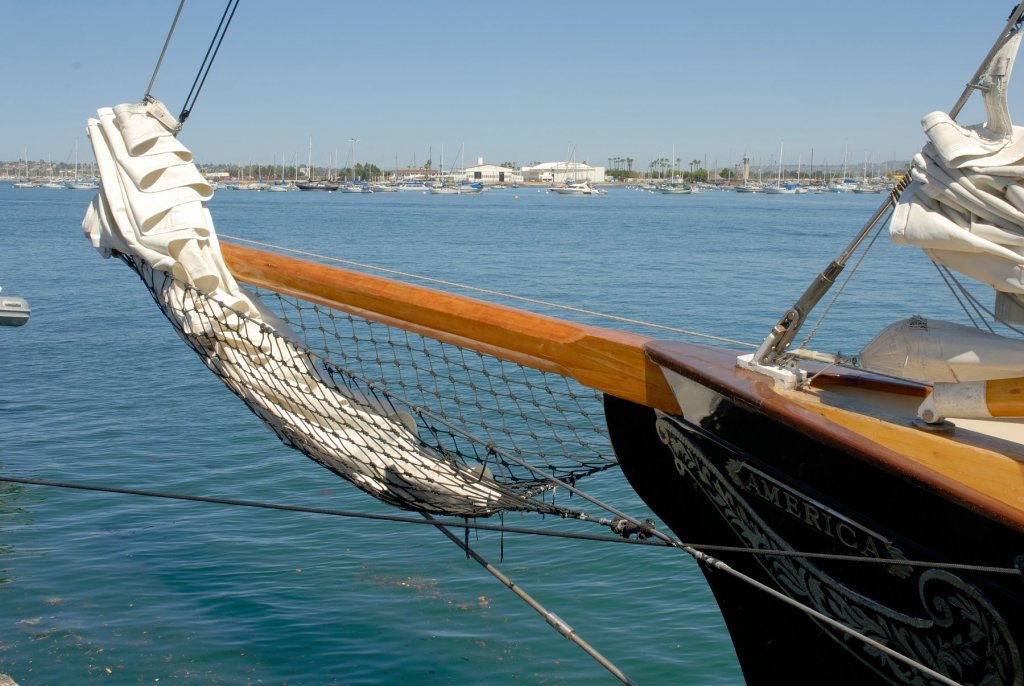
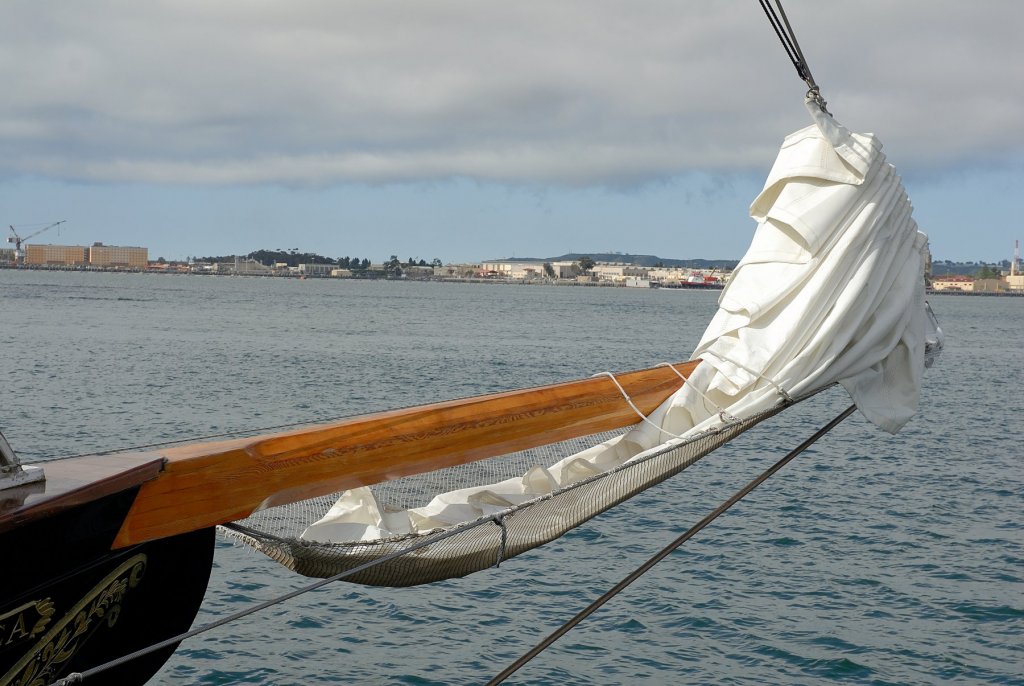
I have these two pics of the schooner America in San Diego
-
Why don't you scan the Polish instructions, indicate parts you don't understand and attach this here and I will try to help you. I do speak Polish, so I might be able to help.
-
May I ask you, what kind of glue do you use for your model? Regards, Thomas
- 295 replies
-
- 2
-

-
- amatsukaze
- halinski
- (and 2 more)
-
Thanks Tiziano for the picture of your milling bit. I think I understand the principle of it, but still have some doubt how it woul actually work on a piece of boxwood (I think ) in practice, and not ruin the piece of wood. There must be also another cutter shaping the opposite side of this intricate ballusters, am I right? (But, I don't want to force you to run too much ahead of yourself with your photo blog on this forum. I just study your pics from the French forum, where you are much further ahead with your built. I think I just photo etch in brass this particular details for my model, even though I would much prefer to do it from wood, like you did it). In any case, I have lots of admiration for your skills with wood and such excellent understanding of ship's anatomy! Hats off! Thomas
-
Thanks Tiziano for the answer. Would it be too much to ask you to post a photo, showing these milling tools made for this purpose? My milling tools are WAY too big to cut such intricate shape. Did you make yours by yourself? Thomas
-
Hi Tiziano, Could you please elaborate on, how did you obtain such a shape from wood? How did you machine this profile? Kind regards, Thomas

-
Hi Tiziano, I too am building the same model, but in a different scale, 1:48. I am not as experienced a modeler as you are, my workshop is also leaner, and this is my first such a big and complexed model (all my previous models were from kits). I am struggling along as I go, using your photos you posted on the French forum, as references (and they are a great help!). I started this build many years ago and about four years ago I returned to this project. I am somewhat behind your model, so your pictures come handy. Thanks a lot for that blog on the Marine & Modelisme Arsenal website! I am keeping my fingers crossed for you, as well as for myself! I hope to see your pics here as well! Regards, Thomas
-
This word won't translate either : dalocelownik Danny Dan, I am Polish and I may try to help you with the instructions. It seems to me that there are some misprints in the original instructions, because in the entire Polish language there is no such thing like "kolowrotycz". It looks to me that they are talking about windlasses (plural) = kolowroty, from the singular "kolowrot", and there should be a space afterwards and then an abbreviation "cz." from the word "czesc", or plural "czesci" = meaning "parts". The entire quoted part of a sentence should therefore read (in English): "we glue the windlasses, parts 47/50, K1 and place them, following the assembly drawings". A bit weird, but... English is their second language, after all. Regards, Thomas PS: As far as the word "dalocelownik", I think that they abbreviated two of them into one. The first perhaps should be "dalmierz" = a rangefinder(?) and the second "celownik" = a sight, a viewfinder (?). If you scan the entire page of the instructions and send it to me, perhaps I would be able to figure it out better.
- 295 replies
-
- 10
-
-
- amatsukaze
- halinski
- (and 2 more)
-
I would attach those ladders more upright.
-
ancre La Salamandre by tadheus - 1:24
Dziadeczek replied to tadheus's topic in - Build logs for subjects built 1751 - 1800
Hi Pawel, Can you tell us how did you make imitation brickwork inside your stove? Wood? What kind? I used for my French 74 precut rectangles from purpleheart, glued to the inside walls - look quite realistic. Regards, Thomas -
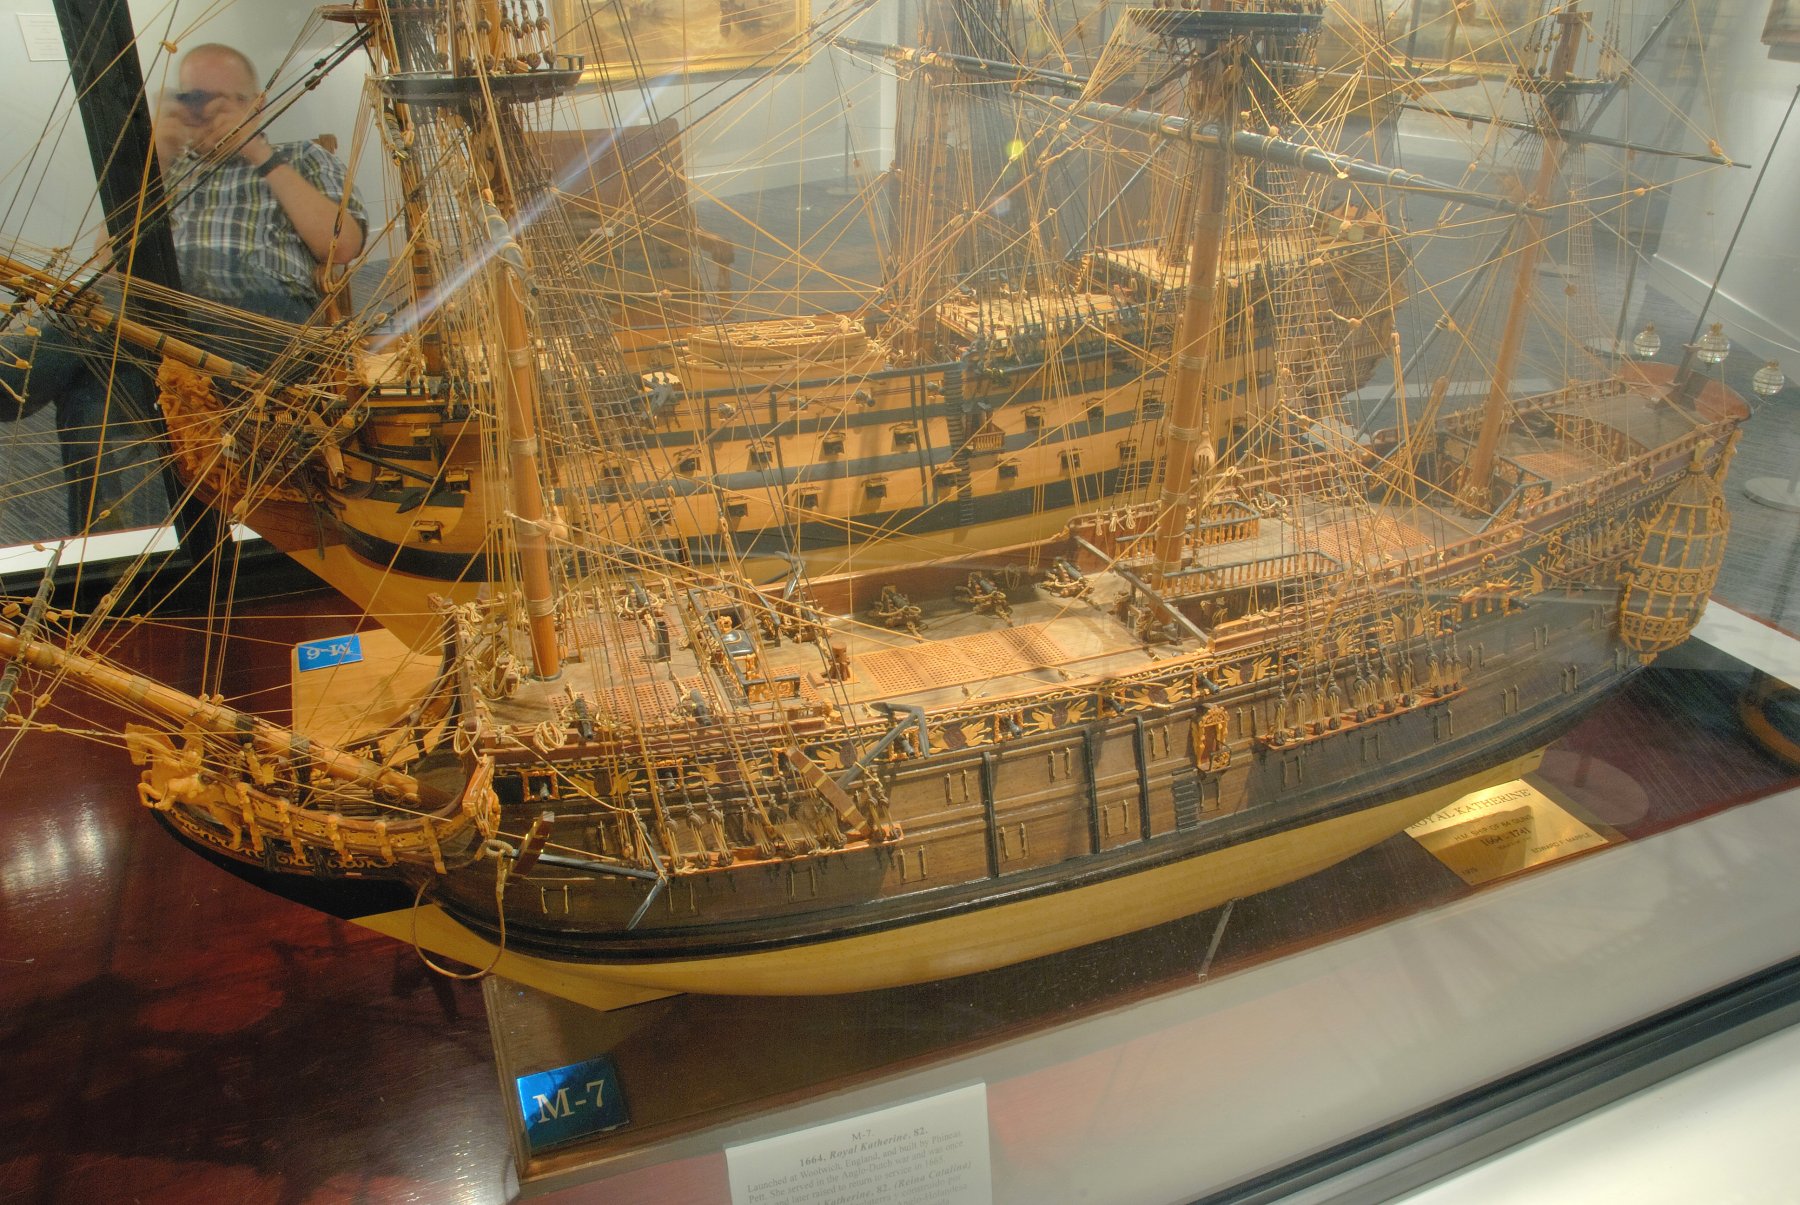
Hi Doris, I think Dan had a point, talking about your entry port being a bit too close to the next gun port. On all models (your links, and others) I see this placed rather symmetrically in between two gun ports, so that all rigging to the guns can be securelly fixed to the inner bullwark. Perhaps it is not too late to tweak it? I happen to have a handful of photos of the late Ed Marple's model of his Royal Katherine, exhibited in the Channel Islands Maritime Museum in Oxnard, Southern California (I included one in my earlier post, above). I took them succesively during my numerous visits there, over the years. I don't remember the sources of documentation Mr. Marple used for building his model, only vaguely I seem to recall that he had some drawings from the NMM in London. If you think that those pictures would be helpful for building your model, let me know and I would be happy to send them to you. Regards, Thomas
- 1,035 replies
-
- 8
-
-
- royal katherine
- ship of the line
- (and 1 more)
-
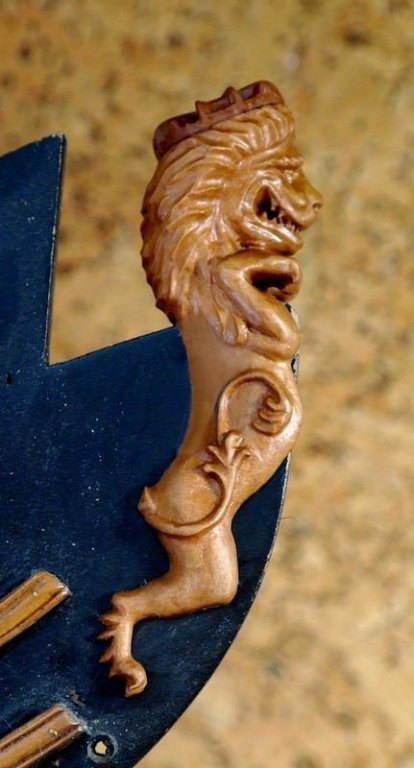
Extraordinary talent indeed! But, if I am allowed to be a bit critical (in this positive way), I would add some "body" to this lion, especially around the chest area, like in the photo below. Otherwise, your lion looks a bit skinny in the chest, I think. Could you carefully glue a piece of wood there and shape it to the rest of the trunk? Congratulations anyway!
- 5 replies
-
- 2
-
-
- lion
- head figure
- (and 1 more)
-
Congrats on your model choice! It is a beautiful ship indeed!!! Thomas

- 1,035 replies
-
- 20
-
-
- royal katherine
- ship of the line
- (and 1 more)
-
This is all fine what he is doing, but gun ports which are towards the stern and, to some degree the bow, are progressively les and less square, and become rhombs (parallelograms with other than right angles) because their vertical lines remain true vertical and the horizontal lines follow the decks. Hence, his handy plastic square template cannot be used there, I'am afraid. Unless he has different templates for those ports, each with different shapes...
-
Planking processes
Dziadeczek replied to MESSIS's topic in Building, Framing, Planking and plating a ships hull and deck
Rather than trying to give detailed explanations, I recommend you read an excellent book (brochure) "Planking the build up ship models" by the late Jim Roberts, or articles on planking that you'll find here, in the "links" part of this forum. -
I built this kit many years ago. But then the kit had a plastic figurehead and some plastic sheet transfer for this ornamental frieze, scrollwork and plastic quarter galleries figures. The kit produces a nice looking model though.
-
No problem indeed, but allow them long(er) time to process your order. Also, as a rule, they don't speak English (or don't want to) and this, and other reasons, slow down delivery time to overseas, non- French speaking customers.
-
Guidance for interpreting plans
Dziadeczek replied to Heronguy's topic in Masting, rigging and sails
This shows placements of shrouds at the masthead. -
Perhaps a harder wood species, like cherry or pear, would be less susceptible to shrinking, than bass. Also, it is better to do most bending of a presoaked plank off the model, say with a hot soldering iron with an appropriate head, and glue the plank to the hull when it is 'almost' dry. That way the internal forces of the wood are minimal. I planked a model with cherry several years ago and today it still looks like I did it yesterday. No cracks and shrinking. By the way, it was a single planked hull.
- 19 replies
-
- 2
-
-
- separation
- wood movement
- (and 1 more)
-
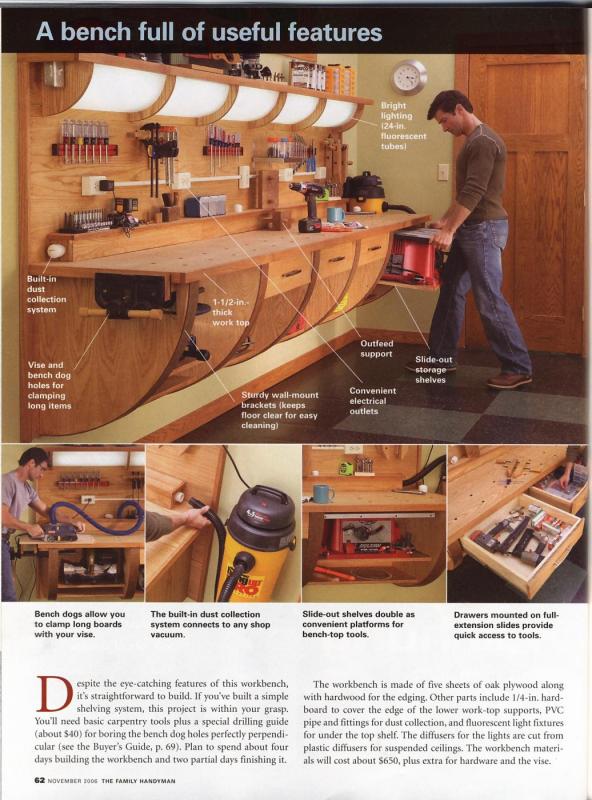
I have built a similar version of the workbench suggested by a magazine "The Family Handyman" many years ago. To this day it serves me well. It is fairly simple to build, everything you can get from places like Home Depot, it has useful features like drawers, good lighting and a simple dust collection to be used with a shop vac. Here is a pic from that magazine, showing you the overall view. If you are interested in more detail, give me your private email address and I will send you the remaining pages of that article. Regards, Thomas
- 72 replies
-
- 10
-
-
Use water and soap (liquid soap works the best) and vigorously lather the brush in it. If the brushes are dry and stiff, use mineral spirits (paint thinner) and soak them in it for a day or so.
-
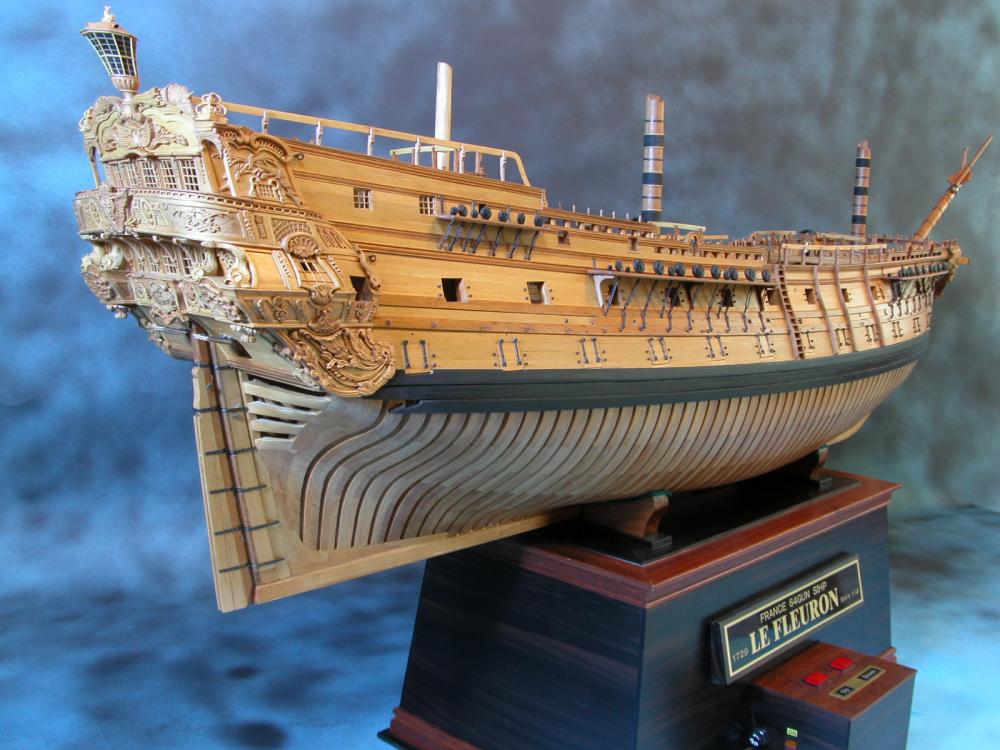
Hi Mike K, I think, your better bet would be with the monograph on Le Fleuron by G. Delacroix rather than the 4 volumes on the 74 gun ship by J. Boudriot. Different ships, rates and a bit different times (besides one volume would cost you much less than four of them). I don't own this monograph http://ancre.fr/en/monographies-en/55-monographie-du-fleuron-vaisseau-de-64-canons-1729.html?search_query=Le+Fleuron&results=2#/langue-anglais but I do have those 4 volumes on the 74 gun ship (in fact I am in the midst of building the 1:48 model based on the works of Boudriot) and I have to tell you that this type of project is strictly for the most experienced modelers, with several other models behind their belt, so to speak. The build is extremely complex and "complicated", you have to have many different power tools, good quality materials and an appropriate space (workshop) for your endeavour. You need to be able to read some very complicated plans and perspective drawings. And be prepared to spend several years of intensive work to complete your model, if you want to build it faithfully to the plans. The French are famous for complicating the matters, they used elaborate wood joints, scarphs, profuse decorations... Ouchhhh... I am sweating bullets already with my 74! And Le Fleuron seems to be even more complicated!!! Even more importantly, you have to have a very patient and understanding wife, who will not mind you spending more time with your model than with her! I have in excess of 300 photographs from various stages of construction of this awesome model (LF) in 1:64 scale, by one of the Japanese modelers - if you decide for sure you want to tackle this project, I could send them to you (CD), that is, if you want them, off course. I would need at least your home email address for that, however. Send me a private message, if you are interested, OK? I attach below one of the pics of this model. The upper section (above the main wale) can be raised with a push of the red button, to visualize the interior of the hull. Awesome!!! As far as the French "Ancre", I have ordered a few things from them in the past. They are a reputable company, but since Mr. Berti now seems to be the only person taking the orders (J. Boudriot is deceased now), it sometimes takes a while to actually receive your books (depending where you live). One therefore has to be patient. Happy modeling!
-
Great progress, Bill!! Congratulations! I am glad you returned to your model, after all these years. Keeping my fingers crossed for you. Thomas from Glendale, California
- 382 replies
-
- 1
-
-
- sovereign of the seas
- carving
- (and 1 more)
-
Did you mean SHROUDS? I always install mine directly on the model.