Dziadeczek
-
Posts
645 -
Joined
-
Last visited
Content Type
Profiles
Forums
Gallery
Events
Everything posted by Dziadeczek
-
 please read my two previous posts As I mentioned, when I twist a 4 stranded rope (with no core), sometimes the strands jump over others, sometimes the twists are a bit irregular, uneven, in places individual strands collapse into this empty space in the center of the rope - end result, the rope looks bad. I am trying to improve the overall results, and I am slowly inching toward my goal, but I think I have to fill this empty space with a core to make the rope even. I don't know if I will be able to use a thin wire for that, or just a thinner 5th strand mounted in the center. I will try both. In the meantime, I attach a pic with two ropes I made today from 4 strands each with no core. Their thickness is about 1 mm (1/64 inch). I used some cheap cotton I had handy at the moment. Back to the drawing board... 🤔
-
My ropewalk has the possibility to twist 4 stranded ropes (as well as 3 stranded ones) and I tried many times to twist 3 and/or 4 stranded ropes on it. The 3 stranded ones come perfect, but the 4 stranded not so - for the above mentioned reason. So, after drilling a center hole through the cone (where the grooves meet) and inserting a thin wire through it, I noticed that such a 4 str. rope comes very ugly - the strands get excessively twisted, form many small knots before they decide to twist around each other to form a rope. At the same time, the central core (wire) wants to rotate in the direction opposite to the direction of rotation of all strands, but because it is only loosely inserted in between the strands, this rotation gets uneven and in bursts. So, the whole rope comes out terrible. There has to be a different, perfect way of suspending the core wire which has to be very straight, like all thread strands, and only than the whole thing can form a rope. The reason I wanted to make such a rope (with a center wire) is, that the wire core would allow me to form more natural ways of sagging of certain ropes on my models rather than all of them stretched straight...
-
Did anyone try to twist a 4 strand rope with a central core (either out of a thinner thread or a thin wire)? I have an old ropewalk I build long time ago, similar in principles to a ropewalk by Phil Krol (see attachment), but my cone (traveller) is suspended on two fishing lines extended between centers, instead of a small cart on a rail, so I can extend the distance between both centers easier, depending on the max length of this line. Like in the design by Russ Long from Ship Modelers Association - Ship Modelers Association - Tip of the Month My ropewalk doesn't have a second rotating center that forms ropes in the direction opposite to the 3(4) twirls, instead it has a fishing twirly that spins freely, thus forming the rope. I am thinking about adopting my ropewalk to making a 3 or 4 strand ropes, BUT WITH A CENTRAL CORE (thread or wire). I had mixed results twisting a 4 strand ropes (some are better, other not so good), until I found out that the reason for this is the fact, that with 4 stranded ropes there is a slightly bigger empty space in the middle and the strands tend to collapse into it, - so to speak -, resulting in uneven twists. I want to fill that space with such a core. I already drilled a center hole through the cone and tried to insert there a length of thin wire, but the strands tend to twist around it excessively resulting in a very ugly rope. I also noticed that the central wire tends to rotate spontaneously on its own, opposite to the rotation of all strands and would have to be suspended absolutely perfectly to do it freely (which is impossible, I am afraid). I remember there was a discussion on this exact topic on the now defunct Seaways list, but I lost this topic, unfortunately... Is such a modification of my type of a ropewalk even possible? What do I have to do? ropewalk by Phil Krol.pdf
-
Hanks for attaching staysails to stays
Dziadeczek replied to Dr PR's topic in Masting, rigging and sails
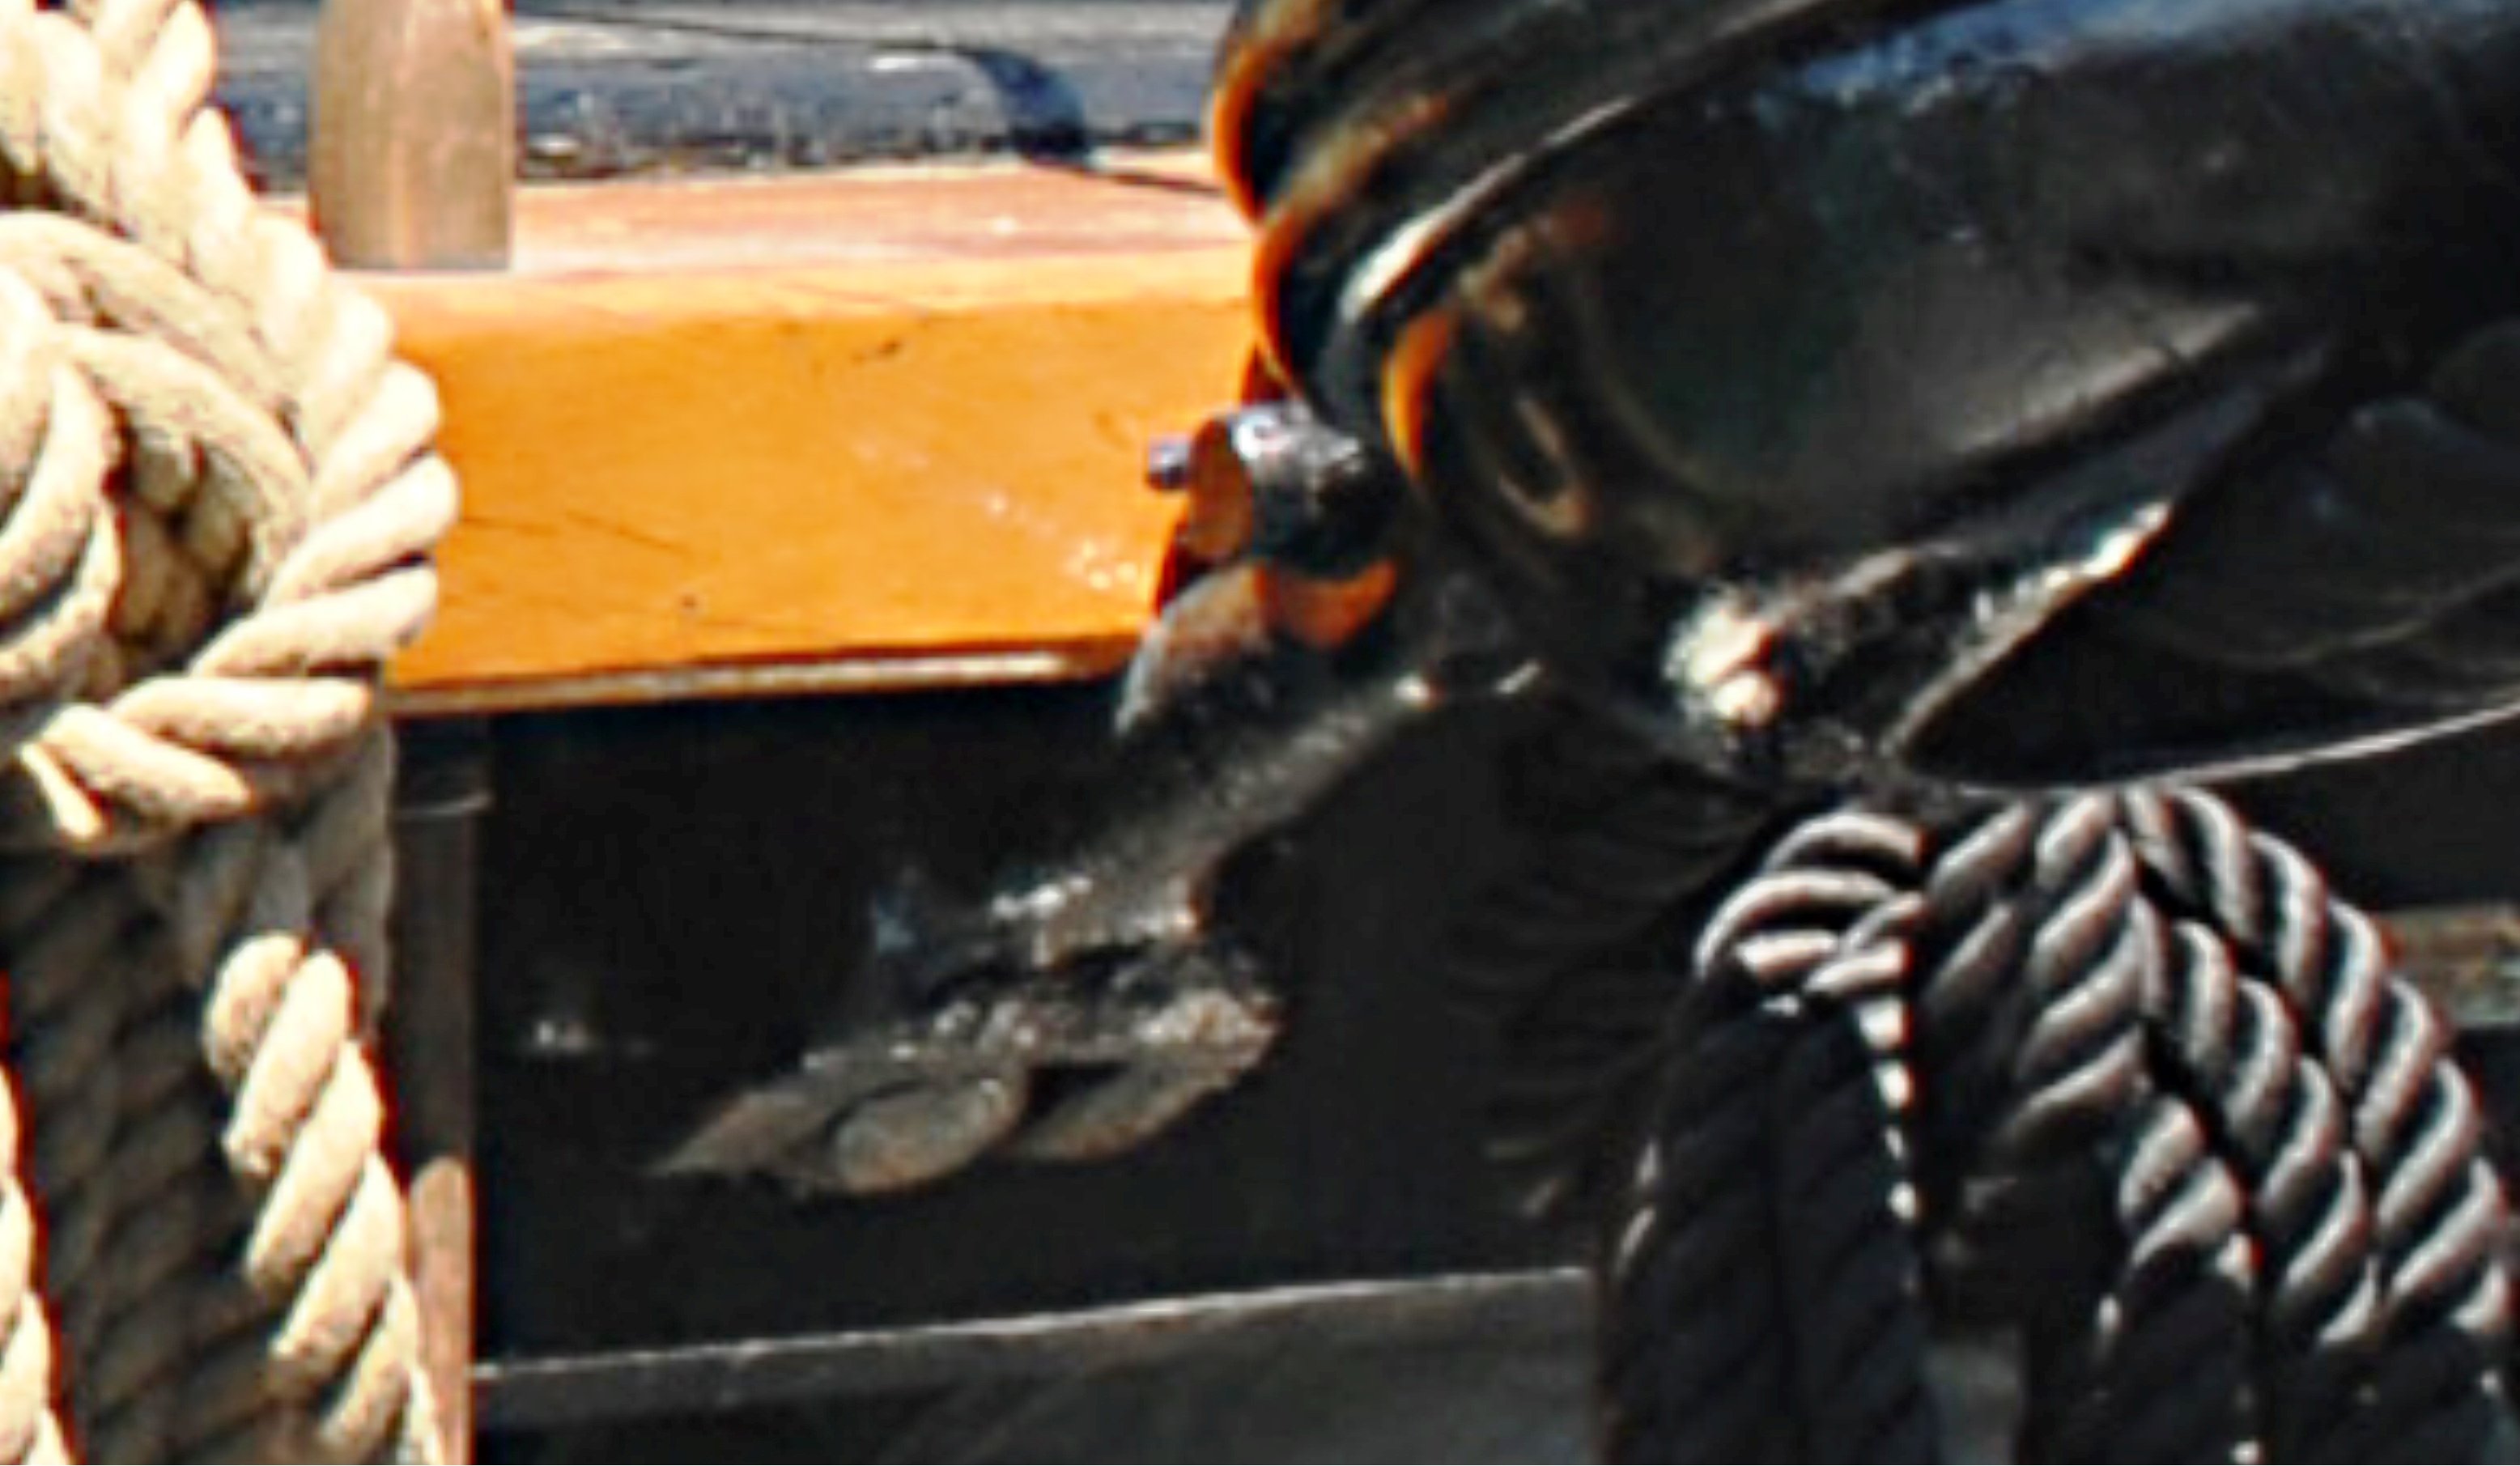
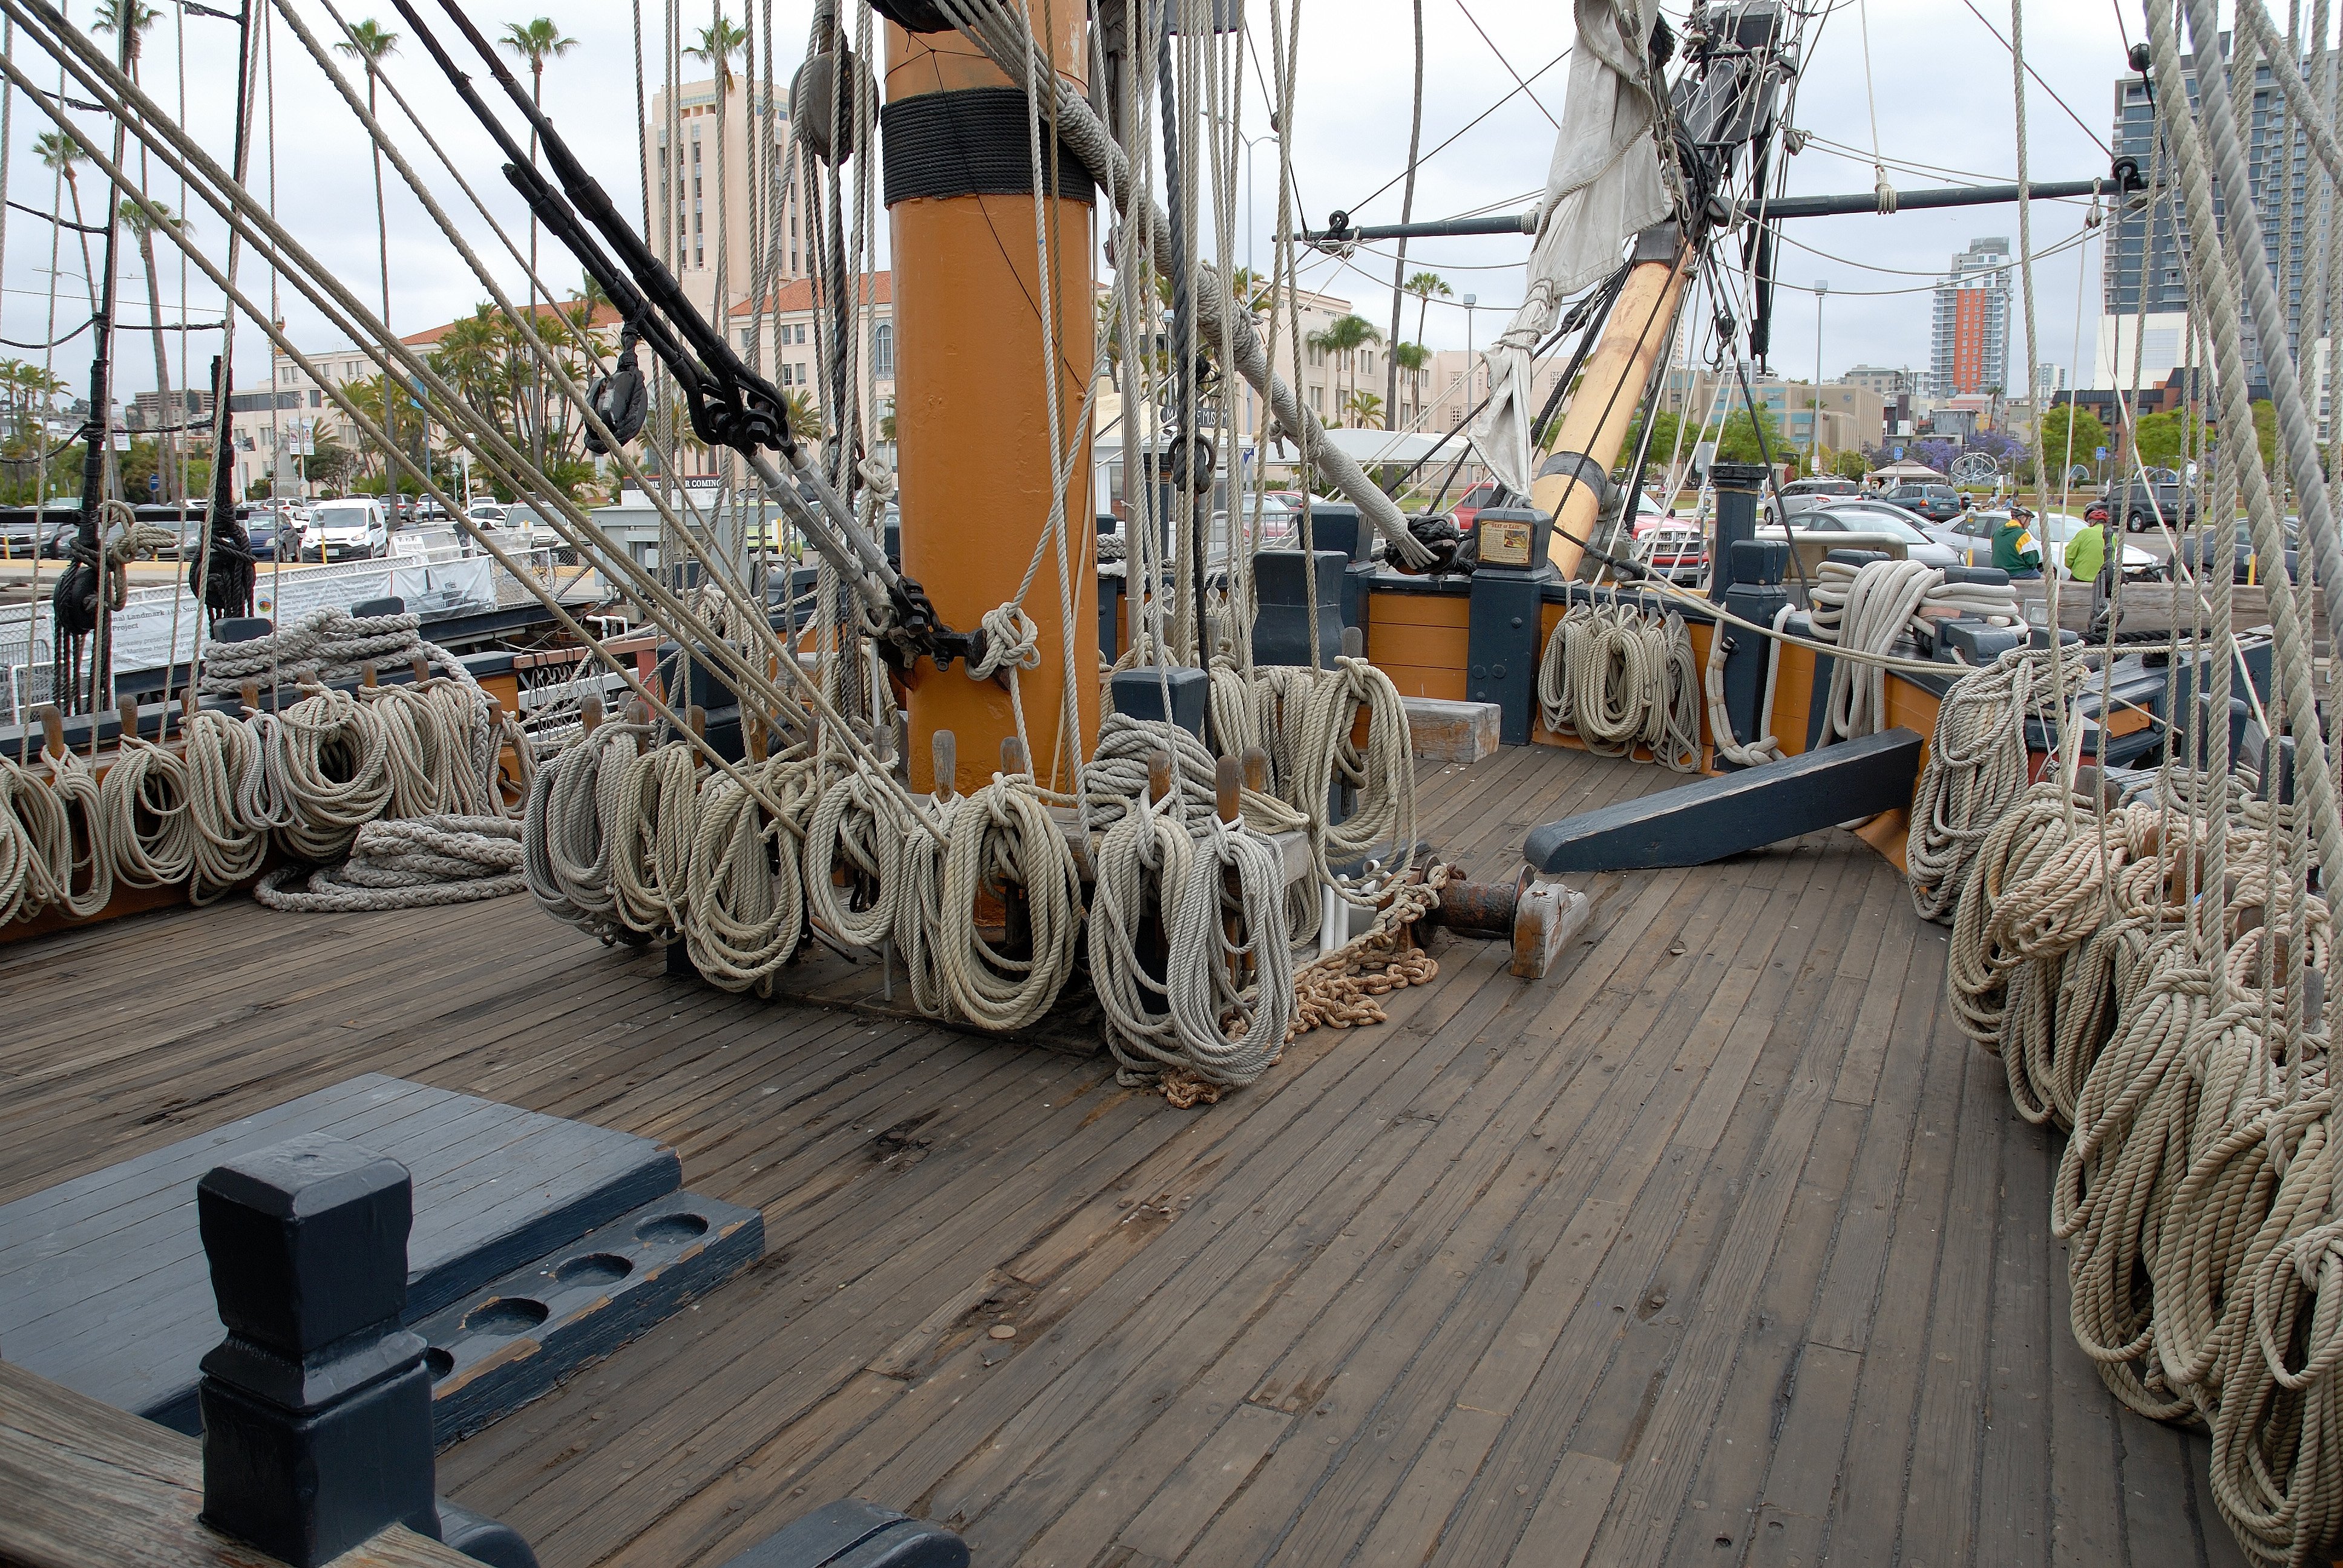
This is how these details look like on the bark "Star of India" in San Diego.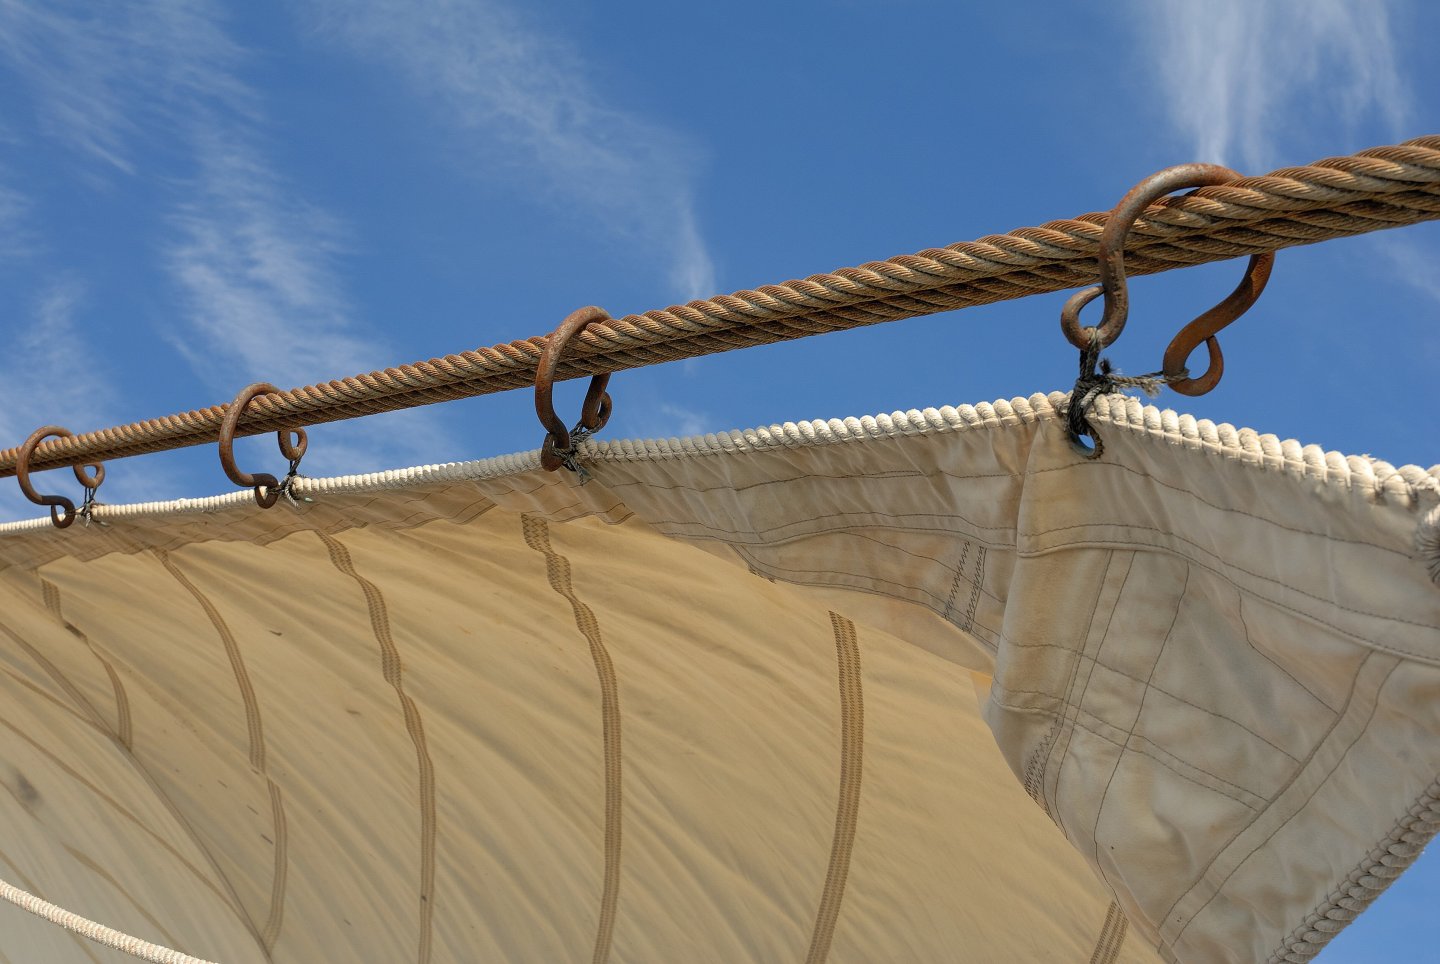
-
Photo etch suppliers
Dziadeczek replied to Dr PR's topic in Metal Work, Soldering and Metal Fittings
Here are my struggles with photoetching (that in the end, turned out successfully): Photo Etching - do it yourself - Metal Work, Soldering and Metal Fittings - Model Ship World™ -
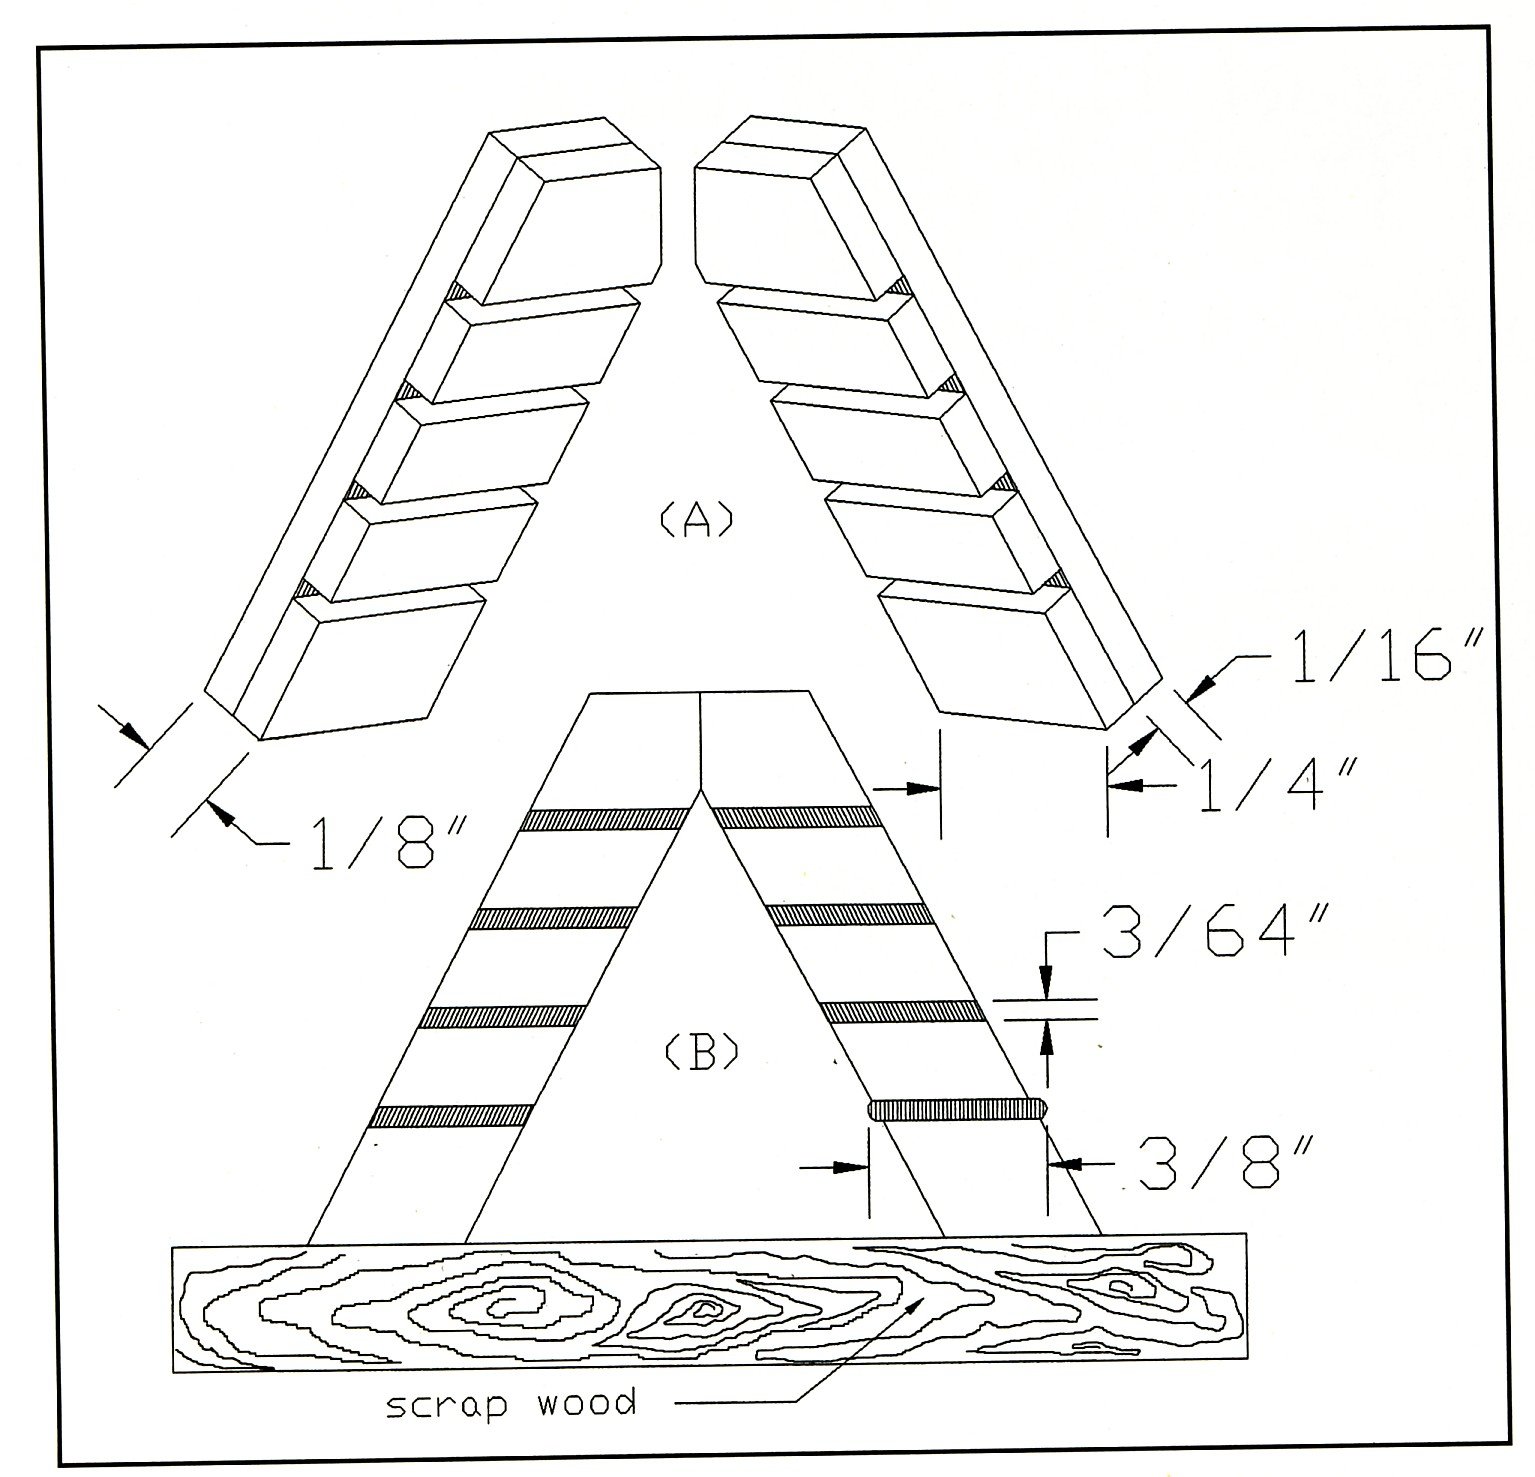
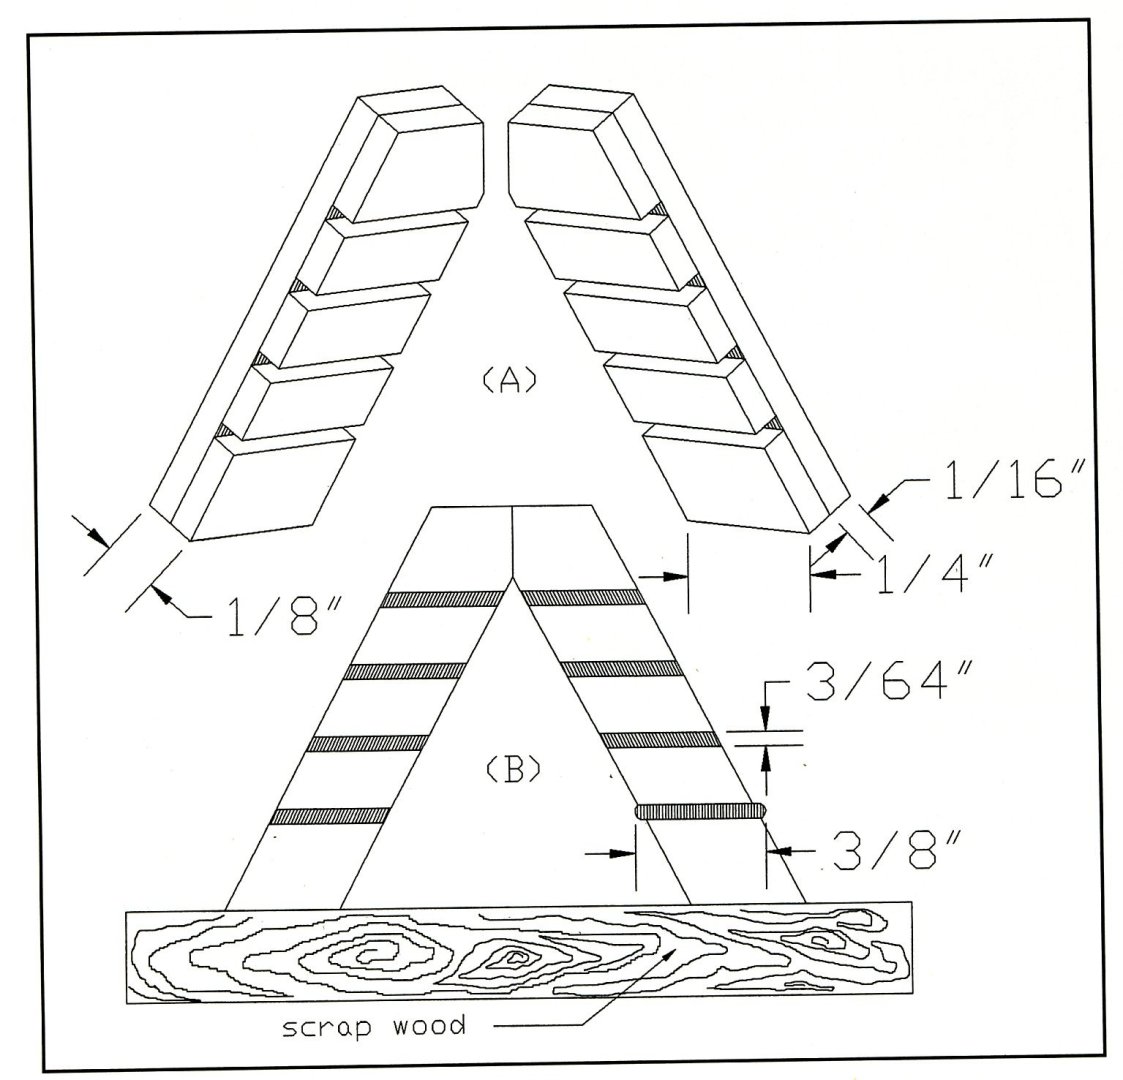
I follow the method described once by Fr. Bill Romero. First prepare yourself the sides of your ladder, then prepare the steps. Assemble temporarily the sides like it's shown on the pic, in the shape of a letter "A" (at an angle that is twice the angle between your ladder and the side of your model), placing a drop of white glue at the tops of the sides. Place drops of glue at the bottoms of the sides and temporarily glue them to the horizontal piece, shown here as "scrap wood". Place your 'triangle' on the table of your miniature table saw (Preac, Proxxon, or like), the side with "scrap wood" facing the fence of your saw and make slits in the sides to the depth equaled half the thickness of your sides. Use an appropriate spacer to make subsequent slits to make sure your slits are equally distanced to each other. Now disassemble the sides from "scrap wood" and from each other. Glue all steps into the slits in one side of your ladder and after the glue dries, glue them to the other side. Alternatively, instead of cutting slits in the sides, glue to them equal size 'rhombs' (parallelograms) of the same piece of wood as your sides, making sure you keep spaces for your sides to be glued in later on. - drawing A. (Don't mind the numbers on the scan - they refer to his model only).
-
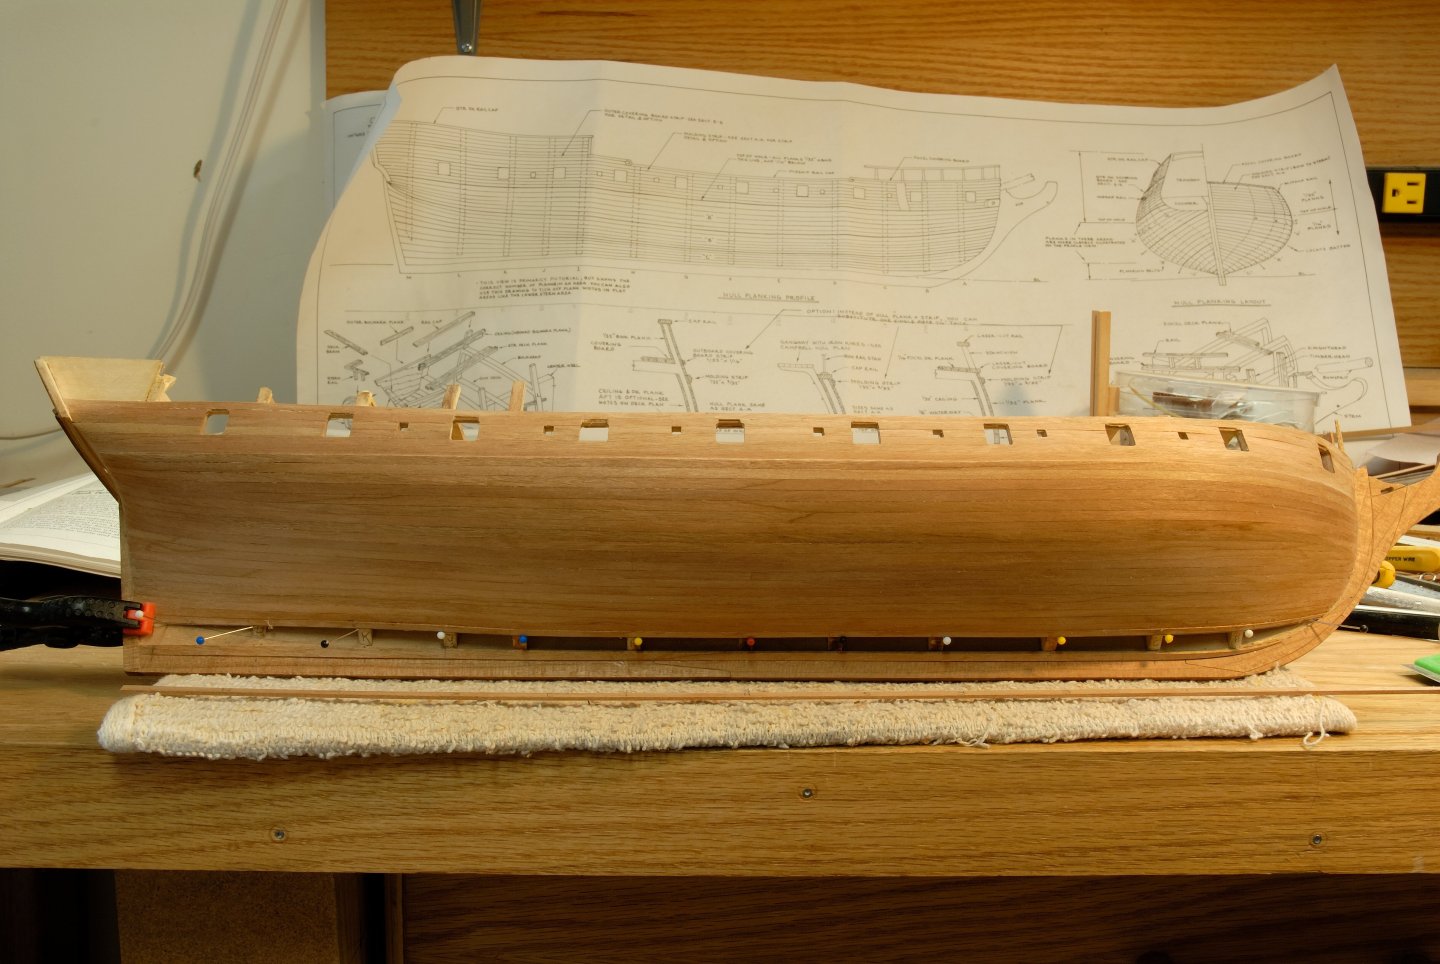
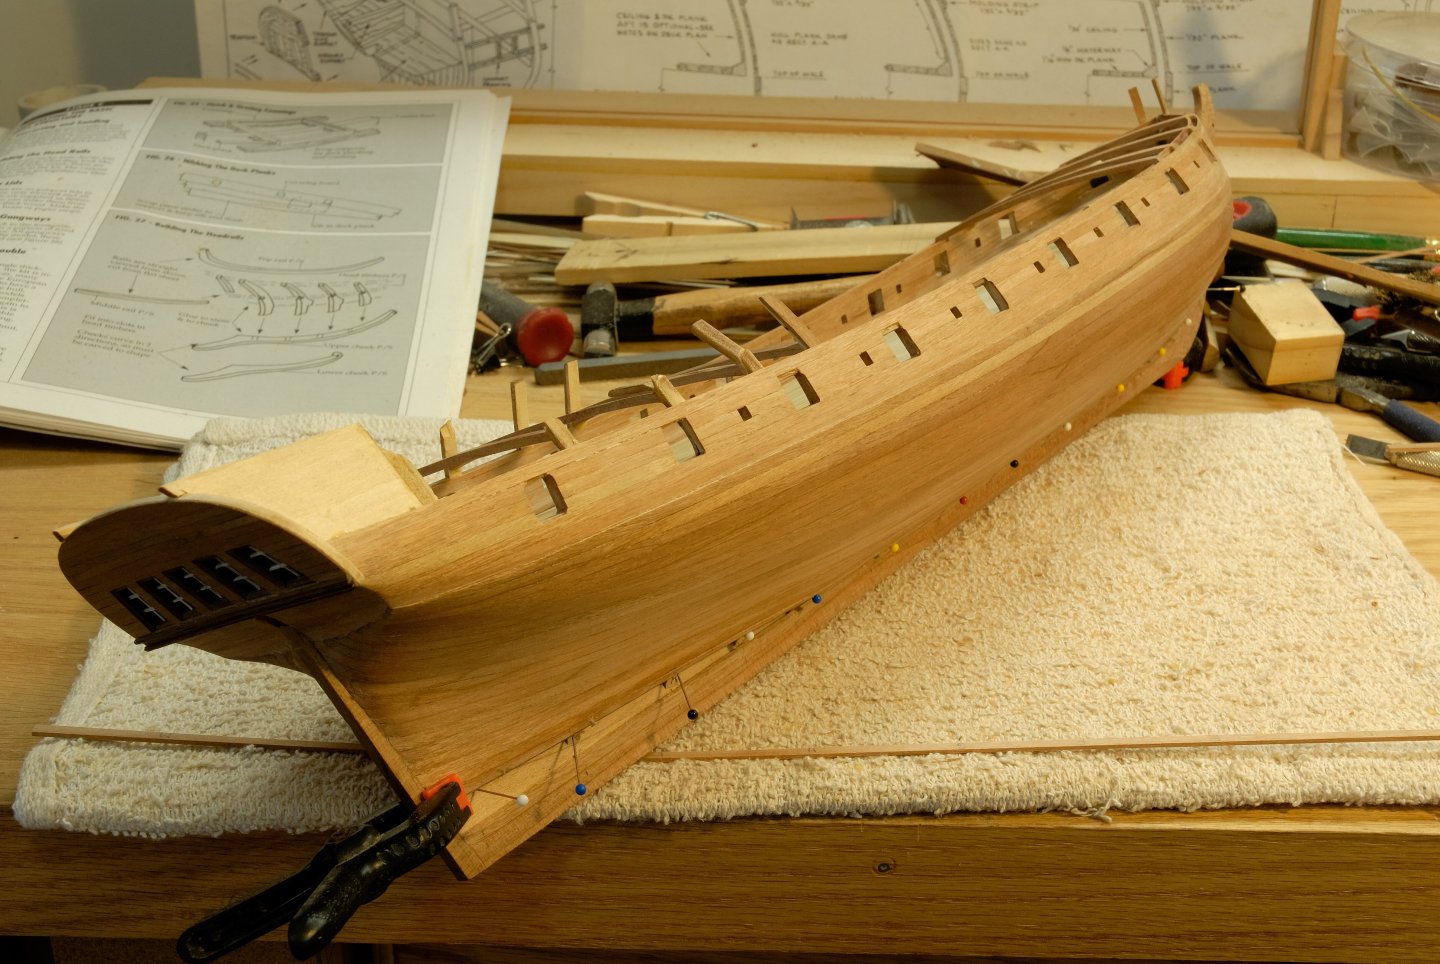
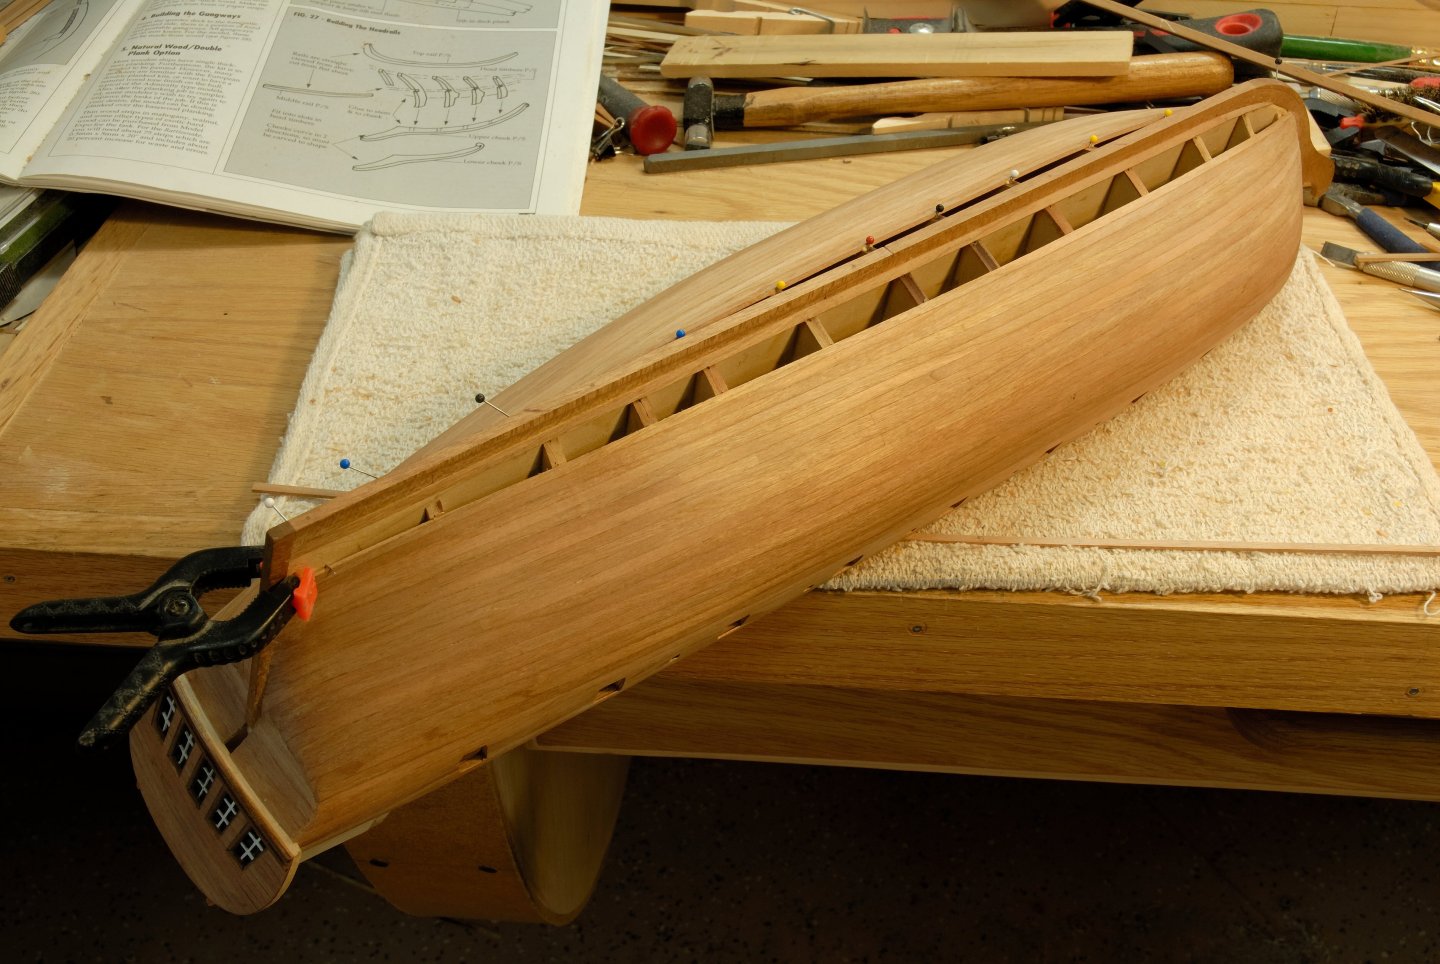
I always glue ONE plank interchangeably on each side of a hull at a time and proceed the same for the remainder of planks. I prebend the wet planks off the model so that they almost fit the shape of the hull, nothing forceful! I only place ONE layer of planks, no second coats necessary.
-
Amazon has several draw plates, their prices ranging from inexpensive to quite pricey. Notice that the holes in the plates are drilled not simply through, but their profile is conical. Which means that on one side of the plate each hole is bigger (base of the cone) and on the other side it is smaller (apex of the cone). The same plate can be used for pulling through a soft metal wire, as well as drawing wood. You insert a wire from the base side (larger hole) of the plate and pull it through the apex (smaller hole). With wood you do it from the opposite side. In other words, to make a thinner wire, you squeeze it through the plate, but with wood, you shave it (apex side has sharp edges). From my own practical experience with a draw plate, the best wood is prewetted bamboo (skewers from grocery stores), because bamboo has long and strong fibres that can withstand pulling with forceps. Other wood tends to break more easily. If you want to use something other than bamboo woods, like fruitwoods, or boxwood or similar for your treenails, use rather treenail cutters from Vanda Lay Ind. - he used to make them in 3 sizes, later on only 2 and finally, as far as I know, stopped making them altogether. Possibly you can still get this gadget on Ebay or similar sources.
-
Jewerly equipment suppliers have various draw plates.
-
Parallel blade to the fence is critical, however long time ago I learnt a trick from someone from the defunct now forum, Seaways Ships in Scale, that even better is when you set the blade every slightly out of being parallel, in such a way, that the distal end (from the operator's point of view) of the blade - the one that comes out and up from the table, is a tiny bit further away from the fence than the proximal (closer to the operator's site) end of the blade - the one that goes down under the table. That way you'll avoid squeezing the wood between the blade and the fence, and hence - the burnt marks. How to do it simply and quickly? Place a strip of paper in between the proximal end of a blade and the fence and another strip between the distal end and the fence. Bring the fence close to the blade all the way, so that it touches the paper. If you set the blade as mentioned above, the proximal strip is now tightly wedged between the blade and the fence and if you forcibly try to remove it, it tears. However, the distal strip still can be removed easily without tearing. The blade is now ready for cutting the wood. Another thought - for ripping the wood, it is best not to use a slitting blade, but rather a blade with larger teeth, preferably with carbide tips (very sharp).
-
Proxxon DB250 3 Jaw Chuck
Dziadeczek replied to mrcc's topic in Modeling tools and Workshop Equipment
I don't think it is necessary to soak everything in machine oil, so that when the chuck spins in the lathe, droplets of oil sprinkle everywhere! Just light oiling will suffice. -
USS Constitution by mtbediz - 1:76
Dziadeczek replied to mtbediz's topic in - Build logs for subjects built 1751 - 1800
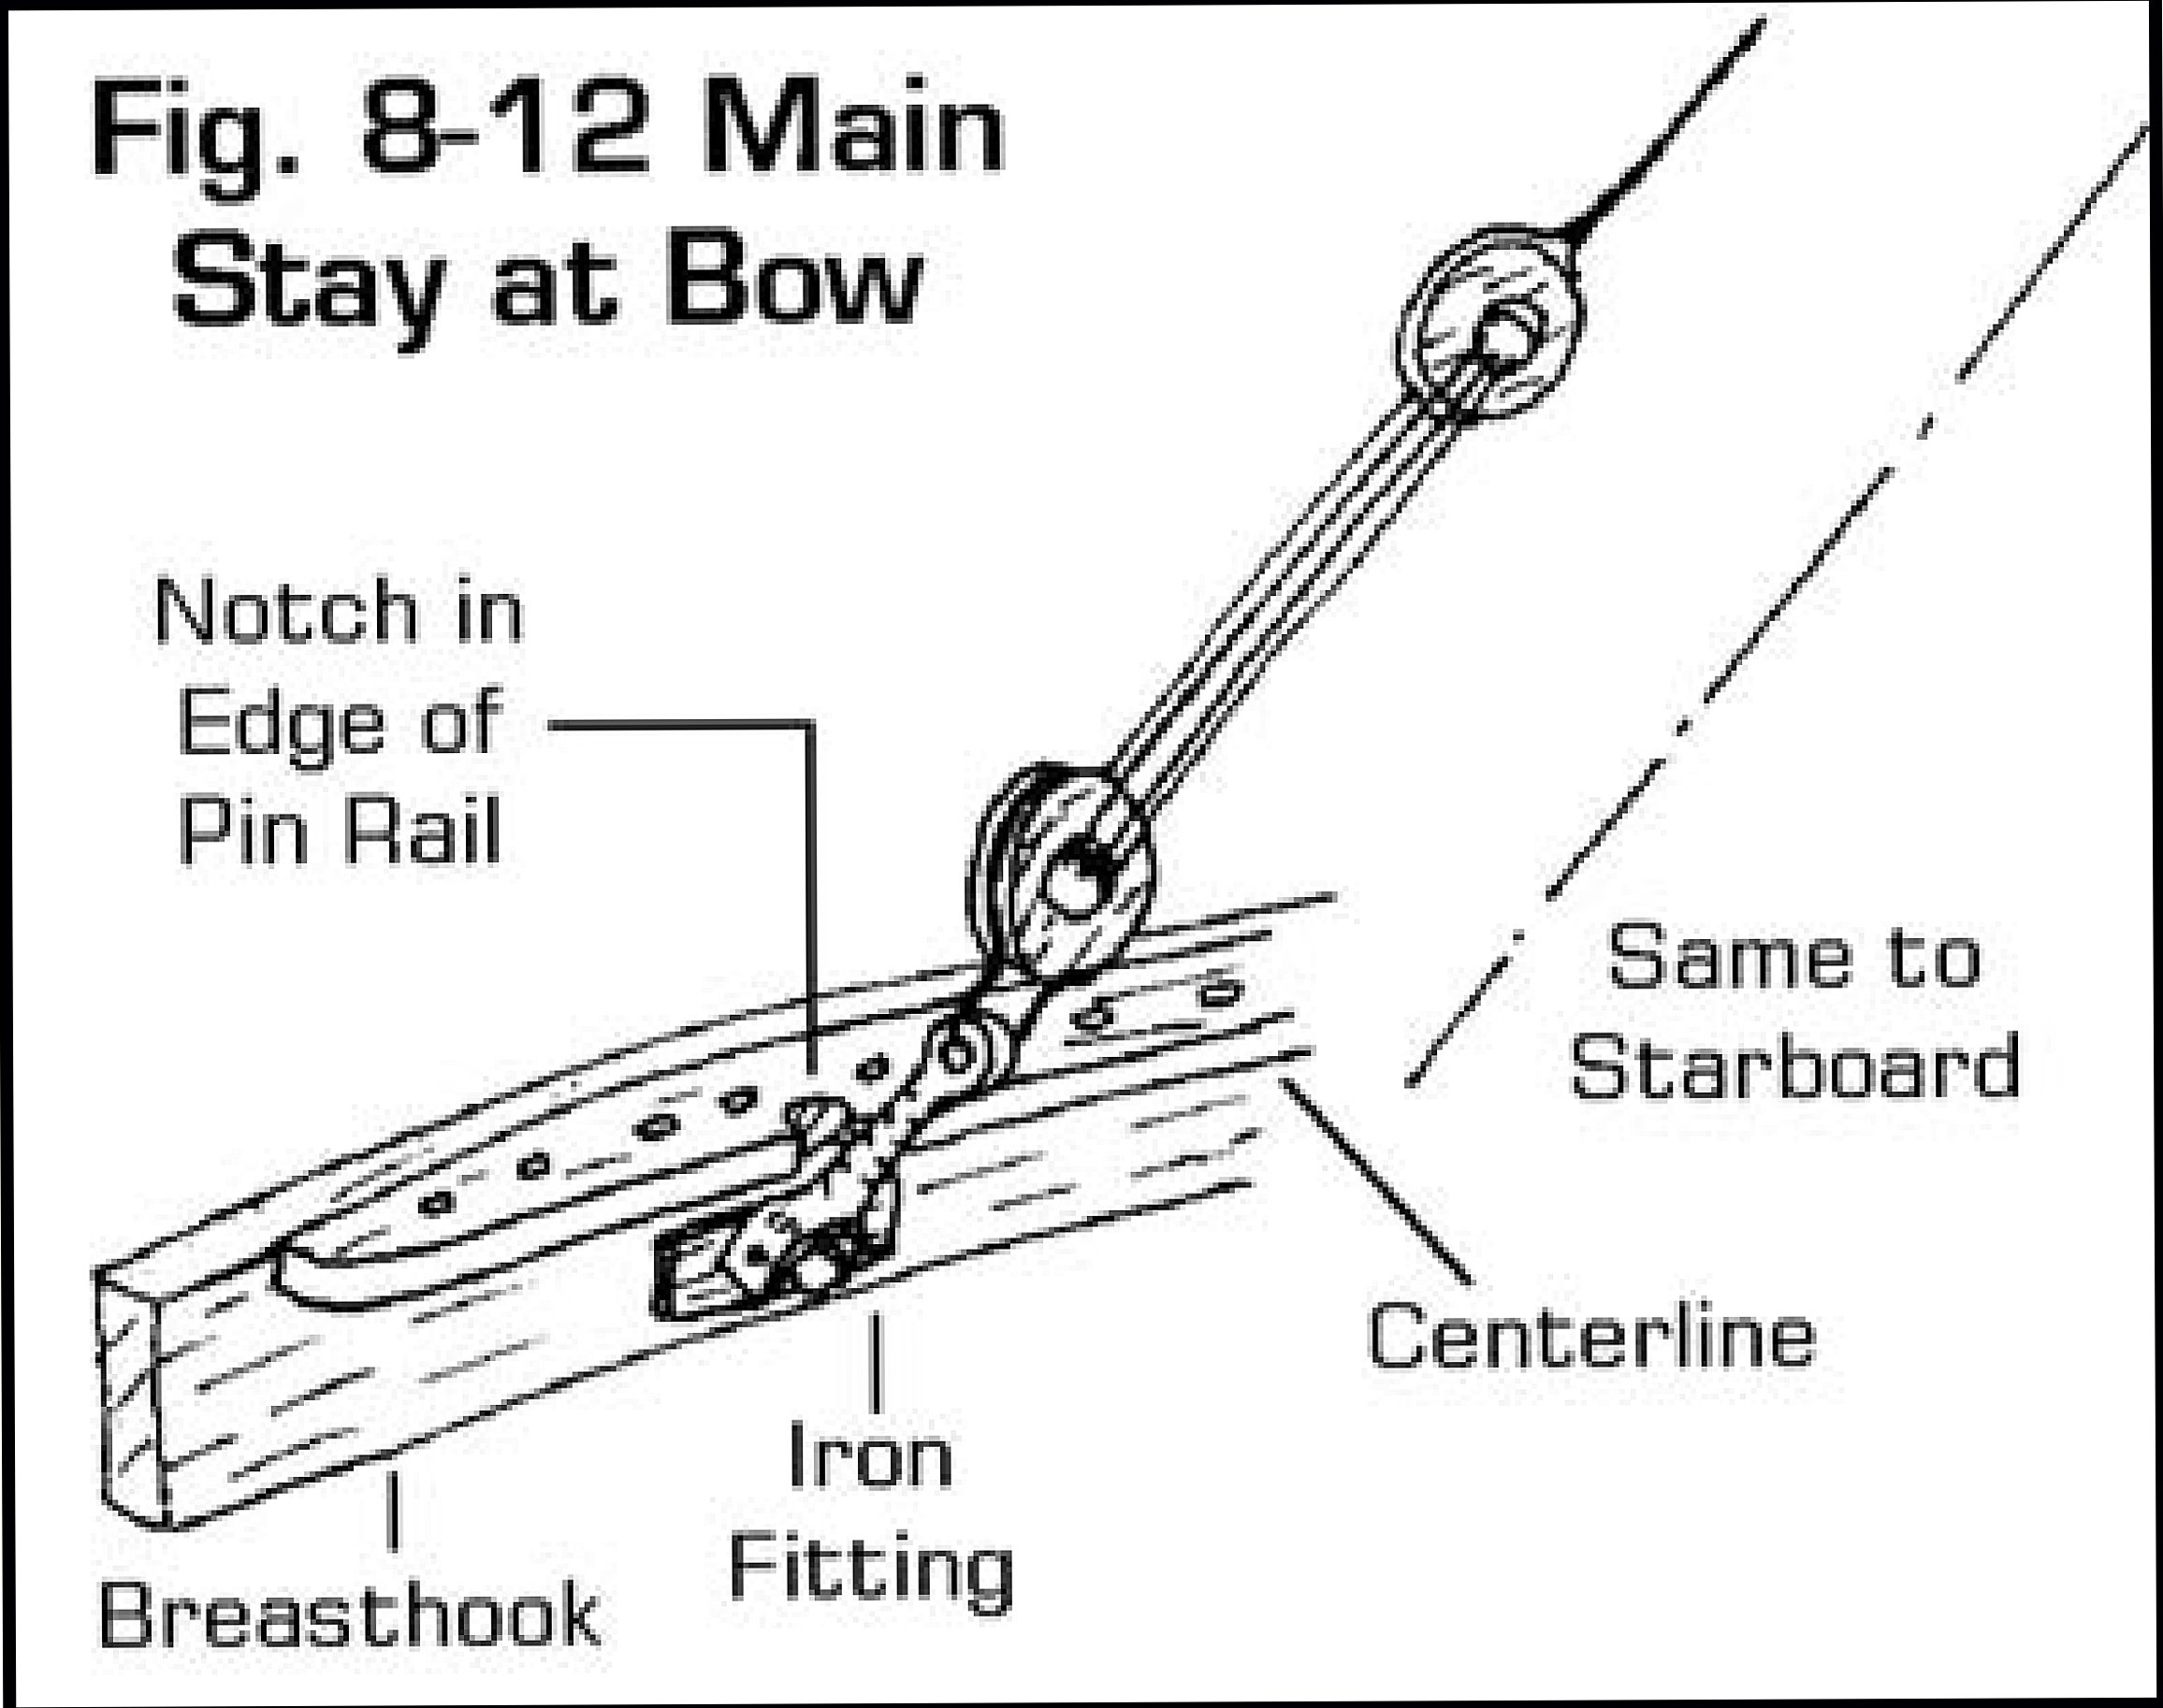
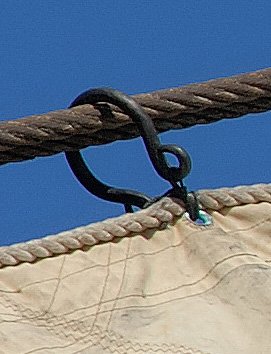
Also, there is a drawing by Ben Lankford from Model Shipways, that shows this detail - he calls it "iron fitting", which is a kind of a metal fork that is attached to a rod bolted to this breasthook, the rod - looks like, it has a hole drilled through it with a pin holding everything together, so it pivots up and down - see attached diagram and the pic (greatly enlarged).

-
Proxxon DB250 3 Jaw Chuck
Dziadeczek replied to mrcc's topic in Modeling tools and Workshop Equipment
I found this video on the YouTube. Activate English subtitles, if you don't speak Russian. -
Proxxon DB250 3 Jaw Chuck
Dziadeczek replied to mrcc's topic in Modeling tools and Workshop Equipment
This is the original Sherline instruction on how to disassemble and reassemble the reversible jaws from a 4 jaw chuck (which I would encourage you to obtain from Proxxon in addition to your 3 jaw chuck, because in certain situations you'll need the 4 jaw chuck to be able to machine, for instance a square or octagonal stock, or similar...). I have both of them for my Sherline lathe. Perhaps the situation with the Proxxon chuck is similar with the one from Sherline?
-
Proxxon DB250 3 Jaw Chuck
Dziadeczek replied to mrcc's topic in Modeling tools and Workshop Equipment
Those numbers refer not only to the correct placements of the jaws in the chuck, but also the proper sequence of reassembling them. Start with jaw 1 by placing it in the chuck in the place marked as 1 and slowly turn the chuck until the jaw engages. Immediately after, place jaw 2 in its place marked as 2 and proceede with turning the chuck until jaw 2 engages (jaw 1 will in the meantime engage further on). Finish with jaw 3 in the same manner. Otherwise, all jaws will sit in the chuck incorrectly and too tight! At least, that's the situation with a chuck from the Sherline lathe. (I would spray WD 40 for the jaws and the chuck to loosen and remove grime in crevasses before reassembling them and then lubricating everything slightly). -
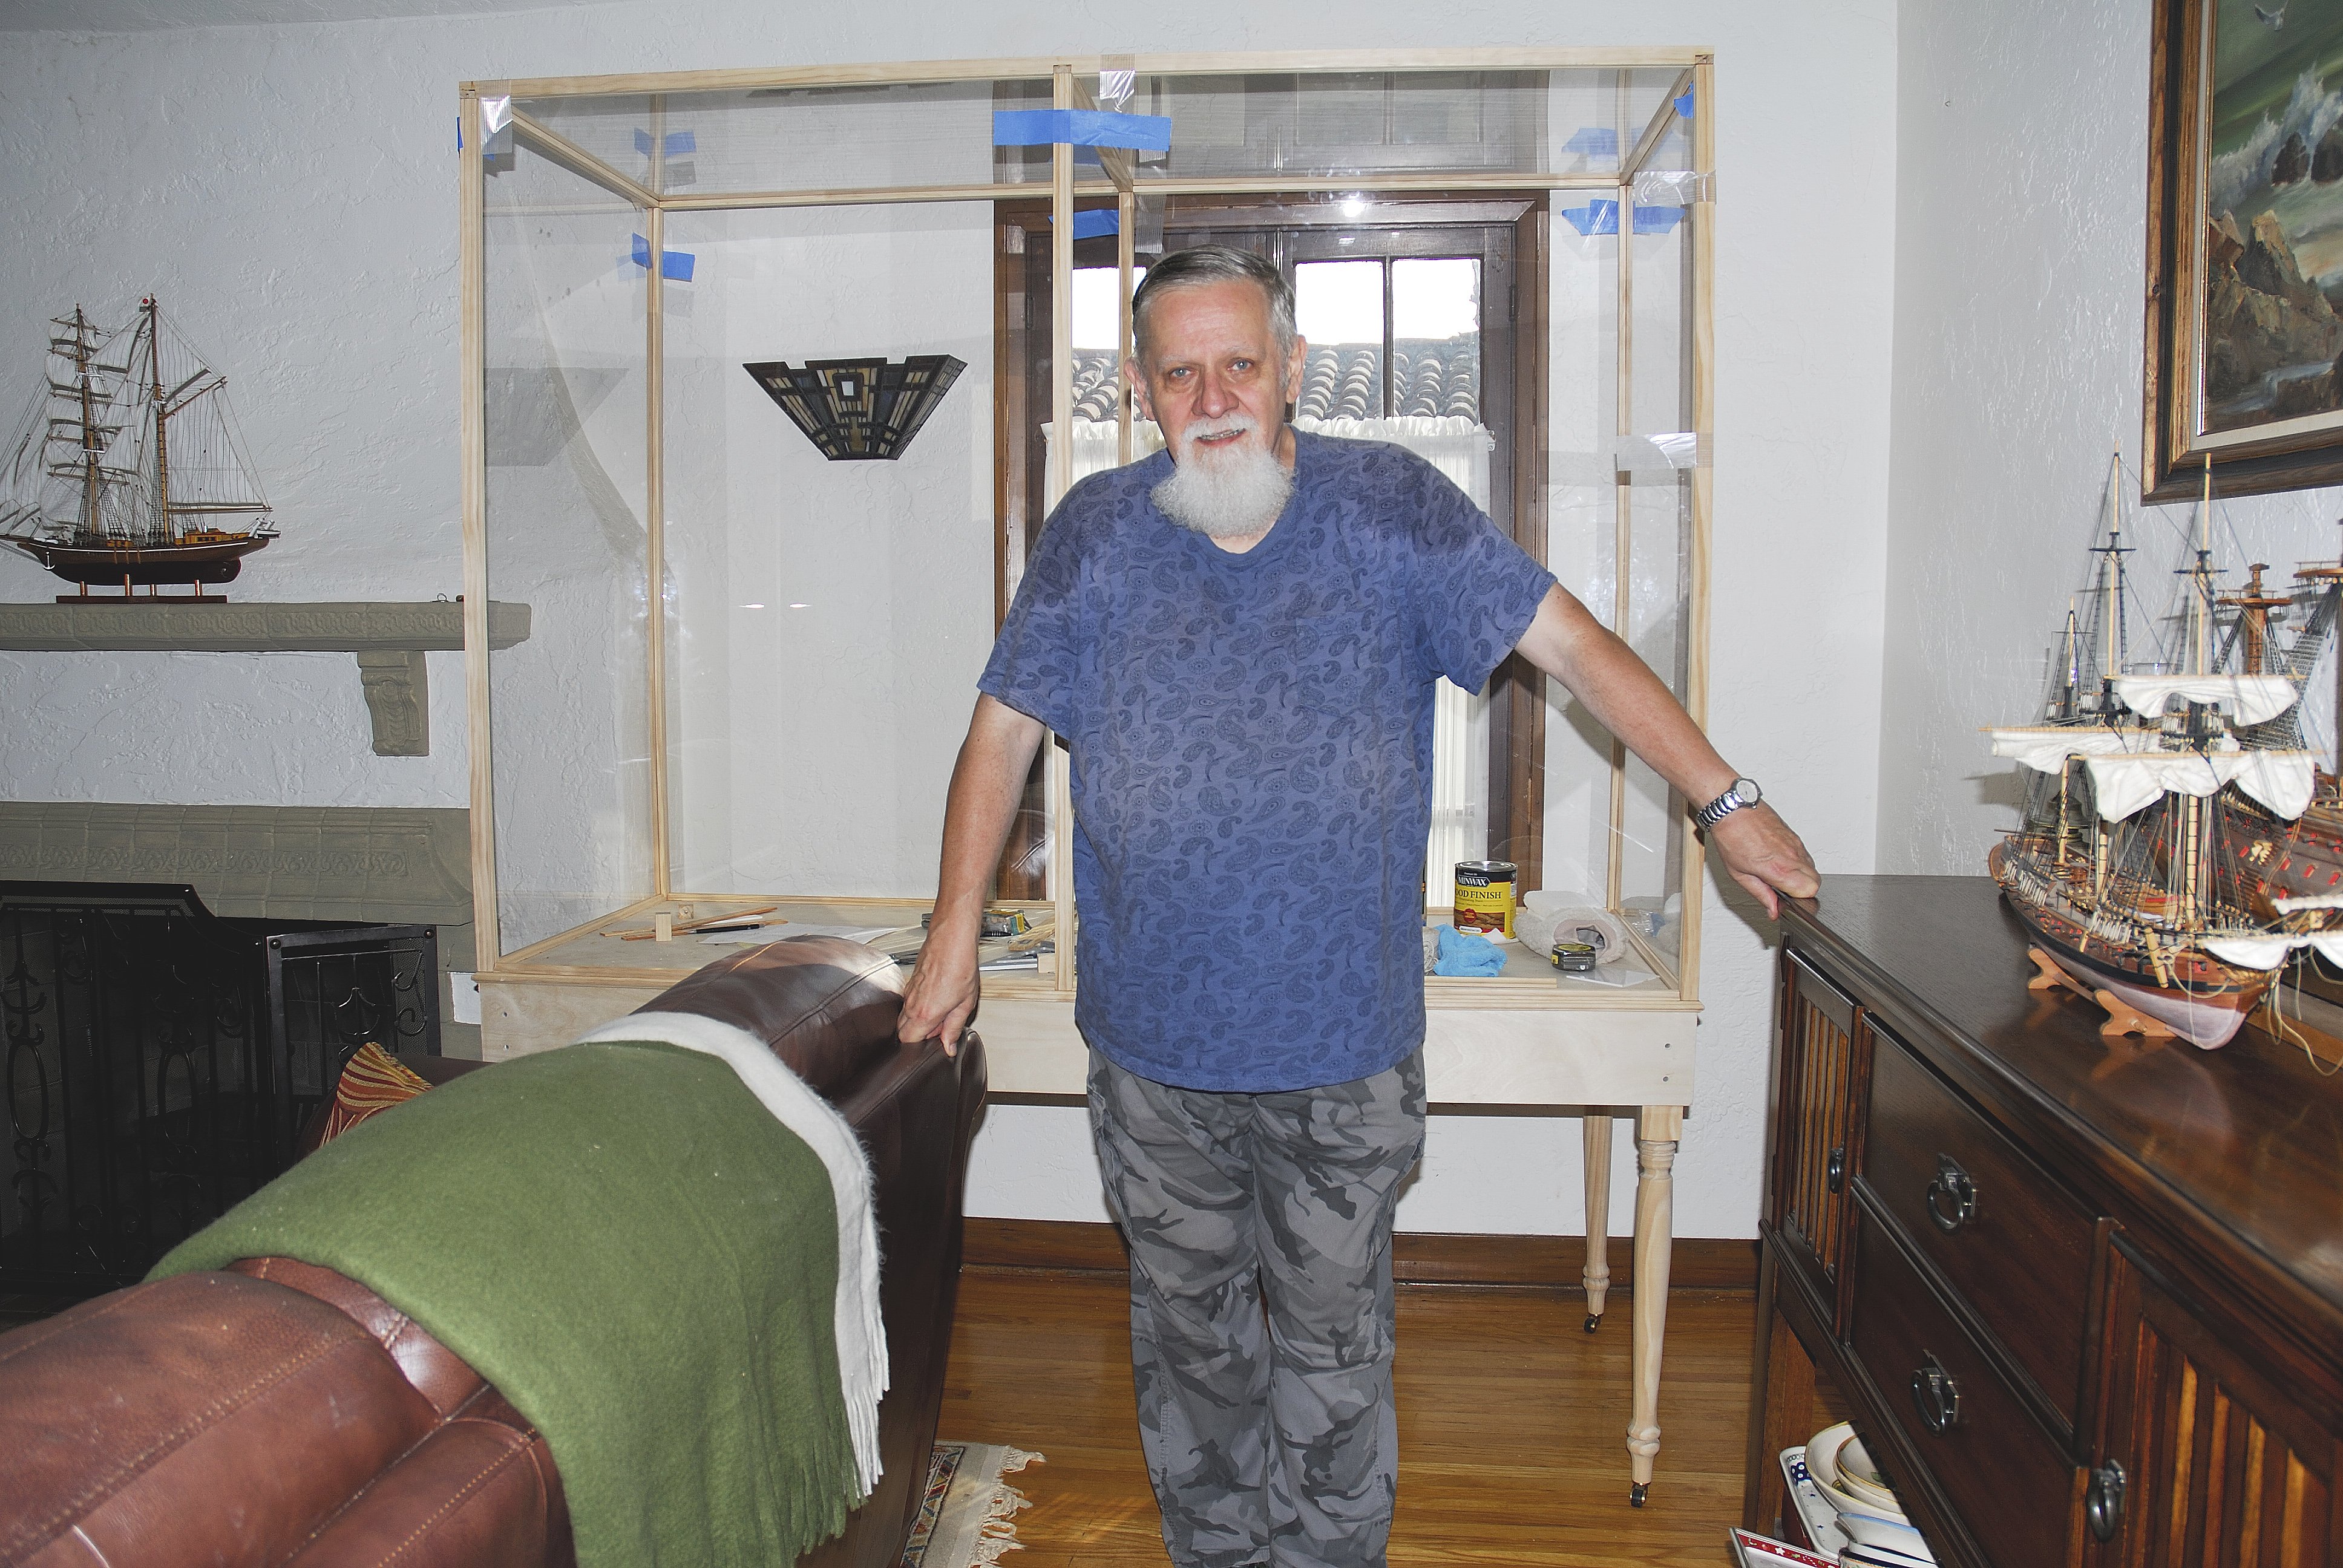
I recently finished a large (!) case for my huge (1:48) model of a French 74 guns 1780, building it 'El cheapo', from common materials from the internet, Home Depot and such... I used plexiglass rather than ordinary glass - for obvious reasons. The pic shows the whole thing in a raw, unfinished state, however in the meantime I managed to finish (stain & polyurethane) it. Without much research, I obtained a gallon of oil-based poly and then I faced difficulties getting mineral spirits to make a wipe on poly from it. It turned out that some time ago California banned mineral spirits altogether. Fortunately, I had some old supplies of this stuff, but used them quickly, so reluctantly had to get some paint thinner (not the same stuff as mineral spirits!) and used it to thin the rest of my poly. The finish did not turn out as I planned, but I guess, it is good enough... Now I am waiting for my son to come home for the holidays, to help me to transport this dinosaur from my workshop to the case in the living room and protect it from the dust and "elements", so to speak... 🤥

-
Excelllent! 😲 Could I trouble you to repost this pic again, in a bigger resolution, say 300dpi, please? I use your pics for my desktop background and, even though I enlarged this pic, it now shows some grain, unfortunately. If you show it in larger resolution (original?), the quality should be noticeably better, I hope. Thanks again! Thomas
-
An easy (fairly) way to make your own shaving planes
-
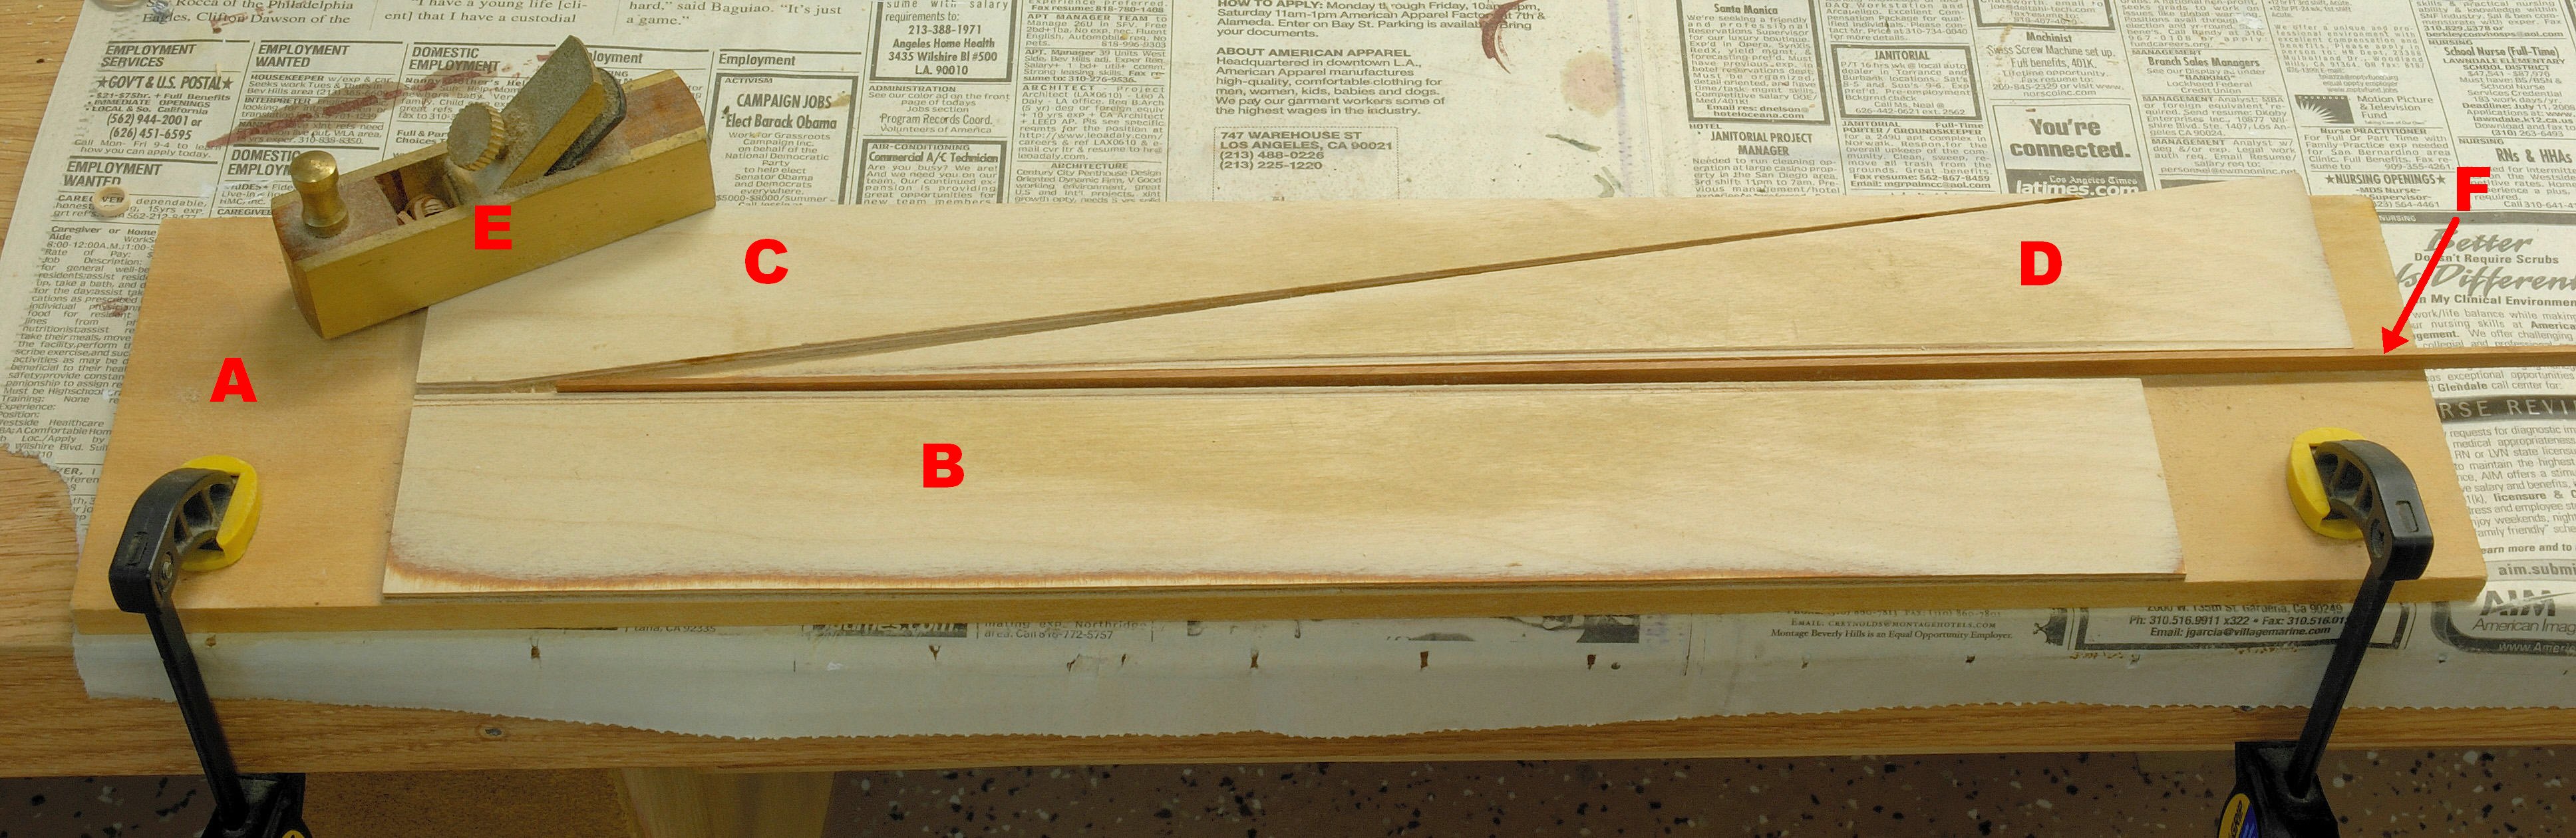
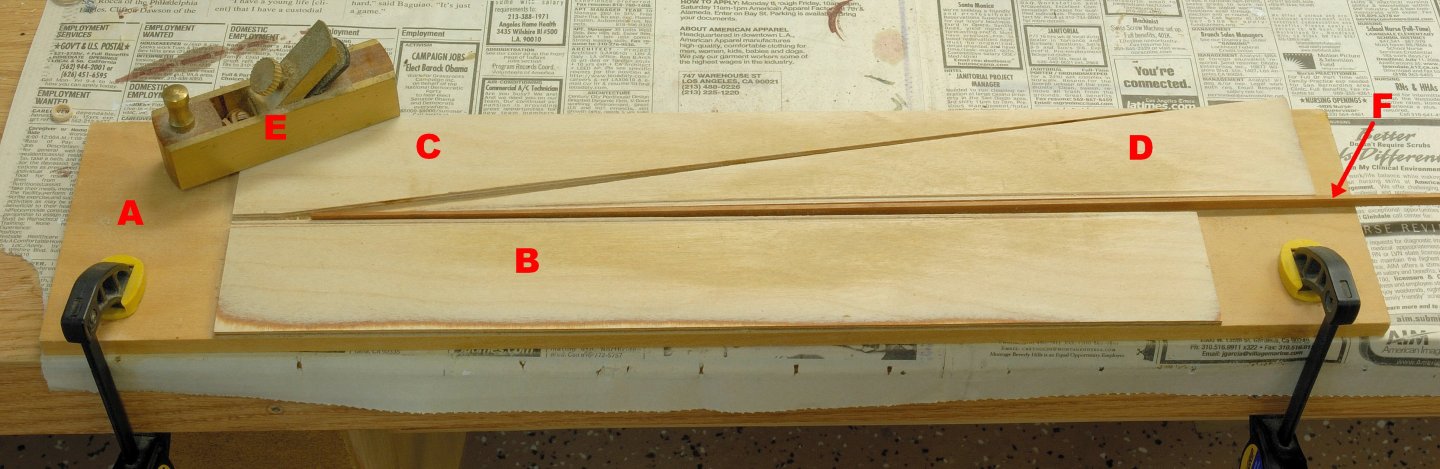
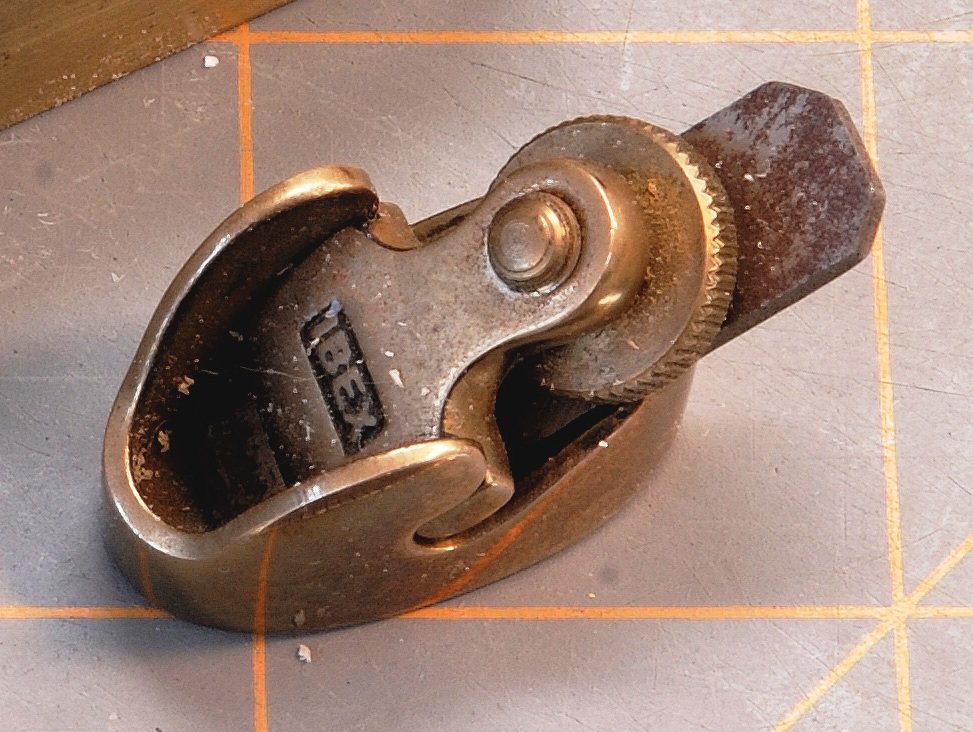
It is best to first build yourself a plank holding (clamping) jig, where you wedge your plank vertically (after you mark in pencil the contour of the plank) and then you proceed to shape (shave) the edge of this plank almost to the pencil line and finish it with a piece of wooden block with sandpaper glued to it. See the pic. A- base from wood clamped to a table B- plywood rectangle glued to the base C- plywood triangle glued to the base D- another plywood triangle, loose, used for clamping the plank E- shaving plane F- plank wedged vertically between B and D It is advisable to do two corresponding planks at the same time, wedged in this holding jig, firstly because one plank will go on the one side of the hull and the other one will go to the opposite side; ideally they should therefore be identical, provided that your hull is perfectly symmetrical... Also - secondly, it will speed up the time of shaving the contour for all planks... For the shaving process I found out that the best planes are the mini-Ibex planes used by luthiers, those tiny ones held in fingers - see attached pic. Those provide max precision and control of the process. They are quite pricey, but sometimes you can get used ones on Ebay for much cheaper. I got mine many years ago for 5$ from a local vendor in one model exhibit/show...
-
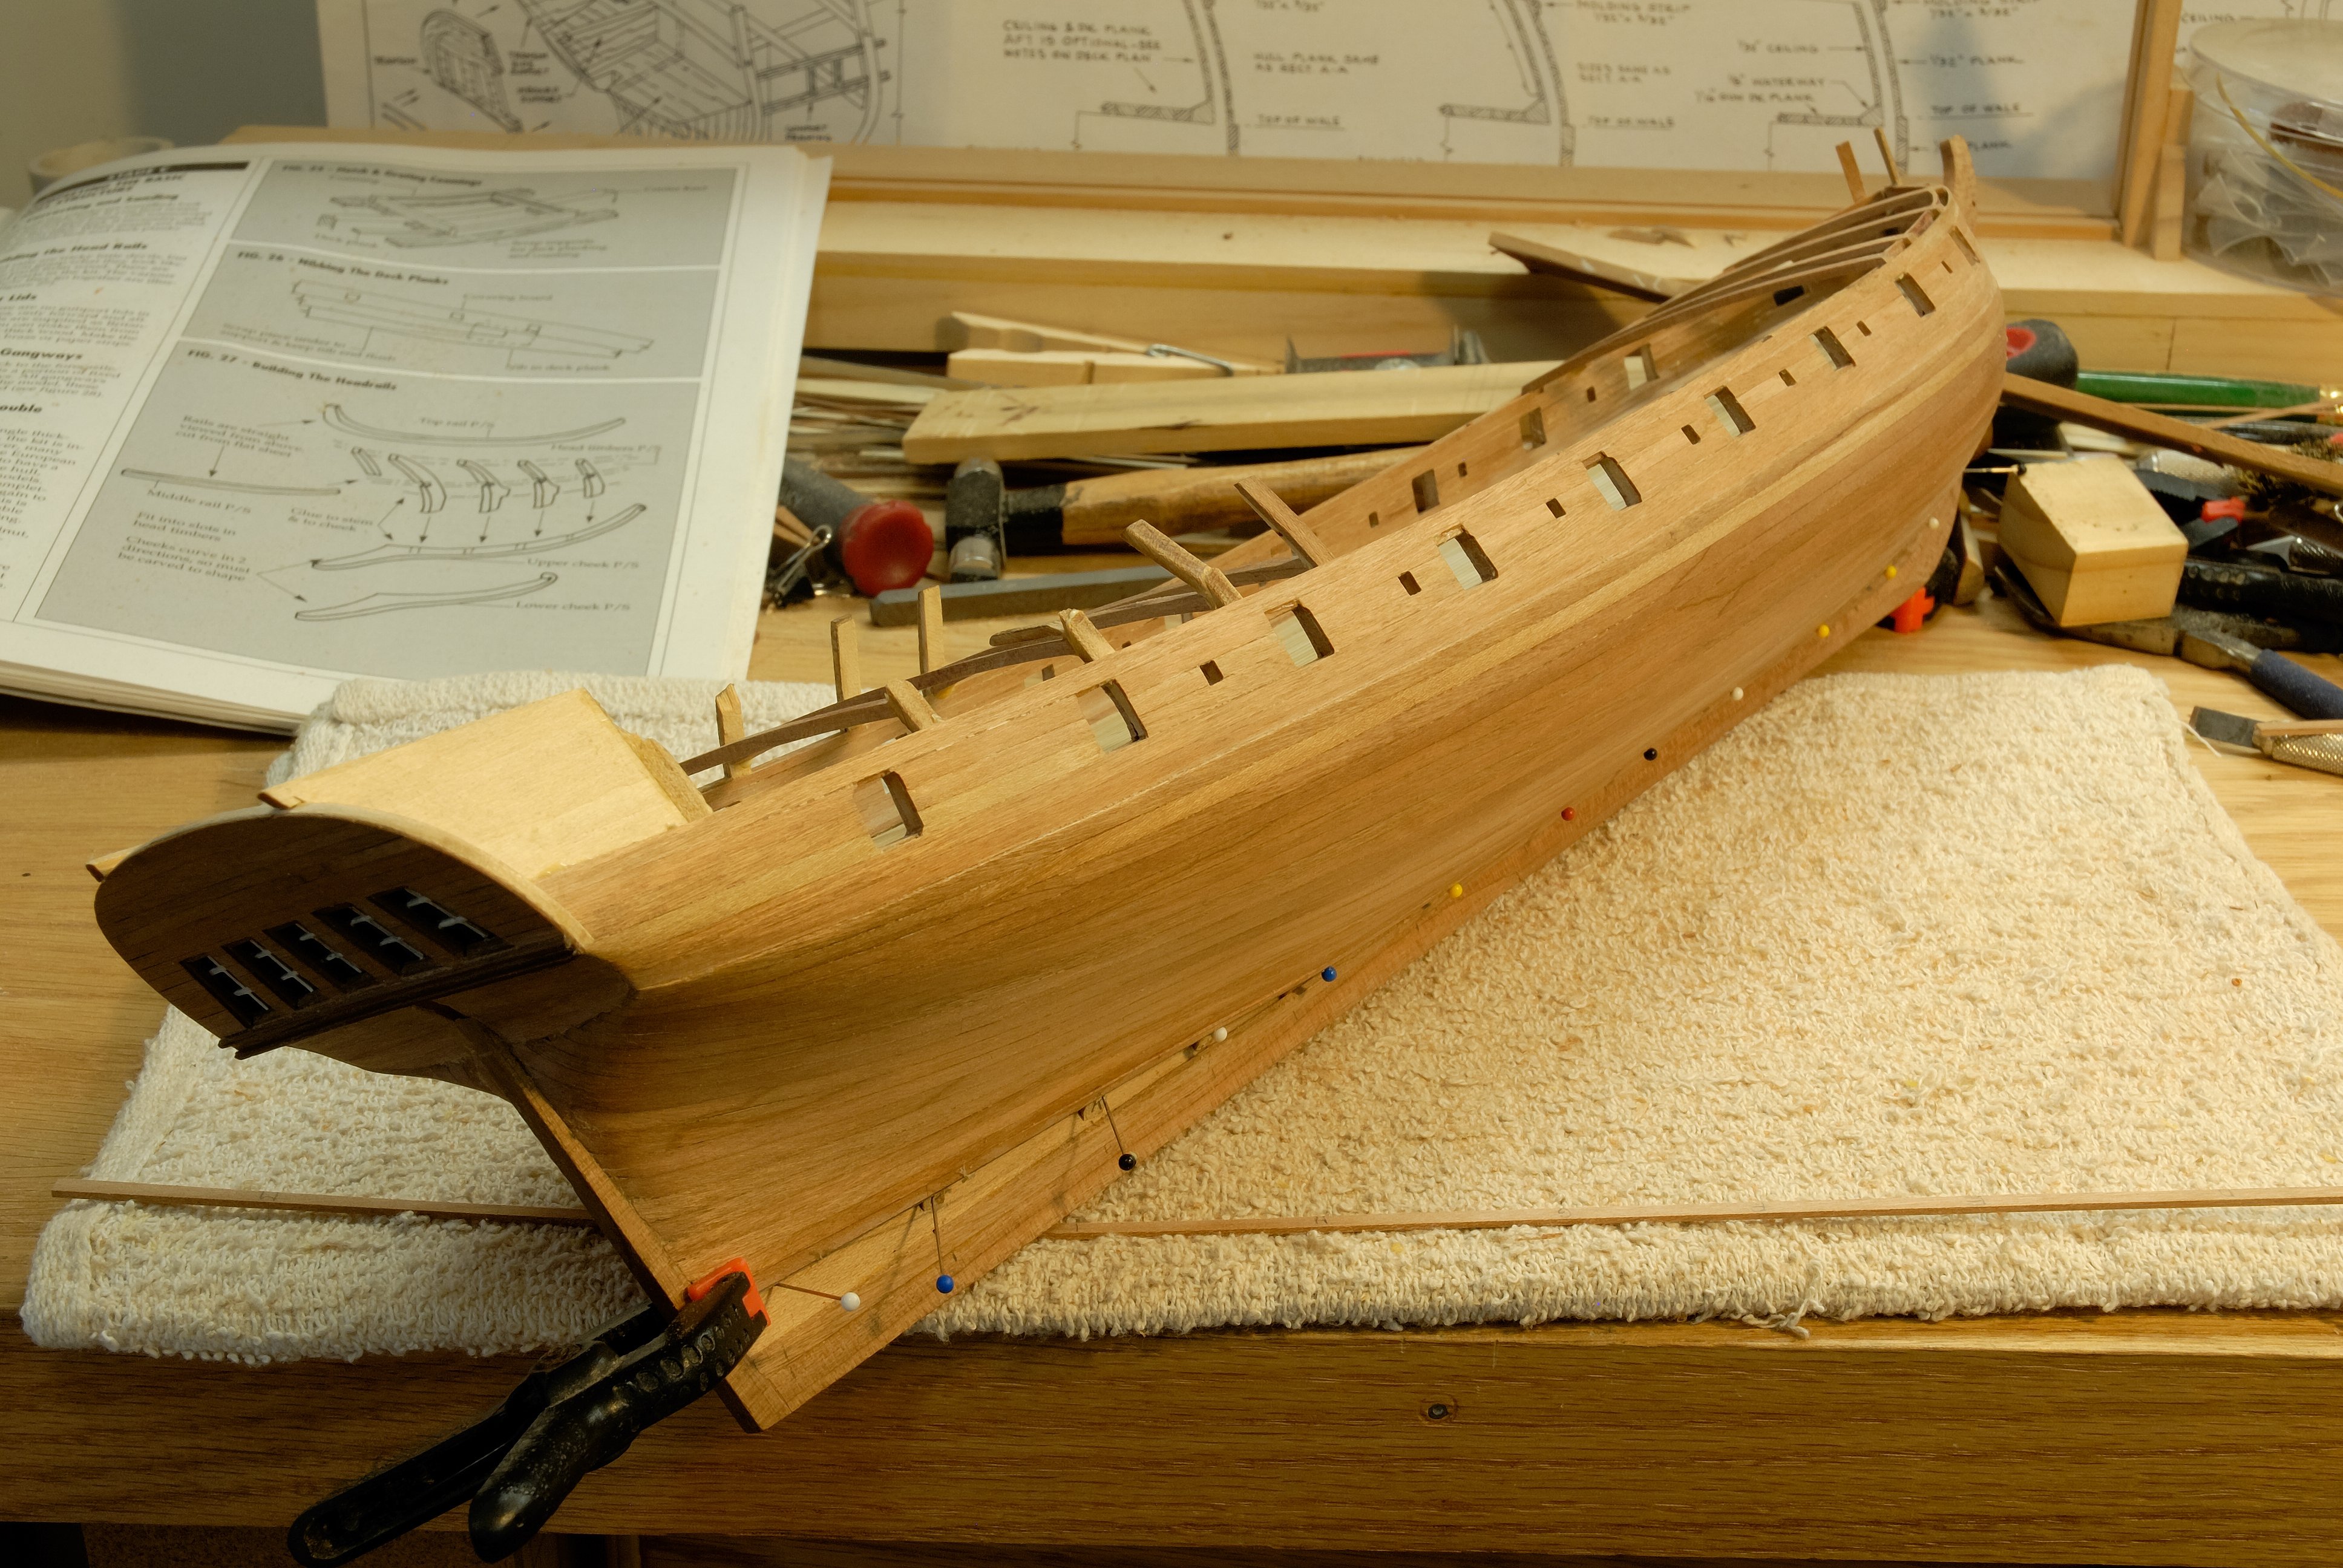
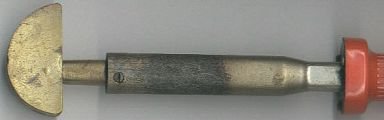
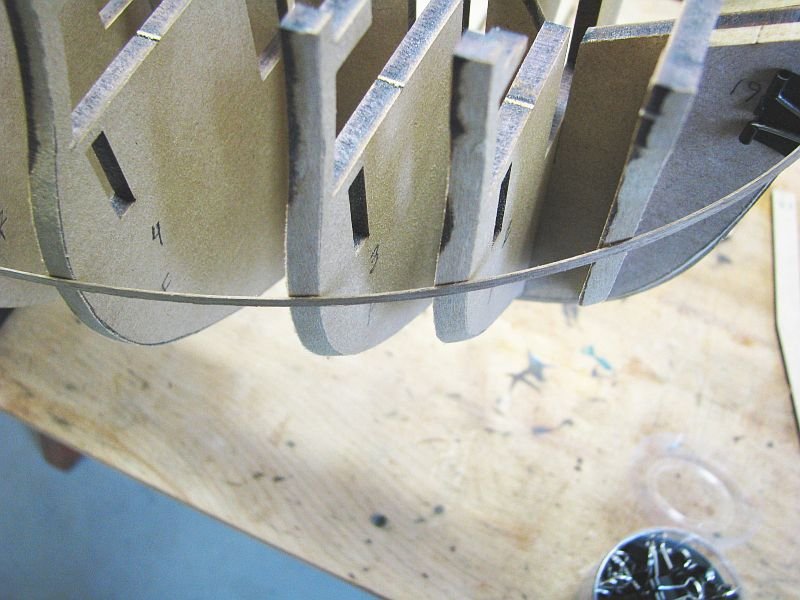
If you pre-bend your plank off the model, frequently checking its shape (until it almost fits the shape of the hull in place it belongs), you'll hardly need ANY clamps! Soak your planks in luke warm water for a few minutes and with an electric plank bender. or a modified soldering iron (see the pic) try to heat bend the plank, frequently checking its shape. Then place small drops of Titebond glue on the bulkhead edges touching the plank and along the one edge of your plank to glue it to the neighboring plank already installed. I only use ordinary tailor's pins to keep the plank in place, NO pushing force is needed. And I push the pins not through the plank, but rather along its edge to avoid holes in the plank after pins are removed (after the glue dries) - see the pics.
-
Help with depicting extra line on bitts
Dziadeczek replied to usedtosail's topic in Masting, rigging and sails
Here is a pic of what these details look like on the "Surprise" in San Diego, although I am not sure if these are bitts or fife rails, since several belaying pins are visible through the beams...
-
Beginner - Rigging Tools
Dziadeczek replied to nheather's topic in Modeling tools and Workshop Equipment
You mean, something like those? I made them from large size needles (from "Joans" or similar places...) and made appropriate cuts with a Dremel tool and cut off wheel. For handles I used turned dowels, but you might also use handles from old artist's brushes. Or you might be able to purchase them factory made from places like Micro Mark... These are very helpful when you work on rigging and cannot reach the spots with your fingers through a thick spiderweb of other ropes that you might damage in the process. They help you with reaching those spots, bringing ropes (lines) towards you or taking them away from you, or even for such tasks like attaching ropes to belaying pins, kevels, bitts, or similar. Without them I wouldn't have been able to do all those tasks for my French double decker of 1780 from Boudriot, I finished last winter.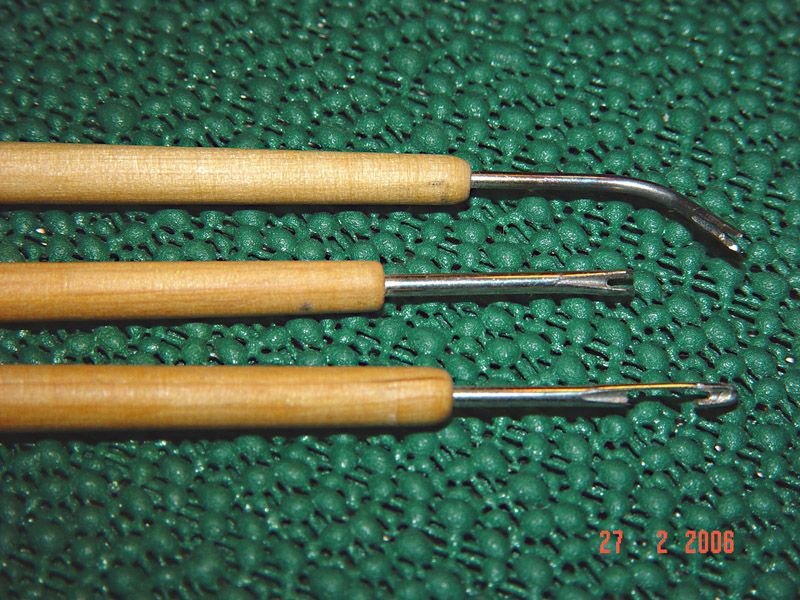
- 15 replies
-
- 10
-

-
Bending plywood is very difficult, if not impossible, even when you soak the wood and heat bend it! Plywood is glued from several thin layers of wood (laminated) and this prevents it from bending, the piece tends to spring back to former shape. Instead, you might try to use a solid wood piece, soak it in lukeworm water for a few minutes - half hour and using a soldering iron set to ~ half heat, press it to the wood and try to bend it at the same time, making sure you do not scorch/burn the wood. You might repeat it several times until you get desired shape. Good luck, Thomas PS: About this fairing of the hull (bulkheads) before planking, I found such a pic, I don't remember where it came from, but it shows the general principle.
-
Also, I recommend "Historic Ship Models" by Wolfram zu Mondfeld.