md1400cs
-
Posts
2,868 -
Joined
-
Last visited
Content Type
Profiles
Forums
Gallery
Events
Everything posted by md1400cs
-
 Glenn, Just catching up - Beautiful project your attention to the smallest of details are and their execution are excellent. Great build. It was a pleasure following along. Yes, there are always things that, looking at her again, you may think that you would add, change, or re-do - Don't go there! it is, as you know the Dark Side of our hobby Gongrats!!
- 101 replies
-
- 2
-

-
- L Toile
- Billing Boats
- (and 1 more)
-
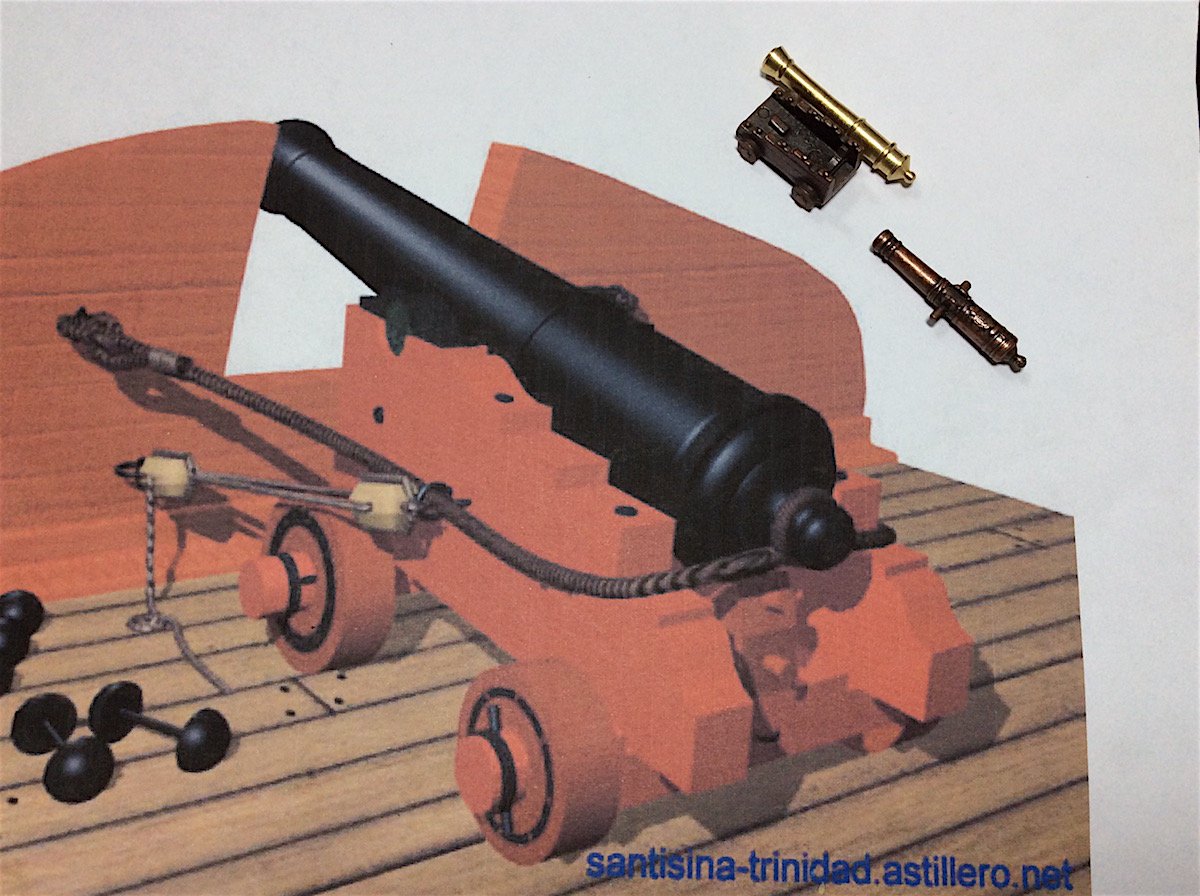
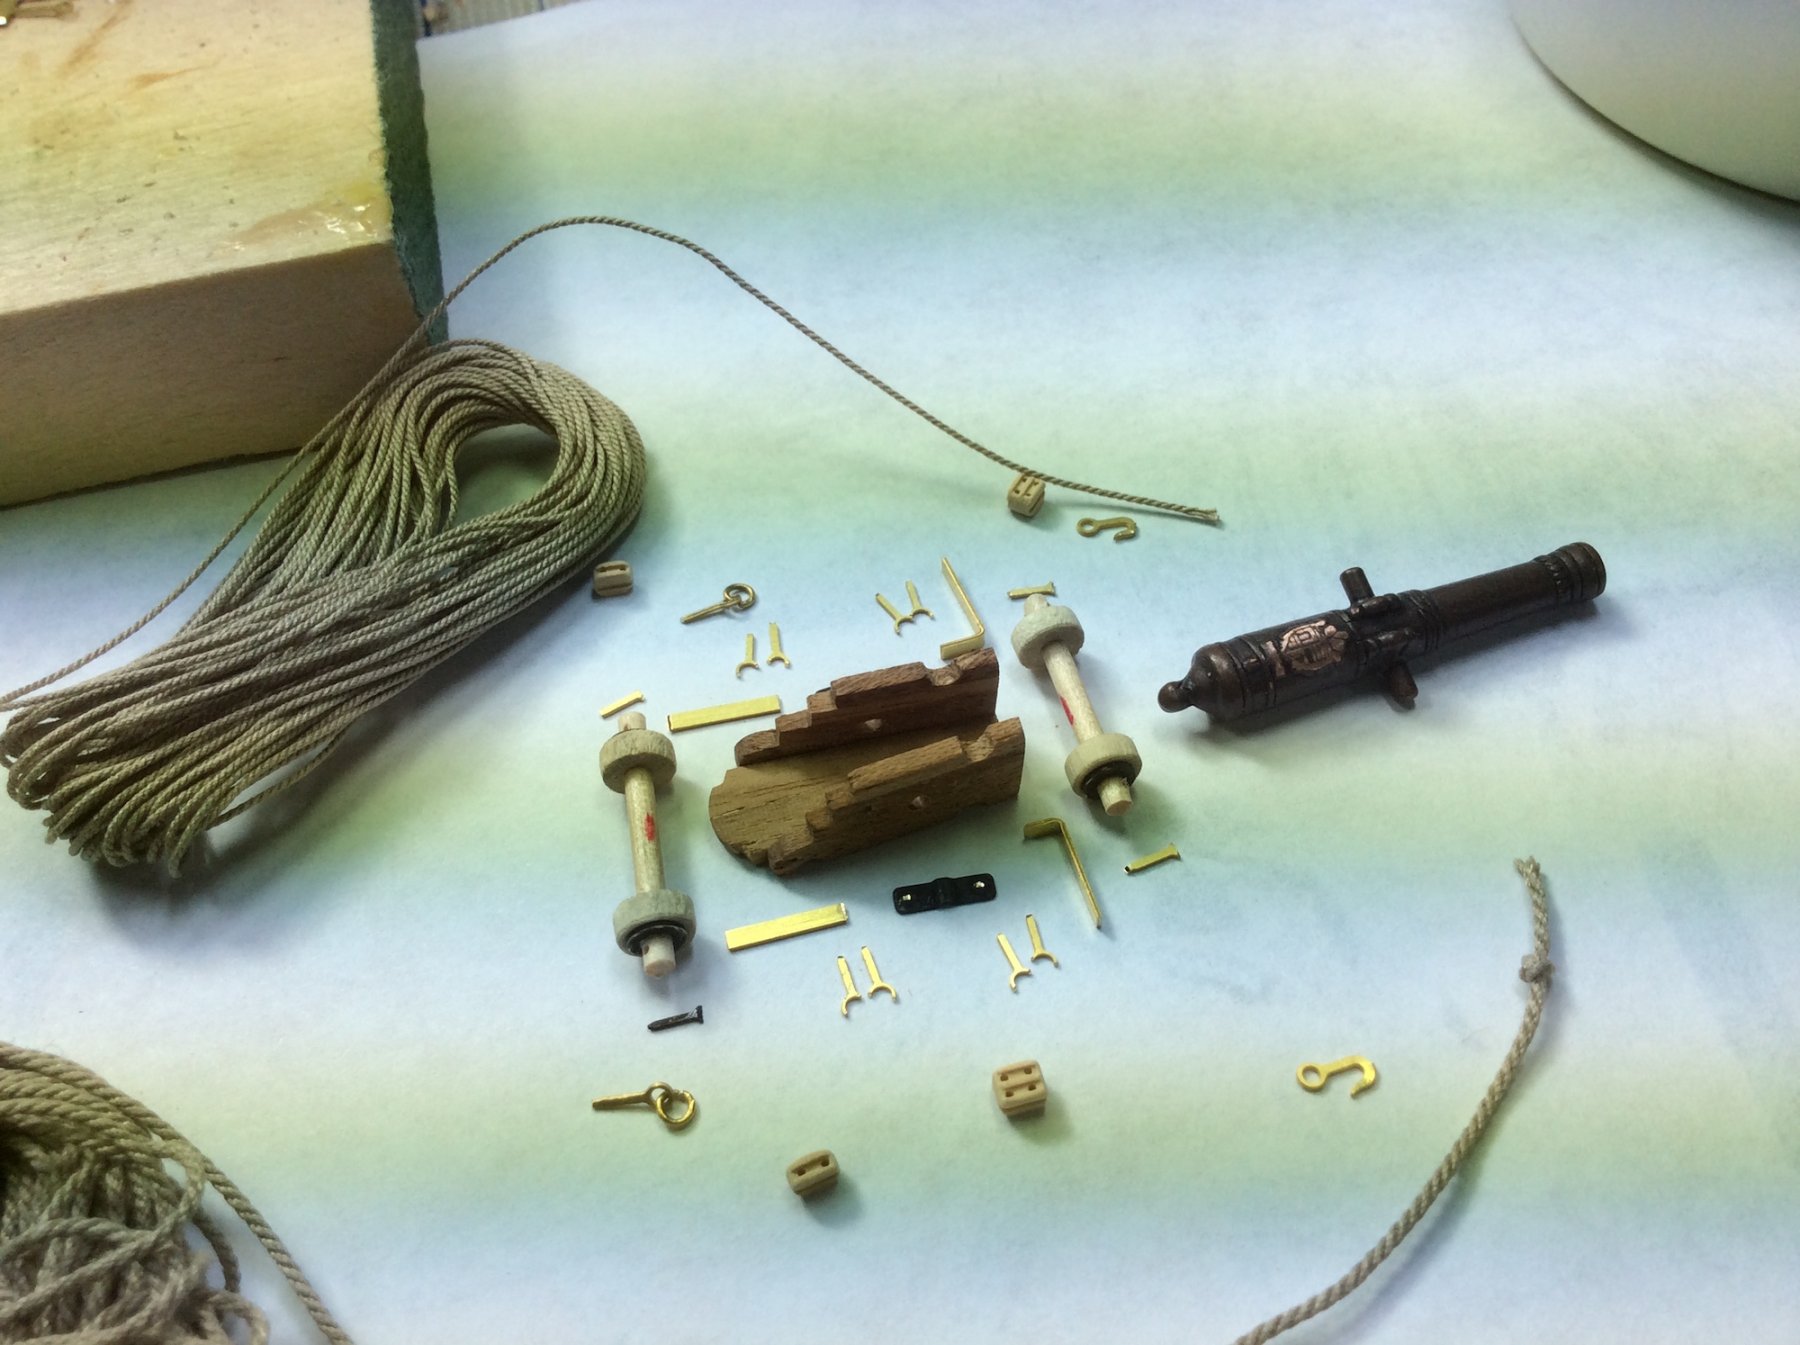
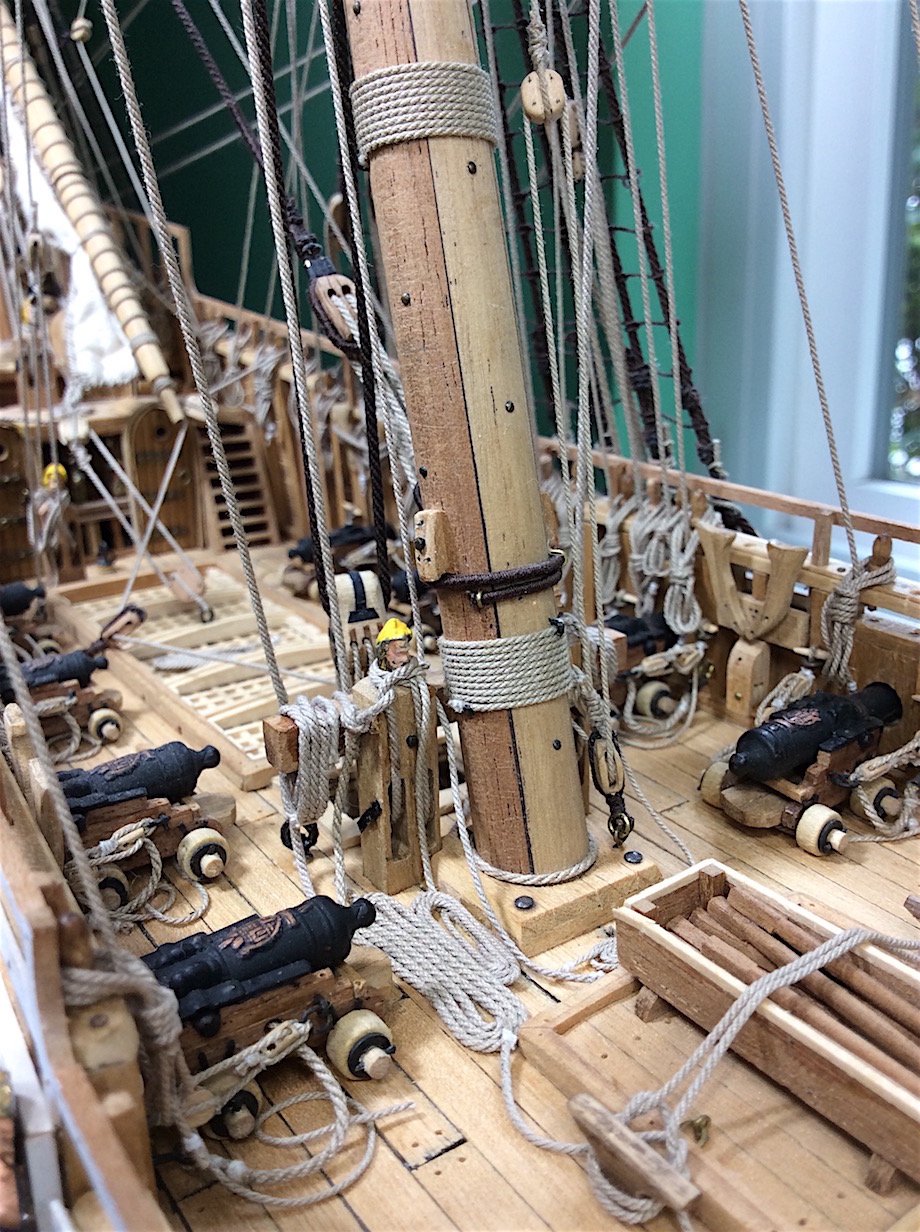
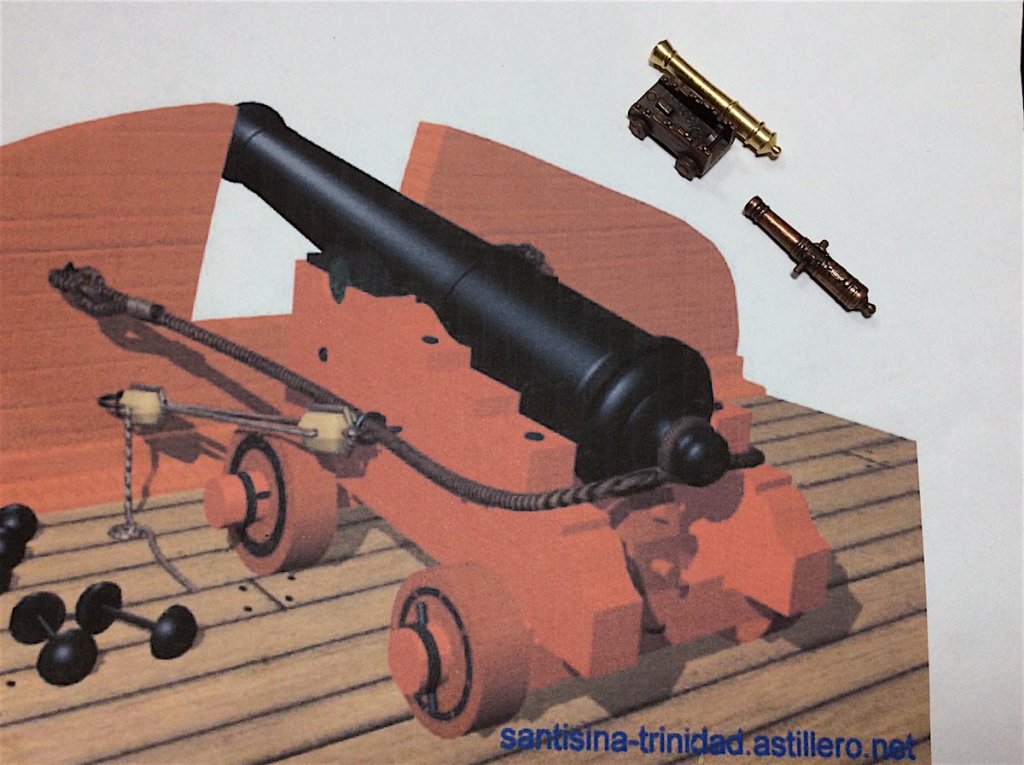
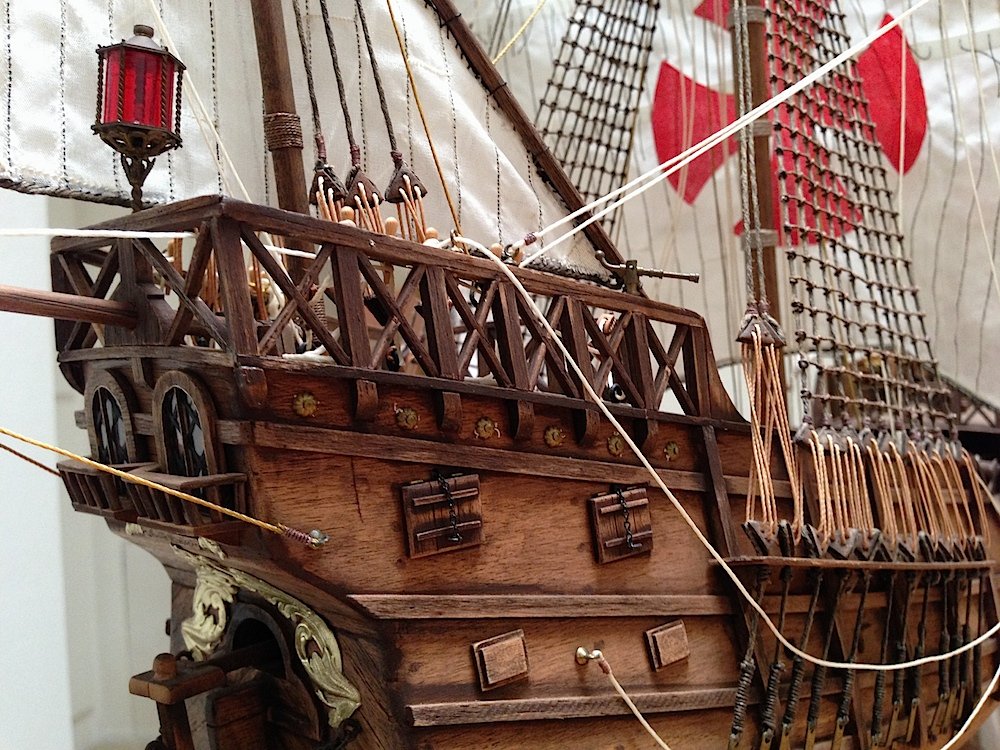
federicoaa, Nice detail. Glad that you could make use of this detail. A detail that I also borrowed from an other build log. Regarding the canons, yes they will be air-brushed black. I will not use the kit supplied issues instead using the same ones that I used in my previous Vasa build. I will also hand make the carriages. The kit provided metal one piece bits - I prefer to make these up. here are a few shots of how they should look once done - from the Vasa. Thanks for dropping by much appreciated.


- 371 replies
-
- 13
-
-
MONTAÑES by Amalio
md1400cs replied to Amalio's topic in - Build logs for subjects built 1751 - 1800
Amelio, Maybe in my next life my skills will come close to your work - prob not - haha - Amazing work indeed. Such a pleasure to follow. -
Mike, Very nice--great noted comments. I will be using pear wood for the first time. Lovely color - much to like with this wood. PS: I was in your neighborhood a few weeks ago - ride back many hours of just white. Wonderful indeed. Regards,
copy.jpg.551d8784a85cc275bfb1c82310fd6a94.jpg)


- 969 replies
-
- 10
-
-
- hahn
- oliver cromwell
- (and 1 more)
-
Patrick, If you are asking about artificial sealers that are typically used to protect wood, I have never used any. My Vasa is also entirely unprotected in that regard. Subjectively speaking I don't care for the look of woods after sealers have been added. I do know that they should, in fact, be used. For me, the exception would be using an oil such as Wacto. That I did apply on my old Santa Maria - still looks the same after all these years. I had thought of that for the Vasa's hull but decided not to. Here are a couple of recent photos of the SM.


- 371 replies
-
- 12
-
-
Funny "ship Visa" - Actually my Admiral should walk the plank - her love of that ship makes me occasionally nervous Nice continuing work on yourSR Cheers
-
Martyn, Absolutely brilliant results. A beautiful ship that that has been given a stunning presence, from every angle, with your superlative work. Big Congrats-- PS: Yes still on my wish list haha
-
Incredible talent indeed!
-
Doris, Just catching up - Yes as everyone is saying Stunning indeed!! Your art is superlative. PS: and yes, as you said in a previous post that your SOS is your favorite build, YES beyond amazing! Sincerely,
- 1,035 replies
-
- 7
-
-
- royal katherine
- ship of the line
- (and 1 more)
-
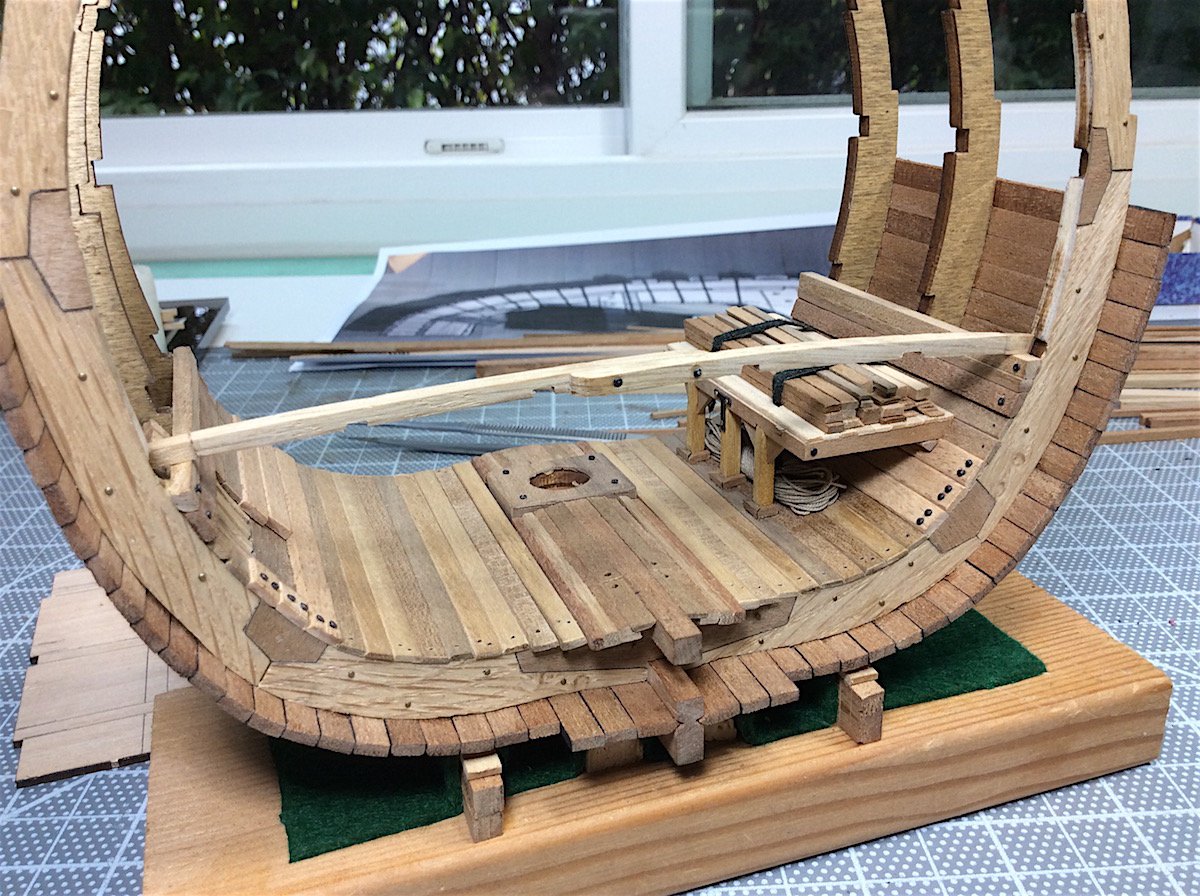
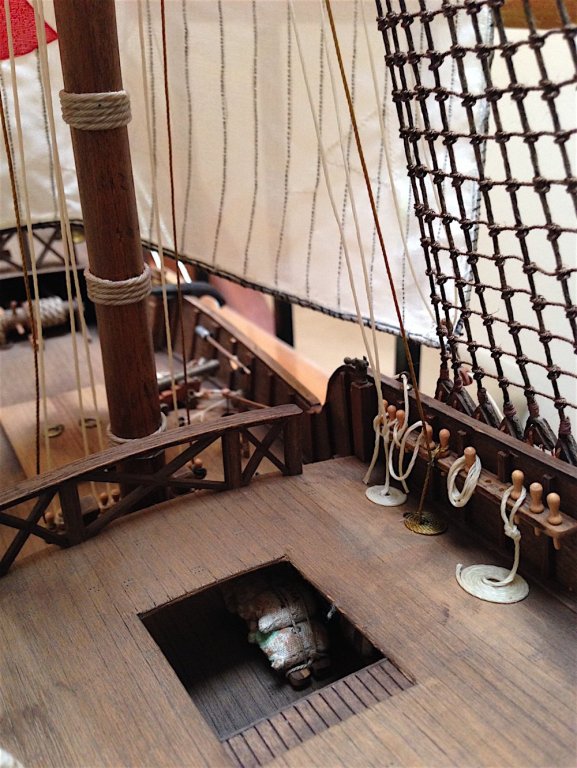
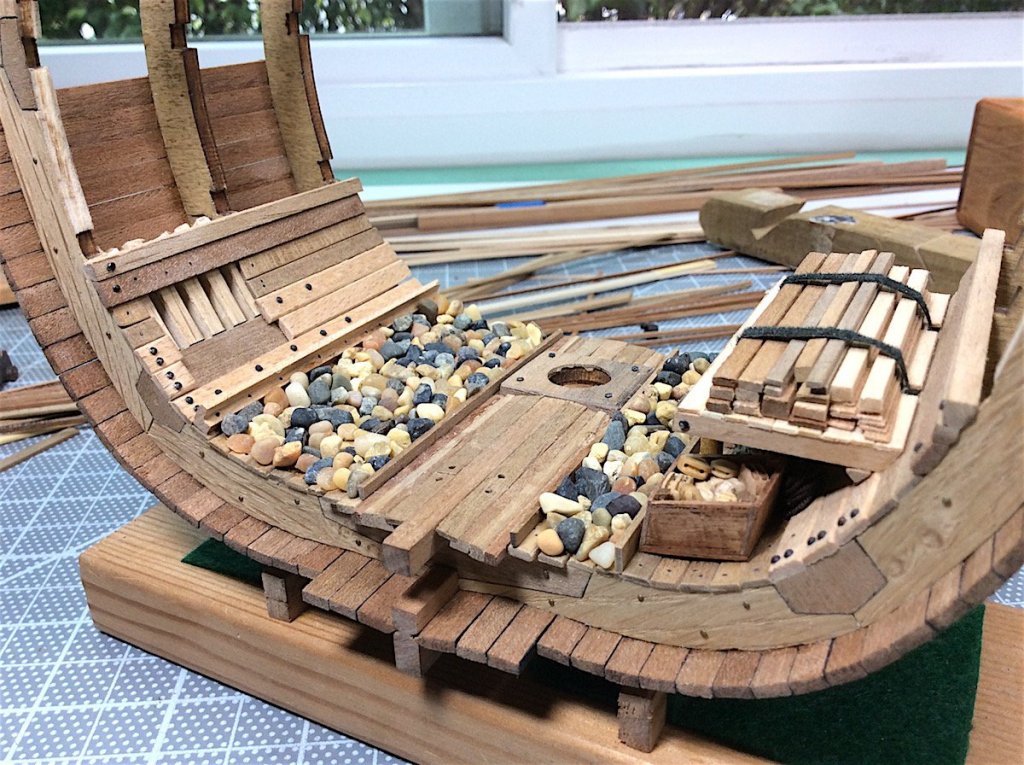
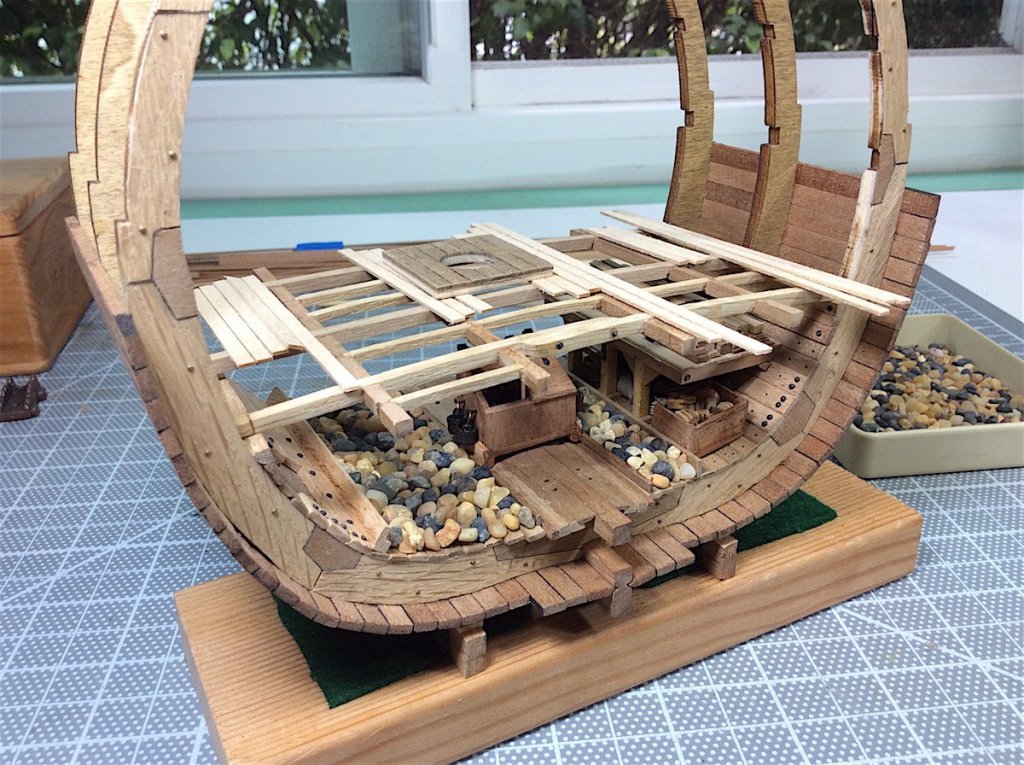
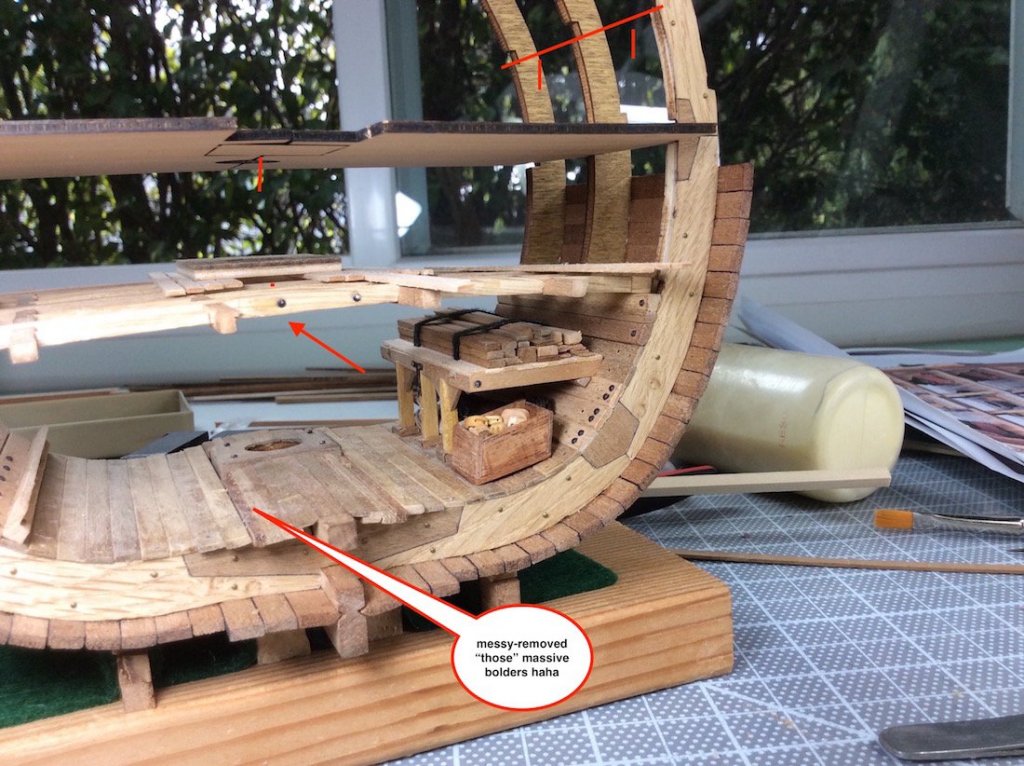
Hi Mates, Patrick: thanks so kind - especially from such a perfectionist such as yourself . Yes, it was time for a new profile photo. Minor lateral update. Re-did the hold ballast rocks. Don't know what I was thinking before. These may be a bit too big as well, but certainly more to scale. Satisfied with this bit. Now waiting for the lights and will start the next floor. I intend on using pear wood that I received from Cornwall Model Boats (PS: great vender) as many of you already know. Here are a couple of updated shots. Cheers,

- 371 replies
-
- 12
-
-
Nigel, As always thanks so much for your continued advice. Yes voltage is an aspect that I am just learning about. This vender, it appears, has incorporated voltage choices for the consumer. Here is a link to the available pre-volted purchase choices. Easy for novices such as I. https://www.modeltrainsoftware.com/smd-chip-leds.html Do appreciate the advice, PS: Glad that you are back active in your yard! Cheers,
-
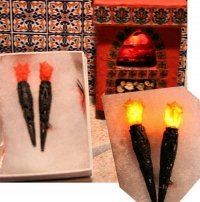
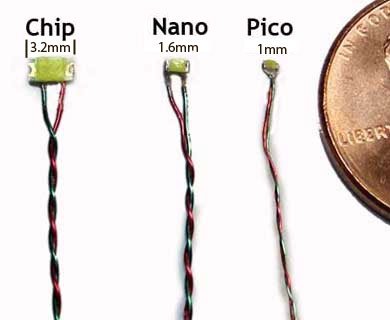
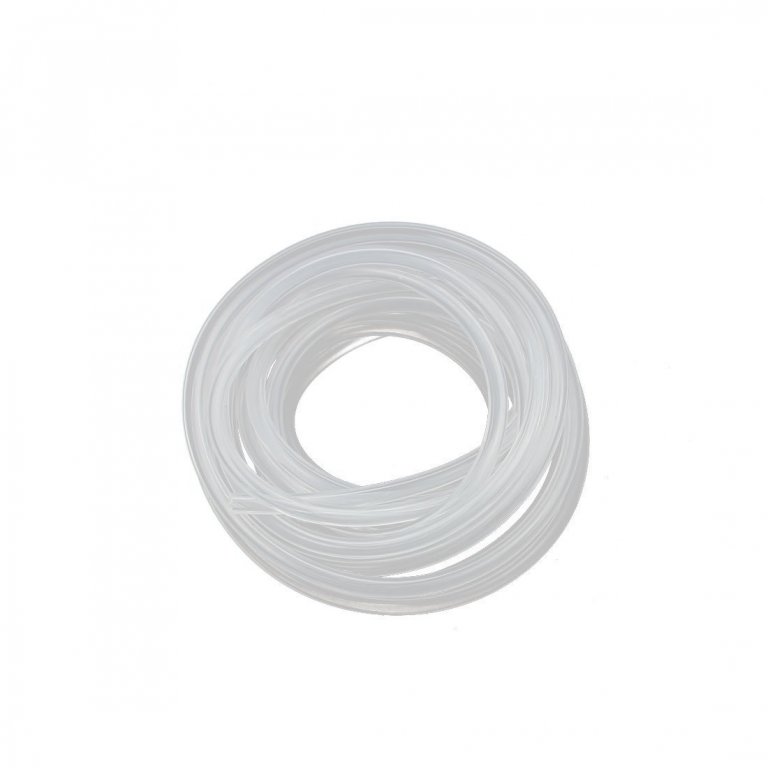
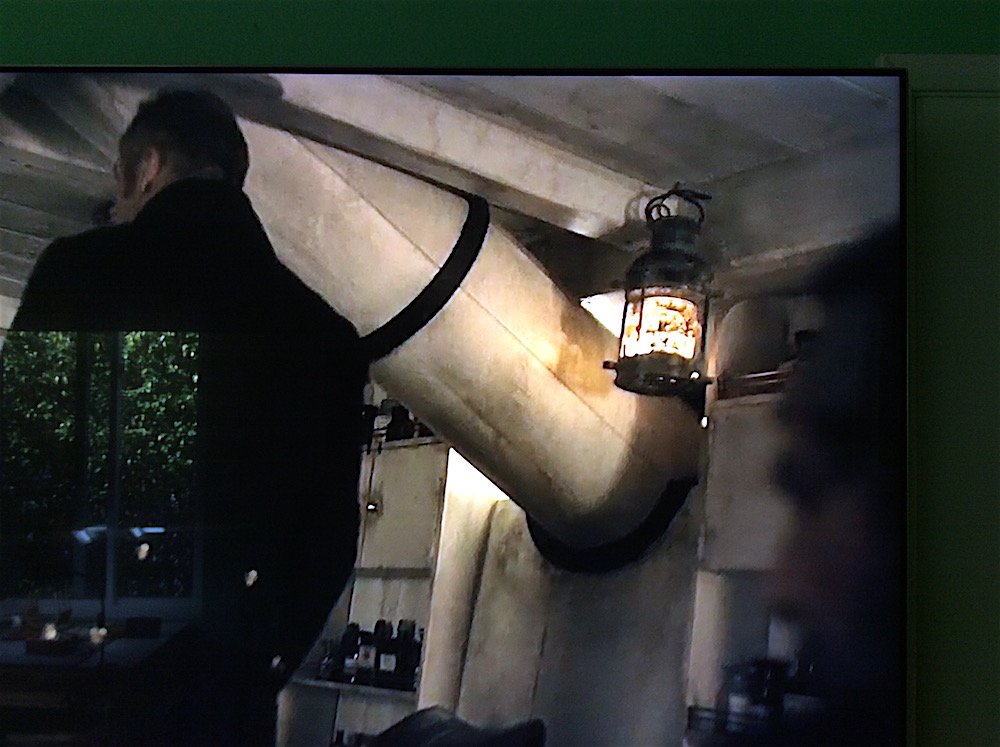
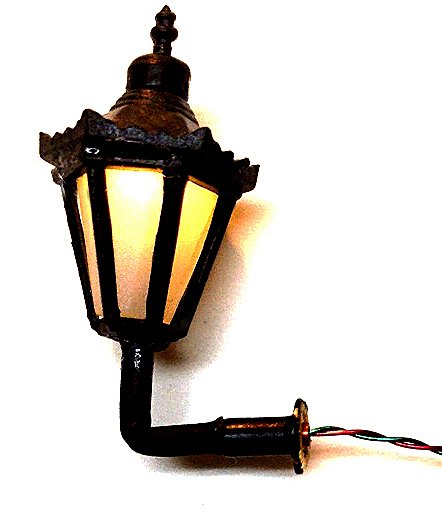
E.J: thanks for you thoughts as well. Yes you are also correct flickering is indeed the correct style of lights to include. That said, in this case they won’t work for this cross-section. The available flickering added tech, at the base of the LED, along with the bulky shrink-wrap make them too large and bulky for this particular very visible application. Intended locations for both gun decks are here – both sides So ordered these super tiny Pico in yellow. Captain Steve: I sure like your idea of using paint brush sleeves –Thanks for the tip. Ordered some tubing from Amazon 1.5mm id - 3mm od. I will play around and make lanterns that look something like this one (From AMC “The Terror” series). Again mates thanks for you advice and suggestions. Regards,
-
Mark: Thanks I have indeed tried looking through all of those vender's sites. No luck beyond stern lamps Michiel: Thanks as well. Yes indeed 3D printing will become a very big part of ship modeling. The improvements are spectacular. I have seen stern ship sections that were rendered using 3D printing. Regarding my small needs, apart from creating a 3d file that is beyond my skills, I will try to fashion these lanterns as you did. I already have some ideas in mind. Waiting for the lights to arrive first. Thanks mates for your advice.... Regards,
-
Martyn, Yes copper tape is also a good solution. In my case were I to completely plank all the decks I would also prefer tape. I might be trying to do a bit too much with this current build. Michiel sent me this link a bit closer for you - They ave a lot of choices for LED lights http://www.expressmodels.co.uk/acatalog/WHITE_LEDs.html
-
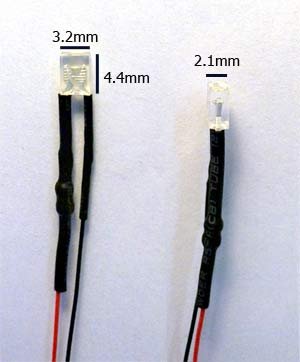
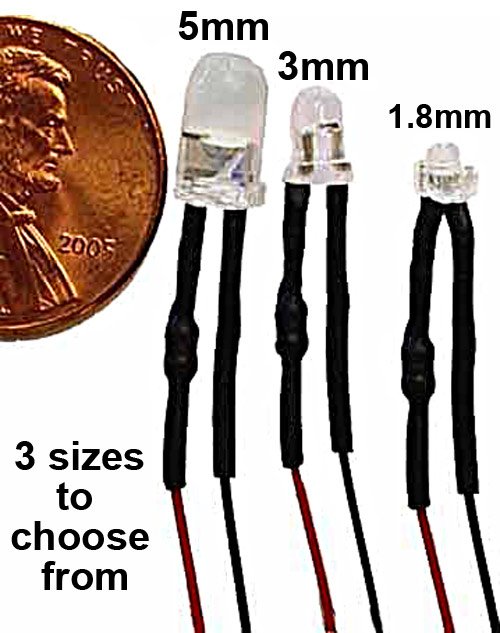
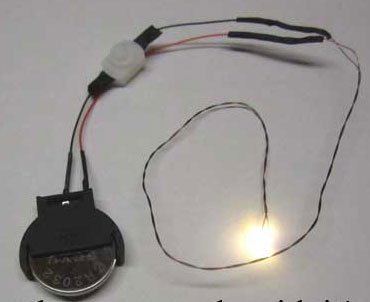
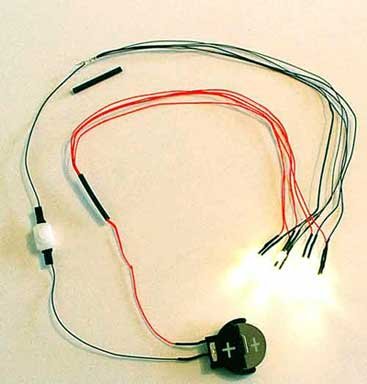
Hi Mates, Martyn: Nice idea indeed. Oops – I have fallen behind on your log – need to fix that Captain Steve: Thanks as well – lot’s of excellent work. Plastic sleeve is a clever idea!! Nigel: great idea – my skills make me a bit unsure of this very clever solution. ========================== The lighting subject is interesting as well as a new to be learned skill. Appreciate all the advice that you are all posting. PLAN: the hold, and storage decks one will hang from above (center). In the two gun decks I will attach two to each wall per side. So will need 10 lights in all. Will need to make some sort of housings as well. First decision is what types to purchase. • Some have shrunk wrap connectors. •Some are rectangular but also have bulky (for my purposes) wires. • Colors warm white or yellow? • Flickering (random) or steady light? If I were adding these to within the hull it would not be such a dilemma. For this cross section all the lights themselves will be visible. So wiring with shrink wrap could be an issue • The Nano or pico might be the best. I spoke with a very nice person at Model Train Software. He also said that I could purchase soft white and then purchase yellow Galley Glass paint. A product used by stain glass hobbyists. I could apply as many coats of this translucent paint as needed to create the yellowish lighting that I specifically wanted. I think that I will go with the Nano or Pico style of LED – those will allow for the stealthiest wiring installation. Also leaning towards flickering yellow to avoid experimenting with yellow paints. Will also purchase the 3V outputs attaching all the lights to that very smart button battery housing that also has an on and off switch. The lights are already at 3V set-ups. =========================== After receiving the lights I will think of how to make the housings. Here are various photos from Model Train Software. AND The last photo might be great for some ships as stern lanterns


- 371 replies
-
- 12
-
-
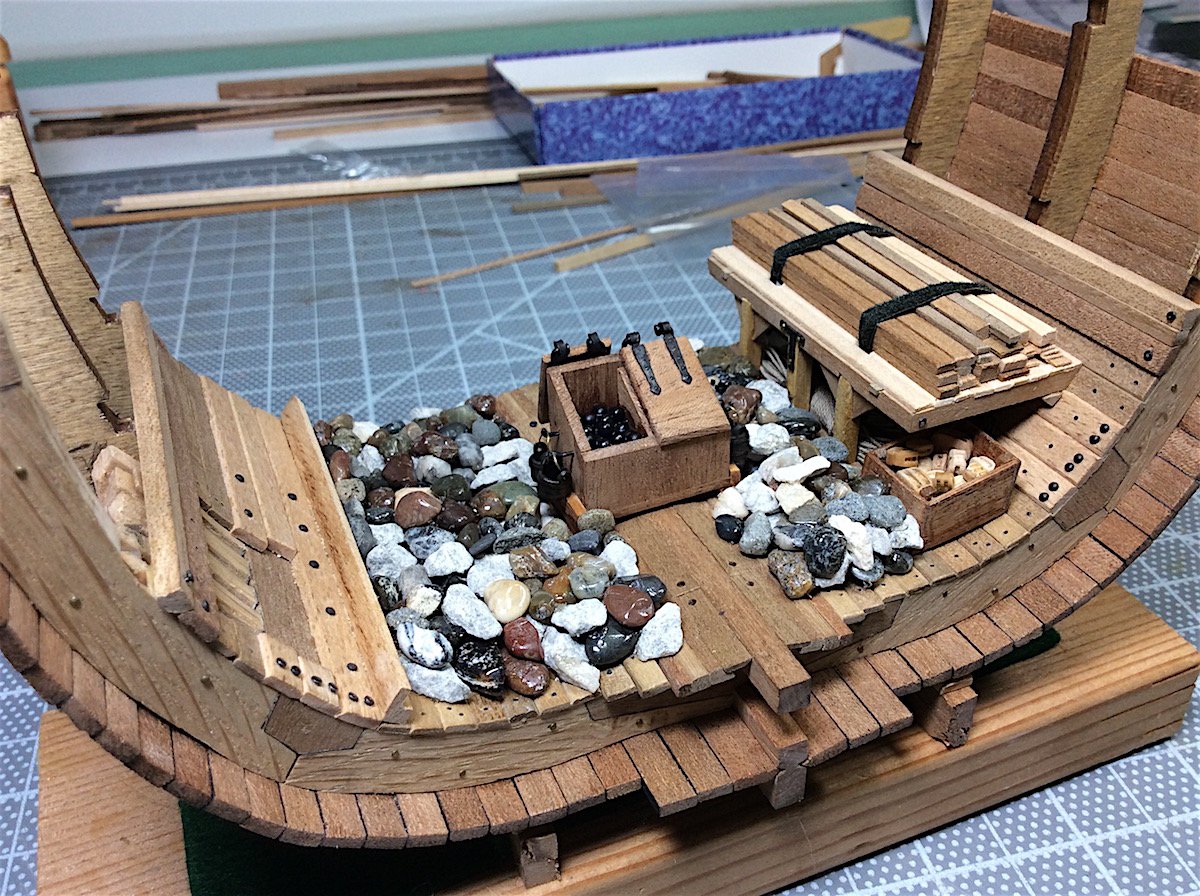
Thanks for the help mates. Denis I ordered model railroad stones from Amazon, Also Home Depot had some pea stones you posted about. Looked great. If these Amazon rocks don't work I'll go over to Home Depot. Regarding the just above pics. Michiel MADE those light covers Brilliant work indeed. Got me thinking haha...... PS: Here is the Amazon link if any of you get into this dilemma. And as Denis said. a hammer would help to make the rocks smaller. this bit of detailing will indeed take a bit of time one rock at a time. https://www.amazon.com/gp/product/B0725P7FT6/ref=oh_aui_detailpage_o00_s00?ie=UTF8&psc=1 Removed those other fish tank shiny rocks - just not ok....
-
I may just play round and try Again Thanks indeed.
-
Michiel, Brilliant work indeed. Hmmm my skills are not there. Thanks for your kind responses. Cheers,
-
Martyn: Thanks indeed. And yes this build would be perfect for lighting. I intend to go up that ladder and try to increase my skills. That occurred to me this morning, and then I read your post – cheers…. I have found a great source for the lights (This seller has been discussed here) Thk. you MSW members. https://www.modeltrainsoftware.com/flickering-led.html Not sure if I go for soft white, yellow, or flickering, also not sure about the sizes – yet. Mark and Denis; Thanks for the nice comments. Yes those rocks sort of annoy me. And I was going to add a dull clear coat as well. Plan B- I think that I will pull them all off – and start again. I found some at Amazon intended for train hobbyists. These might have been for fish tanks - saw the bag in a nursery. Lastly I need to find some kind of great LED light covers. From Michiel’s great build from 2013 HIS log photos below from LED lights below decks

-
Thank you Michiel, I was not clear - I have a sources for the lights. You last link also look perfect. I was asking about the covers around the lights (;-) that you used. Those are so perfect. Regards,
-
Michiel. Hello - I plan to add lights to my current build (first time for this). Saw the great work that you have done in this old posting. I now need to look for the light covers like the ones from your post. If you read this would you remember where you got these? I have looked online but can't seem to find anything at all. Thanks in advance.

-
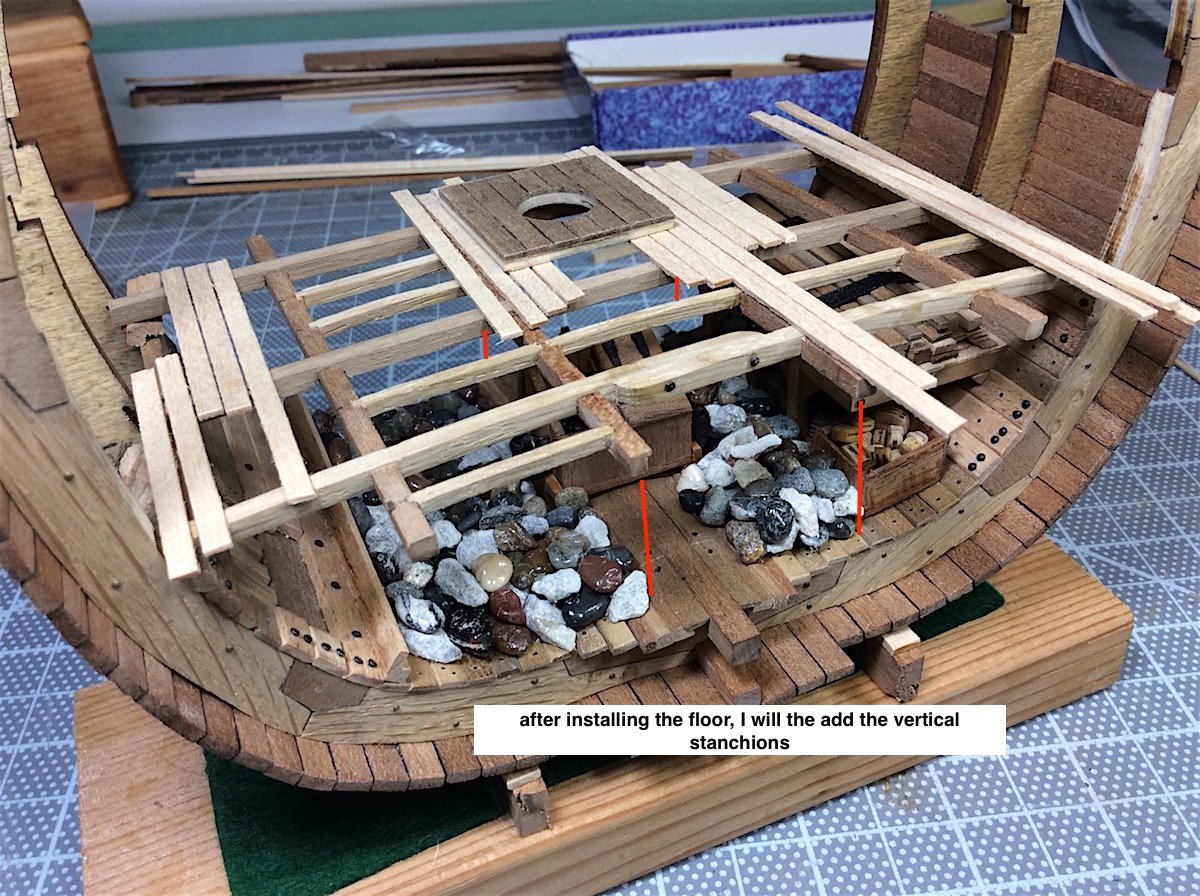
Small update, Added the hold bits. Not sure if the rocks are properly scaled, could be too big. Kit included rocks IMHO were generally too large. That said an area in which I have no knowledge - looked at other builds and these seemed to be better. Barrels will be added to next floor up. Working out some details - need to add the bits without covering too much.


- 371 replies
-
- 12
-
-
Hi Mates, Started work on the first of the floors. Once the smaller filler wood frames are installed I will have a better idea on where to omit floor planks, not to hide so much hold details PS: Will not install framing until rocks, barrels and such have been put into place into the hold area. Regards,


- 371 replies
-
- 12
-