
HOLIDAY DONATION DRIVE - SUPPORT MSW - DO YOUR PART TO KEEP THIS GREAT FORUM GOING! (Only 44 donations so far out of 49,000 members - C'mon guys!)
×

knightyo
-
Posts
527 -
Joined
-
Last visited
Content Type
Profiles
Forums
Gallery
Events
Everything posted by knightyo
-
 The timing of posts has a large effect on whether or not one receives comments. It often just depends who sees the posting when it occurs. Since there are often a large number of posts (especially in the Kits area), build logs can become overlooked very easily. If I have a question on any given technique or I am really stuck on something, I'll go to the relevant "techniques" area and pose the question as opposed to bringing the question up in my own log. If a log has been established for a while and already has a number of followers, there will be a higher likelihood of questions being answered within the log. I believe the other thing which occurs is that we all go through "phases" of interest, and only view certain "types" of logs during these phases. Just like life, any type of community like this can be fairly random.. Alan
- 87 replies
-
- 6
-

-
- scottish maid
- artesania latina
- (and 1 more)
-
I am subject to the same rules, I find. Sometimes it's a zero ship in the shipyard rule! Alan
-
I've decided to pretty drastically update this log, as all of the early construction posts were eventually rendered obsolete as I changed my mind and started the model over a few times in order to attempt to make it a little more accurate. The model currently doesn't resemble the mini-mamoli kit a lot, although the original core of wood is still in the center of the ship in most places. I'll probably also stay with the early lateen sail plan, although I'm toying with the idea of alterning the masts to reflect the voyage across the Atlantic. Alan
-
The Bitumen Experiment
knightyo replied to ChrisLBren's topic in Painting, finishing and weathering products and techniques
I'd love to see more discussion on this topic! I'm considering the liquid Bitumen approach... Not sure where to get it in US tho... I do see Pentart Liquid Patina in the UK tho... Alan -
I'm also now debating my plank width in general. What general width do you guys things the king plank should be, as well as the standard planks? It looks like gundeck planks could be up to 12', but that king planks were also 12'? Alan
-
Thanks guys! I'm good to go with the hooked plank concept, and have already drawn out a planking pattern. Now I'll re-draw the pattern incorporating planks narrowing towards the stem. I'll post in this thread when done. (I'm also going to tell my wife tonight that I'm a master shipwright). Alan
-
Hello, I'm tinkering with the HMS Triton in my free time, and am thinking about the deck planking patterns. I understand that the deck planks would narrow as they approached the stem. Does anyone know to what degree the planks narrowed? Alan
-
Hi Jorge, Unfortunately not. For the past few years (actually a LOT of years!) I've only been able to work in short spurts... I have however, decided to modify the deck planking plan I developed above, and indeed taper the planks as they move towards the bow. Alan
-
I feel like an underachiever. I didn't even think about firearms or explosives. I just used rocks...😕 I will say that I immolated one of my old smurf houses when I realized that I was a little too old for them. That was extremely satisfying at least..... Alan
-
Thanks Mark. I think you are right. Once it's done, I can decide whether or not to do the same with the upper decks..
-
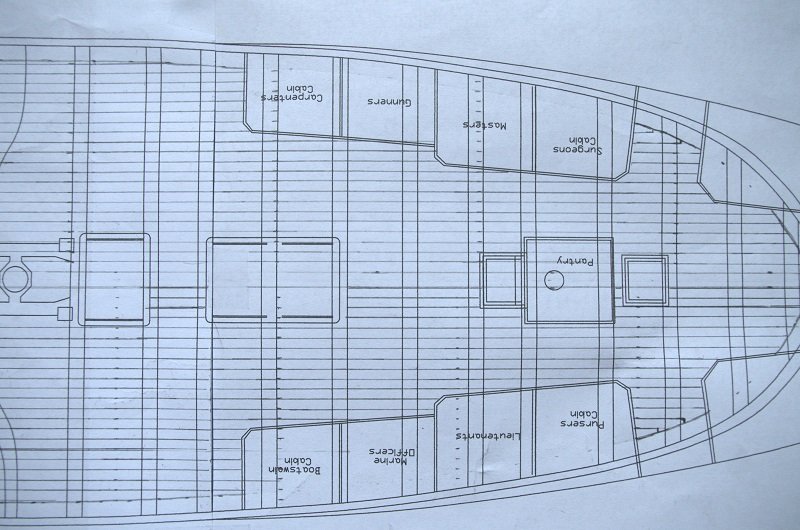
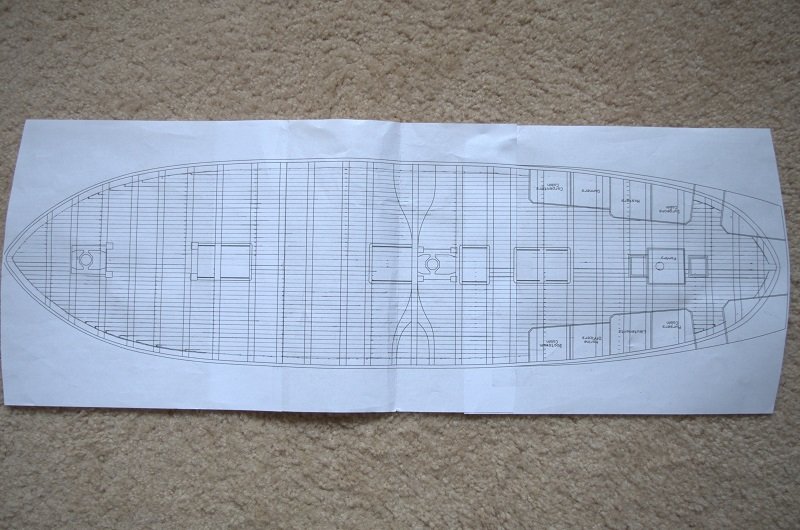
So I had a bit of fun the other day drawing out the deck planking. I felt that 1/8" planks were a reasonable width, so went with that. I can't remember if I'd mentioned before why I'm planking the lower deck, as it won't be able to be seen due to the upper decks. The reasoning behind this is that I believe I need the practice. It will also be a chance to experiment with new wood, and to experiment with methods of trennailing. If I don't like the finished look, I can modify things for the upper decks, and only we will know! With the end of the planks =1/3 of the plank width and the length of snipe = less than twice the width of the plank, I ended up with the below result incorporating the king plank. But.... I didn't narrow the planks as they moved towards the stem/stern. If I had done so, they would be awfully narrow as they ended. Thoughts? Would it be truly inaccurate to plank the deck without narrowing the planks at the ends? It would be pretty easy for me to erase things and start over. I really do want the planking to be as accurate as possible. (I haven't yet drawn the scarfs in the margin planks, or corrected the ultra-thin planks against the margin plank in the mid ship sections. Also have not yet determined whether or not to go with a 3 or 4 plank shift).

-
It might be somewhat torturous, but how about building/painting BOTH sets of aircraft? That would allow you to change them out annually, or whenever the whim strikes! They won't be adhered to the deck, will they? Alan
-
Is it possible to like a post around 20 times? I'm really looking forward to this one. Alan
-
Looks like Danny incorporated a king plank as well. I don't think I can go wrong following his and Chuck's lead, and will start drawing the decking plan accordingly.
-
Ok, I should have the opportunity tomorrow to draw out the Lower Deck planking pattern.... Chuck's Confederacy plans call for a single plank to run down the center of the deck, and planking outward from the "king" plank to both sides to the bulwarks. What is the general consensus for Triton? Would it have had the king plank in the center? As I look at the cross section midships .pdf, it looks like there is not a king plank in the center.... Alan
-
This made me lol and lol. I have a few of these projects as well. 😀 The ship looks great so far! Alan
-
I also built this model as a kid. It was the neatest model of the bunch! Alan
-
Hi Jacek, By looking at the templates (Stern Part Legend, SternParts & Upper Counter Planking), you should be able to mark out the stern areas pretty well. The below pic also shows the numbers of planks in each area on a similar sized ship.. (similar, but definitely not exact).. Not sure if the number of planks in each area of the Triton would be the same, but I think it would be pretty close.. I don't have the Anatomy of a Ship Series covering frigates, unfortunately. I'll bet that would show the exact planking structure....(Hint for anyone who has that book to please look ) Alan (Photo reference is from http://wp.patheos.com.s3.amazonaws.com/blogs/yimcatholic/files/2011/10/HMS-Surprise.jpeg)
-
The stern timbers were kinda fun. On mine, I inserted "filler" limewood pieces between each timber, which made it pretty easy to achieve a smooth surface for future planking. The photos in my journal look horrifying, but the surface is actually very smooth. Aaln
-
Hi Jacek, I can't wait to see how your lower deck fits between the frames, especially in the bow section. I had "challenges" in that area.. Alan
-
Thanks Chuck! (I haven't forgotten about Syren either). 😊
-
Hi Jacek, I've used basswood (I think it's known as limewood in your area?) for everything so far, since it's so easy to shape/sand. It's a great "filler" type of wood. I'll be using pear wood however, for anything visible, and maple for the deck planking. I do think a person could probably plank the entire lower decks with 1/8" x 1/16" basswood/limewood planks, as they wouldn't be as visible, and could easily be stained. They are very inexpensive, pre-cut, and easy to use. In fact, a person could build the entire ship in basswood/limewood, and stain/paint to their preference. I just really like the look of pear wood, and how it can be treated to look "old". I also do still intend on posting a sample deck planking pattern for people to critique when I'm able to start building again. One or more of the templates in the cross-section download area shows a view of the ends of the planks so you can scale the templates to 1:64 and measure the correct thickness/width. Alan