
HOLIDAY DONATION DRIVE - SUPPORT MSW - DO YOUR PART TO KEEP THIS GREAT FORUM GOING! (Only 44 donations so far out of 49,000 members - C'mon guys!)
×

knightyo
-
Posts
527 -
Joined
-
Last visited
Content Type
Profiles
Forums
Gallery
Events
Everything posted by knightyo
-
Lost Pirate Kingdom: New series on Netflix
knightyo replied to Maury S's topic in Nautical/Naval History
I've been watching this! Some of the "adult" content sure surprised me tho, and didn't seem to add anything to the show. Alan -
US Brig Syren by knightyo
knightyo replied to knightyo's topic in - Build logs for subjects built 1801 - 1850
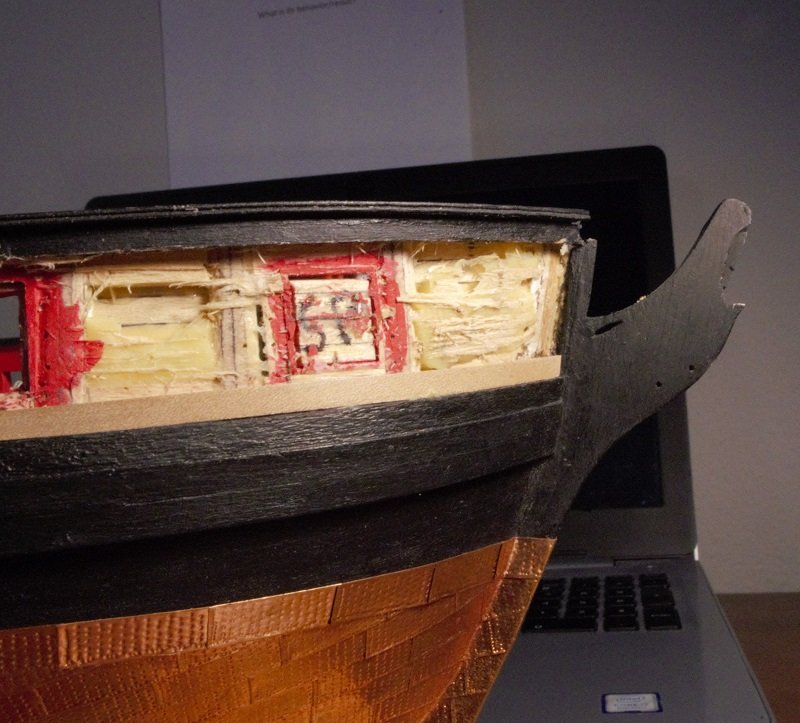
So I've done something a touch drastic with the model, but first I have a question for the group. Take a look at the below photo. These plates were made out of copper tape and installed circa 2008 or so. The are now starting to peel. Any thoughts on solutions? There is a sick part of me that would like to place extremely small rivets in each hole in order to secure each plate; I've made larger bolts out of wire, but something this small? We'll see. My OCD level is indeed high enough that I'd follow through with it, if it turned out to be a viable solution. I definitely want to be careful not to do anything which would cause the plates to "crinkle" tho. And now it's time for my confession. Ever since I planked this ship years ago, I was never satisfied with the hull appearance. As the log reflects, I've done a number of things to the planking to try and make it "good enough", but it's never hit the mark. Sooo..... You can see what I've done. Isn't it beautiful? 😁 Hull re-planking with swiss pear has begun! I believe this will make the model look far and away better than the poorly stained basswood I'd installed previously. This also makes sense, as my quarter galleries, stern decoration and figurehead are also all made out of pear, so everything should blend together. You can see the first plank I've re-laid on top of the wale. Once the planking has been laid, I'll be applying an aging medium I procured from Canada (after extensive testing on scrap strips).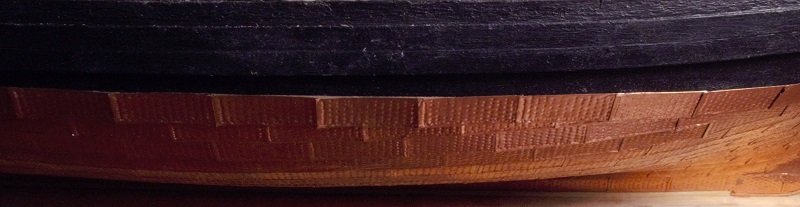
-
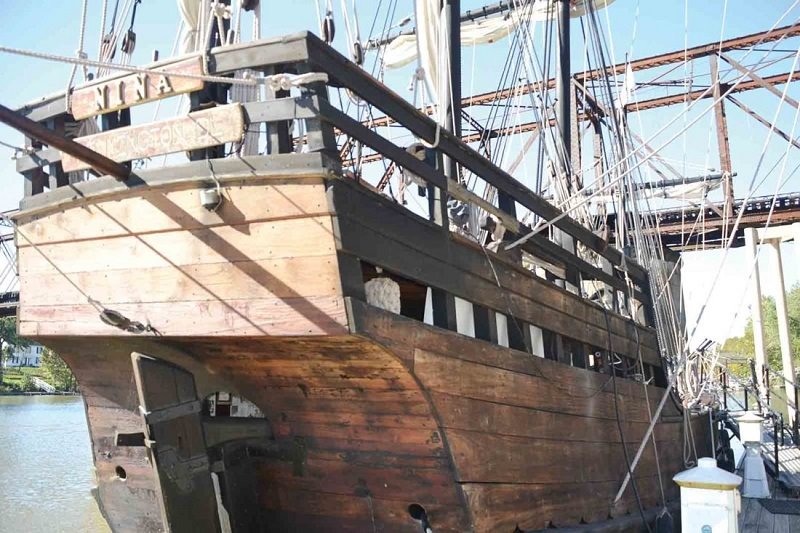
I'm at a good stopping point in my "real" work today, so am taking an early lunch in order to post a few updates. Below is the start of my new deck planking. The deck of the kit had zero camber, and was a straight line fore/aft. I've remedied both items with a lot of sanding. Then graph paper was glued to the deck to ensure the planking was installed evenly, and planking commenced below. It really was satisfying to plank the entire deck from front to back. I'm glad I made the decision to take the plunge in cutting off the quarterdeck. Below is the finished main deck planking, with sawdust included. Sorry for such stark lighting in the photo. The lighting in my den was too dark, so I thought I'd head to the kitchen for brighter, natural light. You can tell that I'm not a very competent photographer. Anyway, now I just need to plank the very front piece in the bow, and of course re-make the quarterdeck. But not so fast! So here's my dilemma. As I was cleaning up the deck and getting ready to shape the waterways, I was viewing my stock of photos of the replica of the Nina.. To my consternation (extreme consternation), I realized that the replica has scuppers (below) all the way down the hull, and not only did my version NOT have scuppers since I re-shaped the deck, if I cut scuppers out at the new deck level, they'd no longer match the wales of the ship on the outside; they'd go right through them. So guess who made the insane decision to remove the wales and all associated "bumpers" in preparation for scupper installation? Yea, I know.. But it's yet another thing which would have really bugged me now that I knew about it. For giggles, since the exterior hull is now "clean", I'm also going to very carefully scribe down the middle of each plank as well, as the initial planks were far too wide to be in scale. I might also take the opportunity to add more "meat" to the bow section, as it has quite a sharp rise at the bow, which my version does not. Might as well add that to the list; we'll see on that point. I think I might need to re-name this model "Pandora's Box", because I've certainly opened said box a long time ago when I thought "wouldn't it be cool if I did X to the model before I apply the finishing touches". It pains me to know how much I could have gotten done on my Syren/Triton by now if I'd just finished the model a long time ago, but I'm in it, so am moving forward. I have to admit it is fun to be putting this much detail into such a tiny model, but fully acknowledge the insanity of "upgrading" a model which was never meant to be very accurate. It would have been FAR better to have built from plans, or to have started with a more accurate kit.

-
You rhymed. 😁
-
I really like the look of pear. This will be a beauty. What are you thinking of filling the gaps with, Mark? Alan
-
From your rope tutorial: "Hope this helps.........start making your own rope. It’s rewarding and FUN!!!!!! Until you have to make 1000 feet per day for seven days every week". This gave me a good lol. I hope you are able to move more into the areas that you gain the most satisfaction from (such as designing the Dutch Boyer, etc). 😁. Alan
-
I would pay $1,700 for tools, not for kits, as with the tools you'll be able to create a FAR better looking model (and many in the future) than relying upon what is in the box with a kit. If it was me, the first kit I'd ever buy would either be from Chuck at Syren, or Chris at Vanguard. I can speak to Chuck's instruction, and it is absolutely superb. I suspect that Chris' instruction is also fantastic just by reading his posts. Alan
-
Hi Mark, I'm sure it's been mentioned, but I can't find what kind of finish you are going to apply to the planks. I've actually ripped the planking off my Syren and am replacing it with swiss pear along with the Pentart Patina discussed in the "Bitumen/asphalt" thread (found a supplier in Canada who still has a stock). I'm going to test it on a number of scrap planks first with mixture of mineral spirts and compare against tung oil, and probably a third candidate of some type. I'll give you a heads-up on the results if you have an interest. Alan
-
I was surprised to see a post by someone from Boise, and then astounded to see someone else from Boise post as well! Welcome! My wife thinks I'm the only person in the world who is nuts enough to enjoy this hobby. It would be nice to prove to her someday that others do indeed exist. 😄 We have a number of posters/vets who also have PTSD. As you read the logs, you will be able to see who they are; there might be good opportunity for like-minded dialogue there. Take a look at this thread for how to maneuver throughout the forum, , etc -> https://modelshipworld.com/forum/47-how-to-use-the-msw-forum/ Below is how to start a scratch-build log. Alan
-
Probably the most important thing in all of this is that you figure out a way to thank your wife for taking Thursday off work. Maybe present her a gift of one of your kits? Alan
-
I'd use balsa wood! Just insert blocks cut to fit between the bulkheads and sand to shape. Balsa is incredibly easy to sand. Alan
-
Oh no.... That figures.. Maybe I'll also end up being a candidate for a Byrnes saw. Maybe we can all get a group discount. lol Alan
-
I've ordered pear for my Syren (below) from The Lumberyard (based in Ohio). It's supposed to arrive sometime this week. I've also been tempted to purchase a Byrnes, but six bucks for the material I need is fantastic, assuming the quality is good. Item:1 - Qty:4, Pear Wood - 2` x 24` (1/16), Price:$6.00 Alan
-
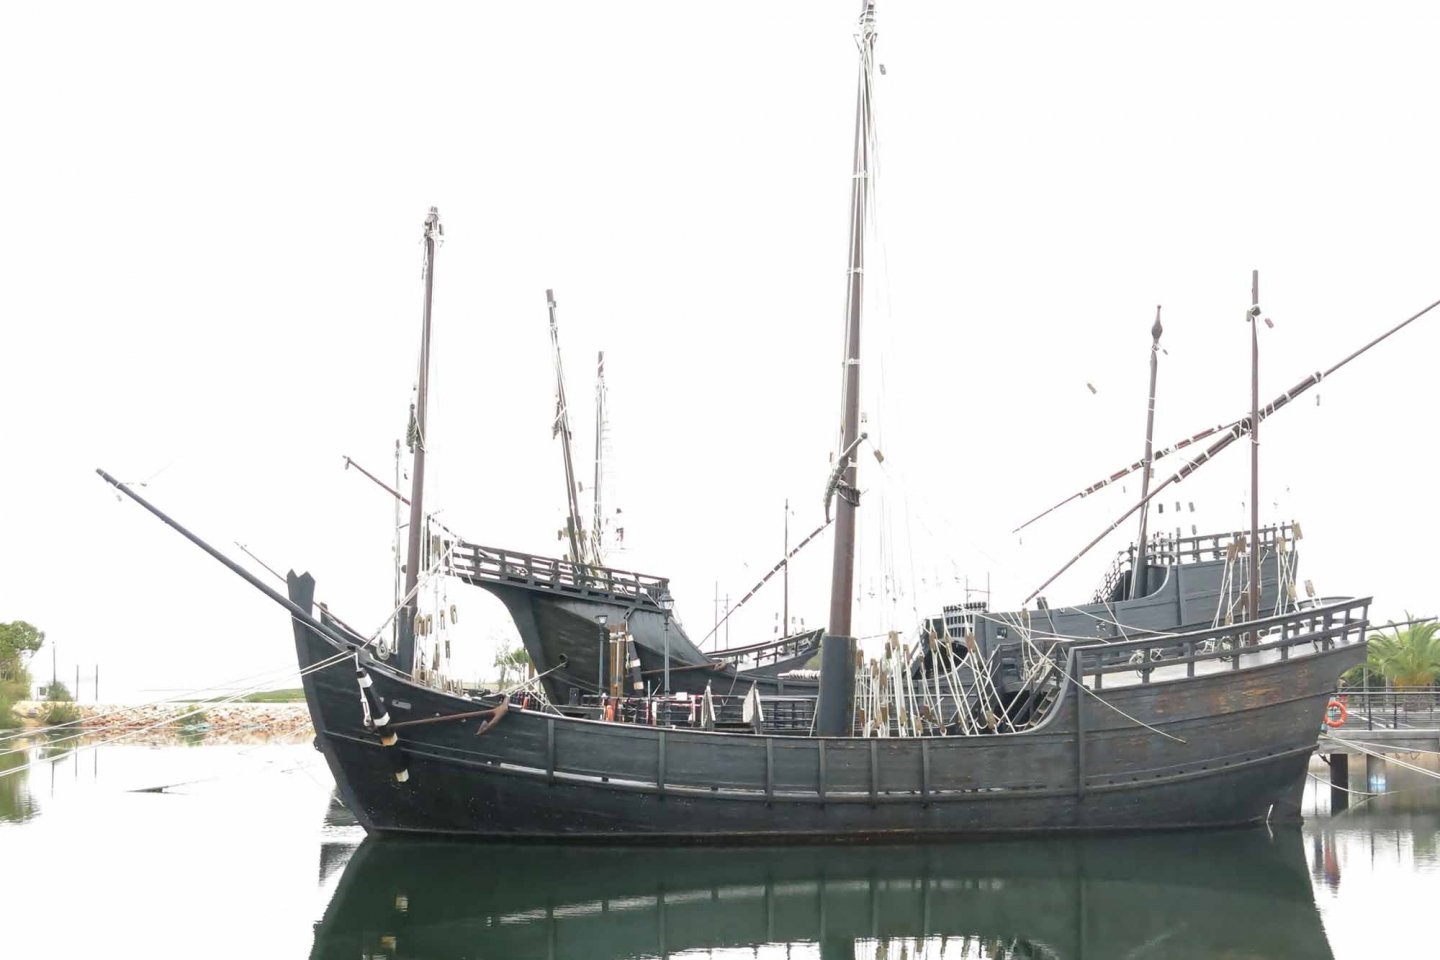
How about a model which wasn't designed for guns in the first place? Below is a photo from one of Chuck's threads regarding a Boyer. These are beautiful vessels! Alan
-
Thanks guys! In addition to the lack of light, I can't even imagine how hard life would have been in general, especially on a ship at sea. I think I'd last a couple of weeks, tops. lol Alan
-
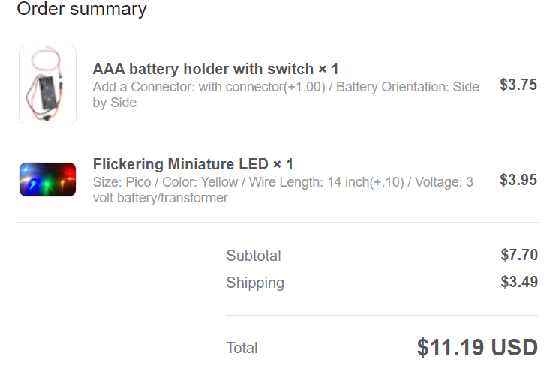
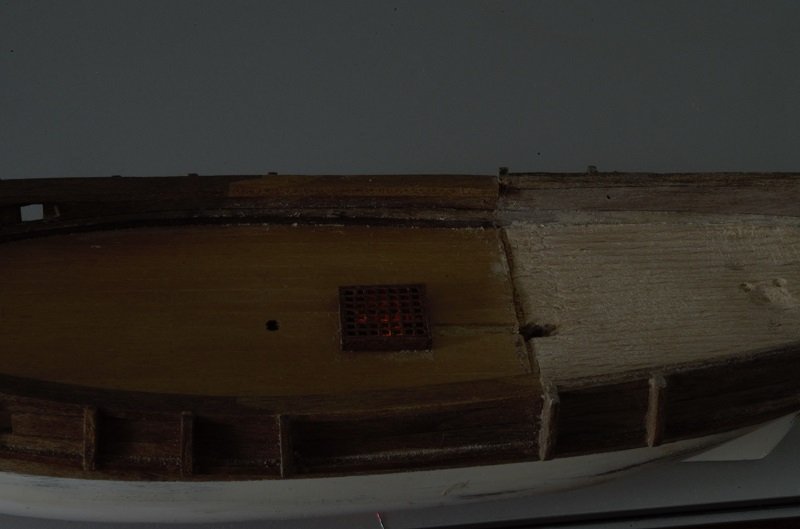
Even though the model is currently a dusty mess, I'm absolutely ecstatic about this photo because it's showing the faint flickering light under the main deck grating which I just received from Evan Designs. The photo does also show the progress I've made so far in removing all of the wood from the cabin area. Now I just need to make the planking run uniformly from fore/aft, and build up the quarterdeck structure. This was a nice lunch break today. (I've copied/pasted what was ordered below. I have zero electronics experience, and for 11.19 USD, I was able to emulate a flickering light, and it was incredibly easy. I'm going to purchase another light for the cabin area.)
-
I've used Ebony for wales in the past. Never again. The dust was unbelievable, and apparently very unhealthy. Alan
-
Yes! I'd always felt like I was taking the easy way out with this model, and realized that if I didn't take this step, it would bug me forever. The only concern I have is whether or not the new decking I've ordered (tanganika) will be a different hue than the tanganika used many years ago. Hopefully not, but we'll see.
-
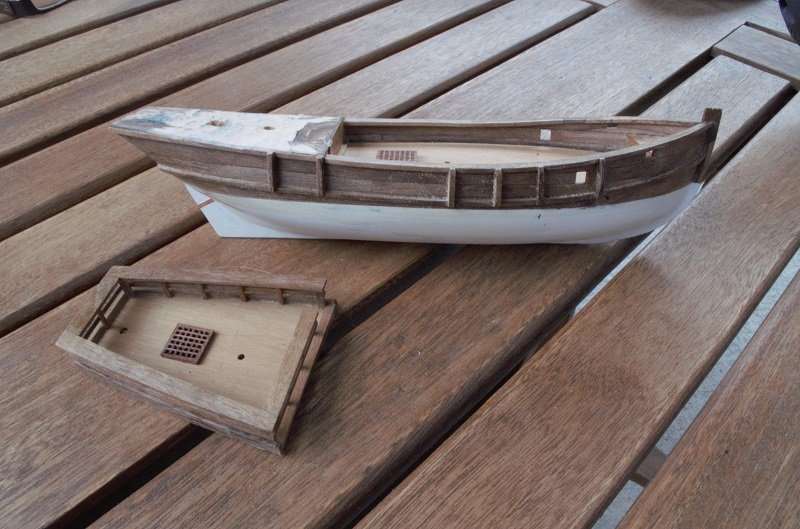
This is Glenns fault. 😄 I think what tipped the scale was the fact that I'd already drilled into the quarterdeck under the grating so it would look more realistic as the viewer looked down through the quarterdeck grating. I then realized that it would look really cool to see the square patterns of light on the floor underneath the deck in the steering area if the entire section was developed. I've ordered additional decking material and will now try to extend the deck back into the steering area after leveling off the flooring. Of course this area will now need to have a dim flickering LED in the steering area and under the main deck grating as well. The second photo is what I'm now going to emulate. It's the "large" replica of the Nina. I do intend to frame out the inside of the quarterdeck in order to allow for the "missing" plank on each side, which will let additional light into the steering area. Alan
-
I've been thinking that all MSW members should have similar representations of themselves on the decks of their builds, at the scale of their builds. How cool would that be? If someone had the ability to 3d print such figures, I'd purchase one of myself. lol Chuck, your build looks flawless as usual; it's really fun to see these updates. Alan
- 1,784 replies
-
- 2
-

-
- winchelsea
- Syren Ship Model Company
- (and 1 more)
-
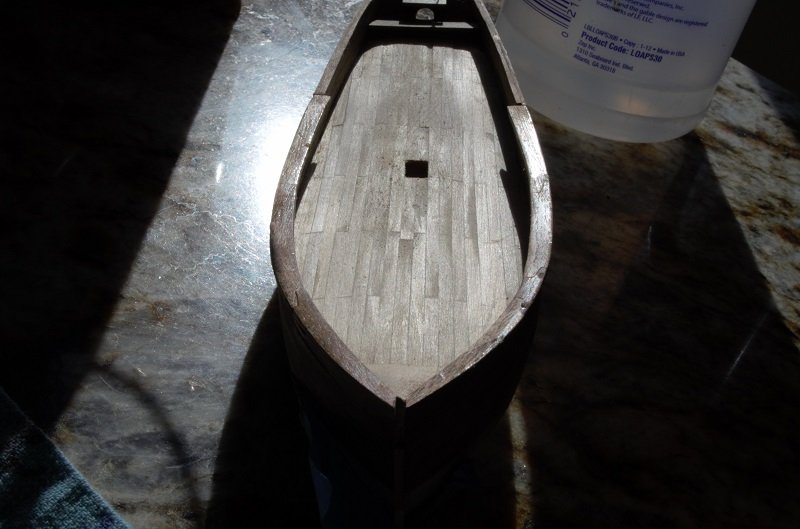
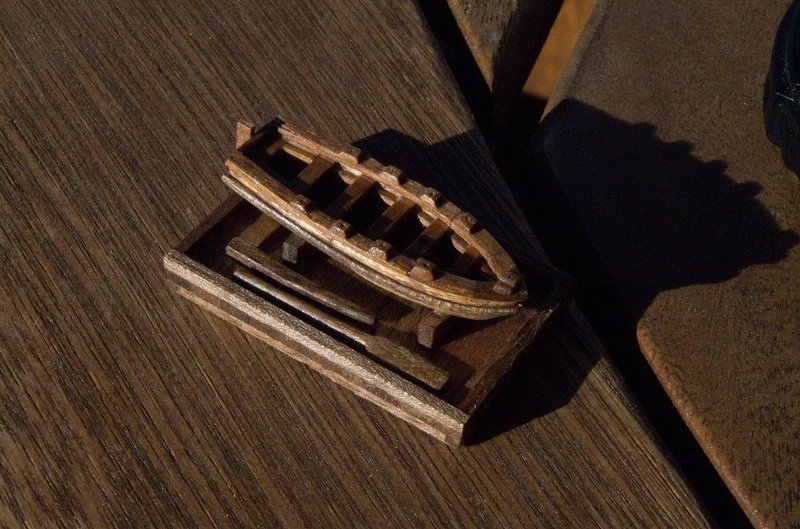
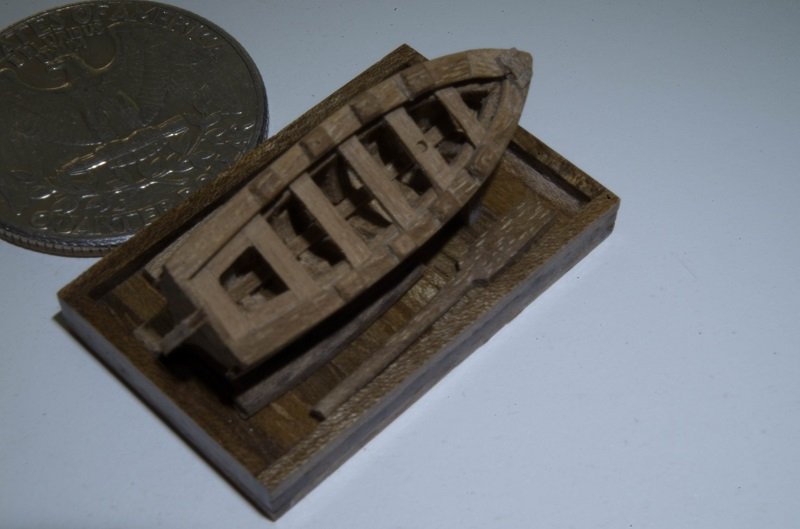
Ok, I'm declaring the ship's boat as complete. I'll glue that to the hull after the stairs and rudder have been installed, since it's a fragile little thing. Alan
-
Ship in a Bottle by knightyo (Alan) - FINISHED
knightyo replied to knightyo's topic in Card and Paper Models
Thanks Mike! I'm actually relieved to be done with that one. Now the Nina can be finished, and then Syren, Triton, etc.. 😄 -
Ship in a Bottle by knightyo (Alan) - FINISHED
knightyo replied to knightyo's topic in Card and Paper Models
Just a small addition to my Ship in a Bottle project. Once I had everything done, ship back in bottle, vid created, etc etc... I realized that I hadn't weathered the deck. Sigh....... -
I hear that. I'm in the same spot with my 1:64 Triton. I was going to bite the bullet however, and fully plank the gundeck in order to practice. I've never installed tapered planks on a deck, so even though most of the work won't be visible, it's still worth the practice time to me. Where I stalled however, was trying to determine how to actually lay that kind of pattern down on my false deck. Running straight from end to end is simple, but how to find/make a suitable tapering pattern? Alan
-
Mark, Are you going to curve your deck planks as well, or have them run straight from end to end? Alan

