
HOLIDAY DONATION DRIVE - SUPPORT MSW - DO YOUR PART TO KEEP THIS GREAT FORUM GOING! (Only 51 donations so far out of 49,000 members - C'mon guys!)
×


mtaylor
-
Posts
26,273 -
Joined
-
Last visited
Content Type
Profiles
Forums
Gallery
Events
Everything posted by mtaylor
-
Keith, I had one of those tools BrianK mentioned. You use the tool off ship (if I remember right..been about 20 years or so) to do your rats with extra long shrouds and then transfer the threaded rats to the ship.
-
Keith, you have a lot of good advice and you'll soon figure out what works for you. And the practice board is a great idea. As for glue, are you using PVA? On the rigging I've done in the past, I used diluted PVA (with water) with the advantage over CA as being "removable" and not making the line brittle. Some go as far as using a mix of PVA and water on all the rigging, not just knots. It gives proper amount of bend/sage and also blocks dust from getting into the rigging.
-
Yes, Carvings on the hull and stern are all PE. Photo Etch. Rather thin and delicate stuff. If you go to the Vanguard Models site (link on the front page, right side of it and near the bottom) you can download the instruction manual.
- 505 replies
-
- 6
-

-
- vanguard models
- Sphinx
- (and 1 more)
-
I just checked and the link and site are working for me.
-
Interesting week so far in the shipyard. I was picking up some more paint at the hobby shop and talking with the clerk. We were discussing a lot of model stuff as he does aircraft and tanks. Turns out, he's "playing" with PE... making it and made an offer I couldn't refuse. Short version.... I paid for some brass sheets, got him the drawings on the PE I needed. I just picked up the bits and it looks like it will all work. So they're being painted and then I'll install them. Only one piece he wasn't happy with. I didn't see the result of that piece but it's a very small one. Pictures to follow once the PE is installed and I'm happy with the repairs to the damaged side.
- 505 replies
-
- 11
-
-
- vanguard models
- Sphinx
- (and 1 more)
-
Rudybob, I use a bit of tape (masking or painter's tape) to hold down the tick strip while marking the bulkheads or frames. I set it up so the strip only covers half the frame/bulkhead so that the other half can be marked with a sharp pencil.
-
Just playing catch up on this, Bob. For some reason I've missed this one. Looking good.
-
Welcome to MSW, DHS. The build log will get you help and and advice and also meet some other builders here.
-
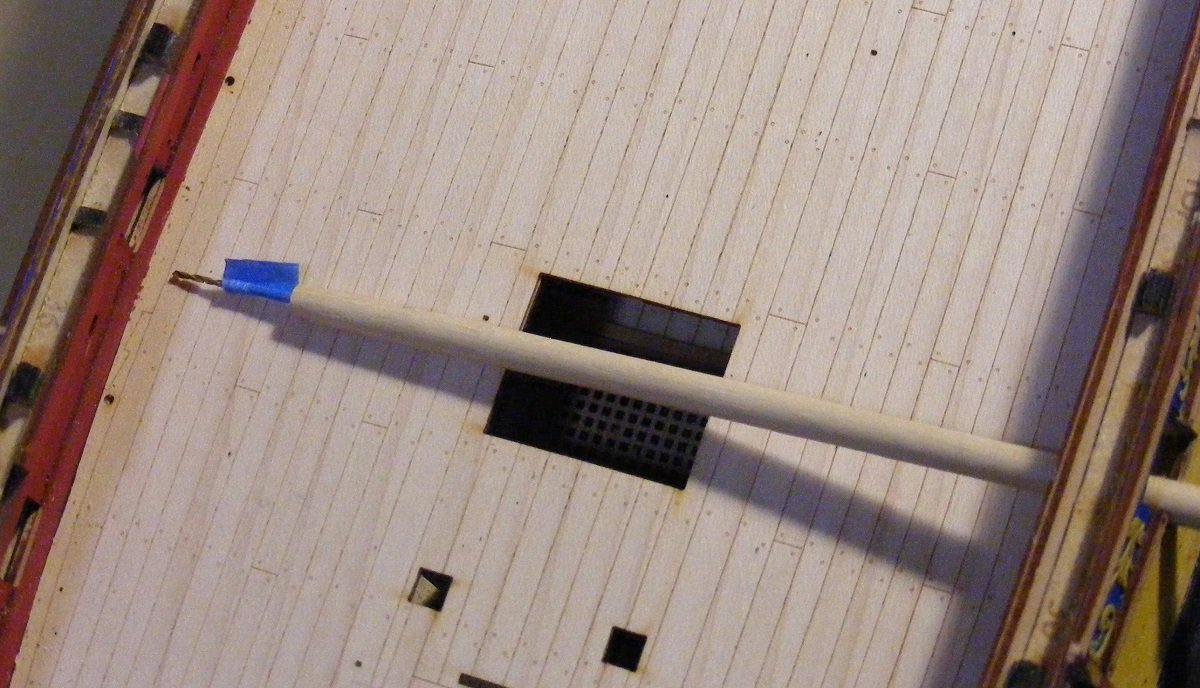
Life seems to be getting in the way, but progress is happening. Here's a handy tool if you decide to go with after market eyebolts either on this kit or any others. I've had it around for long time. Basically, it's a thin piece of dowel with a old micro-drill bit of the proper size needed put into a drilled out hole at one one. It's secured with a drop of CA. If it needs replacing, a quick dip in acetone and it's out. To use, put it though a port on one side of the ship with the bit reaching to the port on the opposite side. Hand turn the tool and you have a hole. Repeat as needed for all the holes you need for gunport hardware. The blue tape is my depth stop so I don't drill completely through the hull. I had to use the macro setting for the lower picture so it's partially out of focus. And yes, paint needs touching up.

- 505 replies
-
- 28
-
-

-

-
- vanguard models
- Sphinx
- (and 1 more)
-
There is a bit of conflict for the guns and internal bulkheads in my mind. If the guns are run out, the bulkheads would be gone. If the guns are properly stowed (pointed fore and aft and secured next to the port) then the bulkheads would be in place along with any items like foot lockers, etc. At best. this is a compromise doing it per the kit instructions.
- 857 replies
-
- 2
-
-
- Sphinx
- Vanguard Models
- (and 1 more)
-
Very true. And if you don't have speed, have maneuverability. Preferably both.
-
Something different-infra red
mtaylor replied to RegAuthority's topic in Photographing your work. How to do this.
If I recall correctly from my film days, IR film required refrigeration also. And yes, B/W only. -
I have no definitive answer but it seems reasonable that reworking rigging would occur. Historically, many captains in the navies did that on warships so I would expect that small vessels would also have had modifications.
-
Welcome to MSW. You did the right thing by going "smaller" for a first build. Do consider opening a log as it's a great way to stay motivated and also get help and meet others. As for the M80's, I think many of us did that as kids.
-
Welcome to MSW, Mark. Looks like the build is going well.
-
Deep down, I know you are right. For now, I'll just be pouty and stubborn.
- 505 replies
-
- 5
-
-
- vanguard models
- Sphinx
- (and 1 more)
-
Thanks for the likes and the comments. Thanks Glen. The repair is on the side not shown. At this point, that's the permanent wall side. Much of the PE came off with some damaged and others that apparently went off into never-never land where they'll never be seen again. I'm trying to talk myself into spending the money (about $100 total) on a new sheet of PE and then replace it. Mental blcok I'm having I guess. Not quite, Dave. There's no prism in them and my eyes cross and go nuts after wearing them for more than an hour at a time. Thanks, Scrubby. I wish some of those who are building this model and not doing a log would take the plunge and open a log.
- 505 replies
-
- 7
-
-
- vanguard models
- Sphinx
- (and 1 more)
-
The going to size size is great and so is the way you did the dimples. Not oversized or looking out of place. Beautiful work.
-
I moved this to proper place in the scratch area for the time period.
-
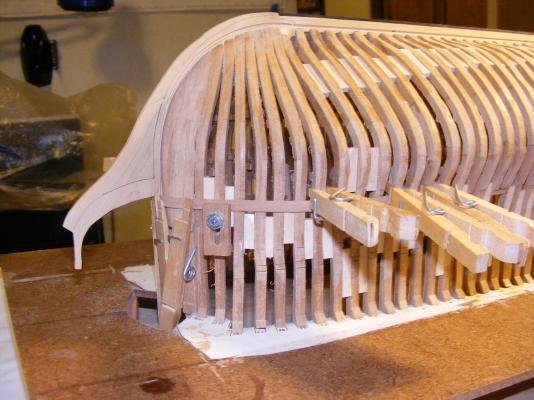
I just found this photo... it shows my claps in action.
-
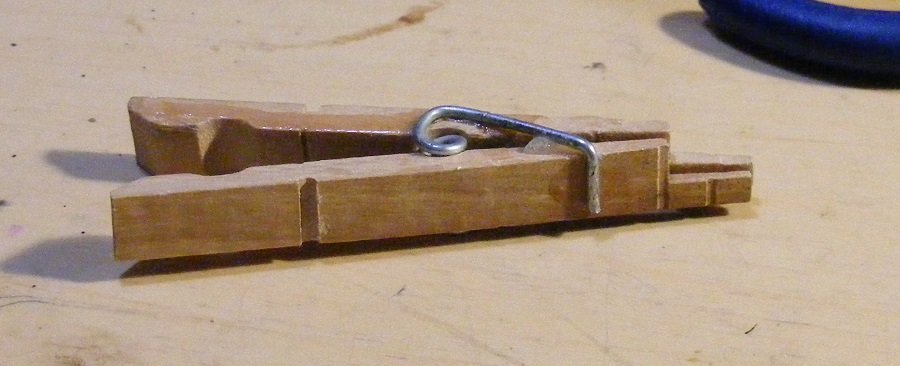
Here's what I use. I've made up probably 20 or more of them. The jaws grasp the bulkhead or frame. The notched end slide over the plank to press it in place. I don't have a photo of it in use.... These are simply a wooden clothes pin (or peg to those east of the big pond). The wood pieces are removed, cut, and then installed back on the metal spring flipped 180 degrees. I do usually, line the gripper end (on the right) with some sandpaper so it doesn't slip off the bulkhead or frame.
-
Some things back then really didn't (and still don't to me) make sense. Like strapping enlisted into the Dunker. Enlisted never flew sitting in an ejection seat. I can see the parachute training (I had to actually do one successful ljumpfrom an cargo bird along with the rest of the Aviation class (all enlisted) in Memphis. Had to qualify on our T.O. weapon... M-14 until I got to Nam. Do that once a year. Pistol? Machine gun? Other weapons? All OJT. I was able to dial in my pistol and rifle at the beach range over there. The .50 was "pull the trigger and watch the tracers while returning fire. Some never got to figure it out. Hell, they were sending us out on perimeter patrol without anyone ever sighting in their weapons. I've heard today's troops get more gun time and training on their weapons. I hope so for all their sakes.
