


M.R.Field
-
Posts
144 -
Joined
-
Last visited
Content Type
Profiles
Forums
Gallery
Events
Posts posted by M.R.Field
-
-
Allan,
The yacht in question is my model of Vanity, a Victorian cutter (see link below).
Your info is helpful except I have no idea what the shroud chainplates look like for a bowsprit. Having trouble trying to visualise the eyebolt/shackle thing.
Any idea what the eyebbolts in the middle of the deck is for?
Cheers,
Martin
-
Hi all,
OK, I have rigging questions. Yacht rigging.
How are bowsprit shrouds arranged? How are they attached to the bowsprit? What are they belayed to tother end?
Also, you see eyebolts in the deck, where everyone could fall over them! What are they for?
Any knowledgable help gratefully received.
Cheers,
Martin
-
Thanks, Nils.
I'm waiting for a pack of sanding pads to arrive so I can smooth down the epoxy sheathing and I need some more epoxy glue to fill a few voids.
Meantime I'll do more on the deck furniture and work out how it can all be stripped down easily for transport.
Or the Mrs. will have me gardening before the rains come! One of the two.
Cheers,
Martin
- mtaylor and Mirabell61
-
 2
2
-
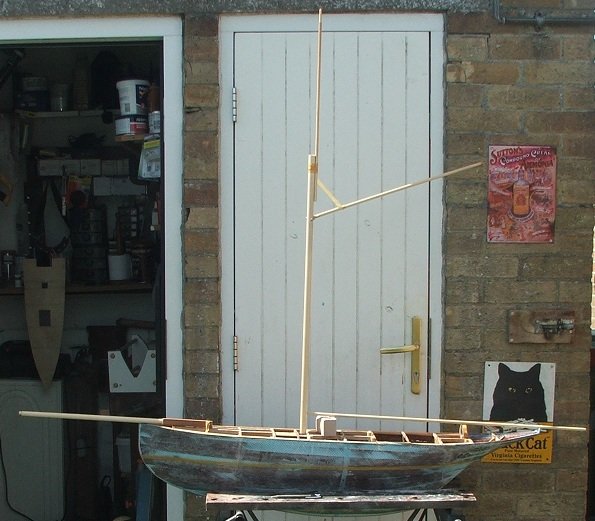
I thought I'd have a look at where the waterline came today, so dug out my Traditions and Memories book and checked the lines for the waterline and found it to be where I'd suspected. So I put it on by eye in Nichiban tape, a good fine crepe tape that we use to use on clay models in the car industry.
I also set the spars up as well as possible. The mast may well be too high as it needs some work to the base. The gaff may be foreshortened as it swung round to the wall. I think the boom needs shortening a little. The main mast needs a little reduction at the top.
It's a big boat overall!
Cheers,
Martin
- egkb, Mark Pearse, mtaylor and 3 others
-
6
-
Keith, thanks. You make a good point about the rudder. I have made it a little wider than the plans suggested. I guess all we can do is try it and see.
I have today rasped off any little creases and bumps and ordered a pack of coarse grit pads for my "mouse" sander. And sure enough, as soon as I order paint, it rains!
I also got some high build primer today and a half litre of the final gloss black. Ye Gods, isn't paint expensive?! 2 half litres and a couple of sheets of wet and dry...over 30 quid! And that was with a nod and a wink kind of discount as I'm a long term customer.
But, the guy offered to make the primer black, so it'll be a great undercoat for the final black gloss.
As to display, I won't be able to display any of my model boats as they're too big! I will have to shove them up in the loft, when not in use, which is why they all have a case made for them.
Had to do more model car stuff than boat stuff today as the guy wants it tomorrow, suddenly, so it had to be painted in preference to anything else.
But I have been able to make the casing for the aft (main) companion.
Cheers,
Martin
-
Woodbutcher, the boats you show are Riva Aquarama Specials. Largely similar to a normal Aquarama, but with the extra length (28' OA) of the bathing platform transom. I have a set of Riva works drawings where the older more upright transom has been deleted and the newer bathing transom added.
I have no idea why these boats have such a reputation. The hulls are made in a steel mould of three layers (Triple Armour, they call it). Very early boats were seam battened, like Chris Craft, to whom they paid a licence. The support structures below the floors are simple soft wood and the plywood decks are made here in England at High Wycombe by a furniture company. The engines are Chevy Big Blocks with a bit of standard marinisation stuff attached. The deck fittings are all catalogued items with a Modena address moulded into the bases.
The apparent excellent timber selection is because the veneers from which the "Triple Armour" is moulded are knifed from the same tree.
I have seen Rivas in anger on Windermere and yes they move nicely, but so, I imagine, do the larger Gar Woods, Hackers and Chris Crafts, not to mention the gorgeous Greavettes and Minett-Shields. I have never witnessed them at close quarters. But I would have a Greavette Streamliner or Gent's Racer any day rather than a really rather ordinary Riva.
Cheers,
Martin
PS, one of the models I've made (from scratch, not kits) of an Aquarama Special.

-
Well,cloth on tother side of Vanity, so now she is officially waterproof.
Also got her after deck in the doggy paddling pool soaking into a camber. Front half's already done.
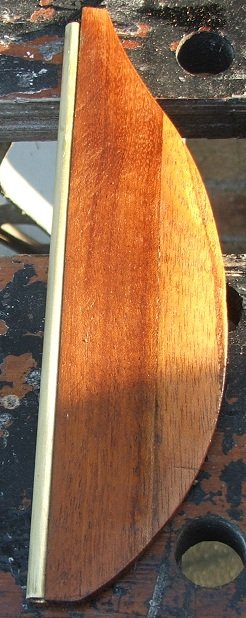
And made her rudder last night. Laminated from 4 pieces of mahogany and fixed to a heavy walled brass tube.
Cheers,
Martin

- KeithAug, vossiewulf, mtaylor and 4 others
-
7
-
Mark, that is gorgeous! I have a bit of a thing for the miniature versions of the big yachts. My chum, from who'm I bought Vanity found a small version of her, built on "our" river, the Crouch and turned out to be the oldest vessel on the Crouch, White Mouse. And it was like your one there only smaller yet.
It would make a lovely model as would your one. Much under-rated, these old yachts. I
I do love a plumb stem and a counter stern.
Just off outside to epoxy/cloth the other side.
Cheers,
Martin
- Mark Pearse and mtaylor
-
2
-
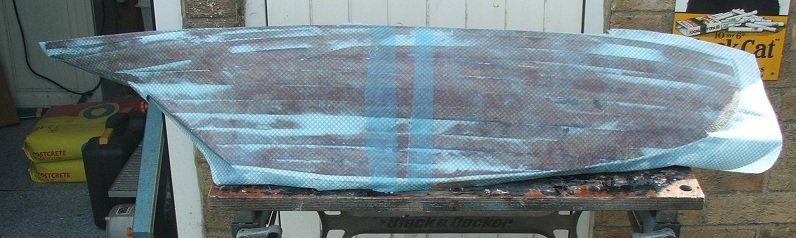
Michael, yes it went on so easily. I shall be checking it shortly, but it had set when I locked the shed last evening. I'll be trimming it and doing the other side today as the weather is again very good.
I should have said that the white areas are a lightweight filler, where the varying thickness of the different planks made it necessary.
Cheers,
Martin
-
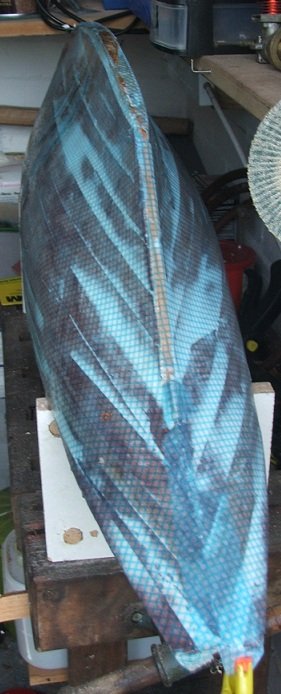
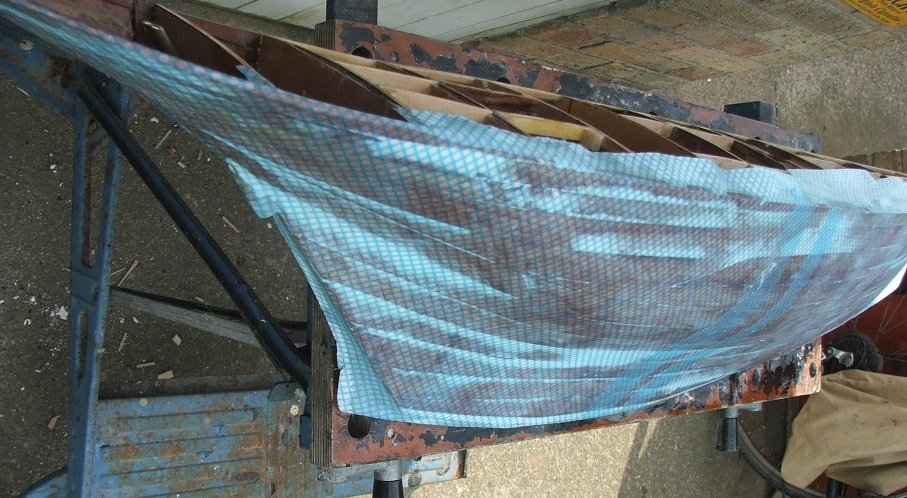
Right, well over the last two days I have filled the hull with a lightweight filler and rubbed down today, so after the grandchildren had left I had no excuse not to cover the side and epoxy.
Now, being a tight wad, I could see no real reason to pay through the nse for lightweight Fibreglass cloth, so I figured why not use a J-Cloth type of stuff. Immensely strong, has a little stretch and easy to wet out with epoxy. Not long after thinking about that I was in Poundstretchers and blow me down with a nitrile glove, but there was a huge pack of J-Cloths (cotton waste, btw) for a couple of quid. Enough there to cover everybody's boat AND use to clean up.
Well, I mixed the epoxy, brushed it on and followed up by sticking the J-Cloth to the forward part o the hull. In this heat the epoxy was starting to tack fairly quickly. Brushing always outwards from the centre of the cloth, I wetted out the cloth and then carried on aft and put the after sheet on, same way. Some judicious cuts with scissors and the cloth went round the starn end a treat. There was a small gap in the middle so a strip cut from a spare cloth was tacked on and soaked with resin. Spare resin was used to fair in the joints and persuade the odd crease down.
Tomorrow the other side gets done. I might iron the cloth as the central folds do take some persuading to sit flat initially.
Here's a coupla shots of the process.
Cheers,
Martin
-
Oh that's wonderful! I always hope to help through these forums and rarely seem able to! So I am very happy to have helped you with a book choice. I think I bought mine in a Library book sale. I was disgusted it was in a sale, but so pleased to buy it at a bargain price! It really is a very good read.
Cheers,
Martin
- Mirabell61 and mtaylor
-
2
-
Trying to work out how much ballast I will need for this model. Rule of thumb suggests something like 19 kilos. Now that, in lead shot, is far too expensive, so I'm thinking buy it from a scrappy, melt it and pour into either little pigs or a mould made from patterns of the space in the bilge of the yacht.
What do others use to ballast their working boats? If this proves too expensive or awkward there'll be no model of Vanity!
Cheers,
Martin
-
I have some black piano keys which I have used occasionally with no trouble. Rosewood and Lignum Vitae which I have used to make tool handles for my clay modelling tools. Most woods are toxic or at best, noxious. Mansonia, a lovely wood to use for small detail and a wood from which we, at John B. Thorp, once made a model in 1/500th scale of the entire city of Cardiff makes barbed dust that doesn't come up if breathed in. I was an apprentice there nearly 50 years ago. Mahogany is allegedly carcinogenic.
Even balsa wood makes me sneeze uncontrollably and pear makes my skin itch more than epoxy modelling board.
The woefully underplayed Joe Jackson had it right with his excellent song..."Everything gives you cancer".
Martin
-
-
-
Floquil were the very finest model paints known to mankind....then they screwed it all up. In England you could get them from Victors of Islington, dealers in all things American model railroad. They shut down. So, next, I got my chum in Florida to buy and send me some. These, I noticed, had a different smell and didn't work so well. "Oh here we go", I thought, "unwelcome, unnecessary changes to formula". Same as cellulose and now they're even trying to foul up our use of the only decent paint left, enamel. I do use Vallejo for detailing figures as the pigmentation is denser than most and I can get it locally, but I hate acrylics generally. The only thing that should be water based is orange squash.
I don't see why, when we have so much technology, we can't produce a "safe" replacement for the older paint media and damned water based muck is not it! But of course it was always perfectly safe. My Grandfather made his own paints. He would grind white lead and mix with oils into a paint that he would guarantee for ten years when applied to a London house. Try getting that these days. He died of something completely unrelated at a goodly age. My other grandfather, between cabinet making, restored old motorbikes and painted them with cellulose. He made his own wood stains and polishes. He too, died of an unrelated problem at a reasonable age.
I have used all the so-called "wrong" substances all my life and am also approaching a reasonable age. I still spray cellulose from my dwindling supply and clean up all things with cellulose thinners, which, considering the lack of paint of that kind, is still freely available, oddly.
If we make the world any "safer", we'll all die of boredom as there'll be little to sniff with a satisfied grin, like cellulose, enamel oil paints, Castrol R, St. Bruno, Valor parrafin heaters, road tar, etc. etc
- Bob Cleek, Ryland Craze, Jack12477 and 3 others
-
6
-
Very spooky that, Michael. I have not long ago finished a kit master for a Crewe Works 18" gauge loco called Dickie! In O9 to take an N-Drive chassis. I do all his patterns. Currently doing a 4mm scale Fifie fishing boat, to be cast in resin as a scenic accessory.
I have a rivet impressing tool that I found at a boot fair for just £2! I couldn't believe my luck. The old boy usually charged way too much for his over cleaned up old tools, but this, he clearly hadn't a clue what it was. Hence the price. I make new punches and anvils as and when the need arises. The piece is made by someone who knows there stuff in cast and fabricated brass, lever action, with a graduated brass adjustable fence and changeable punches and anvils.
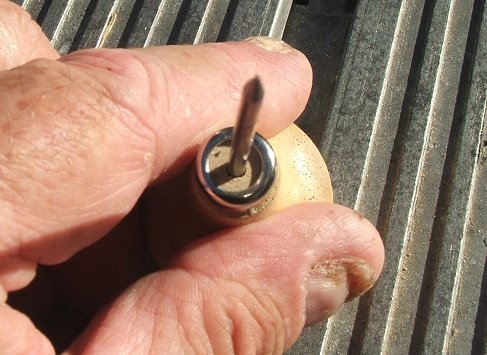
But the rivetting tool I was showing above is to leave marks of a flush aircraft rivet in plastics and foils which you use to cover model aircraft as silver paint is an abboration.
Strange how Perspex is so popular for these model tools.
Cheers,
Martin
-
Nah, I can't take close-ups despite lovely sunshine.
But in the pointy bit of this is a tiny dip, like the anvil of a rivet machine. It's supposed to be a scale rivet in 1/32nd scale for larger model aircraft kits. Mine came with the mushroom handles and I got two despite paying for one. I'm waiting for it to go blunt, but not yet.
Cheers,
Martin
-
-
Keith,
I'm as tight as a duck's derriere, so in the absence of any spare blades that one gets constantly sharpened. I have a large diamond dust stone which I used to use to hone my scrapers when I was a clay modeller for the Germans (mainly).
I have a link to the company's tools, but you may have to get in touch with them as I can't see that item on their list.
https://www.scalemodelshop.co.uk/accessories/tools/other-tools.html?infinite=true&
Cheers,
Martin
-
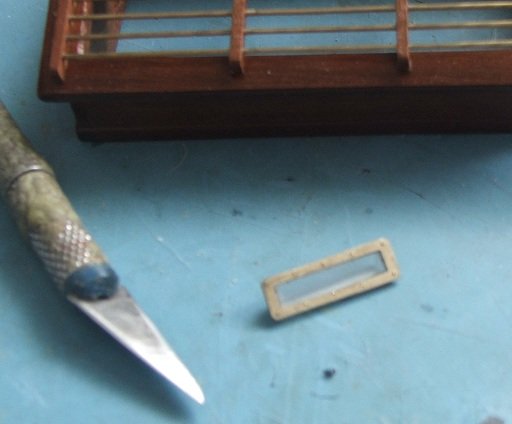
Waiting for someone to call, so a quickie job. The deck prism.
When I lived aboard Vanity, this simple object casting a perfect straight rainbow of colours on the carpet in the galley would always lift my spirits.
I made a brass surround by cutting out a rectangle from some 10 thou. brass photo-etch surround (a great source of scrap shim) and drilling a hole in one end. It was then threaded on my piercing saw blade, trapped in the vice and the opening cut in with one all round pass of the piercing saw. Quick clean up to the lines with Swiss files and a rub down with 800 grit, saw the frame done. Then the prism was filed on the edge of a bit of 1/4" Perspex and that was trimmed off with just enough parallel to hold in the vice. The rebate to sit in the frame was filed in with my sharpest square file. Very careful use of superglue held the two together. Once it's fitted in a deck plank I will have built a wee box under it, so should it leak, the water can go no further than a tiny space beneath the prism.
Finally, tiny screw marks were impressed with a very useful tool I bought for making rivet marks on the foiling of model aircraft panels. I got 2 for 4 quid from ScaleModels, Ltd., an internet seller of goodies.
I put a standard knife next to this and the decklight to give some sense of scale.
Cheers,
Martin
- Roger Pellett, druxey, egkb and 4 others
-
7
-
Michael, just came to this thread. Lovely stuff and you do have some fascinating tools.
It is not widely known that the "great" Basset-Lowke never made a model in their colourful life. They bought companies to do stuff for them. The main two that did their ships were Shipmodels Ltd. and E.W.Twining, the better work being done by the latter. They even had a company in Norfolk who made their well thought of electric motors for them. I have one, as I collect old electric motors and it growls like a good 'un, or in Norfolk parlance, "Bugger thas a rum 'un"
I once met the ex workshop foreman of the company (they did have some machines doing auto carving of toy boat hulls). He confirmed that most of the time he had little to do and at one point in their later, sadder life the company was run by a woman and he seriously offered her 50p for the name and she actually appeared to consider it!
Just a little background for you.
Martin
- michael mott, Mirabell61, Chasseur and 7 others
-
10
-
-
There was me smug as a bug with my wee slats. Trouble with living rural as we do is that you rarely get anything just sitting by the lanes in a skip. We used to live next to a skip collection business and I used to help him with sorting for a few quid cash, but it really was rubbish! Skip after skip of absolute tosh, unfortunately.
But I can stretch to 50p I'm sure.
Cut the deck ply today and marked it up for deck fittings. Also put some carlins in to strengthen the mast area and under the bitts where the bowsprit lodges. After tea I'll be making the carlins for where the decklights and companions go. Tommorrow I'll maybe get round to epoxying the outsides.
Now then, Michael......I'm really not sure I can follow all that and do it at the same time, but I'll have a go and thank you for taking the time. least I can do is have a go.
Cheers,
Martin
Vanity by M.R.Field - scale 1:16 - RADIO - Victorian Racing Cutter
in - Build logs for subjects built 1901 - Present Day
Posted
Well. the sanding pads have arrived and guess what.....it's raining!
Ah well, we have a doctor's appointment and tomorrow I'm helping to set up a "Man Shed!" So deck furniture is all I can do on and off.
Here's some with first coats of sanding sealer.
The main companion, the main decklight and the roundhouse cover being turned by being glued to an aluminium turning I had kicking around. Worked a treat. This is actually an offcut from rudder production.
Cheers,
Martin