
DavidG
-
Posts
213 -
Joined
-
Last visited
Content Type
Profiles
Forums
Gallery
Events
Posts posted by DavidG
-
-
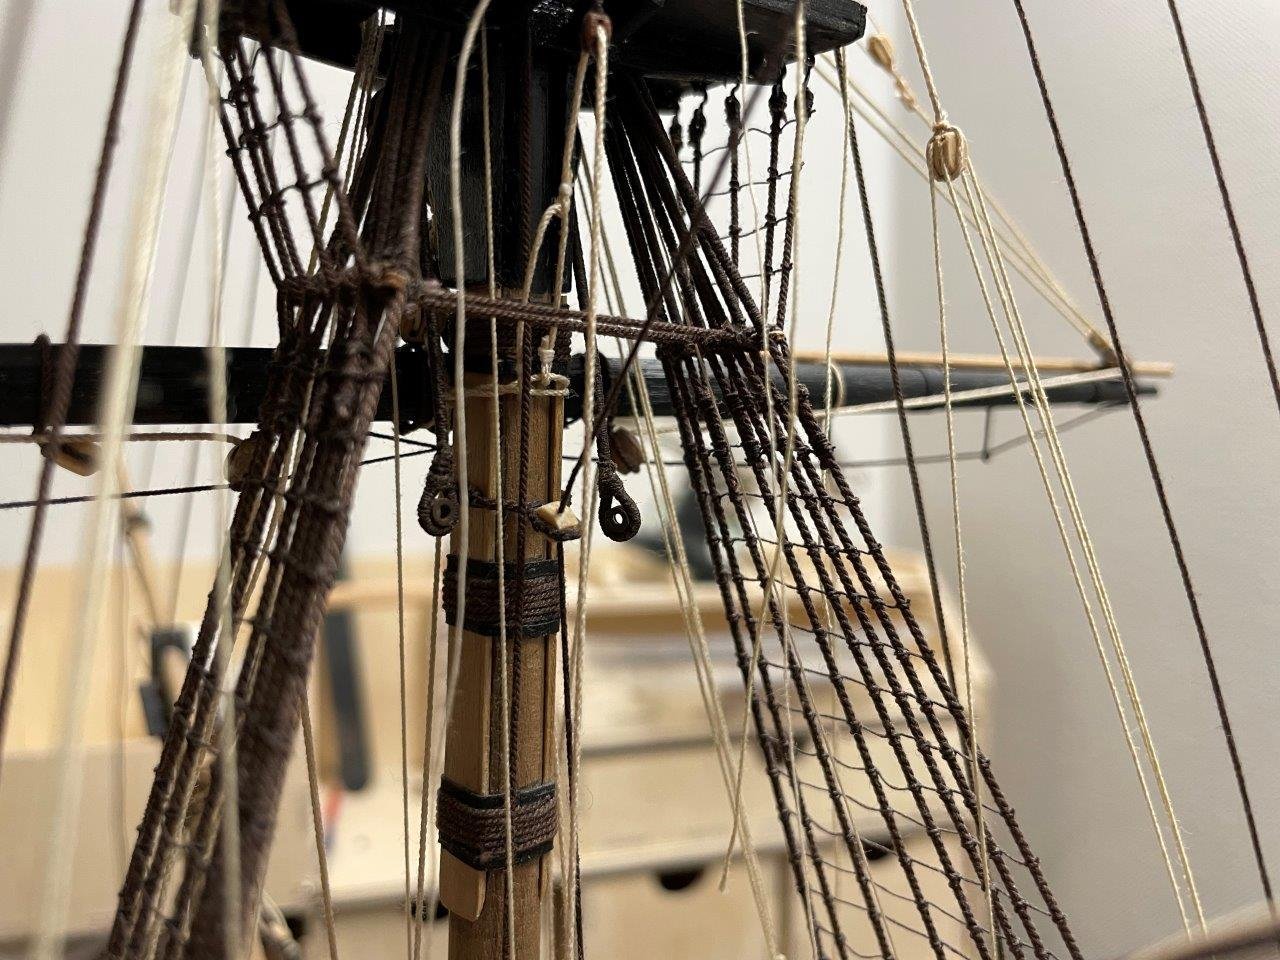
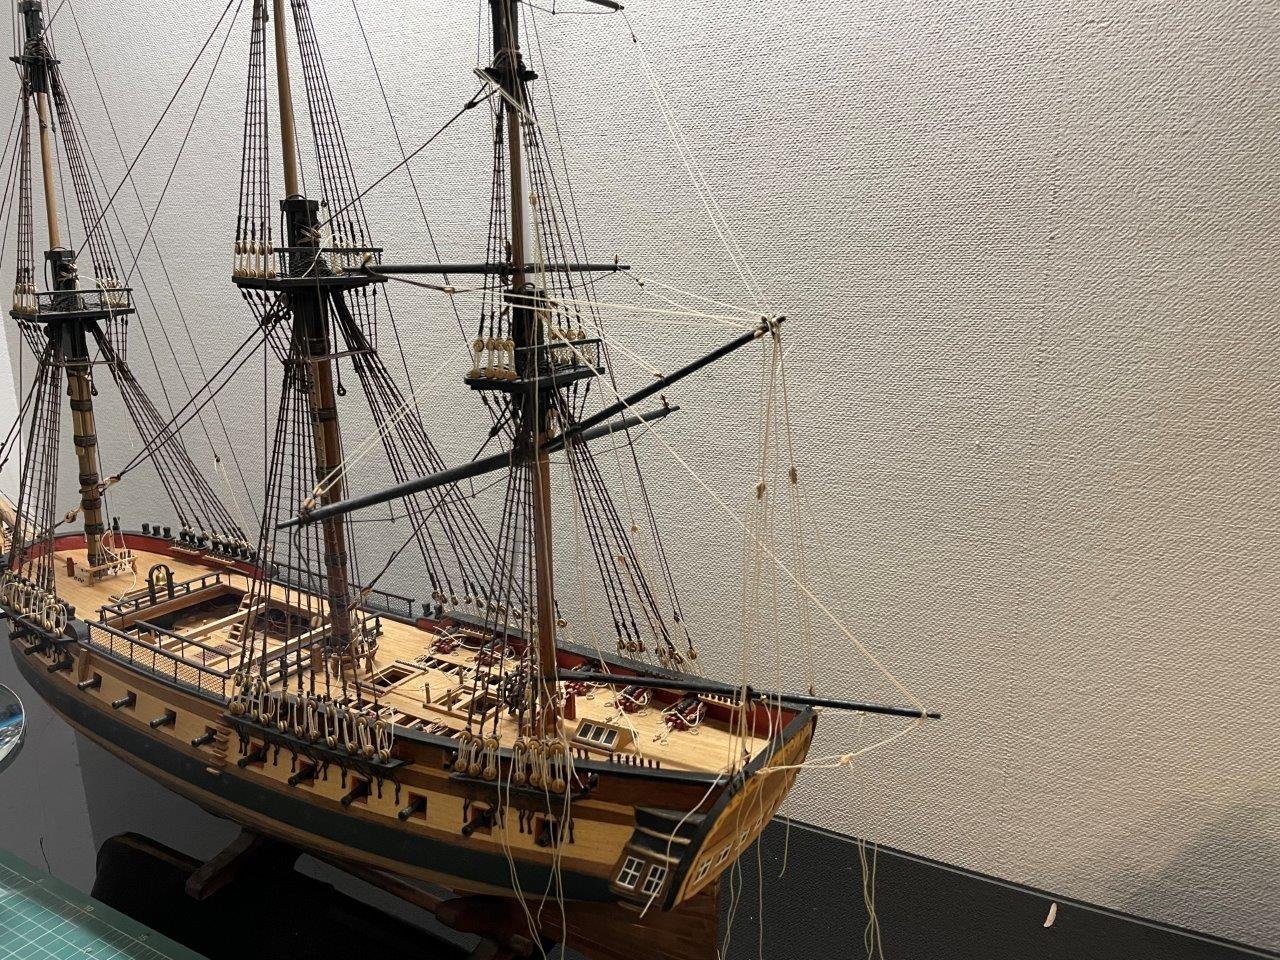
in the recent weeks I added most of the rigging to the main mast, and started to permanently belay the lines. This is the point where my lack of forward planning make some problems, I did not use the kit rigging plan, but neither installed the belaying points from the Petersson book. So I have to do it having a lot of rigging already attached, making some tasks unnecessarily difficult.
I had to work around several lines to attach the shroud cleats for the topgallant lifts.
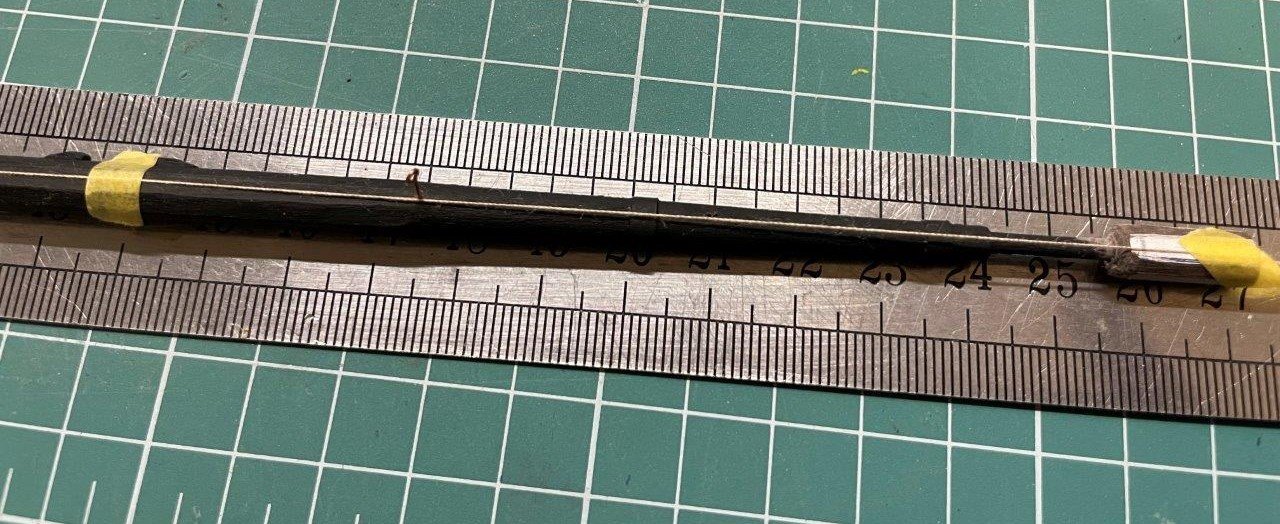
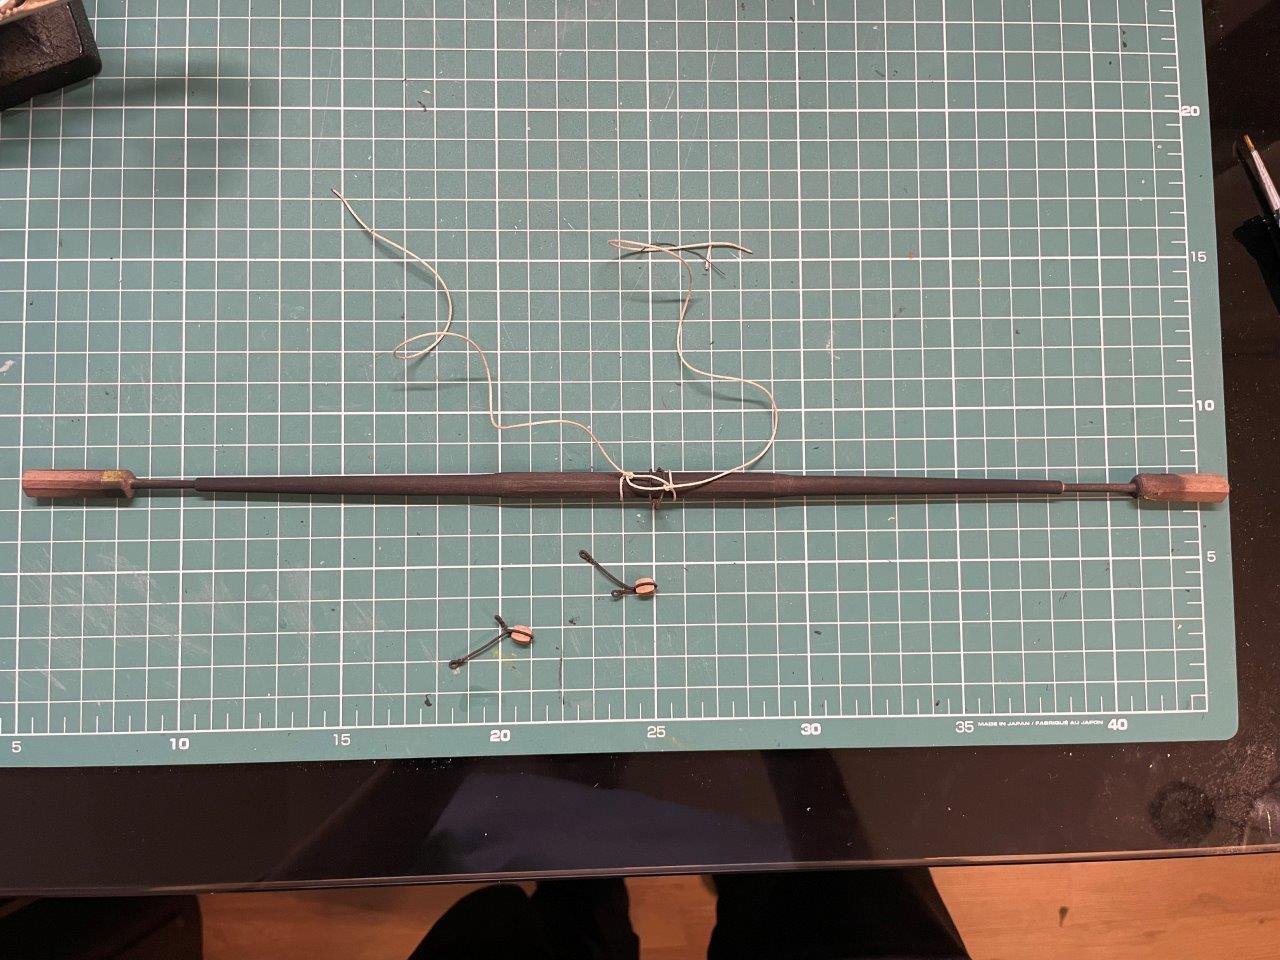
Then I moved to the bow section, and made the spritsail yard. Coming to the end of the yard making, I learned to install properly sized clueline blocks; better late then never. This is something I recognized too late, these blocks are small, and I have to live with the bit oversized ones on the other yards. From the upper outside, there are lines for the standing lifts, thimbles for the jibboom guys. Apart from the footropes, cluelines and their blocks from below.
The spritsal yard in place. Held in place by a sling, and halyard.
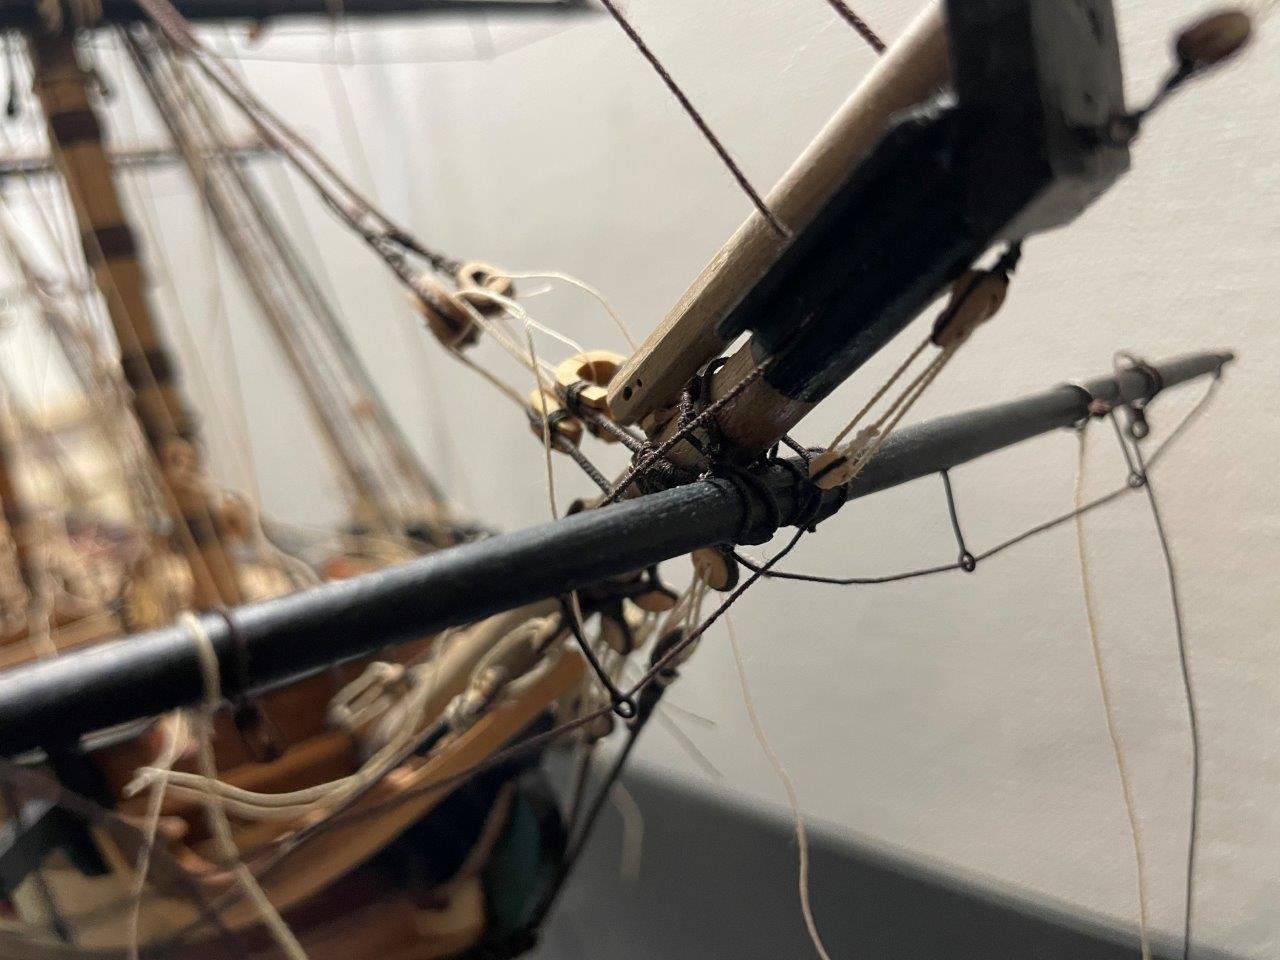
Then started to add the fittings to the bowsprit cap, the standing lifts first, they should have thimbles but I omitted them as the ones I have looked out of scale for me. Looking the picture, the port side lashing needs replacement - by eye it wasn't so bad.
Bowsprit horses rigged next, from the cap to the timberheads. These lines hold the netting, used for storing the staysail - it was a fun feature to add, while I choose to use tulle instead weaving the lines.
- GrandpaPhil, ccoyle, Dave_E and 4 others
-
 7
7
-
Robert, congratulations for your first wooden build. You are a fine builder and your ship will be a great model.
As someone, who builds an Occre model for a long time, trying to make it more accurate, let me have some recommendations.
- please consider to change the eyelets in the kit, they are too big to scale. Buy 2 packs of 2 mm Amati copper eyebolts (comes by 100). If you don't want to paint them, heat them up with a torch and immerse in water, they will turn dark brown. They can be easily formed into hooks, should you wish.
- you will need a selection of blocks sizes, from 2 mm to 6 mm. The Occre blocks are not bad for a kit, but there are no sufficient sizes supplied. Going upwards the blocks will diminish in size, also, clueline blocks should be smaller than the ones for lifts and sheets, etc. There are a selection of blocks available at Syren, Vanguard or Hismodel. I tried all of them, being in Europe the Hismodel ones are pretty good and not expensive.
- the same goes for the rigging thread, you can go as far as you want, but consider 4 sizes for standing and running rigging each. Similarly, there is a wide selection to choose from, but standard Amati thread available in different sizes is already a step up and pretty cheap. You need to dye them though, wood stain worked well for me.
- I saw many inaccuracies / simplification in the Occre rigging plan. Don't know how it is for Endeavour, but i found a rigging book, like Petersson's great help. Vanguard Models sells it.
I see the Occre Endeavour is a nice looking subject. By making small and inexpensive adjustments you can make it even better. My build log have some tips for kit bashing, if you are interested.
Keep on the good work,
best,
David
- DaveBaxt, allanyed and Robert Taylor
-
3
-
thank you Dave for your words. The kit I'm building is from Occre, not Caldercraft. Overall the hull is pretty solid and goes together well. The materials are not first class, but they are OK for the price of the kit. The kit falls short on detailing and fittings, most of my activities revolve around putting this right (or at least improve them some). For me it's not an issue as I feel like doing some actual modeling. A modeler looking for an accurate scale model to be built from the box may find it lacking. While I never built a Caldercraft kit, from what I see they are on a next level of accuracy, they also provide a bigger challenge to the builder. The Caldercraft Diana is a different ship (a British one), I saw wonderful finished models of it.
-
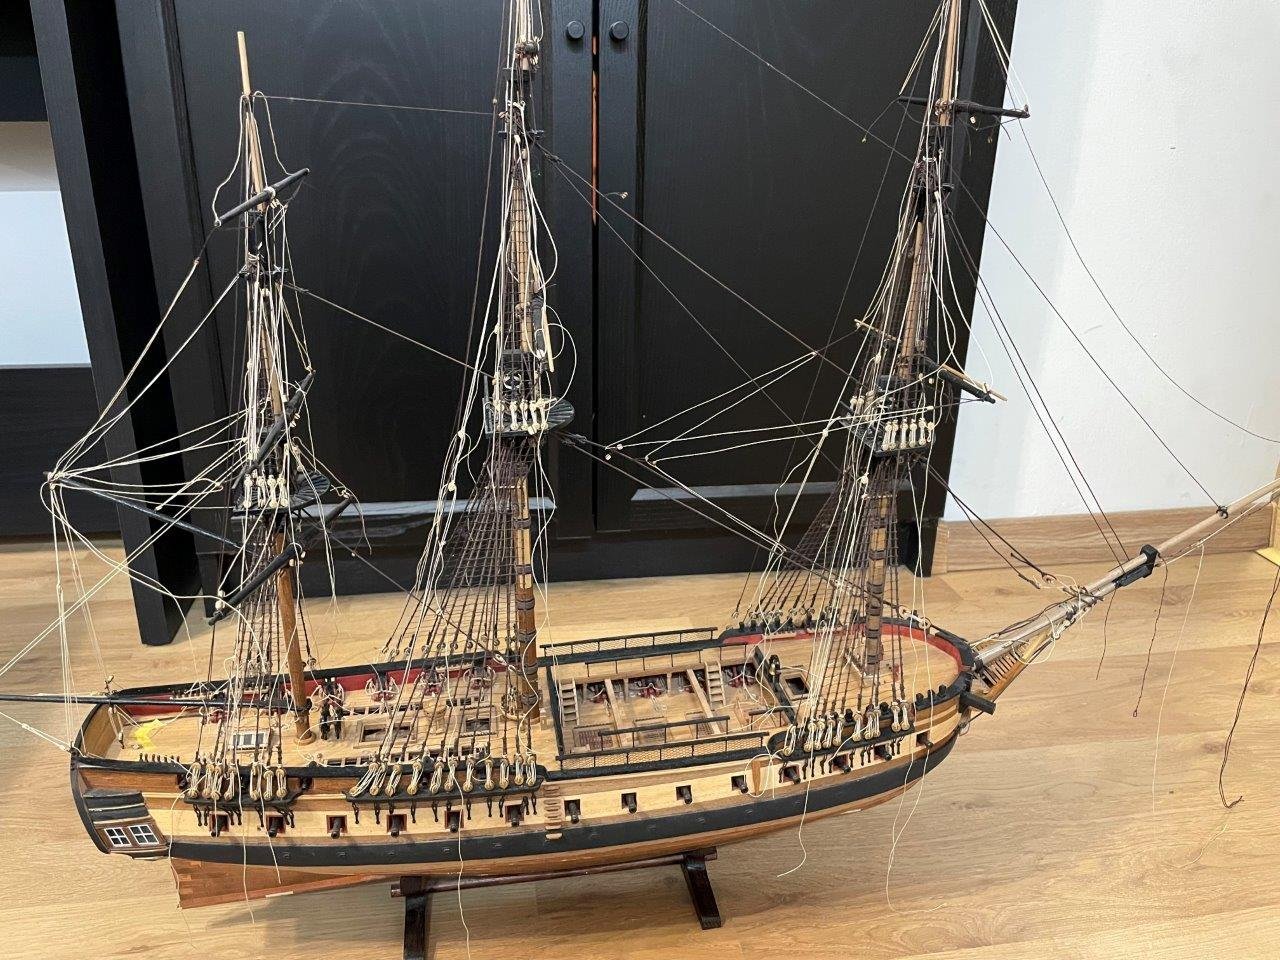
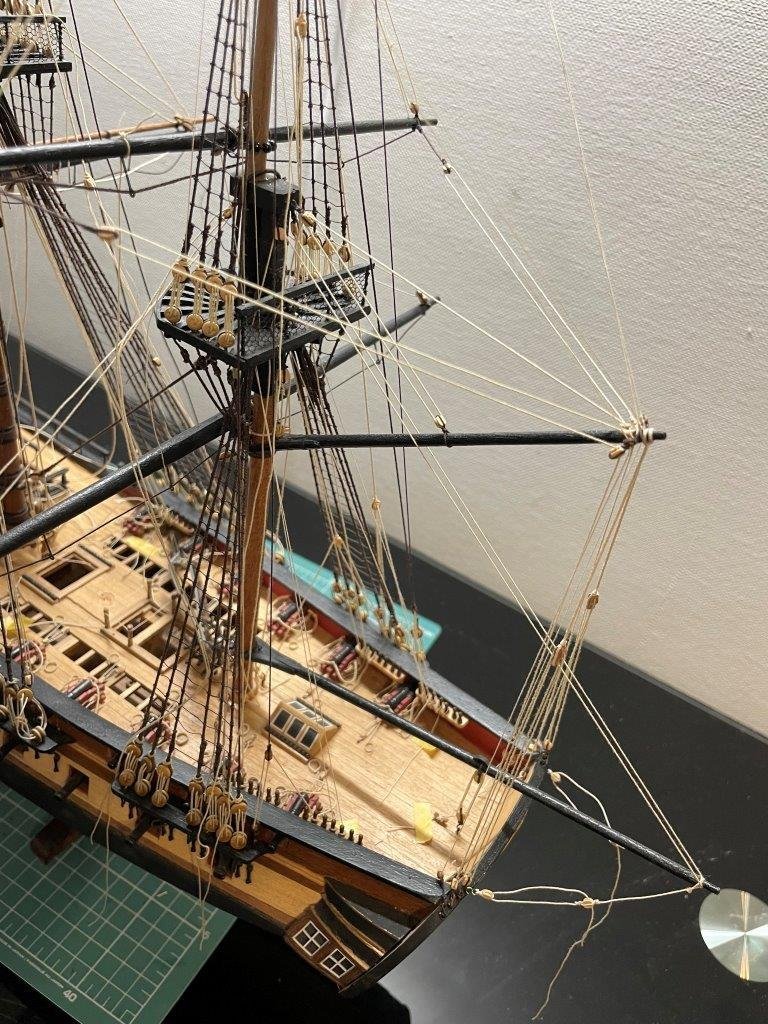
time for an update, I try to do something on the model each day, even very small steps move things forward.
With persistent work, I made a total mess of rigging lines over the weeks.
then started to tie off the lines, which I'm currently doing.
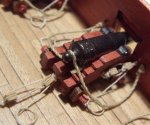
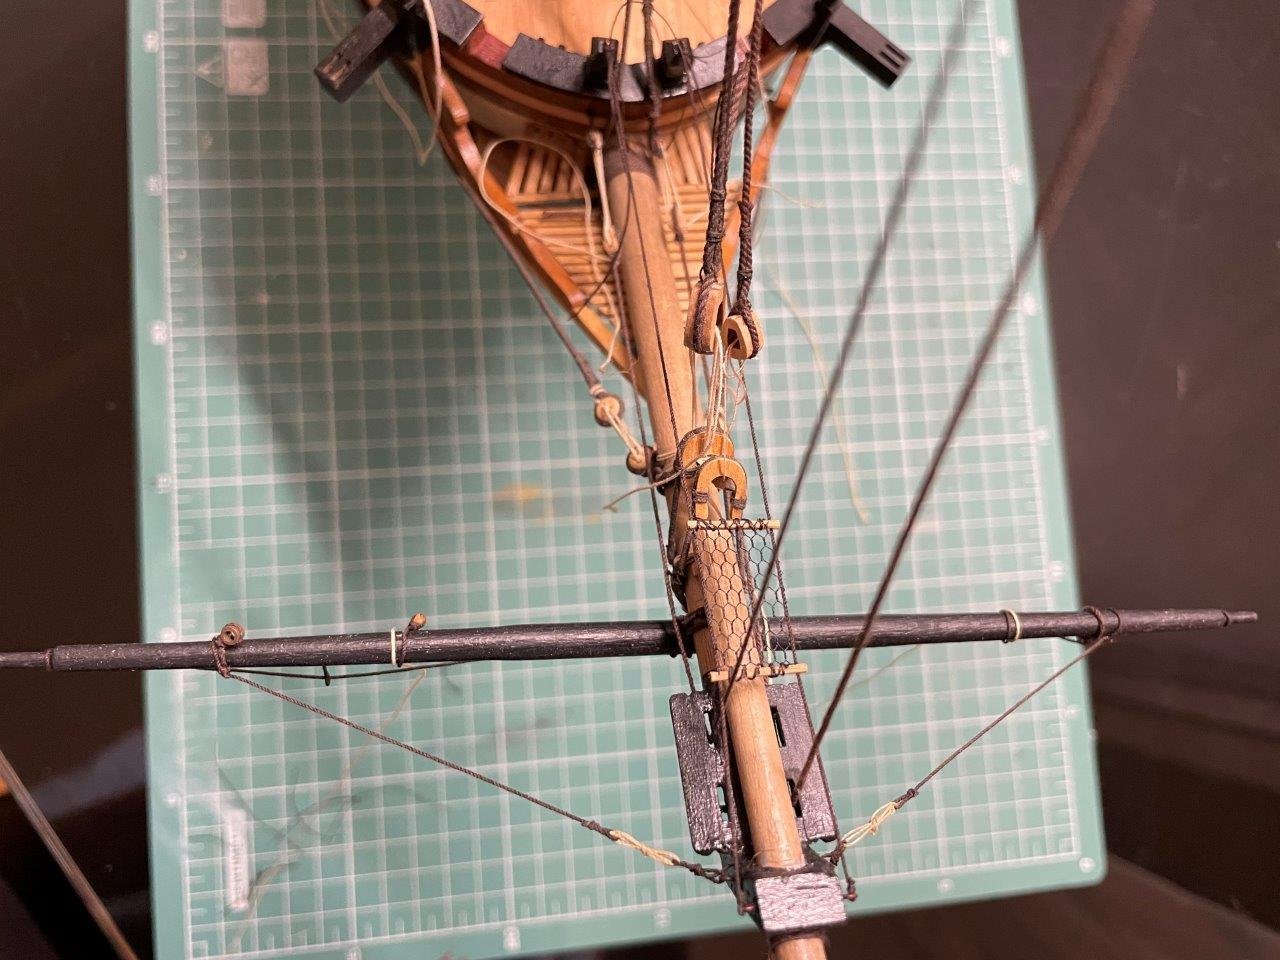
this picture shows the rigging around the fore yard, a significant departure from the kit instructions. I followed the Peterson book to make jeers, sling, lashings, etc. An unexpected side effect, the belaying points prepared by the kit instructions doesn't match, and I have to redo several of them.
I tried myself to make a nave line, I never rigged before. It's hard to notice between the other lines, but this one is attached to the trusses, and holds them from above, through a block under the mast top. It's a tricky bit of rigging to run freely between the catharpins and install it on the right side of the main topmast stay (first I made it wrong and had to remove the block from the stay, as I didn't want to disassemble the trusses)
the stern area also taking shape. I knocked off the guy pendants so many times, I just left them unrigged for now.
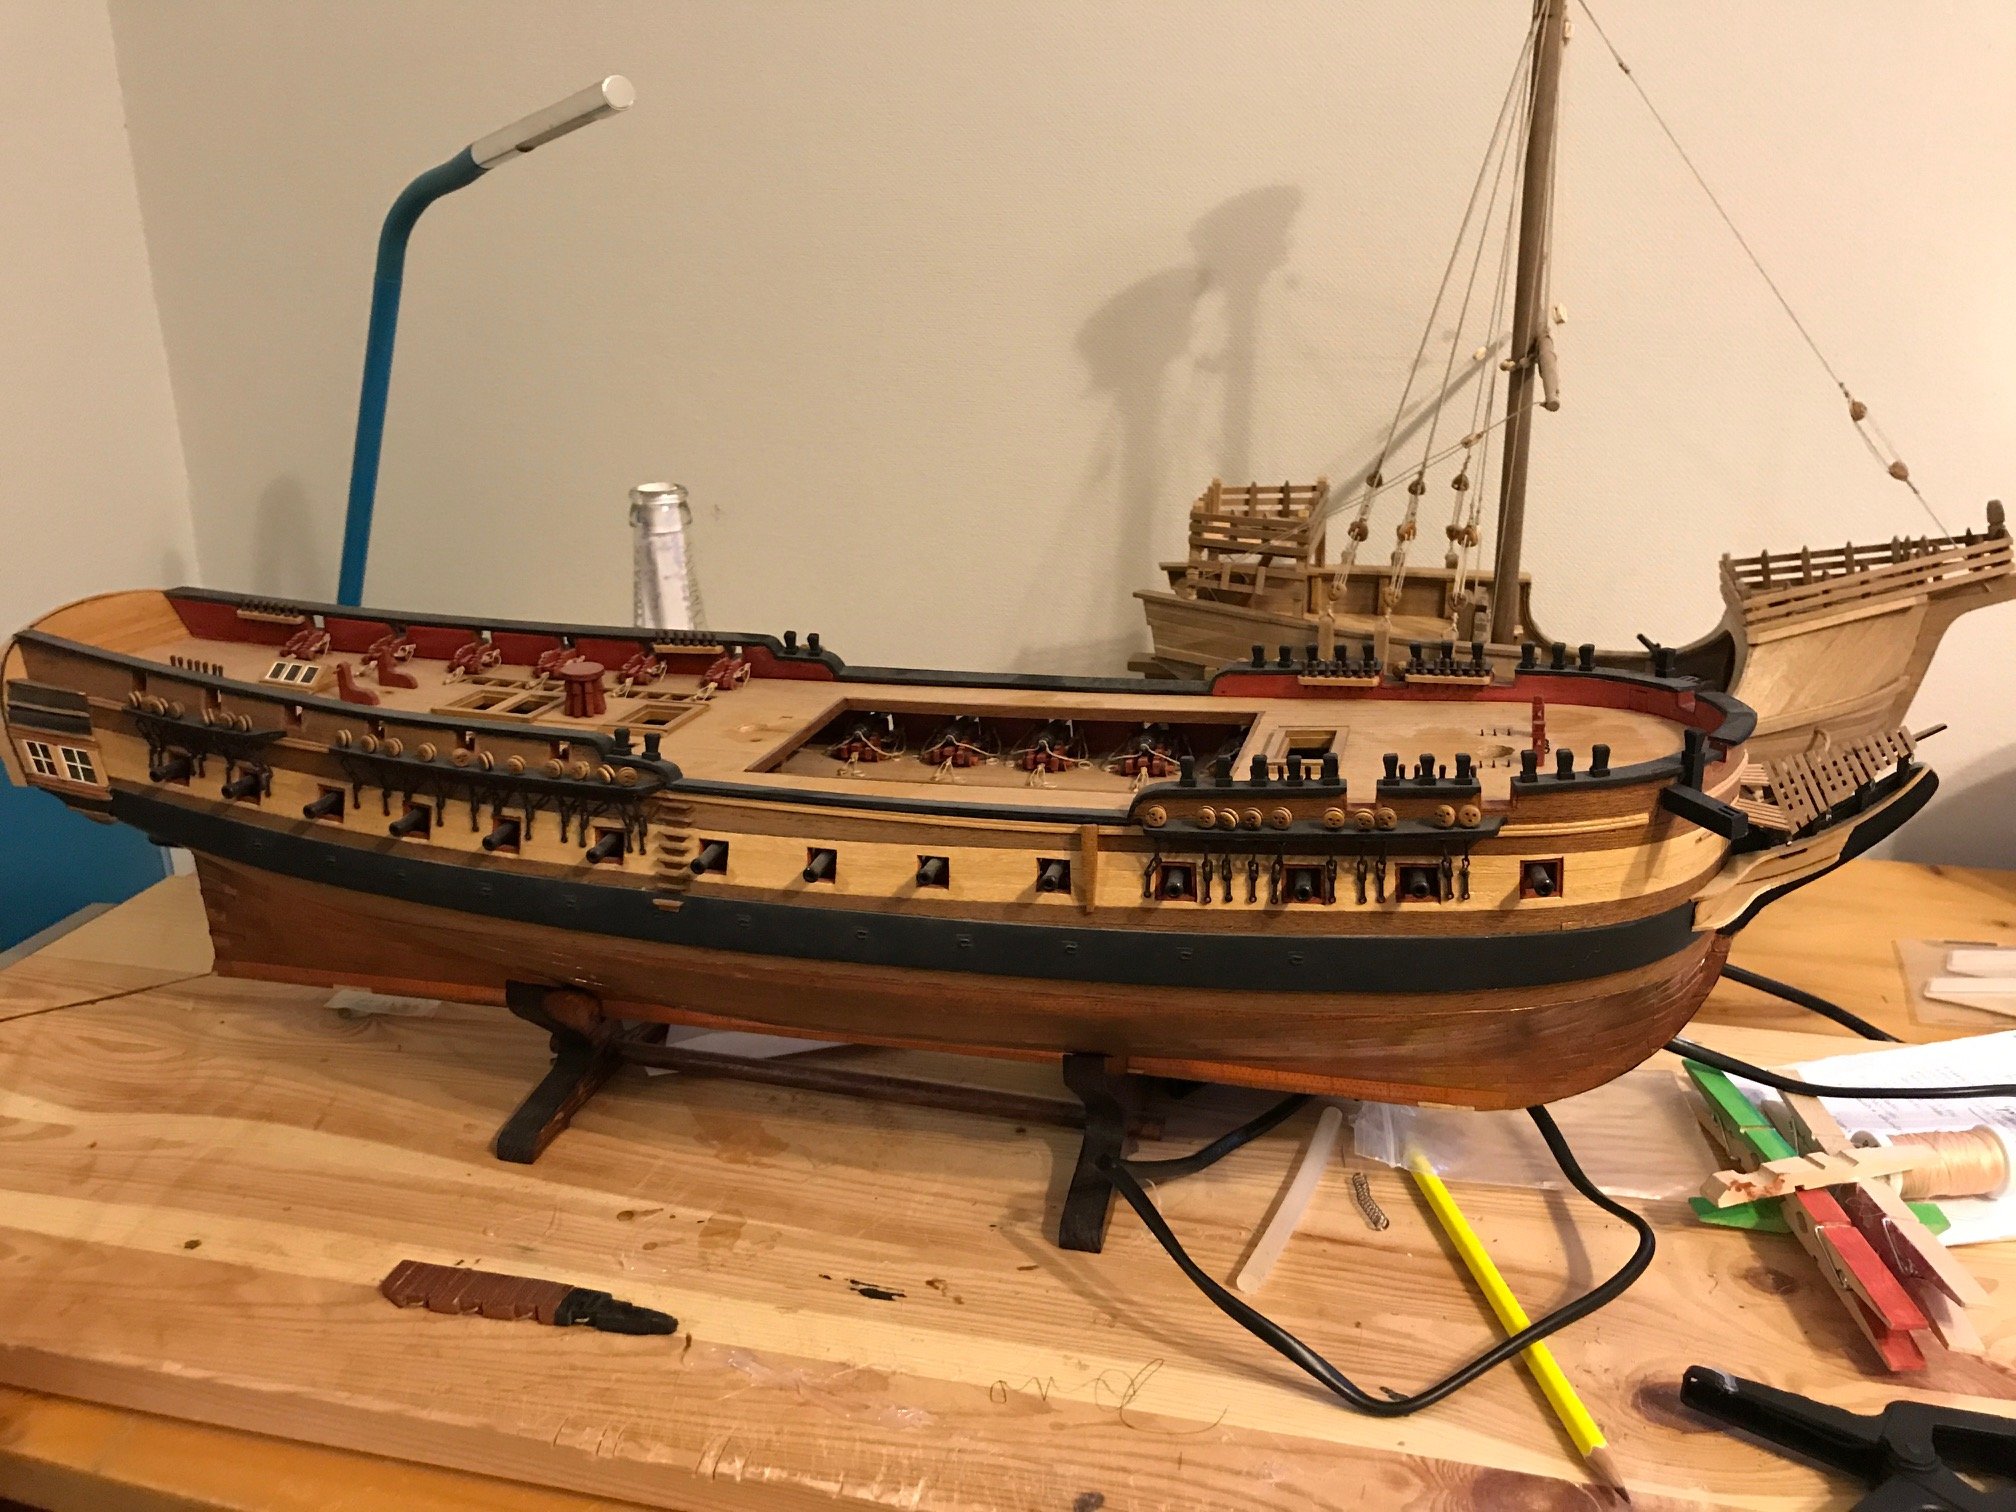
finally an overall picture of the model as of now:
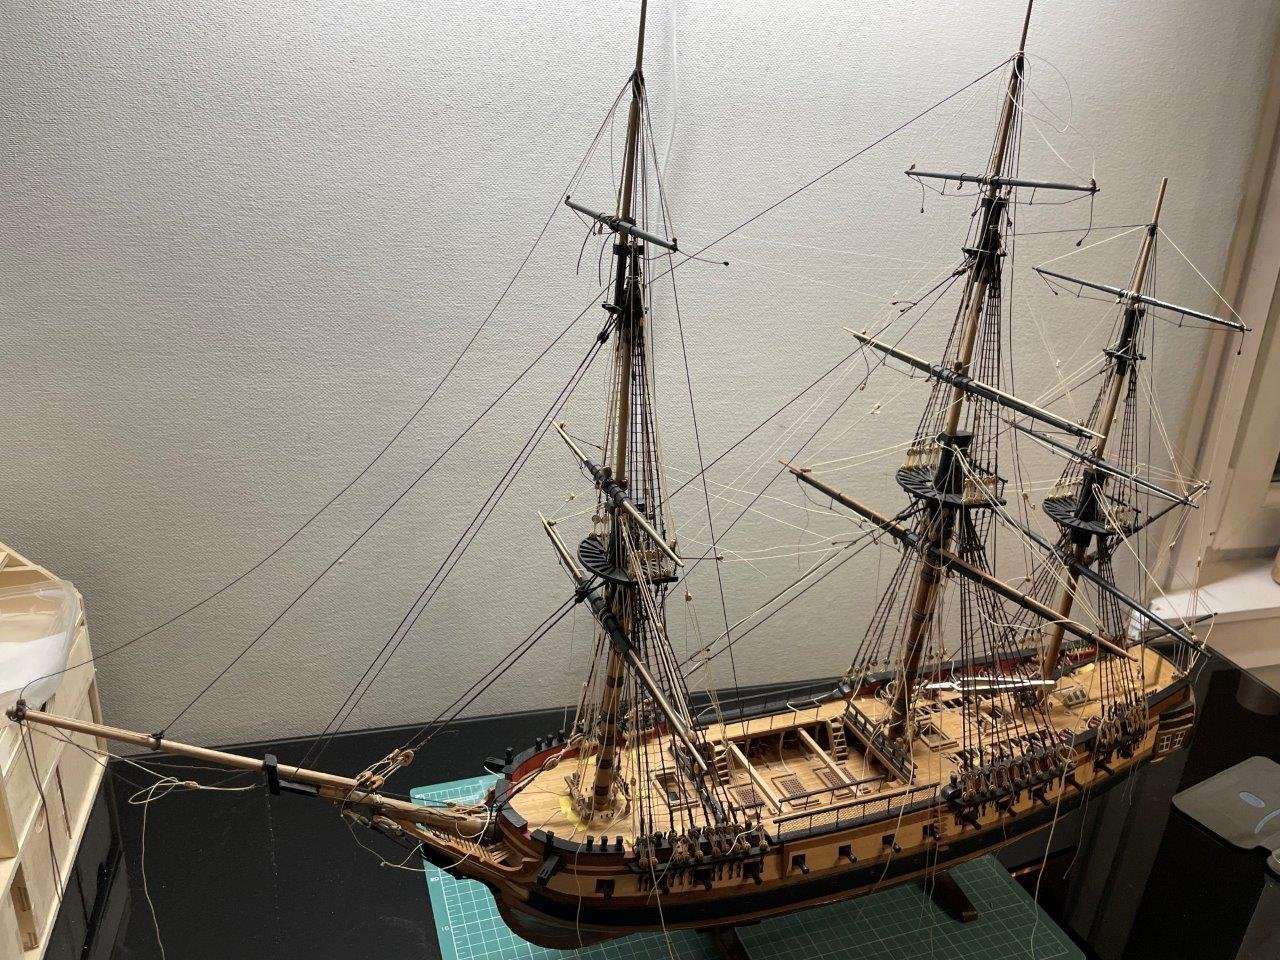
There is some belaying left, a week of work in my pace, then I move to the bow section.
- GrandpaPhil, ccoyle, Gregory and 6 others
-
9
-
This is a very nice example
- mtaylor, thibaultron and Canute
-
3
-
I vote for the Corel Bellona. There are several build logs here you can check.
A nicely built model indeed.
- Canute and thibaultron
-
2
-
Occre kits have a simplified design, but don't cost a lot. Fittings usually are not in proper scale and the rigging plans are less than accurate.
If you are interested in the Endeavour, Caldercraft makes a much more accurate kit. That ship is not recommended to beginners at all though, the hull shape is pretty difficult to plank properly.
- Keith Black, Dave_E, mtaylor and 1 other
-
4
-
-
-
Hi Sonny, you did a great job on the model, I particularly like your work on the head and the shrouds. Very neat.
I build the same ship for a long time, it is interesting, mine is sold under the Occre Diana name, but the model itself seems exactly the same.
-
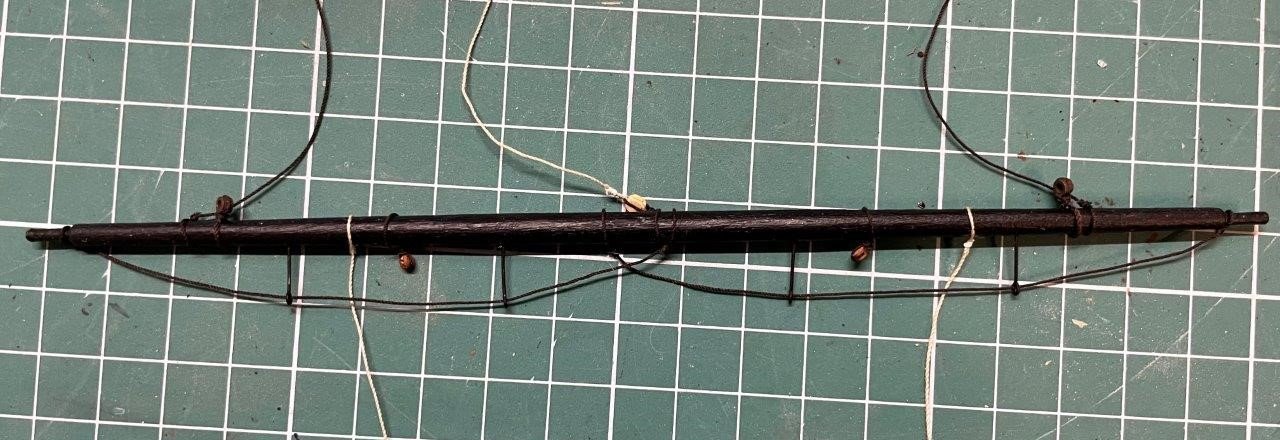
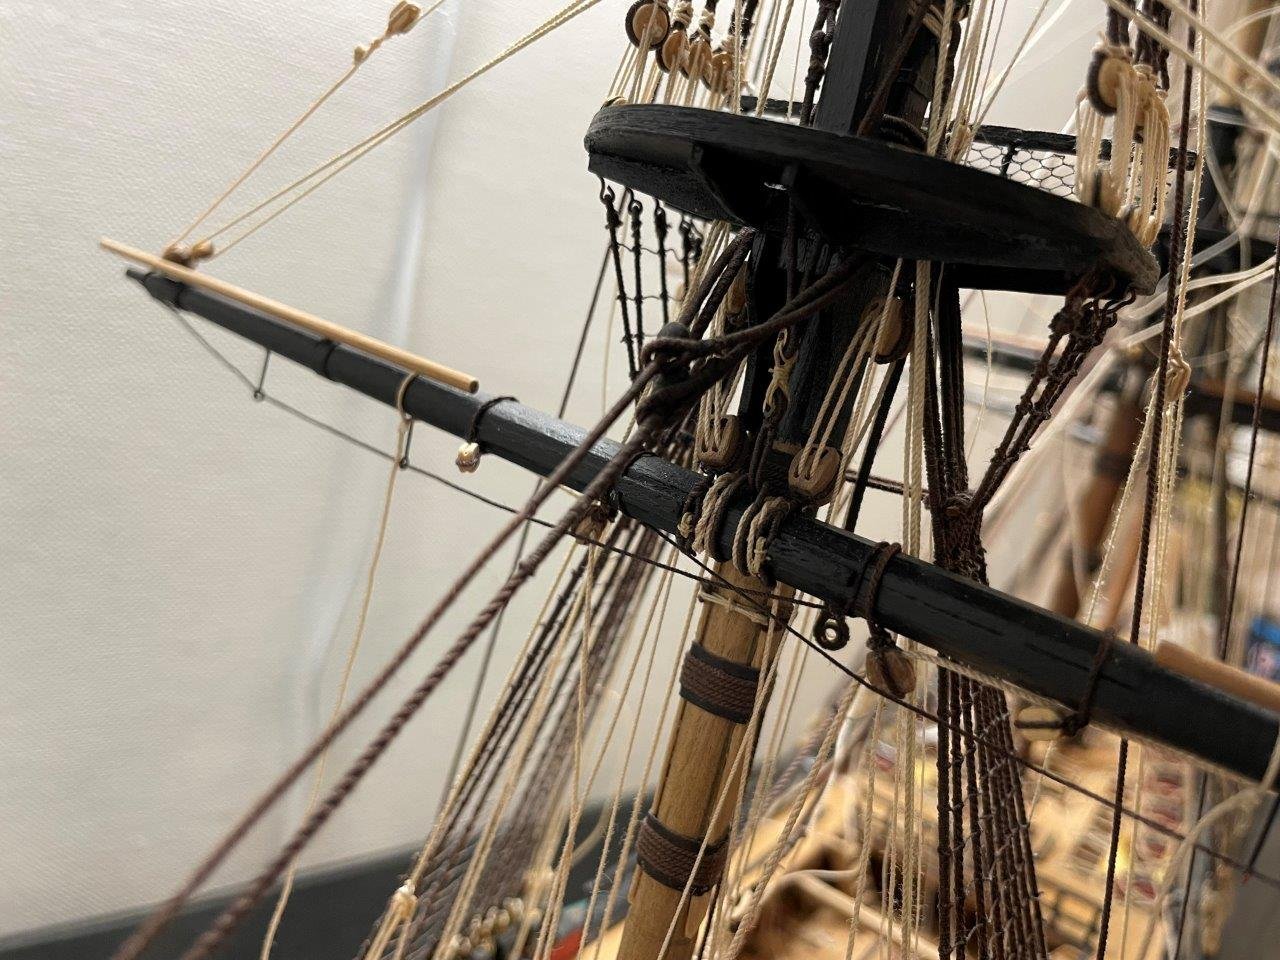
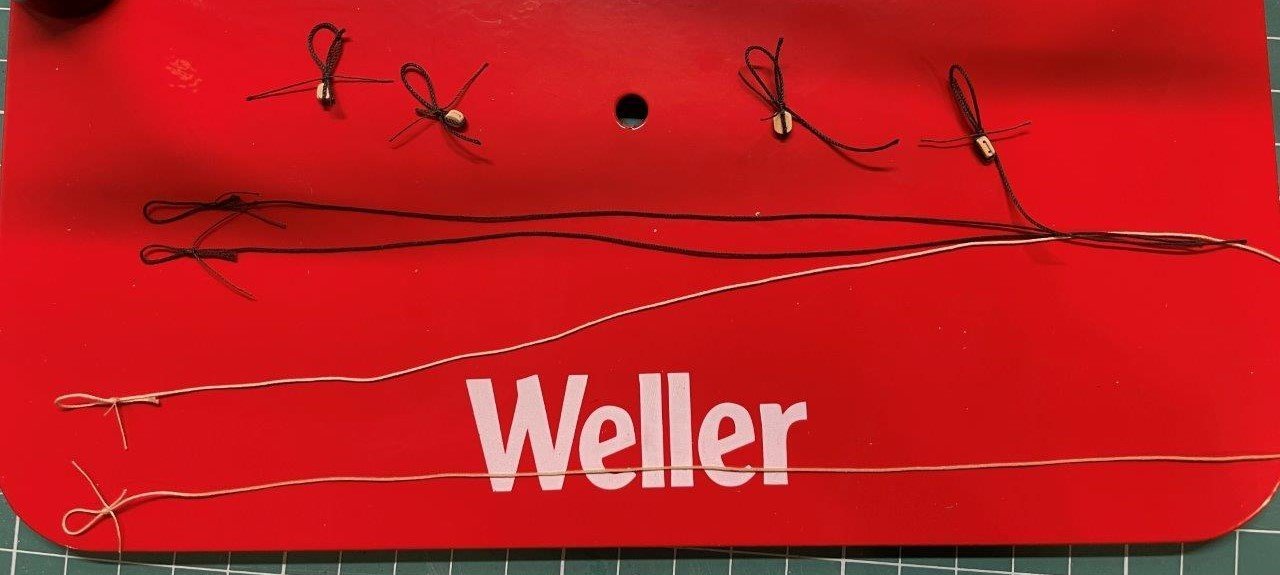
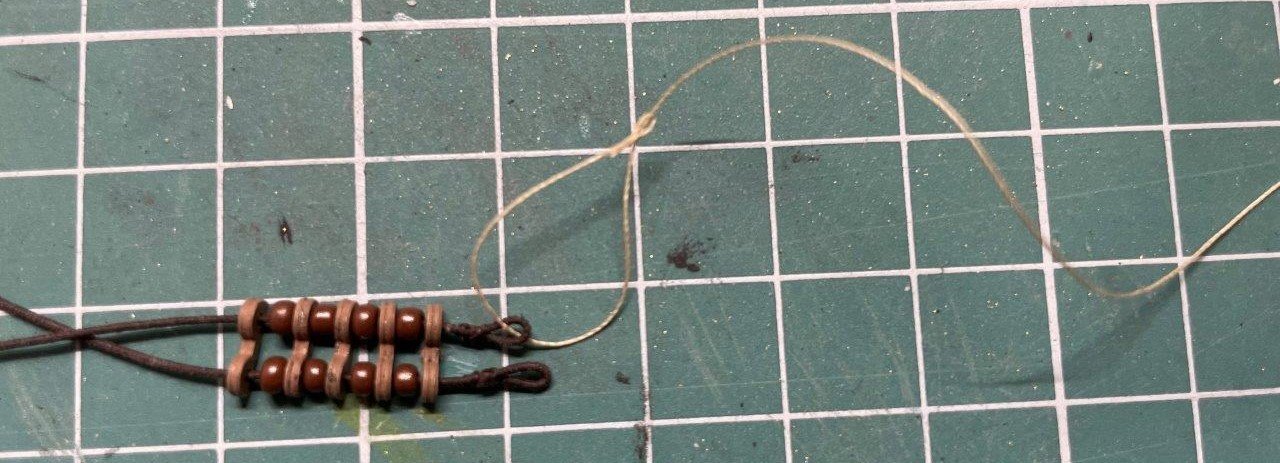
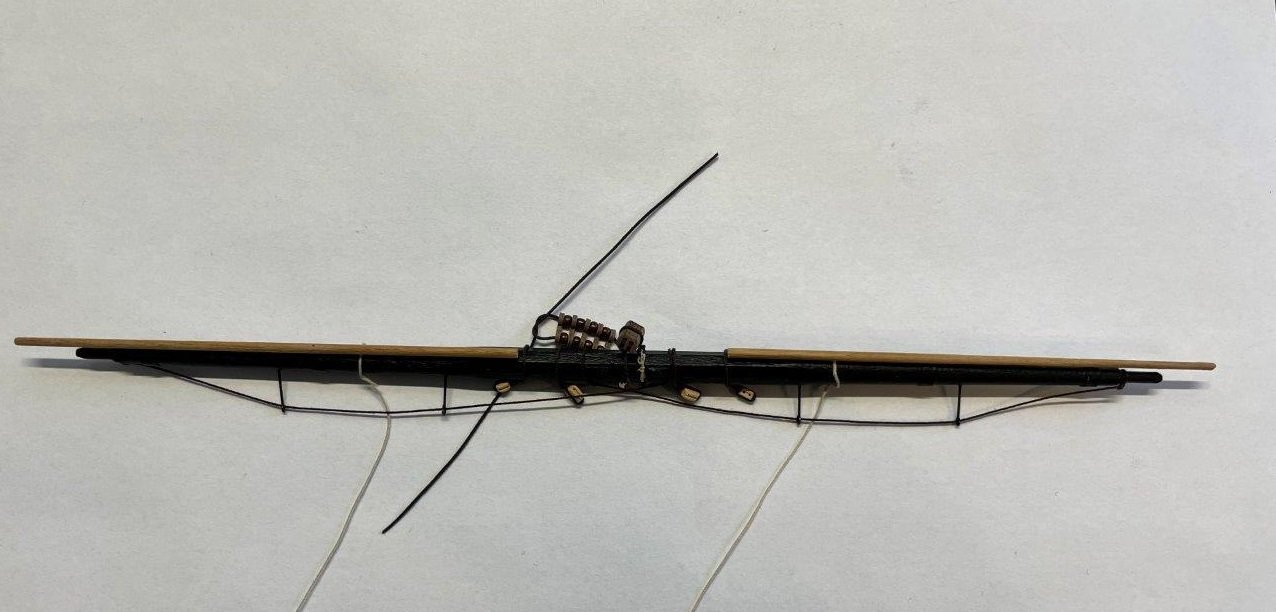
I try to improve the process of making yards. this is my current process making them.
I start with square stock, in this case 6mm for the main topsail yard. The most important step is to prime it with white before doing anything (they will be painted black later). This simple step vastly improved the octagonal shaping, now I can actually see what I do. The white background makes the marking clear, and provides good feedback how much wood to plane or carve away. The picture below shows the yard after shaping, the central white lines are remains of the primer.
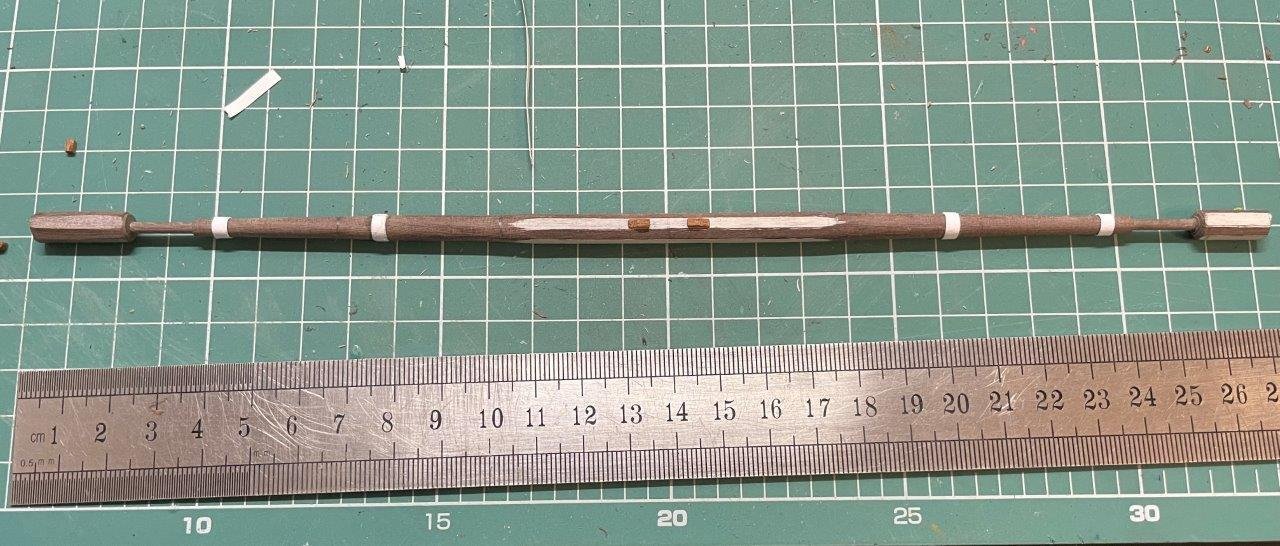
I intentionally leave the octagonal stems at the ends. These act as guides to define the centerline of the planes along the length, and with the help of a thread I can place the stirrups lined up properly (stirrups are copper eyelets in this case, as I failed several times to make proper thread versions with uniform length and having them straight).
Then I make the blocks to add, this tool is a new acquisition after not finding Quadhands locally, but basically the same and works great.
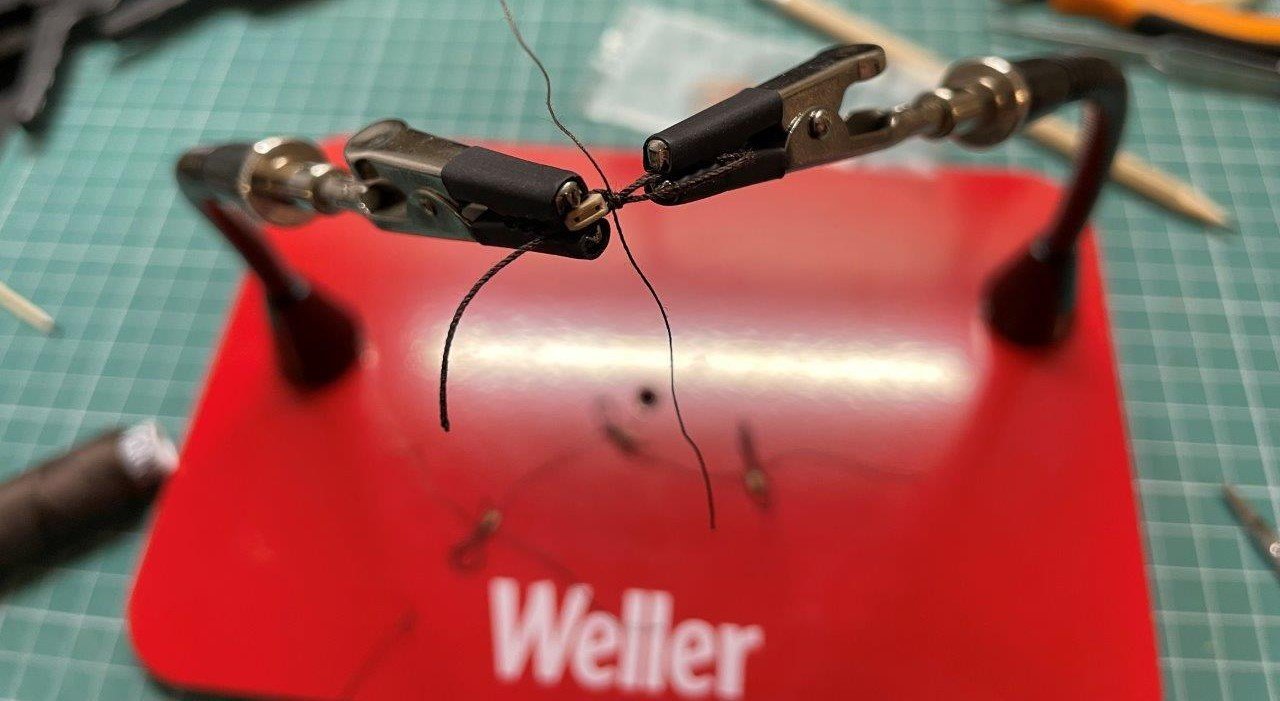
The required blocks and lines (blocks for the topgallant sheets, clueline blocks, footropes and cluelines). I pull the eyes tight after placing them on the yard and fix with diluted glue.
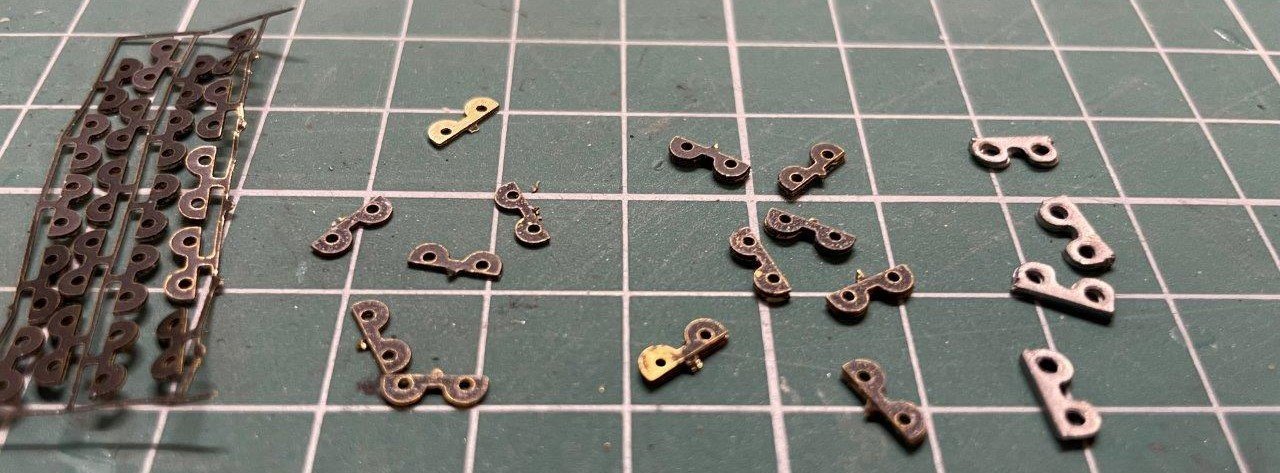
The parrels are made next. I ordered Caldercraft etched parrel ribs in the hope of being more scale (ie smaller) than kit provided ones, but actually they are the same size. They have a cleaner look though so I used them, but made them thicker by gluing them in pairs, as the etched part looked pretty thin. I had the same experience with beads, what I bought in a hobby store was the same size than the kit ones (€0,5 for ~300 of them) , but at least I was able to select similar sized ones.
Ethced ribs, paired ones and kit supplied parts:
After painting them, I made the parrel with served lines, eyes in the end and a lashing attached. This matches my sources, but the use of served line proved to be a mistake as the thickness made the installation around the mast very difficult due to their stiffness (despite having them wet).
Finally cut the stems, painted and varnished the yard and added the fittings. The stunsail boom irons are simulated by paper strips and held in place by brass wire. They are placed 45' forward on the top.
- ccoyle and ObviousNewbie
-
2
-
no need to sorry, that ebay picture is crap indeed. Scaledecks is a respected upgrade for plastic models though, maybe the pictures on the site scaledecks.com provides a better view.
-
they are still not individual planks, but scaledecks offers uncut sheets with small scale plank deatils: https://www.ebay.com/itm/122505736091?_ul=IN
- Canute, mtaylor and Keith Black
-
3
-
-
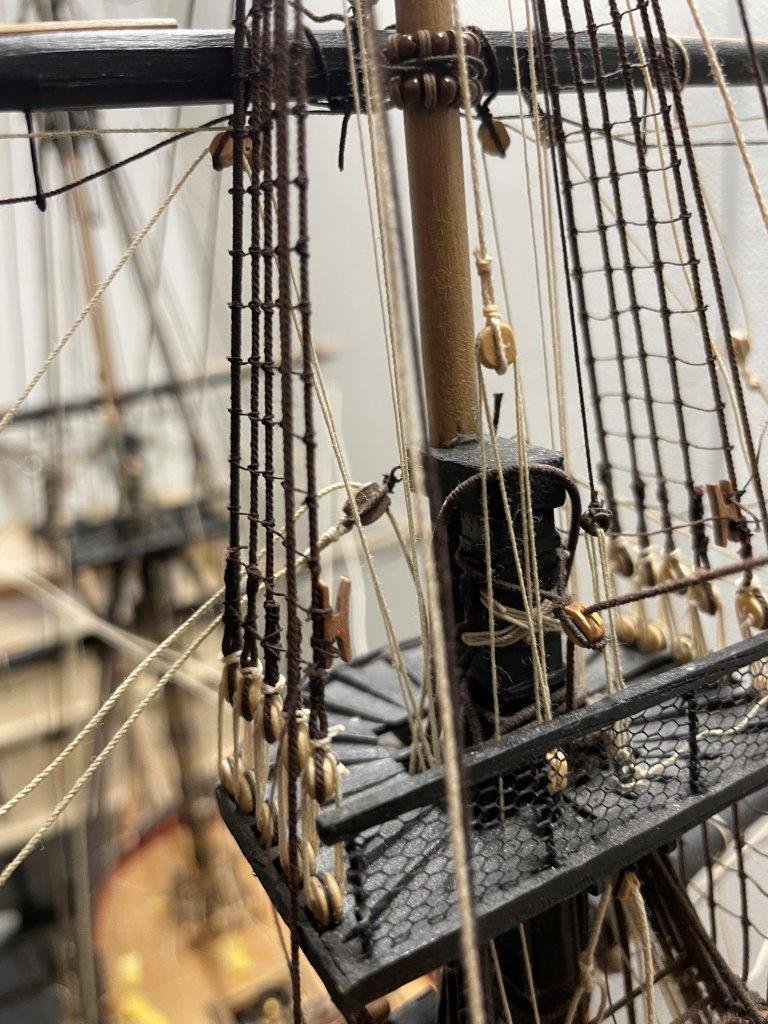
yard making continues, I'm getting faster with them. here is the finished main yard, with all fittings installed. The setup for the stunsail booms are probably wrong for the era, sources indicate the iron should attach to the end of the yard, but I already made the yards for the mizzen by the kit plans and decided to go for consistency.
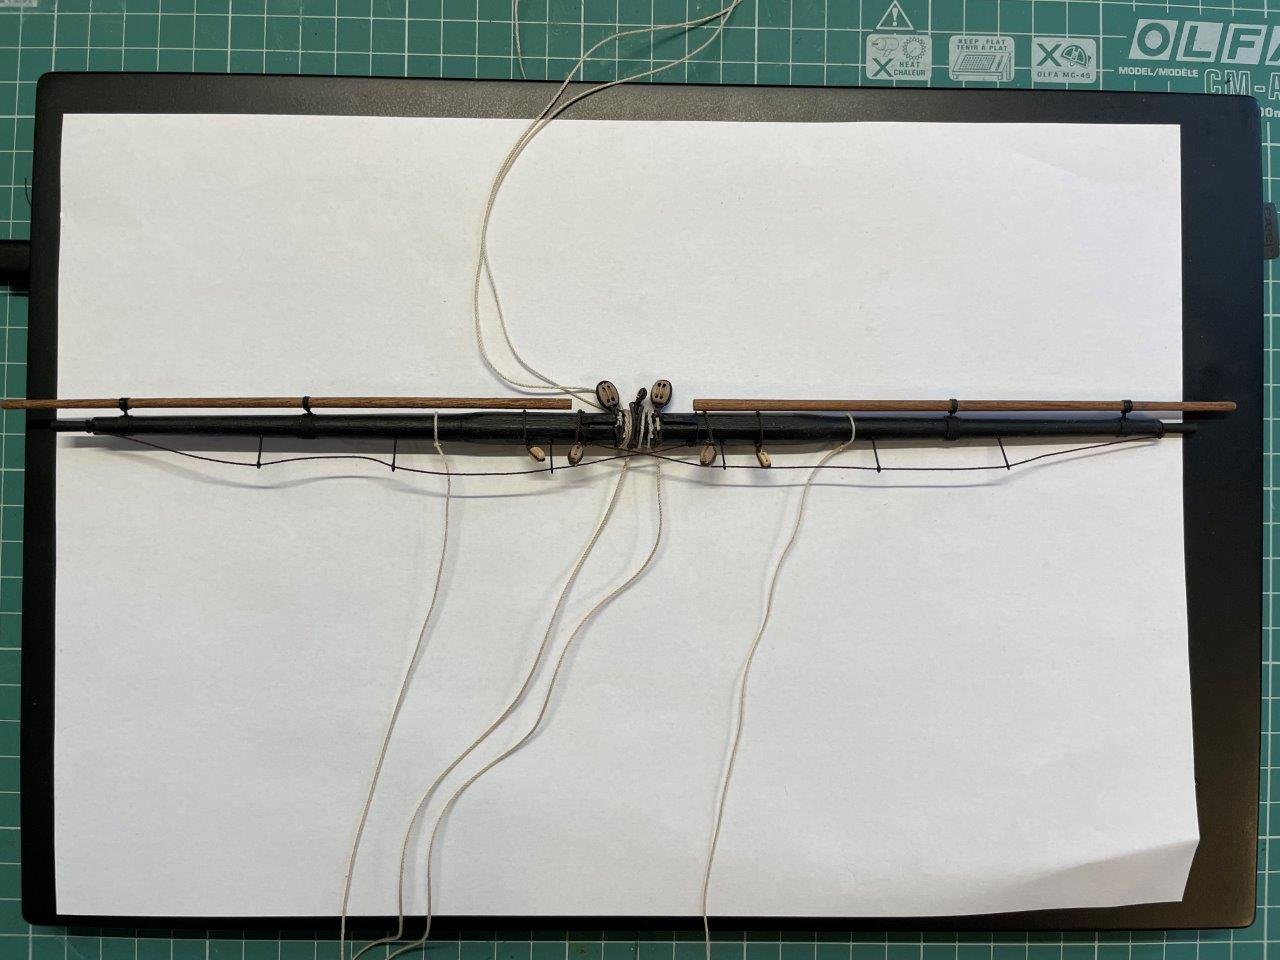
there are several lines in the middle: jeer blocks, held together by a lashing (I still have to figure out, how to make acceptable lashings), jeers, truss pendants and the sling.
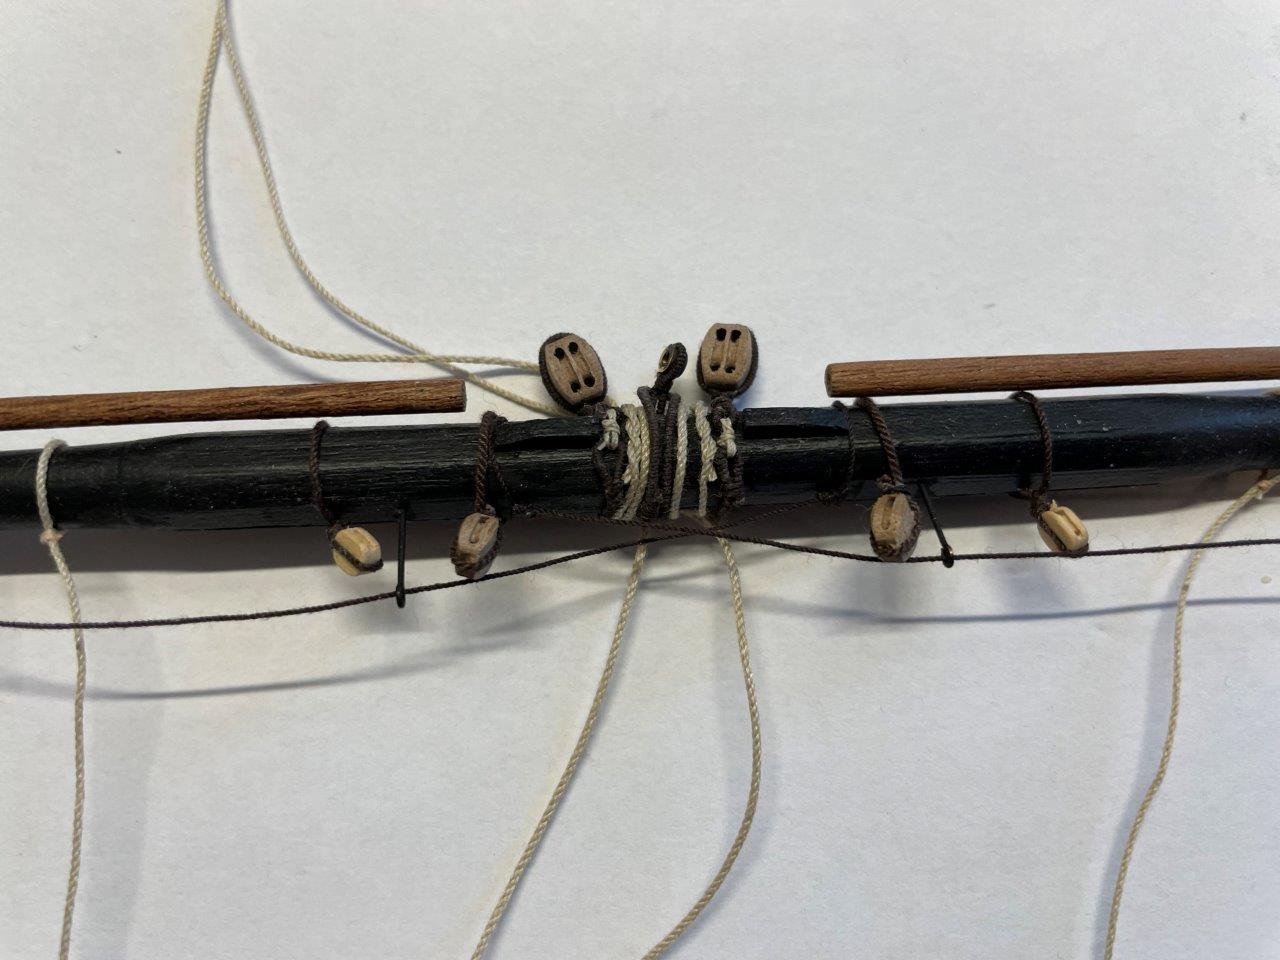
some plans show the jeers are tied to the blocks, but Peterson shows them attached to the yards, woven over themselves. I found it nice looking and chose to do this way.
-
your work is a joy to follow. the painted transom makes the model really unique.
as you use acrylics for your paint job, especially mixing them, a wet palette might be for your help. it can be as simple as a wet dish rag with a parchment paper on top, but keeps the paint from drying for hours and really a great aid for mixing. I learnt this by painting my son's (12) board game figures last year. there is a great deal of info from more competent painters than me on youtube, for example this one.
-
poor Diana was neglected for most of last year, but recently started to work again, as I really want to finish it and move on. this build will celebrate the 15th birthday this year. A major dusting was due, also had to examine the model and my notes to plan for the next steps. Finally made some running rigging lines starting with the mizzen, which is now mostly finished. After a few weeks I got into practice again.
Currently work on the main yard, after spraying with black primer, the truss pendants are being test fitted. In the foreground the jeer blocks are being made.
The current stage of the build:
thanks for looking in.
- robdurant, ccoyle, GrandpaPhil and 2 others
-
5
-
Cornwell Model Boats sells Mantua castings.
They have the complete set for the Vasa : https://www.cornwallmodelboats.co.uk/acatalog/44705-Vasa-Casting-Set-44705.html#SID=88
You may contact them for individual pieces, if you don't need a set.
-
Hi Robert, the line you are referring is called a martingale, which counters the upwards pull of the stays, with the help of the dolphin striker, which is a device to increase the angle of the rope to amplify the downward pull. You took me over by your progress as I haven't rigged this lined yet. To be honest, I don't know what would be the current arrangement for the Diana, but a little research shows several options.
Petersson shows it is belayed besides the foot of the bowsprit after leading it through a block below the stay collars. While I try to follow this resource, for me it seems impractical given the different proportions of the Diana (and probably the shown example is a later period due to the double arrangement).
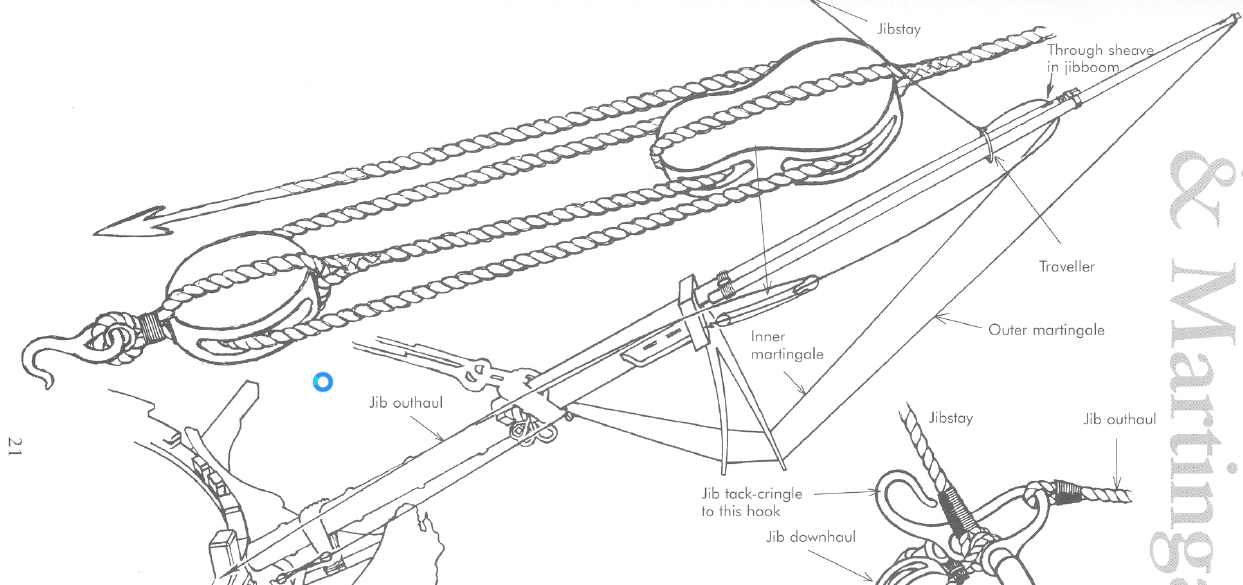
A well documented build of the Occre Diana exist in a Russian forum (here). On photo 13 the builder tied off the lines on the big timberhead just besides the cathead (if I see well). It seems to be a viable option.
The rigging manual of the Caldercraft Victory (available here) instructs, the martingale tied to the knighthead, similar to what the Russian builder did.
Another reference might be the Artesania Latina Surprise, with the manual available here. On page 67 the, line seems to be tied to an eye in the hull below the rails.
I hope this helps.
best,
David
-
On 4/5/2021 at 1:45 PM, ObviousNewbie said:
Question about rigging: Occre's rigging sequence starts with the shrouds and ratlines, and then moving on to stays. Somehow tension-wise that doesn't make sense. Thinking about making the stays, and then proceeding with the shrouds. Also, tension-wise I saw a number of build logs where the stays move forward, starting from the mizzen mast. That makes sense a swell. Any thoughts/comments on this?
rigging the shrouds before stays is the normal practice. If it is done otherwise, the loop of stays around the topmasts gets below the shrouds which would be incorrect, as they have to be over them.
I found it is not practical to finally tension the lines until a much later stage. The braces will pull the shrouds after you rig them, and have to adjust anyway.
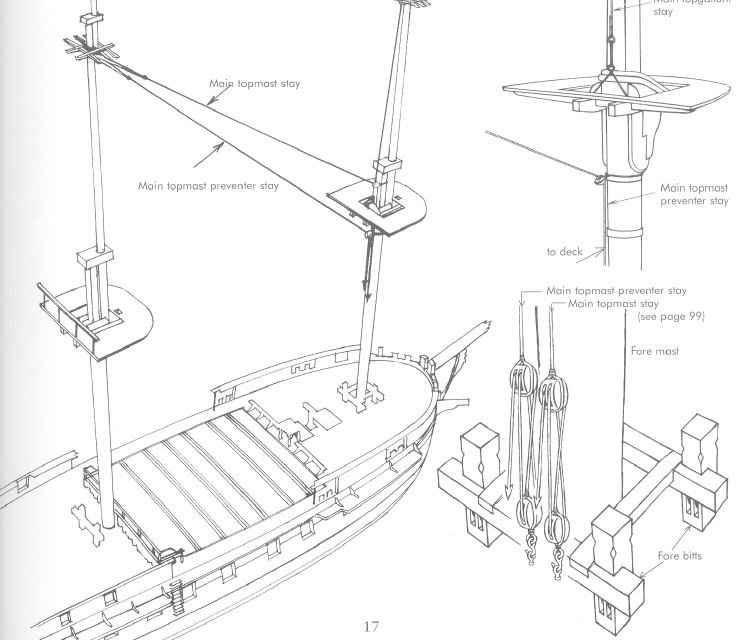
Also note, the Occre rigging plan show the stays tied off on the middle of the masts. In practice, the lines were belayed on the deck or the mas top as below, if you choose to to complicate your life further
")
- Baker and ObviousNewbie
-
2
-
-
that is some great sclupting, well done.
- mtaylor, catopower and DominichSteven
-
3
-
nice work, that's certainly a difficult bend.
you may consider styrene strip for such difficult parts, especially if the model is painted as yours.
another option is the "flexible beech" sold by Cornwall in several dimensions. That's a chemically treated wooden strip, and you can tie knots on them even dry, but after soaking can be formed to any shape, which is well retained when dried again.
-
part 198 is the sling, which holds the yard as a security measure. the loop is the bottom part of the sling (actually holding a thimble), which is clearly visible in the the front view. My build log have a picture of the sling in post 38. Be sure, you install them before the topmasts are glued into place.
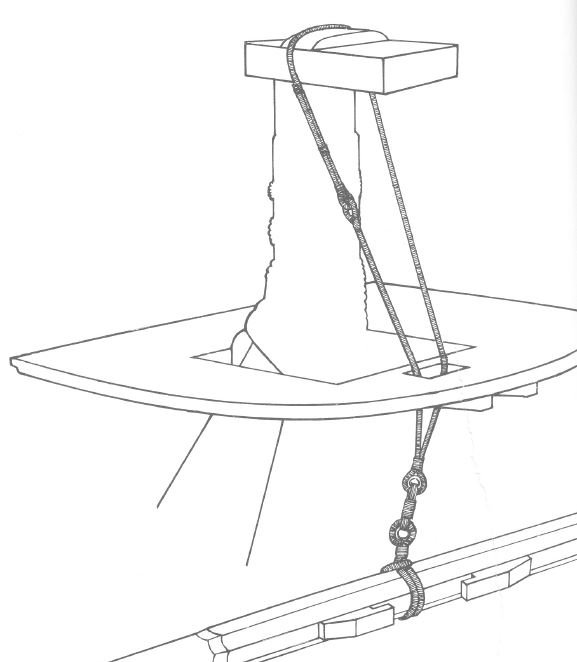
the blocks on the mast cap must be for the lifts, they are lines to lower/raise the yards. What makes me wonder, these blocks should be under the mast cap, and forward of the position shown. The lifts must clear the shrouds in front of them, and I see the proposed alignment would cross the shrouds between the ratlines.
- ObviousNewbie, mtaylor and allanyed
-
3

SANTISIMA TRINIDAD by Floyd-Rw - OcCre - 1/90
in - Kit build logs for subjects built from 1751 - 1800
Posted
Based on your work, you will have no issues with plank bending. Just dont forget to do some serious fairing of those front bulkheads.
good luck")