


Beef Wellington
-
Posts
2,245 -
Joined
-
Last visited
Reputation Activity
-

 Beef Wellington reacted to realworkingsailor in Canadian Pacific Wood Passenger Cars by Realworkingsailor - 1:87 - scratch-built & kit-bashed
As always, I can't thank everyone enough for the kind comments, helpful suggestions and likes!
Work is now complete on the window mullions (WHEW!). It was a slow and tedious process (I think I may have mentioned that before, sorry for the repetition), but it was well worth the effort.
Definitely a detail that, had I omitted them, would have nagged at me, and it saves me from having to make repeated (embarrassing?) explanations as to why I left these features out, if I ever take this car to a prototype modellers meet. Painting has now resumed with a second coat of primer, and this morning the car got it's first coat of tuscan red (photos to follow soon).
During the mullion interlude, I was also struggling with another detail that I had missed:
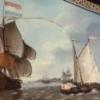
If you notice in the photo above of another prototype car (I'm fairly certain this is an official car), above the window just below the roof overhang of the adjacent car, there is a small valve and some pipework. This feature seems to be present on most (if not all) CPR wooden cars, but I couldn't find photos indicating on which end it was supposed to be located on my car. Until recently, so it was added in the appropriate place:
The valve itself is a brass casting meant for the drain valve of an air tank, but repurposed here, with some brass wire for the piping.
I'm not entirely sure what the function of this valve is. If it was a freight car, I might assume it was a retainer valve. In a KC or AB freight car braking system, a retainer valve slowed the release of air from the car's brakes when descending a hill. These valves allowed the brakes to release gradually while the trainline could be replenished from the locomotive(s), and helped to keep the train in control when descending steep hills. Brakemen working from both ends of the train would have to manually adjust each retainer valve prior to the train beginning it's descent.
In a UC passenger car braking system, this function was integrated into the UC control valve, and could be controlled automatically. This allowed passenger trains to operate without brakemen.
Anyway, regardless of function, the valve is in it's proper position.
Andy
-
.thumb.jpg.62d1d69fed1f32364417cb1f9cdeb009.jpg) Beef Wellington got a reaction from WalrusGuy in HMS Snake by Beef Wellington - FINISHED - Caldercraft - Scale 1: 64 - First wooden ship build
Beef Wellington got a reaction from WalrusGuy in HMS Snake by Beef Wellington - FINISHED - Caldercraft - Scale 1: 64 - First wooden ship build
The Mizzen has arisen:
I can see why build logs tend to neglect rigging relegating it to a bit of a dark art - its so hard to reach a point where one can step back and say 'done' because nothing quite seems to get finished before its necessary to do something else before its too late. Anyway, the mizzen rigging is now essentially complete. This area proved to one of the more challenging so far 'learning the ropes', but also just because of the increased fiddliness factor and decreased access. The plans also proved more challenging in this area due to their either lack of clarity or incompleteness.
Before starting, this was my last chance to address some things that have been annoying me. The kit supplied ladders going to the stern platform just seemed too bulky, so these were ripped off and replaced with custom made items that just felt a little more to scale, and less visually obtrusive. These proved challenging to make in walnut due to the splinter factor, but necessary to avoid introducing a new wood. The ships wheel was also given some coats of a wash to try and make it a bit attractive from the flat brown colour I had used way back when I started (Pre-fix situation below):
Rigging could then proceed, planning ahead proved key due to the many elements that need to be fitted in a very tight space, especially below the tops (tye, parrels throat halliard etc). Petersson's Rigging Period Ship Models and Lever's Young Officers Sheet Anchor provide invaluable to bridge contradictions and lack of clarity in the plans. Items of note as follows:
Boom Sheets - went with single vs a double arrangement as illustrated on the plans as I couldn't find another example like this Gaff throat halliard - the positioning of the gaff is slightly different on each plan, I had to lower my original placement to allow for the two double 5mm blocks, luckily the pin hole was obscured Single boom horse - Common practice seems to have a knotted horses on either side of the boom. I just couldn't get this to look right and the image of a young schoolboy with rather large and unruly ears kept coming to mind....so in the end I just went with a single and it seems to do the trick other than to purists. Blocks for main topsail brace - One of the first blocks I had installed has to be removed, a double block on the mizzen for the main topsail braces as indicated on the plans. It was clear that this just wouldn't work with the crossjack and gaff in place as it needs to sit above the gaff. I elected to remove and replace with 2 single 5mm blocks with a longer clearance from the mast to avoid interfering with the various rigging elements in this space as illustrated in Petersson. These are held temporarily in place with sewing thread. Close up pictures of where things ended up that hopefully can assist others (errors are of course mine):
Finally, some overall shots...
-
 Beef Wellington got a reaction from Blue Ensign in Lady Eleanor by Blue Ensign - FINISHED - Vanguard Models - Scale 1:64
Great to see you start this, nice choice in subject matter.
-
 Beef Wellington got a reaction from KARAVOKIRIS in HMS Snake by Beef Wellington - FINISHED - Caldercraft - Scale 1: 64 - First wooden ship build
The Mizzen has arisen:
I can see why build logs tend to neglect rigging relegating it to a bit of a dark art - its so hard to reach a point where one can step back and say 'done' because nothing quite seems to get finished before its necessary to do something else before its too late. Anyway, the mizzen rigging is now essentially complete. This area proved to one of the more challenging so far 'learning the ropes', but also just because of the increased fiddliness factor and decreased access. The plans also proved more challenging in this area due to their either lack of clarity or incompleteness.
Before starting, this was my last chance to address some things that have been annoying me. The kit supplied ladders going to the stern platform just seemed too bulky, so these were ripped off and replaced with custom made items that just felt a little more to scale, and less visually obtrusive. These proved challenging to make in walnut due to the splinter factor, but necessary to avoid introducing a new wood. The ships wheel was also given some coats of a wash to try and make it a bit attractive from the flat brown colour I had used way back when I started (Pre-fix situation below):
Rigging could then proceed, planning ahead proved key due to the many elements that need to be fitted in a very tight space, especially below the tops (tye, parrels throat halliard etc). Petersson's Rigging Period Ship Models and Lever's Young Officers Sheet Anchor provide invaluable to bridge contradictions and lack of clarity in the plans. Items of note as follows:
Boom Sheets - went with single vs a double arrangement as illustrated on the plans as I couldn't find another example like this Gaff throat halliard - the positioning of the gaff is slightly different on each plan, I had to lower my original placement to allow for the two double 5mm blocks, luckily the pin hole was obscured Single boom horse - Common practice seems to have a knotted horses on either side of the boom. I just couldn't get this to look right and the image of a young schoolboy with rather large and unruly ears kept coming to mind....so in the end I just went with a single and it seems to do the trick other than to purists. Blocks for main topsail brace - One of the first blocks I had installed has to be removed, a double block on the mizzen for the main topsail braces as indicated on the plans. It was clear that this just wouldn't work with the crossjack and gaff in place as it needs to sit above the gaff. I elected to remove and replace with 2 single 5mm blocks with a longer clearance from the mast to avoid interfering with the various rigging elements in this space as illustrated in Petersson. These are held temporarily in place with sewing thread. Close up pictures of where things ended up that hopefully can assist others (errors are of course mine):
Finally, some overall shots...
-
 Beef Wellington got a reaction from toms10 in HMS Snake by Beef Wellington - FINISHED - Caldercraft - Scale 1: 64 - First wooden ship build
Greetings all,
Really is time I got back to finish Snake, time just flies, and incredible that my last update was July 2015! . Firstly, she's been staring at me from across the room and I can't avert my eyes any longer from embarrassment with her so neglected. Secondly, I feel I really need to finish her to be able to hold my head up on this forum by having actually completed something, and thirdly, there are some things I need to contemplate on 'Jason' and skills to hone before I move forward.
I'll be honest, it was a little bit of a challenge getting going again, there are many things about her that I'm not too happy with, but recognize that this is still a first build using kit supplied parts so just need to be happy with it. One trick I've found to reduce 'fuzzies' is simply to use a brush to stroke warm water onto the line. I've tried bees wax, but from my experience it just seemed to result in dandruff!
So what exactly has been done:
Rigging on the foremast has completed for now to include the sheets and clew-line Main mast yards are installed and similarly completed (some lines that belay outside of the line of the main shroud are being left for now to give more room to access the mizzen mast area) Much rework has been done in the completion of the above tasks, which certainly slowed progress, including: Re-rigging many of the horses in situ, trying to give them a little more 'slack' Definitely a case of 2 steps forward and 1 step back picking this back up. The dexterity needed to navigate around the increasingly catch prone pointy bits eluded me, and for every yard rigged it seemed I had to re-strop a block that slipped loose as a result of unwanted contact with a spar or line. Thankfully nothing wooden has broken. Putting a positive spin on this, it definitely required honing of skills - the most aggravating and challenging fix was probably the violin block for the fore mainyard lift (photo below). This was re-stropped in situ and required keeping the existing lines suitably taught and navigating around the existing rigging- despite some rather salty language, this was honestly a bit of a boost after recognizing that if that was possible, pretty much anything can be fixed. (Seizing black thread around black line against the black woodwork proved too much for the eye...)
Finally where things stand. I'm standing by the decision to rig starting with forward masts and moving aft, going from lower to upper. Suspect next up will be the spanker and gaff before installing the cross-jack.
-
 Beef Wellington got a reaction from p.hoek in HMS Snake by Beef Wellington - FINISHED - Caldercraft - Scale 1: 64 - First wooden ship build
The Mizzen has arisen:
I can see why build logs tend to neglect rigging relegating it to a bit of a dark art - its so hard to reach a point where one can step back and say 'done' because nothing quite seems to get finished before its necessary to do something else before its too late. Anyway, the mizzen rigging is now essentially complete. This area proved to one of the more challenging so far 'learning the ropes', but also just because of the increased fiddliness factor and decreased access. The plans also proved more challenging in this area due to their either lack of clarity or incompleteness.
Before starting, this was my last chance to address some things that have been annoying me. The kit supplied ladders going to the stern platform just seemed too bulky, so these were ripped off and replaced with custom made items that just felt a little more to scale, and less visually obtrusive. These proved challenging to make in walnut due to the splinter factor, but necessary to avoid introducing a new wood. The ships wheel was also given some coats of a wash to try and make it a bit attractive from the flat brown colour I had used way back when I started (Pre-fix situation below):
Rigging could then proceed, planning ahead proved key due to the many elements that need to be fitted in a very tight space, especially below the tops (tye, parrels throat halliard etc). Petersson's Rigging Period Ship Models and Lever's Young Officers Sheet Anchor provide invaluable to bridge contradictions and lack of clarity in the plans. Items of note as follows:
Boom Sheets - went with single vs a double arrangement as illustrated on the plans as I couldn't find another example like this Gaff throat halliard - the positioning of the gaff is slightly different on each plan, I had to lower my original placement to allow for the two double 5mm blocks, luckily the pin hole was obscured Single boom horse - Common practice seems to have a knotted horses on either side of the boom. I just couldn't get this to look right and the image of a young schoolboy with rather large and unruly ears kept coming to mind....so in the end I just went with a single and it seems to do the trick other than to purists. Blocks for main topsail brace - One of the first blocks I had installed has to be removed, a double block on the mizzen for the main topsail braces as indicated on the plans. It was clear that this just wouldn't work with the crossjack and gaff in place as it needs to sit above the gaff. I elected to remove and replace with 2 single 5mm blocks with a longer clearance from the mast to avoid interfering with the various rigging elements in this space as illustrated in Petersson. These are held temporarily in place with sewing thread. Close up pictures of where things ended up that hopefully can assist others (errors are of course mine):
Finally, some overall shots...
-
 Beef Wellington got a reaction from Barbossa in HMS Snake by Beef Wellington - FINISHED - Caldercraft - Scale 1: 64 - First wooden ship build
The Mizzen has arisen:
I can see why build logs tend to neglect rigging relegating it to a bit of a dark art - its so hard to reach a point where one can step back and say 'done' because nothing quite seems to get finished before its necessary to do something else before its too late. Anyway, the mizzen rigging is now essentially complete. This area proved to one of the more challenging so far 'learning the ropes', but also just because of the increased fiddliness factor and decreased access. The plans also proved more challenging in this area due to their either lack of clarity or incompleteness.
Before starting, this was my last chance to address some things that have been annoying me. The kit supplied ladders going to the stern platform just seemed too bulky, so these were ripped off and replaced with custom made items that just felt a little more to scale, and less visually obtrusive. These proved challenging to make in walnut due to the splinter factor, but necessary to avoid introducing a new wood. The ships wheel was also given some coats of a wash to try and make it a bit attractive from the flat brown colour I had used way back when I started (Pre-fix situation below):
Rigging could then proceed, planning ahead proved key due to the many elements that need to be fitted in a very tight space, especially below the tops (tye, parrels throat halliard etc). Petersson's Rigging Period Ship Models and Lever's Young Officers Sheet Anchor provide invaluable to bridge contradictions and lack of clarity in the plans. Items of note as follows:
Boom Sheets - went with single vs a double arrangement as illustrated on the plans as I couldn't find another example like this Gaff throat halliard - the positioning of the gaff is slightly different on each plan, I had to lower my original placement to allow for the two double 5mm blocks, luckily the pin hole was obscured Single boom horse - Common practice seems to have a knotted horses on either side of the boom. I just couldn't get this to look right and the image of a young schoolboy with rather large and unruly ears kept coming to mind....so in the end I just went with a single and it seems to do the trick other than to purists. Blocks for main topsail brace - One of the first blocks I had installed has to be removed, a double block on the mizzen for the main topsail braces as indicated on the plans. It was clear that this just wouldn't work with the crossjack and gaff in place as it needs to sit above the gaff. I elected to remove and replace with 2 single 5mm blocks with a longer clearance from the mast to avoid interfering with the various rigging elements in this space as illustrated in Petersson. These are held temporarily in place with sewing thread. Close up pictures of where things ended up that hopefully can assist others (errors are of course mine):
Finally, some overall shots...
-
 Beef Wellington got a reaction from HIPEXEC in HMS Snake by Beef Wellington - FINISHED - Caldercraft - Scale 1: 64 - First wooden ship build
The Mizzen has arisen:
I can see why build logs tend to neglect rigging relegating it to a bit of a dark art - its so hard to reach a point where one can step back and say 'done' because nothing quite seems to get finished before its necessary to do something else before its too late. Anyway, the mizzen rigging is now essentially complete. This area proved to one of the more challenging so far 'learning the ropes', but also just because of the increased fiddliness factor and decreased access. The plans also proved more challenging in this area due to their either lack of clarity or incompleteness.
Before starting, this was my last chance to address some things that have been annoying me. The kit supplied ladders going to the stern platform just seemed too bulky, so these were ripped off and replaced with custom made items that just felt a little more to scale, and less visually obtrusive. These proved challenging to make in walnut due to the splinter factor, but necessary to avoid introducing a new wood. The ships wheel was also given some coats of a wash to try and make it a bit attractive from the flat brown colour I had used way back when I started (Pre-fix situation below):
Rigging could then proceed, planning ahead proved key due to the many elements that need to be fitted in a very tight space, especially below the tops (tye, parrels throat halliard etc). Petersson's Rigging Period Ship Models and Lever's Young Officers Sheet Anchor provide invaluable to bridge contradictions and lack of clarity in the plans. Items of note as follows:
Boom Sheets - went with single vs a double arrangement as illustrated on the plans as I couldn't find another example like this Gaff throat halliard - the positioning of the gaff is slightly different on each plan, I had to lower my original placement to allow for the two double 5mm blocks, luckily the pin hole was obscured Single boom horse - Common practice seems to have a knotted horses on either side of the boom. I just couldn't get this to look right and the image of a young schoolboy with rather large and unruly ears kept coming to mind....so in the end I just went with a single and it seems to do the trick other than to purists. Blocks for main topsail brace - One of the first blocks I had installed has to be removed, a double block on the mizzen for the main topsail braces as indicated on the plans. It was clear that this just wouldn't work with the crossjack and gaff in place as it needs to sit above the gaff. I elected to remove and replace with 2 single 5mm blocks with a longer clearance from the mast to avoid interfering with the various rigging elements in this space as illustrated in Petersson. These are held temporarily in place with sewing thread. Close up pictures of where things ended up that hopefully can assist others (errors are of course mine):
Finally, some overall shots...
-
 Beef Wellington got a reaction from Vladimir_Wairoa in HMS Snake by Beef Wellington - FINISHED - Caldercraft - Scale 1: 64 - First wooden ship build
The Mizzen has arisen:
I can see why build logs tend to neglect rigging relegating it to a bit of a dark art - its so hard to reach a point where one can step back and say 'done' because nothing quite seems to get finished before its necessary to do something else before its too late. Anyway, the mizzen rigging is now essentially complete. This area proved to one of the more challenging so far 'learning the ropes', but also just because of the increased fiddliness factor and decreased access. The plans also proved more challenging in this area due to their either lack of clarity or incompleteness.
Before starting, this was my last chance to address some things that have been annoying me. The kit supplied ladders going to the stern platform just seemed too bulky, so these were ripped off and replaced with custom made items that just felt a little more to scale, and less visually obtrusive. These proved challenging to make in walnut due to the splinter factor, but necessary to avoid introducing a new wood. The ships wheel was also given some coats of a wash to try and make it a bit attractive from the flat brown colour I had used way back when I started (Pre-fix situation below):
Rigging could then proceed, planning ahead proved key due to the many elements that need to be fitted in a very tight space, especially below the tops (tye, parrels throat halliard etc). Petersson's Rigging Period Ship Models and Lever's Young Officers Sheet Anchor provide invaluable to bridge contradictions and lack of clarity in the plans. Items of note as follows:
Boom Sheets - went with single vs a double arrangement as illustrated on the plans as I couldn't find another example like this Gaff throat halliard - the positioning of the gaff is slightly different on each plan, I had to lower my original placement to allow for the two double 5mm blocks, luckily the pin hole was obscured Single boom horse - Common practice seems to have a knotted horses on either side of the boom. I just couldn't get this to look right and the image of a young schoolboy with rather large and unruly ears kept coming to mind....so in the end I just went with a single and it seems to do the trick other than to purists. Blocks for main topsail brace - One of the first blocks I had installed has to be removed, a double block on the mizzen for the main topsail braces as indicated on the plans. It was clear that this just wouldn't work with the crossjack and gaff in place as it needs to sit above the gaff. I elected to remove and replace with 2 single 5mm blocks with a longer clearance from the mast to avoid interfering with the various rigging elements in this space as illustrated in Petersson. These are held temporarily in place with sewing thread. Close up pictures of where things ended up that hopefully can assist others (errors are of course mine):
Finally, some overall shots...
-
 Beef Wellington got a reaction from CaptainSteve in Queen Anne Style Royal Barge c1700 by Beef Wellington - Syren Ship Model Company - 1:24
Glad to have you follow along Jean-Paul, I very much enjoyed reading through your QAB log, a model to aspire to.
Frame Installation:
Additional work done on the keel was some final shaping of the stern post, finishing of the keel taper, installation of the transom, and a coat of wipe on poly for protection. One thing I have noticed with cherry is the grain can cause optical illusions. In a couple of places I know the surface is as smooth as I can make it, but the grain makes it appear quite course still.
I had been working on making up the frames for some time, for many this simply requires to a frame foot to be glued to its corresponding futtock after cleaning off some areas of laser char. Pretty simple as each has its own guideline which is well explained in the instructions. The grooves on the assembly board needed to be filed out a little to allow the frames to be inserted, primarily due to the thickness of the wood and the slight angle introduced by the laser cutter.
I think this is good opportunity to share an observation about the kit. It is definitely a well thought out design with very clear instructions, however, that does not mean that some experience is not required as I was soon to find out....I'm sharing my experience below because every other build log of this kit seems to go together without a hitch, so a little humbling that I found this so problematic.
First Attempt:
First off, the assembled frames were inserted and the keel glued according to the instructions making sure that frames aligned well beforehand and that the bottom of the frame floor were at the right height to sit in the keel, and best effort to keep this in a straight line as well as by eyeball trying to keep what will be the top of the frames smoothly aligned. Everything seemed to work fine, and once the glue had had sufficient time to set, I started to fair the frames. This is when a first inkling of problems started, I noticed that some of the frames were moving in their slots, and upon further investigation some the frames were not really secured solidly to the keel. Although the planking will definitely add to the strength, I wasn't convinced the frames would be rigid enough to allow planks to be installed. Given the construction method, its not possible to remove and re-glue a single frame, so the isopropyl alcohol was brought out to remove all the frames....
Second Attempt:
Upon analysis two things became clear. I hadn't used enough glue in the joints, and that my judgement of what 'play' was needed for the frames in the build board was wrong (the instructions say that these shouldn't be too tight or too loose), but it was really only trying to go through the process of fairing that indicated what this should be. Some tape was added as suggested in the instructions to more rigidly seat these, and the process to align and glue repeated (using more glue this time around). Unfortunately, in the final stages of seating everything, I somehow placed too much pressure on frame G and the result was that the frame foot broke in two places, and the small tabs on one side of the futtock popped prematurely (these are weak by design to allow easier removal at a later stage). The isopropyl alcohol was brought out once more to remove all the frames........I don't have any photos of this, honestly I was too despondent to record it...
Third (and so far final attempt):
After examining the break, the cherry had broken with the grain and looked like it could be repaired. These are delicate pieces, but I don't think will be subject to much stress once the planks are on. The breaks were located on each side of the foot where there is a small dark element of grain, and can just be seen in photos below. The small tabs on the futtock were also given a tiny spot of glue, and to hopefully provide a little more strength a splint was glued to the central section to absorb some of the shearing forces that will be unavoidable while fairing the frames (this is NOT glued to the actual futtock itself).
So far, things seem to be back on track, and work has resumed on fairing the frames which is where things sit currently.
-
 Beef Wellington got a reaction from Sjors in HMS Snake by Beef Wellington - FINISHED - Caldercraft - Scale 1: 64 - First wooden ship build
The Mizzen has arisen:
I can see why build logs tend to neglect rigging relegating it to a bit of a dark art - its so hard to reach a point where one can step back and say 'done' because nothing quite seems to get finished before its necessary to do something else before its too late. Anyway, the mizzen rigging is now essentially complete. This area proved to one of the more challenging so far 'learning the ropes', but also just because of the increased fiddliness factor and decreased access. The plans also proved more challenging in this area due to their either lack of clarity or incompleteness.
Before starting, this was my last chance to address some things that have been annoying me. The kit supplied ladders going to the stern platform just seemed too bulky, so these were ripped off and replaced with custom made items that just felt a little more to scale, and less visually obtrusive. These proved challenging to make in walnut due to the splinter factor, but necessary to avoid introducing a new wood. The ships wheel was also given some coats of a wash to try and make it a bit attractive from the flat brown colour I had used way back when I started (Pre-fix situation below):
Rigging could then proceed, planning ahead proved key due to the many elements that need to be fitted in a very tight space, especially below the tops (tye, parrels throat halliard etc). Petersson's Rigging Period Ship Models and Lever's Young Officers Sheet Anchor provide invaluable to bridge contradictions and lack of clarity in the plans. Items of note as follows:
Boom Sheets - went with single vs a double arrangement as illustrated on the plans as I couldn't find another example like this Gaff throat halliard - the positioning of the gaff is slightly different on each plan, I had to lower my original placement to allow for the two double 5mm blocks, luckily the pin hole was obscured Single boom horse - Common practice seems to have a knotted horses on either side of the boom. I just couldn't get this to look right and the image of a young schoolboy with rather large and unruly ears kept coming to mind....so in the end I just went with a single and it seems to do the trick other than to purists. Blocks for main topsail brace - One of the first blocks I had installed has to be removed, a double block on the mizzen for the main topsail braces as indicated on the plans. It was clear that this just wouldn't work with the crossjack and gaff in place as it needs to sit above the gaff. I elected to remove and replace with 2 single 5mm blocks with a longer clearance from the mast to avoid interfering with the various rigging elements in this space as illustrated in Petersson. These are held temporarily in place with sewing thread. Close up pictures of where things ended up that hopefully can assist others (errors are of course mine):
Finally, some overall shots...
-
 Beef Wellington got a reaction from chris watton in HMS Snake by Beef Wellington - FINISHED - Caldercraft - Scale 1: 64 - First wooden ship build
The Mizzen has arisen:
I can see why build logs tend to neglect rigging relegating it to a bit of a dark art - its so hard to reach a point where one can step back and say 'done' because nothing quite seems to get finished before its necessary to do something else before its too late. Anyway, the mizzen rigging is now essentially complete. This area proved to one of the more challenging so far 'learning the ropes', but also just because of the increased fiddliness factor and decreased access. The plans also proved more challenging in this area due to their either lack of clarity or incompleteness.
Before starting, this was my last chance to address some things that have been annoying me. The kit supplied ladders going to the stern platform just seemed too bulky, so these were ripped off and replaced with custom made items that just felt a little more to scale, and less visually obtrusive. These proved challenging to make in walnut due to the splinter factor, but necessary to avoid introducing a new wood. The ships wheel was also given some coats of a wash to try and make it a bit attractive from the flat brown colour I had used way back when I started (Pre-fix situation below):
Rigging could then proceed, planning ahead proved key due to the many elements that need to be fitted in a very tight space, especially below the tops (tye, parrels throat halliard etc). Petersson's Rigging Period Ship Models and Lever's Young Officers Sheet Anchor provide invaluable to bridge contradictions and lack of clarity in the plans. Items of note as follows:
Boom Sheets - went with single vs a double arrangement as illustrated on the plans as I couldn't find another example like this Gaff throat halliard - the positioning of the gaff is slightly different on each plan, I had to lower my original placement to allow for the two double 5mm blocks, luckily the pin hole was obscured Single boom horse - Common practice seems to have a knotted horses on either side of the boom. I just couldn't get this to look right and the image of a young schoolboy with rather large and unruly ears kept coming to mind....so in the end I just went with a single and it seems to do the trick other than to purists. Blocks for main topsail brace - One of the first blocks I had installed has to be removed, a double block on the mizzen for the main topsail braces as indicated on the plans. It was clear that this just wouldn't work with the crossjack and gaff in place as it needs to sit above the gaff. I elected to remove and replace with 2 single 5mm blocks with a longer clearance from the mast to avoid interfering with the various rigging elements in this space as illustrated in Petersson. These are held temporarily in place with sewing thread. Close up pictures of where things ended up that hopefully can assist others (errors are of course mine):
Finally, some overall shots...
-
 Beef Wellington got a reaction from Ronald-V in HMS Snake by Beef Wellington - FINISHED - Caldercraft - Scale 1: 64 - First wooden ship build
The Mizzen has arisen:
I can see why build logs tend to neglect rigging relegating it to a bit of a dark art - its so hard to reach a point where one can step back and say 'done' because nothing quite seems to get finished before its necessary to do something else before its too late. Anyway, the mizzen rigging is now essentially complete. This area proved to one of the more challenging so far 'learning the ropes', but also just because of the increased fiddliness factor and decreased access. The plans also proved more challenging in this area due to their either lack of clarity or incompleteness.
Before starting, this was my last chance to address some things that have been annoying me. The kit supplied ladders going to the stern platform just seemed too bulky, so these were ripped off and replaced with custom made items that just felt a little more to scale, and less visually obtrusive. These proved challenging to make in walnut due to the splinter factor, but necessary to avoid introducing a new wood. The ships wheel was also given some coats of a wash to try and make it a bit attractive from the flat brown colour I had used way back when I started (Pre-fix situation below):
Rigging could then proceed, planning ahead proved key due to the many elements that need to be fitted in a very tight space, especially below the tops (tye, parrels throat halliard etc). Petersson's Rigging Period Ship Models and Lever's Young Officers Sheet Anchor provide invaluable to bridge contradictions and lack of clarity in the plans. Items of note as follows:
Boom Sheets - went with single vs a double arrangement as illustrated on the plans as I couldn't find another example like this Gaff throat halliard - the positioning of the gaff is slightly different on each plan, I had to lower my original placement to allow for the two double 5mm blocks, luckily the pin hole was obscured Single boom horse - Common practice seems to have a knotted horses on either side of the boom. I just couldn't get this to look right and the image of a young schoolboy with rather large and unruly ears kept coming to mind....so in the end I just went with a single and it seems to do the trick other than to purists. Blocks for main topsail brace - One of the first blocks I had installed has to be removed, a double block on the mizzen for the main topsail braces as indicated on the plans. It was clear that this just wouldn't work with the crossjack and gaff in place as it needs to sit above the gaff. I elected to remove and replace with 2 single 5mm blocks with a longer clearance from the mast to avoid interfering with the various rigging elements in this space as illustrated in Petersson. These are held temporarily in place with sewing thread. Close up pictures of where things ended up that hopefully can assist others (errors are of course mine):
Finally, some overall shots...
-
 Beef Wellington got a reaction from Old Collingwood in HMS Diana by Shipyard sid - Caldercraft - 1/64 scale
Great start David, keep going! Don't think you'll experience too many challenges as long as you keep thinking ahead. I always wonder why people think coppering is an 'easy' option vs planking.
-
Beef Wellington got a reaction from Old Collingwood in HMS Diana by Shipyard sid - Caldercraft - 1/64 scale
You did a great job on that top and butt planking which really jumps out now, hope it stays visible with the guns in place. Good luck with the copper, remember its a marathon not a sprint 🙂
-
Beef Wellington got a reaction from Old Collingwood in HMS Diana by Shipyard sid - Caldercraft - 1/64 scale
Looking good David. I think you're at a nice stage where you can work on a number of things simultaneously, which can be nice to keep changing the pace, especially the all interior main deck fittings and cannons. One thing I'm sure you've read from all the other Diana builds is the challenge with getting appropriate alignment at the stern, and how this ties into the lines of the wale. I tend to start planning as soon as I can and leave final installation until as late as I can to avoid as many unexpected surprises as possible. That may allow you to make any fine adjustments needed to the placement of the wale which doesn't need to go on just yet. I'd also recommend figuring out the placement of the mid-ship beams which will require you cut into the lime planking and nice to get this out of the way without having to worry about damaging anything down the road.
-
Beef Wellington got a reaction from Blue Ensign in HMS Snake by Beef Wellington - FINISHED - Caldercraft - Scale 1: 64 - First wooden ship build
The Mizzen has arisen:
I can see why build logs tend to neglect rigging relegating it to a bit of a dark art - its so hard to reach a point where one can step back and say 'done' because nothing quite seems to get finished before its necessary to do something else before its too late. Anyway, the mizzen rigging is now essentially complete. This area proved to one of the more challenging so far 'learning the ropes', but also just because of the increased fiddliness factor and decreased access. The plans also proved more challenging in this area due to their either lack of clarity or incompleteness.
Before starting, this was my last chance to address some things that have been annoying me. The kit supplied ladders going to the stern platform just seemed too bulky, so these were ripped off and replaced with custom made items that just felt a little more to scale, and less visually obtrusive. These proved challenging to make in walnut due to the splinter factor, but necessary to avoid introducing a new wood. The ships wheel was also given some coats of a wash to try and make it a bit attractive from the flat brown colour I had used way back when I started (Pre-fix situation below):
Rigging could then proceed, planning ahead proved key due to the many elements that need to be fitted in a very tight space, especially below the tops (tye, parrels throat halliard etc). Petersson's Rigging Period Ship Models and Lever's Young Officers Sheet Anchor provide invaluable to bridge contradictions and lack of clarity in the plans. Items of note as follows:
Boom Sheets - went with single vs a double arrangement as illustrated on the plans as I couldn't find another example like this Gaff throat halliard - the positioning of the gaff is slightly different on each plan, I had to lower my original placement to allow for the two double 5mm blocks, luckily the pin hole was obscured Single boom horse - Common practice seems to have a knotted horses on either side of the boom. I just couldn't get this to look right and the image of a young schoolboy with rather large and unruly ears kept coming to mind....so in the end I just went with a single and it seems to do the trick other than to purists. Blocks for main topsail brace - One of the first blocks I had installed has to be removed, a double block on the mizzen for the main topsail braces as indicated on the plans. It was clear that this just wouldn't work with the crossjack and gaff in place as it needs to sit above the gaff. I elected to remove and replace with 2 single 5mm blocks with a longer clearance from the mast to avoid interfering with the various rigging elements in this space as illustrated in Petersson. These are held temporarily in place with sewing thread. Close up pictures of where things ended up that hopefully can assist others (errors are of course mine):
Finally, some overall shots...
-
Beef Wellington reacted to Mark P in HMS Bellona 1760 by SJSoane - Scale 1:64 - English 74-gun - as designed
Good Evening Mark;
Take a look at the pictures below, which come from Rob Napier's book about his repairs to the Princess Royal, published by Sea Watch books. This has a wealth of colour pictures of the internal features which are normally almost unseen.
These show some good views of the roundhouse on this model. The doors are much narrower, and parallel sided.
All the best,
Mark P
-
Beef Wellington reacted to SJSoane in HMS Bellona 1760 by SJSoane - Scale 1:64 - English 74-gun - as designed
Further evidence that the roundhouse has to be at the level of the platform; the side slopes in so far that access to it would disappear at the upper deck level. I am now showing the seat tucked around the corner, as in the last post. But interesting question as to how a door would be hung on the roundhouse. It would have to be hung on the inboard post, and would be a trapezoid (trapezium outside North America?) in shape. And I would think pretty annoying to try to get around it while squeezing into the opening.
OK, enough of this, back to planking!
-
Beef Wellington reacted to MEDDO in Queen Anne Barge by MEDDO - FINISHED - Syren - scale 1:24
So I have been able to get some of the painting done. It seems to have some out fairly well. Not sure how many coats but probably 12ish I think.
Moving on to the panels. Following picture is just a dry fit. these are really delicate and I am glad I have a few extras.
still need to the forward panel. With what is left over I think those will be 2 of the 4 panels in the middle fo the picture as they are slightly curved in an arc and should be able to be bent "just a bit" to fit the front curvature.
very glad for the few extras 'just in case'
-
Beef Wellington reacted to egkb in HM Schooner Ballahoo by egkb - FINISHED - Caldercraft - 1:64 Scale - First Proper Wood Build
++++++Latest .. Hot Off The Press ++++++
Schooner stay In Place.. Not fully Tightened Yet.. Next Up Probably The Fore stay.
Had a 'Moment' when I was checking the Blocks (Opening out the wee holes a little ) on the Fore Mast (I glued it a couple of days ago, Or So I Thought ) suffice to say the whole mast moved Ahhhhhhh ! So back to the Gluing and waiting, then some more waiting as the glue set, so I used the time to get the Schooner Stay ready.. Then this morning I rigged it and took this awful photo of it I will take better ones tomorrow when my nerves settle down from rigging it.. just kiddin.. 🙄😁 It didn't go too badly !
All The Best Folks
Eamonn
Oh, The Wee Man is there again for scale ..
-
 Beef Wellington got a reaction from DaveBaxt in Question on sealing hull before painting or applying copper plates, and paint finishes
I have attached copper plates directly to unfinished (other than sanded) wood without issue using higher viscosity CA. One consideration is that using plates invariably leaves very slight gaps (probably depending on skill level!) so having a 'similar' colour underneath helps minimize the visibility of these imperfections.
-
Beef Wellington reacted to Peterhudson in HMS Diana by Shipyard sid - Caldercraft - 1/64 scale
You are on the way! P
-
Beef Wellington reacted to Shipyard sid in HMS Diana by Shipyard sid - Caldercraft - 1/64 scale
greetings Peter
Yep !! The fitting of the plates is tedious, I have just ripped a few off this morning. I started fitting the Victory tiles working down from the waterline, and you can see I had no problem at all with them by the photos. As I said earlier I am fitting these from the keel upward, which appears to be the way to go, but the quality of the work is very poor. I will carry on working upwards and hope it improves, but if I am not happy I will rip them off and start again from the waterline. Your work continues to be excellent as always, well done. Hello Keith good to hear from you, how are you keeping ? Don’t rush with the dark room there’s plenty of time. Best regards DAVID. ( photos Victory coppering, others Diana coppering so far. )
-
Beef Wellington reacted to Peterhudson in HMS DIANA by Peterhudson - Caldercraft - 1:64 Scale
The next task was attaching the quarterdeck fittings. On the plans, the skylight and the bitts are very close the mast; almost touching. To check the alignment, I inserted the mizzen mast …..hhmmm! In the plans the mizzen mast does lie aft - presumably by design so that the mast takes the tension created by the force of the wind whilst transferring the force into the hull through he stays (all the masts lie slightly aft). The main mast and foremast nest neatly into the precut slots - the mizzen is very tight and doesn't drop into the slots easily, I ma sure I checked it when the gun deck was fitted, however something seems amiss and seems overly skewed...I think it should be close tot he vertical. Not sure what to do here. Any thoughts?
When in doubt, stop...do something else whilst mulling over things.
Peter