Captain Al
-
Posts
613 -
Joined
-
Last visited
Content Type
Profiles
Forums
Gallery
Events
Everything posted by Captain Al
-
I can find those kind of Gutterman rolls in my local hobby store (Joannes in case anyone else has that store) but they aren't marked with the size of the thread. Are your's? How do you tell a .8mm from a .5mm?
- 131 replies
-
- 6
-

-
- bottle
- the old man and the sea
- (and 1 more)
-
Avi, I have a question regarding the frames in the first several pictures. It appears that the frames are rabbitted (maybe the term is dado'd?) on their forward side. Can you tell me to what purpose those rabbits serve? I thought at first they were for stiffeners that fit between frames, but when I look closely I can only see this rabbit on the forward side of each frame, so there is nowhere for a stiffener to fit into on the next frame. I hope my question is understood.
-
Ahh....nowhere near the 120 feet I envisioned. A relatively small schooner. The 1:20 makes a great scale then. No bigger (as a model) then my Bounty at 1:48. I'll be watching and saving this log for future reference. Great work.
-
I'm totally enthralled with this build! I've been wanting to build a ship (any type really) in a real large scale (even 1:48 gives me fits sometime). I'm trying to figure out how long and wide your model will come out. I can't find the actual dimensions of La Jacinthe anywhere. I'm guessing it was about 120 feet long? So your model will be like 6 feet? Much like models I saw once on display on the Sydney Harbor quay. Great work so far.
-
As a relative newbie (working on my first model for 2.5 years now) I am putting out there suggestions that would hopefully bring more novices into the hobby and more importantly, keep them engaged in it. This hobby is not fun as it is set up today. I hate to say that, but it requires so many attributes (not skills) like patience, perseverance, and the ability to overcome obstacles, that young and old alike just do not have. I've found that when the build process is clear, I have fun doing it. When I know where I'm going next; why one step should proceed, not follow another, and I have the right tool available for the job, then the fun begins. But I would guess that I spend 3/4 of my time poring over plans, internet pictures, tutorials etc. to get me to where I'm comfortable taking the next step. Admittedly I started out with an advanced kit (A.L.'s Bounty), but I've read about lots of other novice to mid level builders who experience the same with far simpler kits. So, with that in mind, I will repeat what JerseyCityFrankie and Chuck A wrote a few pages earlier: There needs to be a logical 'curriculum' for entry level builders which will allow them to become familiar with terminology, basic ship structure, tools and materials. Each step in the way should increase the complexity of the build but each step should allow the builder to produce (with not alot of angst) a model he or she can be proud of. Included in this "course" must be far more explicit closeup photos of build as it progresses. A picture tells a thousand words but it takes forever to find the right picture on the internet. And instructions need to be accurate and (if a translation from Spanish is needed, it needs to be proofread or checked with someone who speaks English). Both of these suggestions would have allowed me to complete my Bounty at least a year ago and I would have gone on to spend more $$ in the industry. Instead I am still trying to figure out where the mizzen stay actually terminates, and have decided in advance that running rigging is far too complex for me. So it will be some time still before I look for my next model. I actually suggested to my friend and fellow Bounty builder (thomaslambo) that if I continue to build model ships, even after doing a pretty decent job of Bounty, that I intended to revert to a simple canoe and pretend it was my first model. Then I would proceed as ChuckA has suggested with increasingly more detailed models. So it would be a great help if some experienced hands (and mfrs) could offer such a planned approach.
-
My photography could be better, but here you are:

- 131 replies
-
- 7
-
-
- bottle
- the old man and the sea
- (and 1 more)
-
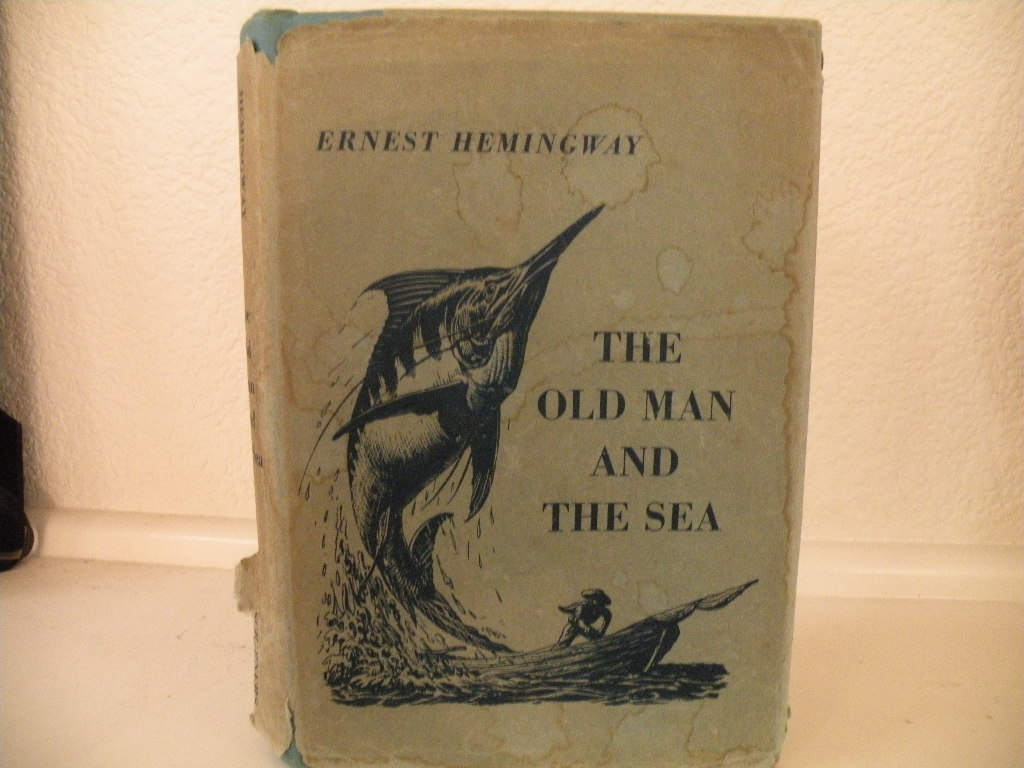
Just wanted to say thanks again for providing us with these images. You're extremely skilled and creative. To add, Old Man is one of my favorites all time and I have a first edition copy. A treasure.
- 131 replies
-
- 5
-
-
- bottle
- the old man and the sea
- (and 1 more)
-
Sorry for the typos Igor and for not being clear. I was referring to the end of the story where the Old Man brings in the sword fish and there is nothing left of it but its carcass, or bare bones. I thought the word for swordfish in Spanish was a "dorad." So I'm wondering if you will take the story to the conclusion in your diorama.
- 131 replies
-
- 5
-
-
- bottle
- the old man and the sea
- (and 1 more)
-
Good thought re. steel. I'll only use brass or maybe even just a stiff toothbrush. But what about the solvent idea? Does that have any place in the maintenance of files?
-
Wonder if there is a good solvent that would melt away resin and debris from the files? Acetone? Lacquer thinner?
-
Great replies everyone to my original post. I can see the point that a ordinary file card from Home Depot would have larger wire than the needle file would have groves. It would hardly penetrate to clean out debris. I've heard the same thing from various sources that once dulled, its time for a new set with these cheapos, but while they are sharp they're quite workable. I do keep mine separate. Those with no handles I stick into the holes of an old spice jar (I think it must have been for cloves or something cause the holes will fit the tangs), and for those that came with handles, they came in a plastic thingy and I just put them back into their slots. So at least on that score I'm covering myself. Question then remains how long have I had these and how much use have they gotten on what materials -- and therefore are they dull enough to discard or is it just the way I'm using them. One lesson I have learned and picked up from posts here is that I should probably maintain two sets of files; one for wood and another for metal (mostly brass). I've been unaware of which ones I use for which. Just pick the one that happens to be closer and has the right shape.
-
Hardly describes me, spyglass. I go in fits and starts regarding order. Every couple months I clean up the work shop and put things in there 'proper' place. Trouble is I think I'm finding better places for things so my organization changes. Then I forget where the tool or material or part has been stored. Takes more time to find things than if I'd left well enough alone. Do you ever, and if so how often, do you use a file brush? I don't own one so Ive never really cleaned any of my 2 sets of files. I'm going to invest in a brush and see if I can get better results from the files after cleaning. If not I may opt for something of greater quality than the Chinese sets for $12.
-
I'm so glad I tuned into this log. Thanks for making my day Igor. Will be following to the conclusion. I can't wait to see how you build the carcass if the dorad.
- 131 replies
-
- 4
-
-
- bottle
- the old man and the sea
- (and 1 more)
-
Thank you guys for the useful answers.
-
Razor saws and a mitre box are useful. Masking tape often can be used to hold down a piece that's being drilled. You usually want to hold the piece being drilled onto a backing piece so the drill bit doesn't punch out and mar the underside of the piece. Tape is quick and strong for this.
-
I keep seeing these terms but cannot really tell the difference. When I look at pictures the only thing that jumps out at me is tht the rifflers seem to have the curved tips while needle files are flat and straight. Is that the major difference? While I'm at it, are the typical files found in the hobby shops and on line (such as Micro Mark) the same as "jewelers" files? The files I have are about 1.5 - 2.0 mm thick. I would like to have some that are much thinner -- maybe like 1 mm thick (not wide, but thick). I'd like to be able to use the edge of a file this thick to file grooves. For example, the grooves or slots in channels that will fit a .8 or 1.0mm wire rod chain. Should I be looking for jewelers files? Most of the specs given for any file do not include the thickness of the file. As an alternative to a thin file like this I've glued two razor saws together to make the desired thickness (kerf if you will) and that worked pretty well.
-
I think what Mirabelle was referring to was fairing (beveling) the frames/bulkheads so the planks will sit flat on their full surface as they round the bow and stern. A very important part of the overall fairing process.
-
Thanks JT. I'll do that over my cafe latte.
-
Got it Duffer. And its pretty well worn by now. I just haven't come across anything in McKay that shed much light on these. Maybe the terminology is slightly different.
-
Thank you JB. This helps in my rigging plan for my HMS Bounty build.
-
Can anyone give me an idea of what the 'burton pendants' are used for? I've looked through two books on rigging and I see them hanging there, but they are always shown just hanging there loose with nothing further attached to them. Are they for the purpose of hoisting things off the deck? If so, would they be tied off when not in use? Hard to imagine these lines just swinging around on a rolling ship.
-
Good luck and happy building. If my experience (with the A.L. kit) is of any value, your leg will be healed long before the model is complete. Have a good time.
-
This is a little late; sorry. I took my measurements of the masts right down to the floor of the mast steps. In other words, yes, I included the squared off parts.
-
Hey LA, good work all around. Someone earlier noted you are your toughest critic. I agree. Nothing about your build looks like a first attempt. I hear you about losing enthusiasm after awhile -- in my case I've been on this same model for 2+ years now and am just getting into building the masts. I'm curious as to whether you not only decided to forego sails (I won't be putting mine on either), but if you've also reduced the rigging to pretty much the bare minimum. I'm no expert so I can't tell if you've done all standing rigging and not going to do running rigging (since no sails), or if there might be some of the standing rigging that you decided to pass on.
-
Cobr, I can tell you from way way long ago that there is no such instruction. You will probably just do what I and others did -- square off the bottom of the mast so it fits. I can remember scratching my head and wondering how strong a round peg in a square hole would be -- it would tend to twist -- until I realized just square the end and it'll fit snug.