

jhearl
-
Posts
355 -
Joined
-
Last visited
Content Type
Profiles
Forums
Gallery
Events
Posts posted by jhearl
-
-
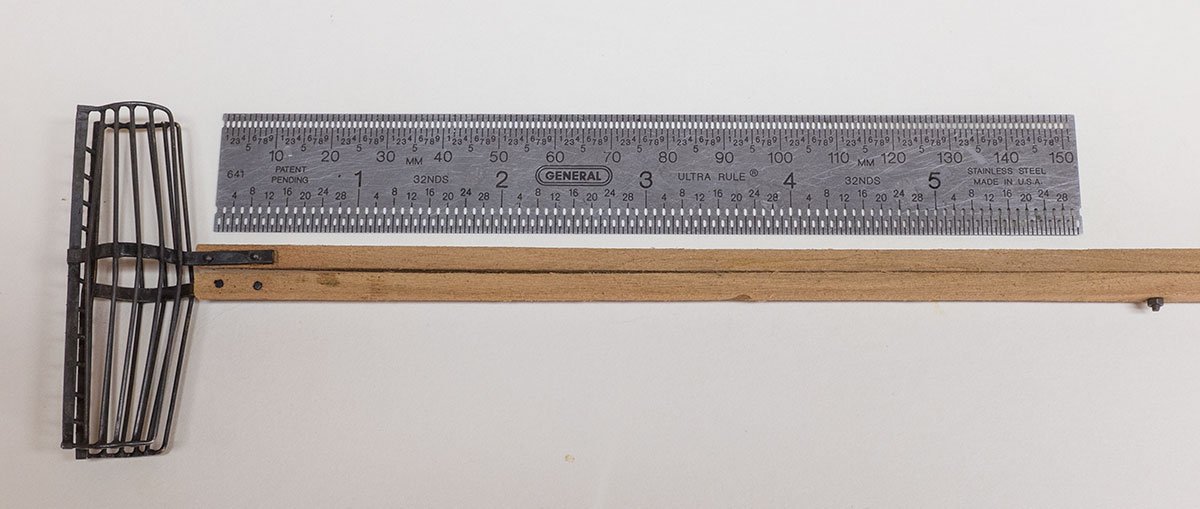
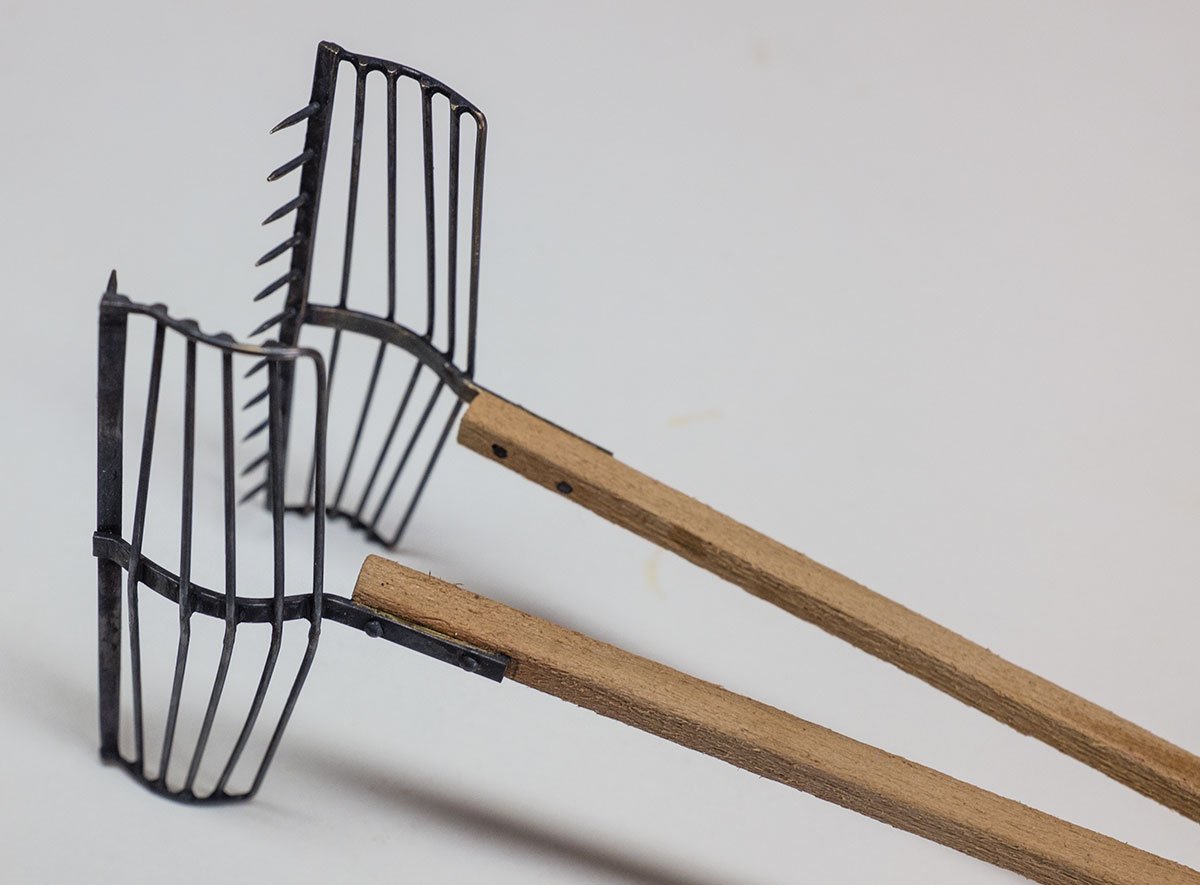
I've owned the resistance soldering unit you pictured for a long time. I don't use it for every soldering task, but for things where joints are very close together, it is an ideal solution. The oyster tongs pictured below are made entirely from brass with every joint soldered. I don't think it would be possible to do this with a standard soldering iron because the rods are so close together. It's a shame they are so very expensive, but I don't regret having spent the money.
My normal technique for something like this is to use a soft solder like Tix. I'll apply some flux to the joint, then lay a very small piece of solder in the flux. The flux helps to hold the solder next to the joint. The trickiest part is getting the points of the hand piece on the joint without knocking the solder off. It only takes a second or so for the solder to melt once you press the pedal and it's so quick, the heat is confined to the joint you're working on. Of course, the heavier the material, the longer it takes. The wires on the tongs are .032" so they're quite small.
Hope that helps -
John
-
-
-
I am currently building a model of a replica of the shallop that John Smith used to explore the Chesapeake Bay in 1607. The boat is 30 feet long. The replica the model is based on has a Danforth anchor in it, but I know that's incorrect. I don't have any knowledge of boats in the 17th century but I'm sure there are members who do. What kind of small anchor would be appropriate for that size boat in that period?
Thanks in advance -
John
-
-
I own the Sherline mill so I guess I'll weigh in with a few things to consider. Before I do, though, if you don't already own a metal lathe, I'd recommend making that your first purchase over a mill. You will use it FAR more often. That aside, the main thing to consider between the Sherline and a mini-mill is the size. I sometimes find the Sherline to be a bit small for some things I'd like to do. But I simply don't have room in my shop for a larger mill. The mini-mill offers more travel in all three axes than the Sherline and that could occasionally be useful. At the time I bought my mill, Sherline didn't offer larger and taller columns, but they do now, so that would be something to consider. On the other hand, the large mini-mills are MUCH heavier. The one Micromark sells weighs 110 pounds. There's no chance I could get that up on a cabinet by myself or even get it out of the box! As for power, I have not found any limitation with the Sherline. I'm not trying to hog out 1/4" deep cuts in steel with a half-inch cutter, of course. On the other hand, if I needed some deep cut in steel, I could do it with the Sherline - it just might take a little longer. For ship modeling, it's not likely you're going to need a lot of power and you're probably going to be cutting more brass and wood than you are steel.
One feature I like on the Sherline that I don't believe is available on the MM mill is the ability to rotate the headstock by 90 degrees. I'm not talking about rotating the column - just the headstock. When I make propellers, I use this feature to cut slots in the hub. There's probably a way to do that without rotating the headstock but it seems to me it would require a more difficult setup.
If you decide to go with Sherline, you might want to compare prices at Discount Campus - http://www.discountcampus.com/
I've bought all my Sherline equipment through them because they offer a better price. They are an authorized reseller and, in fact, the equipment winds up getting shipped directly from Sherline in any case.
Another thing to consider is adding the DRO option. I don't have it on my lathe and don't miss it, but I find it VERY useful on the mill. And, by all means, get it with one of the accessory packages. Also consider a rotary table. Very useful for things like steering wheels.
Bottom line, if I had it to do over again, I'd go with the Sherline with larger table and column.
Hope that helps some -
John
- dvm27, Landlubber Mike, Matrim and 5 others
-
 8
8
-
-
Since you are so close to the Eastern Shore, you might be interested in attending a one-day model show in Oxford, MD that will be on Saturday, Nov. 9th.
https://oxfordcc.org/model-boat-show/
There will be many very competent modelers there and you would probably enjoy talking with them. The show is free too!
Cheers -
John
-
There was an interesting discussion about parrels here:
Cheers -
John
-
I'll tell you how I go about attaching toe rails. I don't pre-bend them or paint them before installing. I start by placing the toe-rail stock at the stem. (You'll probably need to cut an angle on the stock so it fits properly.) While holding it in place with one hand, I drill hole, about an inch or so back from the stem through the toe rail and down into the deck. Then I insert a piece of stiff brass rod through the hole. Now, I move aft to the point where the toe rail needs to curve and repeat the above process. I continue doing that until I've gotten all the way to the stern. You don't need wire every inch or so - just at the points where the toe rail needs to curve.
Here's a picture of this that I did quickly on some scrap (just pretend it's on the edge of a deck):
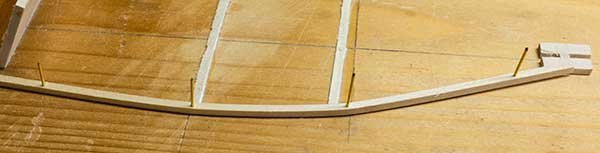
Note that I have NOT used any glue at this point! It's only the wire holding the toe rail in place. Next, you can carefully raise the toe rail up on the wires. This will give you some space to apply small drops of medium CA.
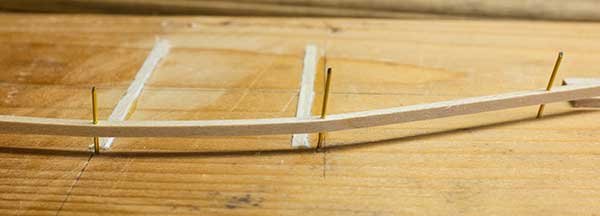
Push the toe rail back down on the deck and it will be glued in place. Rather than removing the brass wire, I cut it off as close as I can to the top of the toe rail, then sand it down flush. You can apply a small drop of thin CA right on the brass wire and that will anchor it in place. Once painted, the wire will pretty much be invisible.
Hope that helps.
John
- GrandpaPhil, Duanelaker, Jeffrey and 2 others
-
5
-
I may be wrong, but I believe Beadalon wire is plastic coated, which may or may not be suitable for your use. Since you're in Florida, you should have no trouble finding uncoated fishing wire since it's often used in salt-water fishing. Here's one online source - http://www.afwfishing.com/afw_products/Surfstrand_Leader_Wire_Uncoated_1x7.asp
Cheers -
John
-
OK - I have two questions:
1) How long do you need to keep the iron on the wood?
2) How long does the wood need to cool before you unclamp it?
OK - just thought of a 3rd question - if you're using a hair dryer, how long do you need to heat the wood?
Thanks -
John
-
Since this discussion has gone wildly off-track, I thought I'd answer the OP's original question about whether the bottoms of Latham or Smuggler were copper plated. The answer is no. They were painted with anti-fouling paint (which sometimes contained copper). If you plan on building either of these models, get yourself a copy of Howard Chapelle's book, The American Fishing Schooners. There are a couple of pages in the book about the paint schemes of the Gloucester fishing schooners.
Cheers -
John
-
Since your profile doesn't list where you are located, I don't know if you want to buy from a company in the US, but one reasonable source of small bits is Drills and Cutters.
https://drillsandcutters.com/surface-treated-drills-metric/
They will sell individual bits in any quantity you order although standard packaging is for 12 bits. Their quality is good and prices are reasonable. I've bought bits from Amazon and got some that were just horrible, so you're taking your chances with them.
Cheers -
John
- Canute, moreplovac and mtaylor
-
3
-
This is not such a difficult thing to do.
First, buy some 2mm diameter brass rod. One good source is Scale Hardware https://model-motorcars.myshopify.com/collections/the-metal-shop/products/9863-2mm-diameter-round-brass-rod
Cut off a short piece and chuck it in your Dremel. Mount the Dremel in a vise or some sort of holder so you can use both hands to hold a small file.
Use a triangular file to score the groove. (The groove really doesn't have to be semi-circular.)
Slice off a 1mm wide piece with a jeweler's saw. You will probably need to run the cut side over a file or some sandpaper to make it flat.
Center-punch the slice, clamp it in a vise (use some scrap wood to protect the edges of the groove) and drill the required size hole using your drill press.
Sheave number one, done. Well, your attempt at sheave number one will be done. It may take making several to get two that are good enough. But seriously, this just isn't that hard to do.
My two cents, anyway.
John
-
-
You might also want to see this review"
- Canute and thibaultron
-
2
-
-
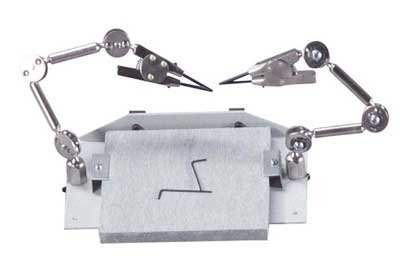
If you think you'll be doing a lot of soldering in your modeling career, you might want to consider a third-hand device like jewelers use. I bought one several years back and I use it a lot. They are quite expensive (about $150), but hugely superior to those cheap ones you see with alligator clips. It also makes a great general-purpose third hand for use when stropping blocks and many other purposes. I've never regretted buying mine. No question I'd be using it for something like this.
https://www.riogrande.com/product/grs-benchmate-double-third-hand-soldering-station/502042
- Ryland Craze, Canute, BETAQDAVE and 2 others
-
5
-
You might try Hobby Metal Kits - https://hobbymetalkits.com/t/cold-finished
They don't carry metric sizes but maybe you can find something useful. I've purchased brass and aluminum from them before and found them reliable.
Cheers -
John
-
Sacks and bales are pretty easy to make from real cloth. Bales are the easiest - fold the cloth around some suitable filler material, glue it together on the bottom of the bale, and tie some rope around it. Sacks are easily made on a sewing machine. Sew three sides with the machine, turn it inside-out, stuff the pocket with cotton puffs or rice or whatever makes sense, and sew the end shut by hand. Below are a couple of examples from boats I've built:
Hope that helps -
John
- mtaylor, thibaultron, Griphos and 13 others
-
16
-
I have not seen these blocks in person so I can't say how they compare to Syren blocks, but ME is selling some nice looking ones now.
https://modelexpo-online.com/Falkonet--F20B1--Single-Block-2mm-Pear-Wood--Pack-of-10-pcs_p_1921.html
Cheers -
John
-
I have had an 8050 for a couple of years now (in addition to other Dremels) and generally like it, but there are a couple of things I find annoying. First, when you turn it on, it always starts at the middle speed. If you want it to be slower or faster, you have to push the up or down buttons once you've turned it on. If you're in the middle of a job and you need to turn it off briefly, you have to reset the speed again when you turn it back on.
The other annoying feature is the light. Seems like it would be a beneficial thing, but if you're holding the tool such that the light is shining in your eyes, it can make it very difficult to see what you're working on. I wound up covering the light on mine with some tape.
I've never used a Dremel tool for 3-1/2 hours continuously so I can't say whether it would work that long. When I'm done using it, it just goes back in the charger and it's always charged up next time I need it.
Cheers -
John
- mtaylor, Captain Poison, Canute and 1 other
-
4
-

Help with soldering
in Metal Work, Soldering and Metal Fittings
Posted
American Beauty makes a tweezer-style hand piece that uses metal electrodes. Very expensive, unfortunately, but they don't break and allow you to get into very tight places. See an example here:
https://americanbeautytools.com/Resistance-Tweezer-Systems/99/features
Cheers -
John