


AON
-
Posts
2,874 -
Joined
-
Last visited
Content Type
Profiles
Forums
Gallery
Events
Everything posted by AON
-

finishing 1786 British main mast top (platform) deadeye shroud slots
AON replied to AON's topic in Masting, rigging and sails
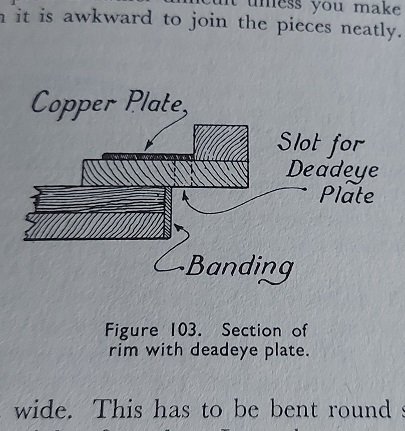
so people can see what I'm looking at My main mast top... below is The Anatomy of Nelson's Ships, pg 173, fig 103... below is The Masting and Rigging of English Ships of War, pg 23...

-
What slicer program are you using? Does it allow you to make adjustments to the settings? Not suggesting you should since everything is printing tickedy-boo right now, without errors (knock on wood)... just curious.
- 321 replies
-
- 3
-

-
- Finished
- Flower-class
- (and 1 more)
-
I believe the new RN aircraft carrier HMS Queen Elizabeth (1) was built that way also.
- 321 replies
-
- 5
-
-
- Finished
- Flower-class
- (and 1 more)
-
I can imagine the satisfaction of realising the fit while assembling these pieces. Can you please hurry up so I can see the whole thing! 😇 😁
- 321 replies
-
- 6
-
-

-
- Finished
- Flower-class
- (and 1 more)
-
finishing 1786 British main mast top (platform) deadeye shroud slots
AON replied to AON's topic in Masting, rigging and sails
But are they truly in balance? I've seen shrouds on cutters slack slightly on the leeside so can imagine deadeyes wearing a pocket in a wooden filler piece. The soft brass plate seems a good bearing or wear surface. Why would one source specify them in the larger ships and another suggest something was there? I wonder about these things 🤔 -
finishing 1786 British main mast top (platform) deadeye shroud slots
AON replied to AON's topic in Masting, rigging and sails
Thank you Druxey Yes that is correct. Yet The Anatomy of Nelson's Ships page 173, Figure 103 shows it as a copper deadeye plate with the slots for the deadeye through it. The write up (2nd paragraph from the bottom) reads as if it is two long plates at one per side. The Masting and Rigging of English Ships of War on page 23 shows for a 1st rate, 1745, a darkened "A" - "plate for the futtock shroud". The accompanying figure, 1794, 36 gun ship, shows no plate. Page 24, 1802 to 1815, no ship specified, shows "A" - "plate for the futtock shroud". and the accompanying figure for 1815 to 1833 shows "J" - "plate for the futtock shroud". There is no written description for it. Might I also point out Steels plate 2 shows 13 woolding hoops for the main mast, whereas plate 3 shows only 10 for the exact same mast. The written description calls up 6 bolts to connect the two halves of the main mast cap but the image on plate 2 shows 8 It is difficult to find sources that agree with each other, or even themselves! I am beginning to think I may need to "wing it". -
I am building a British 3rd rate MOW, launch date 1786, and am trying to represent her as launched. At this point I am working on my main mast top (platform) and am looking at the small details. I am confused by the fact many sources do not agree. Even Steels reads one thing, then presents images that do not agree with the written description or the other view! The Anatomy of Nelsons Ships does likewise. Can anyone tell me if there were in fact 1) individual copper plates, or 2) one long plate per side, or 3) no plates on the top at the slotted holes for the deadeye shrouds? Thank you. Alan
-
If there is a need to press the softened parts together to bond does this deform the edge creating a bulge that needs to be trimmed back? Thank you for this info as it will be very helpful to me.
- 321 replies
-
- 5
-
-
- Finished
- Flower-class
- (and 1 more)
-
Can anyone tell me if there were in fact 1) individual copper plates, or 2) one long plate per side, or 3) no plates on the top at the slotted holes for the deadeye shrouds?
-
Looking very impressive. How well do the white couplers fit? Have you tested the glue to a sample of the PLA?
- 321 replies
-
- 6
-
-
- Finished
- Flower-class
- (and 1 more)
-
Thank you Druxey. They are attached now. If they are found to be a pain to rig I will remove them as you've suggested. Mr. Beef W. I find my scale allows me the option to include quite a bit. And painting does hide more than just blemishes or errors. I am growing quite fond of being able to see the little details... hope I feel the same way next summer 😉
-
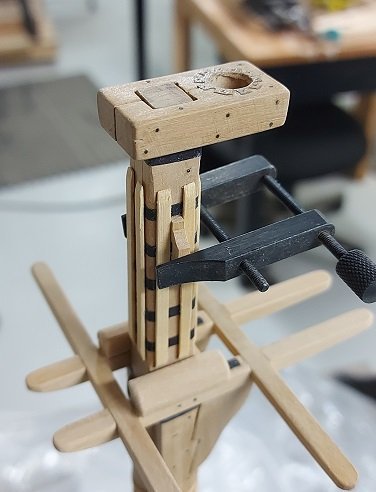
Today I worked on my CAP and the JEER CLEATS. I followed TFFM for the JEER CLEATS, made in three pieces, glued and shaped, assuring there will be adequate clearance to install each sling. If you look just forward of the BOLSTERS you will see a hint of the iron wear or bearing FID PLATE on the top of the TRESTLE TREE for the Top Mast Fid. I almost forgot these. I'll need to review the whole assembly to make sure I haven't forgotten anything else. There are plates on both of the two trees. The Fids were said to be Iron or Wood with holes at both ends so I envision them being secured to the mast with a single lanyard. I followed a number of sources to complete the CAP. The cap is made to look like two pieces bolted through the sides as described by Steels. The most time consuming part was fitting the chamfered or bevelled head into a chamfered or bevelled hole, but I managed! A nice snug fit. The LEATHER COAT was added to both the top and underside of the CAP at the Top Mast hole. The leather was simulated with natural brown shipping paper from Amazon, free with delivery... I keep a bit of everything! Nails were simulated with a soft sharp pencil. Once again everything looks better from a short distance. I have not made my four eye bolts and they will need to be blackened before being installed under the CAP. I have drilled the holes and added monofilament line in the top to simulate the ends of the Eye Bolts. I'm not quite sure when I should do the eye bolts as it might be easier to do them with the blocks that are suspended from them. Any suggestions from those who know!?! The CAP is not glued down. It will not be glued until the Top Mast is ready to be installed... quite some time from now.
-
Depending on how long and how your filament has been stored it my be brittle now so cannot be used. PLA should be kept dry, stored in a zip lock air tight bag, with the air sucked out, and a dessicant baggy in it to keep it dry. If the filament snaps when bending it over about 90° due to brittleness... being old... it is no good. I use a drinking straw to suck the air out while sealing the bag, then put it back in the box it came in.
- 321 replies
-
- 5
-
-
- Finished
- Flower-class
- (and 1 more)
-
Thank you Peter. As a novice myself I really appreciate connecting with other modelers to discover how others do stuff... and I am always happy to share.
-
There is no video demonstration. The link below is to our local club web page BLOG section for May 2019. John gave a live presentation and the blog (with a few photos) explains what he showed us. https://modelshipwrightsofniagara.weebly.com/monthly-meeting-blog/archives/05-2019
-
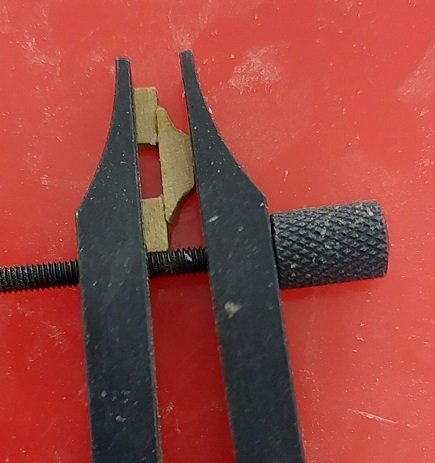
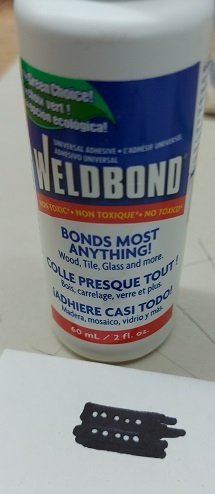
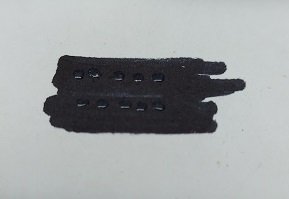
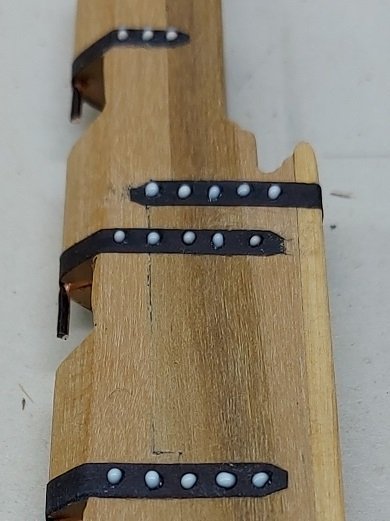
So here is the test with weld bond glue to simulate bolt heads with a thank you to John Cairns of our local Niagara Region club for demonstrating this technique to create shapes on small parts (i.e. insignia like a royal cypher on a gun barrel) Test wet and dry... Here it is on the rudder ... up close and personal. It looks much better from 12 inches away! Rudder wet and dry and full view. The great thing is I can wipe it off when wet and do it again, or when dry (hours or weeks later) I can easily add to it.
-
and to continue... Main Caps Length = 4 x the diameter of the Top Mast plus 3" Breadth = 2 x the diameter of the Top Mast plus 2" Depth = 4/9 x the Breadth Fore Caps Length = 4 x the diameter of the Top Mast plus 2" Breadth = 2 x the diameter of the Top Mast plus 1" Depth = 4/9 x the Breadth Mizen Cap Length = 4 x the diameter of the Top Mast plus 1" Breadth = 2 x the diameter of the Top Mast Depth = 4/9 x the Breadth so I am ready to make my Main Cap.
-
I was called away... so to finish the last post: Trestle Tree Length = 1/4 the length of the Top Mast Depth = 1/2 the Top Mast diameter Thickness = 2/3 x the Depth Undersides snaped (tapered) at each end One end 1 and a 1/2 x the depth; other end 1 x the depth, within the ends Snapes are lined to 1/2 the depth of the trestle tree and rounded to a sweep at the ends The lower outer edge is chamfered the full length The lower inner edge is chamfered to the cross trees Chamfered on the undersides The longest snapes are the foremost ends of the main trestle trees and the aft ends of the foremast trestle trees (nothing mentioned about the mizzen mast!) Cross Trees Length = 1/3 the length of the Top Mast less 6" Breadth = thickness of the Trestle Trees Depth = 2/3 the Breadth Tapered (snaped) at each end on the underside to 1/4 the length of the cross tree, from the end to 1/2 the depth, and round the ends with a sweep
-
For those interested... My main mast platform and trees were made from measuring images found on steels plate 3. I searched high and low to find information on the size of the foremast and mizzen mast platform (tops). On Saturday, at the Chicago NR&MS club virtual meeting I was told to look in Steels Mast Making Vol 1. This was where I found the plates and I had looked before but could find nothing on the platform (tops). It ends up I simply could "see the forest for the trees"! There on page 25/26 was a description of the sizes of the timbers for the trees. The platform sits on the trees and so would be made to suit them. I was searching for the platform when I should have been looking for the trees!
-
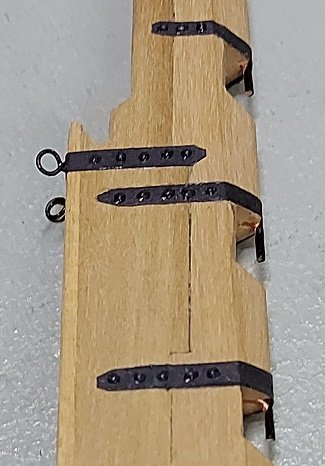
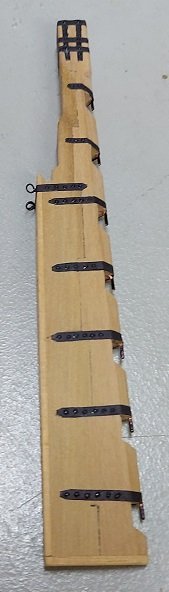
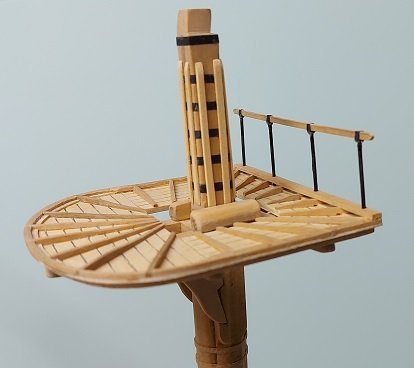
Did a few different things yesterday. Got two more frames glued, I'll be sanding the chocks down to be flush with the timbers, drilling the bolt holes and adding the bolts today. Made my main mast top rail and stanchions. I've seen support stanchions square with fancy turned parts, or square with flutes, or square with chamfers, or round iron bars. All had iron grips at the top that the wooden rail slipped into. I decided to do the latter. I used bamboo and a draw plate to get them down to size. The rail grips were blackened bond paper glued to the three sides (not the top). The stanchions were also blackened with black permanent marker. Both the platform and rail were drilled. I sharpened the top end of each stanchion with my tiny mechanical pencil lead sharpener so they would poke into the glued drilled pocket on the underside of the rail, and put a dab of glue on the foot end of the stanchion. They were assembled and held for the longest time until the glue held up. The tops are not glued to the trees in the above picture. I won't be doing that for some time yet. I'll be marking the mast bolt locations, drilling, and adding the bolts to the mast assembly today (monofilament fishing line). I then pulled out my rudder that I'd made some time ago and added pintles and banding to it. Once again using blackened bond paper. I used 0.04" copper wire for the pintles. Drilled snug fit holes in the forward face of the rudder just above the pintle/gudgeon pockets (where the banding goes). Filed a point on one end of the wire (nail like) and inserted it (pointed end) into the rudder. Gave it a few gentle knocks with a tack hammer to set it, then bent it over with miniature pliers. These were blacked with permanent marker. The banding was added which covers the hole. Today I will do a test to add faux bolt heads with drops of Weld Bond glue applied with a pointed applicator to the blackened paper. As it dries clear I imagine the black colour will come through but a "bolt head bump" will be visible. I will post photos after the job is done.

-
From what I've learnt so far (liquid) resin which involves dipping into a liquid bath requires washing and rinsing. PVA filaments do not need to be washed or rinsed.
- 321 replies
-
- 6
-
-
- Finished
- Flower-class
- (and 1 more)
-
OMG That was hiding in your closet? I've got to go check mine! 😁 I haven't followed plastic models, but I think I'll join you. This looks interesting.
-
Over 20 hours! very nice. 8 hours of printing concerns me as I've had failures occur part way through. I hope you never experience those.
- 321 replies
-
- 7
-
-
- Finished
- Flower-class
- (and 1 more)
-
My intention was to not paint anything but possibly the Wales, Figurehead, and a few other embellishments. I guess we will need to keep that door cracked open! 🤔

